Kenshi
Not enough ratings
Scythe to Kenshi: Physics Attachment Modding
By boazs
Guide on how to use Scythe Physics Editor to create Physics Attachments for Kenshi.
Physics attachments such as the lantern a character wears on their hip.

Will go from Blender to Scythe to FCS and address many issues that can occur along the way.
3
   
Award
Favorite
Favorited
Unfavorite
Introduction
The Purpose
This guide will primarily cover how to use Scythe in its current state to create .phs files for Kenshi.
These .phs objects can have physics (gravity and collision) as well as lights and can be worn by a character.
The guide will also be covering the necessities of using Blender and Forgotten Construction Set (FCS) in order to get the .phs into the game.

There are several notes in this guide which are in boxes like this one. They will typically address the major bug/quirks in the process and shouldn't be ignored.


The Result
Playing off of this Modding Guide I'll be making a halo to be position above the characters head. The difference will be that the halo will emit light and have mild movement.

You'll notice a limitation of the physics attachment is that they always tend to lag behind the character at high speeds.


The Tools
  • Scythe Physics Editor[sourceforge.net]
  • Blender
  • .mesh Blender Exporter[www.lofigames.com]

    A Legacy .mesh Exporter[cdn.discordapp.com] will allow you to export .mesh in an older format for scythe, not having to use a Code Editor. I'm not certain if this causes issues, but it allows use with ragdolls/skeletons. Using both exporters you can just replace the files after the .phs has been made.

  • Code Editor (any will do): Notepad++, Code::Blocks, Visual Studio
  • DDS Converter (any will do): Paint.Net, NVIDIA Texture Tools, DDS Converter

There is also a Kenshi Character Template under the same link as the .mesh Blender Exporter, it isn't necessary but can be helpful.

Project Setup
The first thing we need before creating any files (ideally) is the mod folder.

Opening FCS we can create the mod.
We are done with FCS for now.


Going into the mod folder we can add the necessary sub folders.
While most of the subfolders aren't necessary for the icons they need to be in the directory /ModName/items/icons to be usable in-game.
Be wary that mimicking the Kenshi/data/ directory in this manner will allow you to override game files. That means you could replace a default game .mesh or .dds, but if that is not your intent be mindful of what you name your files so as not to accidentally change the game when you mean to add to it.
The default ragdoll folder is in Kenshi/data/ragdoll, so to replace default ragdolls have your mod's ragdoll folder Kenshi/mods/YourMod/ragdoll

1) Blender - Setup
Using Blender
The primary quirk of Blender is its left- and right-click. Earlier version of Blender the primary-click (the one to select objects) was right-click, now the default is left-click. These settings can be changed under: Edit>Preferences>Keymap
I'm using Blender 2.90 (despite the .mesh exporter being for version 2.80) and for clarity I'll refer to selecting an object as 'Primary-Click' and opening the menu as 'Secondary-Click'.

For quality of life Blender allows you to customize the workspace. Having multiple Editor Types open will allow you to quickly go between Editor Types without constantly switching.
  1. Workspace presets let you instantly switch to the appropriate Editor Types (you can also create your own)
  2. Change the Editor Type by clicking the small icon at the top left of any Editing Area. (or by pressing the appropriate shortcut)
  3. You can divide the Editing Area by secondary-clicking the border between two Editing Areas and drag to change the size with primary-click.


Installing The Plugin
  1. Download the io_mesh_kenshi.zip (.mesh Exporter)
  2. Open Blender
  3. Go to Edit>Preferences...
  4. Select Add-ons tab
  5. Click Install
  6. Find/install the io_mesh_kenshi.zip
  7. Check the box to activate the Add-on


1) Blender - Object and Texture

The Mesh
First clear the scene.
  1. Select the default cube with Primary-Click
  2. Delete the cube with X key
Then add a torus.
Add>Mesh>Torus (Shift+A = Add)
The default torus is pretty high retail: we can edit the eddting easily via the 'Add Torus' menu. Given the size of the object we can lower the detail without it being noticed.


The -Y axis is the forwards direction. That is it is the way the character will be facing in Kenshi.


The Texture
Since we aren't changing the model we can go straight to texturing. If you were making a more complex model you would make sure you are completely done editing it first.
  1. Switch to Edit Mode (Tab key with object selected)
  2. Select the edges along the underside (Alt+Primary-Click on an edge selects all edges in a loop)
  3. With Edges selected mark a seam (UV > Mark Seam)
You'll know it's done when the edge turn red.


With the seam marked unwrap the mesh to texture it.
  1. Select every vertex (A key select/unselect all)
  2. Unwrap mesh (UV > Unwrap)


Now it's unwrapped we can texture it. I'll do it in Blender since it isn't very detailed. (make sure object is still in Edit Mode with all vertices selected)
  1. Switch to UV Editor (Shift+F10x2)
  2. Create a new texture image.


Now to edit the image.
  1. Switch to Image Editor (Shift+F10)
  2. Select the newly made image.
  3. Switch to Paint mode
  4. Paint the texture


Now check what we have made.
  1. Switch to Shader Editor (Shift+F3)
  2. Make sure the torus has a meterial
  3. Add an Image Texture (Shift+A / Add > Texture > Image Texture)
  4. Select the newly created, freshly edited image.
  5. Connect the Color output to the Base Color input.


Returning to the 3D Viewport we can see the result.
  1. Switch to 3D Viewport (Shift+F5)
  2. Switch to Object Mode (Tab key)
  3. Enable Material View (Z key)
  4. Change object to Smooth Shading (Secondary-Click>Shade Smooth)


It is possible to edit the texture in the 3D Viewport by changing from Edit/Object Mode to Paint Mode


1) Blender - Exporting
Mesh
With the object (torus) selected:
File > Export > KenshiOGRE (.mesh)
Tangents is the only necessary checkbox.
Save this to the meshs folder in the mods/ModeName/items/meshs/ directory.


Texture
Switch to the UV Editor or the Image Editor (Shift+F10)
With the texture the currently selected image:
Image > Save As...
The .png file will need to be converted to a .dds file using a .dds converter, then place it in the textures folder.


Icon
If you aren't making a custom icon the easiest way is just to render the mesh we have made to use as an icon.

Switch to camera view.


Adjust the resolution


With the camera selected move into position.
  • G Key will activate move mode, pressing Z,X, or Y will lock to that directional axis, pressing it again will lock to the normal of the select object which is the camera.
  • Press G - Z - Z to move the camera closer/further away


Rotate to the ideal position
  • Changing to 3D Cursor Pivot Point will make the object (camera) rotate around the 3D Cursor.
  • Shift+C will centre the view and 3D Cursor.
  • If the object isn’t centred, Shift + S will let you select Cursor to Selected, moving the 3D Cursor to the selected objects origin (select the torus for this) or the selected vertex.
R key will let you rotate, X, Y, or Z will lock to that axis. Double pressing R will switch to orbit rotation.


Set file export type to PNG.


Enable background transparency.


Render image:
Render > Render Image (F12 key)
Save the rendered image to the icons folder.

2) Scythe - Setup
Opening the program you may first want to change the perspective via Tools > Environment Settings.
The first thing to do to get things working is to set the ROOT. This will be the folder (and subfolders) where Scythe draws files from and save files to.
  • Set the root to Kenshi/mods/
  • You may also be able to use the Kenshi folder to use files from the main game
You can't use a .mesh file you put in the root folder. If you were just trying to quickly test things know that it will crash. The same goes for moving any of the files after making the .phs.
The .mesh is loaded via the pathway which is why we can't change things. This does mean that you can change the .mesh without editing the .phs file if you have already positioned things correctly.

In the Scythe folder there is a manual under the subfolder 'docs'.
While it can give you the basics of how to use the program is doesn't cover some of the major issues when trying to get something from Blender to Scythe to Kenshi. Here are the controls with important keys highlighted.
There is no Ctrl+S to save, you need to use the floppy disk button or go to File > Save and then you navigate to the desired location every time you save.
Also note that the Enter key doesn't confirm inputs (it is the shortcut for making actors) pressing enter seems fine most of the time, but I have had it crash when pressing Enter unnecessarily. Shifting the focus out of the text field is enough to confirm the input.

2) Scythe - Importing .mesh
If you tried to import a .mesh into Scythe you may find it doesn't appear. There is some conflict with the MeshSerializer version. It can be solved by simply editing the .mesh file in a code editor.
  1. Open the .mesh with a code editor like Notepad++ (normal notepad hasn't worked for me, but you could try if you wanted)
  2. Change MeshSerializer_v1.100 to MeshSerializer_v1.30
If for some reason you needed to chagne back to MeshSerializer_v1.100 you can do so after making the .phs and editing the .mesh file again.


If you were to open a .phs file with a different version of MeshSerializer the mesh will appear in Scythe as this:
The same is true if the .mesh is missing from the original directory.


Now we can import the .mesh/
Either double click the file or select it and click insert.
The change button can be used to switch out the selected .mesh with another, but doing so will make the path of the mesh originate from the C drive. This likely means the mod won’t work for people with the game in a different location.
If you want to use a placeholder name the placeholder the same as the final then replace it.

2) Scythe - The Actor
Now that we the .mesh we have to turn it into an Actor.

We add a primitive. This will be the collision of the Actor, but even if you don't want collision it is necessary for having it appear in Kenshi.
In the manual it is said that PhysX doesn't use cylinder, cone, or ellipse primitives and will change them to the closest shape. So if you are trying to be precise try to avoid using them.


Then we add the light for the halo, if you aren't making an object with a light you can obviously skip this step.


Now we combine them into one object known as an Actor.
You can name this Actor whatever you wish, but it isn't necessary rather just a convenience if you have more than one Actor.


After creating the Actor we can still edit the location, rotation, and scale of its components.
Disable Actor selection using the buttons at the top right.
You may also want to change the view perspective or the rendering of objects (making them transparent). This can be done by right-clicking the perspective button.

The mass variable under the Actor tab when set to 0.000 will auto calculate the mass. I have encoutnered a bug that I can't solve and can't reliably replicate where the actor won't render in game when I set the mass to something other than 0.000. Having a low mass (0.100) can make the spring for a joint work better.
When encountering this bug I find the .phs file no longer functions even when undoing the changes. The only solution I have found is to make new file from scratch.
It's a good practice to have multiple files as you add and change things so if you encounter a bug like this you can just roll back instead of start over.
2) Scythe - Root and Joints
Move the object (halo) out of the way and add another primitive. Turn it into an Actor and name it 'root'. This will represent the point in which the other Actor the point in which it connects to the character's skeleton and not having a root will leave the other Actors floating freely or falling to the ground.


If you wanted to have just a single actor (for something like a wearable body torch) without any sort of movement physics you can put the .mesh and light components in the root actor.


Add a joint to connect the two Actors.
For this I'll use a Ball joint.


The location of the joint determines the pivoting point and so I'll insert it near the centre of the halo.


In the Joint Tab you choose the connected Actors via the 'Change Actor' buttons. You will need the joint selected for this, you can also rename the joint if you wish.
After clicking the 'Change Actor' button you click the actor you want.


You can see all the actors and their components/joints in the Object Hierarchy tab.
The joint will appear under an Actor when connected to it, when connected two both Actors the joint will appear in the hierarchy twice.


Back in the Joint tab we can set the limits and springs for the joint. This will prevent it from moving freely and flopping around.
You can test the limits and collision by pressing the hammer button on the top right. You can't test the springs but they will have an effect in Kenshi.

2) Scythe - Root Relocation
If you were to go through the process of creating the item in FCS you would find a result much like this one with the object off to the side of the character.
This is caused by the root not being aligned to the height it should be in Scythe. (yes the height)

The translation of the root actor in Scythe differs from the one in Kenshi, that is the X,Y, and Z coordinates are not the same.
Relative direction based on the character's facing:
Scythe
Up
Down
Left
Right
Forward
Back
Kenshi
Right
Left
Down
Up
Back
Forward


In the Edit tab we can move Actors precisely.
The distance we need to move the Actor is relative to the height of the character's bone we are anchoring it to. Unfortunately that will mean we need two different locations for the male and female mesh as they aren't the exact same height and their bones differ in where they are placed within the mesh.

Male:
  • Y = 19.584
  • Z = 0.137

Female:
  • Y = 19.188
  • Z = 1.111 (this isn't centred on the bone as the bone is not centred on the head)


Now the result will look more like this.


Keep in mind this differs for each bone, the one I am moving the root to is the 'Bip01 HeadNub' which is at the top of the head. You will have different numbers for different bones.
I have put a list for all the human bones at the bottom of this guide under the Info: Bones tab along with how you can find the location as easily as possible.

With this done we can export the .phs file and save it to the /items/ragdoll/ folder. Just note that you will likely have to do a lot of fine tuning to the joints if you are using springs, there is another info tab on them at the bottom of the guide.

3) FCS - Making Physics Attachments
This will only cover the very basics of FCS and getting the object to appear in game.


(The order of making each new item isn't important)
First off we make a generic item. (Generic Item and Backpacks are the only two items that allow a physics attachment.)
Under the item tab right-click on a blank space and select new item.


Most primary settings won't need to be changed.
The major thing is adding the physics attachment.


Creating the Physics Attachment we select the file(s) for the male and female characters. Then add the name of the bone that the root actor is pinned to.


Then we add the light data...


...and material to the item.
This same material is added to the Physics attachment (that is the actual model on the character).


3) FCS - Getting Items In-Game
From here we focus on getting the model into the game. The simplest way would probably be to just have it be a starting item in a Game Start, but I prefer making a building to be able to built it for having as many tests as I need.

Though you could use a building that exists I'll make a completely different building. First the functionality.
It can be easier to duplicate an item rather than make a new one if you are trying to make an item with the same functionality as another to see how it works.


Changing the name to HaloCrafting as it will be the function for the building to craft halos.I remove all the default crafting items and add the halo.


With the functionality done we make the furniture to have the functionality.


Setting up the building (furniture) the most important thing is the functionality and the parts (the parts being the model for the building).
I will also set the build materials to 0 so I can make the building free for testing.


The final thing to do is make sure we have the research for both the crafting station and the item.


Starting the game and with the mod active we can either start a new game or import an older save.
We can build the HaloCrafter (it'll be under misc if you didn't set it to anything else) and then the halo.


That's it.

Info: Joints
I haven't tested all joints in Kenshi, so I am not certain if each works in game.


There are 7 types of joints that are available in Scythe. Their names and functions are as follows.
  • Ball (balls and socket): All movement: pitch, yaw, and roll


  • Hinge: Only roll (twist)


  • Cylindrical: Slide and roll


  • Fixed: No movement


  • Prismatic: Only slide


  • Distance: Rope


  • PointOnLine: N/A (I think this joint is meant to mark the distance between the two actors)


Limits and Springs
Each joint that moves can have a limit applied to it which will constrain the angle of movement.

Springs have a similar function but much less strict. A sprint will try to move or keep a position, with low strength it will simply slow the movements. As mentioned the way springs show in Scythe (if at all) is not the same as they will show in Kenshi.

There are three types of spring:
  • Twist (rotation) the spinning of the joint.
  • Swing (flexion), the bending of the joint.
  • Joint (distance), how far the joint is.

The three settings of the joint are:
  • Spring = strength
  • Damper = smoothing (basically making the spring less springy/bouncy)
  • Target = The angle it is trying to achieve, or Distance = the position it is trying to maintain.
  • A high strength spring (and low mass actor) will maintain a position, lower and it will wobble with movement, very low and it will only slow the movement.
  • Very high damper will make the spring almost useless, lower and the movement will be smooth without much sway (if the spring is strong enough), low damper will make the spring less jolting.
  • Target of 5 will try to rotate or bend the joint 5 degrees, distance of 5 will try to push the joint 5 units apart.

Info: Bones
Here are the list of human character alignments for Scythe.
Male Y
Male Z
Female Y
Female Z
Bip01 HeadNub
19.584
0.137
19.181
0.510
Bip01 Head
17.419
0.137
17.363
0.510
Bip01 Jaw
17.755
0.237
X
X
Bip01 JawNub
17.418
1.435
X
X
Bip01 Neck
16.121
-0.370
16.137
-0.150
Bip01 Spine2
13.072
-0.823
13.092
-0.330
Bip01 Spine1
11.536
-0.497
11.522
-0.328
Bip01 Spine
10.141
0.327
10.117
-0.327
Bip01 Pelvis
9.956
-0.228
9.932
-0.228
Bip01
9.986
-0.180
9.961
-0.180
Bip01 R Clavicle
15.247
-0.272
15.371
-0.288
Bip01 L Clavicle
15.247
-0.272
15.371
-0.288
Bip01 R UpperArm
15.198
-0.552
15.355
-0.572
Bip01 L UpperArm
15.212
-0.554
15.370
-0.572
Bip01 R Forearm
12.349
-0.552
12.507
-0.571
Bip01 L Forearm
12.392
-0.554
12.522
-0.571
Bip01 R Hand
9.105
-0.537
9.263
-0.557
Bip01 L Hand
9.118
-0.538
9.278
-0.557
R Boob
X
X
13.971
0.499
L Boob
X
X
13.972
0.499
Bip01 R Thigh
9.956
-0.228
9.932
-0.228
Bip01 L Thigh
9.956
-0.228
9.915
-0.228
Bip01 R Calf
5.562
-0.219
5.399
-0.220
Bip01 L Calf
5.562
-0.219
5.399
-0.220
Bip01 R Foot
0.955
-0.229
0.951
-0.231
Bip01 L Foot
0.955
-0.229
0.951
0.231
Bip01 R Toe0
0.033
1.541
0.033
1.329
Bip01 L Toe0
0.033
1.540
0.033
1.329
Bip01 R ToeNub
0.026
1.873
0.026
1.656
Bip01 L ToeNub
0.026
1.873
0.026
1.656
Male Y
Male Z
Female Y
Female Z
Alignments are to the bone head (base).


Finding Positions

Finding the location of the bone is as simple as getting the file into Blender (for the human characters there is the Kenshi Template, but for other character you will need to import the .mesh with a skeleton)

Then we select the skeleton, go into edit mode, open the side panel (N key) and look at the transform.
We want the Z for the Scythe Y and the Y for the Scythe Z (opposite).
Enabling the bone names will let you know the name as it is used.
The bone Head is the base of the bone.


End
This is my first mod guide and my first look into Kenshi modding. I will update parts of this guide if I figure out better ways to do things in the future.

In the meantime I will be trying to figure out the process of making unique characters and ragdolls, and trying to find a way of using Scythe without having to use as many workarounds.


7 Comments
TotenMeister Jul 16, 2024 @ 10:26pm 
I can get the halo to attach to the coordinate on the character I want but as soon as the character moves the mesh and light effect remains where I was until I re equip the item the halo phys scythe won't follow me. Any ideas why?
Momayo May 1, 2024 @ 8:49am 
Not sure, but a small report on the MeshSerializer changing.
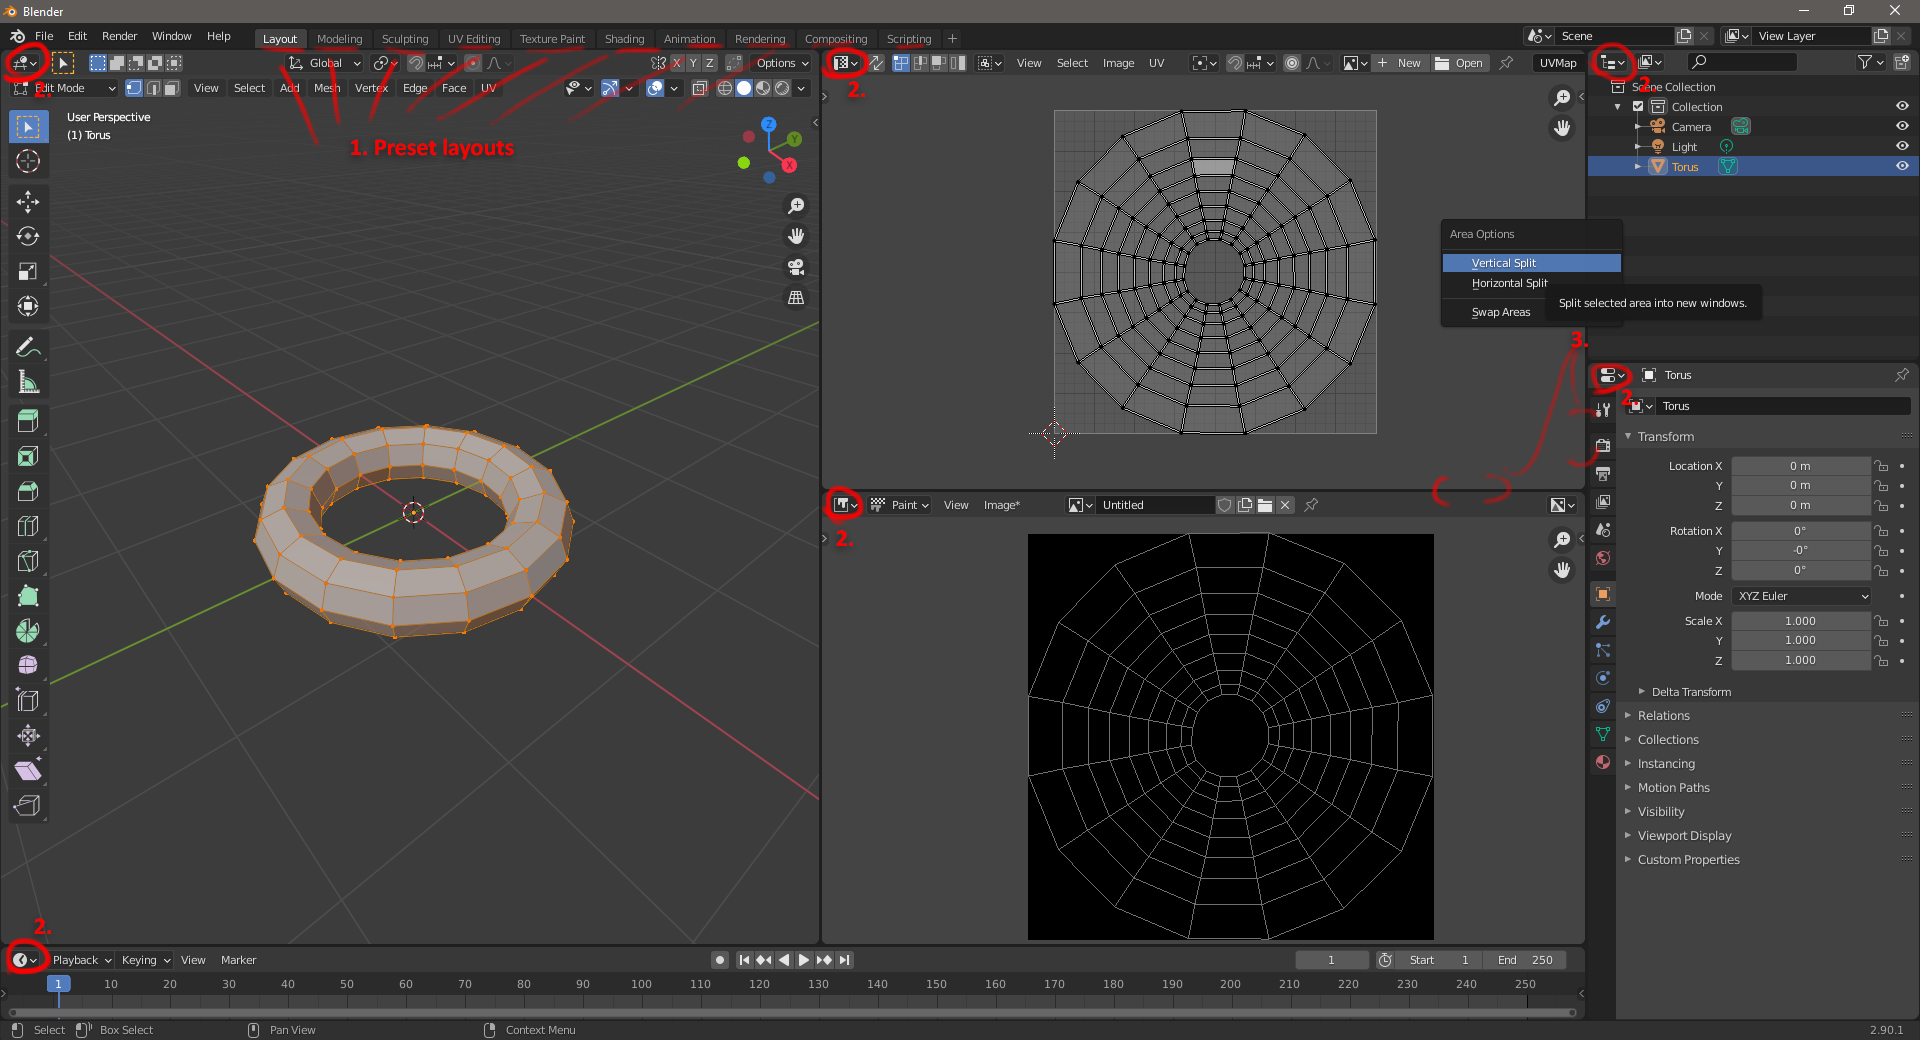
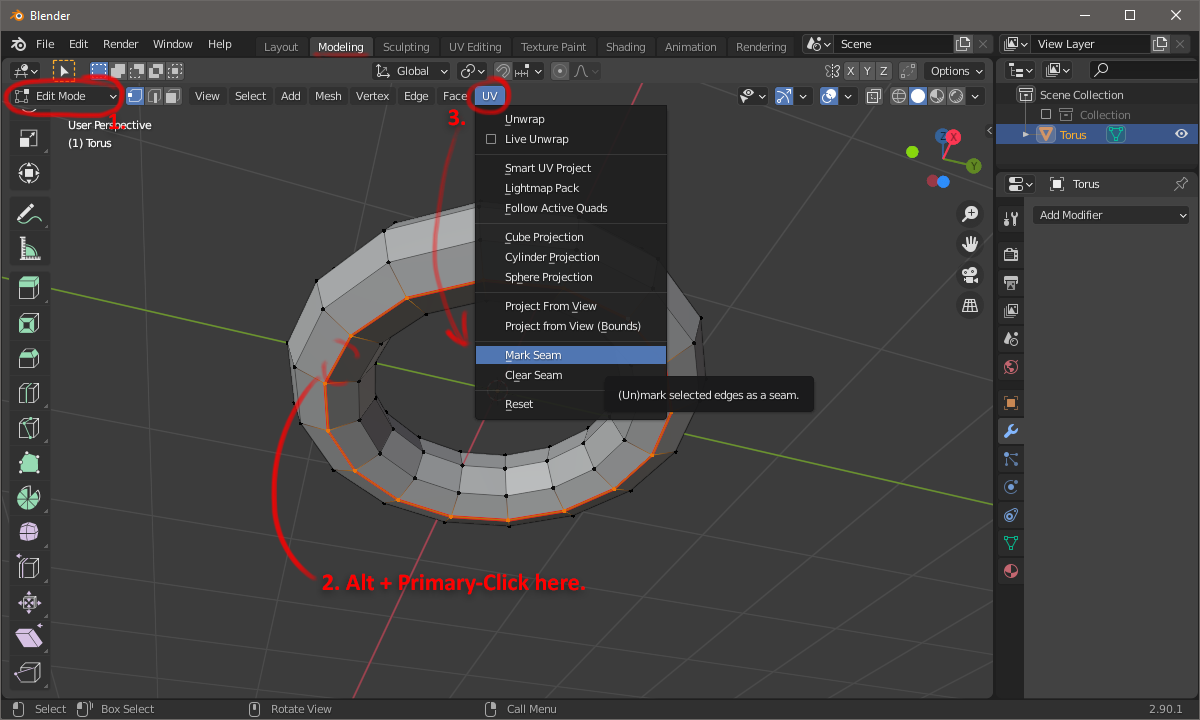
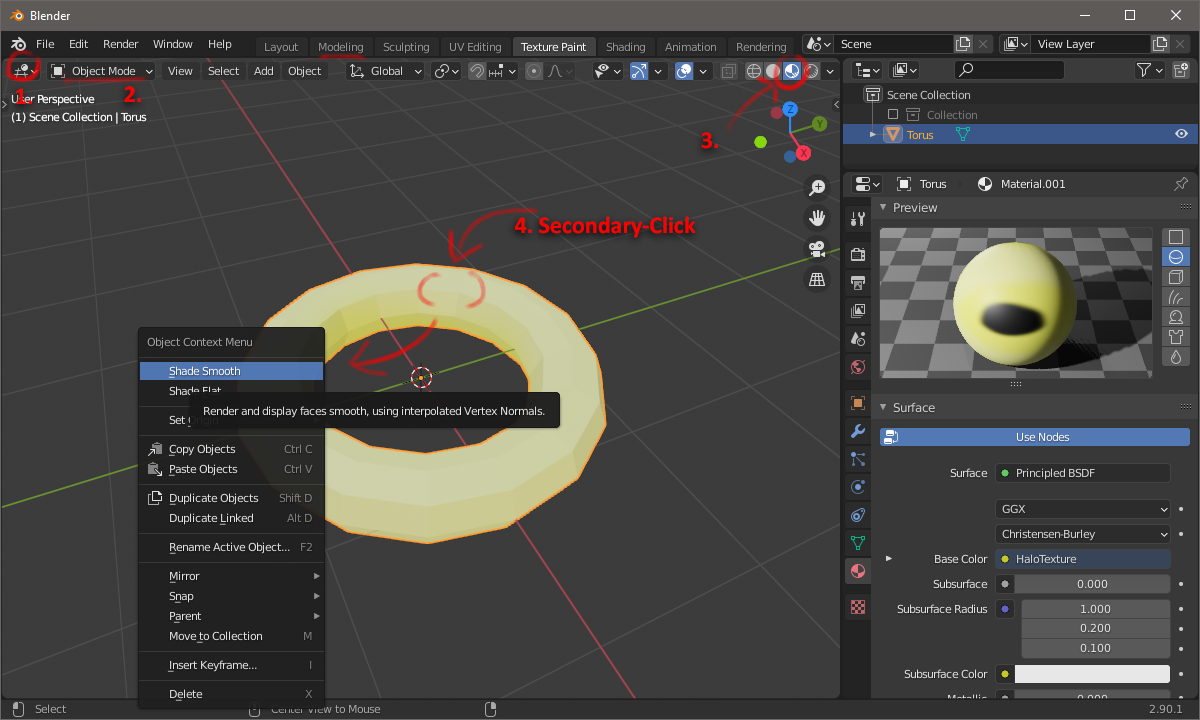
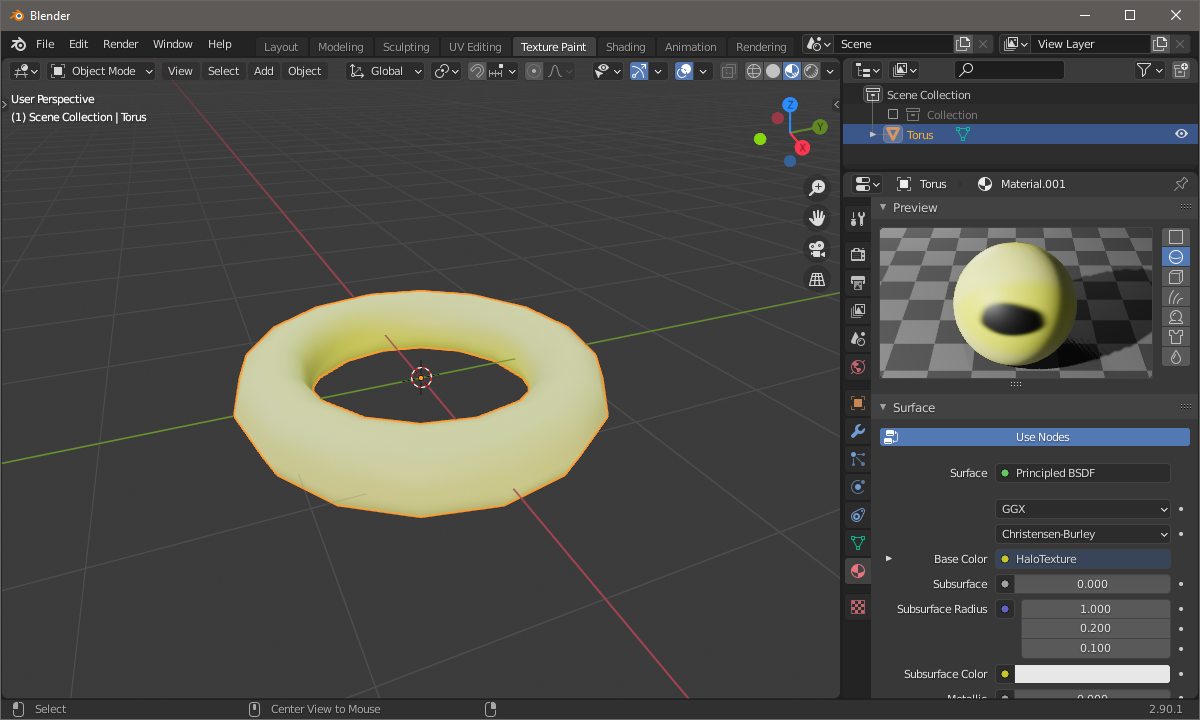
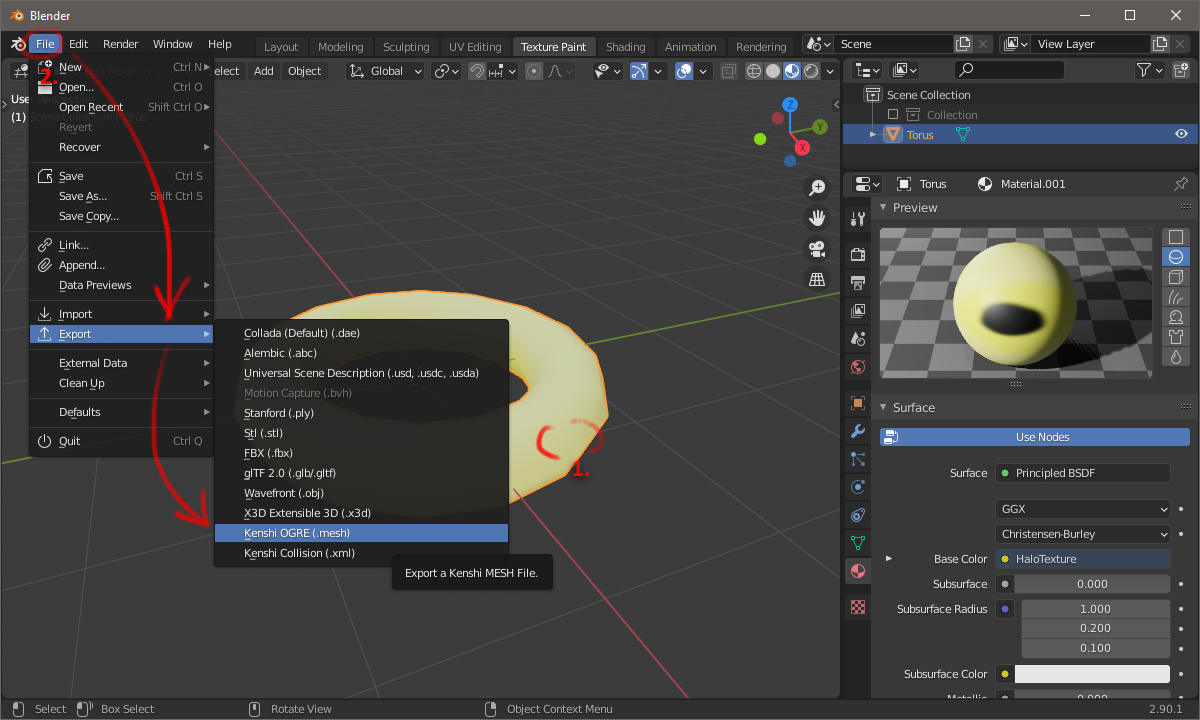
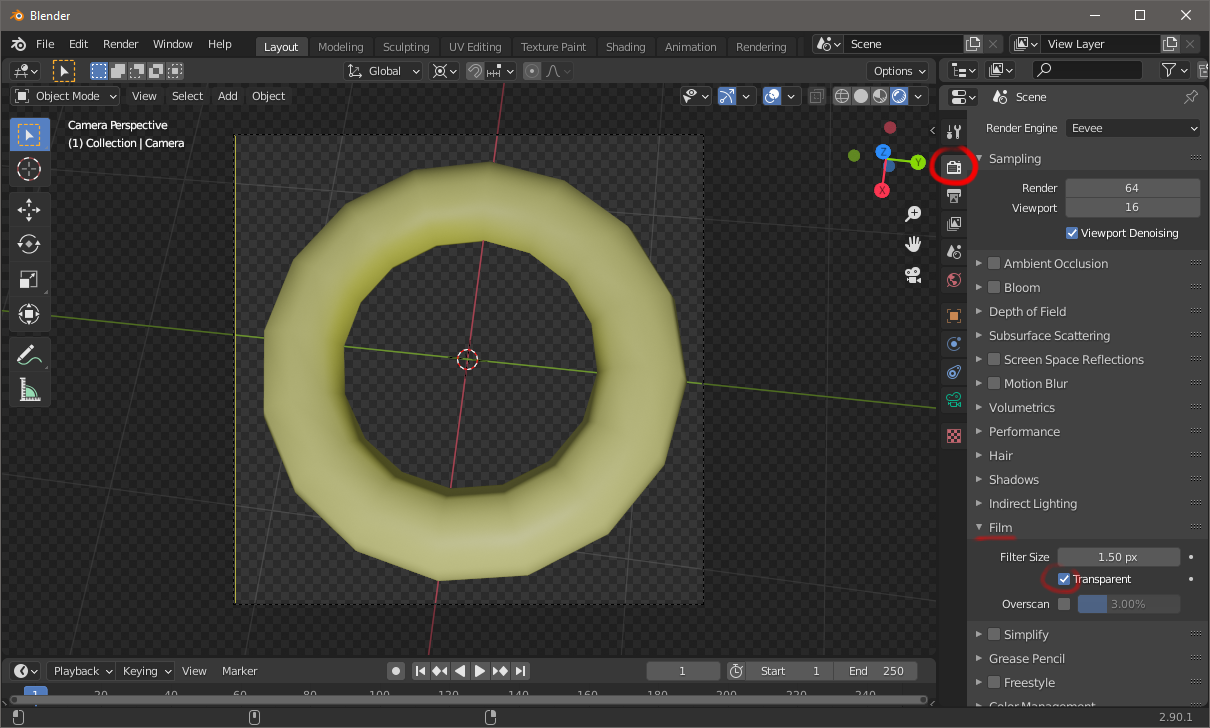
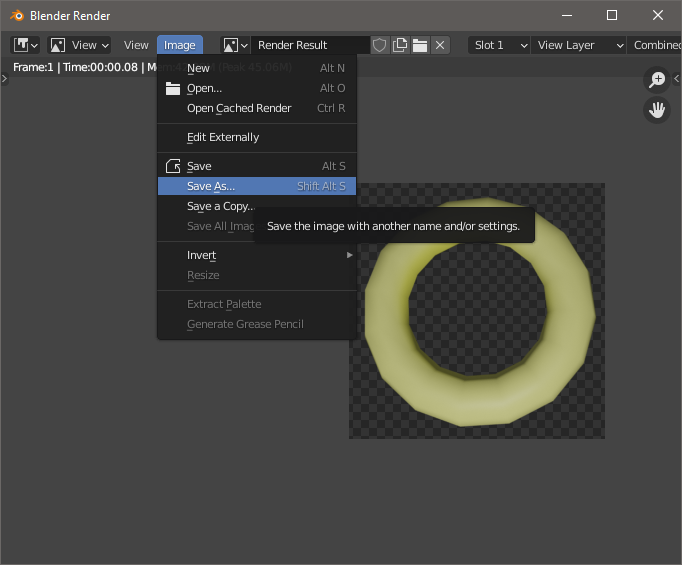
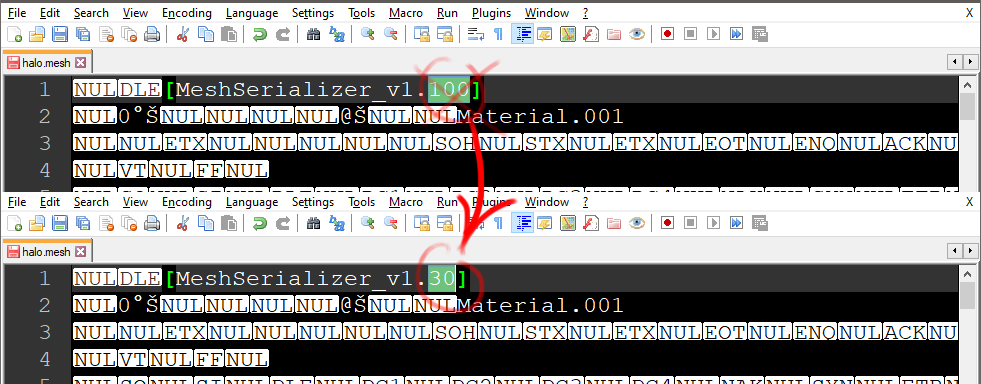
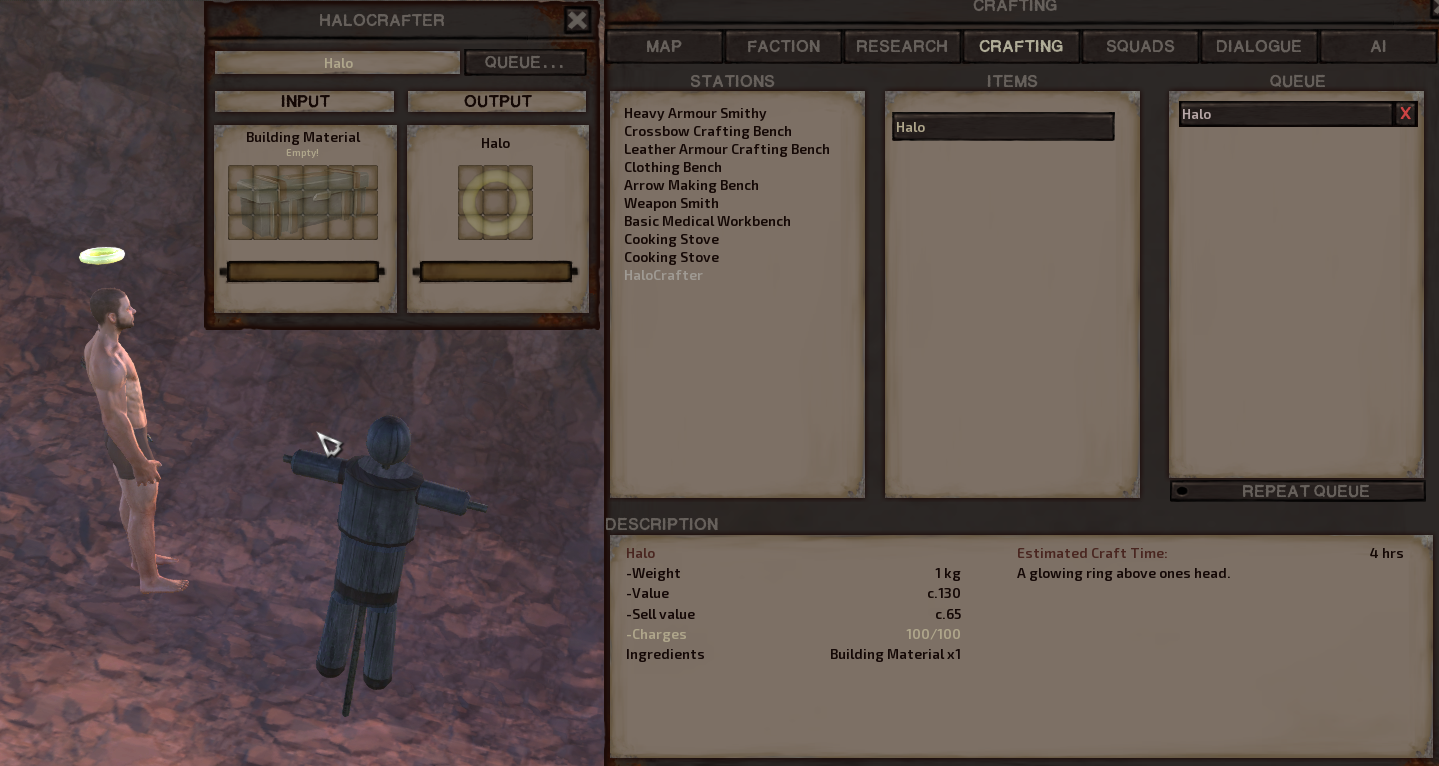
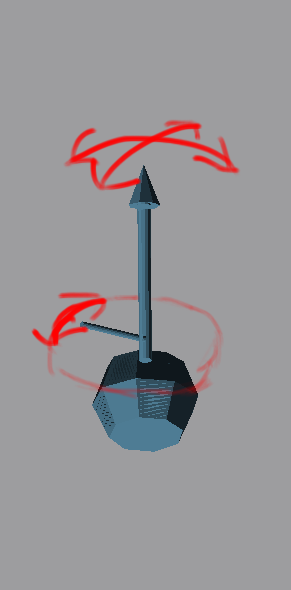
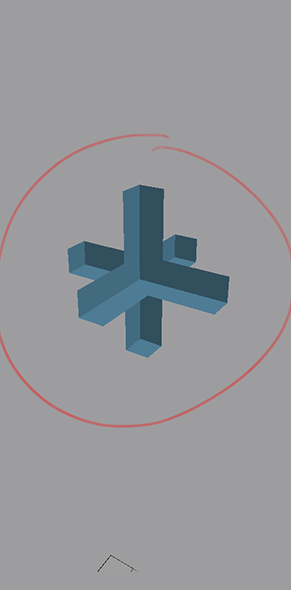
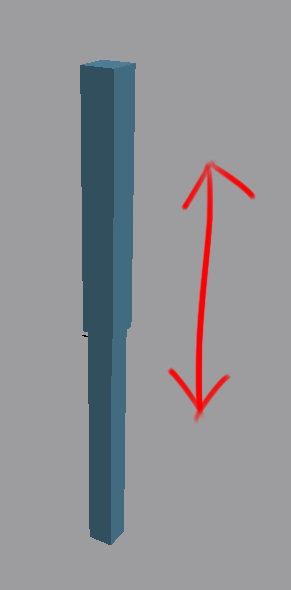
In exporting a mesh on Blender, seems that if it only have triangle faces, the MeshSerializer can be remained at v1.100 and no changes are necessary.
If it still have square faces, need to change to v1.30.

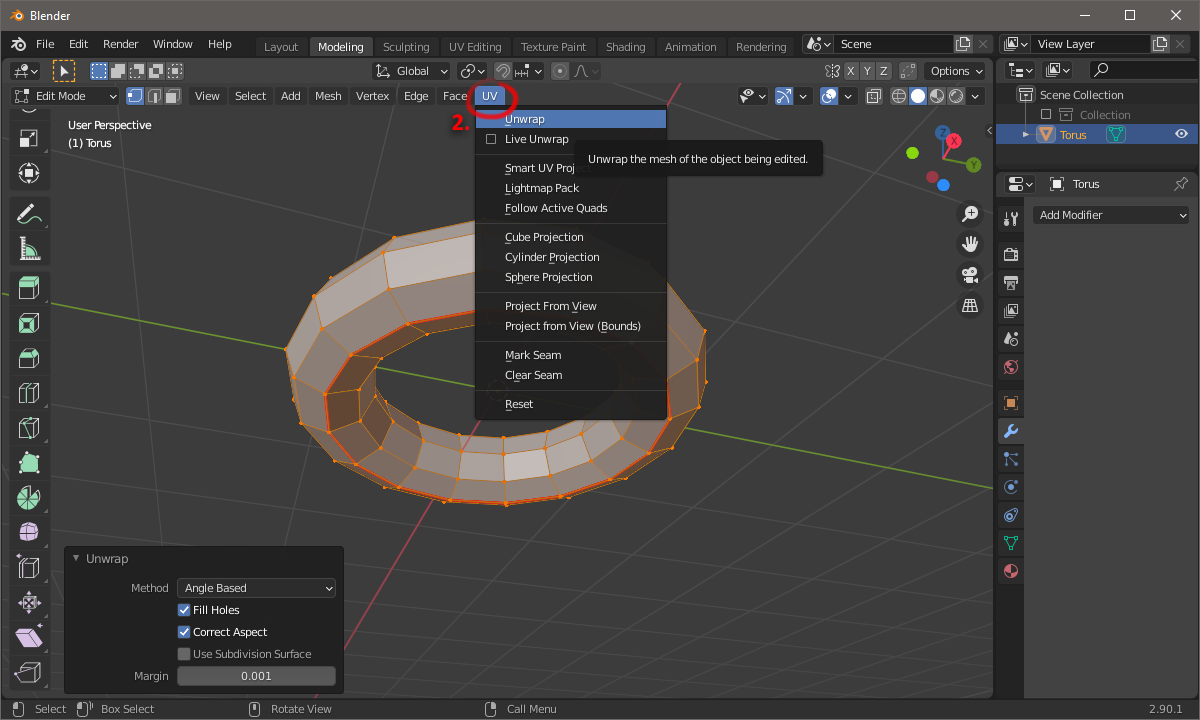
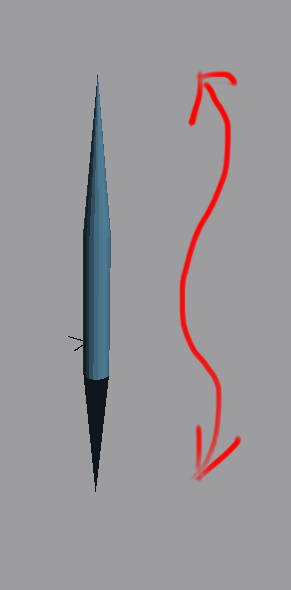
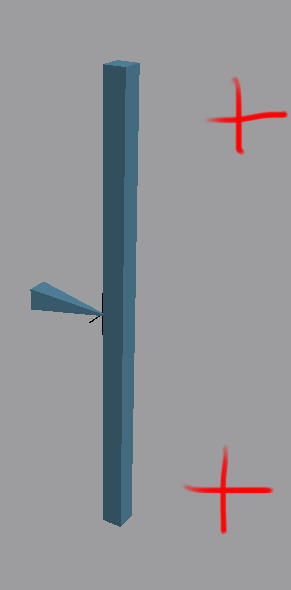
blenderでのエクスポート前に三角面化をしておくとメッシュのバージョンを書き換えなくてもよいようです。
tsokiyZan Sep 20, 2023 @ 12:43pm 
So I'm trying to edit an existing .phs within kenshi to change the positioning of weapons on character's body, but every time I open the file in scythe, It says

"System.AccessViolationException: Attempted to read or write protected memory. This is often an indication that other memory is corrupt."

someone on the ogre forums was having the exact same problem over 17 years ago and our lord and savior himself said it was resolved and that it had something to do with long file paths. Here's the link to the board: https://forums.ogre3d.org/viewtopic.php?t=18859#top

Any help would be amazing, thanks
mopsisgone Mar 23, 2022 @ 8:15am 
Now this is GOLD! Really pleased Ark put me onto this, great job and most comprehensive :) xxx
boazs  [author] Dec 27, 2020 @ 3:04pm 
As a stopgap measure I have modified the Kenshi Mesh IO plugin for blender.
https://cdn.discordapp.com/attachments/391068403122569217/792709816001888256/io_mesh_Kenshi.zip
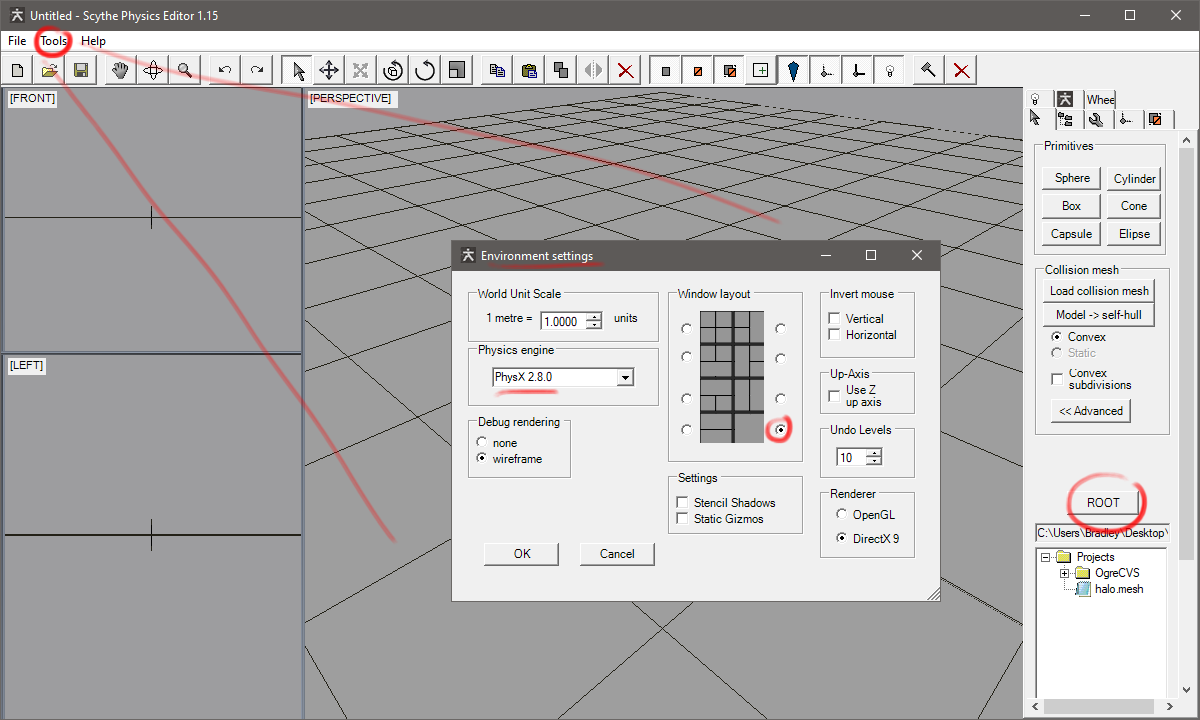
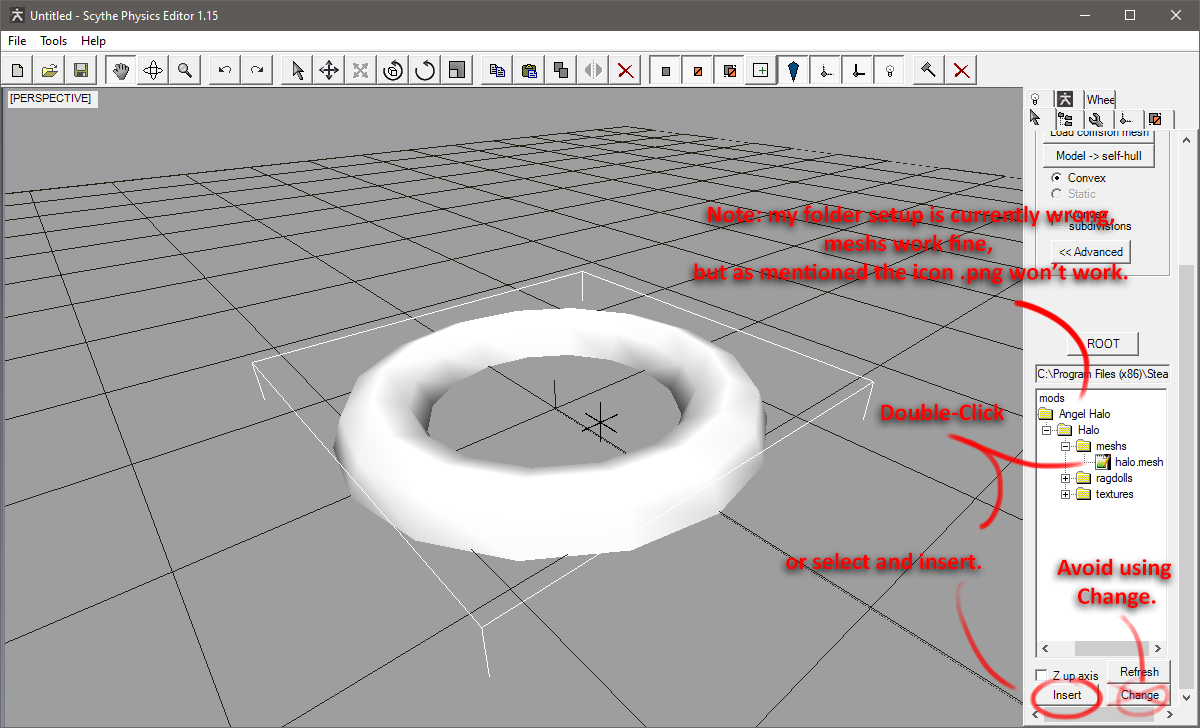
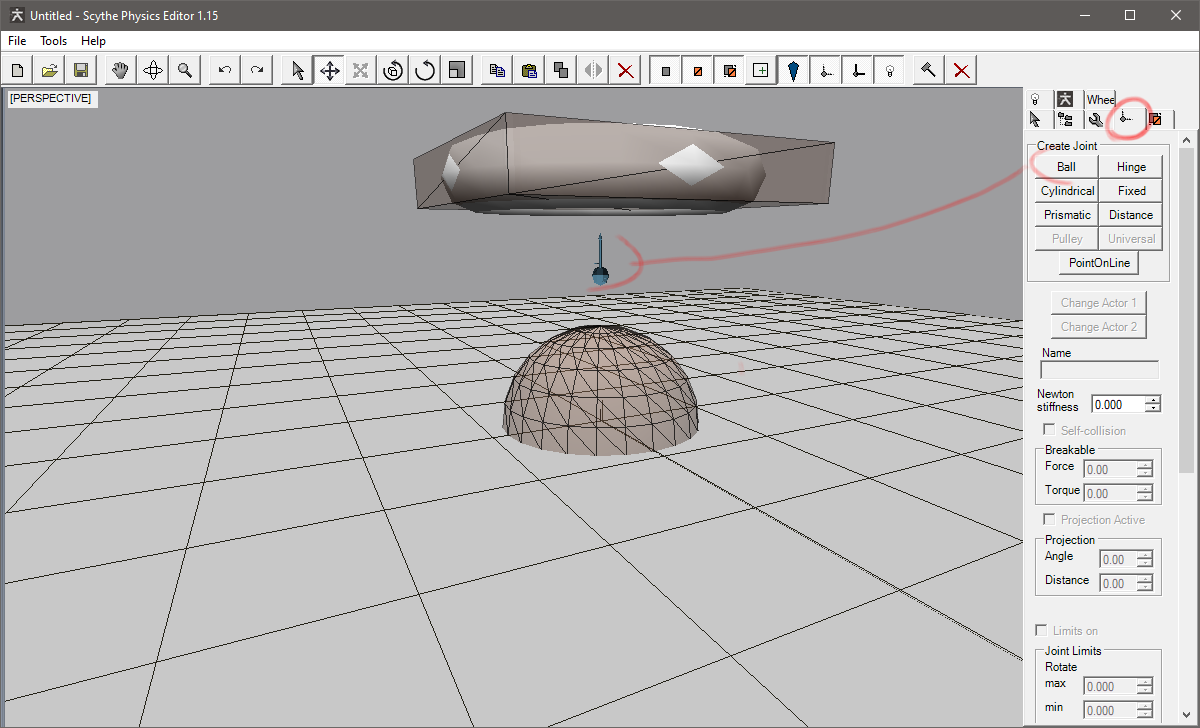
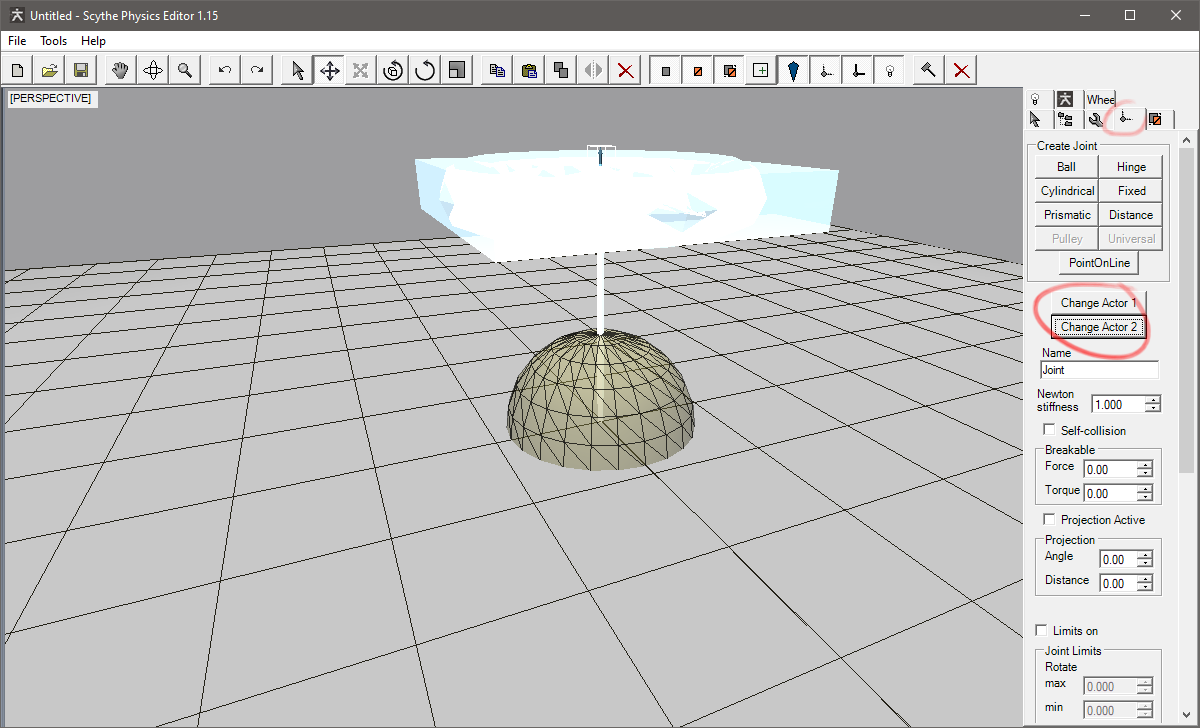
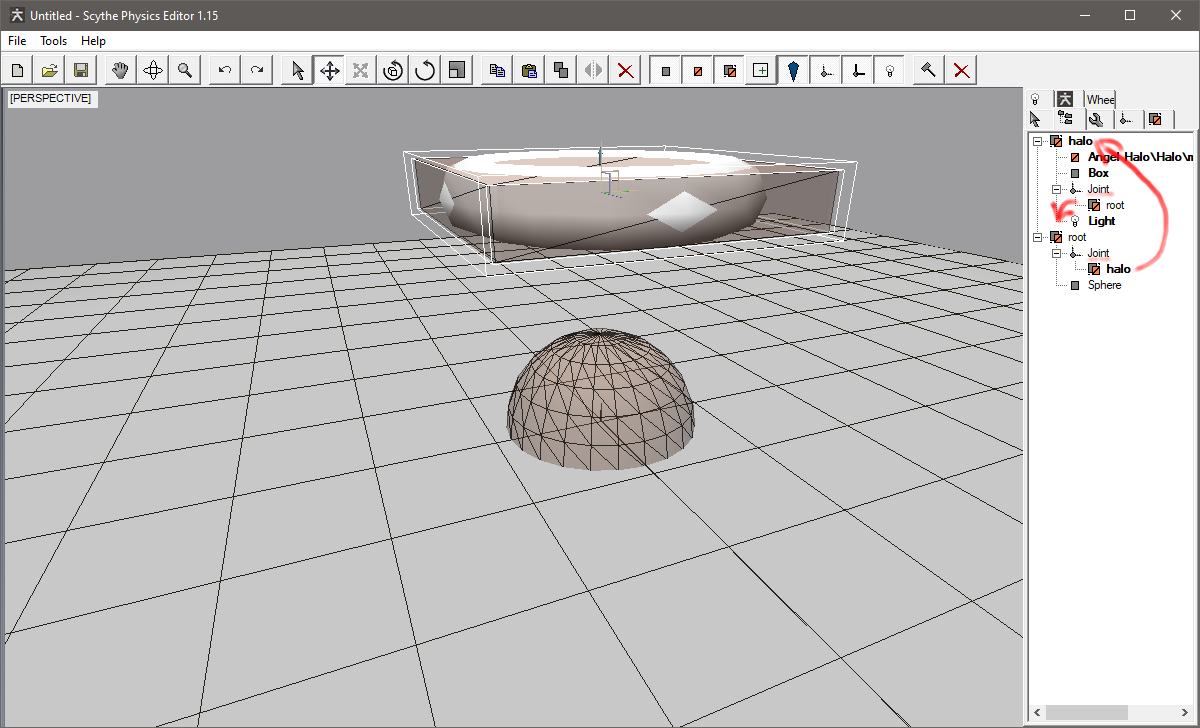
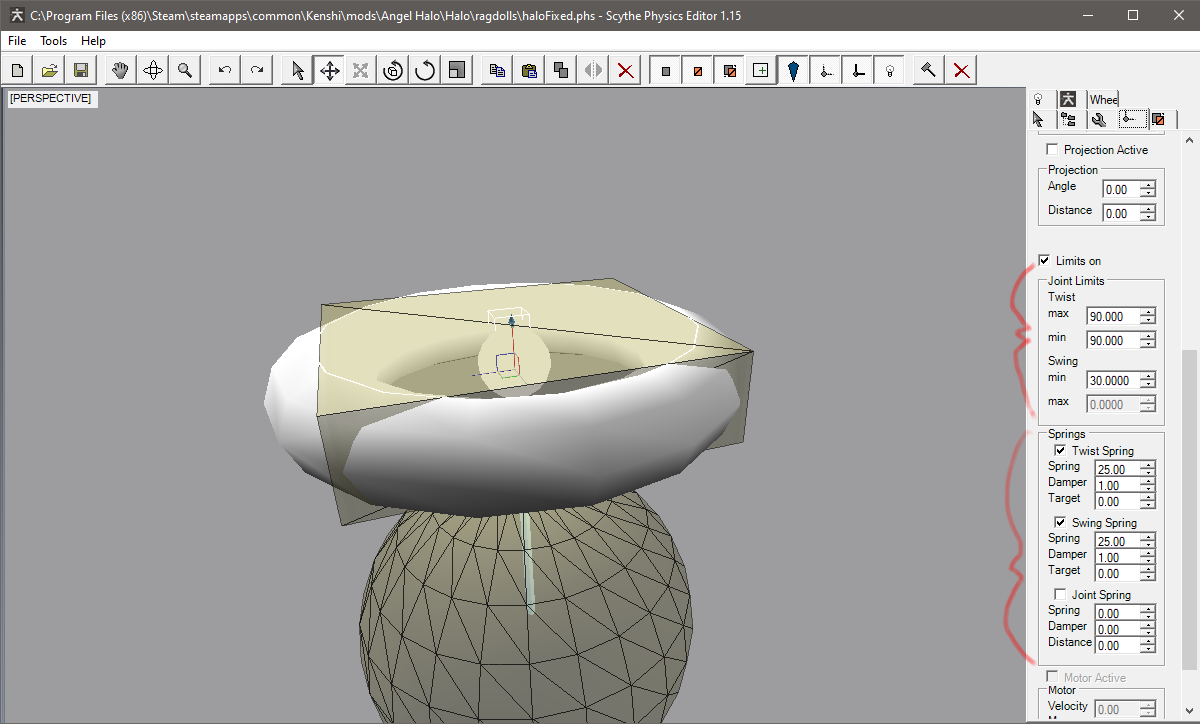
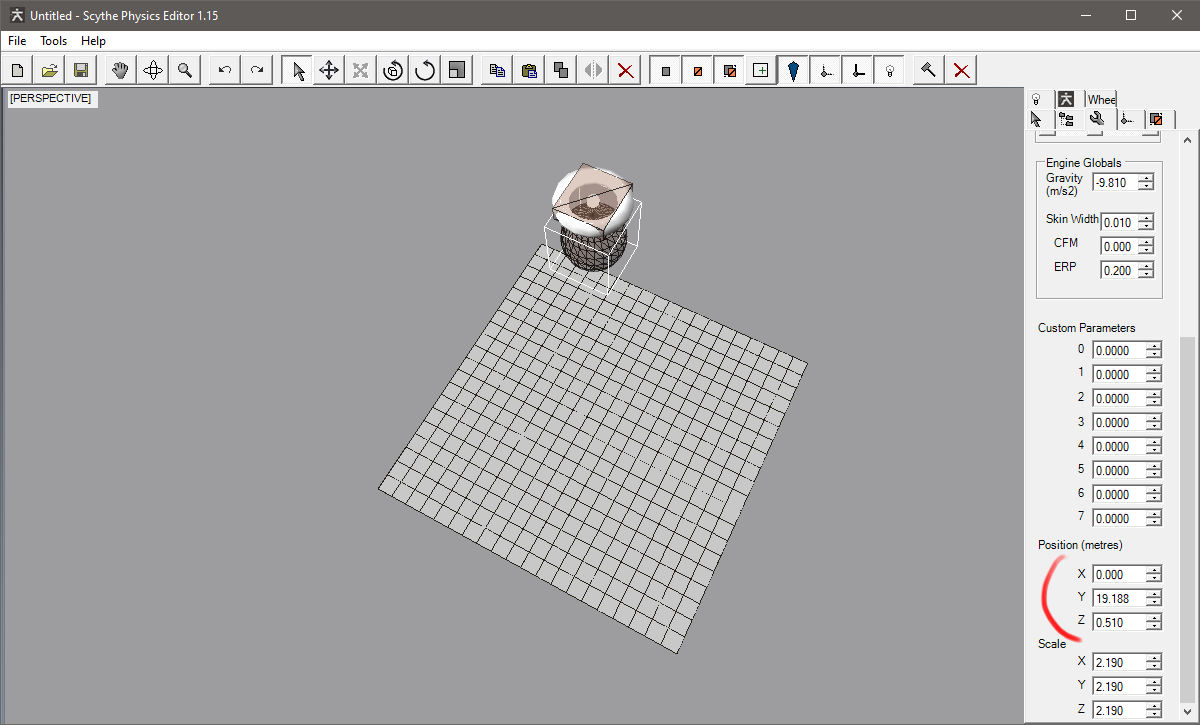
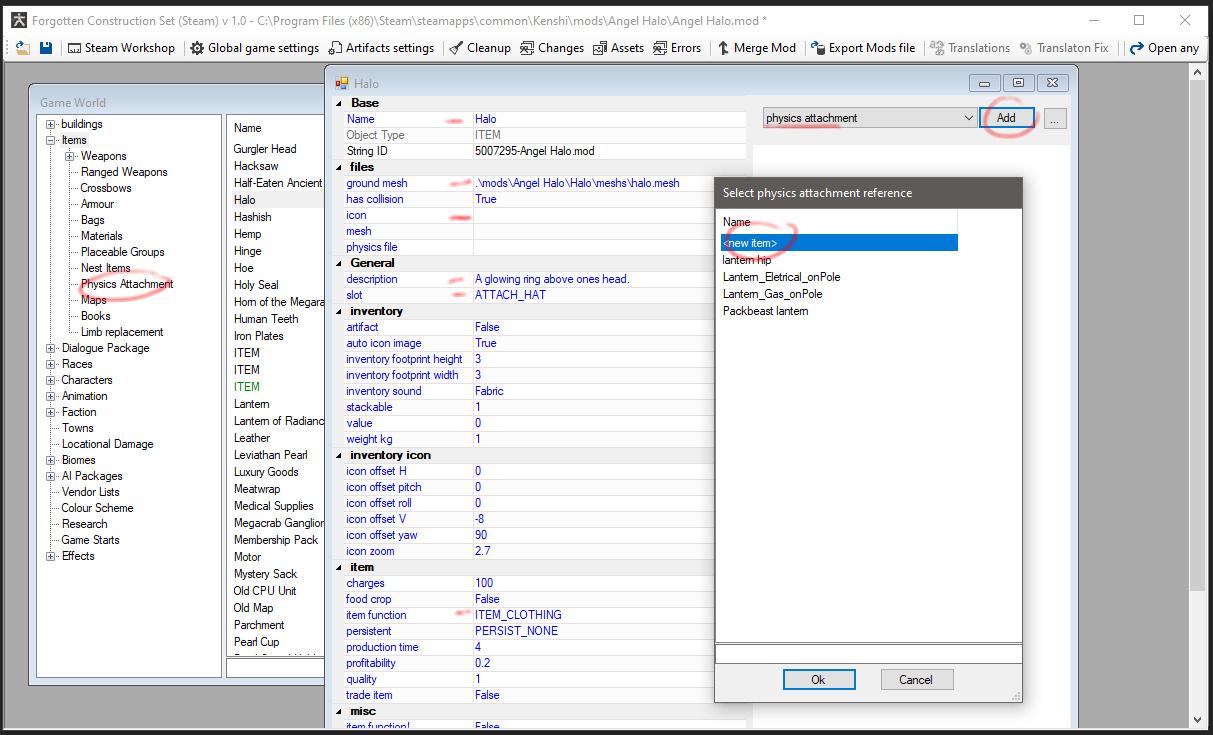
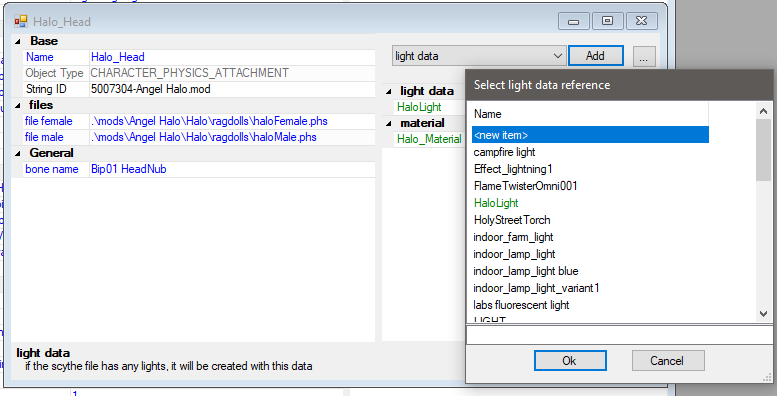
It uses a downgraded version of the mesh serializer to be compatible with Scythe. This lets you make character ragdolls (via importing .mesh and .skeleton).

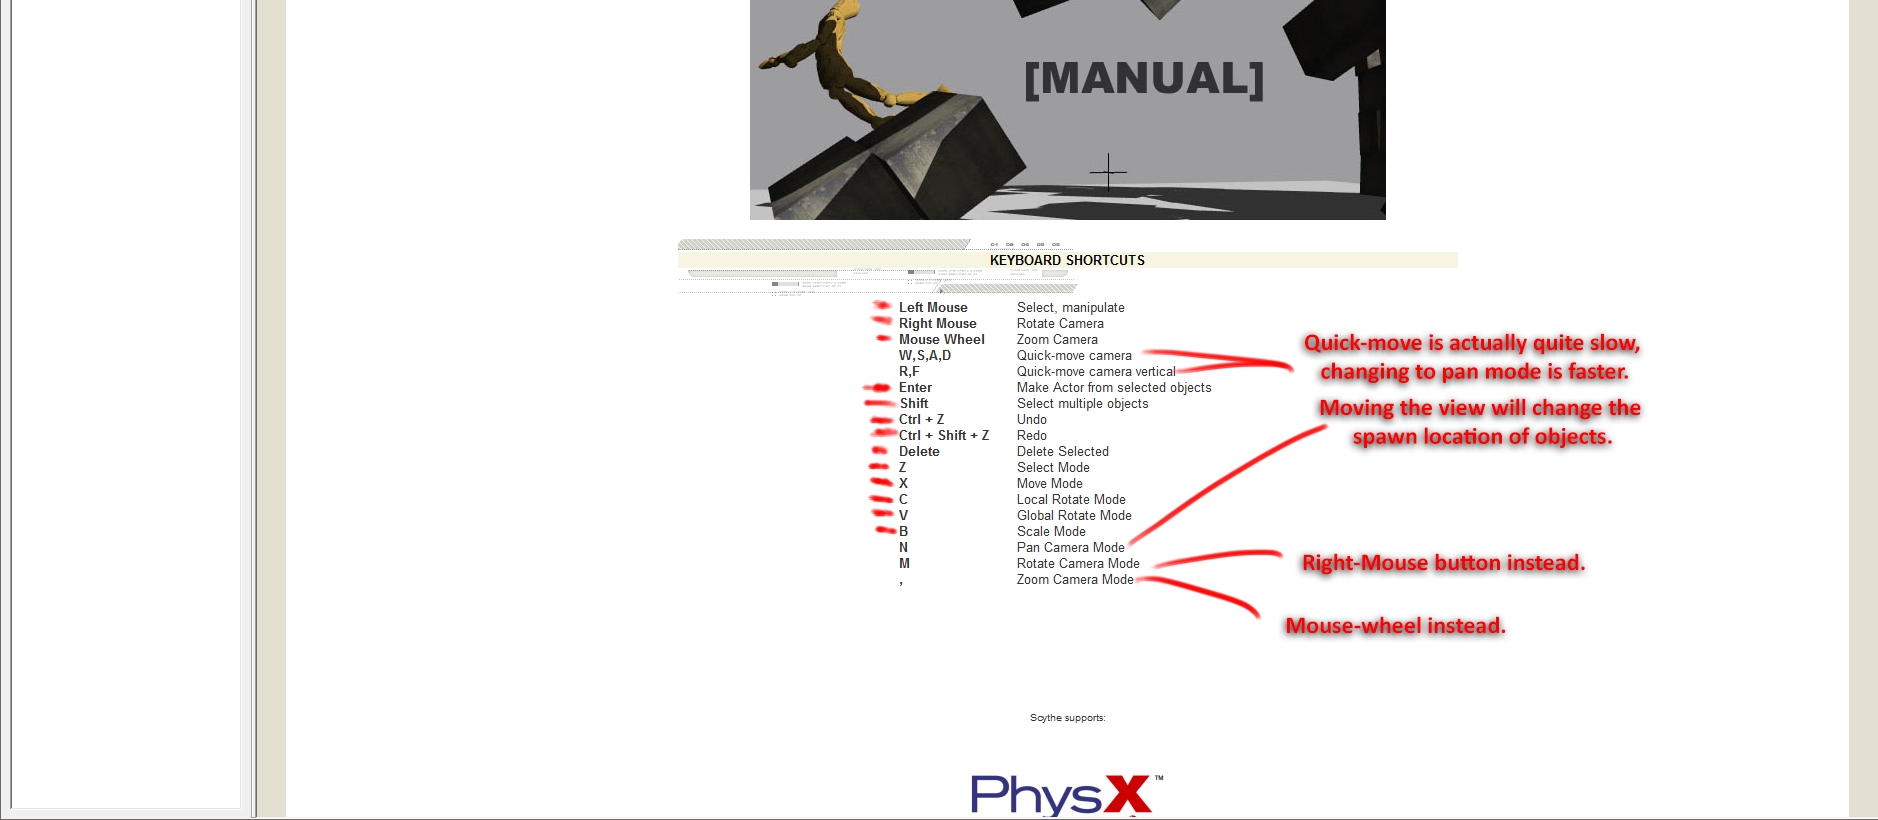
I want to instead update scythe to use the newer version of the mesh and skeleton, then update this guide. In the mean time the Scythe Manual in the docs/ folder of Scythe will give you most of the info needed under the ragdolls tab.
Kindrad Dec 25, 2020 @ 1:40am 
Yo nice work on this Scythe tutorial. It's certainly interesting, particularly the MeshSerializer bit.

Anyways, down to business.

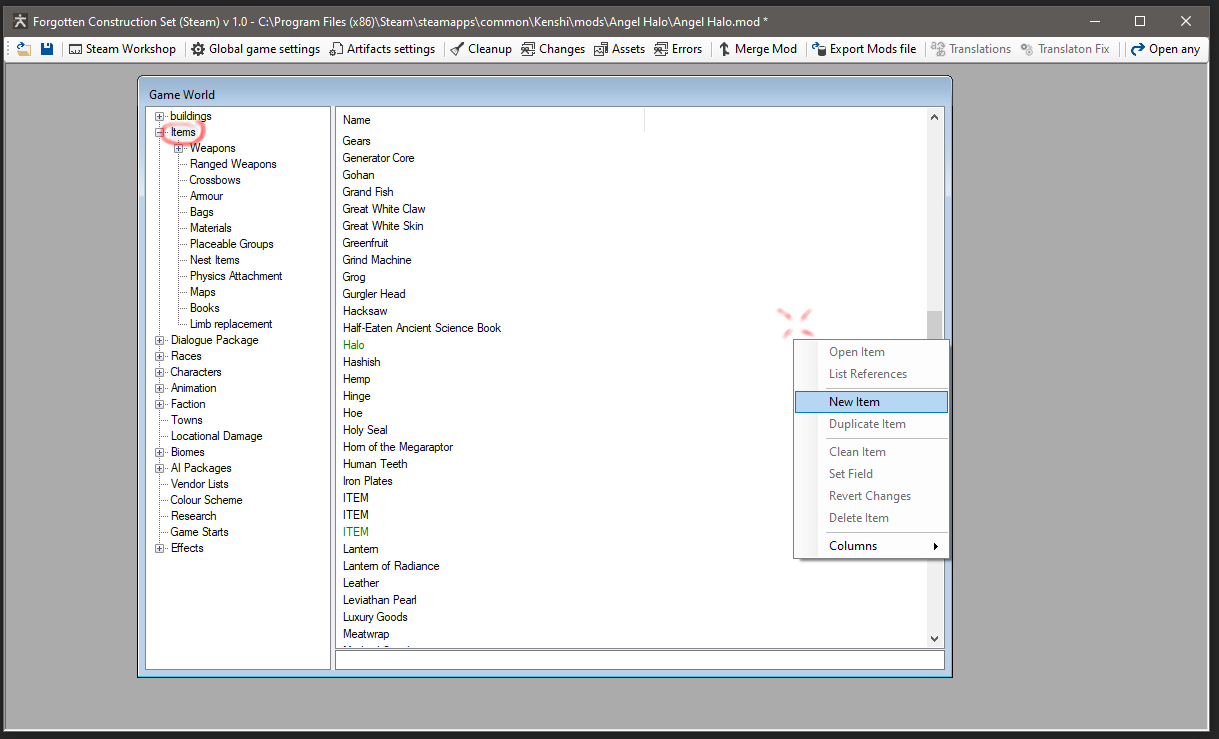
I'm a Kenshi modder myself and a programmer. I recently started a project of reverse engineering the .phs files. Using the Scythe source code and good old forensics I've made some headway in importing the physics/ragdoll object .phs files into the Unity Game engine. The idea being that if I can import the object the reverse can be done for export.

I've already patched the Blender IO plugin for some errors. I also have some scripts that can export Unity colliders to Kenshi XML colliders for things like buildings or weapons. (not ragdolls)

Just shoot a friend request my way if you are interested in helping or are willing to share any information, that'd be great.

Hope this finds you.

Thanks.
Cattrina Dec 8, 2020 @ 4:12am 
Thank you! You are a master :)