Sonic Generations

Sonic Generations

584 beoordelingen
Setting Up, Troubleshooting, Configuring and Optimizing the Game – Noob & Pro Guide
Door BlackLionPT
This guide will help you achieve the best playable experience you can get out of your computer's hardware! Learn the basics on how to configure your controls (or controller!), how to make your game run faster and smoother on Low/Mid-Range Computers (especially laptops) by learning to Cap your Frame Rate, how to make it look even more awesome on High/Enthusiast computers and lots of other neat tweaks to improve your experience!

It also contains dedicated sections with lots of information to help you Troubleshoot problems like "Game not Opening", "Configuration Tool will not start or crashes", "Controls on my Game Pad are all messed up!", the infamous "No valid graphics configuration file found,please run the configuration tool and save" and some other very well documented bugs you might find along the way!

Also, you can use the knowledge from this guide to ANY OTHER game you have on Steam! Cool huh?
4
2
13
2
   
Prijs
Toevoegen aan favorieten
Toegevoegd aan favorieten
Verwijderen uit favorieten
0 - What can you learn from here


Steam has a Guide Index itself, but here's what you can find on each section of the guide, so it's easier for you to get around!

1 - Basic Configuration:
  • How to run the Configuration Tool
  • Setting up your Direct Input (Non-Xbox360(Non Xinput)) Controller
  • Enabling Vibration (Force Feedback) on your Generic Controller

2 - Making the game run fast on Low/Mid-Range computers
  • Learning how every quality setting affects the game
  • Finding the best resolution
  • Finding the best Frame Rate Target
  • Learning about and why Frame Capping is good contrary to popular believe
  • Using the Unleashed Render to highly increase FPS performance
  • Using D3DO to force proper stable VSync and Triple Buffering
  • Locking the game’s Frame Rate for a butter-smooth, console-like experience

3 - Improving Quality on High/Enthusiast-Range Computers
  • Fixing VSync Stability (Stuttering)
  • Improving the game’s Graphical Quality (with picture samples!)
  • Using D3DO (or Nvidia Inspector / Radeon Pro) to force proper stable VSync and Triple Buffering
  • How to Apply the Quality Settings on AMD/ATI Cards
  • How to Apply the Quality Settings on Nvidia Cards

4 - Other Tweaks and Improvements (High/Enthusiast-Range Computers only)
  • Playing in Eyefinity
  • Playing With 3D Vision

5 - Troubleshooting
  • Minimum System Requirements
  • Wrong GPU detected/being used
  • Cannot open game "No valid graphics configuration file found..."
  • Configuration Tool not opening / crashing (Missing MSVCP*.dll)
  • Game Black Screens / Crashes
  • Sound Problems
  • The game is Too Slow!
  • Known Online Time Attack Problems
  • Known In-Game Bugs
  • General Good Advice for Everyone

Ok then, let's get started!
1 - Basic Configuration
Ok then, let's started! Here's the most basic of the basic stuff you need to know before starting tweaking the game / open it for the first time:

# How to run the Configuration Tool


This is the most basic thing you need to know: how to open the game's Configuration Tool. There you can find the most important settings, including the Graphics, Language and Control Options. Audio Options (like BGM volume, voices, etc) are In-Game.

To open the game's Configuration Tool, do the following:
  • Open your Steam Library;
  • Right click on the game's name on your game list;
  • Click on "Configure", right below "Play now".

NOTE: If the configuration does not work, please read the part "5.3 - Config. Tool Crashing / Errors / Not opening" of this guide. Follow the instructions carefully!
1.1 - Getting Controllers Working
# Setting up your Non-Xbox360(Non Xinput) Controller


Chances are if you're reading this, you don't own a Xbox 360 or any other Xinput-Ready controller. The game has very basic D-Input capabilities, so, it's better to configure your non-Xinput controller this way.

If you use your game in D-Input, you'll have most likely issues (due to the analog not being so responsive, controls reversed or worse, and what happens in most cases, the controller not working at all). So, let's just do this quick Controller Setup Guide instead!

We will be using x360ce, a Xinput emulator that will make the game think you have a real Xinput Controller. This can be also use for pretty much any Xinput-Ready game!
  • {LINK VERWIJDERD} (uploaded myself);
  • Go to your game's folder (usually C:\Program Files (x86)\Steam\SteamApps\common\sonic generations) and decompress the zip file files in there;
  • Open up the file x360ce.exe;
  • Configure the keys properly in the window that will open, after that press "Save" and close it;
  • Open up the game's Configuration Tool, and select "Xbox 360 Controller for Windows".
  • Ready to go! Quit the configuration tool and try the game now!
1.2 - Enabling Vibration on Generic Controlers
# Enabling Vibration (Force Feedback) on generic D-Input controllers

Now we got the controller working, but it doesn't vibrate! To make the controller vibrate, you need to install proper force feedback drivers on your PC!

Note: Is shouldn’t have to say this but for this to your controller needs to have the "vibrating parts" inside. If it doesn't, it won't vibrate even with this driver.

Here are the step-by-step instructions on how to do this:
  • Download the drivers here[mega.co.nz] (uploaded by myself);
  • After Downloading, uncompress the zip file. You should have 3 files inside;
  • Run "Setup.exe" and install the new driver;
  • After it finishes installing, unplug and plug back in your controller to the PC;
  • Open up the file "ForceTest.exe", and click on the check-box "Constant Force (the top middle one). Your controller should vibrate!
  • Open up x360ce.exe inside Sonic Generations folder, and press "Save";
  • Open up the Game's Configuration Tool and make sure "Xbox 360 controller for Windows" is selected;
  • Play the game!

All done! Enjoy your Force Feedback active controller!
2 - Low/Mid-Range PC's (Intro)
This section of the guide is dedicated to all you Slow Laptop / Desktop Users!

It has come to my attention that a lot of our fellow not-so-tech-savvy players are running this amazing game with God Awful frame rates / Stuttering / Lag or even BELLOW REAL-TIME SPEED, and this can be a MAJOR setback in becoming good and having fun in this game.

Sonic Generations is best played at constant 60FPS, however most laptops, due to the way how this game is horribly optimized, cannot process the game that fast, even if you lower the resolution to the lowest of the lowest.

Thanks to Dario and his crew on modding, it is possible to squeeze more performance out of Sonic Generations, thanks to a hidden render mode it has (Unleashed Render as they call it). We will cover how to use that render mode to

# Why should I bother following this guide if my computer is so Slow anyway?

Do you like Sonic? Want to zoom smoothly across Green Hill? Want to spank that Homochao robot with everything you got, but smooooothly?

Well then, if any of those above is true, that’s why you should follow this quick guide! Trust me, your computer is probably much more capable than you think!

----------

# What will this part cover?

This topic will help you learn to archive the best quality / performance settings really quick, as well as getting a not before achievable butter smooth console-like frame rate experience on your mid-low range laptop / desktop!

We will learn how every quality setting impacts the game, as well as a brand new way to get your game butter smooth after finishing tweaking it! It will be just like playing in the PS3/Xbox 360, only better!

We will also learn about Frame Capping, and how that’s a GOOD THING contrary to the popular believe. We’ll learn how it affects our experience, and why/how we can use it to get a smoother game experience!

----------
2.1 - Getting Started
# Additional Software required for this guide

We will be using two other programs to help our beautiful game run better. The programs names are D3DOverrider and RTSS (Rivatuner Statistics Server). This programs will ensure you run the game smoothly, with proper frame rates and low Input Lag!

I'm Recomending D3DO and RTSS, but there are more programs you can use to archieve the same effects. I'm recomending this two because they are universaly supported by Intel, AMD/ATI and Nvidia cards. You can also use other software like Nvidia Inspector (For Nvidia Cards) or RadeonPro (For AMD/ATI Cards), but for the sake of simplicity, we’ll be showing just this two ones.

You can also use other software to measure your Frame Rate if you don’t like RTSS own FPS meter. You can use Fraps for example!

I’ll providing the download links below:

# RTSS Rivatuner Statistics Server (Required to cap and smooth the game’s Frame Rate to specific values)
http://www.guru3d.com/files_details/rtss_rivatuner_statistics_server_download.html

# D3DOverrider (Required to cap and smooth the game’s Frame Rate to specific values)
https://mega.co.nz/#!qoYlCKIS!IexMcgJXzkYsBFofXqNHB3rqqwRbBL6oQoG7CwKPLWI

# Fraps (used to see the Frame Rate, not required)
http://www.fraps.com/download.php


----------

# Settings you should change before starting tweaking the game!

There is one setting you should change in Windows’s Power Options, especially if you own a laptop.

First off, Laptop users: PLUG IN YOU LAPTOP TO THE CHARGER. Very important!

Now, both Desktop and Laptop users: Find the Power Options Menu in your system (click on the battery icon or go to the Control Panel), and select the mode “High Performance Mode”.
Doing this will prevent the computer from downclocking your CPU during your game section, which will give you a much better stutter free experience!

----------

# Picking the right Target Frame rate

WARNING: Your screen’s refresh rate should be set to 60Hz to obtain good results! (99% sure it is, don't worry!)

Note: If you want to learn why you should target 30FPS and not 60FPS, please read the “2.3 – Frame Capping” part of this guide. I explain in detail what Frame Capping is, and how that’s not a bad thing at all contrary to the popular believe surrounding the PC gaming community.

One thing to note before hand: This game's quality settings affect VERY LITTLE performance, since this is a plain not optimized console port. The setting that has the most measurable impact is the resolution. Tweaking the resolution to a point where you can archive constant 30FPS is the best way to get a better experience out of your slow hardware!

Before we start tweaking the quality settings, let me make this clear: You will NOT achieve constant 60FPS by tweaking this settings in a slow laptop. At least not without leaving the game looking like dog vomit :( So, our target frame rates will be different in this guide, more console-like ones!

The target you should be aiming for in a low and mid-range computer is 30 FPS. If your computer can render 30 FPS 95% of the time during the level you’ll have a very cool, great, awesome, outstanding, AMAZING! Experience.

There are 3 target frame rates you can be aiming for:

60FPS
The one everyone wants, but you won’t achieve this in a mid-range computer properly, especially due to CPU Limitations. There are a lot of tracks that will slow down to the 40’s FPS, giving you a bad experience. Just let it go. Consoles play at 30FPS too, so, it won’t be that bad, promised! If you have a good computer however, and are just using this low/mid-range part of the guide to learn how to tweak settings for games, do target this one! Remember tough! This game has issues with it's own Vsync mechanism. We will enable it later on using D3DOverrider, but for testing purposes, let it DISABLED.

30FPS
This is the target you’re aiming for. 30FPS will give you a very smooth gaming experience. This is the number you should be looking to stay above during our test session next topic! If you can have 95% of the time during a level 30FPS+ (40+ is even better), you’re going to have an amazing experience after the tweaking!

20FPS
This is the Bottom line, minimum acceptable Frame Rate you can run the game with. Anything below, even 1 FPS and you’ll be running below Real-Time Speed. Make sure your system rarely touches the 20’s during our next testing phase, and if it can’t keep up 30FPS’s even in the lowest quality settings, you should target at all costs 20FPS’s. If you can’t handle 20 with everything in the lowest possible settings, well then, time for a new PC, that one belong in a museum!


# Configuring RTSS to display the frame counter

Before zooming into testing action, remember to activate the frame counter! It will show a pink number on your top left part of the screen. To enable this, open up RTSS and activate the option "Show Own Statistics". All set!


----------

# Setting up the Unleashed Render for a HUGE boost in performance!

Before going on with the tests, give the Unleashed Render a try! I've tested here, and it gives a HUGE boost in performance on the game! Before going on testing what resolution you should use, what frame rate to target, etc, activate Unleashed Render so you can have some big FPS gains. To do so, check bellow the part "2.5 - Playing with the Unleashed Render".

Now then, let’s get ready to and see how to find the proper game settings.
2.2 - Learning about Quality Settings
# Find the best and Impact of Quality Settings and Screen Resolutions

We’re ready to start understanding, testing and finding the best quality settings for our beloved game!

Let’s start by opening the Game’s Configuration Tool.

Click on the option "Graphics Configuration" on top of the window. Let’s see what each one of the options has to offer us:


Graphics Configuration:
This here shows what card your computer is using to render the game. If you see a "Nvidia" or "AMD" seal on your laptop / desktop, and it shows "Intel", please see the topic 5.2 - Wrong GPU Detected to learn how to make the game use the faster GPU!

Resolution: Recommended 1280 x 720 @ 60 Hz
This is the setting that has the biggest impact on your game. Start of by trying the recommended setting, and start to decrease it / increase it according to the testing results we talked about on point 2.1.

Anti-Aliasing – Recommended: None
This option has quite the impact on the performance too. Anti-Aliasing will smooth out the rough edges on 3D objects on the screen. This game uses a very simple blur-like method called “FXAA”. Not as good as True MSAA, but still very, very good! This can have a quite measurable performance hit. Start by using it ENABLED (FXAA option) and then disable it if you find the performance too slow[/u]

Shadow Quality – Recommended: Low:
This option has very little impact on the game. You can try to use it on "Low" or "High", but it wont change much quality or performance wise. Try using LOW and then use it on HIGH if your PC still handles decent framerates!

Reflection Quality – Recommended: Low:
Same as the above one, this option has very little impact on the game. You can try to use it on "Low" or "High", but it wont change much quality or performance wise. Try using LOW and then use it on HIGH if your PC still handles decent framerates!

Vsync – Recommended: OFF:
Vsync is way broken in this game. It can give horrible stuttering on most systems. We will use a external aplication to run Vsync and Triple buffering on the game, that will improve a lot the smoothness of the game! Leave it "Off", not just for testing, but also for better performance / smoothness.


If your game can’t reach 30FPS, it’s time to lower the resolution. Test a little around, use Green Hill ACT 2 (Modern Sonic) as a performance measurement stage.

Play around with the settings until you can satisfy the “Above 30FPS” target, or 60 if your PC is good enough and you are just reading to learn how each setting affects the game! Remember, it doesn’t need to stay above 30 100% of the time, but make sure it rarely drops below 30! If you couldn’t hit stable 30’s, but you stay above 20’s, then your target frame rate for our next part is 20FPS. Once you're satisfied, go to the next part!
2.3 - Learning about Frame Capping
# Making the game Butter Smooth with RTSS and D3DO, just like consoles!

Now let’s go to the most epic part of this guide! Using RTSS and D3DOto make your GPU and Screen properly sync at 30 or 20FPS, so you have a constant and smooth frame rate to give you a console-like experience.

# Quick FAQ:

# Why should I cap my game to 30FPS? Won't it make the game run slower?

No! By capping the frame rate to a value your computer can handle, you're making your game run more stable, thus, faster! When your computer can't render 60 FPS constantly, you'll get stuttering. Stuttering is a very abrupt frame drop that will make your game seem to slowdown abruptly and then speed up (repeat infinitely). Now this the entire stage can't be good right?

You'll be hitting walls and failing tricks all over the place because of this! This is due to the GPU trying to sync the FPS to the screen, but it can only send 60 or 30 to keep the game stutter-free. Anything else will make the game jump and skip frames like mad. The only moment you will notice the game "slower" (not actually slower, just LESS SMOOTH) is navigating the main menus (Press "start" ones), as stated bellow after this part of the guide. However, try running on a stage! You'll LOVE the Frame Cap after one single zooom!

# If VSync is the culprit, why not just disable it?

Tearing my dear.[zoneitastuces.com] Tearing is the most horrible thing ever. You will get huge horizontal image cuts all over the place, and contrary to popular believe, tearing also happens on sub-60 FPS. Having the game caped at 30FPS VS having it running at 40FPS with Vsync off, you'll love WAY MORE the [/b]first alternative, it will be just like that sweet nectar from the Gods themselves!

# What about Input lag?

Input lag will be severely reduced using D3DO due to triple buffering use. Just try for yourself!


----------

# I want to know more. Why can the screen only receive 20 / 30 or 60 FPS?

NOTE: To the more advanced users reading this for fun, remember: I am not going to get EXTREMELY technical here, and i will show a few graphs / info that are not 100% accurate, but are simple enough so that our less-tetchier friends can understand how Vsync works!

------

And you do very well for not being happy with the simpler answers above. Let’s learn a bit more how you GPU and Screen works then!

(Pretty pictures/graphs down below, but keep reading!)

Your screen can only show 60 Images per second (if set to 60 Hz. 60hz = 60FPS or 60 Images Per Second (One Frame = One Image)). This update cycle is fixed and cannot vary (well, Nvidia is developing a very promising technology to fix this tough! Google for Nvidia G-Sync!)

It takes 16.66ms to each frame(image) to show on screen. So, you graphics card needs to have the frame ready within that short time. If it fails, the frame will ONLY be shown in the next image update, making your game stutter (jump / lag).

Your screen can ONLY update the images in those specific time intervals (each 16.66ms it draws one image). If your GPU sends a new image while your screen is still drawing the previous one, you’ll get tearing, because the screen starts to draw one image, and mid-draw it will switch frames and start to draw the other one.

VSYNC is the name of the option that makes your GPU send images to the screen ONLY and ONLY when the screen is ready to show the next one. Every 16.66ms, it gives the screen a new image to draw.

When your game is running at 40FPS with VSYNC ON, you get stuttering, even if it’s constantly rendering 40FPS all the time. This is because 40 is not a good 60 division result. You need clean 60 divider, or the GPU cannot sync with the screen.

Here’s the simple math on why this happens:

Screen Update time per frame: 16.66ms [For 60hz]
60 FPS = 16.66ms per frame. (60/1)
40 FPS = 25.00ms per frame. (60/1.5 – BAD)
30 FPS = 33.33ms per frame. (60/2)
20FPS = 49.98ms per frame (60/3)

Now, when your GPU tries to sync the 40 frames with the screen, we have a problem: Your screen is constantly updating each 16.66ms. However, it takes 25ms for your GPU to finish one frame.

This means that during the 1 second cycle, the first frame will be shown during the third screen update (third Frame out of 60), but the second one will miss the next update cycle, and be delayed to the 4th update cycle.

Confused? Here’s some images on how your GPU will try to sync the frames to the screen, so you can understand when Stuttering happens:

# At 60FPS (On a 60hz Screen)


As you can see, it goes smoothly. The reason we have the “frame 60 from previous cycle” is because while your PC is rendering frame 1 the previous one is being displayed.
Or in other words, During the Second Update Frame 1 is displayed, Third Update Frame 2 is displayed and so on.

# At 30FPS (On a 60Hz Screen)


The same as the 60FPS graph, but this time one image is shown during 2 Update Cycles. Since it’s constant, you get every 2 update cycles 1 image, so the game will render smoothly and stutter free.

# At 40FPS (On a 60Hz Screen)


All Hell breaks loose on this one! As you can see, during the First and Second Screen Update, frame 40 is being displayed. Frame 1 meantime, during that same period is being rendered by your GPU. Since the Frame 1 wasn’t ready when the second Update Cycle started, that frame is put on hold and delayed until the Third Cycle, and the GPU starts to work on another frame, then, Update Cycle 3 comes, and Frame 1 is Displayed. Now, Frame 2 finished right on time to be sent to the screen during the Fourth Update, so there it goes. Frame 3 is still being rendered, so it cannot go to the screen on the Fifth Update Cycle, so it gets delayed to the sixth one.

As you can see, some frames are being displayed 1 time (one Update Cycle) and others are being displayed 2 times (two Update Cycles) making the game look like it’s constantly speeding up / down, thus you feel it stuttering. This is because the GPU will miss and delay frames by not being able to render and send them to the screen on time.

All clear now? See why capping the frames to 30FPS is better? Good! Now, lets learn how to do it!
2.4 - Frame Capping / Propper VSync (How to)
# How to Cap the Frame Rate / Apply Proper Vsync

First off, you need to already know if your GPU can handle 30FPS, or 20FPS. Also, remember: Your screen refresh rate should be set to 60hz (Check the "Troubleshooting" section for help).

If your PC can handle the game at 60FPS, just ignore the part about RTSS and skip to the part about forcing vsync / triple buffering using D3DO!


# Capping the Frame Rate with RTSS:
Now that you know which frame rate your GPU can handle, open up RTSS and set the "Frame Limit" to the value you targeted (30 or 20). That's all!


# Applying VSync and Triple Buffering using D3DO:

D3DO is easier, it goes pre-configured by me! Just open it up and make sure it shows a green "X" next to your windows clock in the task bar! All set, launch the game!


---------

# STUPIDITY WARNING (About the Menu’s Low Framerate):

(READ THIS BEFORE JUMPING TO SILLY CONCLUSIONS)
(I’M SERIOUS, READ THIS)


Before you fire up the game, here is something you NEED to know before jumping to conclusions: The menu of the game WILL LOOK SLOWER because you are accustomed to it rendering at over 30FPS.

However, try to run on a track and you’ll see just how much better your game now is!

To be humble, just ignore the fact that the menu is running at 30FPS. You get used to it after running around for a while. Seriously, just ignore it. :)

# 20FPS TARGET GUYS:

This framerate will make the game look really slow, since the game is really fast-paced. However, running at stable 20FPS is better than running at inconstant 21 - 25 FPS for example.

The game cannot render the initial SEGA videos properly at 20FPS. This is normal. You will have sound crackling. The menus will also look sluggish, but they will be rendered in real-time.

Now remember! This is what you should do before playing the game:

- Make sure your Desktop/Laptop is on High Performance mode in the Power Options;
- Laptop Users, Plug the laptop to the charger!
- Open up RTSS and D3DO;
- Open the game and enjoy!

All right, all set up! Fire up the game and have fun with your super butter smooth Green Hill Act 2! Boost to win!
2.5 - Playing with the Unleashed Render
It has been tested, and using the recently discovered Unleashed Render can give huge boosts in performance, especially for slower GPUs!

Here's what you have to do to play with the Unleashed Render:

  • First off, Download the SonicGMI tool here.[sonic-glvl.googlecode.com]
  • After downloading the tool, uncompress the files inside Sonic's Generation folder:
    Usually located at "C:\Program Files (x86)\Steam\SteamApps\common\sonic generations"
  • Open up the file "SonicGMI.exe".
  • After opening it up, check the mod "Unleashed FxPipeline Shaders
    NOTE: if you already have more mods installed remember: This particular mod needs to be on TOP of the list to work!
  • Check the checkbox bellow "Enable FxPipeline Render".
  • Press "Install/Uninstall" button to install the patch;
  • Press the button "Create Alternate Executable";
  • Press "Save";
  • To play the game with this alternate render, all you need to do from now on is Open up Sonic GMI and press "Save and Play". That's all!

Example image of SonicGMI ready to use for playing with the Unleashed Render:


You can now enjoy a faster Sonic Generations, and with the bonus of a little bit prettier scene effects and dynamic shadows! How cool is that?
3 - High-Range PC's (Intro & Samples)
Just because you have a biffy rig, doesn’t mean you have to know how to punk it up a little! So, this guide is for you if you, the guy with that super cool PC but that doesn’t know how to tune it!

Intro:

This game has by itself very cool graphics, but they can become better with just a little tweaking!

I’ll be providing the universal ways of implementing this, the AMD/ATI way and NVIDIA way of implementing this changes, as well as a few screenshots for comparison.

High/Enthusiast-Range Computers - Index:
  • Improving the Game’s Graphical Quality (Samples);
  • Applying the Quality Settings (AMD/ATI - AMD Catalyst);
  • Applying the Quality Settings (AMD/ATI - Radeon Pro);
  • Applying the Quality Settings (Nvidia – Nvidia Control Panel);
  • Applying the Quality Settings (Nvidia – Nvidia Inspector);


----------

Improving the Game’s Graphical Quality (Samples).

This configuration was tested on an ATI HD5870 and a i7 2600K clocked at 4.6 Ghz @ 1080p
Well, before anything, let me show you a few comparisons on what this changes provide:

(Example Picture: FXAA + Anisotropic x16)

To use the comparisons bellow, know the following: Without your mouse over the picture, it's the first one. With the mouse over the picture, it's the second one! (1 VS 2). The pictures might take a while to load on the website, be patient!

» SMAA + x16 Anisotropic VS Default FXAA + Anisotropic x16[screenshotcomparison.com]
» Default FXAA VS FXAA + Anisotropic x16[screenshotcomparison.com]
» Default FXAA + Anisotropic x16 VS SMAA Ultra + Anisotropic x16[screenshotcomparison.com]
» Default FXAA VS No AA[screenshotcomparison.com]
» No AA VS No AA + Anisotropic x16[screenshotcomparison.com]

As you can see, just forcing the Anisotropic 16x on the game will have a HUGE impact on its textures quality! So, forcing it is a MUST for any capable system!

Sold yet? Let’s see how to apply this!
3.1 - Fixing VSync Stability (Stuttering)
# Fixing Stuttering (vSync Fix):

Sonic Generations Stutters like hell in a lot of GPUs. Using D3DO (Direct3DOverwriter) is the best universal way of fixing this problems!

First of, Download D3DO Here:
https://mega.co.nz/#!qoYlCKIS!IexMcgJXzkYsBFofXqNHB3rqqwRbBL6oQoG7CwKPLWI

Now, to use D3DO is super easy, it goes pre-configured by me! Just open it up and make sure it shows a green "X" next to your windows clock in the task bar! All set, launch the game!
3.2 - Applying the Settings (AMD/ATI)
Applying the Settings: AMD/ATI

# Via Catalyst Center

Catalyst from AMD’s drivers can only apply the anisotropic filter unfortunately, so you’re either stuck with no AA, or the game’s default one (FXAA). But here’s the way of applying Anisotropic x16 only Sonic All Stars Racing Transformed via Catalyst:

If you want proper VSync and Triple Buffering you will still need to use D3DO to force it. Radeon Pro supports forcing this all by itself, check bellow!
  • Open up Catalyst Center
  • Make sure you are on Advanced mode. Click on “Preferences” and pick “Advanced View”
  • Click on the “Gaming” Tab » 3D Application Settings.
  • Click on “+ Add …” and select the game’s EXE file (SonicGenerations.exe)
  • Switch “Anisotropic Filtering Mode” to “Override Application Settings”
  • Switch “Anisotropic Filtering Level” to 16x
  • Switch “Texture Filtering Quality” to High Quality
  • Switch “Surface Format Optimization” to OFF
All Done!

# Via Radeon PRO

Radeon Pro is the most complete and epic tool to use if you have a AMD/ATI Card. It has a hell of a lot of settings you can tweak, including the better Anti-Aliasing SMAA. SMAA takes less detail away from textures, and provides a better aliasing of those ugly rough edges!

Radeon Pro can also force Triple Buffering and proper VSync on the game, so, if you use Radeon Pro you can ditch using D3DO! Instructions on how to force VSync and Triple Buffering are also provided in part 3.2 - Applying VSync and Triple Buffering:

Download Radeon PRO Here: http://www.radeonpro.info/download/
  • First of, go to the Game's Configuration tool and disable Anti-Aliasing (place it on OFF);
  • After installing Radeon pro, Add a new profile for the game (Click the document with the green +, and find the game .exe file (SonicGenerations.exe):
  • On the “Visual” Tab, Check “SMAA” and set the quality to “Ultra”;
  • Still on the “Visual” Tab, check “Anisotropic Filtering” and select 16x;
  • On the "Advanced" Tab, check the box "Texture Filtering Quality" and set it to "High Quality";
  • Right Click on the name of the game on the list (left side of Radeon Pro), and click “Apply Now”.
All Done!
3.3 - Applying the Settings (Nvidia)
Applying the Settings: Nvidia

# Via Nvidia Control Center

Nvidia Control Center can only apply the anisotropic filter unfortunately, so you’re either stuck with no AA, or the game’s default one (FXAA). But here’s the way of applying Anisotropic x16 only via the Control Panel:
  • Open up Nvidia's Control Panel (Right Click anywhere on the Desktop)
  • Under "3D Settings" (left side), click on "Manage 3D Settings"
  • Click on the “Program Setting" tab;
  • Click on “Add" and select the game’s EXE file (SonicGenerations.exe);
  • If it's a Laptop, under "2. Select the preferred Graphics Processor for this program", select "Nvidia processor";
  • Switch “Anisotropic Filtering” to “16x”;
  • Switch “Texture Filtering Quality” to High Quality;
  • Press "Apply"
All Done!


----------

# Via Nvidia Inspector

We can't also apply SMAA on Nvidia Inspector. Read the "Notes" bellow for more information. But here’s the way of applying Anisotropic x16 only via the Inspector Utility:

Download Nvidia Inspector Here: http://www.guru3d.com/files_details/nvidia_inspector_download.html
  • After downloading the program and open it;
  • On the newly opened window, click on the Wrench Icon located in the "Driver Version" line;
  • On this new tab, click on the profiles list. If you can't find Sonic Generations there, keep reading;
  • If you don't have the profile already listed, do the following: On the top of the program, click on that Yellow Sun Icon. When it shows up a window asking for a name input "Sonic Generations" and press Enter;
  • After that, on top of the program click on the tiny symbol of a blue window with a green cross. Go to the game's folder and select the file "SonicGenerations.exe" (usually located at: "C:\Program Files (x86)\Steam\SteamApps\common\sonic generations\SonicGenerations.exe"
  • Under "Texture Filtering", on "Anisotropic Filtering Mode" select "User Defined / Off";
  • On the "Anisotropic Filtering Setting", select "x16";
  • On "Texture filtering - Quality select "High Quality";
  • Press "Apply Changes".
All Done!
4 - Other Tweaks and Improvements (Intro)
There are some more things you can improve! Here you can find a lot of cool tweaks to make your experience even better. See below the mini-index of this part of the guide!

Other Tweaks and Improvements (High/Enthusiast-Range Computers only)
  • Playing in Eyefinity
  • Playing with 3D Vision
  • Other Helpful Tweaks
4.1 - Playing in Eyefinity/Surround
Playing in Eyefinity

To play this game in Eyefinity without the HUD being all stretched out, you must use the program Flawless Widescreen. Here's what you have to do:

  • Download Flawless Fullscreen here[www.flawlesswidescreen.org]
  • Open the program and select the HUD FIX on the Sonic Generations profile;
  • Activate Eyefinity / Nvidia Surround on your control panel;
  • Play the game!
4.2 - Playing with 3D Vision
Playing in 3D Vision:


The game already supports 3D Natively. Just boot up the game, go to options and activate the 3D option!

DO NOTE:
The Unleashed Render DOES NOT support 3D vision!
5 - Troubleshooting (Intro)
Before you going around saying this game sux... STOP. Bad kitty! The game doesn't suck, your PC (at least until you don't fix it following this guide) sux!

Find on the next part the problems you are having, as well as how to fix pretty much all of them!

Here's a mini-Index of this Troubleshooting part:

Troubleshooting:
  • Finding if your computer respects the Minimum System Requirements
  • Wrongly using the slowest GPU in your computer and how to switch to the fast one
  • Config. Tool Crashing / Errors / Not opening
  • Most Common Crashes / Black Screens / Errors
  • "Why is my game so Slow?!"
  • Known Time Attack Problems
  • Known In-Game Bugs
  • General Good Advice for Everyone
5.1 - Minimum System Requirements
First of let's see if you didn't rush out, bought the epic game, but are now trying to play it on a toaster. This are the Minimum System Requirements your computer needs to have in order to be able to run and enjoy the game:

OS: Windows XP, Windows Vista, Windows 7, Windows 8
Processor: 2GHz Intel Core 2 Duo or equivalent
Memory: 2GB Ram (Windows XP), 3GB Ram (Windows Vista, Windows 7, Windows 8)
Graphics: 512MB with Shader Model 3.0 support (Nvidia 8800GT or superior card)
DirectX®: 9.0c
Hard Drive: 11GB free hard drive space
Sound: DirectX 9 Compatible

Ok, compare these to your computer. If you have a Pentium 4, that's a toaster. A very old Intel Celeron? Also a Toaster. Old AMD Althon? Toaster. Old Intel Atom? You toasted boy.

# Alright, I made sure I’m not playing in a toaster

Not a toaster, you say? Still crashing / not opening / showing Black Screens? Next page then!
5.2 - Wrong GPU Detected
Most of this is handled by the drivers themselves, but human/driver stupidities are a reality too! So, here's how you can check what GPU's your PC has and how to switch to the correct one for better performance!

# Checking What GPU's your Laptop/Desktop Might Have

Nowadays a lot of PC's have two GPU's (Graphic Cards) inside of them, especially Laptops. If your Laptop Has a "Nvidia" or "AMD" Sticker, but the Game's Configuration Tool is reading as "Intel HD" something might be wrong on your configuration!

Here's simple ways to check what GPU's your PC has:

# For Laptops

- Check if your PC has any sticker that says "AMD" or "Nvidia".
- If your PC doesn't have stickers at all, download and run GPU-Z[www.techpowerup.com], and check on the drop down menu the list of GPU's you have.


# For Desktops

Sometimes human stupidity strikes, and it's funny to watch. Lot's of people accidentally do this mistake, and get poor Desktop performance because of it.

Lot's of Desktops have a Integrated Graphics card as well as a Discrete, more powerful GPU, but people accidentally connect the screen to the wrong GPU.

Check the back of your PC. If you have down below an horizontal Monitor VGA/DVI/HDMI port (usually bellow the "motherboard" part, where you connect the USB ports, Ethernet Cable, etc), connect your screen there! Make sure it's not on the "top vertical" port, as that one will use the iGPU (Integrated Graphics Card) instead of the powerful dGPU (Discrete Graphics Card)! That's all you need to do on desktops, no software configuration needed!

For reference and better understanding, check the image below:


# Making the game use the correct GPU on Laptops

Now that we know that we have another GPU, it's time to make the game detect it and use it!

# For Nvidia Laptops with OPTIMUS (Switchable Graphics):

Ok, let's see how to change the settings on Laptops with Nvidia GPU's!
  • Open up Nvidia's Control Panel (Right Click anywhere on the Desktop)
  • Under "3D Settings" (left side), click on "Manage 3D Settings"
  • Click on the “Program Setting" tab;
  • Click on “Add" and select the game’s EXE file (SonicGenerations.exe);
    Usually located at "C:\Program Files (x86)\Steam\SteamApps\common\sonic generations"
  • If it's a Laptop, under "2. Select the preferred Graphics Processor for this program", select "Nvidia processor";
  • Press "Apply"

  • To make the Launcher.exe (Configuration Tool) also detect the Nvidia GPU, you might need to do the following too:
  • Open up Nvidia's Control Panel (Right Click anywhere on the Desktop)
  • Under "3D Settings" (left side), click on "Manage 3D Settings"
  • Click on the “Program Setting" tab;
  • Click on “Add" and select the game’s configuration tool .EXE file (ConfigurationTool.exe);
    Usualy located at "C:\Program Files (x86)\Steam\SteamApps\common\sonic generations"
  • If it's a Laptop, under "2. Select the preferred Graphics Processor for this program", select "Nvidia processor";
  • Press "Apply"
All Done!
5.3 - Config. Tool Crashing / Errors / Not opening
# Cannot Open Configuration tool (or the game) / Errors Opening / Nothing Happens Opening it

Crashing and stuff not opening can be a lot of things. So, let's try to correct "lots of things" by following a typical fool-proof fix guide!

If you cannot open the “ConfigurationTool.exe” file (Configuration Tool of the game), follow this procedure bellow very carefully!

REMEMBER: If you have a 64 Bits System, you need to install BOTH the 32 bits and the 64 bits versions!


-----------

# Updating your Graphic Drivers

This is very important. Running old drivers can make your system very unstable. Download the latest drivers for your graphic card, according to your manufacturer. I'll be providing quick Links bellow:

# Intel:
https://downloadcenter.intel.com/

# Nvidia:
http://www.nvidia.co.uk/Download/index.aspx?lang=en-uk

# AMD/ATI:
http://support.amd.com/

----------

# Making sure you have Direct X Installed

Without Direct X you can't Run the game AT ALL. Download, and run the Microsoft Direct X Run Time tool, and let it automatically download and install / repair the Direct X on your system

DirectX Run Time: http://www.microsoft.com/en-au/download/details.aspx?id=35


----------

# Configuration Tool not opening / Crashes with "Missing MSVCP*.dll" message

Your PC is missing some redistributable libraries. You can download Microsoft Visual C++ Redistributables And NET Framework 4 below. Make sure to download the right version for your system. If you are running a Windows 64 Bits machine, you need both of them.

32 Bits Version: http://www.microsoft.com/en-us/download/details.aspx?id=8328

64 Bits Version: http://www.microsoft.com/en-us/download/details.aspx?id=14632

NET Framework 4 [32/64 bits]: http://www.microsoft.com/en-au/download/details.aspx?id=17851

-----------

# Configuration Tool does not open and no error is shown:

Note: This is also the fix for the error "No valid graphics configuration file found,please run the configuration tool and save." while opening the game

First off, make sure you installed the above dependencies.

If you followed every step precisely, do the following:

  • Open up the game's folder;
    Usually located at "C:\Program Files (x86)\Steam\SteamApps\common\sonic generations"
  • Delete the following files:
    • AudioConfig.cfg
    • GraphicsConfig.cfg
    • StatsConfig.cfg
    • DefaultInput.cfg
  • Right click on the file "ConfigurationTool.exe", and select "Execute as Admin";
  • Set manually ALL settings (graphics, controller and audio), and press "Save and Quit";
  • Make sure you unplug and plug back in your controller (if you use any). Also, read the "Basic Configuration" part of this guide, and configure properly x360ce in case you already have it on folder.
  • If the game still throws an error while opening, reboot your computer;
  • If you still get an error, check the this guide part "5.2 - Wrong GPU detected" to fix the problem.

-----------


# Can't move the cursor out of the top Left Corner on the Configuration Tool:

This is a common problem, and easy to fix! Just unplug your controller and open the Configuration Tool again! Tadah!
5.4 - Error "No valid graphics configuration file found,please run the configuration tool and save"
# Cannot open game: Error Message "No valid graphics configuration file found,please run the configuration tool and save":

First off, make sure you installed all the dependencies found in part "5.3 - Config. Tool Crashing / Errors / Not opening".

If you followed every step precisely, do the following:

  • Open up the game's folder;
    Usualy located at "C:\Program Files (x86)\Steam\SteamApps\common\sonic generations"
  • Delete the following files:
    • AudioConfig.cfg
    • GraphicsConfig.cfg
    • StatsConfig.cfg
    • DefaultInput.cfg
  • Right click on the file "ConfigurationTool.exe", and select "Execute as Admin";
  • Set manually ALL settings (graphics, controller and audio), and press "Save and Quit";
  • Make sure you unplug and plug back in your controller (if you use any). Also, read the "Basic Configuration" part of this guide, and configure properly x360ce in case you already have it on folder.
  • If the game still throws an error while opening, reboot your computer;
  • If you still get an error, check the this guide part "5.2 - Wrong GPU detected" to fix the problem.
5.5 - Game Black Screens / Crashes
NOTE: If your configuration Tool isn't working and you figured "I'll just skip it and play the game without configuring it", BAD MODE! Go to point "5.3 - Config. Tool Crashing / Errors / Not Opening" and install all dependencies first!

-----------

# Instant Crash on Opening the game

Try this if your game crashes as soon as you open it (no error messages, just plain crashing:)

  • Go to your Window's Control Panel » Sound » Right click your speakers » Proprieties » Advanced tab
  • Press the button "Restore Defaults", press OK
  • Should work now!


----------

# Fixing Black Screens with Sound / Missing Geometry in-Game / Flashing Objects

This can be quite a few things. Let's go by parts then!

# If you are playing on a TV:

If you are using a TV to play this game, make sure your game is at the TV's native Resolution (or at least one your TV supports!). If this won't fix the Black Screen on the TV, you might need to change the option "GPU Scalling" your AMD/Nvidia Drivers have. To do so, proceed as the following:

AMD/ATI:
  • Open up the Catalyst Center by Right Clicking your Desktop anywhere;
  • On the left side, find the "My Digital Flat Panels";
    • On Windows XP, Expand the "Digital Panel Properties" and Highlight the "Attributes" tab.
  • Check the "Enable GPU Scaling" Checkbox
  • Press Apply. It should fix your problem! If not, Keep reading bellow!

Nvidia:
  • Open up the Nvidia's Control Center by Right Clicking your Desktop anywhere;
  • On the left side, find "Display", expand that menu and click on "Adjust Desktop Size and Position";
  • Change the Scaling mode to "Aspect Ratio" and change "Performing Scaling On:" to GPU.
  • Press Apply. It should fix your problem! If not, Keep reading bellow!

# Disabling Forced Anti-Aliasing (most common fix for BlackScreen / Missing Geometry):

This problem mostly occurs on AMD/ATI cards. You need to disable the Forced Anti-Aliasing in Catalyst Center. Here's how to do so:
  • Open up Catalyst Center by Right-Clicking anywhere on your Desktop;
  • First, make sure you are in "Advanced" mode. On top of Catalyst Center, click "Preferences" and switch to "Advanced View";
  • Click on "Gaming" and then "3D Application Settings".
  • On the bottom of the window, press "Defaults".
  • If necessary, press "Apply". Your game should now work!


----------
# Frequent Crashes / Endless Loading Screens / Crashing a lot during Levels:

A few crashes are to be expected. But if you are having lots and lots of crashes, try the following, it might help a lot:
  • Go to the Game's Folder
    usualy C:\Program Files (x86)\Steam\SteamApps\common\sonic generations"
  • Right Click on "SonicGenerations,exe" and select "Proprieties";
  • Click on the "Compatibility" Tab;
  • Tick the box "Run this program in compatibility mode for:" and make sure "Windows XP (Service Pack 3) is selected;
  • Tick the box "Run this program as Administrator"
  • Try now.

If crashing still persists a lot, make sure you don't have any crazy Anti-Virus, Firewalls, DirectX Intrusive programs running in Background (as an old version of Fraps, DXTory, etc).

If you are running custom Anti-Virus and Firewalls, make sure to put this game (and Steam itself!) on the exceptions list!

If it STILL crashes a lot, please post on the forum so we can try and help you out!


NOTE: If you are running any mods, the game will crash a lot more! It's normal, and there isn't much you can do :(
5.6 - Sound Problems
# Sound too loud/low when opening/closing the game

If your game has the Sound too loud or too low when playing, follow this simple step-by-step bellow to get it working again!
  • On your System Tray (next to the clock), find the speaker item and right click it;
  • Click on "Playback Devices";
  • On the new window, click on the "Communications" Tab;
  • Select the option "Do Nothing" and press OK
  • Should be working now!
5.7 - The Game is Too Slow!
If your game is running too slow, go back on this guide a little!

Here's what you need to do if you opened up this guide and jumped straight into this part:

  • Make sure your computer is not a Toaster and respects the 5.1 - Minimum System Requirements.
  • First Check if you are not running on the Wrong GPU. Check the point 5.2 - Wrong GPU Detected for more information!
  • Read the "Low/Mid-Range PC's Configuration" part of this guide, it will help you select the best configurations for your game, as well as teaching you how to cap your frame rate to an even better experience!
  • And most important of all: Try running your Game with 2.5 - Playing with the Unleashed Render. It was tested, and this can give HUGE boosts in performance!

    Gogo!
5.9 - Known Time Attack Problems
# Time Attack Crashes. A lot.


Sonic Generations was a game that had very little support by the development team. As such, things like "Time Attack" crashing a lot are normal.

There is no point in trying to use this mode (unless you're trying to get the Time Attack Achievement) because the leader boards are full of false times posted there by cheaters :(

There is no fixing for this, you just have to insist a lot to be able to time attack the stages.
5.9 - Known In-Game Bugs
# Troffy Room Bug on Controller.


For some reason, i can never open the trophy room using the controller (xinput emulated by x360ce). Make sure you use the keyboard if you want to visit the trophy room!
5.10 - General Good Advise
There are a few simple rules that you can follow to improve your game experience.

Your PC is exactly that, a PC. It can multi task, but that doesn't mean it can handle everything you throw at it without losing speed or going crazy. So, here’s a small list of things you can do:
  • Activate High Performance Mode in Control Panel » Power Options. This will prevent your PC from downclocking the CPU / other components, thus reducing greatly stuttering during the game. Especially useful for laptops!
  • If you have any torrents, stop them before going to play! The game is very bandwidth hungry, and needs all it can get so you can have a good experience!
  • Close all unnecessary programs running in your computer, to free up resources for the game!

And the most important of them all:
  • Close your Browser, or at least tabs that have Adobe Flash Player Videos inside! Flash player will really mess with your GPU clock, making your game go nuts! Just close it! Flash is EVIL!!
6 - Final Notes


Ok, you are now all ready to start boosting trough the green fields and toxic chemical plants! Good luck, and careful with the spikes!

If you find any miss-information or have new information to add, just say so, I'll be happy to do it!

Also, a big thanks to Infamous Cynic, kj3400, NoVa, Ice Blade, Sadistic Cyanide, JohnTH, Twinbee and Perforated Soul for bearing with me with some testing / print screening requests / questions i had to make!

Good games! Gotta go fast!

Any questions, fell free to post them in the forum's post, or in this guide! (preferably in the forum since the guide has character limit).

PLEASE REMEMBER:
Even though this guide is big, there is always room for improvement. If you want to help, simply add me on Steam and talk to me, so i can add more content to the guide!

BlackLionPT Out
211 opmerkingen
brontro548 16 apr 2024 om 3:10 
Whenever i try to open the game i get an error message saying "Configuration Tool- Bad image"
Pinkerton 16 nov 2023 om 21:14 
i have an x input controller that the configuration tool just refuses to recognize. i tried x360ce and it didnt help at all. please help, i find the default controls unplayable and I'm just considering uninstalling atp.
Valhalla360 11 sep 2023 om 15:04 
I had SG working on Steam Deck just fine a couple of weeks ago. I even had HedgeModManager working to add the Direct3D11 mod with a couple of others.

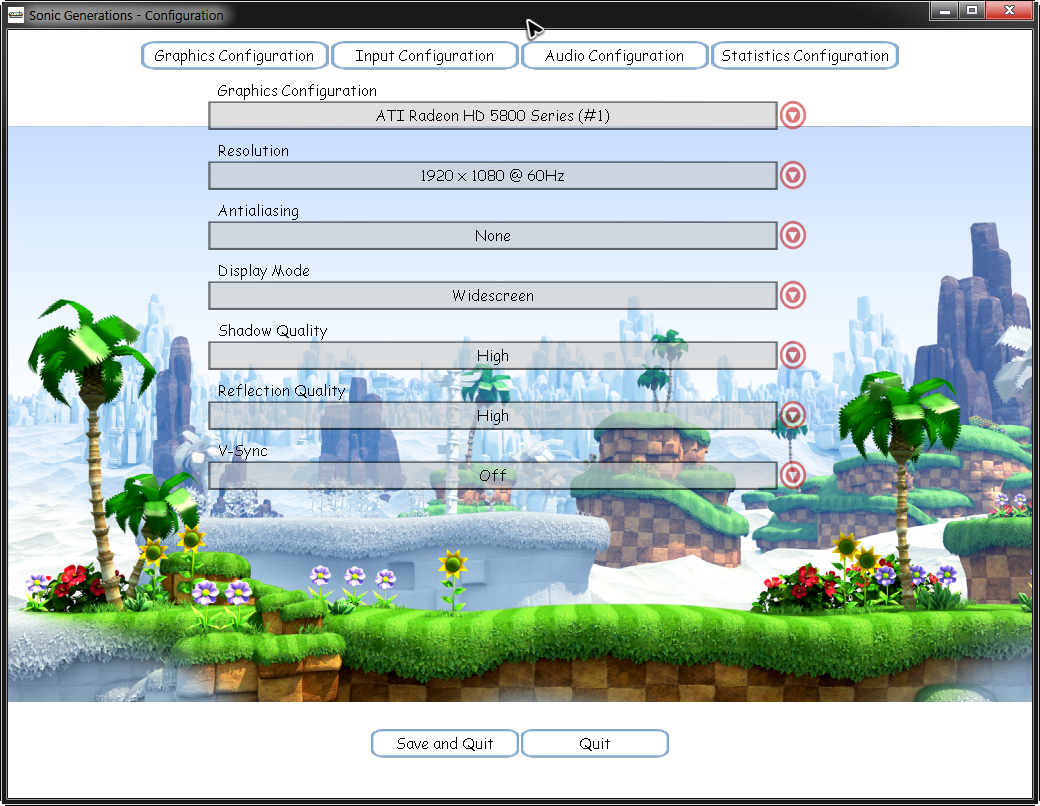
BUT recently my MicroSD card (where the game files were stored) crapped the bed so I reformatted it and after redownloading SG, I can't seem to save the config in the config set up.

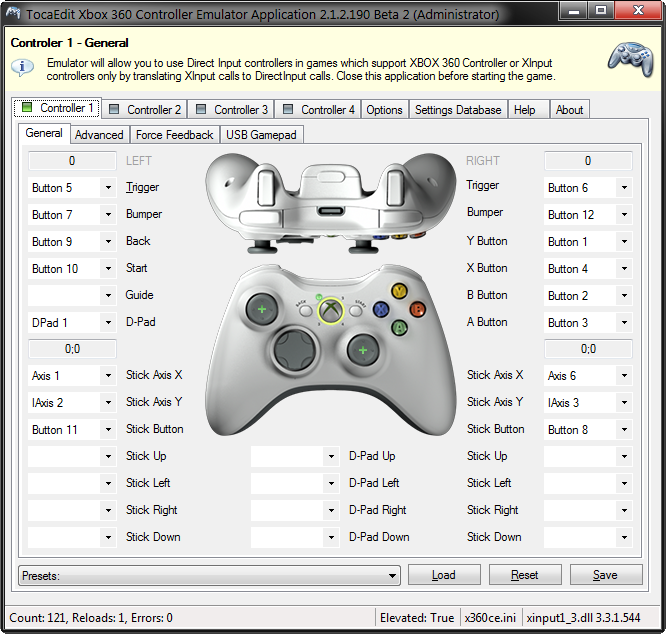
Further, I can get SG working in Desktop mode (w/ and w/o mods) BUT I can't get SG to open in Game Mode any more. I get the graphic config error. The config doesn't seem to be saving the controller selection either.

I've tried deleting all of the .cfg files in the SG folder and redoing the config in Desktop mode but even though I can play SG in Desktop mode - I can't get SG working in Game Mode.
Unseen 11 mei 2023 om 7:53 
You can also boost performance a lot if you install the mod manager and deactivate a lot of superficial effects you don't need. Boosted the games performance by a lot for me.
Emerald Entrail 21 mrt 2023 om 21:04 
I cant get joy-con with better joy to work and my error when booting up the game is "The detected configuration does not match your current hardware please rerun the configuration tool" It also does this while booting with keyboard controls. My laptop is a surface pro 4 with Intel(R) Core(TM) i7-6650U CPU @ 2.20GHz 2.21 GHz and Intel Iris 540 graphics.The fan is a bit broken so that might have something to do with it.
hamstergod80 21 jan 2023 om 20:16 
is the game coming up on the wrong monitor for anyone i would like to get this fixed. also my second monitor isn't HDMI
The Mouse from Hyperion 5 jan 2023 om 6:34 
I'm refering to the Online Ranking Attack. When I find a solution myself, I'll post it here.
The Mouse from Hyperion 5 jan 2023 om 6:31 
After I played Speed Highway Act 1 and Also Sky Sanctuary Act 2 the game crashed. I could still finish all the Modern Sonic levels by switching to Act 1 and going to Speed Highway Act 1, then switching to Act 2 and everything worked fine. However, Act 1 can now not be finished, since I can't do that trick anymore cause Sky Sanctuary Act 2 crashes the game when selecting it. I want to get the Achievement. Does someone know how this works?
Mario Wumpus 25 dec 2022 om 8:40 
I have updated my drivers, and troubleshooted and I only get 5 seconds of black screen and then a crash with no message.
DracRio 20 dec 2022 om 17:48 
Quick question, is there anyway I can play this game windowed or something?

like is there a way I can minimize and maximize the screen myself, or am I just stuck playing it in widescreen?

thanks