The Lord of the Rings: War in the North

The Lord of the Rings: War in the North

Ocen: 110
WitN General Guide + Farin In-Depth (Solo+Co-Op)
Autorstwa: MarioVX
A short guide on the game War in the North, preparing the reader to beat the game on all difficulties in singleplayer with Farin.
I kept it as short as possible, providing some tips on how to best skill, equip and play him for a safe and easy playthrough, as well as explaining some game concepts where it is useful. This guide doesn't cover specifics about side quests, the other character classes, or certain item sets. Keeping it short and simple.
2
2
   
Przyznaj nagrodę
Ulubione
Ulubione
Usuń z ulubionych
Introduction
Hi guys, I'm MarioVX and this is my Lord of the Rings: War in the North guide.

I've completed eight playthroughs of this game by now, most of them playing Farin. I enjoyed the game pretty much, so after I've gotten all the Steam Achievements and were practically done playing this game, I decided to write this guide to it to help other players that may have trouble finishing it, especially without co-op partners.

This guide is by no means exhaustive, I kept it short so it's just enough to serve its purpose of allowing other players to finish the game at the highest difficulty without co-op partners without too much struggle.

I hope you like it, and without further ado, let's get into it.
Combat Basics
Lord of the Rings: War in the North is an action-roleplaying game, so let's face it: you will spend most of the time fighting. Here are the basics to show you your repertoir and set you up:

Offensive Melee

Left Mouse Button - Basic Melee Attack
A quick melee strike against a close enemy roughly in the direction you are facing. You can combine these to fluent succession, they cause normal damage and light hit reactions to the target and while you are performing them, you are immune to light hit reactions yourself (but not the damage that comes with it). They have no resource cost aside from a miniscule durability loss on your melee weapon, so this is the standard and best way to open up any normal fight and on its own sufficient to end them against defensively weak enemies. Clean hit streaks, uninterrupted through hit reactions, will eventually open up an opportunity to critically strike.

Right Mouse Button - Heavy Melee Attack
A very slow melee strike against a close enemy roughly in the direction you are facing. Inflicts more damage than a basic attack and a stronger hit reaction, but you are vulnerable to any hit reactions yourself while performing the attack, so you may be interrupted in doing so. Upon successful hit, you may quickly follow up with basic attacks. You should use this move only as a blockbreaker against currently parrying enemies, and only if no other enemies are close to you.

Right Mouse Button, against marked target - Opening Critical Strike
If your basic attacks have opened up an opportunity to critically strike an enemy, he will be marked by a small white triangle above his head. If you face him and are in range, this triangle becomes yellow, signaling you may now critically strike using RMB. Such a critical strike is a fast high-damage attack that puts you into critical streak mode. Whenever you see an opportunity to do so, do it. If the target is also staggered or knocked down, this becomes a finishing move.

Left Mouse Button, in critical streak mode - Empowered Basic Attack
Once you've entered critical streak mode, your basic attacks become empowered, dealing more damage and triggering heavier hit reactions. You're still immune to light hit reactions while performing them, but becoming subject to a heavy hit reaction will interrupt your streak and set you back into normal melee mode, just as not hitting an enemy for about three seconds.

Defensive Melee

Ctrl - Blocking Stance
While in blocking stance, incoming damage will be significantly removed, you are immune to all except heavy hit reactions, and you move slower. Use this to respond to incoming attacks from normal enemies, and especially to those that cause medium hit reactions that would otherwise interrupt your movement flow. Successfully blocking an incoming melee attack will also trigger a stronger hit reaction on the attacker (without dealing any damage however), which opens a safe timeframe for you to attack him without having to fear an incoming attack. All in all, Blocking has two main purposes: Diminishing incoming damage and conserving your critical streaks.

Ctrl + Left Click - Push
While blocking, you may also actively trigger a heavy hit reaction on an enemy, while doing almost no damage, to open the mentioned timeframe for a safe attack without having to wait for your enemy to attack you. You can also perform this move quickly to interrupt incoming attacks.

Direction + Spacebar - Dodge Roll
Dodge Rolls are great to avoid slow, heavy strikes by large enemies, and projectile shots if you time them well. During the roll, you are insusceptible to any damage or hit reactions, but it has a brief preparation time, which makes it inappropriate to avoid quick melee strikes. You may also use it to quickly reposition yourself - it's a very versatile move.

Ranged

Alt - Ranged Stance
While in ranged stance, your field of view is reduced in favor of higher zoom, you move slowly and are vulnerable to any attacks. In this stance, you may use ranged attacks, our you can just use it to peak into the distance. You can use the mousewheel to zoom in even further.

Alt + Left Mouse Button - Basic Ranged Attack
Shoot your bow, crossbow or magic staff in the direction of your crosshair. Unlike melee attacks, this uses a resource, namely arrows or bolts, or prepared charges and power, so don't use these wastefully. The damage of ranged attacks is hit zone dependent. Headshots cause significantly increased damage, and even more does hitting the target's eyes. If an enemy is standing directly in front of you while trying to shoot, a combat kick is performed instead, causing a light hit reaction but no damage and shoving the enemy back slightly.


Alright, neglecting skills for now, this is your full combat repertoir so far. Reading through it, this arsenal seems a bit complex and vast to all keep in mind, but by trying it out, you will see that Snowblind Studios succeeded in creating a natural, intuitive and fun combat system. Just give it a shot. I conclude this section with a set of tips:
  • Use basic melee attacks to attack your enemies and build up critical opportunities.
  • Critically strike as soon as you can.
  • Keep up a fluent critical streak with empowered basic attacks as long as possible - it also grants bonus XP!
  • It's better to block than to bleed. Not just because of damage, but because of initiative.
  • Against groups, frequently shift targets to keep them at bay, block more often instead of trading hits, and eventually escape with a dodge roll.
  • Mobility is trump.
  • Be efficient.
Resources
I don't want it to get too theoretical here, but I found it very helpful to think about the issues of money, health, power, ammunition, durability, experience points and time using an abstract, generalized concept. All of these are resources, and you are constantly transforming some of them into others; the challenge comes from restrictions in your ability or opportunity to do so. You're supposed to be efficient, and time is the only infinite resource in our model, so it is the value we are optimizing when looking for optimal strategies, with all the other resources providing boundary conditions to our optimization problem. Let's look at these resources individually:

Money
You gain money directly and indirectly from looting and through quest rewards, that means, by investing time into the game. The more thoroughly you explore the game world, picking up more loot, discovering more secrets, completing more side quests, the more money you get from it, up to a hard cap where you take everything with you and do everything that there is.
You use money to buy better equipment (which conserves all other resources), repair damaged equipment (transform it into durability), replenish your ammo, health and power potions, or buy a respec token in case you skilled your character inefficiently.

Health
Health is simply a boundary condition: you have to keep it above 0 in order to progress, that's it. There is current health, maximum health, and stored health (potions). Current health may not exceed maximum health. Having more health only gives you the opportunity to react to incoming damage by drinking a potion in time, but you don't fight more efficient or anything if you have more health; it just may never drop to 0. If it does, you may have to replay a section of the game, which means you then wasted a lot of resources. Get your maximum health to a value that allows you to react to and deal with the threats you are facing, but not higher. Your character has a base maximum health which increases with your character level, as well as stat points spent into Stamina. There is also magical equipment that provides a bonus to your maximum health. You can replenish your current health by using health potions that you found or bought, or though healing abilities that cost power instead. Your character also has a passive health regeneration rate, which also increases with Stamina and certain item enchantments.

Power
Power is the resource required to use your active abilities. There is current, maximum and stored power. Your current power may not exceed your maximum power, you can use stored power to restore your current power, you can only use abilities if you have sufficient current power. Your character has a base maximum power, which increases through level-ups, stat points spent into Will and certain item enchantments. Your character also has passive power regeneration, which also increases with Will and certain item enchantments. Thus, power is a non-essential resource that can save you time, health and durability.

Ammunition
There is a hard cap of 40 for Farin's and Eradan's ammunition, while Andriel is holding a certain number of charges that will be refilled using her power. Ammunition is required for ranged attacks. It is found by looting and can be purchased. A stock of ammunition allows the player to react to demanding threat situations in a more versatile way by using their ranged combat capabilites.

Durability
Durability is a resource that is unlike all the previous ones not bound to a character, but to a weapon or armor item. Each of these items has a maximum and current durability which works similar to character health, but there are no durability potions or durability regeneration, the only way to replenish durabilty is having it repaired by a blacksmith in one of the settlements in the game, paying him money. There is limited opportunity to do so during missions, which means you should highly consider maximum durability when comparing weapons or armor pieces. If a weapon's or armor piece's durability drops close to 0, its stats are severely decreased, and at 0 it becomes non-functional. The "reduced wear" enchantment may reduce the rate at which an item's durability decreases.

Experience Points, Character Levels, Skill Points, Stat Points
These are all coupled resources that work inversely to the others: You start with 0 and try to obtain as much of it as possible, because stronger base stats, stats and skills mean more health and power and allow you to save time, health, power and durability: Character Level and Stats may be requirements for good equipment, stats and skills affect your combat performance. You obtain skill and stat points through character levels, and character levels through experience points. Experience points, finally, are obtained by defeating enemies, completing quests, and building up longer critical streaks. Since building up longer critical streaks also increases your damage output and (through hit reactions) decreases the effective damage output of your opponents, doing so is saving you time, health, power and durability and thus highly rewarding in every way.

Time
Well, this isn't a hard resource, you may invest as much time into the game as you like. But we're playing games for fun, and the intensity of perceived joy is determined by the quotient of positive experiences and the time throughout which you experience them: If you make the same amount of positive experiences in a shorter amount of time, it feels more intense. And since the amount of positive experiences in the game is capped at all the main and side quests and fights, you may only increase your fun by shortening the time you live through all of this. This doesn't mean skipping dialogue or side quests, since this would decrease the amount of positive experiences, but taking less time to kill your opponents for example, or having to spend less time to destroy every single crate that there is in hope to find some more health potions because you're doing so horrible in the fights because your character is too weak, for example, or having to play some encounters multiple times because you keep dying in them. It may not feel like this during your first playthrough, but you will see what I mean at later ones.


The lesson is clear: Be efficient. (And mind durability!)
Stats & Equipment
Alright, now let's have a look at the character and equipment statistics that determine your character's combat capabilities.

There are three combat stats which are used whenever damage is exchanged between you and your enemies and its amount has to be calculated. On the stats screen, these are the bottom three within the left column.
  • Melee - Determines your basic melee damage before any enemy damage mitigation. This stat is based on your current melee weapon and your Strength, and may be increased by certain skills and damage enchantments.
  • Ranged - Determines your basic ranged damage before any enemy damage mitigation and without hit zone modifiers. This stat is based on your current ranged weapon and your Dexterity, and may be increased by certain skills and damage enchantments.
  • Armor - Diminishes incoming physical damage. This value is the sum of the armor stats of all your equipped armor parts, as well as armor enchantments.

Aside of the combat stats, there are also the combat resources shown on the Stats screen, as well as Experience, in the bottom right. Since we covered these in the Resources chapter, I will make it short here.
  • Health - Health > 0 is required to actively fight, if it drops to 0 you're knocked down and need to be revived by an active ally. This resource is based on your Stamina, and may be increased by health enchantments.
  • Power - Power is used to perform skills, if it's lower than the power cost of a skill, you can't use it. This resource is based on your Will, and may be increased by power enchantments.

These are all the stats that have a direct influence on combat. As mentioned, however, these are all impacted by "secondary stats" which "stand behind them", figuratively speaking. These are your character's four attributes:
  • Strength - Determines Melee stat and is the requirement attribute for melee weapons.
  • Dexterity - Determines Ranged stat and is the requirement attribute for ranged weapons.
  • Stamina - Determines Health resource and its passive regeneration rate, and is the requirement attribute for armor pieces.
  • Will - Determines Power resource and its passive regeneration rate, and is the requirement attribute for amulets and rings.

Lastly, there is equipment. Each piece of equipment has a set of requirements that all have to be met by a character so he may equip it. The requirements are:
  • Character Class - Only an appropriate character class may equip a certain item. There is nothing you can change about this requirement, if you don't meet it, pass the item on to the eligible party member.
  • Character Level - Every item has a minimum character level requirement to be equippable. Sometimes you may find or buy items your character can't equip yet. You may still keep them and wait until you can.
  • Attribute - You may only equip an item if you meet the minimum value of its determining attribute.

The following list contains the various types of equipment in the game along with their basic item stats and what else should be said about it. Every piece of equipment has a money value and might be enchanted, strongly enchanted, and/or contain slots for Elfstones, which is not mentioned here.
  • Body Armor Pieces (Head, Shoulders, Chest, Hands, Legs, Feet) - The six components of your body armor all have an armor value and durability. The armor value of these parts contribute to your character's armor independent from his stance, so for their part it doesn't matter whether you block or not. Body Armor Pieces are the only equipment items that may belong to a set: If you have multiple parts of the same set equipped, you recieve certain set bonuses that depend on the specific set. You can check these set bonuses by viewing "More Info" to the specific set item. Set items are not unique, you may find several pieces to both the same set and body part, in which case you may discard the weaker versions.
  • Trinkets (Amulets and Rings) - Your character may equip one amulet and two rings. These have neither armor value nor durability, but either strong enchantments or slots. Rarely there are completely useless trinkets.
  • Shields - If your character isn't Andriel and you aren't using a two-handed weapon, you may equip a shield to your off-hand (left hand). Shields can be used to block incoming attacks more effectively, have durability, and a usually strong armor value, whose influence on your character's armor is depending on the current stance: It's strongest while in defensive stance, average in normal stance, and non-existent in ranged stance.
  • Ranged Weapons - These have a ranged damage value and durability. Farin uses crossbows, Eradan uses Bows. Not much more to be said.
  • Melee Weapons - There is a vast variety of different melee weapons in the game, what they all share is a melee damage value and durability. Staffs can only be used by Andriel. The other weapons are either blunt (which confusingly includes axes) or sharp, which makes a difference for some skills which may only be used by one of the two groups, and either one-handed or two-handed. One-handed weapons can be used alongside a shield, or staff for Andriel once she's unlocked a certain passive skill, or another one-handed weapon, dual-wielding, for Eradan once he's unlocked a certain passive skill. Two-handed weapons can only be used by Eradan and Farin, usually inflict a lot more damage compared to one-handed weapons, and have a far longer reach, which is their greatest advantage. On the other hand, they are a bit slower, which makes your character more vulnerable when using them, and they usually have very low durability values.

Opinion on Sets:
I suggest keeping all set parts that you can find, until you've found a better one of the same set for the same bodypart. On top of that, though, always keep the best item for a body part disregarding set afiliation. When you've collected several parts of the same set, compare your character stats when equipping the set pieces to when equipping the best pieces, and decide what's better. If you find magical items with attribute enchantments, keep them in any case until you find a magic item for the same bodypart with an enchantment for the same attribute that is stronger than the previous one; these can be used to equip items with attribute requirements that you don't meet otherwise. The body armor pieces inventory parts usually don't get full this way, unlike the weapons/shields inventory part (which can't be set parts).


That's it for this chapter.
To make sure you understood the relations between stats & equipment, take a look at this scheme:
Skills
The Skills are an important component of character development in WitN and thus don't go without mention, but I won't dive into details here. Each of the three characters has his own unique skill tree. Whenever he levels up, he gains one additional skill point which he may invest into any unlocked non-filled skill. The skill tree of each character is divided into three columns and four tiers. To unlock the skills of a higher tier, you need to invest a minimum number of skill points in the previous tier - within the same column.


Example of a skill tree, here Farin's

There are three types of skills: active skills (abilities), ability enhancements, and passive skills. Active skills always have a bright icon and passive skills always have a dark icon, but the color of ability enhancements is inconsistent.
Abilities become available for the player to use once he has spent at least one skill point into the corresponding active skill. They're bound to a shortcut, either [1], [2] or [3], in a specific stance, and if equipment requirements are met. Their use consumes power. The first tier of all skill trees always contains only one skill, which is an active one. The second one is always a damage attack against a group of enemies, the third one is always a damage attack against a single enemy, and the first one is the class-defining skill. For the second and third skill, all enhancements are within the same column. The first skill has by far the most enhancements, and they are scattered through the entire tree. Higher tiers usually contain more desirable (stronger) skills, but on the other hand the skills within one column are usually a bit similar, challenging the player to balance specialization against versatility.

Active skills have a generally stronger impact than passive skills, which is counterbalanced by their power cost.

At some points in the trees, the player is forced to make a decision between various combat styles to keep skilling efficiently, which is also a game mechanic to balance specialzation against versatility.

The damage of all your abilities except the first one is not a fixed amount only determined by skill level and character level, but rather a multiplier to your melee or ranged damage, so increasing you weapon damage also increases your ability damage.

I think that's all that can be said about skills without going into the class specifics.
Strategies
With regards to strategies, I really prefer to leave it open and encourage people to try different things. It's just important to actually have a strategy, that means, to think about how your party as a whole is going to deal with any kind of threat situation you may face. If you're playing singleplayer, this means you have to think about how you ALONE are going to deal with any kind of threat situation you may face. The game punishes unprepared players. Here are just some common mistakes and things you should consider:
  • You can't fully depend on ranged combat due to the ammunition limit.
  • Increase your attributes roughly equally. This will allow you to use the best available equipment of any type. It also makes you more versatile.
  • Don't assign skill points to two mutually exclusive skills, like a skill that requires a blunt weapon and one that requires a sharp weapon, or one that requires a two-hand weapon and one that requires a shield.
  • Put a slight emphasis on melee combat, it's the most resource-conserving way to deal with enemies.

I think other than that, it's quite intuitive. If you play the game with friends, coordinate specializations with them. If you play the game alone, you have to be a jack-of-all-trades.
Farin - Overview
That's it with the general part of this guide, the following is an in-depth character guide to Farin, the Champion from Erebor.

This is Farin's skill tree:

Class Skill

His class-defining ability is War-cry, which increases his offensive melee and defensive stats for a certain duration. It has many strong enhancements throughout the skill tree, the most notable and desirable being Dwarf-armor to become immune to hit reactions and Indomitable Spirit to instantly revive nearby party members upon activation.
Furthermore, Retaliation and Abundant Harm are great to increase your damage output against groups of enemies, and since Retaliation damage scales with your armor value, this allows you to gain an offense benefit from your defense stats. Bonus damage enchantments fully add to any reflection damage as well (to any way of inflicting damage, in fact).

Melee Combat

Farin's skill tree forces him to make two decisions affecting melee combat:
  • Two-handed weapon vs one-handed weapon + shield.
  • Swords vs Axes, Hammers and Maces
The latter one is mostly a matter of personal taste, while the first one is quite impactful. Two-handed weapons have greater reach and greater damage. They make you a more fierceful duelist but also more vulnerable to crowds of enemies. They also break pretty fast, so you should have a stock of them in your weapon inventory. Shields + one-handed weapons on the other hand make you a more defensive "tank" type class.
This may trick you into believing you should decide between playing Farin as either a defensive tank or an offensive melee damage dealer, while in fact it is better to compensate this weapon decision through your attribute development instead, especially but not exclusively when playing solo. If you decided in favor of two-handed weapons, you need a lot of stamina to compensate your lack of additional armor through shield, and to make sure you can always equip the best body armor available. If you decided in favor of shields, you need quite some Strength to deal satisfying damage with those weaker weapons at all.

Ranged Combat

There are only three skills in the tree regarding ranged combat, which suggests Farin is supposed to be played as a melee fighter. Well, this is totally wrong! Heavy Bolt is pretty useless, yes. But Explosive Bolt is the by far best ranged skill of all characters in the entire game and probably the one with the highest damage as well. Explosive Bolt is really just ridiculously overpowered once you have a potent crossbow to use it with. One-shotting trolls and two-shotting bosses is no problem with this skill.
Crossbow Adept is also an important skill once you reached Heroic difficulty, for the sole purpose of dealing with Goblin Sappers. These can instantly kill you and your allies if you don't shoot them in time, and there is also a mission objective later in the game during the Siege of Nordinbad where you have to prevent them from reaching a certain place for which many of them make a dash; I found Crossbow Adept really helpful in completing this passage on higher than Normal difficulty.


The way to play Farin I want to suggest here, which makes it really easy to complete the game even on Legendary difficulty in singleplayer, is essentially: Kill few and weak enemies in normal melee without the use of abilities, kill strong enemies and anything around them with Explosive Bolt, fight crowds with War-cry. Between fights, make sure to collect enough bolts to keep your bolt stock at 40 if possible. Don't spam useless skills that aren't worth their power cost just because your useful skills are on cooldown: just block/dodge and wait. That's it, pretty much as simple as that.
Farin - Skills Synopsis Pt.1
Finally, here is a synopsis of all of Farin's skills and what I think about each of them.

War-cry is a must-have since there are so many useful enhancements to it.


Sweeping Attack is a melee ability to handle crowds while you're surrounded. Comes in handy in these types of situations.


Crushing Blow is a strong single-target melee attack. Since we will be using Explosive Bolt against strong enemies later, don't bother enhancing it too much. Even the first point is little more than an unlocking of the right column.


Dwarf-armor is a really useful enhancement to get since it makes you immune to hit reactions. This means you can revive your allies while you're being attacked without getting interrupted, and your critical streaks won't be interrupted as often either.


Shield Bash is a mediocre skill to get. Of course, there is only sense in getting it if you decided to use shields. Its main application is stunning annoying dual-wielding enemies or other strong fighters, but the normal defensive push usually suffices for this and doesn't cost power. The Shield Bash just applies a longer-lasting stun instead of a short-lasting hit reaction.

Mighty Reach is a really useful enhancement to your Sweeping Attack to deal with larger crowds of enemies, especially if you're using one-handed weapons which have a short reach on their own. Since it's generally harder to deal with groups of weaker enemies than to deal with single strong enemies without the use of skills, you should use (melee) skills to deal with the groups, i.e. enhance Sweeping Attack rather than Crushing Blow, and this one is an attractive way to do so.

Fortitude makes war-cry a weak healing ability on top of its other effects. I always get this because it saves your health potions and makes you a bit less dependent on Andriel's Sanctuary.

Heavy Weapons is a must-have if you decide to fight with two-handed weapons, and a no-go if not. Simple as that.


Battle Fury is certainly the better option in the second tier of the right column, and already useful on its own. Dealing more damage per strike allows you to take out the same enemies within a shorter time and less durability loss, and usually less health loss as well. It also buffs your allies' melee damage. Get it.

If you decided to make Crushing Blow your primary melee skill for some reason, you should definitely get the Impact enhancement, but in any other case - and that means all cases for me - skip it.

Taunt is another extremely useful War-cry enhancement. If you get this in a coop party, it allows your partners to partially neglect their defense in favor of offense or utility, while you become the "tank" of the party. It's also useful in singleplayer since your allies will die often if you don't take the pressure off them with this skill. It increases the damage enemies take and damages enemies upon acivation, too.

There is absolutely no point in getting Determination early on, since it doesn't boost your damage or defense in any way, it only increases your power hungriness. Once you've gotten Explosive Bolt, however, it's completely legit to get it, though there may still be better alternatives.

I've put these together because they're essentially the same thing. I hate them because the decision for one of them will limit your weapon arsenal, but in order to unlock the fourth tier of the middle column, where Explosive Bolt is placed, you need to spend at least one point in one of the two. Which one you take makes pretty much no difference at all, it's up to your personal preference.

Endurance is great because it provides free healing, you don't have to activate War-cry to gain its effect. While the healing may not look much, it definitely saves you some health potions over a longer period of fighting.

Crossbow Adept's sole valuable purpose is to effectively deal with Goblin Sappers. Don't use it to spam a "magazine" of weak normal shots into a random enemy you could take out otherwise, that's a waste of ammunition. But especially on Heroic and Legendary difficulty, and especially in singleplayer, you really need to get this to handle Sappers, since they are able to instantly down anyone on these difficulties and most of all, it's extremely difficult to succeed in a later mission, the Siege of Nordinbad, when hordes of Sappers make a straight run for the gate and only five of them getting through are enough to destroy it.

Heavy Bolt is a joke compared to Explosive Bolt. It's only good to take out a single archer that's annoying you with his arrows and is located somewhere you can't reach him in melee, but you will need to score a precise headshot for its damage to be enough to kill him with this one shot.

I personally like Retalation on shieldbearing Farin builds, since it's a strong additional damage source. It's especially useful against enemies with strong offensive but weak defensive capabilities, and against groups. You may just block or strike and enjoy the fact that your enemies are hurting themselves more than you when they're attacking you. The damage scales with your armor value, that's why it synergizes well with shields, and it grants your defensive stats an offensive use.
Farin - Skills Synopsis Pt. 2
Annoying chapter size limit in Steam Guides.

Shield Charge is a pretty cool active ability to break out of situations when you're surrounded while dealing significant damage and applying the strongest possible hit reaction to a specific high-priority enemy. When your character gets too strong for the enemies to deal with him and you got Explosive Bolt + Determination, you won't need it anymore, but by the time you get it, it's nice to have, and can really help in dangerous situations.

Abundant Harm is similar to Retaliation in the way that it adds another way of dealing damage to multiple enemies while War-cry is in effect. Retaliation is the better option for more defensive builds that have a high armor value but are a bit weak on melee damage, while Abundant Harm is certainly better and really useful for two-handed weapon fighters, since groups of enemies are their natural weakness. Not really effective for shieldbearers, and especially having both enhancements is pretty unnecessary.

Indomitable Spirit is absolutely essential to get as early as possible, instantly reviving allies by just activating war-cry near them is extremely useful. While you may already revive your allies with War-cry + Dwarf-armor during fights, there may still be situations where you don't have enough health to endure the heavy beating you will be exposed to while doing so. Thus, once you have this skill, your party will rarely die and be forced to replay a section of the game at all.

Explosive Bolt was mentioned often enough already; it's the game ender pretty much. When you have it maxed out, especially on the later playhtroughs (Heroic and Legendary), this makes any boss fight plain easy. It's also good against literally anything else. To stress how insanely overpowered this skill is is probably the main purpose of this entire guide. Note that the damage is not fixed, but scales with your ranged damage, so equipping always the best available crossbow is advisable. You don't need to pump many skill points to Dexterity though, just enough to fulfull the crossbows' requirements. If you use Explosive Bolt against groups, try to position yourself in a way that allows you to place it in the geometric middle of the target group, to make sure all targets are affected, rather than shooting it directly into the first enemy of the group which is at its edge, that would be uneffective. No more micro required.

This enhancement to Crushing Blow grants the ability some crowd combat capabilities, but not too much. To use if effectively, roll through the strongest enemy of the group you are fighting, turn around and cast it on him, so he is the primary target and the wave propagates to the other enemies of the group. Not as useful as other fourth-tier skills, I only suggest it if you decided to make Crushing Blow your primary melee skill.

Battle-ready is nice because it conserves your power potions. While it's not worth activating War-cry before using another active skill just to benefit from this effect, the main application of this spell is probably spamming Sweeping Attack while your War-cry is active while fighting dangerous groups of enemies.

Those were all of Farin's skills, we're done!
Conclusion
Alirght, that's it. I hope I made my points pretty clear. Any kind of feedback is highly appreciated, make sure to leave a comment if you are still having trouble with the game in any way, or if you found anything in this guide confusing or difficult to understand.

I'm done here, have a nice day! :)
Komentarzy: 9
MarioVX  [autor] 28 maja 2019 o 11:24 
I provided extensive info about all the skills so you can decide for yourself how to skill him, not a fan of telling people to "just do XYZ". But if you don't want to think about your character development in an RPG, you can actually see my final skill allocation on the right hand side of the skill synopsis, it shows which skills I took and which I did not.

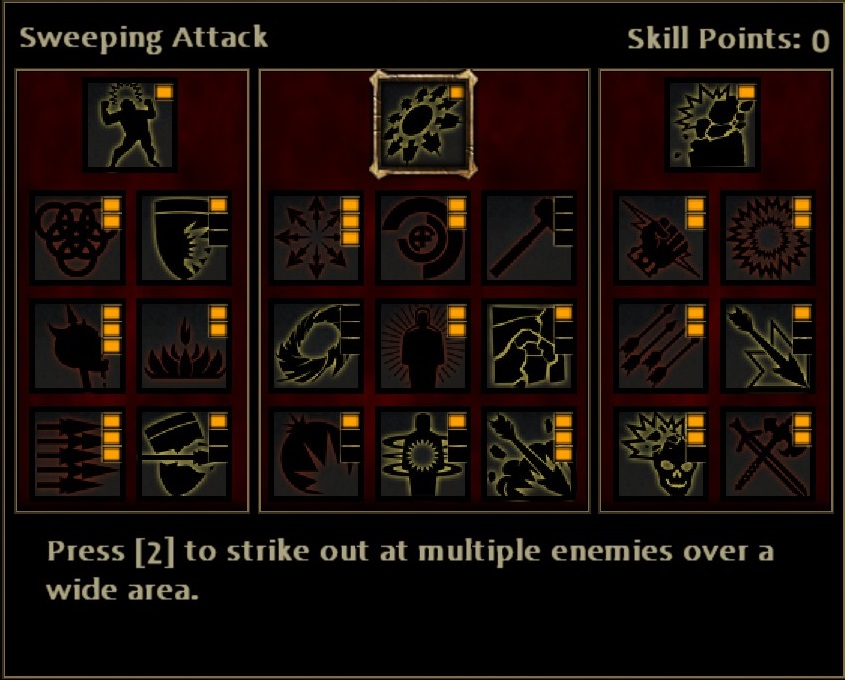
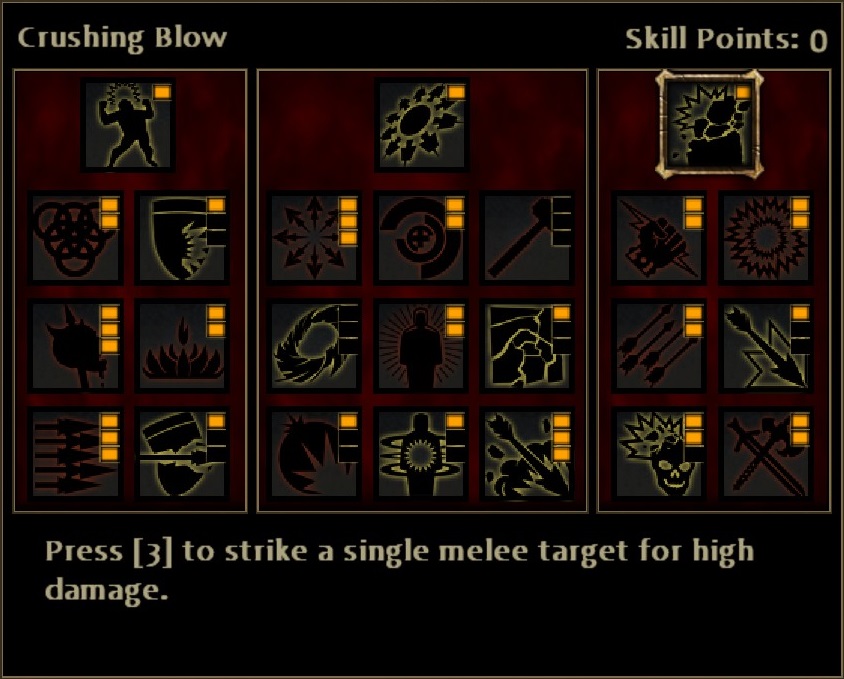
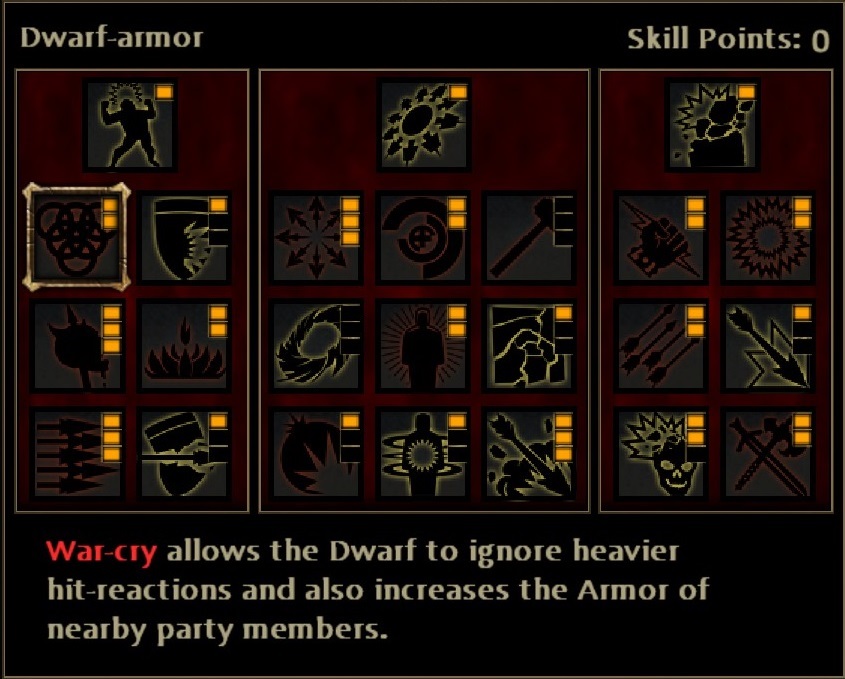
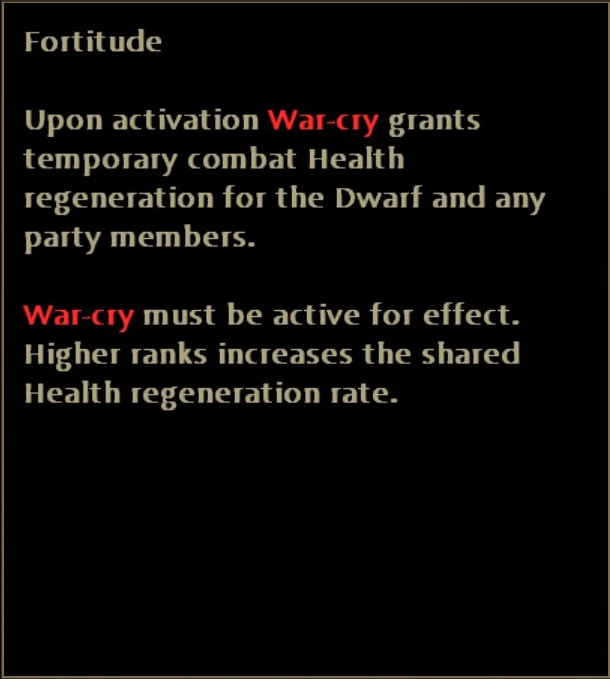
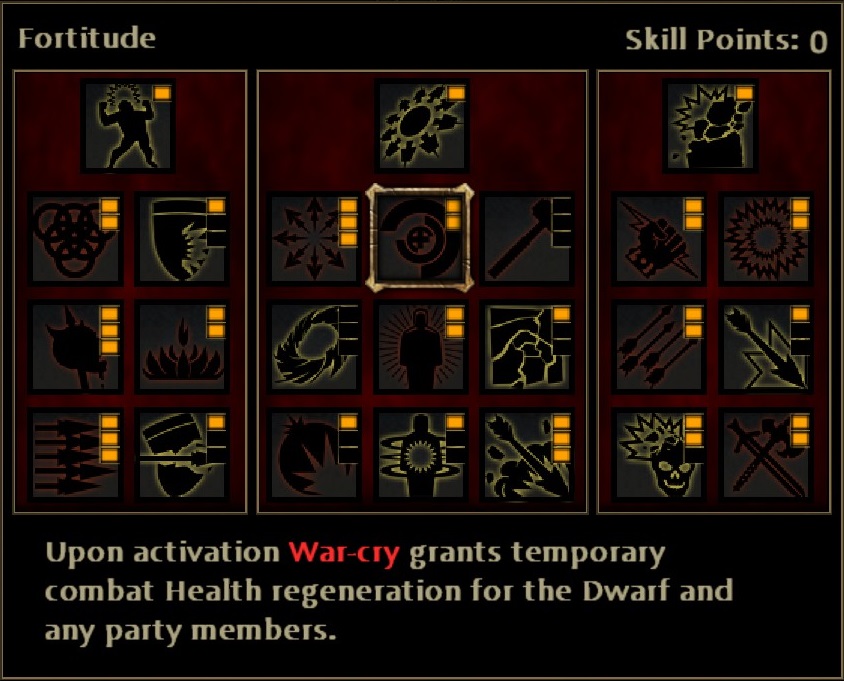
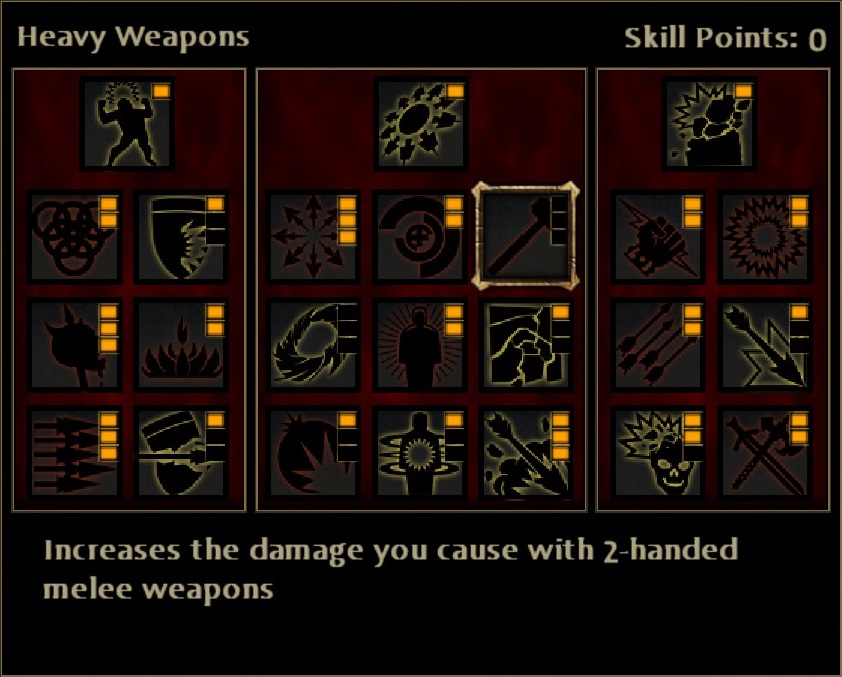
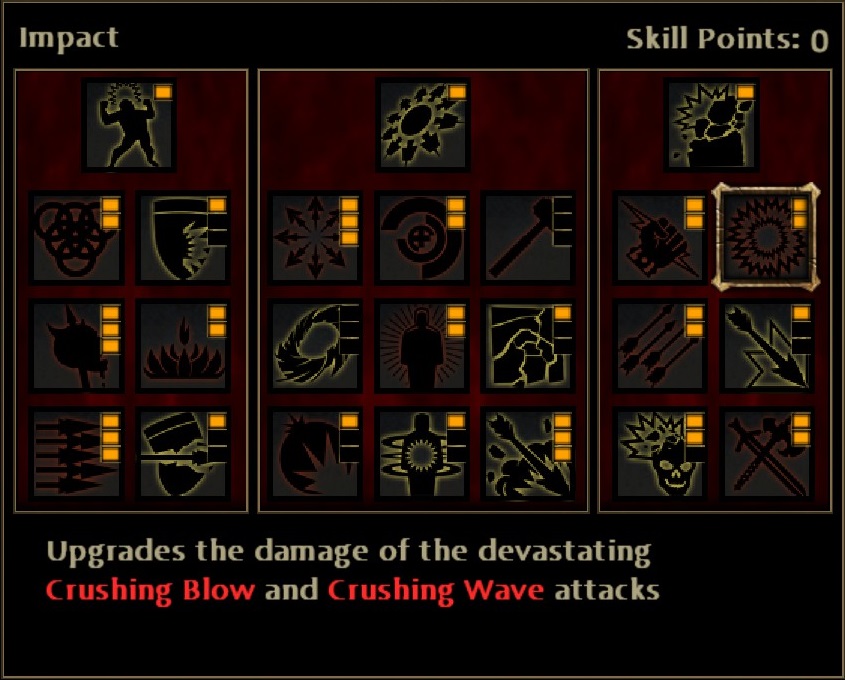
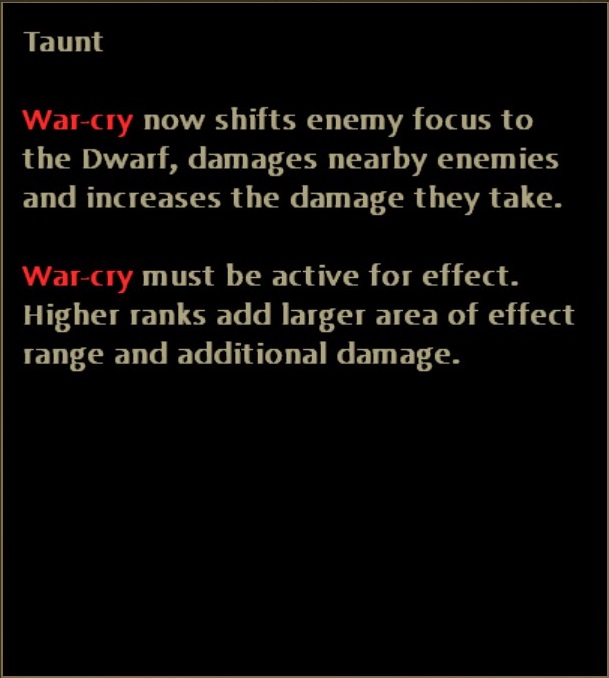
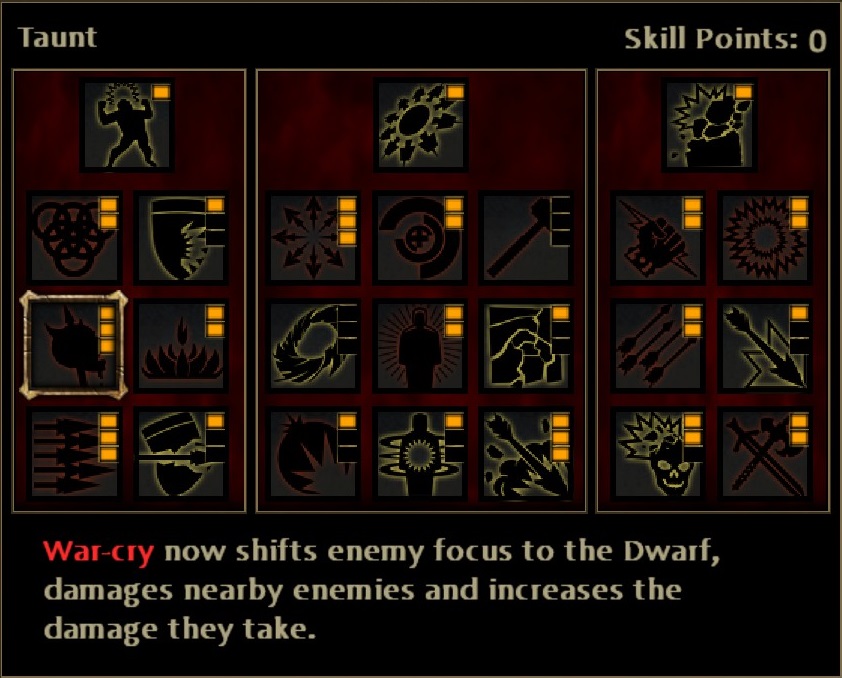
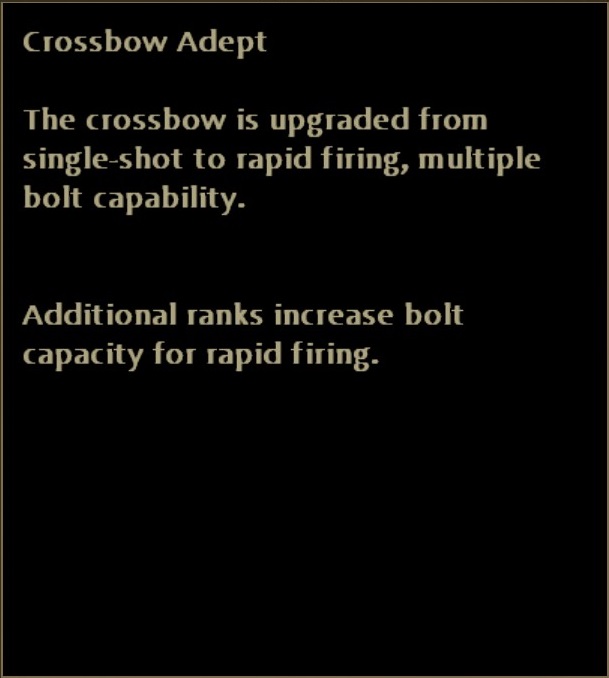
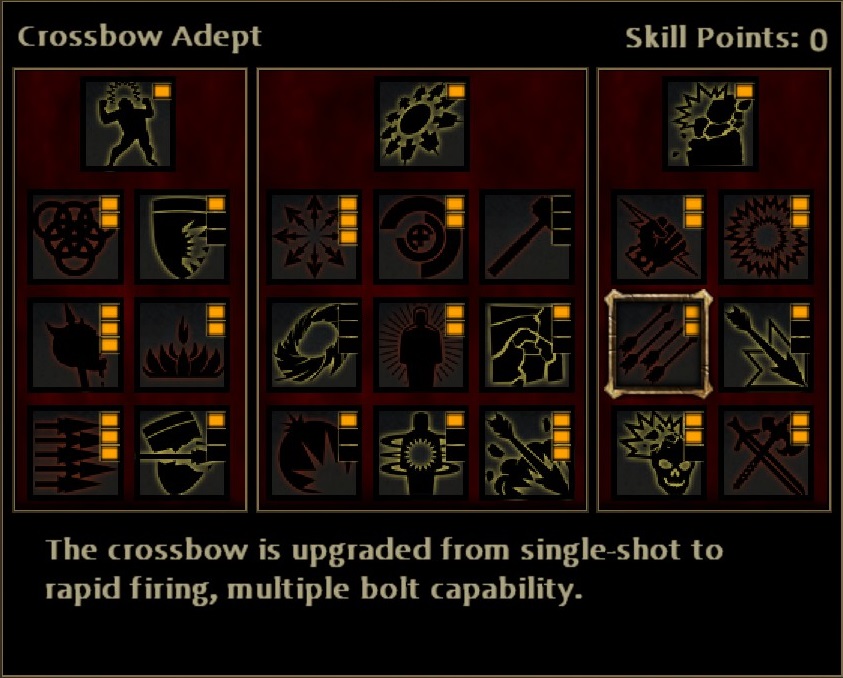
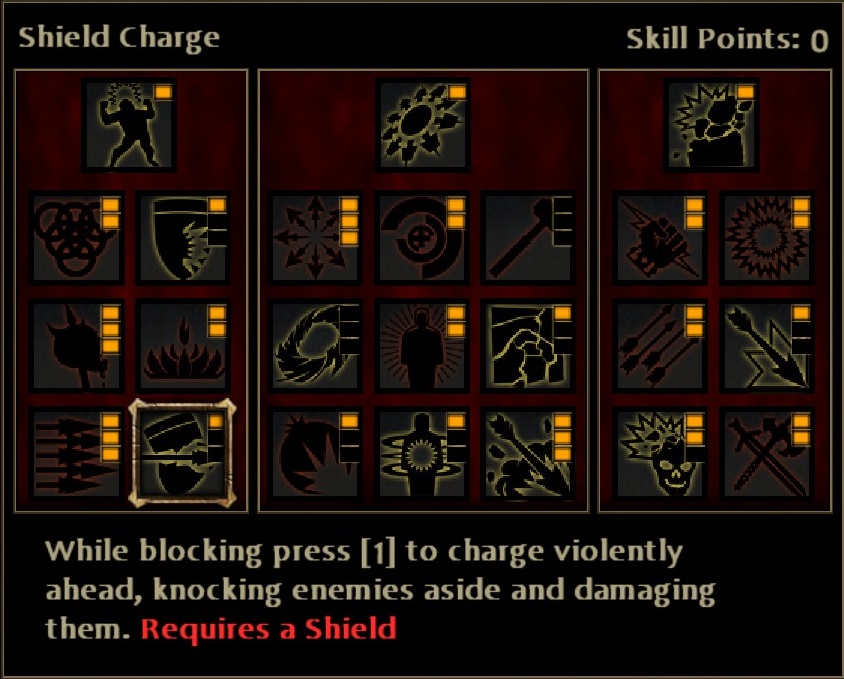
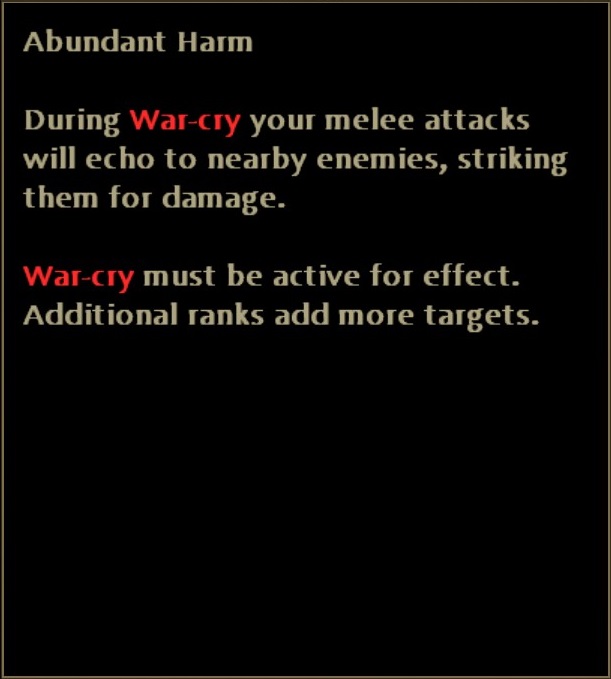
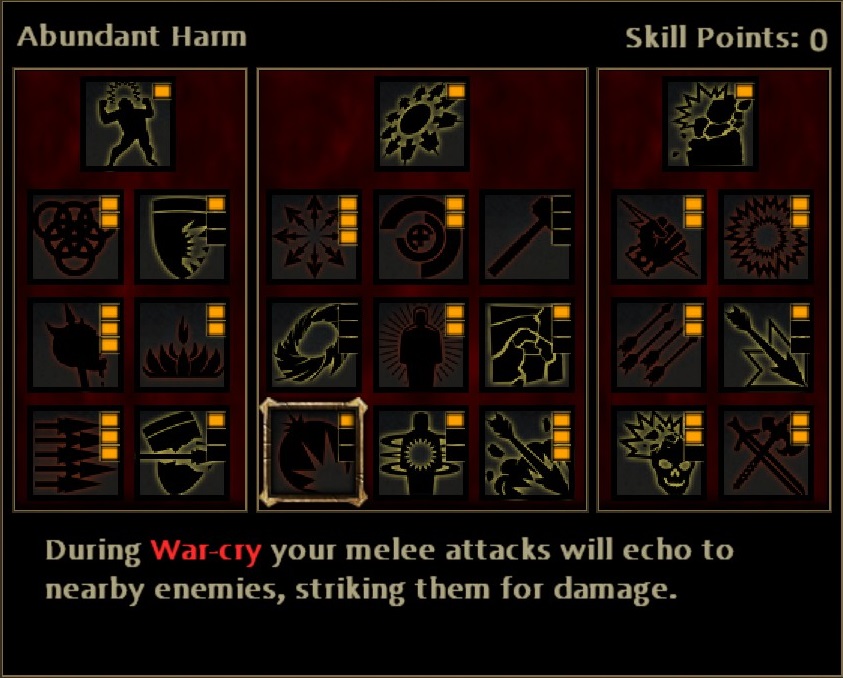
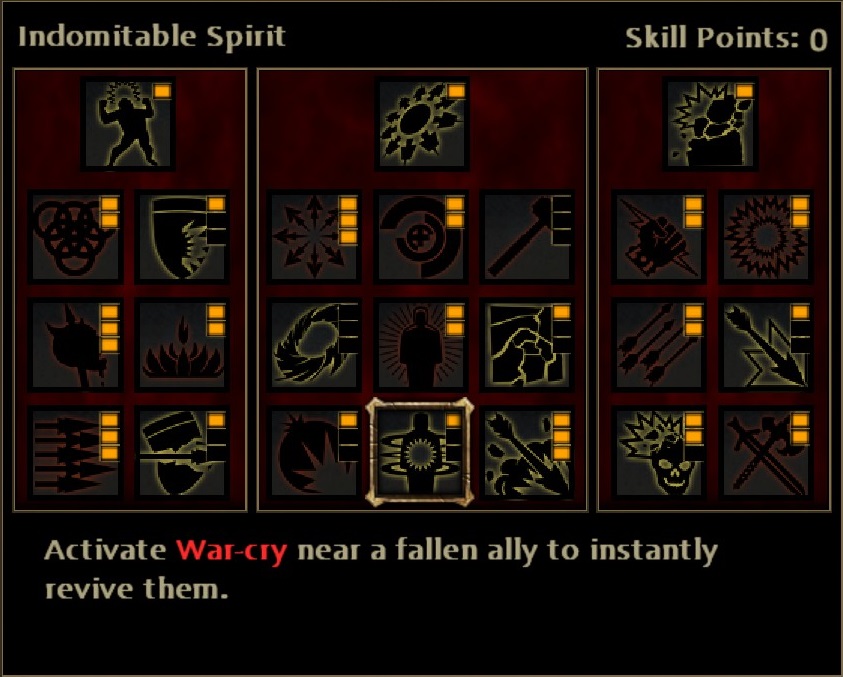
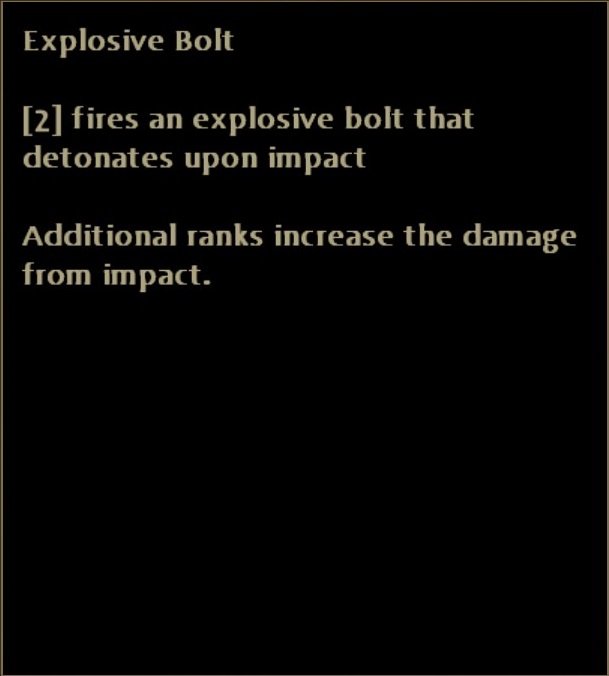
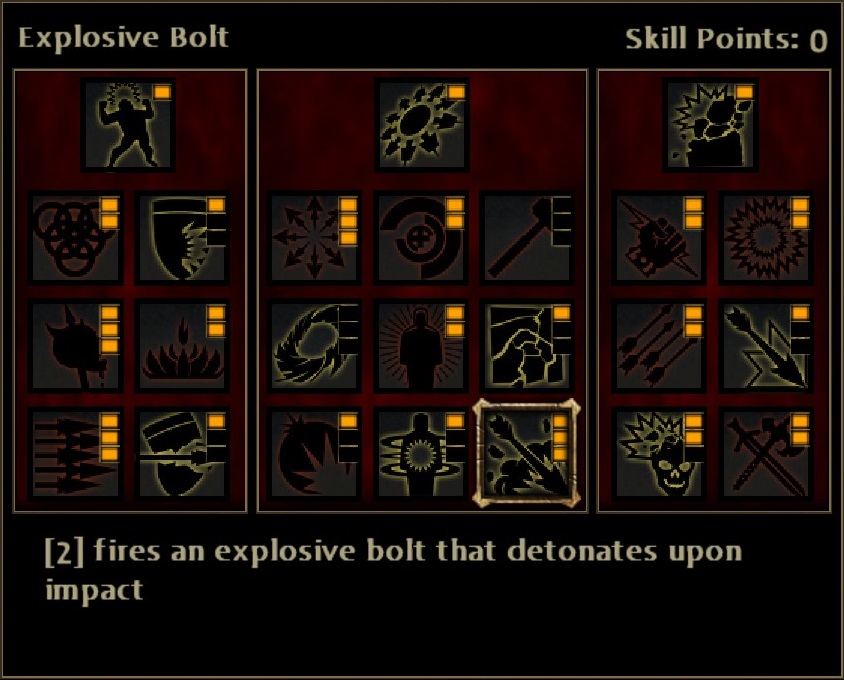
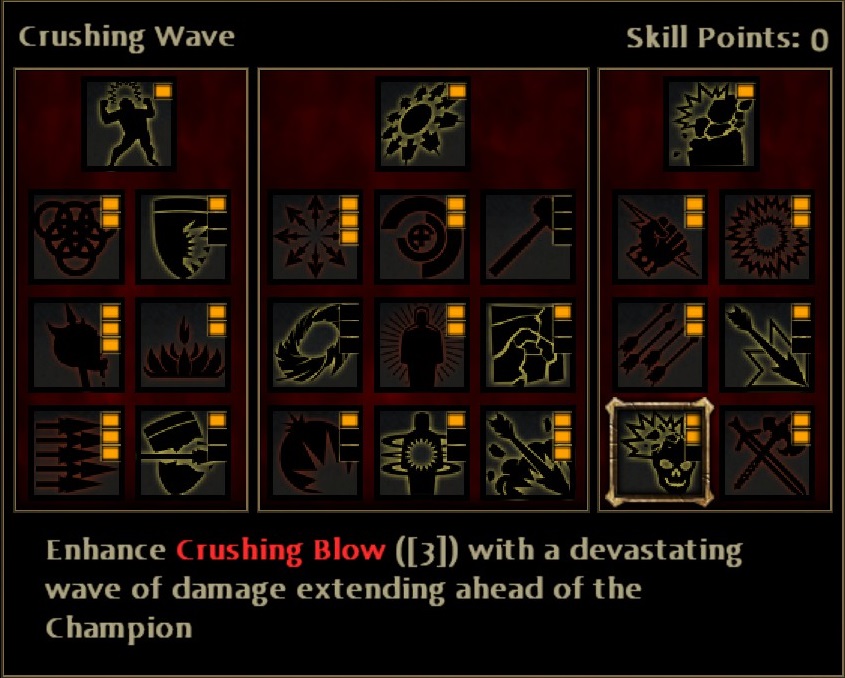
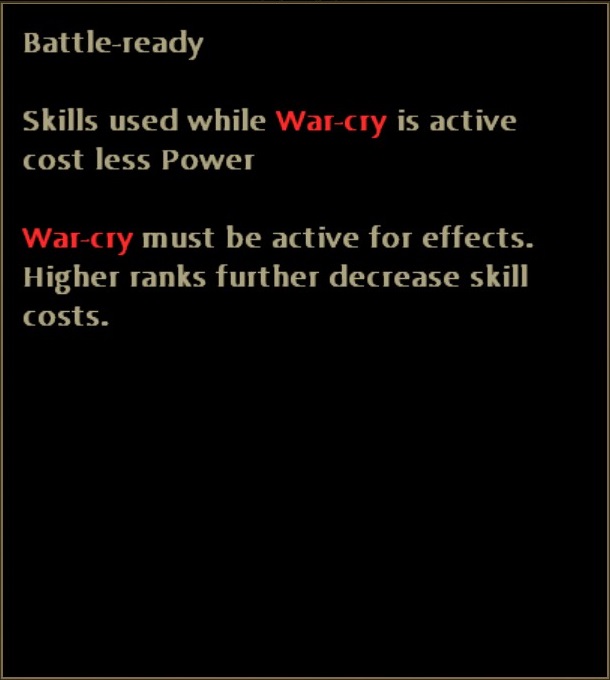
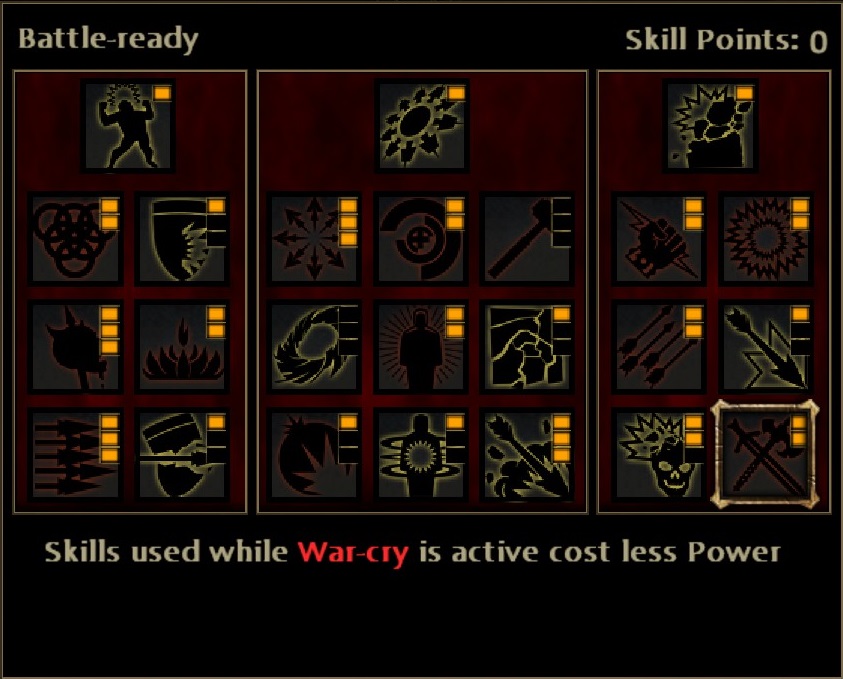
For the order, figure it out for yourself, I haven't played this game in a too long time to remember. But basically: pick up some useful War-cry enhancements (especially the stagger/hit reaction reduction, idk how it's called), then rush straight for the Explosive Bolt thing, its absurd damage made the game really easy going forward even on the highest difficulty.
proximityAlert 26 maja 2019 o 12:28 
Hey if you are still around would you mind giving some more advice on how you allocated your points for Farin and what they looked like by endgame?
Dog ch1ld 5 września 2017 o 23:46 
Nice and clear! Would like other characters guides to!
shrinp 9 lipca 2017 o 9:01 
Great guide, good job.
wolf.jaa 12 maja 2017 o 10:02 
Wow, Very cool. Very useful. Very detailed. very in depth guide about the game and Farin. this is my fourth play through and I leanred a lot of great info here.
Wanted to say thanks for your hard work in putting this guide together. Spasibo
MarioVX  [autor] 7 stycznia 2015 o 15:44 
Thank you guys for the feedback, I'm glad you enjoyed my guide!

@Kimosabe The first half of this guide is general and applies to all characters, so that alone may be helping. Regarding In-Depth guides to the other two characters, I feel like I'm lacking sufficient expertise on them since I haven't played them a lot, and I don't think I can motivate myself to play several more playthroughs of this game since I completed it really often already.
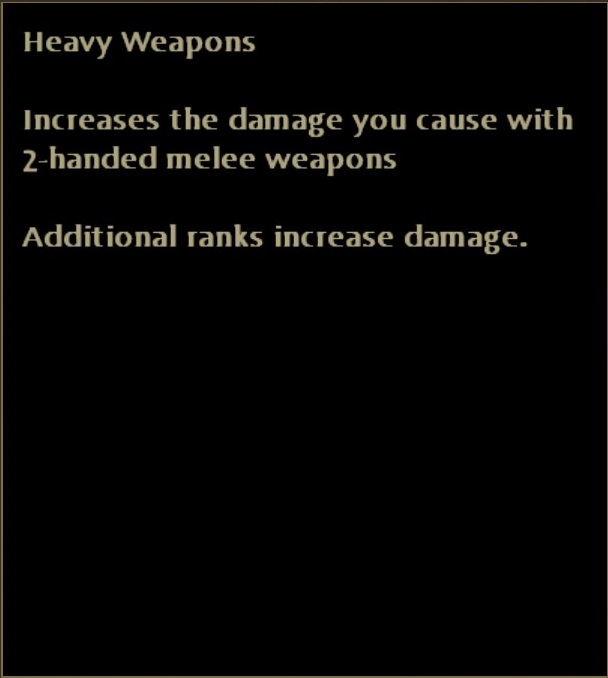
All I can tell you is from playing about half the first playthrough with Eradan, that it sucks to build him as an specialized archer. He's more viable in melee, since ranged damage can't be scaled so well and can never be your "bread and butter", due to ammunition restrictions.
No idea about Andriel.
Kimosabe 7 stycznia 2015 o 12:12 
Thank you! Great guide! It would be very interesting to see guides from you for the other 2 characters
Nazaniel 25 września 2014 o 5:32 
Great Mario, great guide, detailed, interesting and deep. I really enjoyed it, and learned a lot from it. A lot of thanks!
Zathraas 17 lipca 2014 o 19:19 
Nice guide.