Door Kickers

Door Kickers

25 ratings
The Stats-Corrected Firearms Guide
By KwirkyJ
This guide goes past the firearms' base stats and examines their performance numbers as the game sees them, with stats modified by attack types (behavior at various ranges) and player abilities (further modifying attack type and firearm stats), and provides analysis and recommendations based on time- and probability-to-kill computed from these "real" stats.

All firearm data and python scripts to generate them are included in the attached zip file -- explore the .csv results in your favorite spreadsheet program!
2
   
Award
Favorite
Favorited
Unfavorite
Reference Material
First is credit to Marbur for their illuminating guide, without which this guide would not exist. Reading it in advance is recommended, as it presents much of the information that went into this data-dive and analysis.

https://steamcommunity.com/sharedfiles/filedetails/?id=745159653

This guide, such as it is, takes a programmatic approach to formulating and analyse the firearm data as a whole, synthesizing base stats with attack types, abilities, and situational details such as range to target and target being armored or shielded or behind cover.

As most reader will not use the tools themselves (I've included all my work in a .zip file linked at the end), an attempt to summarize the process and results is the reason for this guide's existence.
The Firearm Base Stats are Misleading
Each weapon in-game has a definition, outlining its behavioral characteristics -- unlock cost, muzzle drop distance, damage per bullet, refire and reload time, &c. What is far less apparent from these numbers, however, is that those characteristics are modified -- in some cases, quite extensively -- depending on the relevant attack type when engaging a target, and which attack type applies depends on range to target. Attack types are why those full-auto weapons act like semi-auto outside a certain range, why bursts of fire shoot as many bullets as they do (and why not always the same number of bullets at a given range), and why Mozambique at longer range doesn't take the same amount of time as closer.

Let's look at the P90 PDW. On paper, it looks as though it will shoot one bullet every 66.7 milliseconds (1 second / 15 shots), with a bullet spread of 0.15m at ten meters. Why, then, does it not shoot at point-blank range? Why does it shoot more slowly at mid-range, and later to one or two shot bursts? Attack Types, that's why.

With all abilities unlocked, its characteristics look like this:
AttackTypeName
effectiveRangeMeters
shotsPerBurst
folllowupShotTime
spreat10mPerShot
SWAT_MP7FullAuto
3 .. 7
1 .. 50
66.7
0.250, 0.259, 0.268, 0.278, 0.288, 0.300, 0.312, 0.326, 0.341, 0.357, 0.375, 0.395, 0.417, 0.441, 0.469, 0.500, 0.536, 0.577, 0.625, 0.682, 0.750, 0.833, 0.937, 1.071, 1.250, 1.500, 1.875, 2.500, 3.000, 3.000, ...
SWAT_MP7RapidFire
7 .. 15
2 .. 50
150
0.333, 0.231, 0.176, 0.150, 0.150, ...
SWAT_MP7AimedFire
15 .. 30
1 .. 2
150
0.150, 0.150
SWAT_MP7AimedFireLong
30 .. 60
1
N/A
0.150
SWAT_MP7AimedFireLongXX
60 .. 9999
1
N/A
0.167

In addition to these traits as seen in the weapon stats, the time to shoot also depends on the attack type and range, using the attack type-defined values for aimTime and resetTime. AimTime is the delay between acquiring a target and the initial shot in the burst (bursts include one-shot "bursts"). ResetTime is the time after a burst before restarting the process. ResetTime is constant for a given attack type, but aimTime varies with distance, usually increasing. (AimTime is not always continuous between adjacent attack types. (e.g., the P90 has ~450ms aimTime for FullAuto fire just under 7 meters, yet ~200ms for RapidFire just over 7 meters.)

Consolidating this information manually for all the firearms, with different possible adjustments from abilities in the doctrine tree, in order to do an effective comparison to find what works "best" (or, put another way, sorting the S- and A-tier options from the rest) is daunting, to say the least. Enter the automating programs: python scripts. After some trial-and-error, command-line utilities were created which can programmatically generate usable, sortable, human-readable data.
Calculating for Lethal Dose
The primary deciding factor for determining a firearm's effectiveness should be its ability to kill targets quickly. Other factors certainly contribute to the calculus (silencing, magazine size, purchase cost, reload speed, muzzle drop distance, move- and turn-speed modifiers), but all things being equal it is time-to-kill that takes priority. How, then, to determine this, when bullets may miss, bullets may hit armor or cover, and so on? The choice made for this analysis comes from "LD50", or "Lethal Dose 50%" – a term used more commonly when determining how much of a substance will kill 50% of the subjects; here, it applies to time – time from acquiring a target to firing enough bullets to kill.

50% is a good baseline – it shows by what time at least half of enemies will be killed. (Assuming one plays for a time, things average out so this kind of analysis makes sense). However, because the probability to kill is not linear with time, it is also important to consider a near-100% time-to-kill probability, or LD95, to find a reasonable upper bound for how long to kill "all" enemies encountered.

Because, as we saw above, aimTime is a function of distance, comparison of the time-to-kill probabilities are only meaningful at a single range. As such, time-to-kill must be calculated at multiple ranges independently.

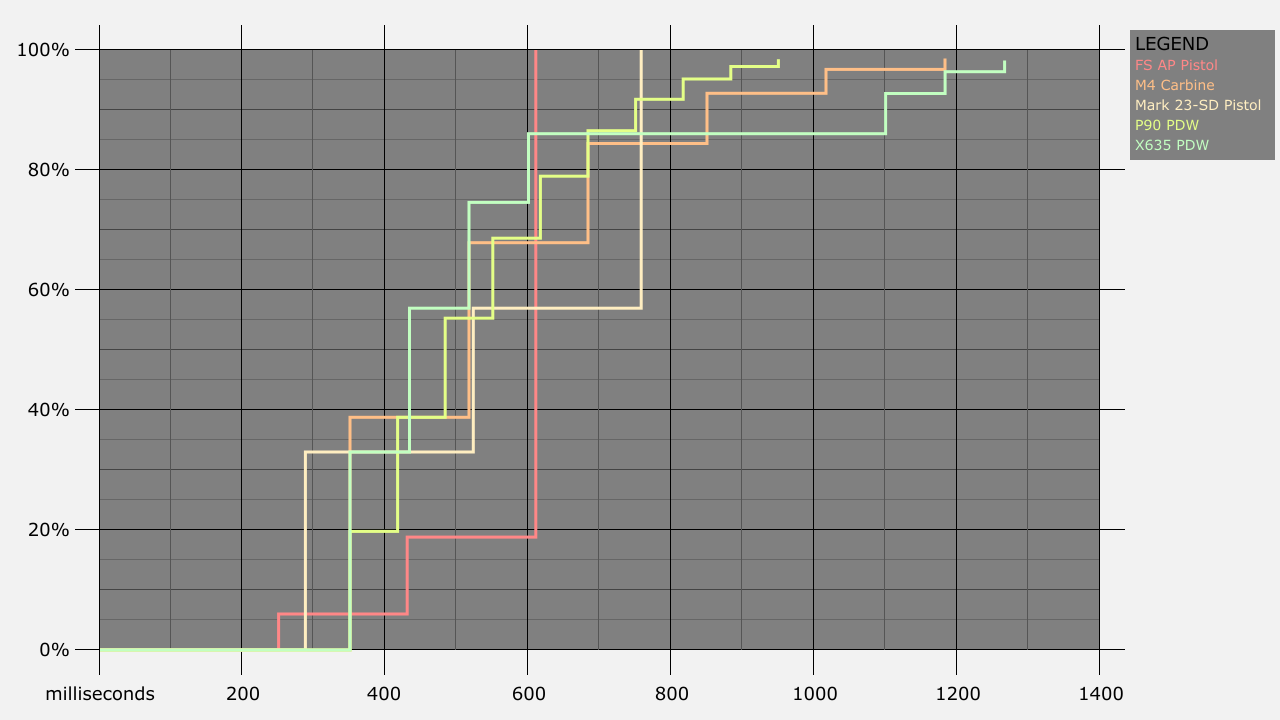
Here is a chart showing one example for a few choice firearms with all abilities unlocked, at 5 meters range, firing at a target facing the shooter with Raider Armor (armor level 5, 40% coverage):
Notice especially the FS AP Pistol having very low probability to kill until the Mozambique headshot hits; contrast with Mark 23-SD which shoots more slowly but has higher initial probability to kill with its higher base damage (remember, the FS AP Pistol only punches through IIIA armor, which is level 4).
Pistols, the Under-Rated Close-Range Domineers
Pistols are your first choice for close range combat.

The Mozambique doctrine must be every players' top priority. The majority of engagements will take place in fairly close range, and the third-shot headshot when engaging between 1.5 and 8 meters puts most pistols on near-equal or better footing, in terms of average time-to-kill, with almost any primary weapon. Pistols are also, as the game states, the fastest to return to ready after encountering an obstacle such as a wall or a door, reducing time between seeing a target and taking the first shot.

That said, the realm of pistols is the most complex, and below is a breakdown of various pros and cons of the front-runners. With the overlapping domains of range-to-target, target armored or not, and magazine size, there is no single obvious choice.

  • 1911 Pistol
    • Inexpensive to acquire and high base damage and refire rate.
    • Shortest muzzle drop distance makes it more handy at very close distances.
    • Small magazine can be a problem when engaging multiple enemies.
    • This should probably be your first purchase.
  • FS AP Pistol
    • Armor-piercing, large magazine.
    • Fastest Mozambique completion 4-8 meters.
    • Fastest refire rate (shortest delay between shots in burst and between bursts) 4-8 meters.
    • Low stopping power means having to wait for Mozambique headshot to kill most targets, resulting in less favorable average time-to-kill (LD50).
  • SP01 Shadow Pistol
    • Fastest Mozambique completion time 1.5-4m.
    • Fastest refire rate (shortest delay between shots in burst and between bursts) 1.5-4 meters.
    • Lesser stopping power results in slightly slower average time-to-kill (LD50).
  • Mark 23-SD
    • Silenced draws fewer enemies to the area at once.
    • Remains effective up to 15m.
    • Same high damage as 1911 Pistol.
    • Slowest Mozambique completion time of other front-runner pistols.
  • Tazer
    • Not actually a pistol, not actually a lethal firearm. However...
    • Very high accuracy with limited usable range means it will (almost?) never miss, and a hit is guaranteed to incapacitate the target.
    • Against unarmored opponents, other front-runner pistols will drop targets 200-600ms sooner on average (LD50) depending on range, but
    • Against armored opponents, Tazer is on average (time to LD50) comparable to slightly worse than the other pistols, but, as its time to LD50 and LD95(100) are identical, will stop all armored targets more quickly than any pistol (by about 400ms or more).
    • Two-second reload time and limited incapacitation of the target makes its use complicated.

Below is a table sample of the minimum computed time-to-probable-kill for sequential targets for the highlighted weapons at various ranges.

Note that, when engaging armored enemies in the Mozambique range, all LDxx before the headshot is well below 50% and the greatest LDxx variance is approximately 20%. The 1 meter range is given against soft targets. (Always avoid point-blank engagements with armored enemies!)

8 to (up to) 15 meters can remain reasonable for engaging unarmored targets with high-damage pistols – HK45s, Mark 23s, 1911, and Magnum 44 – but is not advised. As such, those distances (e.g., 9 or 10 meters) are not represented.

1 meter (Emergency firing)
Firearm
LD50(1) ms
LD95(1) ms
LD50(2) ms
LD95(2) ms
LD50(3) ms
LD95(3) ms
1911 Pistol
T+200
T+533
T+600,933
T+933,1267
T+1000,1333,1667
T+1333,1667,2000
FS AP Pistol
T+533
T+1033
T+1167,1667
T+1667,2167
T+1800,2300,2800
T+2300,2800,3300
Mark 23 Pistol
T+200
T+600
T+570,970
T+970,1370
T+940,1340,1740
T+1340,1740,2140
SP01 Shadow Pistol
T+343
T+771
T+836,1264
T+1264,1693
T+1329,1757,2186
T+1757,2186,2714

3 meters (Mozambique)
Firearm
LD50(1) ms
LD99(1) ms
LD50(2) ms
LD99(2) ms
LD50(3) ms
LD99(3) ms
1911 Pistol
T+200
T+533
T+1033
T+1367
T+1867
T+2200
FS AP Pistol
T+533
T+533
T+1267
T+1267
T+2000
T+2000
Mark 23 Pistol
T+230
T+630
T+1130
T+1530
T+2130
T+2430
SP01 Shadow Pistol
T+343
T+486
T+1079
T+1222
T+1815
T+1958

5 meters (Mozambique-Long)
Firearm
LD50(1) ms
LD99(1) ms
LD50(2) ms
LD99(2) ms
LD50(3) ms
LD99(3) ms
1911 Pistol
T+250
T+750
T+1300
T+1800
T+2350
T+2850
FS AP Pistol
T+610
T+610
T+1420
T+1420
T+2230
T+2230
Mark 23 Pistol
T+288
T+758
T+1325
T+1795
T+2363
T+2833
SP01 Shadow Pistol
T+470
T+690
T+1410
T+1630
T+2350
T+2570
An Argument for Shotguns
Even with pistols being so strong at close-range, there remain niches for the not-so-humble shotgun.

Shotguns can open locked doors very quickly and efficiently. Shotguns can one-hit-kill unarmored enemies, and the good ones can dispatch most armored foes with a quick follow-up shot.

With this in mind, it is fairly clear that the criteria for a shotgun should be its speed of acquiring a target (and reset after a "burst"), maneuverability (muzzle drop distance and turn speed), and refire rate (followup shot time during a "burst"). The relatively horrible spread on all shotguns implies that they are to be employed at short range only, and experience and data support this.

Selecting by refire rate, the contenders are halved from the catalog to Joint Combat, S12K Tactical, and the Six 12 variants. Muzzle drop distance favors the Six 12s (0.2 v 0.4m), and the Joint Combat Shotgun cannot engage at point-blank (<1.5m) at all. The targeting and reset time of the Six 12s and S12K are the same through their effective range (to about 7 meters).

Thus, it becomes a value call:
  • S12K Tactical Shotgun
    • Less maneuverable.
    • Higher rate of fire.
    • Faster reload.
  • Six 12 Shotgun
    • Inverse of the above.
    • Probably swap to pistol instead of reload.
  • Six 12-SD Shotgun
    • Lose one pellet (bullet) and gain silencing over the Six 12.
Recommendations
Here I provide my own recommendations based on the analysis of available data and my own playthrough. I have found that this list has allowed me to purchase what I needed roughly when I needed it, and perform well.

Shopping List
Purchase in order:
  1. 1911 Pistol
    • Inexpensive.
    • Hits hard.
    • Essential first purchase.
    • Remains useful at close-range throughout your career.
  2. Assaulter Vest
    • Stay alive more.
    • Could substitute Front Plate or Raider Vest, depending on playstyle.
  3. M4 Carbine
    • General-purpose rifle.
    • Excellent at all ranges (except below three meters, where it cannot engage).
    • Amazingly inexpensive.
    • Use face-direction waypoints judiciously to keep the muzzle raised and ready to engage.
  4. Lockpick
    • Open most things, and quietly.
  5. Six 12-SD Shotgun
    • My shotgun of choice – I value not alerting all the baddies at once, if I can help it.
    • Opens unlocked doors quickly and somewhat quietly.
    • Can engage opponents at point blank through ~7m.
  6. Mark 23-SD Pistol
    • Upgrade from the 1911 Pistol to a larger magazine and silencing.
    • Higher accuracy keeps the pistol useful through 15 meters.
  7. Honey Badger
    • Very quiet, powerful rifle for stealthy operations.
  8. Ironman Shield
    • Sometimes you just gotta get behind some self-made cover.

Wishlist
Curios, or things that might fill an unoccupied niche:
  • Extended Protection
    • Increased coverage is occasionally useful – often more of a safeguard against poor planning, or when facing groups of enemies cannot be avoided and getting behind a shield is not practical.
  • Raider or Assaulter Vest (that which was not initially purchased)
    • Trade protection for speed as appropriate.
  • Bolt Cutter
    • Ready to cut through bothersome gates.
  • Tazer
    • The non-lethal option.
    • Can be extremely useful against armored enemies!
  • HK416D10-SD Carbine
    • A not-very-quiet rifle upgrade for stealthy long-range engagements; the crossover point happens around 15 meters (Honey Badger more effective below that range, HK above).
    • Out-performed by non-silenced rifles (e.g., M4 Carbine), but occasionally the minor sound dampening is preferable (13-meter sound radius vs. 20 (or 30) meters for other rifles).
  • FS AP Pistol
    • At Mozambique range, overall most effective option against armored enemies, especially against small groups, even more effective than rifles; marginally inferior to SP01 at 1.5-4 meters, significantly superior at 4-8 meters.
    • Avoid point-blank range with extreme prejudice – no headshot, low damage.
    • More risky than other pistols against single enemies, especially unarmored enemies. Low damage results worse average time-to-kill, giving enemy more time on average to respond and shoot back.
  • Magnum 44 (One Hand)
    • Improve the shield unit's offensive punch.
  • Bren A1 Assault Rifle
    • Increased accuracy offsets slower time on target and between shots, resulting in faster average time-to-kill at very long-range.
  • S12K Tactical Shotgun
    • When being quiet is a non-issue, this is the One Revealed Shotgun – faster refire time, and, at the distance it is being employed (<10m), the worse spread means very little (but be careful around hostages or VIPs, nonetheless).

Honorable Mentions
Equipment that I find not useful or redundant, but see recommended elsewhere or otherwise important to address:
  • P90 PDW
    • The reduced damage and lower accuracy make the P90 less effective than the M4 Carbine (and its kind) at all ranges.
    • The lower muzzle drop distance is to its credit, but maneuvering in tight spaces should usually see you using pistols or face-direction waypoints.
  • SAR-18 Bullpup
    • For all intents and purpose, the SAR-18 is an expensive clone of the M4 Carbine.
    • It is a little heavier (slower to walk with) and slower to reload, with a slightly lower muzzle drop distance.
    • Its shooting characteristics are identical to the M4 Carbine.
  • Mk 17 Long Barrel
    • High damage and accuracy look promising on paper, but in application has little to no justification for use because of its slow time to target and refire rate.
    • Against unarmored enemies, its first hit will drop the target; however, the M4, for example, will drop over half the targets with its first shot/hit over 100ms sooner, and the second shot/hit will drop the target only 50-100ms later.
    • Against armored enemies, near half of the bullets will be blocked (depending on the target's facing), making ability to shoot again at an even greater premium. At long range, its increased stopping power (damage) makes it competitive again, but again losing to 50% kill-probability time for an improved ≥95% kill-time, which is not preferred – i.e., 70~80% of the time, an enemy will live longer (and shoot more at you!) against the Mk 17 instead of the Bren or M4.
  • HK45-SD Pistol
    • Very similar to the Mark 23-SD in most respects.
    • Cheaper to purchase, slightly worse accuracy.
    • Slightly faster aiming time, but Mark 23 compensates with slightly faster followup-shot and reset time.
    • The difference in magazine size has me preferring the Mark 23 (12 rounds) over the HK45 (10).
Appendix
I have included all my work in the attached .zip file below.
Comma-separated-value (csv) files contain stats-with-attack-type and time-to-kill results, with python and shell scripts I used to generate them.
An additional python script makes pretty graphs (vector graphic, SVG files), a pre-generated selection of which are included in a folder. This was used to create the graph above (I exported it to a .png with Inkscape).
Copies of my game data are included in a folder; it is from this folder that the scripts were reading.
A README text file explains a bit more about what there is and why.

All are welcome to download, unzip, and explore my work for themselves.

Download .zip from Dropbox here[www.dropbox.com]

Finally, thank you, KillHouseGames for the game, other guide-writers for leading me this far, and you for reading. :)
Appendix: Detailed Response to ajburges re: P90 and X635
Added to article because of the comment character limit.

ajburges:
You are correct to point out that both P90 and X635 are competitive, and that I left out the X635 from my discussion entirely. Magazine size is a point in the P90's favor, but none of the rifles are skimping on rounds, and finding time to reload is rarely an issue. As for the X635, it is (sadly) condemned because of its burst firing when close against armored opponents and its spread and slightly less damage at longer range -- it's powerful against unarmored enemies up close but offers marginal benefit over the M4, not worth the cost for priority purchase.

To simplify the discussion, I will present four sample scenarios: armored opponent or unarmored (lvl5), and two sample ranges: 5m (middle of rifles' close range attack type, 3..7m) and 9m (low end of rifles' next attack type). I will examine the rifles M4 Carbine, P90 PDW, X635, and pistols Mark 23 and FS AP.

Unarmored, 5m:
LD50: Mark23: 288ms (55%); M4: 350ms (65%), X635: 350ms (55%), P90: 416ms (63%), FS AP: 610ms (99%)
LD95+: M4 & X635: 517ms; FS AP: 610ms, P90: 617ms, Mark 23: 758ms
M4 fires twice, X635 thrice, both at the minimum number of shots for any burst in this Attack Type range. Note that the M4 has a higher probability to kill on the first shot; X635 has a window in the middle where its second shot gives it the probability-killed advantage.

Unarmored, 9m:
LD50: M4 375ms (63%), P90: 455ms (56%), Mark 23: 474ms (55%), X635: 555ms (73%) (40% @ 375ms), FS AP: 1088ms (99%)
LD95+: M4: 542ms, P90: 905ms, X635: 915ms, Mark 23: 1299ms, FS AP: 2171ms
At no point does the X635 outpace the M4 anymore, and the P90 and X635 effectively keep pace with one another.

Giving time-to-kill against armored enemies is not as straightforward as above, as I hadn't implemented a way to average the times depending on burst size -- which is relevant now that enemies survive into or past the X635 bursts. I will assume a fluctuating average of burst size (alternating floor of average, ceil of average) as in my scripts.

Armored (level 5, 50% coverage), 5m:
LD50: M4 & X635: 517ms (M4 54%, X635 66%), P90: 550ms (59%), FS AP: 610s (99%), Mark 23: 758ms (99%)
LD95: FS AP: 610ms, Mark 23: 758ms, P90: 950ms, M4: 1183ms, X635: 1267ms
The higher rate of fire gives the X635 an edge for initial kill, but enemies that survive the first (or second!) burst fall to the M4's continuous fire while the X635 cycles. The continuous, high rate of fire makes the P90 a competitive rifle option. The Mozambique doctrine puts pistols on a comparable footing as well.

Armored (level5, 50% coverage), 9m:
LD50: M4: 548ms (57%), X635: 735ms (58%), P90: 755ms (56%), Mark 23: 1299ms (65%), FS AP: 1971ms (62%)
LD95: M4: 1208, X635: 1635ms, P90: 1805ms, Mark 23: 3071ms, FS AP: 4786ms
Despite all being continuous fire at this range, X635 and P90 no longer have "double-time" refire rate, and their reduced damage and accuracy puts them well behind the harder-hitting M4. Without the Mozamique doctrine, pistols are not worth considering.

On aspect remaining is the reset time, which the X635 has about 150ms better than either P90 or M4 in the close-range cases, which can give it an edge when facing small groups of enemies.

Conclusion: P90 is a possible contender against armored enemies at close range (sustained fast fire), but still loses to pistols. X635 has promise against unarmored enemies at close range, hitting hard and fast with quick reset time. M4 remains "A rank" in the close range case, and dominates elsewhere.
Perhaps the X635 could be promoted to 'whishlist' in the role against (small groups of) unarmored opponents at close, but in general its high cost does not offset the small performance gains to merit making it a priority.
10 Comments
Dance Mar 27, 2023 @ 2:09pm 
How does the unsuppressed HK416 compared to the M4? I've been using it for the extra mobility in enclosed spaces.
KetchupWarthog Dec 11, 2020 @ 11:10pm 
On second thoughts I agree with your assessments. The PDWs get through faster, but the bullets are less fatal. Maybe just my combat style of engaging up close that the full-auto attacktypes become significantly noticeable (similar argument to a shotgun basically; lots of bullets per second). But anyways great guide that stands out from many others! Hope to see you in Task Force North
KwirkyJ  [author] Dec 11, 2020 @ 3:38pm 
My analysis includes facing armored opponents, though the procedure I used has an approximation of time between bursts instead of a proper average I would have liked (just too much effort). See the case example in my appendix about P90 and X635 -- at 9m (in the 7-15m range you point out), the M4 has a faster average time to kill. This is primarily because the greater damage on each successful hit, though fewer in number, is more effective than more, lower-damage successful hits in this situation.
Thanks for your thoughts!
KetchupWarthog Dec 10, 2020 @ 9:47am 
PDW vs SMG vs Rifle: Body Armor
"Armor piercing" stat is overrated. With exception of a few Low-Threat vests, the tougher ones have Level III armor which is impenetrable by ANY of your bullets. You kill them by throwing the dice against the armor's coverage probability (40% on Assaulter Vests) and hope a bullet gets through.

All SMGs (not including PDWs i.e. P90, MP7, X635) suffer from their poor attacktypes restricting to only burst at 3-7m, and rapid semi-auto at 7-15m. I had to make a SMG full-auto mod just to fix this glaring oversight. The P90 and MP7 are only weapons that fires full-auto at 3-7m (X365 fires 3-6 round bursts), and has the fastest retrigger time at the 7-15m rapid-semi range. Becus most fights in DK occur at these ranges, they are the best weapons against armor simply by overwhelming the probability dice rather than being "armor piercing"
KetchupWarthog Dec 10, 2020 @ 9:46am 
THANK YOU for pointing out attacktypes vs weapon stats. So many guides ignore this crucial factor. Some things I'd like to add though:

Pistol: defensive sidearm
There are times your primary runs dry and you have to pull out the sidearm because the guy in front is still alive (Breachers run into quite often). You have to factor draw time on top of Mozambique 3-shot cycle. For this reason the XD4 is my go-to defensive sidearm where accuracy doesn't matter; G17 and M&P 40 deserves honorable mentions followed by VP9 for those who care about accuracy
Rakshal Sep 30, 2020 @ 3:28pm 
This is the most solid guide I've read so far. Excellent work.
KwirkyJ  [author] Aug 20, 2020 @ 10:44pm 
ajburges,
Thank you for your comment!

The detailed answer in response to your comment exceeded the comment length limit, so I have amended my article with an appendix outlining my analysis. Do let me know if you find error or issue.
ajburges Aug 19, 2020 @ 12:47pm 
Why doesn't the X635 PDW get more attention? At only a 5% move penalty, it's substantially quicker than most primary weapons while boasting better TTK than pistols on anything lower than Armor 5.

To me, the biggest selling point of the P90 is the magazine combined with the lack of glaring weakness. You only reload it in the most extreme circumstances.
KwirkyJ  [author] Aug 8, 2020 @ 1:35am 
Significant changes 8 August 2020:

* Promoted FS AP pistol from "Honorable Mention" to "Wishlist" after further exploring its effectiveness against armored and small groups of armored enemies. Not moved to "Shopping List" because judicious tactics may negate its benefits.
* Added chart of highlighted pistols' performance for quick reference and rationale.
Bolmin Jul 26, 2020 @ 10:03am 
great guide! thanks!