Spirit Hunter: Death Mark

Spirit Hunter: Death Mark

103 ratings
Walkthrough and achievements
By MadHatterBelial
This guide is not spoiler free since it can't possibly be but I did make a small section on partners|key items for every chapter|ending if you're stuck on something. And the more detailed part is as brief as possible with as little spoilers as I could manage plus I really don't think people need a step-by-step guide on how to make Salt Water out of Plastic Bottle, Water and Salt so this guide won't help you if you want to skip the whole thing just doing the important stuff.
3
3
3
16
2
   
Award
Favorite
Favorited
Unfavorite
Some general tips and achievement info:
The game is pretty much straightforward once you get used to it but still:
- the text speed is slow and there's skipping (Q LB (left bumper) or L1 on controller) if you're using keyboard, mentioned by Mary somewhere in ch 1) that just skips everything. Nothing can be done about that, if it's really frustrating try skipping bits of text and reading the log (W, START and auto-advance (not the fast one) is RB / R1), but events and such erase it so be careful with that; thanks to Felixinius for controller directions :3
- saving can also get problematic but unless you're fighting|in the middle of event you can return to the mansion to save|change your partner anytime;
- choosing the right partner is important for both exploring and fights so be sure to save beforehand if you want to solve everything by yourself;
- most of the choices that don't require Spiritual Energy don't matter so I skipped those;
- events and such won't trigger until you have stuff to get at least normal end so explore all you want;
- while exploring looking into stuff that has options like 'Feel', 'Tool' etc. is the fastest way to search for items;
- just pay attention to what's going on, yellow and red text specifically and you'll be ok :3
- if you want to get all achievements: just save before every fight and get both endings for each, won't be missing much (if anything at all) but will save lots of time, be sure to make the good ending route your main though;
- for getting to chapter 6 (the DLC one) you need the good ending (aka good ending in all fights). You'll just get the game start from the beginning if you get the normal ending;
- this game is known for having issues and crashes (like not getting to chapter 6 at all or not loading pictures while exploring) and while I didn't encounter any of those myself it's possible so please note this.
Quick guide to fights|endings:
Hanahiko - choose Moe or Tsukasa (if you can), you'll need Wire Umbrella, Plastic Sheet(x3) and Salt Water, Lipstick, Round Hand Mirror (good end) or Salt Water, Flare (normal end).

Shimi-O - Mashita or Shou, you'll need Stinky Liquid(x2), Baseball, Tennis Ball, Good Morning(x2), Baseball bat (Shou)\Handgun (Mashita) and Bottle of Honey, Plant Root (good end) or Lg Btl Sweet Dreams, Lg Btl Nite Nite (normal end).
Note you'll need to explore with Christie for items.

Hanayome - Suzu only, this one is more about the options aka order you do things and not the items, just read that info. For good end you need to go to T Mountain, for normal one go anywhere else.

Miss Zoo - Ai only, use Office Trash, Aizen Asura's Charm, Clear Bottle, Matches, Hatchet, Carp Streamer (Sheet Music) and Aizen Asura's Charm, Matches (good end) or Megaphone (normal end)
Note you'll need to explore with Hiroo at some point.

Kannon Soldier - Hiroo only, use Kagura Suzu Bells(with everything), Gun with Blanks, Palm Pistol, Ranged Short Sword, Rusted Army Sword and Large Chisel (you get it while you fight) use it on 'Right ear' (good ending) or 'Between the eyes' (normal ending).

Red Riding Hood - no specific partners here and you'll just need to get your Live or Die choices right. Mini Massager, Wooden Horse Head, then choose 1-1-2-1 (good ending) or 3-1-3-1 (normal ending), there are more combinations with those, though.
Chapter 1

Nothing of importance till you get to the actual exploring, just choose whatever you want.


Where items are:
1. Worn-out Talisman
5. School Keyring (second visit)
8. Worn-out Talisman
9. Holey Hard Hat (you don't need it but it's there)
10. Important notes, Salt (second visit)
11. Important notes, Wire Umbrella, Worn-out Talisman, Water (second visit)
12. Plastic Bottle, Worn-out Talisman
13. Worn-out Talisman
14. Red Pen, Lipstick, Girl's Slippers, Flare, later on: Round Hand Mirror, Plastic Sheet

You can explore whatever you want, just note that going to the second floor is impossible (but try it nonetheless) and looking at the mirror where Hanahiko is will trigger Live or Die choice, correct answers are: 2-2 'No' and 'I'm the tallest in my class'.
When cornered in room 14 use the trapdoor.

Second visit:
More exploring, another Live or Die: 3-2 'Call your partner' and 'Close your eyes and pray'.
Choose Moe or Tsukasa (if you went with him) as your partner.
Fight Hanahiko:
- Wire Umbrella, Plastic Sheet x3
and
- Salt Water, Lipstick
- Round Hand Mirror, pretty much anything, I used Girl's Slippers (good end)
or
- Salt Water, Flare (normal end)
Chapter 2

Running around, lots of it. Again nothing significant till you get to the site.


E. Entrance - Worn-out Talisman, Empty Bottle, (later) Honey Bee Family Draft, Bottle of Honey
4. Nite Nite, Honey Bee Family Note 1, Honey Bee Family Note 2, Sprayer
5. Worn-out Talisman
8. Crowbar
11. Worn-out Talisman
12. Honey Bee Family Note 3, Nite Nite x3
13. Stinky Liquid x2 (or in 21)
15. Cottage Key, Lg Btl Sweet Dreams
18. Tennis Ball, Lg Btl Nite Nite, Nite Nite x3, Dried Root (with Christie)
21. Stinky Liquid x2, Good Morning x2 (with Christie)
22. Bug Repelling Incense, Suicide Note, Plant Root (with Christie)

Live or Die choice, right off the bat: 2-3-3 'Silently listen', 'Someone's here', 'It's impossible'.
Then another one: 3-3-2 'I am!', 'Deny it', 'Nod'.
When leaving the cottage (12) go straight to the exit (consult the map) or you get game over.

Second visit:
Choose Christie as your partner to get everything you need to fight Shimi-O.
Another Live or Die choice in 13: 2-1-3 'Close the eastern hive', 'southern hive', 'western hive'.
To get to 18, 21 and 22 choose 'Ask your partner' when you're with Christie. In 21 be sure not to open the hive while you're with her, though, since she can't fight Shimi-O and getting the last item will trigger the fight. You need to go back to the mansion when you got everything aside from Good Morning x2 and change partners (both Mashita or Shou are ok). Then go back for the fight.
Fight with Shimi-O:
- Stinky Liquid, Baseball
- Stinky Liquid, Tennis Ball
- Good Morning, Baseball bat (Shou)\Handgun (Mashita)
and
- Bottle of Honey, Plant Root (good end)
or
- Lg Btl Sweet Dreams, Lg Btl Nite Nite (normal end).
Chapter 3

Start exploring with Rest Area, nothing much to do, just choose 2 'I haven't seen it' to Hanayome, go back and explore Park next.
This time go with 1 'I saw it' and end up with Live or Die choice: 3-2-2 'Telescope', 'Maybe pink?', 'Romance is great'.
Next to already familiar Forest. A really small map this time. Choosing Christie is pointless and choosing Eita will make you come back again so just go with Suzu from the start.


2. Worn-out Talisman
3. Instant Camera, Dog Collar
5. Worn-out Talisman
6. Tape x3 ('Charm...Song', '...Echo Ballad', 'My...')

To get Dog Collar select 'Boost my partner up', then 'Show collar' to the dog. Live or Die choice: 1-2-1 'Stand still', 'Turn my back to it', 'Genta'.
The ending depends on where you go while returning to the mansion, choose T Mountain to get good ending and Forest or Park for normal one. The fight itself is the same for all 3 locations.
Fight with Hanayome:
- Take a picture with the camera
- Play the tape labelled (just go with them in any order you want, like 1-2-3, but don't play same song twice) x3
- Play 'My...'
Chapter 4

Again nothing too important before you go to the place you can easily guess from the hints already. Now second floor is available.


3. Worn-out Talisman
4. Office Trash, Fragment - I, Worn-out Talisman, Clear Bottle, Brown Bottle, Bottle Wrapped in Foil, Bundle of Clothes (later) Matches, Music Room Key
6. Worn-out Talisman
7. Worn-out Talisman
8. Megaphone, Fragment - G
10. Fragment - S (I read it can be found in 12 but I don't see it there)
11. Twinkle Twinkle Little Star ( Sheet Music)
14. Carp Streamer (Sheet Music)
15. Worn-out Talisman

Do you like tests? Well, you have no choice. Hope you paid attention, read your files, checked your items and learned your Japanese German. If not...
Live or Die 1: 1-2-2 '2', 'It needs a lightproof container', 'Indole'.
Live or Die 2: 1-2-3 'Ai', '-mson', 'a trained Asura'.
Brown Bottle contains acid, use it to open the door.

You end up in the mansion, choose Hiroo as your partner before heading out again. Also more tests... yaaay...
Live or Die 3: 1-1-3 '12 seconds', 'About 2 seconds', '1\4 as strong'.
Live or Die 4: 3-2-1 'Showa, 1926-1989', 'A date which will live in infamy', 'Germany'.
Live or Die 5: 3-1-2 'They aren't scared', 'The giant fish song', 'Harmonica'.
You proved you're worthy, now go show your Answer Sheets to anatomical model in 4, get some items. Then go to 1st floor where Mashita was hiding from Hanahiko (basically it's right below where the anatomical model is). Search the wall, use Hammer on it, then Clear Bottle and Matches on the hole you've made. Get Aizen Asura's Charm. Now go back to the mansion to change your partner to Ai, unlock the Music Room and, when choosing, choose it again.

Fight with Miss Zoo:
- Office Trash, Aizen Asura's Charm
- Clear Bottle, Matches
- Hatchet, Carp Streamer (Sheet Music)
and
- Aizen Asura's Charm, Matches (good end)
or
- Megaphone (normal end)
Chapter 5

And a big map right from the start. It's easy to get lost here so be careful.


E. Worn-out Talisman
4. Kagura Suzu Bells, Disposal Vat Mgnt Record, Research Records 1, Ranged Short Sword, Worn-out Talisman
6. Worn-out Talisman
8. Research Records 2, Palm Pistol, Correspondence Code
10. Rusted Army Sword
12. Worn-out Talisman, Woman's Head (Human Head in inventory)
17. Small Key, Research Records 3, Gun with Blanks
18. Worn-out Talisman

While exploring you'll stumble upon sound of the telegraph, don't retreat, get your Live or Die choice: 2-1 'Soul', 'Point to my head'.
When you'll see a half-transparent door use Kagura Suzu Bells on it, then another Live or Die: 1 'Touch the Diamond Arhat head'.

Second visit:
Go to the locked rooms, start with 11. Choose Woman's|Human Head. If you choose to keep going (and you should) you get Live or Die: 1-3-3 'One hundred million honorable deaths!', 'The land of the gods is indestructible!', 'If the kamikaze winds blow'. Now go to 17 (left turn), give the Human Head (aka Woman's Head) to the body on the table and enjoy your human experiments.
Live or Die: 1-2-(any) 'A chisel', 'Female head, male body', ... pretty much no choice there.
Going to 23 and searching will trigger a fight. Choose Hiroo as your partner to proceed and make a save, you won't have a chance to do so for some time. Look at every statue to unlock the box.

Kannon Soldier fight:
- Gun with Blanks, Kagura Suzu Bells
- Palm Pistol, Kagura Suzu Bells
- Ranged Short Sword, Kagura Suzu Bells
- Rusted Army Sword, Kagura Suzu Bells
- Large Chisel (you get it while you fight), Kagura Suzu Bells
Use Chisel on
- 'Right ear' (good ending)
or
- 'Between the eyes' (normal ending)

And onto some revelations. Did you guess it? Live or Die: 3-3-2 'Saya's room', 'Floor', 'Right arm'.
Chapter 6

This was originally a DLC, I mean you even get some voice acting for a change. Read some text, choose what you want, you know the drill by now. Here's the map:


1. Emergency Key Ring
3. Mask Guestbook 202, (second visit) Contraceptive
5. Mask Guestbook 201, Mini Massager
8. Spoon
9. Credit Card
11. Vaseline, Wooden Horse Head, Worn-out Talisman
14. Key to Room 502
15. Mask Guestbook 401, Worn-out Talisman
16. Worn-out Talisman
18. Demon Encyclopedia
19. Bath Salts, Insect-repelling Cream
20. Cheap Lighter, Monster Encyclopedia
21. Bent Hanger

Use Credit Card to get items in 5, encountering Live or Die afterwards: 3-2-2 'I come with my wife', 'What's right', 'Both'.
And another Live or Die: 3-1-3 'Have some shame', 'Pat her back', 'I depend on you'.

Second visit:
This is where the fun begins! Fixing elevator with Vaseline and power with Contraceptive? That's what you'll be doing at a love hotel, deal with it. Also you'll need a Spoon.
4th floor and Live or Die: 2-3 'Yell loudly', 'Use the mini massager'. *Ahem*

Third visit:
4th floor and above. Just explore until you stumble upon more Live or Die: 3-3 'Run to my left', 'Draw his attention'.
And there we go again. You need the correct order of paintings on each floor to proceed (4-2-1-5-3).

Fight with Red Riding Hood:
Live or Die: 3-1 'Activate the massager', 'Use the Wooden Horse Head', next choices will determine your ending.
Good ending: 1-1-2-1 or 1, 1, 3, 1
Normal ending: 3-1-3-1 or 1, 1, 1, 1 or 3-2-2-1
There's probably more combinations but I think this is enough as is.
22 Comments
MadHatterBelial  [author] Mar 10 @ 5:20am 
Thank you for clarifying. This game is convoluted so listing every action was a tad too much for me at the time.
jhourcade77 Mar 10 @ 4:39am 
I found it, it was on the nightstand. Although I had already tried to use the card on the nightstand, I had to check it with "look" first.
MadHatterBelial  [author] Mar 7 @ 3:27pm 
jhourcade77, I'm sorry, it's been so long since I played this I don't really remember.
jhourcade77 Mar 7 @ 2:36pm 
In Chapter 6, where in the room should I use the credit card? I am in the first visit
MadHatterBelial  [author] Sep 9, 2024 @ 9:42am 
Sure. I checked everything over an over while I was writing this but still some stuff I did miss keeps popping up. There's really lots of items and choices here and lots of them don't make much sense so I'm grateful for pointing out misplaced items and whatnot, just don't want to add too much explanatory text. Thank you :happyrin:
Felixinius Sep 9, 2024 @ 9:35am 
Fair! Thank you for the correction. I'm gonna play the whole game using your guide for the following days, If i find more misplaced directions like that one, am I free to comment?
MadHatterBelial  [author] Sep 9, 2024 @ 8:17am 
Changed the salt location.

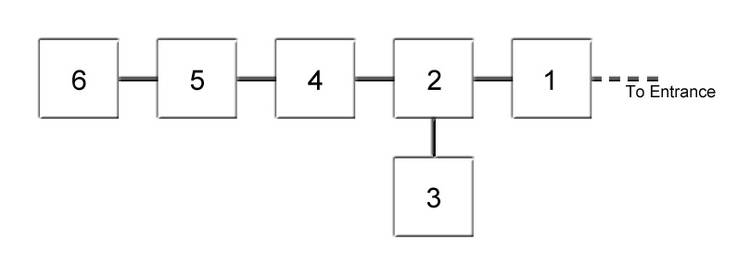
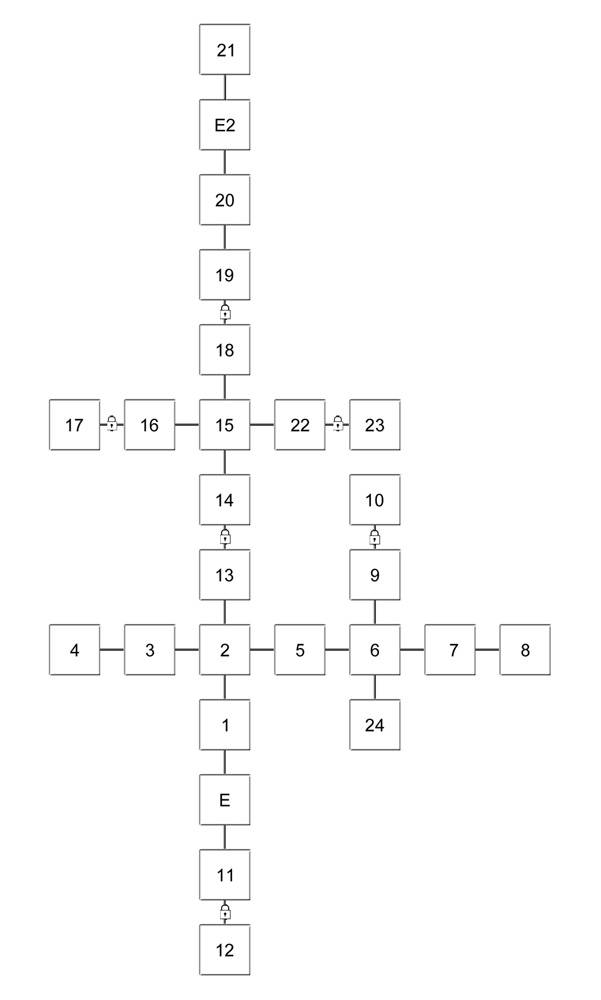
A quick reminder that I started this guide with "really don't think people need a step-by-step guide on how to make Salt Water out of Plastic Bottle, Water and Salt". This game is overcomplicated and it will get even more so as it progresses so no, I'm sorry, not adding every little detail here, water is where it is, choices are where they are, it's a visual novel, there's no rush about it.
Felixinius Sep 9, 2024 @ 7:57am 
Hey, on Chapter 1, Second visit to school, the SALT is actually on room 10, not 11.
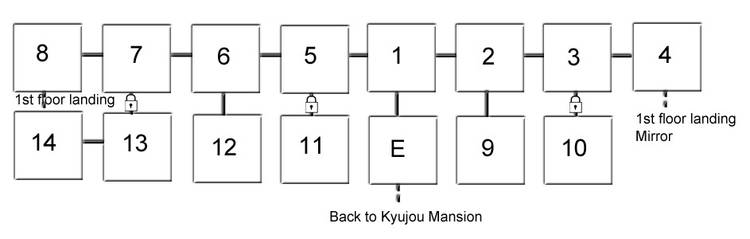
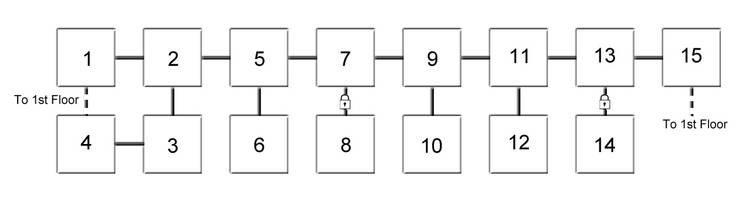
Also I know your guide is simple but you might want to give people a tip that you're supposed to "Tool" action on it with a Bottle of Water filled by the aquarium on room 11.

Oh and the Live or Die on the 2nd visit happens exactly when you're trying to enter room 10.
MadHatterBelial  [author] Jun 30, 2024 @ 3:13am 
Done, thank you :3
Felixinius Jun 30, 2024 @ 1:23am 
Suggestion to add at the very beginning of the guide where you say to hold Q to fast skip dialogue
That button on controllers is LB (left bumper) or L1

Log is START and auto-advance (not the fast one) is RB / R1