Transport Fever 2

Transport Fever 2

65 ratings
Exporting to FBX from Blender
By themeatballhero
With the new Model Editor, FBX import is finally possible. Find out how to inside!
2
4
2
   
Award
Favorite
Favorited
Unfavorite
Overview / Prelude
This guide assumes you have a model that you made, and if necessary a rig (a set of animations) that is fully functional and isn't baked already. This will require basic knowledge of rigging if your model requires animations. I won't be touching on that really, but I will cover baking.

If you need help with your animations, I have an example blend showing all the constraints, origins, parenting and armature in this blend from the Big Boy:
https://drive.google.com/open?id=1Byuk1eHgB2RGPUyL98S-m2VD9bMFRdxo

For this tutorial, I'll be using Blender 2.82 for screenshots. I currently use 2.9, and find that works great.

This guide does not instruct how to use the Model Editor beyond importing the model. Other than that, lets get started!
Prep Work
Open Blender. Prepare your model and have the deltas correctly where you want them, and all objects origins set to where they need to be.
-Tip: I suggest selecting a face in edit mode, selecting that face or faces and shift s, and cursor to selection. Then exit edit mode to object mode, and set origin to cursor. Remember though, the origin needs to be the middle of the model, except in rigging


Materials
In your materials tab, make sure you have only one material per object.

For objects with multiple materials, these need to be assigned to one face minimum. Otherwise the Model Editor wil crash.


Animation setup
If you have animations, make sure the actions are baked and the animations function correctly before hand.

If you haven't, do so.
-Tip: select all the objects with the initial object with the keyframes last to make it active. Then hit object -> animations ->bake action....


For the options, make sure yours line up. I always find that the top option needs to be checked. These are the options from my Black Diamond mod.


It should look something like this:


Rotation
So the wheels don't end up having a helicopter rotation, regardless of animations involved, you need to have the model "standing" correctly, but the rotation needs to say 90 degrees, like so:

To do this simply go into edit mode, have the cursor at the world origin, set the origin as pivot, and rotate all (by pressng a) on the x -90. then in object mode, rotate back +90 degrees. You could do both in object mode, but for linked objects, this works best.

Edit: If no animations exist on the model, you can simply check "experimental!: Apply transform". If you have this checked with your animations, it screws up the models animations.

NEW!
Mesh Naming and Material Naming
So I learned something absolutely fantastic that has helped me manage my files upon importing: naming files as the intended file path.

If you name your mesh as the intended path, example:
/vehicle//train/black_diamond/front/body

or
/vehicle/wagon/40_foot_gondola/brake_wheel

Then the importer will search for that path. If the path doesn't exist yet, or the file does not yet exist, it will be created. If it does exist, the file will not be created (or updated) and it will load the existing as the model.

Personally, I move my .mdl to a lower subfolder once it first gets created, that way if I ever need to update or add something to the model, it is not overwriting the existing model that I have hand edited. There will need to be things that will be hand edited.

It's important to note this is the exact same process for naming materials.


You can also use this for crew, emitters like smoke, and rider's positions.
Here's what UG says on this:
Originally posted by UG:
It is possible to predefine particle emitters by adding emitter_<number> items. The position, rotation and scale (used for velocity) will be imported.

To predefine seats, items with seat_ can be imported as part of an .fbx file. The position and rotation info is used. To mark a seat as a crew position, crew_ should be used.


Game Animation Events
Before we move on to the FBX export settings, make sure your scene is set to your animation event type. I know of a few at the time, but I'll list the ones I know. These cover trains & wagons exclusively.

The black diamond & big boy update use the wheels event, which syncs the drivers animation to the wheels.

-drive -open_doors_left -open_doors_right -close_doors_left -close_doors_right -open_all_doors -close_all_doors -wheels
Export Settings
Hey, you got this far, congrats!

Okay so once you're all prepped and ready, heres the juicy bits. I personally have run into an error (not sure if its me or blender) where the export settings disappear. If that happens, just select what you want to export in object mode, and hit "ctrl c" to copy your model. Open a new blank .blend and paste via "ctrl v" it here. For animations, you will need to reset the timeline in terms of length to your desired length of time.

These are the settings I used for the big boy. I use collections personally, but you could always do it manually and select them.


Scaling
This bit....it got me confused for a while. I use fbx with apply units, basically use the current blender units set, should be meters fyi) at a scale of 1.0.

Blender defaults have you covered for the forward and up. Long story short, depending on your program the Z[ed] axis may not be up always...

Animations
For animations, I've found the experimental functional seems to work well and correctly translates the rotation. However, for parented objects with grandparents, you will need to 0 out that translate code in the text edtor when you save it in the model editor.


Geometry Tab
I didn't touch anything here, it all seemed to work fine by default. I would cherck "Apply modifiers" so that way you can keep your workspace clean for future edits (like the mirror modifier or edge split).


--if your model does not have animations, you can export your model and skip Animations--

Armature
Contrary to what I originally thought, armature does not translate to the model editor. This is why you need to bake everything. So disregard the armature tab and you can leave it unchecked in the main tab.


Animations tab
The "Bake Animation" bakes all actions into one big animation. The name, it depends on this:


See "wheels", at top center? That's my scene name. You name that based on the animation in Model Editor you'll be using. It also serves as the name for the "Baked Action" setting under the animations tab in the FBX Export Settings [see Prep Work section for a list in trains and waggons]. This will result in the name in the drop down menu on Model Editor.


I suggest this method only if you have only one animations and not like, say, doors. If you have multiple type of TF2 animations, I believe you'll need different NLA tracks for that I believe. (looking into that more myself)

I only had the one animation needed here, and thats the wheels animation. So I disabled all actions and nla strips.

Important Note as of Blender 4.1
You may experience an error "Normal mapping mode 'eByControlPoint not supported" when importing a FBX into the model editor. I'm not certain this is the only fix, but I fixed this by selecting everything and going "Alt+N" then "Reset Vectors" in blender. Seems to be a vector issue with your face normals.

Moving on


Setting Up Model Editor
Alright, first. Model editor is not an .exe, its .bat file under steamapps/common/Transport Fever 2.


There are some settings that need to be updated, here are the dev's instructions from the beta program:

The Model Editor can be started by double-clicking ModelEditor.bat in the installation folder (e.g. C:\Program Files (x86)\Steam\SteamApps\common\Transport Fever 2). Install Starting the Model Editor will give you the following warning: Please set the userdata path in 'C:/Users/<username>/AppData/Roaming/Transport Fever 2/model_editor_settings.lua' Open the settings file with a text editor and set the line (insert your actual Steam ID): userDataPath = "C:/Program Files (x86)/Steam/userdata/<steamid>/1066780/local/" Make sure to use forward slashes "/" If you restart the Model Editor, the warning should have disappeared and it should be ready to use Use In the top left corner you can select your current working mod Using the import button, you can either import models from the base game or the fbx_import folder located next to your "model_editor_settings.lua" file Fbx files can also be imported by simply drag-and-dropping a "*lod0.fbx" file into the Model Editor window For more info about Fbx import, please have a look at this example[www.transportfever2.com] (available in binary[transportfever2.com] format too), demonstrating functionalities like LODs, animations, seats and particle systems

Next, is fbx_import folder. This can be found here:


See on mine, black diamond has a binary and no binary? Blender uses the binary language. FBX has 2 forms, ASCII and Binary. Because this is a blender export guide (and because I don't know crap about 3ds and Modo), I'm going to skip over the ASCII and focus on the binary.

Looking below, this would be how you set it up, note the dashed vs the underscores respectively:

vehicle-[insert mod type]-[insert mod name with spaces as underscores]_binary

Next, in that new mod folder you just create, create a new folder again, with the same name just dropping the binary. So it would look like this:

vehicle-[insert mod type]-[insert mod name with spaces as underscores]

Then for the file name. Again, same format, only at the end of the file name, add _lod0. If you have multiple LODs, add a second FBX file with the respective LOD. So it would look like this:

vehicle-[insert mod type]-[insert mod name with spaces as underscores]_lod0.fbx vehicle-[insert mod type]-[insert mod name with spaces as underscores]_lod1.fbx vehicle-[insert mod type]-[insert mod name with spaces as underscores]_lod2.fbx

Next in the staging folder. You can find that here:

Program Files (x86)\Steam\userdata\[insert steam id]\1066780\local\staging_area

In the staging folder, create a new folder for the mod. Like TpF1, it requires "_1" at the end of the name of the folder. There will need to be a new file named "mod.lua" for the Model Editor to see the folder. Mod.lua code luckily has not changed, so if you're converting an old mod, you're in luck, you can just copy paste.

Also for textures this is important, you need to drop the textures in where they would actually be when you publish the mod. Meaning, the folder structure has to be correct.

Here's an example:

staging_area\UP EMC E2_1\res\textures\model\vehicle\Train\e2a\up_la_diffuse.dds

Take note that its set up that way so the game can read it, but I also have it set up to be slightly organized by the .mdl name (e2a). The .mdl name isn't necessary, but I find it saves me headaches in the long run.


Now for importing!
The Model Editor
Alright. Here is the moment we've all been waiting for! Since this is an importing guide and not a Model Editor Guide, I'll keep this section short.

Now, select the drop down at the top.


Next, go to import. Select FBX. Go to your new mods FBX location and select the FBX. It should now import correctly. Congrats! You got this far!.


Some notes:
The Model Editor, to my knowledge so far, does not display Multiple Units [that i am aware of]. So that config file will need to be done by hand.

Now its important to note, it will take some trial and error, I've been messing with this thing for 2 months at the time of writing. Yes, 2. So be patient with yourself. You can even see here, that loco is floating.

Because the model editor isn't perfect, you'll need to verify this portion of the code in the .mdl of the file matches this. From my experience it outputs 0's in the brackets.

backBackwardParts = { }, backForwardParts = { }, blinkingLights0 = { }, blinkingLights1 = { }, fakeBogies = { }, frontBackwardParts = { }, frontForwardParts = { }, innerBackwardParts = { }, innerForwardParts = { },

Another issue is the model editor doesn't have a category for the emissions category, take this code and copy it anywhere as a direct child of the metadata:

emission = { idleEmission = -1 powerEmission = -1, speedEmission = -1, },

It's here in the ME:


For the materials, make sure the redGreen is only in the normal.

PHYS_TRANSPARENT is what I use for objects with transparency.

Last comments
I hope I helped you guys, and that everybody will be able to make mods faster with ease. I know I would have appreciated it, it took a lot of trial and error.

I will update this more on animations when I learn more.

Let me know in the comments if I should add / remove something and if it was helpful for you!

If this helped you, please rate give a thumbs up! It will help others.

And lets give a hand to the devs for giving us a FBX Importer! Big thanks, UG!

-themeatballhero
48 Comments
Fabiano Mar 22 @ 10:18am 
Hi @themeatballhero this guide is awesome, pretty informative, thanks a lot for the time you put in it.
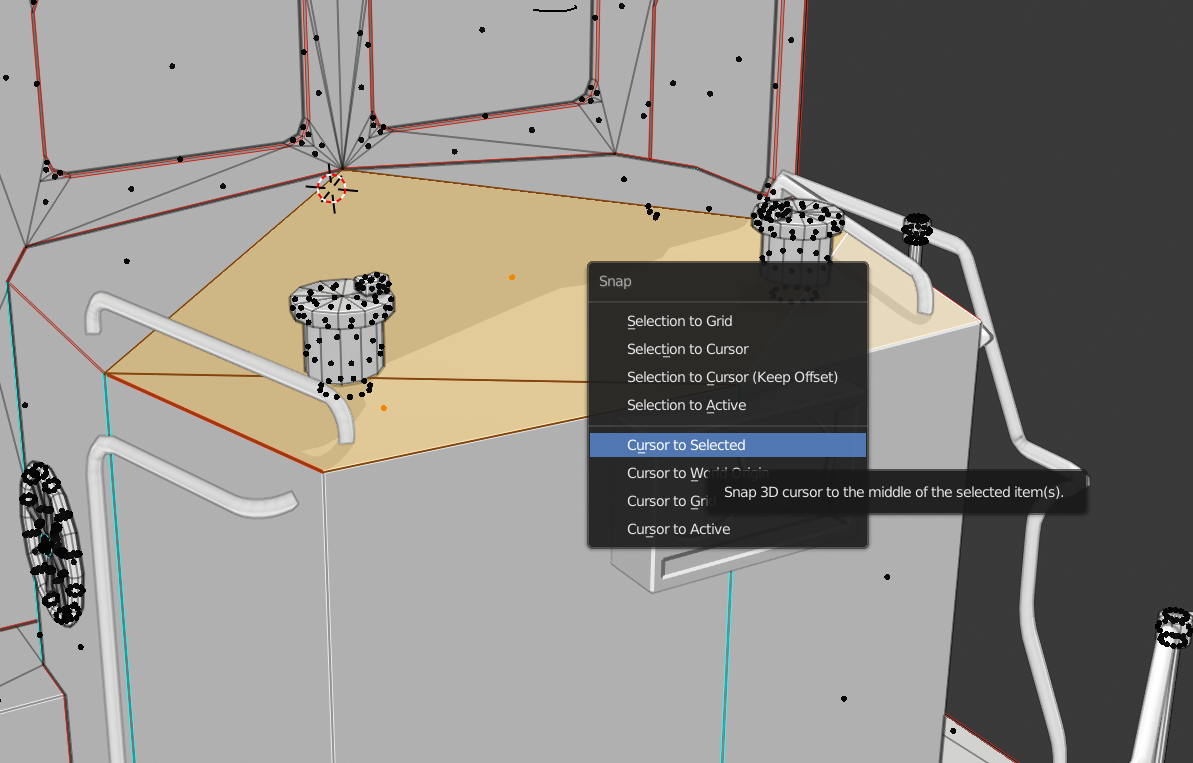
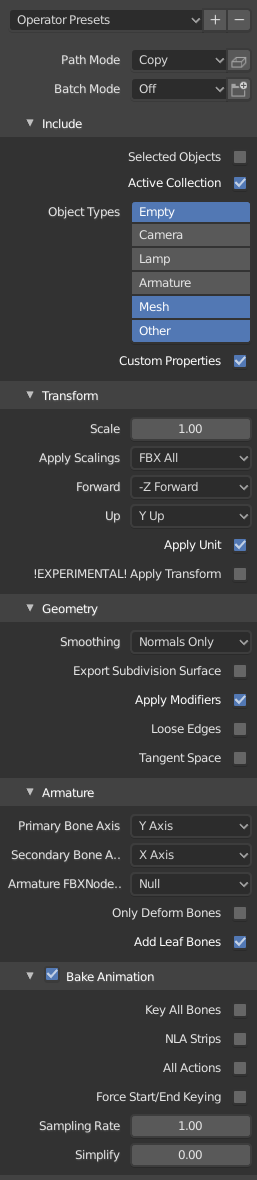
Do you happen to know how to work with SubMeshes from Blender?
My situation is: I'm trying to do a draft horse improvement mod, reusing vanilla assets as much a possible. So, as in the original draft horse, the horse mesh is separate from the harness, but I've added skinning to the harness too, so that it follows the movements of my horse.
The original harness was static.
So now, I don't want to have in the .mdl 2 identical armatures that animate the 2 meshes, instead I'd like the 2 meshes to reuse the same, and I think this can be achieved with SubMeshes, but no idea how to set them in Blender for the Model Editor to like it. The FBX exports just the horse unless I explicitly exclude it from the export...
themeatballhero  [author] Nov 16, 2024 @ 9:05pm 
i dont do any texturing in blender, i use substance painter and photoshop. the way it looks in blender isnt a good judge. also you cant export shaders from blender directly to the model editor to my knowledge
t3x Nov 16, 2024 @ 7:50pm 
1st thing 1st, I'm known to Blender for a very long time but am wondering, do you just use the workbench or Evee/cycles. Creating transparent in the workbench??? No idea after version 1.9 all changed to shaders, that is not something workbench uses.
themeatballhero  [author] Sep 10, 2024 @ 8:35am 
Thats when the wheels spin along the X axis rather than the Z axis
Blake Johnson Sep 10, 2024 @ 7:25am 
What's helicopter rotation?
themeatballhero  [author] Aug 12, 2023 @ 11:42am 
sounds like you didnt set up the model editor correctly in the notepad. check the box of text in the "Setting Up Model Editor" section.
Avada Kedavra Aug 12, 2023 @ 11:39am 
Hi man, i've a problem. I followed ur tips but Model_editor says ''fbx plugin not found''... What does it mean?
themeatballhero  [author] May 12, 2023 @ 10:32am 
@briansyston nope, it cannot. Probably won't as its a potential copyright issue.
zenixlo Feb 20, 2022 @ 12:50pm 
Thankyou so much! will come in hand later!
briansyston Oct 19, 2021 @ 10:50am 
Can the Model Editor export as well ?