Patrician III
117 valoraciones
Old man's guide to Patrician III
Por Oakshield
Information gathered by members of The "Tavern Side Room" Patrician fansite.
6
8
2
2
10
2
   
Premiar
Favoritos
Favorito
Quitar
Introduction
When I first began playing Patrician II a very long time ago, I joined a Fan forum named Patrician World Board; or PWB; at some point. Among the members of that forum were some players having their own fansite and - after the previous forum wasn't updated and overrun by spambots - began their own forum, linked to their fansite, The Pirate's Cove.
By then Patrician II Gold, or Patrician III as the international version was named, was released and lots of information about these two games was discussed at the new forum.

That forum was the Tavern Side Room. Or TSR as we used to call it.

Originally set up to discuss Patrician III, eventually other games were discussed over there as well. But just how things go, at some point the forum got neglected, the Pirate's Cove site got neglected and at some point both went down.
When the TSR wasn't around, I decided to copy a lot of the information of the Pirate's Cove into a Word-document for future use at my own Patrician III website.
For some reason I never got to do that, however, I still got the info at an external drive and I found that I may as well share it here.

However, since the original creators of this guide were loving piracy, a part of this guide will show how to deal with those white sailed pirates.

And just for the sake of melancholy, or being nostalgic or whatever, I'll add myself using my old TSR nickname as contributor.


Versions:


V 1.0: Basic guide plus all salvaged information of the Tavern Side Room added.
V 1.01: Added sections for the game interface
Introduction to Patrician III
Patrician III is a trading - city building sim, set in14th Century Europe.
The goal of the game is to start at the lowest rank of Shopkeeper and rise through the ranks to eventually become Alderman of the Hanse.
To do that, the player needs to trade goods, build houses, industries and ships, expand into other cities by erecting trading offices and joining the city's trader's guild.
Furthermore, the player needs to perform certain missions for the Alderman to show the Hanse Council he or she is suited enough to lead the Hanse.

However, trading and expanding into cities isn't just all you can do in this game. Sooner or later you will have to deal with pirates, or instead you will become a pirate yourself.
Depending at how good you're at the naval combat, this can be quite satisfying or downright frustrating.

And finally, there are also missions given in the town hall or the Tavern Sideroom, plus a bath house and a church which will help you to increase your standing with both the law abiding and the law breaking citizens of the Hanse.

All in all enough things to confuse people when they got all requirements for a new rank met, yet somehow they're not advancing in rank.
Starting out
After you've started a new game, you're confronted with three choices which will have a major influence to your game.


The first one is which map to use.

Patrician III got a map editor; slightly hidden in the Steam folder, but it's there; in which you can change the layout of the cities, the amount of cities and the goods they're producing.

Therefore it's possible to achieve a population at the entire map, which can't be managed when a player is using the standard map.


For the sake of this guide, I'll use the Standard Map, which is the map the game usually starts with when you're launching the game for the first time.

The second choice one has to make, is which city to start in. This is one of the most important choices in the game. Pick the right city and the game can be a walk in the park, pick the wrong one and you'll face a hard time.


As one can see, there are three different kind of dots at the map.
The Blue dots represent the Hanseatic cities.
These are the cities having a guild you can join, but more important, these are the cities you can start in as well. Or you can move to them when you decide to.

The Red dots with the blue center are Hanseatic Towns. These still got a guild to join, however you can't move to them.

The Red dots are the Hanseatic Trade centers. You can't start in these towns, can't move to them and there's no guild to join. Though it looks as if you don't have much influence at them, other as building houses and industries, at some point in the game you will be able to tell them to increase that wall or expand the military.

As said, picking your starting city can be important.
Over time I've seen the same cities being picked over and over again, simply because of their location or the goods they produce.

Good starting cities are:
(Note: I'll add the spelling of some game versions to this list, as it's still possible players having the old map use this spelling.)

Bremen:

Close to the expedition exit point and Cologne and Groningen (wine production!), produces Iron Goods and Cloth, while having cities close by for the raw materials for these goods;

Lübeck (or Luebeck):

Quite central at the map, produces Iron goods and fish and got towns to supply with the resources and other goods close by. Also got a land connection to Hamburg, making it easier to get early access to wine and spices.

Gdansk (or Danzig):

Produces Grain, Beer, Pitch and got Hemp, Skins and Iron goods close enough for a good devellopment of the city.

Visby (or Wisby or Bisby):

One of the most underrated cities of the game.
It got a cloth production, some hemp, honey and grain, but more important, it's centralized location gives it easy access to Iron Goods, Skins and Beer.

Stockholm:

Produces a full Iron Goods chain, while having Cloth, Grain, Beer and Skins nearby.

Reval

Produces Iron Goods and Skins, while having several cities nearby to produce the Big Four.


The last choice we need to make is the difficulty settings.
While the game got pre-set settings based upon the ranks you can achieve, it's possible to adjust those to your liking, giving you an easier or harder game.


All options shown in the screenshot are having three different levels; low, normal and hard.
The difference between these three can have quite some influence on your game; so although they may seem self explaining, I will do some explaining.

Difficulty level of trade:

This one basically sets how much profit you will earn from trading. At high settings, the profit margins are small, meaning you have to aim at selling quantity over quality for some goods or even sell at a loss for others.
At low settings the profit margin is high, meaning you can even earn millions by selling wood and grain. Although I wouldn't advice that.

Difficulty level of reputation:

This one sets how hard it is to earn reputation and to gain ranks when you got enough reputation.
For instance: Selling 10 barrels of beer in a besieged town at low reputation settings may be enough to make you loved by all citizens, while you may need 50 barrels or more at the high settings.
It also has influence at your reputation increase with the four groups of population a city has.

Needs of the citizens :

This one is related to the reputation setting, although not everyone is aware of that.
Each group of citizens - beggars, poor, wealthy, rich - has certain needs.
While the poor can be happy when you sell beer, fish and grain to a town, the rich prefer wine, meat and honey; while the wealthy are in between those two groups.
The exception in the food list are beggars, all they need is a job, so they can advance to the poor.

Difficulty level of sea battle:

One of the more important settings to the game and most likely also one of the most underrated.
This setting is used to make the battles harder or easier; also meaning it's making it harder or easier to capture or sink ships.
While defeating pirates and sinking their ships is a valid choice in this game, capturing their ships is a lot more useful to expand your trading empire, as it would save you the costs of building one.

Pirates activity and activity of the Prince:

I'll list them under one name, as they basically do the same thing.
Low pirate activity means a pirate starts with a convoy of just one ship; while a high activity means the first convoy you encounter has three ships and usually they're Cogs and Crayers.

The activity of the Prince sets how demanding he is and how quickly he's annoyed enough to start besieging a city.
And since a besieged city doesn't produce any goods in industries outside the city walls, having the Prince at low settings makes it easier to keep a steady supply of produced goods.

Starting capital and number of ships:

The last two settings that make up how easy or how hard your start will be.
With high starting capital setting you start out with 30,000 pieces of Gold; which is usually enough to last several months. Unless you're really messing things up.

With a low starting capital setting, you start out with "only" 1,000 pieces of gold. Which means you need to make a choice about what to buy in your home town and where to sell it.
Often, players starting with a low starting capital take a loan or switch to piracy the moment they found a captain to fund their company. More about that later.

The number of ships not only set the amount, but also the type of ship. A high number of ships give you two snaikka's while the low number of ships give you one snaikka.


After all settings are done according to your preferences, hit [OK] to save them and when being returned to the settings screen, click at [Start] to start your game.
The economy Part I
Trading:

The purpose of the game is to make money through trading, done by buying goods at a low price in one town and selling them at a high price in another town, while using ships, or caravans, to transport the goods between both towns.

To make sure you're buying and selling the goods in town they are or aren't produced, you can check the map to show what goods they produce, or click at the statue when you're in a town for the same thing.

For a reference; this map shows all goods produced in the cities. Double symbols means effective production, single symbols means ineffective production:


Auto trading

1. First you must have captain on the ship
2. Click on the ship and then on the scales on the far right of the ship menu.
3. Select a city for the first destination
4. Click on that city name to open the instruction window.
5. Select an instruction next to each product your interested in trading. There are two instructions (buy and sell) for trading with that city and two instructions (load and unload) if you have a warehouse in that city.
6. Enter a quantity for each item and a price. If the quantity is zero then the ship will do nothing for that good. To enter the quantity, either use the + or – key’s, or click at the number-box and type in the desired amount.

o Tip: For the maximum amount of goods, click at the – key or use the button at the bottom of the screen. Beware: this button sets all goods exchanges in that screen at maximum!

7. Exit that screen and return to Destination screen
8. Select Second Destination and repeat steps to set it.

Captains


There are always two captains in the Hanse. They may be found in any city, and you must enter the tavern to find one. Early on in the game, the other traders need captains also, so if you spot one and you have an empty ship, hire him. When you click on the tavern, the interior screen will pop up. To the right side is the list of those people present. See The Tavern for the other individuals. If you click on captain he will offer his services. Click yes. If you have more than one ship without a captain in port, you will see a plus sign beside the ship he offers to hire upon. Clicking on this will advance the ships, until you have the desired ship, click yes at that time. A notice will appear in your messages that he has completed formalities with the harbourmaster and awaits you orders.


Captains may also be transferred between vessels, this is accomplished by selecting the ship with the captain aboard, and then right clicking on the vessel you wish to move him to. This is also the way to transfer crew.


Captains have varying abilities. They are rated on trading ability, sailing ability and fighting ability. A 0 is the least able, a 5 the highest. A captain can be a 0/0/0, 1/0/0, 1/0/1, etc all the way up to a 5/5/5. If you see a high level captain hire him immediately, whether or not you need him at that time. If all you find is low level captains, do not despair. The captain will improve in skill level as time passes and you keep him busy. If he has improved, a message will appear in your personal messages that he has gained so much experience that he demands higher wages. These cannot be refused. He may be dismissed, but beware: other captains will notice and you may have difficulty later in hiring, and your prestige will decline.


There are ways to improve his quality. If he is a terrible trader, place him on a stationary trading ship buying goods at a specified price. If he is a terrible sailor, he may be placed on guard ship duty where he will improve. Fighting is self explanatory.


Captains later in the game are a little more likely to appear in out of the way cities, particularly river towns. Levels of ability vary in cycles. Lastly, there is a time limit to captains. If he is a 0/5/5 for example, he is commanding a high salary and will ultimately be able to retire. The length of time at the higher levels to retirement varies. Do not waste your higher level captains. The high sailing levels are great for exploration; the high trading will get you better prices in the Mediterranean and the New World. The best captains to send are those with low fighting ability and high trading and sailing skills. The high sailing levels will be able to travel faster, return less damaged. Higher fighters will defeat an enemy quickly with fewer casualties.

Depending what task you have in mind for your captain, assign him to that purpose.
Early in the game, you’ll need captains having good trading and sailing skills; 3/3/* at least, while later in the game the captains are just ferrying goods between one port and another, meaning their sailing and fighting skills */4/4 are more important.
The reason for this is your importance. The more your reputation all over the Hanse grows, the more likely pirates are going to attack you. But at the same time you’re expanding, meaning your convoys are getting bigger and more loaded; which also a nice temptation is for pirates. Add to that the fact you need to make lots of money early in the game and you have the explanation why the skills are needed in that way.

Tip:

When you have enough small ships available, not aren't able to use them in a convoy, sail them to towns you don't have access at and fire the crew.
These ships make it possible for you to access the town, without having an office; which also makes it possible for you to check whether or not a captain is available in the tavern.

Auto-buying and Auto-selling to a city from your warehouse


Auto-selling:

• Place a ship with a captain in the city.
• Set three stops for the ship each to that city.
• Set first stop to pick up goods that you want to sell.
• Set second stop to sell every single good.
• Adjust prices on second stop to reflect what you want to sell at. (default is the lowest manufacture price in the Hanse)
• Set third stop to dump every thing back into your warehouse in order to start fresh the next cycle.
• The cycle time for this route is three days, one for each stop.


Auto-buying:

• Just a variation of the auto-selling tactic but with two stops. One to buy goods from town and the second to dump goods into warehouse.

A new addition to this one is the use of the Warehouse Administrator.
In general you set his buying / selling sequence up just like you order a captain to do so. However, the administrator is doing either a buying or a selling sequence of each particular good. You can’t order him to buy a good one day and sell it the next, unless you change his priorities.
Using a floating warehouse and the administrator together will maximize your profit even more, since you are able to buy back some of the goods either one of them sold.

Good Places to buy stuff


• Beer - Stettin, Gdansk, Western Cities(minus Bergen and Edinburgh)
• Cloth - Malmö, Visby, Edinburgh, London
• Wine - Bruges, Cologne
• Iron Goods - Bremen, Edinburgh, Stockholm, Lübeck, Reval
• Meat - Bergen, Gdansk, Reval
• Leather - Bergen, Gdansk, Reval
• Skins - Reval, Riga, Novgorod, Bergen(-), Oslo (-)
• Spices - Bruges sometimes, Expeditions
• Wool – Thorn (Torun), Gdansk, Bisby (or Visby / Wisby in some versions) Western Cities


Transfer between Ship and Warehouse

Select your ship and then right-click on the trading arm. Look into the right hand menu and you will see 4 options:

1. Ship to Town
2. Ship to Warehouse
3. Warehouse to Town
4. Ship Weapons


Select Ship to Warehouse and you're all set to trade.
The Economy, Part IIa : Trade routes
Introduction

While the previous chapter covered the basics about how to set up a trade route, this section will discuss the different trade routes, their uses and how to combine them with the warehouse manager.
It'll contain one "route" that could piss off another player in a MP game a lot, if used in a co-op game - something that actually happened to me - as well as an alternative to that "route", how to use your convoy as a storage to avoid building warehouses - something we used a lot in Patrician II - and how to use it for day-trading; showing that even selling goods to a town produced in that town can be profitable.


Different kind of trade routes

In Patrician III you can use the following trade routes:
  • Circular trade routes
  • Two city trade routes
  • Transport routes
  • Sucker routes

Circular trade routes

These are the routes most players start with, as they provide a steady amount of goods which can be bought and sold in each and every city you visit. They usually start and end with the same town to drop off and pick up the goods needed to be sold at the route.
Circular routes usually are done clockwise and / or counter clockwise to cover all cities at least once during a run.

An example of a (clockwise) circular route is this one:
  • Bremen (Pick up goods)
  • Groningen (buy / sell)
  • Cologne (buy / sell)
  • Bruges (buy / sell)
  • London (buy / sell)
  • Scarborough (buy / sell)
  • Edinburgh (buy / sell)
  • Ripen (buy / sell)
  • Hamburg (buy / sell)
  • Bremen (sell)
  • Bremen (drop in warehouse.

As you can see, I make my final two stops in Bremen to sell goods before transferring them to a warehouse. The reason I do that is because early on I don't have a warehouse manager and selling goods with a captain often gives me a good price.
The second reason is when I do have a warehouse manager, the manager is only able to sell / buy once a day. So by adding an extra stop to Bremen before dumping all goods, I got the chance to double my profits at one day the route is active.

When I add the counter clockwise version of this route to my list, I'll even have an occasional 3 times a day sales moment. And with a captain having 5 in trading, as well as a manager at that skill, profit made can be quite high.

Two city trade routes

This is basically the first step towards the use of a HUB-system of which one city is the center of a hub, while the other ones are the "spokes".
Usually at this time I got a warehouse manager in my HUB-city, which means I'm able to buy / sell there at least once a day. Despite that, keeping one extra stop to the route to sell items to the city may be a good idea, resulting in a route like this:

  • Bremen (Pick up goods from warehouse)
  • Cologne (buy / sell)
  • Bremen (sell goods)
  • Bremen (dump into warehouse)

Transport routes

Same as the above, except the goods are transported between two warehouses.
There are two variations to this route, the first one being a 3 stop route:

  • Bremen (pick up goods)
  • Cologne (drop goods in warehouse, pick up goods produced there)
  • Bremen (Drop all goods in the warehouse)

Note In theory this route could be a 2 stop route as the goods you pick up in Bremen are dumped in Cologne, while the goods you pick up there are dumped in Bremen. However often a 2 stop route bugged out, as it didn't want to start, so having two stops at Bremen is an unfortunate necessity. Fortunately, one stop doesn't take a full day, so even with 2 stops in Bremen the increase of the time a route takes isn't that bad.

An alternative to the above is a 5 stop route in which we use the captain to buy / sell at both towns:

  • Bremen (take goods from warehouse)
  • Cologne (buy / sell)
  • Cologne (drop / pick up)
  • Bremen (sell)
  • Bremen (drop in warehouse)

Because of the two extra stops, this route is going to take at least one day longer as the previous one.

Sucker routes

These come in two variaties, of which one - as already mentioned - can be quite annoying when a player a MP game is confronted with it. I therefor recommend that before starting an MP game, players decide which one of the two is allowed to use.

The first route - and the one able to cause problems in MP games - is a simple 20 stop route in a single city to buy one specific item. For example
  • Cologne (buy wine)
    20 x repeated

The goal of the route is simple; the captain buys wine whenever the price is right and nothing else. After the 20th stop has done, and if the ship - or convoy - hasn't filled up, he will start over, until the point he no longer can store the bought wine. At that point the route stops and will remain inactive until the ship or convoy is emptied and the route can be started again.

This route is often used by players starting in the central or eastern area's of the map, as they got no access to wine.
A similar one for a player in the western and central area would be a route that's having 20 stops to pick up skins in Reval.

The reason why this route can cause problems in a Multi-player game, is that the AI will build vineyards as fast as they can to keep up with the high demand of wine. As a result, Cologne will grow rapidly, putting a big strain at a player who's started in the west; as he or she has to use lots of resources, ships and money to keep Cologne supplied, often resulting in neglecting the other cities and thus creating an imbalance in that area.
Because of the imbalance, the player in the western area will eventually start to loose money and may even go bankrupt, simply because one player needed wine.

A better solution for a sucker route and one that works a lot better in an SP game as well is a circular route in which the player not only buys wine, but also use goods from his region (in this case, skins, iron goods and cloth) to be sold in the cities producing or importing wine (and spices):

  • Reval (Load skins, iron goods and cloth)
  • Groningen (sell skins, iron goods and cloth, buy wine)
  • Cologne (sell skins, iron goods and cloth, buy wine)
  • Bruges (sell skins, iron goods and cloth, buy wine and spices)
  • London (sell skins, iron goods and cloth, buy wine)
  • Reval (sell wine and spices)
  • Reval (drop all in the warehouse)

While this route may generate less wine as the 20 stop, single city sucker route, the overal profit is a lot higher. The reason for that is that the profit on a barrel of skin can easily go over 300 gold; which means the cost of a barrel and a half of wine; while the profit on iron goods and cloth are about the cost of half an barrel of wine.

Of course, setting up a similar route starting in a western or central town and visiting Torun, Riga, Reval, Ladoga, Novgorod, Oslo and Bergen to pick up skins while selling wine, spices, iron goods and cloth works too.
The Economy, Part IIb: Trade routes, warehouse manager and supply calculations
Introduction

Warehouse manager

The warehouse manager is basically a land based captain, able to buy or sell goods from / to a town.
While he's quite useful to supply trade routes with the required goods or to sell all goods your hometown doesn't produce - and in later stages of the game, the ones the town does produce - his biggest drawbacks are that he does his buying / selling actions only once a day, and that he can only buy or only sell.
It's because of that a lot of players ad a stationary convoy to their hometown set to pick up goods from the warehouse, dropping goods in the warehouse and selling goods to the town.

Warehouse convoy

It's said that a captain takes about 6 hours for one trading action, which means that a warehouse convoy could do 3-4 actions a day on top of that of the warehouse manager. (I haven't checked that, so right now I consider it a rumour)

What is confirmed is that a captain is able to trade twice a day; hence picking up and selling goods to a town can be done at a single day, making a convoy combining with a warehouse mananger a lot easier.

What makes a warehouse convoy useful, is that it's able to pick up, sell to town and drop goods in a town, making sure your warehouse is always supplied with enough goods to supply your industries, while also selling to the city.
Warehouse convoys were a big thing in Patrician II; as you only had your office to store goods and with its capacity of 500 barrels, it was quickly filled. It has more or less been ignored when the warehouse manager was added in Patrician III, however, even in this game it still got its uses.

A typical warehouse convoy "route" looks like this:

  • Bremen (Pick up excess goods)
  • Bremen (buy / sell from / to town)
  • Bremen (Drop in warehouse)

What this route does is picking up the goods from your warehouse, selling everything the town needs to it, while buying the goods the town produces, followed by dropping things in the warehouse for other convoys to be picked up.
The two disadvantages of this method, are that you have problems keeping a steady supply of raw materials for your industries, as you always had to keep an eye on what's brought in, picked up, dropped and used.
The second disadvantage was that trade routes may leave the town without the goods they needed.

With the introduction of the warehouse manager, the problem of running into shortages for your industries when using a warehouse convoy were solved.
The reason for that is that you can order the warehouse manager to keep a certain amount of goods into stock and lock those from being picked up by convoys.
Thus a warehouse convoy would drop all goods in the warehouse, filling the shortages, then picking up excess goods, leaving the fixed amounts in the warehouse, selling goods to the town, before dropping them in the warehouse again. The advantage of this method is that you're able to sell / buy twice a day (captain and warehouse manager), are able to keep your industries supplied with all goods and don't need to build warehouses.

Daytrading

Day trading is a mechanic some players used to generate huge profits by using the captain skills to their advantage.
They even managed to generate profits from buying / selling goods produced in that town; which is quite a feat.
Although I've never been able to pull this off myself, I do understand how it works and will post it here.

What's needed is a convoy with a level 5 trading skill.
This skill means the captain is able to get a 15% discount on bought goods and a 15% extra profit on sold goods.
Because of that, he's able to buy goods very cheap and sell them at a higher price as a player manually could do. The result of it, is a nice profit, which could quickly add up.

For this example I'm using the Iron goods in Stockholm, as that town also produces the required resources at an effective rate, meaning the iron good are produced cheapest and most effective there. Since a 2 stop route doesn't work, I'm using a 3 stop route as well. Production price of Iron goods is 265 gold

  • Stockholm: Buy 10 iron goods at 300
  • Stockholm: Sell 10 Iron goods at 350
  • Stockholm: Sell 10 iron goods at 350

Since a lvl 5 trading captain get a 15% discount at his bought goods, he won't buy them at 255 gold, but instead but up to 345 gold ((15* (300/100) = 45)+300 = 345) while paying 300 gold for it. So the first 450 gold is already in the bag.

At the second and third stop the captain will sell the goods at 350, however since the level 5 trading skill add another 15% to it, it means he'll sell goods up to 15% below the set selling price, which results in a profit of 52.5 gold for each barrel.
In other words, the 10 barrels of iron goods are sold for 297.5 gold each, but he still gets the required 350 gold for it.
Which means that with this little trading, the captain has earned roughly 950 gold, simply because his trading skill is that good.

Calculating trade routes supply

While some players prefer to play this game up to the point where they've become Alderman and build up their home town to 10.000 citizens; others prefer to build up the entire Hanse to their maximum amount of citizens.
Both goals can be achieved by occasionally checking what a town has in stock and if it has shortages. The images at the world map help with that, but opening trade screen for each town works better.
But with 24 cities at the map or more if you added the 3 from missions, that's a very time consuming activity.

Fortunately Bagaluth created a very handy tool for that, making it easy to calculate what's needed for a town to grow, how much it's needing every week, how much the Hanse needs every week, based upon its population, the cost prices in both goods and materials as well as the running costs of business.
Over the years when I played this game, I've added the needs of construction materials and their costs DredBanGer had collected at the TSR and the travel times in full days between cities, using a Level 0 sailing captain on a Cog for the sea-towns and a similar captain on a snaikka for rivertowns.

(And as soon as I've figured out how to upload the bloody excel file, I'll add it here.)

Using those travel times, I managed to create a formula telling me how much I need of a certain good to supply the city with enough goods to keep them happy.

For that, you need the weekly consumption of the goods of a town; something you can easily find in the market hall.
The next thing you need is the weekly production of the goods of that same town.
The third thing you need is the time it takes a ship to travel. Since it's a bit hard to figure out how long a ship travels between two cities as Patrician III uses an hourglass instead of a clock, I've kept full days in my formula.
This means that over time you will create an overstock at the destination city, however, it also guarantees the city won't run out of materials the moment a port is frozen or a convoy is in repair.
The last thing you need is the knowledge that you're sailing in TWO directions and make both stops twice, meaning you need to add those to the formula as well.

The resulting formula will look like this:

((X-Y)/7)*((A*2)+2)
whereas
X = weekly need of citizens and production
Y = weekly production
A = travel time


The screenshot shows the amount of goods both the citizens and industries use in Bruges. My own industries aren't taken into account here.

I'm going to use Beer for the example. Travel time between Bremen and Bruges is 4 days for a single trip. That would result in a formula looking like this

((58 - 0) / 7)* ((4*2) +2) or:
(58 / 7) * (10) gives
82.85714 barrels of beer needed for each week.
As the game can't work with decimals, I advise to transport 83 barrels of beer between Bremen and Bruges to keep it at full supply.
The Economy, Part III; Parties and expeditions
Festivals


Throwing a party means lots of food and drink. The amount depends on how many people show up.
Guidelines:
• Beer - 50 per 1000
• Wine - 30 per 1000
• Fish - 5 per 1000
• Honey - 5 per 1000
• Meat - 5 per 1000
• Spices - 5 per 1000
• Grain - 10 per 1000


Marriage


Marriage can be very profitable especially in the beginning of the game. When you accept a marriage offer you must throw a successful party(see above). After the party you get a dowry depending on how good the party was. You'll get one or two ships and goods loaded onto those ships. Sometimes the goods are valuable other times you will be disappointed.

Expeditions

Expeditions have two meanings in this game, with two different reasons.
To start an expedition, sail your convoy to the port near the big arrow at the left bottom corner of your map. Repair your ship(s) to make sure they are in the best condition. When that’s done, select your convoy, click at the arrow at the bottom left and a screen pops up. Select up to four destinations you want your ship to visit and confirm each destination after selecting it using the buttons using 1st – 4th. When all four destinations are selected, choose “Explore” to make the circle your captain explores the coastline at bigger.
When that’s done, click at “Let’s Go”. Your ship(s) sail off and will be gone for a certain time. Exploration takes about 3 months, trading takes less time when the captain gets to know the routes better.

The first expeditions you have to do are the exploration-expeditions.
These are sent to the coastline in the Med and their main purpose is to find a city or trade post you can trade with later. Because you can’t be certain which goods are accepted by the trade post or city, it’s best to use a single ship. Give the captain some gold to make it possible for him to buy some goods in case he does find a city or trade post. After about 3 months, the ship returns from the expedition. If you have found new trading opportunities, a video message will show you that. That also means the captain has used the gold you gave him to buy some goods.
The second kind of expeditions you can do are the trading-expeditions.
To do so, you have to send a convoy loaded with goods to the cities / trade posts in the Med. Instead of choosing “Explore” you choose “trade” this time. This command gives your captain a slight advantage when he is doing the trading in the city. Keep in mind that the captain’s trading skills have no effect at Med-trading at all.
To have the best effect of your expeditions, you have to keep some things in mind.
First of all, your ships will encounter storms and pirates along the way. This means your ships return to their starting port at high damage and because of that you need lots of money to repair the ships.
Make sure you have an office in that port, so you can transfer the bought goods to your warehouses. Also make sure you have a second convoy in that port, to transport the goods to your hometown. Use the same crew you use for your expedition convoy to save at wages. After you brought the goods from your expedition port to your hometown, you can fill the second fleet up with the needed goods, sail it to the expedition port and send it at an expedition again. If you do this right, you’ll be able to send at least 4 expeditions to the Med a year.

Captains

Since the trading skills aren’t important when going on expedition, there are only two skills you have to keep an eye out for when selecting a captain for your expedition convoys.
• Sailing skills – Make sure your captain is having at least level 4 in these. During the trip to the Med he’ll encounter storms and pirates. A captain with high sailing skills is more likely to avoid them.
Also; higher sailing skills makes it more likely the expedition is done faster.
• Fighting skills – As said before, the convoys most likely will encounter pirates along the way. Your captain won’t capture any ships when he’s attacked by pirates, but he will try to destroy them. Higher fighting skills are needed for the moment when the convoy returns. It’s very likely a pirate convoy is awaiting your return from the Med. Since most of your ships are loaded to the boards and damaged a lot, it’s hard for them to flee. A captain with good fighting and sailing skills is able to drive the pirates away, to sink them or even to capture some ships.

Amount of cargo

The key of an expedition is to return with special goods; wine and spices are the two most important ones, but cloth and pottery are useful too. However, that's of no use if your convoy (partially) sinks when it's on an expedition.

Therefore it's reccommended to load your cargo ships with no more as 75% of it's maximum amount to avoid the ships being damaged too much by pirates and storms. Also, make sure your convoy leader isn't loaded with goods at all, as it's most likely the first ship the (unseen) pirates will attack.

Unfortunately does the AI not use this setup, meaning a returning convoy is having its ships fully loaded, including the convoy leader.
It's therefor a good idea to have an office in either Bruges or London from which your expedition departs, making it easier for you to transfer the goods onto other ships for further distribution, while your expedition fleet gets repaired.
Having more fleets later in the game to be send to an expedition will be a smart thing to consider as well.

A map with all locations of the Mediteranian trade ports:


Discovering and trading with America

• Sail to a most western point of your expedition map.
• Use a level 3 Holk with a captain with a 5 in sailing abilities.


The best ships for Expedition

o Explore with Crayers in the Med.
o Explore with level 3 Holks in America
o Trading convoys Holks or level 3 Cogs

Round trips

A round trip is a good way to make loads of money and still end up with goods to trade in the Hanse.
The idea behind it is based upon the Triangle-trade, done in the 17th and 18th European powers.
To do a round trip, load up a convoy with the goods required to buy wine in one of the Mediteranian cities. However, don't load up more as 50% of your convoy capacity. Instead use the other 50% to load up your convoy with Iron Goods.
When this is done, select one of the cities in the expedition screen requiring the goods you want to sell and buy only wine in there. You can even select a second city to sell the rest, however keep in mind you won't sell the Iron Goods.
As third and fourth stop, select an Indian tribe at the American coast and sell all wine and Iron Goods there. If all goes well, your captain will return with an empty convoy, but also with a huge load of gold.
While these trips may take some time, they're quite profitable as all goods are usually sold for the highest price as long as you make sure you keep a reasonable time between them.
The Economy, Part IV; Construction
Construction


Construction is the key to expanding your trade empire. During the course of the game you will have to construct ships, factories and housing along with city improvements like streets, wells and hospitals. New additions are the School (to attract beggars), the Mint, (to increase the number of Rich citizens) and the Chapels; to give the population more church access.

The key to saving money on all of your construction projects is to buy your building materials from towns which produce them efficiently and amass them in your warehouse before starting construction. Here are some tips to consider along with a few key production cities.

• AVOID buying materials from cities which don't produce them. Iron goods are going to be at least twice as expensive in towns like Stettin, Gdansk and Thorn (If you can even find them in those towns.) as they will be in Lübeck or Stockholm. Buying iron goods in non-producing towns will needlessly add THOUSANDS to your construction costs. Have them on hand before you begin building.
• Maintain a flotilla of ships for construction. Keep a convoy of Holks and/or Cogs strictly for the purpose of picking up and delivering materials to your construction sites. One Holk and two Cogs can easily amass enough materials to supply the largest construction projects. Trade Offices, Hospitals, Merchants houses and certain factories will require 50 loads of tiles, 20 loads of timber and 20 barrels of iron goods to initiate construction.
• Strongly consider producing your own building materials. There are times when timber and other goods can be scarce and expensive. Settings up an extra sawmill or two will eliminate that problem. Don't be shy about producing your own tiles (bricks) either. If you goal is to become Lord Mayor and expand your hometown, then you will have to have a steady, reliable supply of tiles for wall construction. Consider this a necessary expense of building your empire.


When constructing ships, don't forget about the other materials you'll have to amass in order to build them. Keep these items on hand for ship construction: Hemp, cloth & pitch as well as timber and iron goods.


Keep some spare Pirate Cogs in port to store materials that you don't want sold by your auto trader. By moving materials out of your warehouse to spare ships, you remove them from the auto trade cycle and will have them available for construction.


Finally, a list of materials and a few key cities that produce them:


The Big Construction Three (only effective production taken into consideration)

1. Timber - Thorn, Novgorod, Groningen, Stockholm, Scarborough, Aalborg and Oslo
2. Tiles - Lübeck, Oslo, Ripen, Bremen and Groningen
3. Iron Goods - Stockholm, Lübeck, Reval, Bremen, Scarborough, Bergen and Edinburgh

The Big Four (only effective production taken into consideration)

1. Timber - Thorn, Novgorod, Groningen, Stockholm, Scarborough, Aalborg and Oslo
2. Wool – Malmö, Visby, Bruges, London and Scarborough
3. Grain - Groningen, Hamburg, Rostock, Stettin, Gdansk, Reval and Ladoga
4. Fish – Hamburg, Lübeck, Stettin, Riga, Ladoga and Edinburgh

Additional items for ship construction (only effective production taken into consideration)

• Hemp - Rostock, Gdansk, Stettin, Ladoga, Hamburg, Groningen & Bruges
• Cloth - Visby, Malmo, Edinburgh, Scarborough, Bremen & London
• Pitch – Oslo, Gdansk, Riga, Lübeck, Bergen & Novgorod

As we at some point need to expand, we will need building materials in quite large amounts. Especially for the city building or land-route missions, large quantities of building materials are required.
It's therefore advised to start storing these materials aboard of one or two convoys and make sure you got all you need to finish the project before even starting it.
The Economy, Part V, Production
Production


Production can be very expensive and dangerous if started too early. A good guideline on when to start is if you having a network of ships consistently supplying a town with its needed goods and you are distributed goods between a few towns in the Hanse. Good early production items are iron goods and beer. Iron goods require ore (pig iron) and timber; so make sure you always have iron ore and timber in your warehouse. Beer requires Grain and Timber. A single Iron goods workshop will increase your tax bills about 5000/week when fully manned. If you build a business and can't distribute its output in time to meet the tax bill then you should destroy it or start moving the goods quicker before ending in bankruptcy.


Building in towns that are efficient at making a good, will greatly improve your ability to make money. Also your business gets bonuses in efficiency if they have numerous sites in an industry. +5% for 3 +10% for 6 and +15% for 9 businesses each.

Note

While it doesn't seem to be logical, eventually producing goods ineffective in a town will be needed as transporting them to that town won't be enough.
The reason for that are the bonus' you get from having 3, 6 or 9 industries, turning a cluster of inefficient industries into a semi-efficient one. As a result the prices of the items will drop and when being mixed with similar goods from an effective production facility, end up lower as they are when using a single ineffective plant.

Another reason to produce goods with ineffective industries is that they'll help you cover shortages caused by events. Especially plagues can increase the demand of wood and cloth and having an ineffective sawmill in that town will help you selling off your excess wood for a price you usually won't be able to sell at.

City Growth

In order to grow a city population people must want to live and work in your city. You accomplish this by maintaining a sufficient stock of food and drink at a reasonable price in the city. These goods must be sold to the city and not in your warehouse. You must also provide jobs to people moving into the city by building production facilities. Also they must have housing available most importantly timber houses for the poor. The higher classes will come and stay if the town consistently has luxury items like wine, spices, and skins.

Improved Ships


Each time you build or repair a ship that shipyard improves its designs and building time. Ships get a higher loading capacity as well as more crew. Snaikka’s, Crayers and Cogs are available from the start. Holks only show up after your shipyard gets a certain amount of experience. Starting closer to 1400 will give you the ability to have Holks early in the game too. Extending a ship will provide it with capacity for ship weapons and also make the ship less vulnerable to damage. Ships begin as Level 1 and can reach maximum Level 3. While Snaikka’s and Crayers need an upgrade before they can carry weapons, Cogs and Holks have weapon slots from the start. However, upgrading a ship to make it possible to carry (more) weapons, also means you have less cargo space available.
The Economy part VI: Other means to make money
Introduction

While trading most likely will form the bulk of your income, there are other means to generate an income as well. And some of those can be rather profitable if you play things well.

Some of those means of income are already mentioned in other sections, while others haven't. Although they aren't always good enough to provide a good income; they may be good enough to give you just that extra bit of income to keep alive at hard times. Or just being done because you can.

Piracy and auctions

As mentioned earlier and further down this guide, both piracy and auctioning things off can be profitable. When combining the, however, they could even create a nice income.

What's needed for it is a good ship able to deal enough damage, have a full crew armed with a surpluss of cutlasses and be a member of your hometowns guild.

What you need to do is pretty easy:

Capture any AI merchant ship with your pirate vessel.
Sell all goods it has aboard in your hometown, remove any weapons and sell them to the weapon smith if there are any; but save a few cutlasses to replace lost ones, fire the crew, repair the ship and put it up for auctioning.
Once the auction starts, place a few bids to increase the price, then wait for an AI merchant to buy the ship. If you got the chance to capture it, do so. If not, there are plenty of white sailed pirates around who's wrecks needs to be salvaged.

Selling to the prince

After getting to a certain rank - I believe it's councillor - you are able to talk to the envoy of the prince at the city gates. While talking to him once in a while to deliver goods is useful, using the prince to get rid of excess materials is a nice thing too. Especially when they're bulky goods like bricks, grain and timber, which use a lot of storage space but generate barely any profit.
I remember how a player used to sell all his excess grain to the Prince when we were having a challenge at the TSR; earning that player the nick name "Grain-man".

Loan sharking

This is a bit harder to start, but could generate quite a nice income once you got it going.
The general idea is to give out enough loans to AI merchants that they will generate a profit once they've been paid back. The trick is to manage getting loans being paid back every day, and generate enough money to pay off the weekly taxes of your office.
The problem is that occasionally an AI merchant isn't able to repay his loan, giving you the option to let is slide or impound his ship and goods. That usually means you end up with low profit goods like grain, wool or timber and a ship that's having 20% health left. Which also means you need to repair the ship before you can even aution it off.

All in all is loan sharking something that's better done on the side, instead of being your main source of income.

Buying shares

While this isn't possible in a single player game, it is possible in a multi player game.
But with that knowledge, it is possible to abuse the save-game system to help you generate an extra income, as the AI never buys back its own shares.

What needs to be done is to start a game in Single player.
Save the game using a noticable name (i.e. shares), exit Patrician III and open windows explorer or any other program having the ability to move data files.
Move the single player saved game from
C:\Program Files (x86)\Steam\steamapps\common\Patrician III\Save\Ein

to

C:\Program Files (x86)\Steam\steamapps\common\Patrician III\Save\Mehr.

Now start Patrician III, choose the multi player option and pick hotseat.
The first name in the row will be yours, but when clicking at the buttons below it you will be able to add AI traders as listed below:


After starting the game, make your first move, then click at the pawn to move to the next "player"


The fun part is, that you're able to play as the AI traders, thus selling a part of their shares; which you are later able to buy up in either Single player or the Hotseat mode.
After a while the AI traders will have to dividend to the shareholders, which is you. And the more their company value increases, the higher the dividend will be.

After you've sold the 20% of the shares of the AI merchants, save your game, exit to the menu and load the game in hotseat mode again. This time, remove the AI merchants from the list, so that only you are left as a player. When that's done, start the hotseat game and save the game again.
This time, exit Patrician III and move the saved files back into the "Ein" folder.
After that, start Patrician III, load the saved game and continue playing. At some point the AI shares will pop up at the money lender. When they do, and you do have the money, buy them and wait for the dividend roll in.
Construction Part I: Office and town buildings
Introduction

No matter what you do, sooner or later you will have to expand not only your fleet, but also invest in both industries and housing. Not to mention that certain missions demand you to build up an entire town.
As that may require lots of planning, gathering construction materials and building, here's a list of all buildings you can construct in a town, found under the office and town buildings buttons. And for convinience, I've added the amount of materials needed to build them.

Office buildings

These are the buildings found under your office button in the construction menu.

Trading office
Bricks: 50
Iron goods: 20
Timber: 20
Gold: 13.000


Half Timbered house
Bricks: 25
Iron goods: 2
Timber: 2
Gold: 5.000


Gabbled house
Bricks: 40
Iron goods: 10
Timber: 10
Gold: 8.000


Merchant house
Bricks: 50
Iron goods: 20
Timber: 20
Gold: 8.000


Warehouse
Bricks: 40
Iron goods: 20
Timber: 20
Gold: 10.000


City Buildings

These are the buildings found under the municipal button in your construction screen.
Some of those are only available when doing a "build a new town" mission.

Armoury
Bricks: 50
Iron goods: 20
Timber: 20
Gold: 4.000


Bath House
Bricks:
Iron goods:
Timber:
Gold:


Chapel
[image added later]
Bricks: 80
Iron goods: 30
Timber: 30
Gold: 2.000


Church
Bricks: 80
Iron goods: 50
Timber: 50
Gold: 8.000


Hospital
Bricks: 80
Iron goods: 30
Timber: 30
Gold: 7.000


Money Lender
Bricks:
Iron goods:
Timber:
Gold:


Market hall
Bricks: 50
Iron goods: 20
Timber: 20
Gold: 4.000


Mint
[Image to be added later]
Bricks: 80
Iron goods: 50
Timber: 50
Gold: 25.000


Road
Bricks: 10
Iron goods: 1
Timber: 1
Gold: 200


School
Bricks: 80
Iron goods: 40
Timber: 40
Gold: 15.000


Tavern
Bricks: 50
Iron goods: 20
Timber: 20
Gold: 4.000


Town hall
Bricks: 80
Iron goods: 50
Timber: 50
Gold: 8.000


Weaponsmith
Bricks: 50
Iron goods: 20
Timber: 20
Gold: 4.000


Well
Bricks: 10
Iron goods: 1
Timber: 1
Gold: 2.000
Construction Part II: Agricultural and raw material industries
Introduction

These groups of buildings are those which either provide a resource for a finished products industry or are subject to influence of the seasons. As that influence not only includes reduced output, but also the effect caused by a frozen port, two industries that may be considered to produce finished products are included in this list.

Agricultural buildings

Apiary
Bricks: 40
Iron goods: 10
Timber: 5
Gold: 3.000


Cattle Farm
Bricks: 50
Iron goods: 20
Timber: 20
Gold: 5.000


Grain farm
Bricks: 25
Iron goods: 2
Timber: 2
Gold: 3.000


Hemp farm
Bricks: 25
Iron goods: 2
Timber: 2
Gold: 3.000


Sheep farm
Bricks: 20
Iron goods: 20
Timber: 20
Gold: 8.000


Vineyard
Bricks: 50
Iron goods: 20
Timber: 20
Gold: 8.000


Fisheries

Fisherman's house
Bricks: 40
Iron goods: 5
Timber: 5
Hemp: 10
Gold: 3.000


Fisherman's house (oil)
Bricks: 40
Iron goods: 5
Timber: 5
Hemp: 20
Gold: 5.000


Raw material industries

Iron smelter
Bricks:
Iron goods: 10
Timber: 10
Gold: 10.000


Sawmill
Bricks: 25
Iron goods: 2
Timber: 2
Gold: 3.000
Construction Part III: Finished product industries
Introduction

In this section you'll find the buildings that produce the finished products that usually offer the biggest profits.
Each of these buildings require at least one resource to produce the item, however, none of them is having any problem with a chance of seasons. Which is why the fisheries won't be found under this section, although according to some they could be considered as finished product industries.

Brewery
Bricks: 40
Iron goods: 5
Timber: 5
Gold: 5.000


Brickworks
Bricks: 10
Iron goods: 1
Timber: 1
Gold: 1.000


Hunting lodge
Bricks: 40
Iron goods: 10
Timber: 10
Hemp: 10
Gold: 8.000


Pitchmaker
Bricks: 10
Iron goods: 1
Timber: 1
Gold: 1.000


Pottery
Bricks: 40
Iron goods: 10
Timber: 10
Gold: 5.000


Saltworks
Bricks: 25
Iron goods: 2
Timber: 2
Gold: 3.000


Weaving mill
Bricks: 50
Iron goods: 20
Timber: 20
Gold: 8.000


Workshop
Bricks: 50
Iron goods: 20
Timber: 20
Gold: 8.000
Construction Part IV: Military buildings
Introduction

This section contains all buildings required to defend your city. Not just the walls and towers, but also the ones where your weapons are created and your men are trained.

Defensive structures

Gate bombard tower
Bricks: 20
Iron goods: 20
Timber: 20
Gold: 3.000


Gate cannon tower
Bricks: 50
Iron goods: 20
Timber: 20
Gold: 4.000


Pitch shoot
Bricks: 25
Iron goods: 5
Timber: 5
Gold: 2.000


Port bombard tower
Bricks: 20
Iron goods: 20
Timber: 20
Gold: 3.000


Port cannon tower
Bricks: 50
Iron goods: 20
Timber: 20
Gold: 4.000


Town wall

Bricks: 10
Iron goods: 1
Timber: 1
Gold: 200


Townwall gatehouse
Bricks: 25
Iron goods: 2
Timber: 2
Gold:
Construction Part VI: Ships
Introduction

While it's gold in this game that makes it possible to buy goods, erect buildings, walls and other defences, all of it would be useless without ships.
It's your ships that transport the goods between towns, making it possible to buy what you need and sell what they need.
It's your ships that transport the goods needed to complete certain missions and it's your ships that destroy the pirates that prey at your convoys.

Patrician III offers four different ships, out of which three are available if you start at 1300, while the fourth is available after you have managed to upgrade your shipyard far enough to build them. The only other option to get the fourth one available is by starting close to 1400.

While each of the four ships start with a certain amount of cargo it can transport, these amounts - and the maximum amount of sailors - can increase the more experienced a shipyard becomes.
However, when upgrading a ship to have it carrying (more) weapons, the amount of cargo a ship can hold decreases; while it's hull becomes stronger.

To seperate the ships, I've split them into two classes; River sailing ships and Sea going ships.
While the River sailing ships are able to sail at the seas - and usually have to before they even get to a river, the Sea going ships have a draft too deep to sail (far) upon rivers.
However, if for some reason your hometown is a river town, any captured Holk or Cog will be able to sail up river. Miracles do exist in games!

All ships can only be build by a Ship YARD; however, reparing and expanding can be done by both the ship yard and repair dock.


River sailing ships

Snaikka

This is the first ship you start with and one you most likely will capture more of or build more of before you're able to build bigger ships.
Eventually most Snaikka's will end up in convoys supplying one of the three river towns, Cologne, Novgorod or Thorn (Torun). However, despite that, they're very useful ships early in the game.

Snaikka's can't be armed after they're finished at the shipyard, but instead need to be upgraded to Level 2 to carry 2 small weapons at both sides or to Level 3 to carry 5 small weapons or 2 large weapons and one small weapon at both sides.

  • Speed 6 knts
  • Agility: 100%
  • Size (barrels): 150 / 190 / 230 / 250
  • Crew: 5 - 15 / 5 - 19 / 5 - 23 / 5-25


    Required construction materials:

  • Timber: 7 / 9 / 11 / 11
  • Cloth: 3 / 3 / 3 / 3
  • Iron goods: 3 / 3 / 3 / 3
  • Hemp: 3 / 3 / 3 / 3
  • Pitch: 20 / 20 / 20 / 20
  • Gold: 8.550 / 9.114 / 9.664 / 9.664

Crayer

Fast, quite agile, a decent crew; the Crayer will most likely become your main pirate hunter, pirating ship or convoy leader for all your rivertown convoys.
Although it's not as agile as a Snaikka, it's higher speed, bigger crew and higher amount of hitpoints makes it a much better combat ship. It's therefor likely that you build Crayers from the moment you can and only use Snaikka's for other purposes.

Just like Snaikka's, Crayers need to be upgraded to Level 2 to carry 2 small weapons at both sides or to carry 5 small weapons or 2 large and one small weapons at both sides at Level 3.

  • Speed 7 knts
  • Agility: 90%
  • Size (barrels): 280 / 310 / 340 / 350
  • Crew: 8 - 28 / 8 - 31 / 8 - 34 / 8 - 35


    Required construction materials:

  • Timber: 12 / 14 / 16 / 16
  • Cloth: 5 / 5 / 5 / 5
  • Iron goods: 5 / 5 / 5 / 5
  • Hemp: 5 / 5 / 5 / 5
  • Pitch: 30 / 30 / 30 / 30
  • Gold: 19.110 / 19.519 / 20.697 / 20.697

Sea going ships

While the Snaikka and Crayer are able to sail the seas, Patrician III offers two ships which are able to transport large amount of goods between all cities not located along a river.
Out of those two the Cog is immediately available, the Holk will become available later, or is only immediately available when you start your game very late.
Unlike the Snaikka and Crayer, however, both ships are able to be armed at Level 1; which gives them a bit more defence against pirate attacks.

Cogs

Cogs are most likely going to be the majority of your transport fleet, including being convoy leader until you have the ability of Holks.
Cogs are able to carry 4 small or 2 large weapons at both sides at Level 1; 6 small or 3 large weapons at both sides at Level 2 and 9 small weapons or 4 large and one small weapons at both sides at Level 3.

  • Speed 5 knts
  • Agility: 100%
  • Size (barrels): 450 / 480 / 520 / 550
  • Crew: 10 - 45 / 10 - 48 / 10 - 52 / 10 - 55


    Required construction materials:

  • Timber: 18 / 20 / 22 / 22
  • Cloth: 3 / 3 / 3 / 3
  • Iron goods: 4 / 4 / 4 / 4
  • Hemp: 4 / 4 / 4 / 4
  • Pitch: 40 / 40 / 40 / 40
  • Gold: 17.280 / 17.239 / 18.174 / 18.174

Holks

What Crayers are to Snaikka's are Holks to Cogs. Bigger, faster, able to hold a larger crew and more cargo; Holks are going to be your convoy leaders, pirate hunters and transport ships for expeditions and "inter-hub" convoys. They may even replace your Cogs at some of the convoys transporting lots of bulky goods, but they will never completely replace them.
Just like Cogs, Holks can be armed at Level 1. A Holk at that level is able to carry 6 small or 3 large weapons at both sides; at Level 2 it's able to carry 9 small weapons or 4 large and one small weapons at both sides and at Level 3 it's able to carry 12 small or 6 large weapons at both sides.

  • Speed 5 knts
  • Agility: 80%
  • Size (barrels): 550 / 590 / 650 / 700
  • Crew: 12 - 55 / 12 - 59 / 12 - 65 / 12 - 70


    Required construction materials:

  • Timber: 30 / 33 / 36 / 36
  • Cloth: 10 / 10 / 10 / 10
  • Iron goods: 10 / 10 / 10 / 10
  • Hemp: 8 / 8 / 8 / 8
  • Pitch: 50 / 50 / 50 / 50
  • Gold: 23.628 / 23.724 / 25.467 / 25.467
Available Missions (1)
Introduction

In Patrician III you'll find three locations where you can find missions.
The first location is the Tavern Sideroom.
The second location is the Alderman's office; which is located at the townhall of the city where the current Alderman (or Fleetmaster in some translations) is from.
The third location is the Townhall, where you can find the easiest available missions.

While the missions in the Tavern Sideroom are pretty straightforward and usually easy to complete, the one in the Alderman's office usually require to invest a lot of time, money, resources and overall... patience.
The benefit of all three mission locations, however, is an increase in reputation in either the town the mission is from or the entire Hanse, captured ships, goods, a "bank" and gold.

Tavern sideroom missions

These are the first missions a player encounter and usually the ones taking little time - yes even a patrol mission takes little time compared to some Alderman missions - require often the use of one ship and depending at the player's skills and game settings could even end up with a captured ship.
I'll list the available missions here, as well as the possible reward and a small walkthrough as they're pretty obvious.

Avenged brother mission

The player is contacted by a man who has lost his brother to a notorious pirate and now seeks revenge. He's willing to play a small sum to the player, if the player is prepared to kill that pirate.
After accepting this mission, the player gets a map in his message box, showing a piece of costline and a red cross; which are the location of the pirate.

Sail to the location - which is pixel sensitive, so it may time a few attempts to the right spot. As soon as the player does, the player get a message about being attacked by the ship of the particular pirate. Accept the fight, defeat the pirate and you'll receive the reward.

Note
Before getting to the location, slow your game down and save the game. It could be useful to do the fight again if you fail to capture the ship the first time.
Keep a good eye at the amount of money the man offers. The higher the amount - usually around 7.000 pieces of gold - and chances are you will encounter a 55 man Holk, usually with 40-50 man aboard. With the right tactics and patience, it's possible to whittle the amount down below 28 crew, meaning you can board that ship with a Tier 1 Crayer. The tricky part is to achieve that amount without sinking the Holk. Usually the Holk ends up with 4-7 health points when you get its crew below 28. If the crew is still too high, sink the ship and take the reward, or load the game and try again.

Competitor

The player is asked if he or she is prepared to destroy a ship of a competitor of the person contacting you. If the player accepts, he or she will receive a nice sum of money.
When accepting this mission, keep in mind that it means you need to use an armed ship, but also have to become a pirate. With all the advantages and disadvantages that come with that.

However, if the mission is accepted and the ship of that specific trader is captured; the player not only ends up with the gold offered as mission reward, but also with a new ship, goods and an increased reputation with the underworld.

Courier

The player is contacted by a person who's left behind in a town and now seeks someone to help him doing his deliveries in other cities.
If the player accepts, the courier and a package board your ship and the name of the first city to visit is given to you. After the player has visited all cities, a reward is given; which can be higher as the offered reward, depending how swift the mission was done and whether or not the player was attacked by a pirate.

Note
Just like the excort and patrol missions do, does the height of the reward give you a clue about what kind of ship you encounter.

Delivery missions

These mission require the player to deliver an X amount of Y good within Z days to the person giving the player the mission.
When the good are delivered they player receives the amount of money the contact in the side room has offered for the good. Failing the mission results in reputation loss.

Escort missions

The player is contacted by a person who has to leave the town rather quickly. When the player accepts, the contact boards one of the ships, which then has to sail asap to the mentioned town. Often the player is attacked when doing this mission, so if you plan to capture ships, make sure that particular person is aboard an armed ship or at a ship that's part of an armed convoy.
Whether or not the ship is captured, sunk or avoided, the moment the ship with that passenger docks in the mentioned town, the mission is completed.

Note
Just like with the Avenged brother mission will the amount of money give you a clue about what ship to encounter. Ships you can encounter at this mission are Snaikka's or Crayers, both upgraded to first stage or a 55 crew Holk.

Fugitive

The player is contacted by a person who needs a quick ride to another town and is willing to pay a nice sum for it.
While the wording is slightly different, this is basically another escort mission. Which also means that depending at the amount of gold offered, the player will face a Snaikka, Crayer or Holk if he or she is attacked.

Goods buyer

As the name already says, the person contacting the player is asking the player to deliver a certain abount of a specific good at him within 7 days.
If the player succeeds, he or she is offered a certain amount of gold.

Patrol missions

The player is contacted by a person who'd like to visit several towns with a trading convoy, but is afraid the competition will attack that convoy. Therefore the player is asked to send an armed convoy to several towns to make sure the trader will be able to travel safely.

Again, a very straight forward mission. As soon as you accept the mission, you get a message with the first location. Sail to that location, recieve a message with the next location and so forth.
After visiting a few towns, the mission is completed and the player gets rewarded.

Note
Just like previous two missions, the amount of gold offered shows if and what kind of pirate can attack you. The higher the amount offered, the better the ship. If the player manages to defeat the pirate, the reward is increased.

Renting storage space

One of the more illegal missions; similar to the messages asking for some storagespace.
The message and the mission look pretty easy, however there's a nasty trick involved in it. Which is that the amount of goods you need to store have to be "covered" by similar goods you have. And to do that, you need to have at least 9 times more good available as there are offered. Which often means you need to build yourself a warehouse or two for this mission, while the reward is usually pretty low.

Smuggler

Another illegal mission and another one with a nasty trick in its sleeve, as here too you need to have similar goods aboard your ship to cover the smuggled goods.
Moreover, in order to do the mission, all goods need to be stored at a single ship; meaning that occasionally only a 70 crew Holk is able to be used.

Trader

A mission similar to the smuggling mission, except you don't have to cover up the transported goods.
You do however need to have the goods being loaded at a single ship.
Available missions (2)
Townhall missions

The missions you find in the townhall are usually not the hardest ones to complete, but they do have a time limit. Which means it's a good idea to check how many days you got left to complete the mission, how long it takes the ship you want to use for the mission to get to the mission goal; or if the ship is able to get here at all!

In general they are all "delivery missions"; meaning you need to transport X amount of goods to Y city before Z date. When arriving at the right city before or on that date, enter the tavern, contact the person the message tells you and hand him the amount of goods he asked for. As soon as the date mentioned in the contract passes, the money will be transferred to you.

Succeeded missions end up with a nice payment for the goods and an increased reputation in the delivery town.

The second kind of townhall mission isn't a real mission in its meaning, yet it's something the player can consider to do to keep a nice reputation in any town he / she got an office in.
What I'm talking about is placing an Outrigger.

In short, the Outrigger is a guard ship, having a captain, full (armed) crew and is usually a Stage 3 ship with full armament.
Although there's no financial reward for having an Outrigger, it's a good method to train a captain in fighting skill and to boost your reputation in that town.
In a few occasions a pirate is dumb enough to attack a town you got an outrigger in, you will have the chance to command the ship and either capture / sink the pirate's ships.

Alderman missions

These are the harder and occasionally most frustrating missions available in this game. While all of them give you a good reputation all over the Hanse if you complete them, failing them will result in being considered "unreliable" and in worst case having to wait a while before you can even do a new attempt.

There are a total of 5 available missions, three of them requiring you to build something, two requiring you to find and destroy pirates. All five missions require a good preparation in either goods and / or ships to be completed.

Construction missions

Bring a town to prosperity

This is one of those missions that require time, goods and ships.
The goal of the mission is to increase the population of a certain town to a certain amount within a year.
To do that, you have to build houses and industries, and supply it with enough goods to increase the town population.

Create a new town


In this mission you will have 1 year to build a town with all of it's facilities and make it to reach a population of 1.000.

In order to build everything, You will need:

Around 1200 brick, 400 timber, 400 iron goods, 50 hemp and 200.000 gold.
Large enough convoy(s) that can carry goods in this rate.

After you accept the mission, a new town (called a settlement) will be added to the map. You can't decide the place and the name of this settlement. When you visit it you will find an already constructed port, including the harbourmaster's watchtowers and the piers.

You will have to build the different facilities in a given order:
  • Markethall: trade cranes will be added with it, so you can start to sell/buy goods to the town in a price of 0, so effectively it provides storage.
  • Trading Office: Gives you the usual abilities like building dwellings, businesses, warehouses and the ability to store goods separate from the market in your own office/warehouses.
  • Town Hall
  • Weapon Smith
  • Armoury (Arsenal)
  • Town Wall
    After the town wall is completed:
  • Repair dock, roads, wells, Tavern
  • Church

Buy/sell prices will remain 0 until you finish the mission, so you don't have to build warehouses, you can use the marketplace for storage, but keep in mind that the citizens will consume the goods stored there but your businesses won't. Since sell prices will be 0 and you have to provide for all the needs of the citizens, you have to bring all the goods there for free until the settlement has a population of 1.000.

As a life-time manager (effectively lord mayor), you don't need the permission of the council chamber, you can set the taxes to any values, build the next wall immediately after you finished one, and train as many units in the armory as many you want, but there is a limit of 20.

An easy way to increase the settlement's population is by dismissing sailors (sailors are hired beggars) in the town and then training them in the armory. Keep in mind that the town's guard has an upkeep cost. A population of 1.000 can maintain around 10 units from normal taxes, so you have to donate gold to the coffers if you exceed this practical limit.

The mission will be done once you have the buildings constructed and the settlement reaches a population of 1.000, so you don't have to wait until the deadline. However, there is a minimum time set, which is 6 months.

Note:

The following towns can be constructed at the standard map:

  • Ahus
  • Boston
  • Flensburg
  • Göteborg
  • Haarlem
  • Harlingen
  • Helsinki
  • Königsberg
  • Memel
  • Newcastle
  • Naestved
  • Pernau
  • Rügenwald
  • Stavanger
  • Tönsberg
  • Windau


Each city with the yellow dot represents the location of a new town the player can construct.

Overland Trade Route

An overland Trade Route is one of the possible missions that lead to the rank of Alderman. You can accept the mission under the Alderman's Office menu in the Town Hall of the hometown of the current alderman.

You have a 5-7 months to estabilish an overland trade route between two towns. You simply need to deliver a large quantity of materials to any of the two towns (and dump them at the town gate). Goods can be delivered all at once or in smaller portions (it's best to bring all types of goods at each delivery, so that the construction can start).

You can check the status of the development under the towngate's Overland route menu. It will show the rquired amount of materials in the right side and the amount You provided on the left. The right side always show the amount that haven't been used yet, so it will decrease during the development. It also shows (in percentage) how much of the route has been constructed. The construction time is in the range of months so You have to make sure that all 4 materials are available from the start and during the whole development, so the construction never has to stop. When the construction is done, the building of a barn will be started in both towns. After the barns have been built, the land route will be opened (an animation will be played for this event) and you can use them for land trade (if you have an office in both town) just like the ones in the Luebeck-Hamburg route.

Total number of goods depends on the route:

Ladoga - Novgorod: Timber 270 Load, Bricks 360 Load, Iron Goods 90 Barrel, Hemp 180 Load
Cologne - Bremen: Timber 390 Load, Bricks 520 Load, Iron Goods 130 Barrel, Hemp 260 Load
Stettin - Torun: Timber 360 Load, Bricks 480 Load, Iron Goods 120 Barrel, Hemp 240 Load

It is however also possible that an overland route between one of the newly created towns and one of the other towns can be constructed.
Available missions (3)
Alderman missions Part 2

Pirate hunting missions

Hunt a Notorious pirate

The goal of this mission is to find a specific pirate and to destroy him and his convoy. To do that you got some means at your disposal, however, imho this is by far one of the most, or perhaps THÉ most frustrating mission in the game.
The main reason for that, is that the pirate you need to hunt often sails to a hideout as soon as possible and stays there until the mission time has completed.

Fortunately there's a way to counter this problem. One is offered to you by the game, the other one is by using your wits. And the save-load "cheat".

  • In order to destroy the pirate, you need to find him first. Even with many convoys at sea, that may not be easy, so it's recommended to slow the gamespeed to the slowest setting, then save the game, prior to accepting the mission.
  • After the game is saved, enter the Alderman's office and accept the mission.
  • You will now know the name of the pirate, so visit a tavern and check the informer. Usually he will give you a rough location where the pirate has last been seen.
  • Now you know the rough location of the pirate, start looking at your minimap for black dots.
  • As soon as you see one, click at it to see if it's the name of the pirate you need to hunt down.
  • If it's the pirate you need to kill, attack it with the nearest armed convoy. It doesn't matter if that convoy is a trading convoy or not; as long as the convoy leader is armed and dangerous, it's able to help you complete the mission.
  • Kill the pirate, wait for the message to tell you you've completed the mission and continue the trip with the convoy that killed it.

If, however, the pirate doesn't show up in the time the mission has to be completed, load your saved game and wait a couple of days.
  • Since you know the name of the pirate you need to hunt and his last known location, check the black dots when they show up on the map until you find him.
  • Reduce the game speed to slowest again, visit the Alderman's office and check if the mission is still there.
  • If it is, save your game, accept the mission to see if it's the same name.
  • If it still is the same pirate, accept the mission and attack his convoy.
  • If it isn't, load the saved game, wait a few days and try again until you're successful.

Destroying a pirate hide-out

Destroying the pirate hideout is one of the missions you can accept in the Alderman's Office menu in the Town Hall of the hometown of the current alderman.

Once you have accepted the mission, you will get a map marking the location of the hideout and will have 1 month to destroy it.
The locations are similar to those used for the build a new town missions.

Each city with the yellow dot represents the location of a possible pirate hide-out.

When you approach the marked place, a black dot will appear that you can attack like any other cities if you were a pirate. When you enter the hideout you will find a settlement with a Tavern in the center and different amounts of half-timbered houses around it indicating the size of the hideout. Defending forces consist of around 8 ships (of different types) and 1-3 port towers. You have to sunk, capture or flee all the ships then destroy the towers.

You can flee from the hideout and reenter as many times as you want. If you reenter immediately the pirate ships will remain in the same condition, so You can easily destroy the pirate fleet with a single ship and some good maneuvering by attacking along the side of the map and fleeing from unfavorable situations. Destroyed port canons also remain destroyed, but the damaged ones will be fully repaired each time you enter the hideout.

A good tactic is to create a small convoy (2-3 ships) from fully armed and manned crayers or hulks to manually destroy all the pirate ships by multiple reentering. Then, with a second convoy consisting from many fully armed cogs (best maneuvering abilities) to destroy the port canons either manually or by letting the computer to do the work. If you do this manually it is good to know that you can anchor ships by putting the little sailing ship icon on the speed slider (above the graphic that shows the ship's weapons) to zero. This way (without dangerous pirate ships) you can anchor your fleet out of the port cannon's range and use only a few cogs for attacking by hand, so if one of them gets hit, you can swap it to another anchored one still being in great condition.

The port cannons always shoot in front of the ships. Before the tower shoots it calculates where the ship will be on impact, based on the ship's direction and speed at the time of the shoot. So the best way to avoid the hit is to sail as fast as possible and after the cannon shoots change direction immediately. This is easier to do when the ship is far away from the tower, but you have to keep in mind that the tower has a bigger range then any of the ships weaponry. Wind direction is an important factor too. You should wait until the wind changes, so it blows in a direction that lets your ships to sail mostly parallel to the coast so you can get in and out as fast as possible.

You can use multiple ships to attack the same tower, but it is best to order them into a queue with some space between them so they don't collide during maneuvering and also protect each other, because while an incoming ship is being targeted, a leaving ship can sail safely and vice versa.

After you destroyed the last tower, the mission will end and an animation will be played for the event. Unlike attacking regular towns, You don't get goods from attacking a hideout, but You do receive the freed up gold and get a chance to capture their ships. The amount of gold received depends on the size of the hideout. Smaller ones reward around 100.000; the bigger ones can give above 1 million.
Important Town Facilities
Below are listed some of the more important town facilities and what you can do at them.

The Trade Office


The Trade Office serves three major functions:
  • Warehouse Space - This is where all of your goods will be stored prior to sale or transfer to another city. Your warehouse initially comes with a capacity of 50 loads (500 barrels). This capacity can be upgraded in stages of 200 loads, when you built additional warehouses. You will be charged a fee of one gold coin, per load, per day for every load of goods stored over your warehouse's storage capacity. It's best to get your warehouse's capacity up to 200 loads ASAP! Captured Pirate Cogs make for excellent "offline" storage of bulk items such as tiles, grain and timber.
  • Warehouse Administrator - You may hire an Administrator for your Trade Office. Administrators are useful in keeping certain goods at a minimum level. Example: Assume you have a Fisherman's House in Stettin that consumes 14 barrels of salt weekly in the production of fish. You can instruct the Purchasing Agent to buy a barrel of salt from the city if the quantity drops below a certain level, say three barrels of salt. Of course, you can set this man’s option to sell to the city too. In that case he sells the goods to the amount and for the price you have ordered him.
    To make sure you don’t sell all the goods you need for your own production, check the box behind the amount you have set. This prevents your automated convoys and your administrator to pick up / sell anything below that level.
  • Access to Cities - In order to gain access to a city to build businesses and housing, you must first construct a Trade Office in that city. Setting up a Trade Office will also give you access to the town's Money Lender.
    However, even before you are allowed to build an office, you need to gain a certain reputation in that city first. Best way to do that is to start trading with that city ASAP.
    Hunting down and killing famous pirates is increasing your reputation in other cities too.
    When your reputation has reached the level you are allowed to build an office in a city, that particular city sends you a letter, informing you that your reputation is high enough to construct an office.

The Money Lender


The Money Lender acts as a third party in arranging loans for you and the AI merchants. He also accepts payment for the various fines incurred for heresy, dealing with unsavoury characters and piracy.

Clicking on the Bank Building will enable the follow options:
  • Take out loan - Here you may borrow money from various merchants. The amounts and terms of the loans will vary.
  • Repay loan - Selecting this option will enable you to repay loans made to you. You will also select this option to pay off any fines levied against you during the game. In addition to paying off loans and fines, you will also pay off your share of the damages done to a city during a siege.
  • Grant loans - Whenever you have excess gold and want to put it to work, come here! The Merchants of the Hanse often require working capital. This is where you step in and act as creditor by loaning them your money. In Patrician 2, loans are always repaid.
  • Granted loans - Here you may review all the loans that you've granted. The payoff, due date and interest rate will be listed for all loans. Loans are sorted by payoff date.
  • Buy shares - This option is inactive in P3 Single Player Mode. You cannot buy shares in a company controlled by the game.
  • Sell shares - You can, however, sell shares of your company to the Money Lender for some quick cash. Avoid this, if at all possible!


Banking Tips
  • Loans may be taken out or granted only in cities where you have a Trade Office.
  • Interest rates for the money that you borrow and loan out are compounded on a weekly basis.
  • When loaning money, always select the highest interest rate available. Keep loan terms to 26 weeks or less for the best possible return.
  • Do not attempt to make a living as a loan shark, trading is far more profitable.
  • Loan out money only when you have excess capital and can comfortably pay your taxes and employees.
  • Loans, available to you, may be scarce or non-existent in the early days of your trading company.
  • You will only have three loans available to you at any one time. Use them wisely.
  • There is no limit on the number of loans you may grant.
  • Pay your debts off only when they become due, not until then. Make the most of the money you've borrowed.
  • Avoid the debt spiral. Do not take out bigger and bigger loans to pay off your debts!
  • Shorter term, small loans have the best rates available, some above 3%.
  • Never loan your money out for less than 2.0%. At 2.0%, your money wills double every 36 weeks.
  • Fines become due 20 days after you receive notice that you've been fined for a crime.
  • Maturity. If you miss a payment to your Banker, he'll send you a notice that the payment is due in 10 days.
  • If you lack the gold to pay off a loan when it comes due, the Money Lender will confiscate all your money and enough goods from your warehouse to pay off your debt.
  • If you don't have enough gold and goods to pay off a debt, the Money Lender will take what you have and give you an extra 10 days to pay off the balance.
  • In order to avoid having goods from your warehouse confiscated, move them to one of your ships.

Important town facilities (2)
Weapons and the Weapons Dealer

Your main source of weapons for both your ships and your town guards are bought at the Weapon smith. There you find two buttons, one called “Ship weapons” and one called “Hand weapons”.
Under ship weapons ballista’s, catapults, bombards, cannons and cutlasses are found. The Cutlasses are the replacement of the swords in the previous version of this game.
Hand weapons are swords, bows, x-bows and muskets. These weapons are only available to you after you became Lord Major in your hometown.

The Weapons Dealer is a character frequently encountered in the tavern. He is only semi-legal. If you click on him the town constable, a man in black who leaves and re-enters city hall may take notice and inform the Hanse where you will be accused of crime and fined. Nonetheless, he is necessary to you. To avoid detection, there is an interval of about forty seconds immediately after your ship arrives in town in which you may purchase weapons. It usually is safer to watch the town hall until he shows up, watch him through his rounds (he will go to the town square, read a paper, than slowly return past the church to the town hall. A few seconds after he re-enters, it is usually safe to enter the tavern and conduct your business. If the town is under siege, signified by a shield, you may do business with the weapons dealer anytime with impunity. The MIB never appears.

The game at the beginning always has a town somewhere with about 20 swords for sale cheaply. Later, these will be gone. Not every tavern will have a weapons dealer present.

There are other weapons at the weapons dealer. He may have none at all, or may have bows, crossbows or carbines. These others are of no use to you until you become mayor. They can be transported by ship, but your crew cannot arm themselves with them. They are used to arm the town guards and are effective in sieges. Some people have recommended if you find a particularly good price at one town, you can transport for a quick profit. I never bother.

If you buy the dealer’s entire product, he will promptly disappear, which will make you unpopular in a siege. It is best to leave him something in trade.

The swords are purchased and delivered to your ship in harbour or to your trading office if you have one in the town. You may select which ship or office by clicking on the plus sign when he asks you where to deliver them. The trading engine is the same as in the rest of the game, bigger quantities means a higher purchase price if you are buying or lower if you are selling.

The weapons dealer is in many ways like the weapons smith. Activity will make him develop, and after he has a full stock of swords, bows, then crossbows, and lastly the muskets will be in his inventory. A purchase of a lower type will make him pause and refill the lower quality before increasing the more advanced weapons.

The weapons when delivered to your ship are not arming your sailors yet. To do so, click on the head icon for your ship. You will see weapons on the right with an arrow. Click on the arrow to deliver them to the crewmen to arm them. Some people have wondered why with forty swords aboard their crew fought so poorly against pirates, not knowing how to arm them!

Later when you are Lord Mayor you may visit the weapons dealer in your hometown only without regard to the MIB. As fleet master, you may visit any weapons dealer anywhere at anytime.


The Tavern


Besides the weapons dealer and the captain, other characters are encountered in the tavern. The Trader, Informer, Traveller, and Pirate will be found on occasion. There’s also a new area, called the Side Room. In here you find refugees, smugglers, transport orders, travelling traders and representatives of traders that need a patrol mission to be done, who want a certain trader to be taken out or who want revenge at a certain pirate.

The Trader has an overstock of goods, and will offer a bargain price on, for example, timber in Novgorod. If you have a trading office and a ship, you will be offered the choice of where goods are to be delivered. Click on the plus sign in his conversation box to select the destination.

The Traveller offers a good price to get to another city in a hurry. If you have more than one ship in port, take special care! Click on the plus sign in the conversation box to select the ship he is to board, if you take him up on his offer. Players will make the mistake of loading him on an auto trading ship, or even a Cog/Holk which will not get him to a river town if that is his destination. Once he is on board, you can't transfer him to another ship.

The Informer will offer a hot tip, like "They are out of cloth in Lübeck" for a price. Most players do not bother with him since paying over 100 is a high price to pay, and, half the time by the time you get a ship there someone else has already beaten you to the market. He is of value in the treasure map and when taken a Notorious Pirate hunting mission (look under this section for more details). Keep in mind that an informer will charge you more when your Company value rises.

The Pirate is an underworld character. Only meet with him when the constable/man in black is inside the town hall or you will be fined and have a loss of reputation. He will offer to take a ship from you, and give you a percentage of the profits. Select the ship using the plus sign in the conversation box. Most players prefer to do their own pirating. If you use him do not give him a Snaikka, since it will take ages for him to catch anything. He will provide his own weapons and repairs, so a stripped cog in great need of repair is just fine. A Crayer or Holk will give best results, but an upgraded cog is also good. A danger is present here though. The pirate will form a convoy, which can grow to a considerable size, as he captures your competition. If the lead of the convoy (your mercenary pirate) is killed, the convoy will have a new leader who will not recognize your contract, and will begin attacking your own shipping. One way to keep things manageable is to occasionally attack his convoy, sinking or capturing ships that are not the convoy leader.

The Weapons Smith


The Weapons Smith's office is where you will purchase arms for your ships or to supply the townguard. You must have a Trade Office available in the town where you wish to purchase weapons. The Smith will not load weapons directly on board your ship.

Available Weapons
Shipweapons
  • Small Catapults
  • Large Catapults
  • Small Ballista’s
  • Large Ballista’s
  • Bombards
  • Cannons
  • Cutlasses

Without a doubt, Cannons and Bombards are the best weapons available. Unfortunately, you'll have to wait a while before they become available.

Town guard weapons
  • Swords
  • Bows
  • Crossbows
  • Muskets

The Armoury (Arsenal)


The armoury is the spot where you train your town militia after you have become Lord Mayor. To supply them with the required weapons, you need to have at least 5 weapons of one type available in your trade office
The town militia is formed from units of twenty beggars (five will bear the arms, the other fifteen are family members who will disappear from the available beggars). Since the militia will defend the town when its besieged, it's a good idea to ask to expand the militia during a siege as the town council most likely will agree to that proposal.
The size of the militia depends at the townwall, however, so it's not possible to have a 30 man strong militia patrolling a town inside a level 1 wall. Only exception is the town you build for an Alderman mission as you don't have to deal with the city council.
Important town facilities (3)
The Bath house


This is one of the buildings you will visit a lot more as you thought, as it's not only the place where you can bribe councillors or the Lord Mayor, but it's also a place where you will keep your reputation up; even without knowing it.
If you ignore visiting the bath house for too long, you will eventually get a message to inform you that you've been accused of a minor crime. For the small fines you need to pay for that, it's not really useful to pay a bribe. However, when you want to win an election, get a proposal approved or have been accused of a major crime - for instance: piracy - it may be useful to bribe a councillor or even the Lord Mayor.
However, keep in mind that the amount you need to pay for your bribery increases every time you successfully bribed someone.

The Church


One of the other locations you most likely will visit a lot more as you thought you would.
The church is not only a place where you pray - and thus show the citizens of your town how pious you are - but also the place where you can attrackt beggars to your town by making food donations, by making financial donations to increase the size of the church and to make financial donations to keep the church more beautiful.
The latter have to be done at a regular bases, but when you've got a fully beautified church, a monthly donation is enough to keep the church's interiour looking nicely.
Both the donation to enlarge the church as the one to keep it beautiful will increase your reputation in the city.
If you don't visit the church often enough, you will receive a message sooner or later, accusing you of the crime to state that the world is round.

Note

For your own convinience it's a smart idea to set a fixed date once a month to visit both the bath house and the church - in that order - for your baths and prayers. Personally I prefer every first of a month, as that's a date one can easily remember.

The Townhall


As mentioned in previous sections of this guide, the townhall is the place where you can pick up missions or offer a ship to become outrigger.
However, it's also the spot where you can propose a new town wall, increasing of the town's militia, visit the council chamber to vote for proposals, Lord Mayor or Alderman elections or to vote for actions against other cities if the Alderman calls for a meeting.

You will also found a restaurant in the basement, serving various dishes, but it's not clear to me if that's really having a purpose in this game or not.
And as a Lord Mayor you can donate or take money from the town coffers; something which is extremely useful when a besieging army breaks through the gates, as you can empty the coffers before they can loot the money and put the money back after they've gone.
Keep in mind that taking money from the town coffers will hurt your reputation, while donating money to the town's coffers will increase that reputation.

The Guildhouse


The guildhouse is visited for several reasons:
  • Putting a ship or building up for auctioning
  • Visiting an auction
  • Expeditions
  • Checking on expedition goods contracts

Since expeditions are explained elsewhere, I won't go into that here. Instead, let's turn our attention to

Auctions

Auctions are an easy way to obtain cash. You must be a member of your guild to auction a ship.
Click on the guild house and when inside; click on the auctions bar. It will say "Register Ship for Auction", and there will be a plus sign beside the name of your ship if you have more than one ship in port. Select the ship to sell by clicking on the plus sign.

Usually the auction will be up to a month ahead, but sometimes you can enter one two weeks ahead if there is another ship being sold. Only three ships maximum will be sold. If you offer a forth, it will be auctioned the following month. You cannot undo or take back a ship offered for auction.

There is a notice option for the day of the auction. It is wise to click on this, and have ready cash available on the day of the auction. You do not get to specify a price to auction the vessel at, it is chosen by the guild. On the day of the auction, enter the auction hall. If you are auctioning a ship in catastrophic condition, do not counter bid since you will be buying your own ship back, and paying ten percent for the privilege to the guild! Ships in better condition should be counter bid. Depending on the ship, the condition and number of bidders present, and the rapidity of the counter bids, you may offer 600 more gold. It is possible to get a cog in very good condition sold for up to 27,000+ when, if you had not countered, might have been sold for 13000 or so. One tip: save the game before you begin the counter bid. Keep saving before each counter bid, and when the ship is purchased by you, load the save and you have obtained maximum profit.

The ship you register for auction should not have crew, merchandise or weapons aboard. A favourite trick of some of the very advanced players is to have a few vessels under pirate flag nearby. The ship will sail with minimum crew and no weapons. A pirate Snaikka can capture a Holk under these conditions! Just be careful not to be observed.

Besides the ships, also buildings are able to be auctioned off. This can be useful in times of lacking money, when you sell off the industries giving you a small profit against the high costs.
However, there’s a far more useful use of this function, caused by a bug that shows up after the last patch is installed.

Click at one of your buildings and double click at one of the similar buildings of the AI competition. (Houses for houses, industries for industries). You see now two buttons appear above the information screen of that particular building. One option you have is to tear it down; the other option is to auction it off. Select the auctioning; confirm the auctioning and the building your competitor build is now up for an auction.

All you have to do now is to make sure you got notified when the auction starts and to do that you simply have to check the box in the screen asking you if you want to be notified.
The rest goes similar as mentioned above. At the day the auction takes place you enter the auction room and place your bid. Early in the game you should be able to buy the building after 1-2 bids. Later in the game when the AI gets more wealthy too, expect longer sessions; often leading to paying twice as much for the building as the price it was set up for.

In general your bids you place can be separated in three price classes.
  • 200 gold bids – used for Half Timbered Houses and low profit industries (i.e. grain farms, sawmills)
  • 400 gold bids – used for Gabbled Houses and medium profit industries (i.e. fisheries, apiaries)
  • 600 gold bids – used for Merchant Houses and high profit industries (i.e. workshops, hunting lodges)

    Each of the classes also have a fixed starting bid, ranging from 4.500 gold for the low profit buildings to 10.600 gold for the high profit buildings.
Piracy
Pirating


Pirating is a major facet in Patrician III, although you can play the game successfully without ever raising the Jolly Roger, what fun would that. By Pirating you are in direct competition with your competitors, and if successful give you an advantage by taking from your opponent.

Turning a ship to Pirate

Requirements:
  • Must have Captain
  • Must be out of sight of all enemy ships (Ships not your own)
  • (Crew) Must be armed


- Click on the ship
- Click onto the crew guy head in the right menu
- Near the bottom you should see a button that says pirate, click on it.

You are now a pirate.
Attack something by right-clicking on it.

Embark on Your Career as a Mafioso Pirate

The first and most important step for attaining success in pirating is selecting a ship. If you take the proper steps in building your Pirate/Hunter you're half way to winning most of your battles.

Ship


Start with a Crayer. There are other ships to start with and they have other advantages but for most of our pirating theories speed is required, and the Crayer is the fastest most manoeuvrable ship in the league. Once, your Crayer is built, you have to extend it, do this at the Shipyard, and extend it to level 3.


Weapons

Arming your Ship

With your Crayer extended you can now add weapons to its deck. No matter what year or time period your Weapon-smith is in you can come up with a good combo.Try these combos depending on period time period.

One of the First ships you'll probably build, it's still effective, just take more hits.


This is a step up, from the first but is not necessary unless your weapons smith happens to be really slow.


Most of my Killers/Pirates tend to be outfitted like this, enough fire power to speed things up, while you’re not ripping the ships apart, at least to much. Careful with your range on this bad boy, Bombard tend to be quite effective at close range.


Ship Killers

Punch so many holes in the hull he can't possibly float anymore. Course doing this with a bunch of arrows might take some time.


This is not a bad killer, just steps away from cannon, makes you salivate though.


Blast him, just blast him, then do a Drive by.


The Difference is obvious here, and most of my evaluations are made on experience and assumption. Ballista's have a punch power, as they are basically big arrows punching through the hull. Cannon are much like Ballista just more powerful. The Catapults and bombards are lobbed at an arc in the air and land on the deck, and hopefully on crew. As we know any heavy object striking a wooden deck is going to make lots of splinters that can rip through unsuspecting crewmen. The difference between the weapons and their relative effectiveness is small, but it makes a difference, and you have to use ever edge you can.

(Personal note: This section is originally written by MacAngus and BaronMoney, based upon their experiences with piracy in Patrician II. Over the years I've noticed quite some differences, most notably that using a weapon mixture as proposed in some of the texts is in fact having more negative as positive effects. Personally I prefer to use small catapults at my pirating or pirate hunter ships until I'm able to switch those for cannons. Only my Holks will be outfitted with Bombards once they're available. Main reason I stick to smaller weapons, is that a single hit can destroy one weapon, which with the large weapons means you loose 33% (or more) of your damage output at one side, while with the small weapons you only loose 20%. Which imho is a significant amount.)

Arming your Crew


This is probably one the worst chores you face at the beginning of your career as a Pirate/Hunter. Buying Cutlasses is painful at the beginning of the game, but you'll have to bite the bullet and do it. It can be long process of visiting multiple ports, visiting the weapon smiths if you have an office there, or the taverns and weapons dealers and purchasing swords. Don't buy the other weapons unless they're at a really good price (Ex. Bows 56 Gold), and if you do buy them, sell them to the next dealer you find who doesn't have any and make a profit. Once you've acquired at least the amount of cutlasses that is equal to your crew aboard your ship, transfer the cutlasses to the crew (Under the crew Icon - Little Sailors Head). Now you're crew is armed.


Captains


Another hassle but a very important part of pirating. While visiting the ports to purchase cutlasses, keeps your eyes peeled for a captain. Finding a captain can sometimes be difficult, they are always in the tavern, and there is always at least one Captain available on the map. A lot can rest on a captain's shoulders while in battle, but as I stated earlier speed and manoeuvrability is what we're going for, so try and get a Captain that has very least a level 3 skill in sailing, and at least a level 2-3 in battle.

Now you're ready for combat.

Combat

Movement is the one of the most important characteristics of battle. This is a key to taking ships. However before we get into movement you have to be ready to strike. If you want to take down your competition, try setting up in a place like Edinburgh, its out of the way and not prone to too much traffic. This will also give you a wider selection of ships to choose from for whatever needs you is trying to fill. Snaikka’s, Crayers, Cogs and Holks all visit Edinburgh, especially later in the game.

Snaikka’s will without doubt be the majority of your victims in the first part of the game. They are a small quick ship with the ability to out run Crayer if movement is not conducted appropriately. The key to getting a Snaikka, without hitting him, is to cut him off from his escape route. This is the primary action when you first enter the battle screen. Using the wind condition to your favour you angle greater into the wind more than him, but only slightly. The advantage your Captain and Crayer provide will be necessary here. You will gain on him eventually and he will be forced to turn into the wind more and more to escape your oncoming boarding.

This is the hardest ship to take. It is your equal so you have literally no advantage. The only advantage you have in a battle with another Crayer is to hurt him first. Firing on the opposite Crayer is going to be hard, especially if he's a runner, and if the ship isn't already damaged by another pirate or weather, you’re probably going to be looking down the barrel of a fine. The easiest way to pickup a Crayer, is to spot one already damaged. Select one that is damaged below 70%, this will give you a speed advantage, taking him from there is like taking a Snaikka. If you can don't want to wait for a damaged one, try to use the obstacles on the ship battle screen. If you can get him to get caught on one of those, even for a brief moment you can turn the tide of battle.
Piracy (continued)
Cogs are the easiest ship to take. The only hard part is their crew content, especially as a Crayer. If you're dealing with a merchant vessel that is unarmed, you can most likely just run up and board him. If you're attacking a Cog that is armed (usually a Pirate) you have to be a little more careful.


Use the wind to your advantage to get away from the Cog. Tack back and forth just enough to fire at the Cog that will be following you. When you have hit him enough so his crew compliment is about 5-7 less than yours, turn and board. Remember to collect the cutlasses after you go into port with this ship, this is your new weapons dealer.

Holks are big and carry a lot of crew, so only hit the merchants that have not armed these ships yet. Otherwise if he is armed and crewed, you're really going to have to make a mess of him before his Crew compliment is down enough for you to board. At least with a single Crayer...

Exceptions to this are the Holks that spawn through Tavern Sideroom missions; as they usually don't have a full crew aboard. Still, even with a Crayer these ships can be a pain to capture.

Miscellaneous Pirating Tips

Pirating Fines

Axioms of pirating:

1. You will not face any fines if you just sail around the Hanse.
2. If you attack a ship and it escapes and returns to port then you will probably get a fine.
3. If another ship sees you attack someone and returns to port then you will probably get a fine.
4. Entering a city as a pirate results in attacking that city.

Piracy early game

While the previous section of this chapter covered piracy after you got yourself a Crayer, it's still valid to start piracy almost the moment you have started your game. To do so, we use our knowledge of a few things mentioned before:
  • There are always two captains available in a tavern somewhere the game;
  • Every city has a few cutlasses for sale
  • The AI doesn't hire captains in taverns in river towns
  • Rivers are one of the better locations to capture other ships

So here's how we do it:
  • Start with buying all available cutlasses at the weaponsmith;
  • Transfer the cutlasses to your ship and give them to your crew;
  • Use (part of) your remaining gold to buy the goods making money for you. (this depends at your starting contitions);
  • Start sailing around, manually selling and buying goods to increase your wealth. It's ok to take a loan if you run into debt. Soon some white sailed pirated will help you to cover your expenses;
  • When you found a captain, hire him, even if he has low sailing stats. You may be able to replace him in a rivertown;
  • When you enter a rivertown, check for a better captain first. If there isn't one there, stick to the one you got now.
  • Since you're in the tavern anyway, hire as much crew as possible. Don't worry about your money, you get means to cover up the expenses soon enough;
  • Click at the competion building to see which AI traders are listed there. Note; there are ALWAYS 2 AI trades in a city, one registered at the guild, one not registered. Checking ships docked there is a good way to figure out the name of the 2nd trader;
  • Now we know the name of the trader(s), leave the city and dock in the river, far enough to see ships leaving it, but not too close to the sea-town nearby to be spotted by ships there.
  • Wait for the coast to be clear - sorry for the pun - and turn the ship into a pirate as mentioned in the previous section of the guide.
  • Now wait until an AI ship shows up - prefered one that wants to enter the city, then click at it to check the name of the owner and it's health.
  • If the incoming ship belongs to one of the AI merchants of the river town, let it go. If it's health is above 70%, let it pass. If it isn't fully loaded, let it pass.
  • If the incoming ship has a low health, doesn't belong to one of the AI traders of that town or is loaded over 100 barrels - and prefered all 3 - right click at it with your ship selected.
  • As soon as the battle screen shows up, choose manually fight.
  • Try to capture the ship as fast as you can using the grabbling hook symbol and steering your ship towards the other snaikka.
  • As soon as your crew boards the other snaikka, they will kill the other crew; which - considering you got cutlasses and they don't - won't be much of a problem.
  • As soon as the other crew is killed, part of your crew will transfer to the ship and you are able to check the goods it was carrying.
  • After you leave the battle screen, the newly captured ship will sail back to your hometown.
  • If the ship was incoming and didn't belong to one of the AI traders, select it and order it to enter the city.
  • As soon as it's docked, select the shipyard and change the name of the ship. After that, sell any goods it had aboard to the town, add or remove crew if needed and use it to find another captain.
  • If the ship was leaving the city, sail to the nearest town and dock there to change the name and selling the goods.
  • In both cases, use your new ship for manually trading until you found a captain, while using your pirate to sail to the next river to repeat capturing another ship. Keep in mind that a pirate ship needs to turned into a "normal" ship again before entering the rivertown. Otherwise it'll be considered as attacking the town.
  • Turn your pirate into a normal ship when you have captured enough ships to your liking.
Combatting pirates
Pirates, their behaviour during combat and tactics to kill them

Pirates

In this game you’ll find three kinds of pirates
  • The notorious Pirate – These spawn from the hide-outs and are feared by most sailors. They sail across the entire Hanse and are using Snaikka’s, Crayers, Cogs and Holks. Most likely to see them is a convoy with Crayers and Cogs.
  • The Hired Pirate – These are hired in the Tavern; either by you or a competitor. After being hired they have the choice to hunt in front of the city they’re hired from or across the entire Hanse. Most of these pirates use Snaikka’s or Crayers; with the occasional Holk. All these pirates have "Adalbert" as their first name.
  • The Mission Pirate – These are found when you accept an escort mission, a patrol mission or a mission to avenge the killed brother. To be sure you’re encountering a mission pirate; the first name always starts with Adalbert. The ships they use are most likely Crayers and Holks and an occasional Snaikka.

Pirate behaviour during combat

There are two kinds of behaviour in the pirate tactics when you fight them.

The Notorious Pirates will try to circle around your ship, damage it enough to slow it down and to reduce your crew and to board it after that.
To do that, a 3 ship convoy will split up. Two ships will attempt to come alongside you, using their weapons to damage your ship to slow you down, while the third ship will sneak up on you from behind to board you.
If the boarding succeeds, the remaining two ships will continue shooting at you to reduce your crew and thus your resistance.

The Hired and Mission Pirate will fire once or twice at you as long as he’s in the right position and run as fast as they can after that. These pirates are in general cowards, preying at the weaker ships and fleeing for the stronger ones.

Ship battle tactics against pirates

There are several ways to deal with pirates in ship battles.

The two most common are:
  • The “Over the Shoulder attack” – Sail in front and slightly to the side of the ship you want to attack. Because of your movement speed, the fired projectiles will hit the pirate ship when he passes the place you fired at. The advantage of this tactic is that it leaves you with enough manoeuvring space. The disadvantages are that you need to stay in front of the ship(s), but that it’s likely the pirates find it easier to surround you.
  • The “Crossing the T” – With this tactic you sail in front of the ship, giving it a full broadside attack. As soon as your weapons have fired, make a sharp turn to make it possible to fire the other side of your ship at your opponent. Make a sharp turn again to allow an attack with the first side of your ship. Rinse and repeat until the pirate flees or has a crew low enough so you can board it without risking your own ship. Of course, you can use this tactic also to sink the bugger.

Two tactics involving some more risks, but certainly giving you a good feeling when you succeed are:
  • The “Cascade” or “Divide and Conquer” – For this you need a fleet of at least 3 Snaikka’s and 2 Crayers. Outfit all Snaikka's with the maximum crew and a few cutlasses. Full cutlasses and ship weapons for your Crayers only.
    Engage the pirate with your Snaikka’s and let them board the ships. Because of the lack of cutlasses, your crew looses the fight, but they’ll reduce the amount of pirates too.
    After the pirates captured the ships, they’ll split the remaining crew over the two ships. At this point you bring in your Crayers, ordered to board the pirate ships first. With these under your control, board the Snaikka’s the pirates probably use to flee with.
    When performed right, you end up with the same fleet you started with and up to three new ships; all undamaged.
  • The "Wolf in Sheep's clothing" – This is without doubt the most risky tactic possible and because of that also the one giving you a high feeling of satisfaction when you succeed. It’s best done with a 35 crew Crayer, un-extended, fully manned, with full cutlasses and a captain with high sailing and fighting skills; i.e. */4/4.
    This tactic is best used when doing the escort missions, the “avenge the killed brother” missions and doing the patrol missions.
    Because you don’t carry any weapons aboard, your only option in the sea battle is to board. Having more crew aboard as the pirate Crayers, you’ll be able to overrun that ship with your men thus giving you an undamaged ship, extra weapons and of course the reward.

    It can also being used to fight and destroy any hired pirate patrolling in front of one of your ports.
    To make sure it attacks you, put some high value goods aboard your ship. 5 barrels of skins, spices, wine and iron goods are good pirate bait.
    Start sailing in front of the city where that hire pirates is wrecking havoc and wait until it attacks you. Since you're "unarmed", chances are the pirate will aim at boarding you right away. However, if it already got low health, it may instead fire a few times at your ship to even the odds.
    To make sure that won't happen too often, reduce your sails until you're sailing slightly slower as the pirate. Wait for it to board you and to discover that the ship doesn't carry weapons, but the crew certainly does! By the time the pirates notice that, it's already too late for them.
Interface Pt 1: The world map
Will be upgrade the moment I got all required screenshots.
Interface Pt 2: The town map
This section will be upgraded the moment I got the required screenshots.
Interface Pt 3: the Naval Combat map
This section will the upgraded the moment I got the required screenshots
A word of thanks
Most of the information used in this guide comes from an old guide that once was posted at The Pirate's Cove and / or The Tavern Side Room. Other parts are based upon my own experiences and where those two somehow colide, I've mentioned my personal opinion about it.
That doesn't mean that either of the things is right or wrong, it's just that every player has his or her own approach to this game. I am therefore still thankful for the information I have recovered from The Pirate's Cove and the TSR and the effort the contributers at the time have put into it.

The information posted at the Pirate's Cove and the TSR was gathered and posted by:

- MacAngus: Owner of both the Pirate's Cove and Tavern Side Room
- Baron Monkey: MacAngus' sidekick and often subject of several tests
- Baltic Trader: One of those gifted players who has been able to use modern day economics in a trading simulation set in the 14th century. But also the one using a Tier 3 Snaikka to discover America, simply to find out if it's possible. Also the one who came up with the "Cascade" combat tactics.
- Robber Baron: Another person using modern day idea's in this game. IIRC the one who "invented" the round trip. Unfortunately no longer among us and he's surely missed.
- Bagaluth & vonSchelte: Two players who've been using their knowledge of Patrician II to set up a great list of information, eventually resulting in Bagaluth creating an exell file which can be used to calculate how much goods are needed to be send where.
- DreDBanGer: Less dreaded and more bearded nowadays as he used to be back then, but still the one who figured out what was needed in raw materials and gold to build the new cities or land routes.
- Rookie: AKA me. The one who "invented" the "Wolf in sheep's clothing" in a MP game and the "Divide and Conquer" combat tactic at the same time Baltic Trader came up with the same idea; baptised "Cascade".


A big thanks to you guys, wherever you are and whatever you do. I wouldn't been able to write parts of this guide without you.

Thorin :)
32 comentarios
Valen 13 MAR a las 3:36 
Also, the person making those mods (Trolldemorted) analysed the game code (see https://p3modding.github.io/index.html) and figured out the game actually calculates the stores in fractions of a load and barrel. It just shows the rounded values. Keep track of the produced and consumed goods when there are no merchants in the port. At some time during the day the town takes their consumption and the stock will drop by X plus or minus 1 depending on the fraction.
Valen 13 MAR a las 3:25 
The Economy, Part 2B: The production page of the markethall shows production per day, instead of week. (a bug) So you need to multiply by 7, but the daily number might actually be less than 1 and not show at all. So, to approximate consider x*7+3.5 for the weekly production of the town.

In the Patrician III HD discord people made mods for the GOG-version which fixes various bugs like this. I don't think it works for Steam yet.
Oakshield  [autor] 15 ABR 2024 a las 9:41 
When you build a new city you will have to build your office there as well. I think it's even one of the first buildings to build.
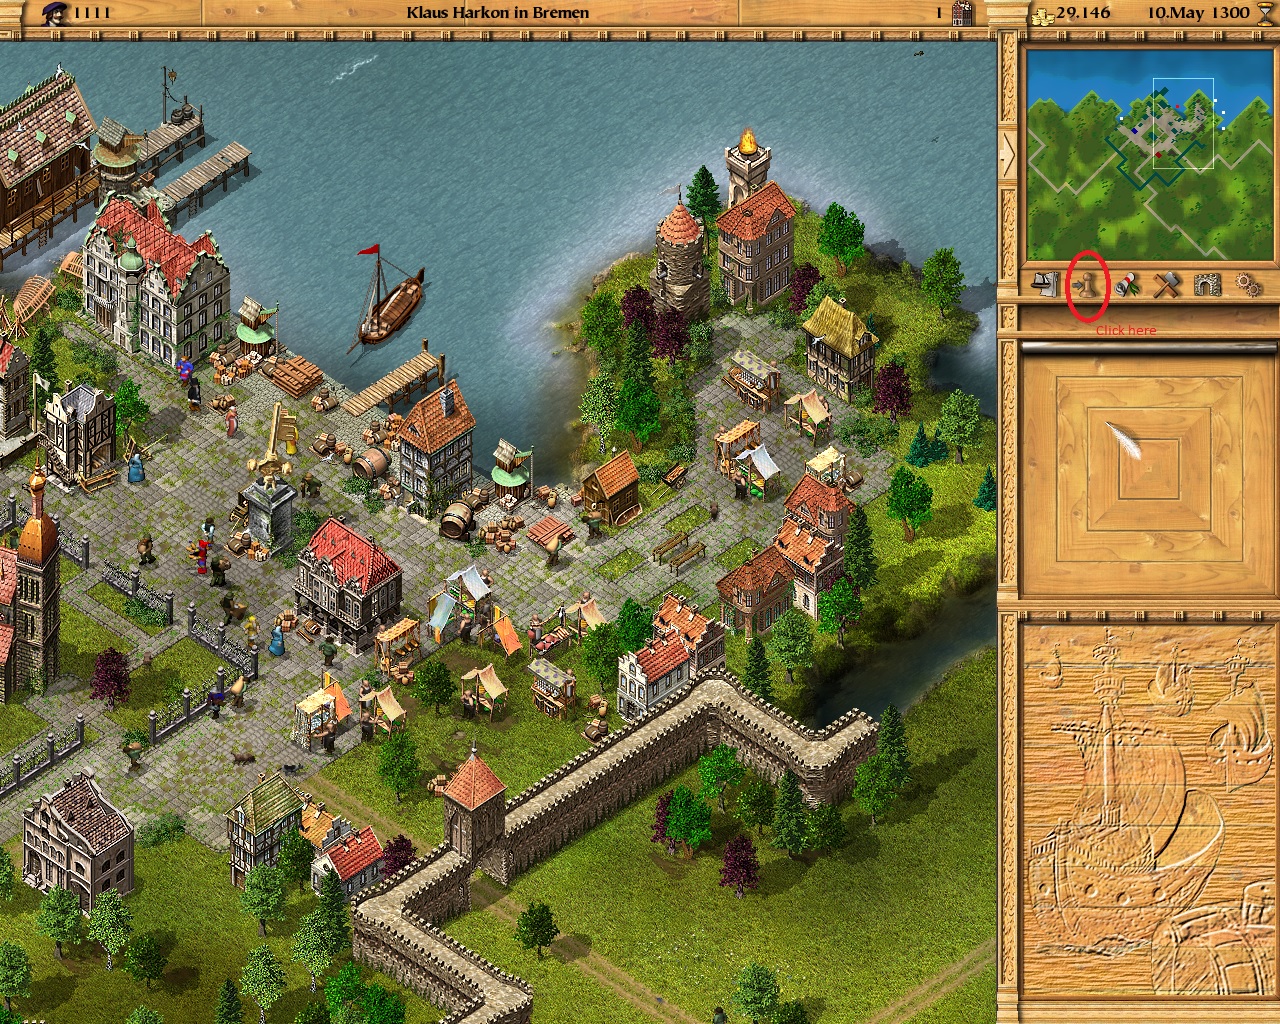
Once it's finished and the mission is completed, you will become a "permanent mayor" there.
Meaning that no matter what you do, you won't be replaced by an AI mayor. Kinda means you "keep it", yes.
That also means that the city is a "solid" place to be used as a bank. Like dumping all your cash there the moment you expect to be caught in a crime and retrieving it the moment you have dealt with the penalty.
Although you do get some reputation loss because of that, it won't put you down on an election list.

The other way around works too; you can remove all the money from the city coffers and use it your self or keep it. This is a good method to make sure a local "prince" won't loot much from your town once the defences are breached.
BOT 14 ABR 2024 a las 15:06 
ähm wen you build the city and finished the the city .. do you keep it and ?? can you open an kontor or be elected their? or how it works? never did it that far. got too dull or boring.
gronn 7 FEB 2023 a las 7:23 
I joined that site, thanks Oakshield. Some good discussions going on there!
gronn 6 FEB 2023 a las 8:16 
Thanks. I did search on Discord and found some Patrician channels, such as for multi-player. I'll check out your link. Amazing how this game still gets so much attention, is still so popular!
gronn 1 FEB 2023 a las 11:58 
No, I haven't heard about Patrician III discord. That sounds like the voice program used by gamers to speak to each other via computer.
Oakshield  [autor] 17 ENE 2023 a las 17:24 
BTW; are you aware there's a Patrician III discord, setup and run by fans of the game?
Would be a better place to discuss about the past.
gronn 12 ENE 2023 a las 8:12 
Ah yes, I think I remember that challenge now. Sounds like a lot of fun, and that was typical of the fun and camaraderie of the folks on the forum.
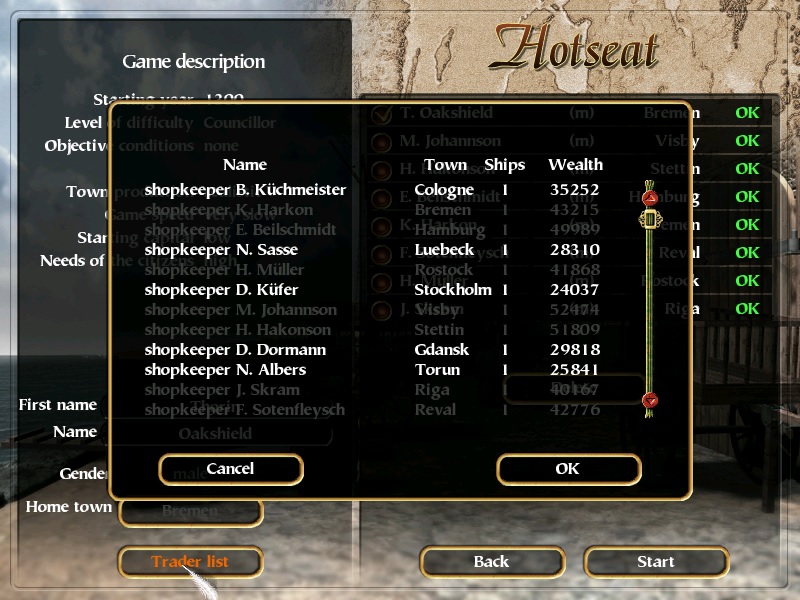
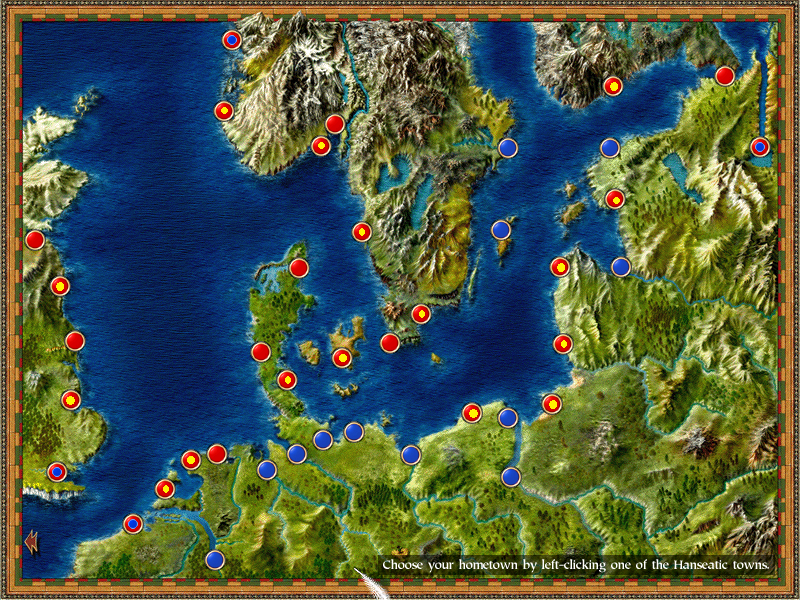
As for Reval, it's a pretty good starting city as it has iron goods which are a very profitable and heavily demanded item. Also has the staple food grain, and of course skins which are lower demand in early game but also very profitable. I also really like the architecture of Reval, and it has lots of space to build within the first walls.