Sally Face - Episode One

Sally Face - Episode One

551 ratings
''Sally Face'' - COMPLETE GUIDE in ENGLISH
By emmerald.mezzasalma and 1 collaborators
Guide All-In-One Walkthroughs and Steam Achievements.
Links to the German, Spanish and French translations included !
9
53
6
3
6
5
4
6
3
3
3
2
2
   
Award
Favorite
Favorited
Unfavorite
Introduction
Here you'll find a complete walkthrough of all five episodes, including how to earn all the Steam achievements. See a summary on all the achievements in the last section of this guide.

If you follow this walkthrough, you'll earn most of the achievements easily. However, getting 'Dark Melodies', 'Destoyer' and 'Escaping Death' will depend on your skill, as they involve defeating enemies without getting hit and also playing a guitar mini-game. The best I can do to help is showing you what guitar notes you have to play.

Most achievements will also help you understand the story better. Some exceptions are:
- 'Dark Melodies', 'Destoyer' and 'Escaping Death', which are skill-based.
- 'Memorized', 'Clumpy' and 'Dead Potato' aren't really related to the story.

I hope this ''all-in-one'' guide will save you from reading a different guide for each episode. Huge thanks to linusonline for proofreading and correction !

I hope you'll find all the answers you're looking for here. Feel free to use Ctrl+F for precise searches. I wish you good reading and a wonderful time playing Sally Face!
Pour le guide en Français, utilisez ce lien
Um den deutschen Guide zu sehen, klicken Sie hier
Para la guía en español, haga clic aquí
EPISODE 1 - Stage Neighbors
1) The dream
- Pick up the phone and choose any answer. Switch the light on with the switch on the left. Go to your right and push the small cabinet to find a key. Note the '5' on the key. Leave the room.
- Your goal now is to spell the word 'DOG' by going through the corresponding doors. In the first corridor, go through the 'D' door. When in the second one, go left first to see a '3' on the wall and then go through the 'O' door. In the last corridor, take the 'G' door.
- Go to your right to talk to the dog with blood on its mouth (cf. Ep.5, where you'll learn why). Carved into one of the branches just above, you can see a '6'. Go back to your left and climb down into your mother's grave.
- There is a '4' carved just where you are standing. Go right to find an old door. Use the code 5364 and end with 'E'. (The door will open even if you make mistake. However, using the wrong code will stop you from earning an achievement, so be careful). Enter the door.

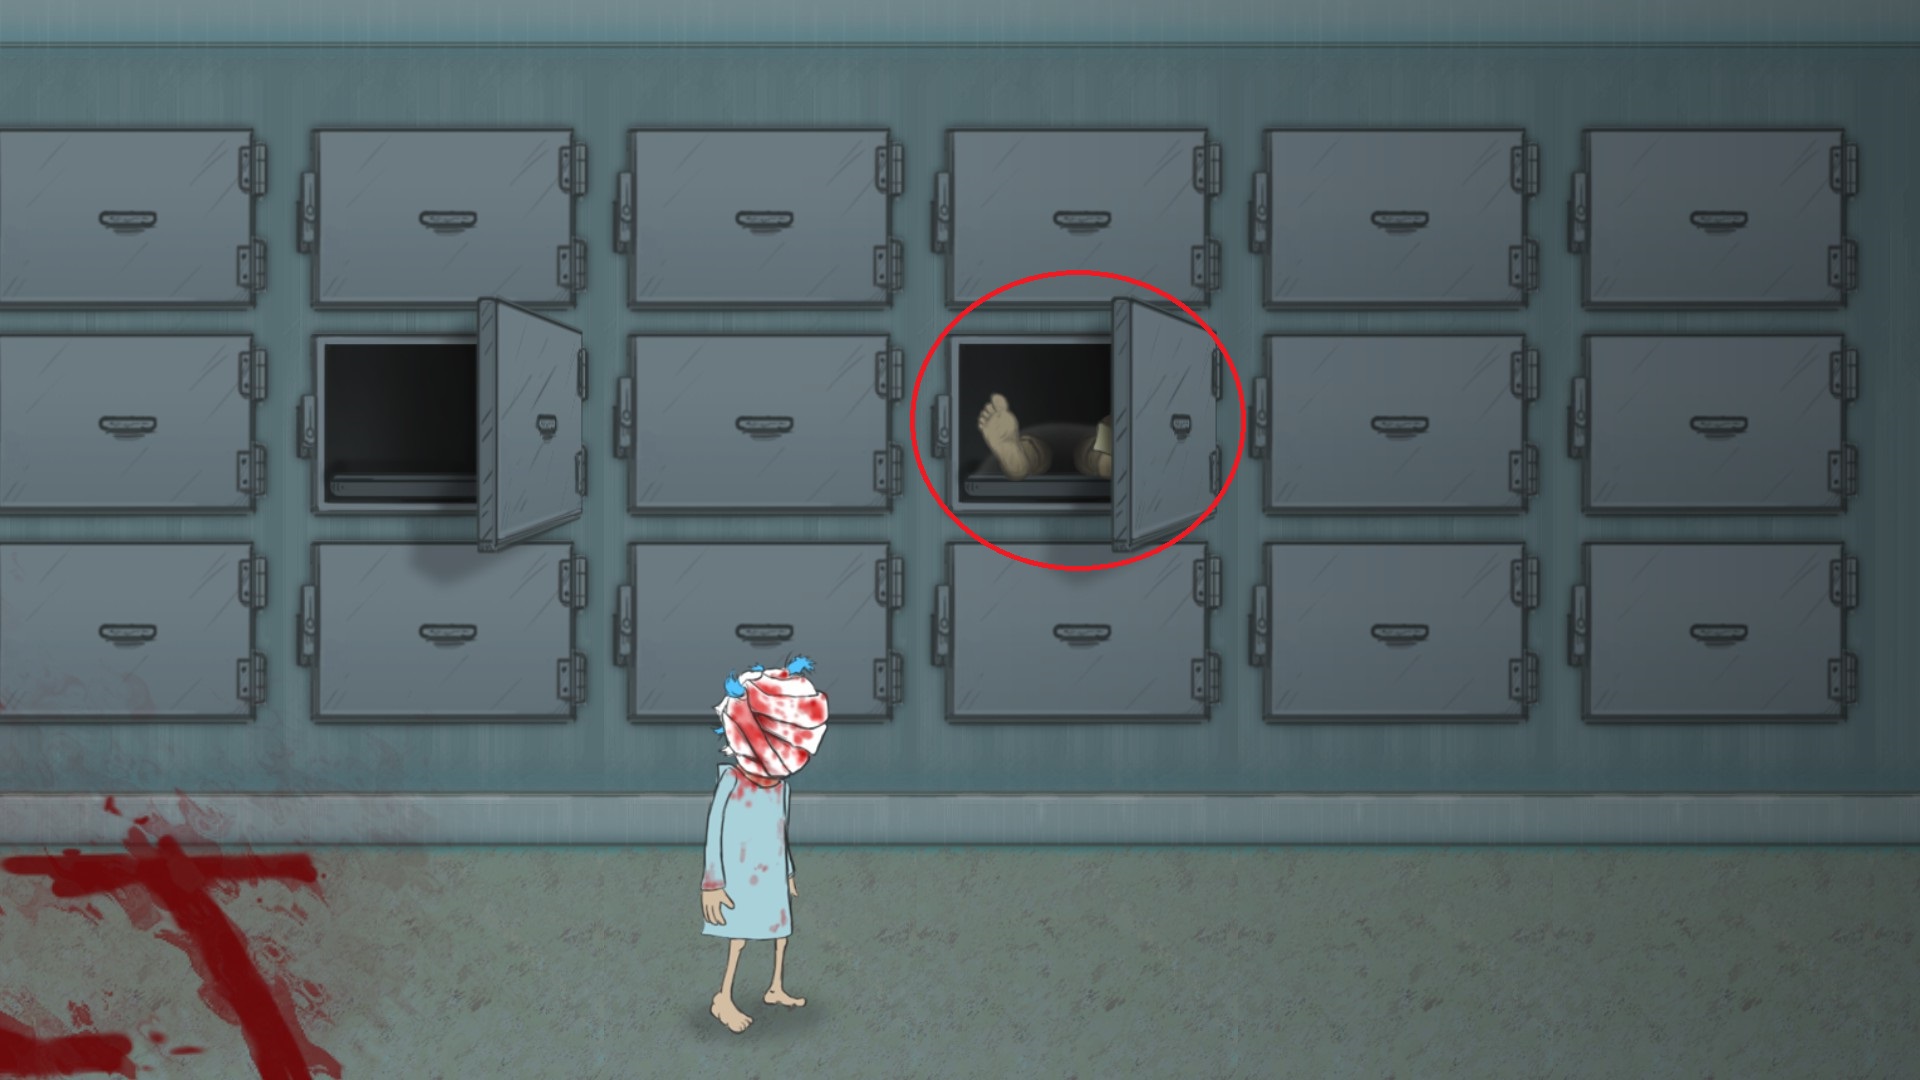
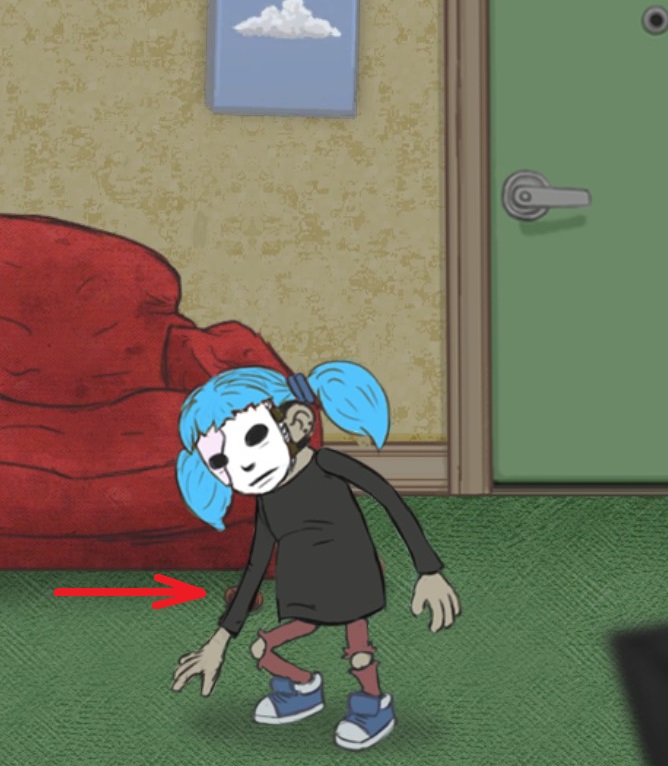
- While going right, interact with the body compartments two columns after the already open one, to open a secret one. Watch out: nothing is showing you that you can interact with it so press the action button around it until you get it open (see picture).
- Go right and interact with the hospital bed.


2) Meeting the tenants
- Go into Sal's room and go left. Interact with the furniture on the far left to push it and then grab your Gear Boy.
- Go out of the room, walk left and interact with the bags in the kitchen to find batteries for your Gear Boy. You can also go and have a chat with your dad in his room.
- Leave the apartment. Go to the right and talk to the policeman.
- Head to the 5th floor. (Do not interact with the hole in the wall on the far left side: To get the Steam achievement 'The Unknown', you need to leave it for later.) Go into 504 to meet the mysterious bum.
- Head to the 3rd floor. On your left, meet Lisa. Talk to her twice and ask her ONLY if there's anything to do for fun around here (don't ask her anything else for now).
- Go to the 2nd floor. Note the weird noises coming from 201 (cf. Ep. 3).
- Go into 204 to meet Charley. Look at his Pony Collection and talk to him.
- Head to the 1st floor and go to 103 to meet Terrence Addison (the building's owner).
- Keep going right to talk to the detective.
- Finally, go down to the basement. Go right and interact with the little box labelled 'lost + found', where you'll find and old cartridge for your Gear Boy. You can try to play it but it won't work for now.
- Go left and go into 1B. Once inside, go left to the kitchen to see the Red Eyed Demon.
- Go into Larry's room to meet him. Use all his dialogue options. When going out, interact with his radio and his painting.

3) The investigation
- Go back to the 1st floor and talk to the detective (you'll learn that Larry has a history with the law).
- Go to 103 and ask Terrence Addison for a cup of tea.
- Following your plan, go to your apartment (402). Find the quarter next to your father, who's now asleep in his office. Go to your room and then call Larry.
- With the policemen gone, enter 403. Look at the broken table, the mess in front of the sofa and LASTLY the ponies (your goal is to make Larry use all his dialogue).
- When in Larry's room again, make Larry use all his dialogue and ask him to play the Sanity's Fall song again to get the 'Metalhead' achievement.
- Head to the 3rd floor and talk to Lisa. Use the options ''Do you need any help?'', then ''I'll keep him out of trouble'', and finally ''He told me a dark secret''.
- Go back to Larry in the basement and talk to him about his curse.
- Go to the 3rd floor and talk to Chug. Ask him if he thinks the building is haunted (only available if you've asked Larry about the building being haunted). Trade him for the key by giving him the quarter.
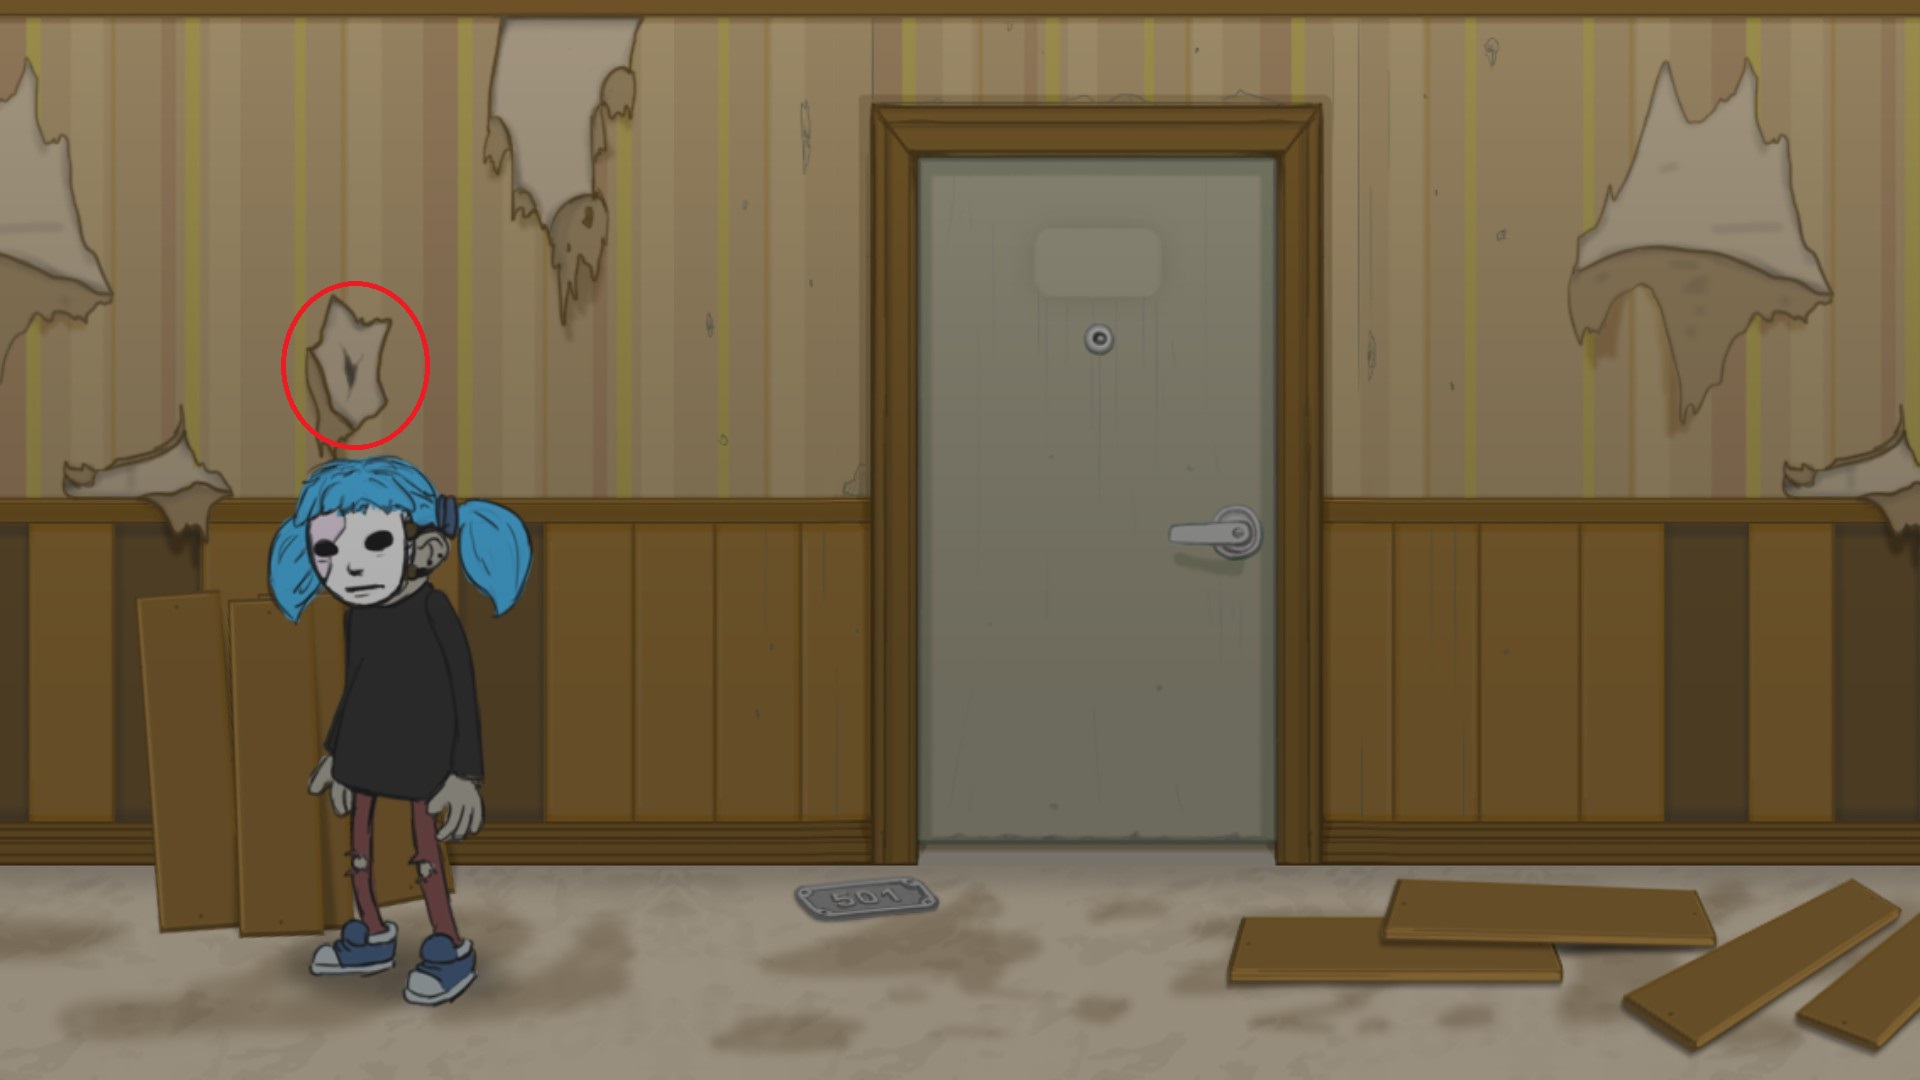
- Head to the 5th floor and go to the far left side. Interact with the little hole in the wall, to the left of the door to 501 (see picture).
- Go into 504 and then into the bathroom to meet Megan. There is an Old Laxative on the ground. If this is your first playthrough, go ahead and pick it up. If not, ONLY pick it up if you intend to give it to Charley in this playthrough (see following instructions).
- Exit the bathroom and talk to Chug. Go back in the bathroom: the Gear Boy game is now available, so let's play it!
  • Level 1: Go left until you disappear and look for a grave to interact with somewhere outside the screen. Your character will say something about his father and then find a key. Go right to open the gate.
  • Level 2: Interact with the fire pit on the left and then with the tree just left of the cemetery's gate to find a twig. Use it on the fire pit to find the key. Go right to open the door.
  • Level 3: Interact with the first armchair you see going right to find the key. Go upstairs.
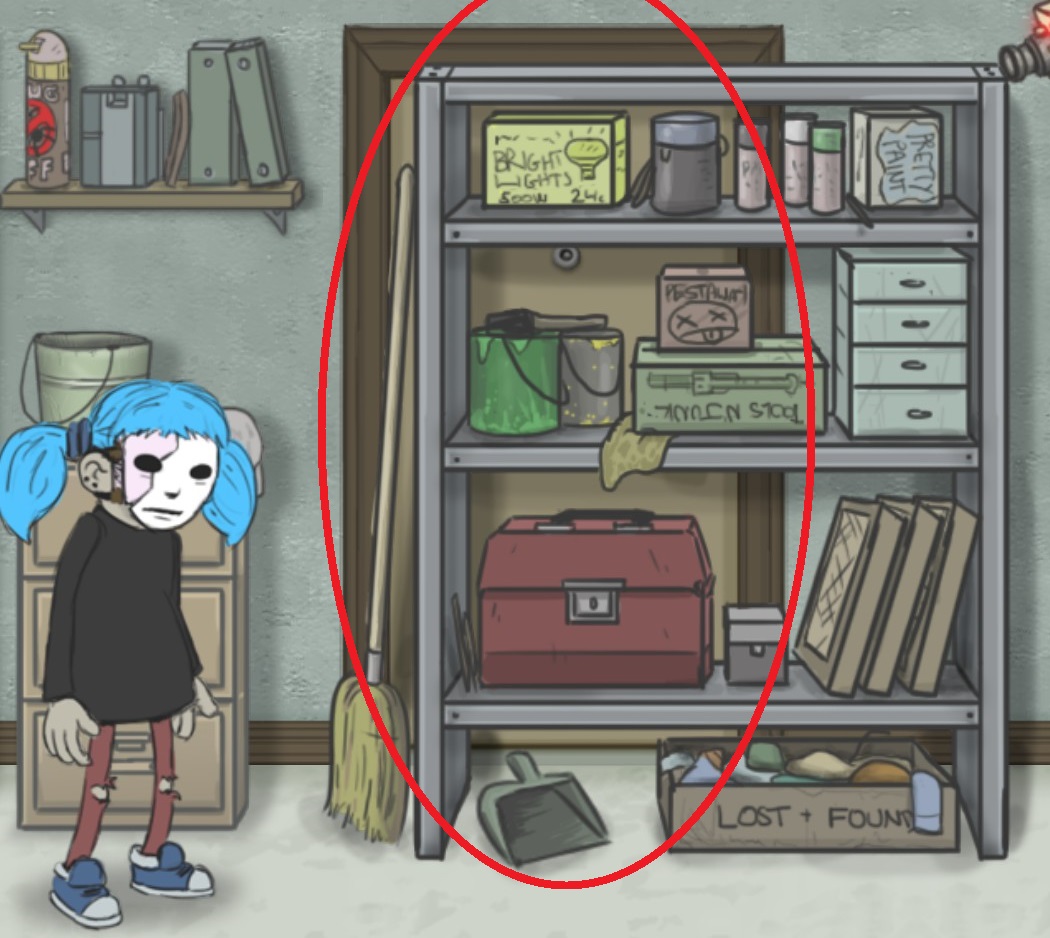
  • Level 4: Interact with the last bookshelf to get the key, then go back left to interact with the first filing cabinet (see picture). Leave through the door.
  • Level 5: Interact with the chest. Go right and into 504. Go through the door on your left. Find the key on the body, go out and go all the way right to enter the last room. Interact with the note close to the hanging man.
- Now you need to take the pony Charley has stolen, which means you need him out of the way. There are two ways to accomplish this (each giving an achievement, so you'll have to play Episode 1 twice to earn both). Each way involves putting something in Addison's tea and then giving it to Charley; either a Sleep Aid or an Old Laxative.
  • The Sleep Aid is in the bathroom of your apartment (402).
  • The Old Laxative is in the bathroom of 504, where you met Megan.

- Each is mixed with the tea automatically when you pick it up, and you can't change it later. Only pick up the one you need for the achievement you want.
- Go to Charley in 204 and talk to him. Exit the conversation and he'll take the tea from you and drink it.

- Now Charley is either asleep (if you gave him the Sleep Aid), or in the bathroom (if you gave him the Old Laxative). You can now grab the pony and give it as evidence to the detective on the 1st floor.
- Keep going right, go through the exit door and go to the ambulance to see what's inside.
-------------------------------------------------------------------------------------------------------
With that, you'll have at best 86% completion for the first episode. Play the episode again using the other tea ingredient to get 100%.
Note that if you use the Sleep Aid with the tea, it's possible to skip all the interactions with both Chug and Megan!
EPISODE 2 - The Wretched
1) Memories
- Keep going right until you get to the ambulance. (Notice the shape of the dog's head watching you through the trees(cf. Ep5)).
- You're now experiencing Mrs. Sanderson's murder as if you were Larry. Go into the bathroom and interact with the toilet.
- Go right and talk to the pony. Use the ladder to climb up.
- There are three floors of pipes and you'll find a switch on each of them. First activate the one on the second floor, then the one on the third floor and finally the one on the first floor.
- Go down and keep going right to get out of the sewers. Look through the bathroom door.
- Leave the apartment. Go left through the black space until you reach Charley.

2) Research
- Follow Larry to the left and leave, or talk to him. Outside, follow him to the tree house.
- Search everything in the tree house before taking the metal puzzle box in the chest.
- Talk to Larry again before climbing down. Follow him back inside the house.
- Once in his room again, ask him if his mom is okay.
- Go to the 5th floor and go into 504. When Larry arrives, go into the bathroom.
- Go back to the basement and ask Larry where you can find Todd, and only then go to Todd in 202.
- If you want to see all of Todd's dialogue, leave the option "I need your help" for last.
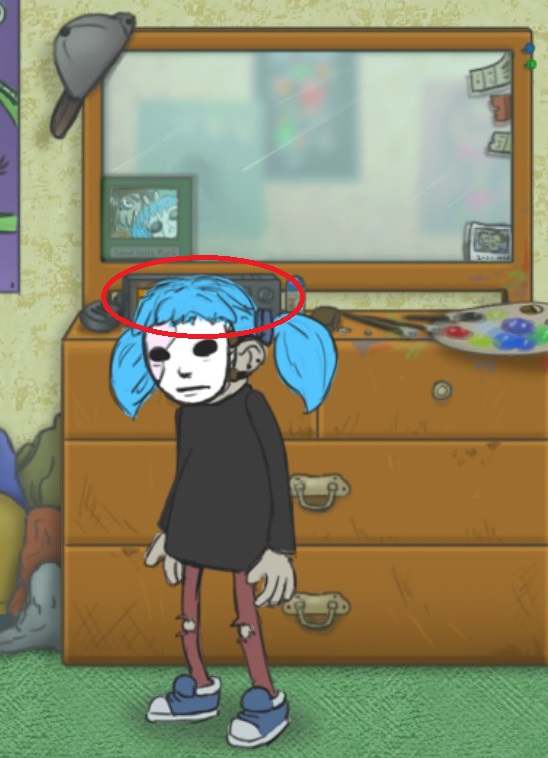
- Go back to 1B and interact with Larry's radio to take the antenna. (see picture).
- Go back to Todd in 202 and give him the antenna (for the reception) and the walkie talkie (for the power).
- After meeting Greg, go down to Larry in the basement and show him the Super Gear Boy (SGB). Interact with his stereo and ask him to play the last Sanity's Fall song.
- Go to the tree house and use the SGB near the picture inside.
- On your way back, go to Larry's kitchen and use the SGB there to find one of the seals.
- Go to 102 and use all of Rosenberg's dialogue options before using the SGB on her. (You can ask her one more question after, if you want.)

- Go into 204 and use the SGB to find another seal. You can still hear weird noises coming from 201 (cf Ep.3)...
- Go and talk to Todd two times.
- Go down to talk to Terrence in 103. Select ''About Addison Tea''.
- Go to Larry in the basement and ask him if he has seen the necklace before.
- Go to the 'Lost + found' box and find the necklace in it so you can call Megan again. If you want to hear all her dialogue, pick the options from top to bottom.
- Use the SGB near the hole in the wall to the left of 501's door, to find the third seal.
- Go to 502 and use the SGB near the bird cage to find the last seal. (see picture)).
I fogot to take a screenshot of one of them...
- Go back to the basement to talk to Larry.

3) Mysteries
- Go talk to David in 302 about the crowbar.
- Go meet the college students in 301 and help them with their party: Sierra (Chess Tournament), CJ (89.3) and Azaria (Telephone). The party's gonna be way more quiet now!
- Go back to David and ask him about the crowbar again.
- Talk to David again and ask him to come inside. Take the little puzzle piece on the ground just where you stand (see picture).
- Go to the basement and talk to Larry.
- Go to the 4th floor and open the door to 403 with your crowbar. Go inside and use the SGB.
- Now it's time to take care of ''The Box'' achievement. Switch the SGB on and play the chapters you've unlocked so far. If you've followed this guide, you should have chapters 1, 2, 3, 5, 6 and 8, so 6/8 in total.
  • Chapter 1: Guide young Rosenberg when trying to join the Cult. Avoid the spikes and find The Book of Forgotten Truths to be accepted amongst the cultists.
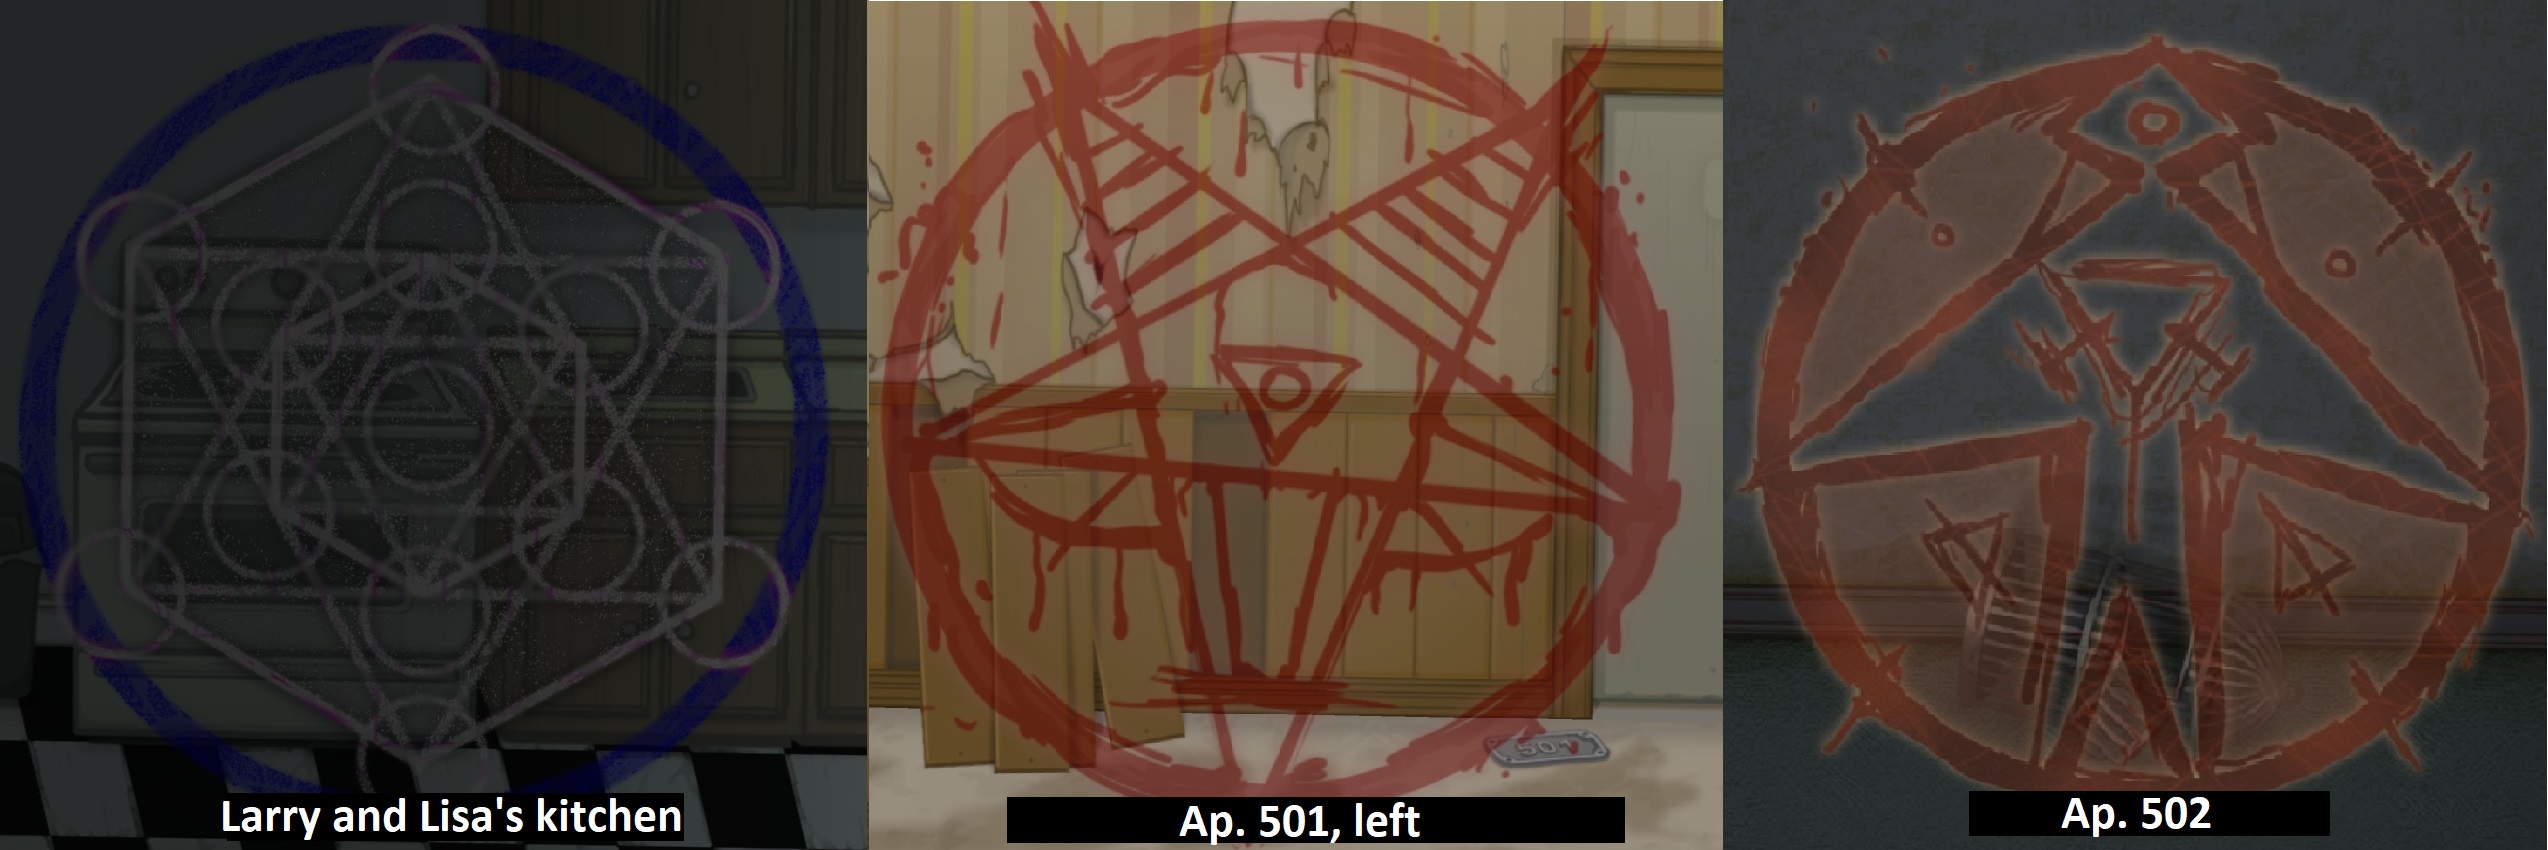
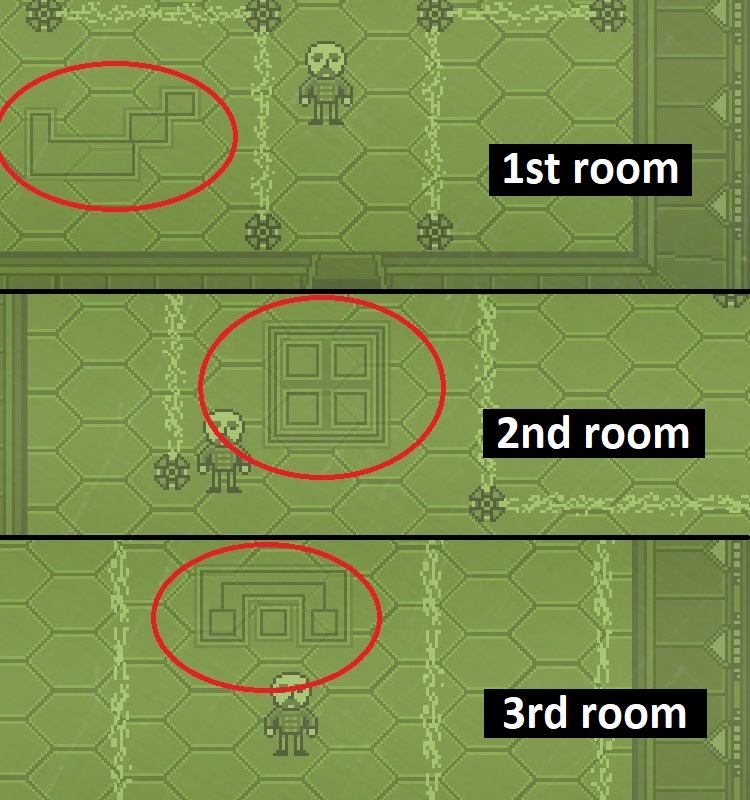
  • Chapter 2: Guide Jim through the three rooms and activate the gates. Note that each of the rooms has a symbol on the floor (see picture).
  • Chapter 3: Go up to enter the church. Take the door on the right and then follow the sobs (yes those annoying noises are supposed to be sobs...) through the doors: up, right, down, right. Greg will meet Stacy.
  • Chapter 5: Get Megan out of the forest: down, left, down, right. (I found this in a guide but I can't figure out how it works...) Her mother will give Megan her necklace.
  • Chapter 6: Guide the occultist to find the three skulls while avoiding the spikes. (To save time, you can touch the spikes after taking a skull to return to the start.) The occultist becomes a Red Eyed Demon.
  • Chapter 8: Guide Mrs. Sanderson to avoid the occultists and find the 'evidence', then bring it back. Charley appears, apparently turned into a Red Eyed Demon.
- Look at the metal puzzle box. It's time to use the symbols you saw during Chapter 2 of the SGB game (see picture). Then open the box.

- Go to the basement and talk to Larry.
- Go talk to Todd in 202... two times. Check your inventory to find a... Rubix Cube.
- Go talk to Larry in the basement again.
- Go open the bedroom door in 504 with your crowbar. Use the SGB near the mattress inside and then play Chapter 4 of the SGB game.
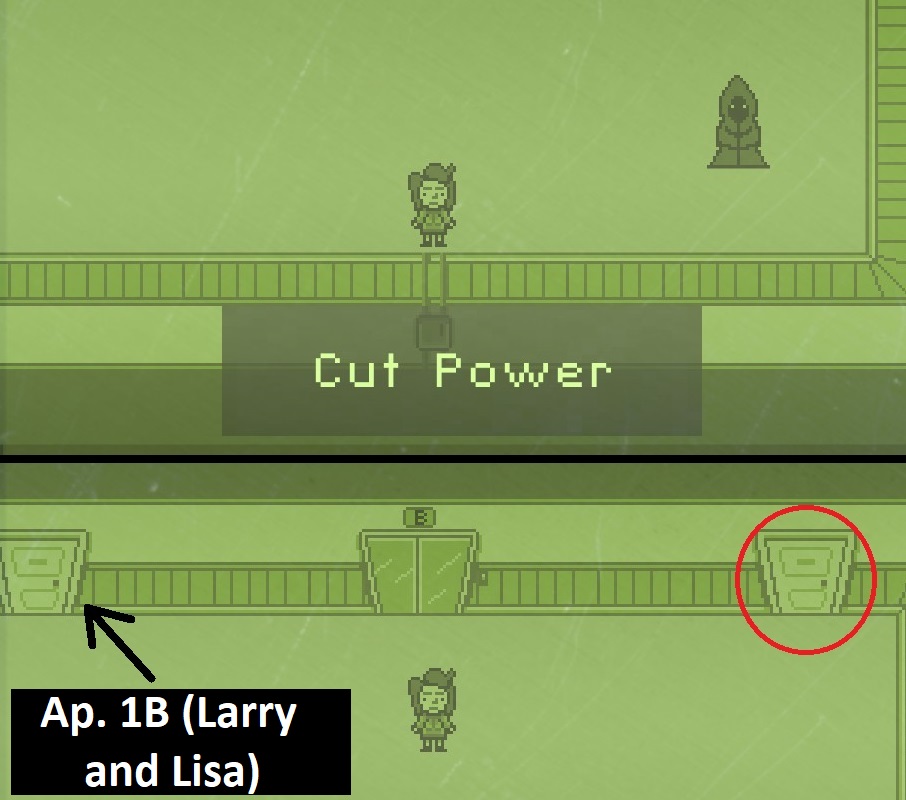
  • Chapter 4: Guide Stacy to cut the power on each floor of the building. Then take the right door in the basement (see picture). This door corresponds to apartment 2B, which is hidden behind the furniture where the 'lost + found' box is. You'll find out what's inside later (cf. Ep3).
- Go through the hole in the wall on the far left. Keep going left and use the SGB near the hanging noose. You can now play the last Chapter of the SGB game.
  • Chapter 7: As Luke, the Council has persuaded you to get rid of your wife and daughter, whom they see as obstacles to the Cult. Go through the three rooms and then go into the fire.

- As Dr. Enon, go to the tree house and check what's inside.

----------------------------------------------------
If you have followed this guide carefully, you should now have 100% of the Episode achievements and story parts in a single playthrough.
EPISODE 3 - The Bologna Incident (part 1/2)
1) The Journal
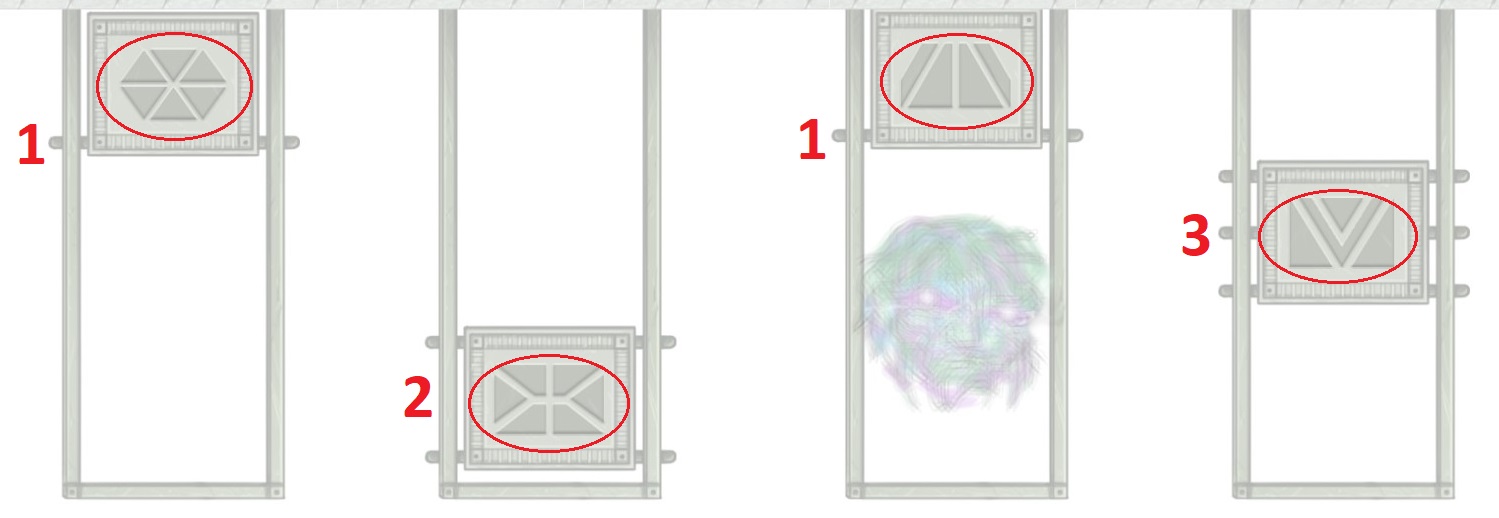
- While listening to the Phantom talk, you have your only chance to study the four symbols (see picture), which are the clue to the upcoming real-time puzzle. The puzzle starts right when the Phantom is done talking, and you only have one chance to solve it.
To solve the puzzle, you need to set each symbol to have the same number of bars behind it that you saw in the clue.

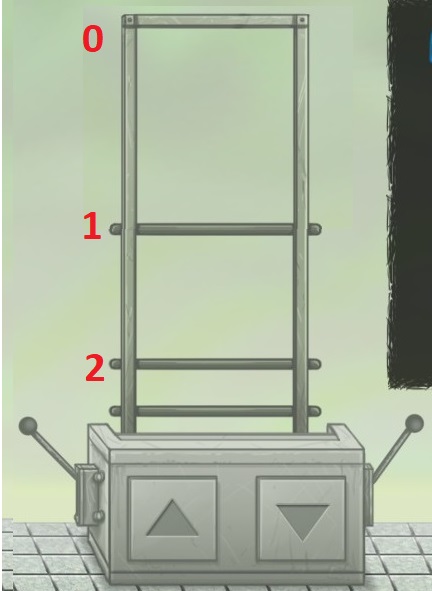
(Note that in the puzzle, one of the bars moves with the symbol itself, which can be confusing.The structure itself has three zones with 0, 1 and 2 bars; add one to that to get: One bar = Up, Two bars = Middle, Three Bars = Down. Also note that in the puzzle, the symbol images are upside down and come in a different order than in the clue.)
- What this boils down to is; while running left in the puzzle sequence, do the following. (You can pause the game during the puzzle!)
  • Pull the 1st symbol UP 1 step to the TOP (one bar)
  • Pull the 2nd symbol DOWN 2 steps to the BOTTOM (three bars)
  • Pull the 3rd symbol UP 2 steps to the TOP (one bar)
  • Pull the 4th symbol DOWN 1 step to the MIDDLE (two bars)
- You are now in the White Room. The Phantom gives you two complimentary parts of a code, which you must use to solve the next upcoming, real-time puzzle. The code is 9687 96753 47 663 63 6269.

- This puzzle can also look confusing. The time limit is a bit more generous than the last one. (Pause any time if you need to.) You are in a very wide room. In the air behind you are seemingly random groups of floating buttons. There are six groups, each separated by a pretty wide distance. You need to enter each section of the code into the corresponding group of buttons. You start out with the rightmost group on your right, so go to that group first, and enter the last section of the code there (6269). Then keep going left and enter one section of the code at a time (63, then 663, and so on). Each button group has an 'X' button that resets only that code section, so use it if you make a mistake. The numbers at the top of the screen show your progress, and will match the code when you're done (see picture).
- When you're done with the code, keep going left to end this section. You will receive the journal and journal page 1.

2) Mr. Doodle
- Go right and use the ladder to go down. Go left and go down again. Go right to meet the Prophet. Go right to find the hole.
EPISODE 3 - The Bologna Incident (part 2/2)
3) Bologna
- Talk to Kim and then go out into the hall. Go into Mrs. Packerton's classroom (104) and take the paperclip on the ground to the right.
- Go out, go left and interact with Sal's locker. Select 'Lockers' and then Ash's Locker. Take her camera.
- Go right and enter 'hall 2' and then the Science Lab (201). On your left, take the sticky tack (DON'T give it to Ash!).
- Outside the lab, go right and enter the courtyard. Interact with the tree a few times to make the ball fall, then take it. Go back into the hall (the right door is faster) and talk to Larry.
- Go back outside and use the camera on the tree on the right to take a photo (you'll find the bird in the east-north-east direction). Then use the ball on the window.
- Go talk to Larry twice to give him the camera. Go throw the ball at the window once again. Go back and talk to Larry.
- Go to the cafeteria (on your right) and give the photo you took to Kim.
- Go into the boys bathroom. Read the note near the trashcan and then go right and talk with the person in the last stall (Travis). Pick the answers: 3, 2, 3 and 2. He'll give you journal page 2.
- Go back to the Science Lab. Once you're in Mrs. Packerton's classroom with Larry, open the desk with the code 3141 (the first four numbers of Pi, which you can see above the chalkboard). Take the little metal object inside.

4) In the building
- Check your mail to find journal page 4, then go to your place (402).
- In your father's room, look at the picture under the bed and then unlock the computer with the code 491145. (Those are the numbers corresponding to the letters D, I, A, N and E, Sal's mother's name). Go left and take the letter on the ground (journal page 8).
- Go into your room and take the SGB and the tea cup. Read the note on the fridge in the kitchen. (Go into the bathroom for a small surprise.)
- Go meet Robert in 401 and use all his dialogue options. Interact with the falling poster to use the sticky tack on it and earn a quarter.
- Go into 403 and use the SGB to get journal page 7.
- Go into 501, read the old newspapers and use the SGB near the last nail to get journal page 5.
- Go into 502 and interact with the bird cage.
- Go into 504 and use the SGB in the bathroom to talk to Megan.
- Go to the 1st floor and talk to Terrence in 103; use all his dialogue options and ask him for some tea, which will cost you your quarter.
- Go into 102 to talk to Rosenberg and then use the SGB near her. Take the letter from the empty chair once she's gone (journal page 3).
- Go into 202 and give Todd's parents the tea. They will give you a chocolate bar instead.
- Go to the 3rd floor. Talk to Chug and use all his dialogue options to get the 'Clumpy' game.
- Use the SGB in the kitchen of 304 to get journal page 6.
- Go into 1B in the basement. Look at the flowers in front of Lisa's door and then try to enter the bathroom. In the kitchen on your left, talk to Lisa and use all her dialogue options.
- Go into Larry's room and interact with the blank canvas.
- Use the TV in Larry's room to play 'Clumpy'. You need to get 1000pts. Since I don't have any skill for this, I chose the cowardly (but safe) way: go to the top left of the screen and hit only the small flies coming right at you (5pts each). And yes, it takes some time (it's 200 flies after all...). Feel free to try and kill bigger flies if you have the skill (red ones = 20pts and green ones = 50pts). If you're impatient, here's a good guide on how to beat it quicker.
- Go to Todd's room in 202. Check his new gadget on the desk and then talk to him and tell him you're ready.

5) 201's secret
Go left to talk to Larry and then go away from the kitchen and interact with something. (The diapers, for example.) Wait a little while. Larry has now opened the lock; go and check it.
- Once Larry is gone, use the SGB near the blood.
- Go right and set the radio to 104.7. You can now interact with the clock. The goat gave you the clue for the time: set it to 12:12.
- In bedroom 1, read the newspapers and talk to Larry. Use the SGB near Mr. Packerton and choose to switch the machine off.
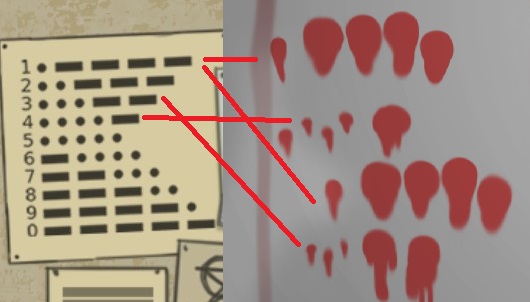
- In bedroom 2, look at the blood on the freezer and compare it to the board (see picture) to find the code 1413. Use it to open the freezer.
- Once in 2B, go interact with the suspicious part of the carpet in bedroom 2.

6) The Temple
- Go to the far left, take the light bulb from the floor and use it on the nearest trident. Then use the SGB to activate it. Go to the far right to activate the second one. (Two levers will come out of the ground.)
- Talk to Todd and then continue right. Sal will disappear, but keep going right until you find a secret room. Open the chest to find journal page 9, and then go back into the main room.
- Interact with the right lever and then two times with the left one. Walk onto the button, then go towards the gate.
- Larry: go through the left door to enter the 'maze'. You need to take the door where you can hear a noise: first take the right door, then the middle one and then the left one. Stop here. Keep going left past the edge of the screen, like Sal did before, to find a secret room. Activate the button and the lever and then go back to the room on your right. Go through the right door. To solve the puzzle on the ground, step on the buttons in this order: 5, 4, 3, 4, 3, 2, 3, 2, 1. Go through the door.
- Sal: you now need to take the door where you can NOT hear any noise. Take the middle door, then the left one, then the right one. Stop here. Keep going right to find a third secret room. Activate the button and the lever and then go back into the main room. Take the left door. Walk past the puzzle for now and go through the door on the far right. Switch the lights on with the SGB and take the letter (journal page 10). Go back and solve the puzzle on the ground, by stepping on the buttons in this order: 3, 4, 5, 4, 3, 4, 3, 1. (If you start solving the puzzle from the left, just start by pressing 2, 3, 4, then do the same solution.)
- Interact with the left lever and then with the thing that came out of the ground.
- Do NOT go to the left yet. Go right to find journal page 11. This is your last and only chance to read the entire journal! Then go left to finish the episode.
EPISODE 4 - The Trial (part 1/2)
1) Beelzebub's art
- Go left and go through the exit.
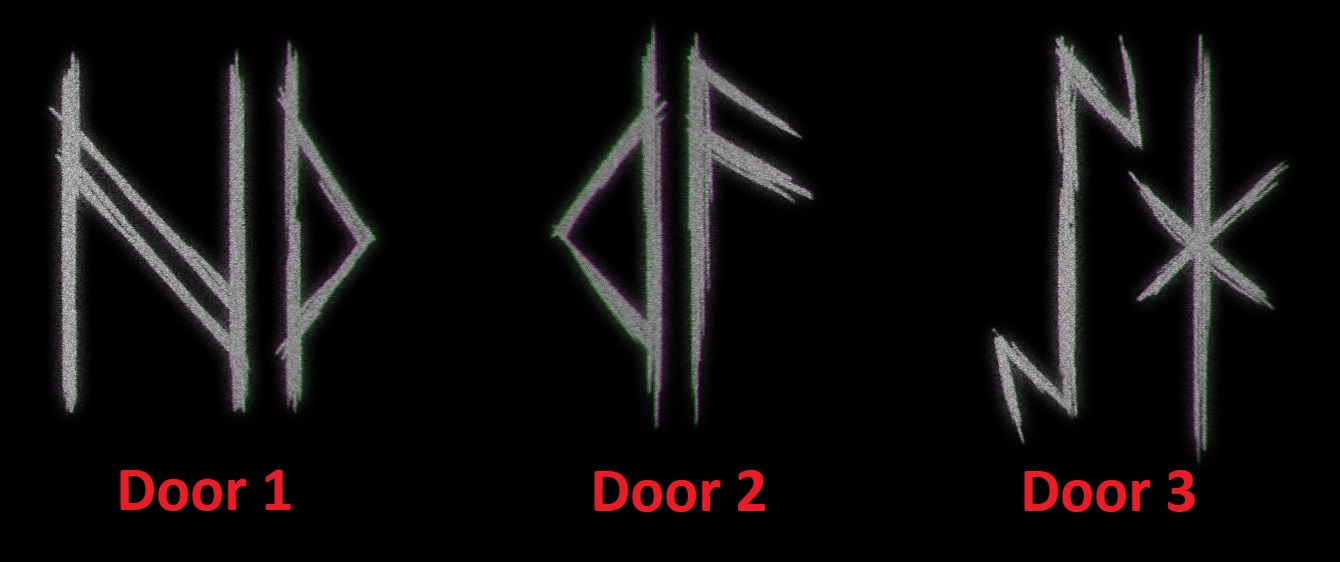
- Talk to Beelzebub on the right. In each of rooms 1, 2 and 3, look at his art and note the runes on the opposite side of the entrance (see picture).
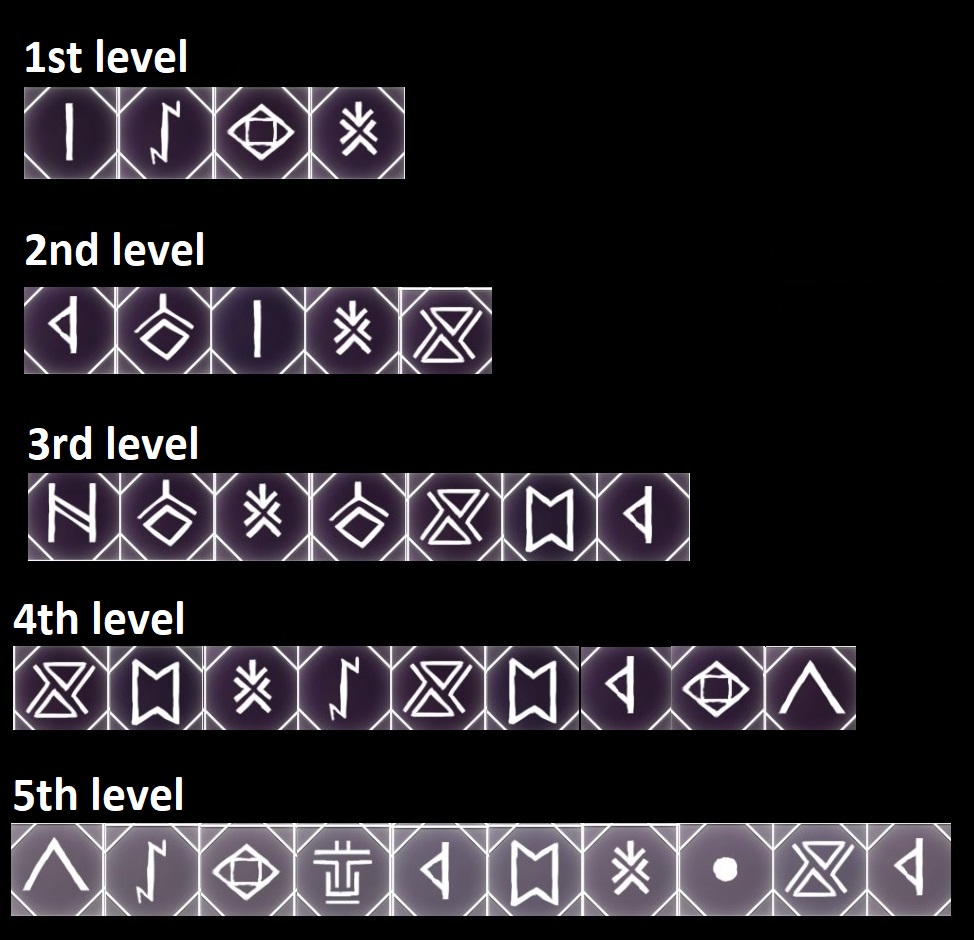
- The runes are the clue to the code for room 4. The meaning of each symbol is the number of lines in it (see picture). Each set of two runes gives you one number for the code, when you add up the total number of lines. The runes in room 1 have 4+3=7 lines, the ones in room 2 have 3+3=6 lines, and the ones in room 3 have 5+3=8 lines. So the code is (starting from the bottom of the key pad): 7, 6 and 8. Enter the symbol for each number using this picture:
- Enter room 4. Note the code on the wall to your left: 342697 (we'll need it later). Then go right to discover ''Her Fate''.
- Go back to Beelzebub and talk to him about his art. Ask him to go through his door. Take door 6.
- Go right and interact with the TV. You will get VHS tape nr. 1, "LOST".

2) Home
- Interact with the phone charger near the room's door and go out. Go upstairs and talk to Neil twice to use all his dialogue and get your phone back. When Neil's gone, go right and read the note on the yellow paper. It gives you the code 4035364.
- Go downstairs, back into your room, and put the phone in the charger.
- While your phone is charging, go right to the basement, then outside and use the new code to enter the shed. Look around and take the VHS tape on the far right (nr. 2, "PHANTOM").
- Go back to Sal's room and pick up your charged phone. Check the message from Larry.
- When out with Larry, wait a bit in the first screen, because you need Larry to talk three times (to get 'Brothers'). Touch the front door to get one of the dialogues.
- When you're certain Larry has said everything, keep going left to Addison Apartments.

3) Addison Apartments
- Go to 104. When Larry stops talking, talk to him again.
- Go say hello to Terrence Addison in 103.
- Go into 102 and interact two times with Rosenberg's old chair. Take the tooth from the ground on the right.
- Go bother Mrs. Gibson in 101. Then go to the basement.
- Go to 2B (the right-hand door in the basement) to find the second tooth in bedroom 1. Interact with the hatch in the floor (to the temple) in bedroom 2.
- Go into Larry's old room in 1B and interact with the stereo twice. Go to the tree house and choose to tell Larry the truth. Go to the 2nd floor.
- Go into 201 and go in the bathroom. Interact with the blood on the kitchen floor. In bedroom 1, interact with the machine and the suspicious square in the floor. Go into bedroom 2 and interact with the machine twice.
- Go to 202 and talk with Janis and Ray (Ray is in Todd's old room). Take the black tooth in the bathroom.
- Take the pocket knife from the kitchen in 203.
- Go into 204 for some dialogue and then go to the 3rd floor.
- Talk to CJ in 301. Talk to David in 302. Go to 303 and talk to Maple + Chug (two times) and then to Soda (two times).
- Take the tooth in the kitchen in 304. Then go to the 4th floor.
- Talk to Robert in 401 and then to your parents (Henry and Lisa) in 402.
- Go into 403 and talk to Mr. Sanderson. Once outside again, try to enter 403 again two times to use all of Larry's dialogue.
- In 404, use the pocket knife to fix the VHS tape and take it (nr. 4, "BRIDGE"). Go to the 5th floor.
- Go into 501. Take the tooth in the window (you now have all five of them).
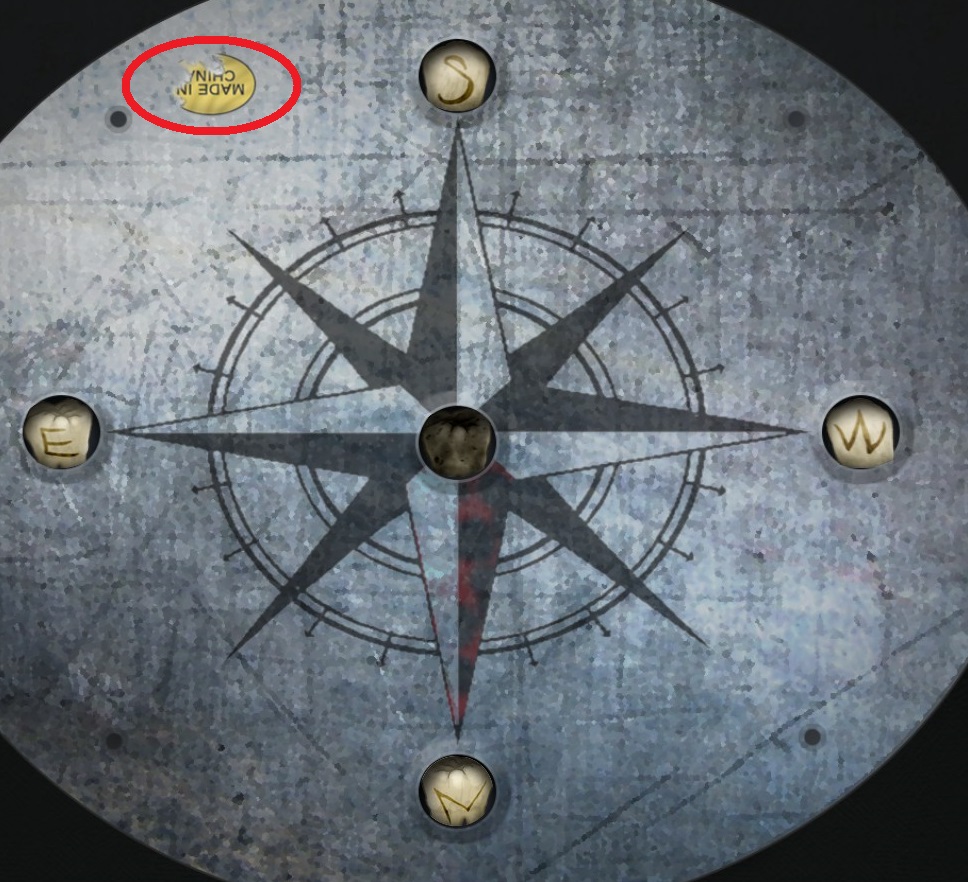
- Go into 502 and use the pocket knife on the bird cage. You need to use the teeth according to the cardinal points (S = south, etc.) and put the black tooth in the middle. However, the thing is upside down (see the flipped 'Made in China' sticker).
- In 503, interact with the hole in the wall several times to get VHS tape nr. 5, "HUNGER". Talk to Larry before going out.
- In 504, go check the bathroom and then go right into the bedroom. Interact with the mattress and then go through the hole. Go left and interact with the rope three times. Go to the 2nd floor.

- Go back into 201 and use the pocket knife on the suspicious square in the floor in the first bedroom.
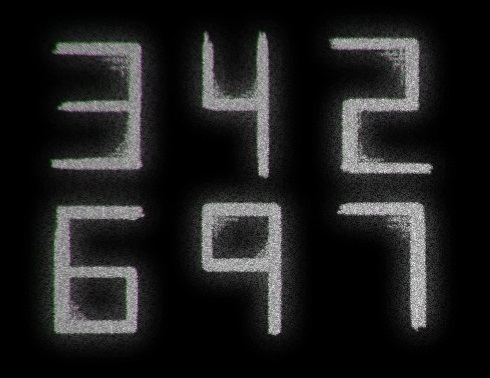
- The code to open the floor panel is the one found in room 4 of Beelzebub's art:

But, as with the runes, we need to use the number of lines in each character: 3=4, 4=3, 2=5, 6=5, 9=4 and 7=2. So the code is 435542. You will get VHS tape nr. 3, "OTHERS".
- Go to the basement and go back to the hidden temple entrance in bedroom 2 of 2B.
EPISODE 4 - The Trial (part 2/2)
4) Faster than music

IMPORTANT NOTE: if you miss a guitar note in this section, you miss "Dark Melodies" and "Destroyer"!

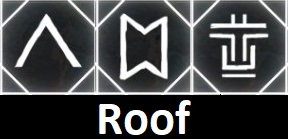
Think of each symbol as a number, according to the number of lines it consists of, just like the runes in Beelzebub's art gallery. When you play the guitar, the notes are organized clockwise into a wheel. Up is 1, 2, 3; right is 4, 5, 6; down is 7, 8, 9; and left is 10, 11, 0 (see picture).

WARNING: Be careful to not drop down to the next floor too soon in this section, or you may miss things. You will get a yes/no prompt each time you drop down.
- You can now switch characters through your inventory.

Larry: Take the Deadstone to your left and use it on the spark and then on the pillar.
Sal: Play the three notes (''Roof'' (2, 6, 11)) to destroy the pillar.

Larry: Drop down to the 5th floor. Use the Deadstone on 501's door to unlock it. Go inside and use the Deadstone again on the man.
Sal: Drop down to the 5th floor. Go into 501, take the key and go into 504.
Larry: Go through the hole in the bedroom of 504 and use the Deadstone on the black thing on the ground.
Sal: Go through the hole in 504 and take the VHS tape (nr. 6, "SKIN").
Larry: Go down to the 4th floor. Use the Deadstone on the TV in 402, the radio in 401 and finally on the pillar.
Sal: Go down to the 4th floor. Play the four notes to destroy the pillar (''4th floor'' (1, 5, 8, 9)).

Larry: Go into 403 and then, in 404, use the Deadstone on the mysterious thing which hasn't been touched by shadows.
Sal: Go into 404 and take VHS tape nr. 7, "EVOLVE".
Sal: Go down to the 3rd floor. In 301, change the radio's frequency to 93.7.
Larry: Go down to the 3rd floor. In 301, again change the radio frequency to 93.7 and then use the Deadstone on it. Go out and use the Deadstone on the pillar.
Sal: Play the five notes to destroy the pillar (''3rd floor'': 3, 7, 1, 9, 10).

Larry: Take the dark pony from the floor of 303.
Larry: Go down to the 2nd floor and, in 202, use the Deadstone on the bathroom door.
Sal: Go down to the 2nd floor. Go into the bathroom in 202 and flush the toilet.
Larry: Take the key in the toilet. Go into 201.
Sal: Go into bedroom 1 in 201. (This opens the door for Larry.)
Larry: Enter bedroom 1 and use the Deadstone on the machine. Then go out and use the Deadstone on the pillar.
Sal: Play the seven notes to destroy the pillar (''2nd floor'': 4, 7, 9, 7, 10, 6, 3).

Larry: In 204, place the dark pony in the middle of the pentagram.
Sal: In 204, take VHS tape nr. 8, "RAGE".
Larry: Go down to the 1st floor and use the Deadstone on the pillar.
Sal: Go down to the 1st floor. Play the nine notes to destroy the pillar (''1st floor'': 10, 6, 9, 5, 10, 6, 3, 8, 2). Go into 104 and take the carrot, put it in front of the door to 101 and open the door.

Larry: On the far right of the 1st floor, take the lighter from the ground. Interact with the thing you now can find outside the door to 101.
Sal: Take VHS tape nr. 9, "/ / /". (That's the last tape, and this is your last chance to see everything!) Then go into 103.

Suits of notes to fight the Endless One (Terrence Addison):

Once it's done, take the knife and kill all the tenants.
EPISODE 5 - Memories and Dreams
As Ash, go all the way left to find the first color piece (5 green) and then go right and interact with Sal's grave.

1) Home
- Read Todd's notes and talk to Neil before going downstairs. Go all the way right and into the bathroom to find a second color piece (1 white) on the left.
- Go down in the basement and interact with Maple. Keep going right and read the notes on the sofa.
- Go outside and open the shed with the old code: 4035364.
- Read Todd's notes on the board, then take your package.
- When Neil is gone, go right; read the note under the map and take the C4 in the backpack.
- Go back into the basement and check the cage where Maple used to be.
- Go in Larry's room and have a look at the picture of Larry with his grandmother (important for the achievement 'Seeker of Knowledge').
- Go back into the kitchen and read the note on the table.

2) The Temple
- Go right and go to the east hall. On the right, find the third color piece (3 blue). Continue right to place the C4.
- Go to the north hall and then to the west hall and place the C4.
- Go right to enter the inner west hall and place the C4.
- Backtrack to the east hall; enter the inner east hall and place the last of the C4. Then keep going left to enter the dungeon.

3) The Void (1)
- Use all the dialogue options, then go left and enter the house.
- Go into the Black Room and then into the White Room before going upstairs. (Exit the White and Black Rooms by walking left or right.)
- When Jim's done with all the things he has to say, talk to him again to be sure you've used all his dialogue options. Go through the door.
- Go into room 2 and enter the light.

4) Smooth Cartoon
- Go left, read Ash's note and note the number on the microwave (145).
- Go right into the bathroom and interact with the sink to find the number 7842.
- Going back left, interact with the TV to see the number 5023.
- Enter Sal's room to find the fourth color piece under the bed (2 black).
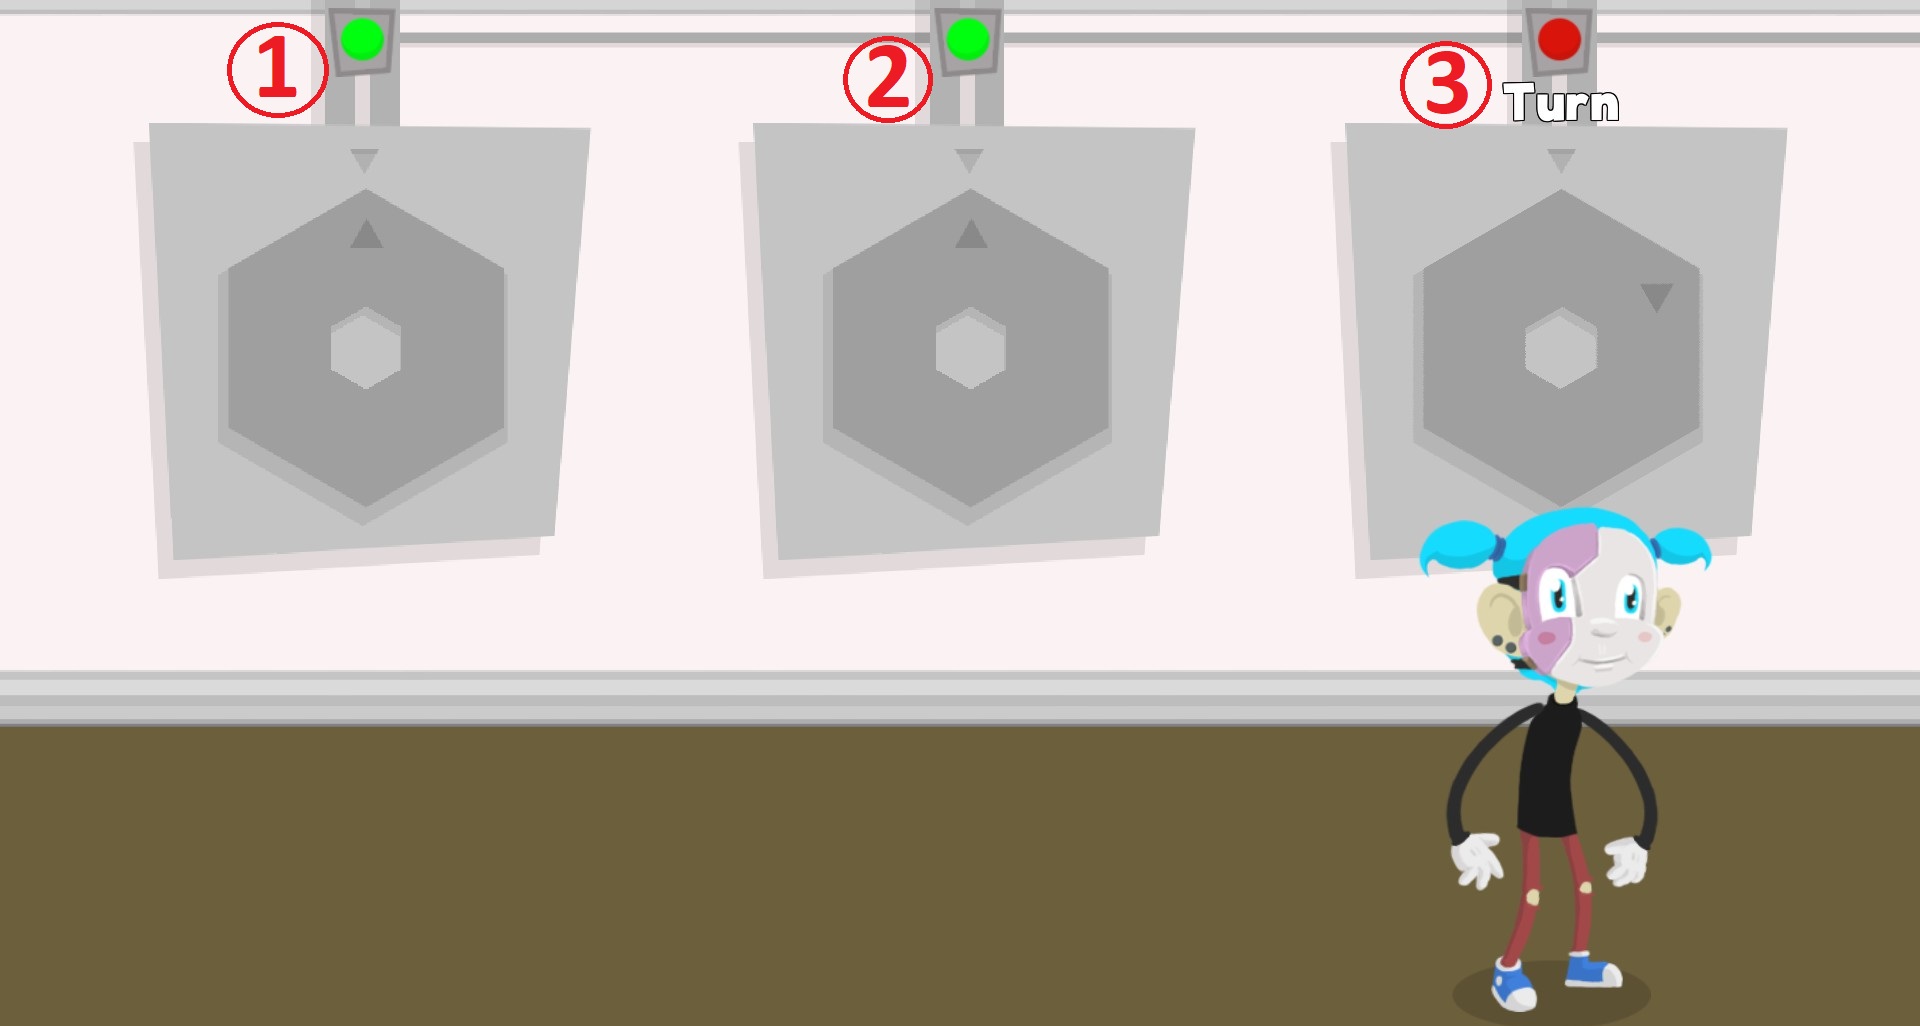
- Go to the room between Sal's and the locked one. To turn the power on, turn the hexagons in this order: 1, 1, 1, 1, 1, 2, 2 and 3.
- Now that the power is on, you can open the locked door. The code is the sum of all the numbers you've seen in the house: 5023 + 7842 + 145 = 13010. Enter Todd's room.

5) The 1st pyramid
- Go right to Sal's grave.
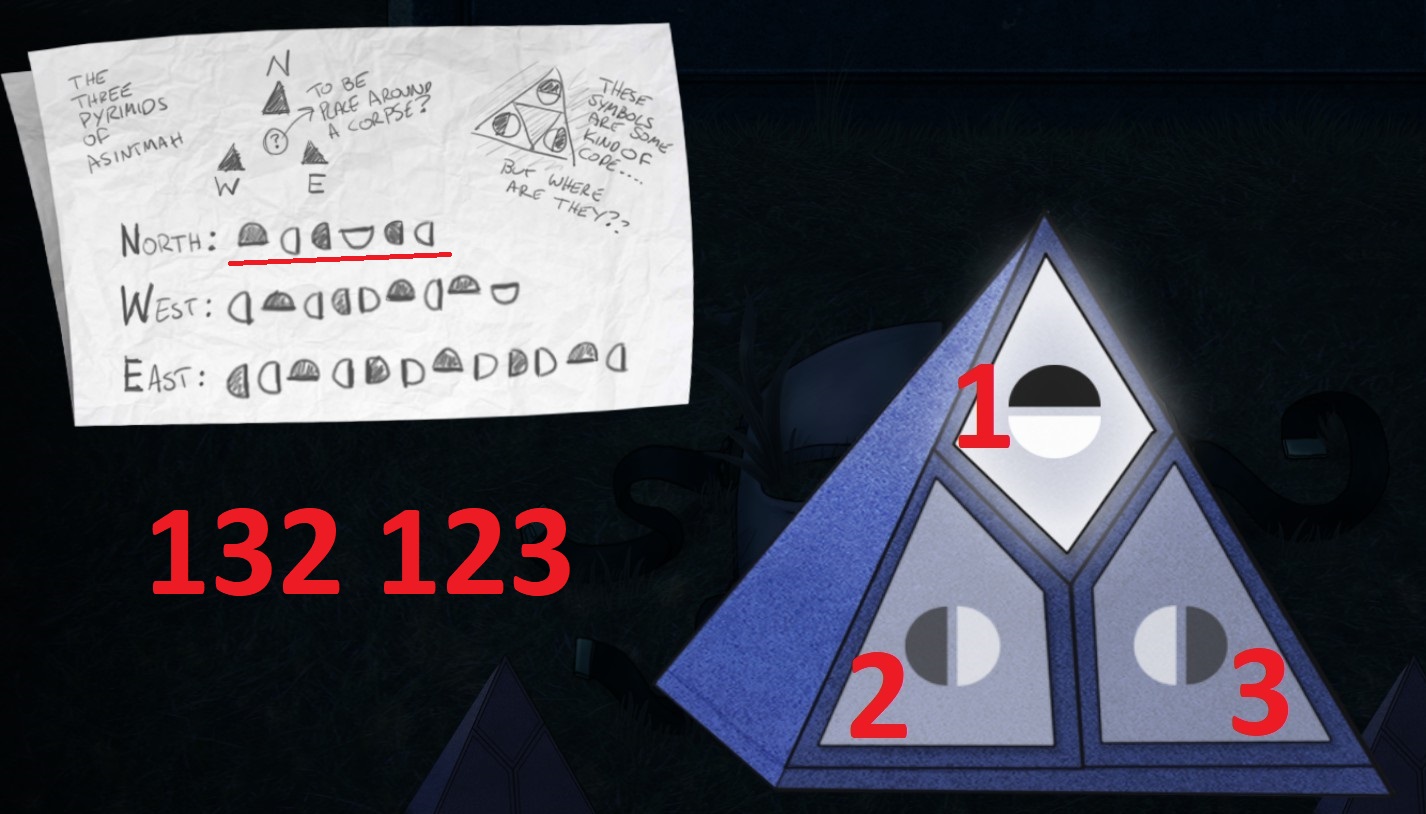
- The code for the first pyramid is 132 123 (see picture). Then place the pyramid to activate it.

6) The Void (2)
- Go into the Black Room and then into the White Room before going upstairs.
- Use all Jim's dialogue options and then go through door 1.
- Take door 3 and enter the light.

7) Polygonal 3D
- Down on the far left, you'll find the next color piece (4 red).
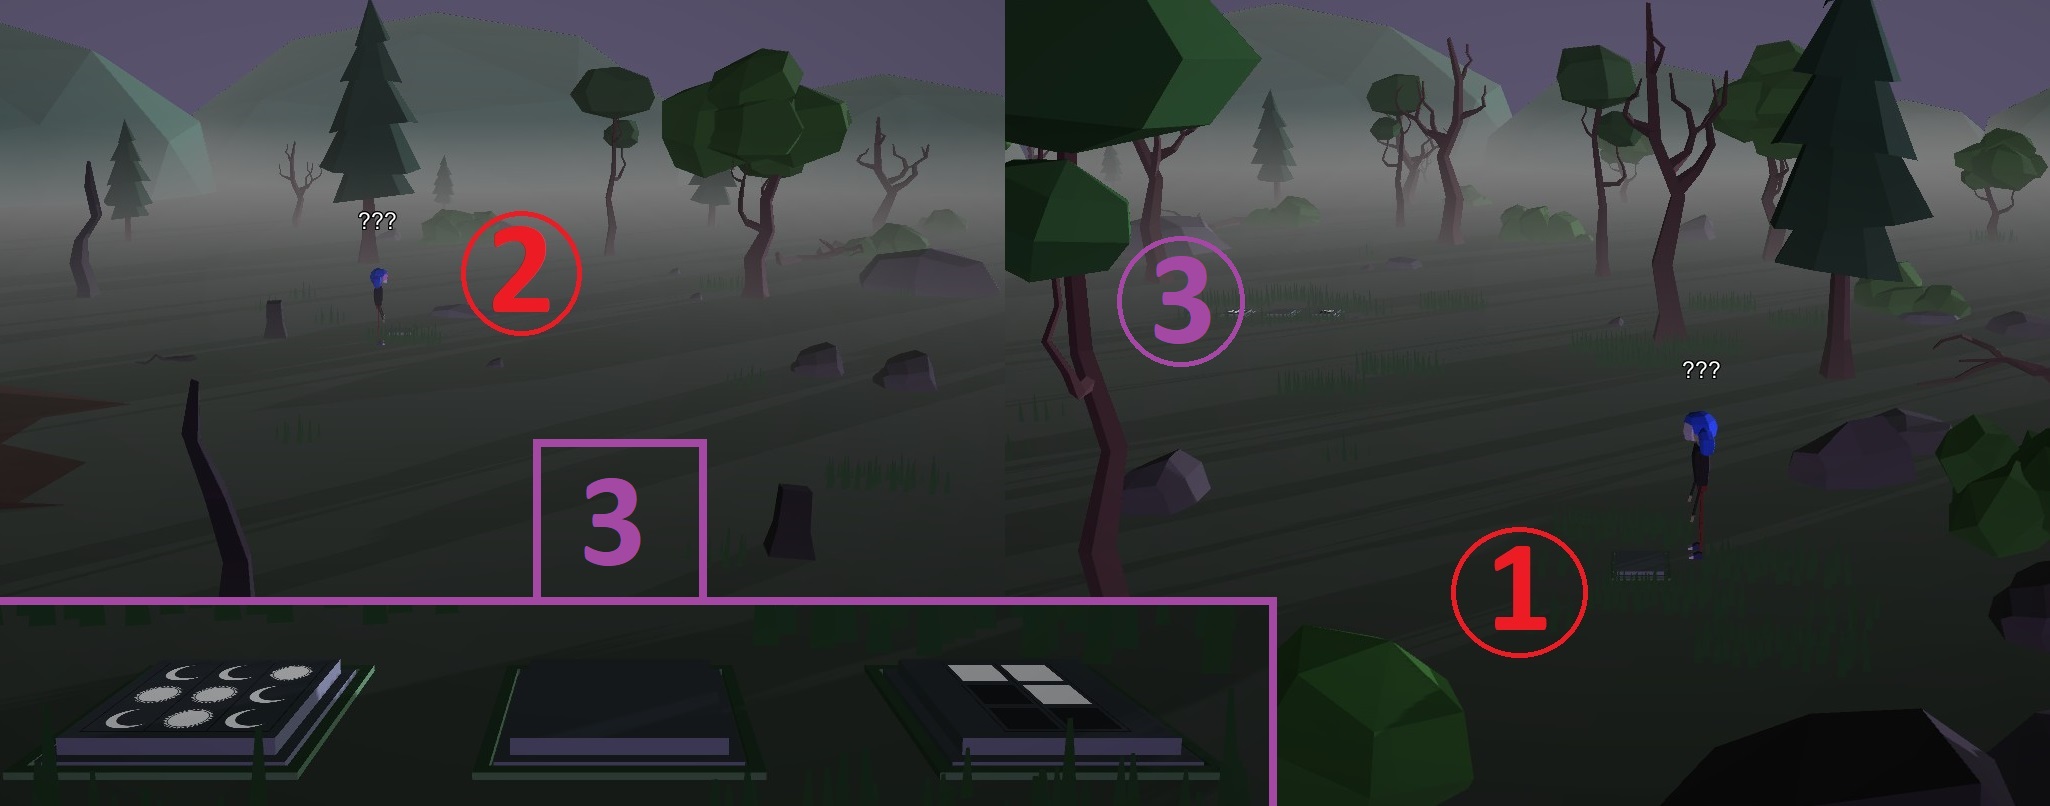
- On the right, you'll find two tiles with puzzles on them (1 and 2 in the picture) and one set of three tiles with two clues on them (3 in the picture). In these puzzles, suns = white squares, and moons = black squares.
In puzzle 1, set the white squares according to the suns in the left clue. In puzzle 2, set the suns according to the white squares in the right clue.
- When the pillars are up, use the arrows to solve the puzzle. For example: 1, 1, 2, 2, 3, 3.

8) The 2nd pyramid
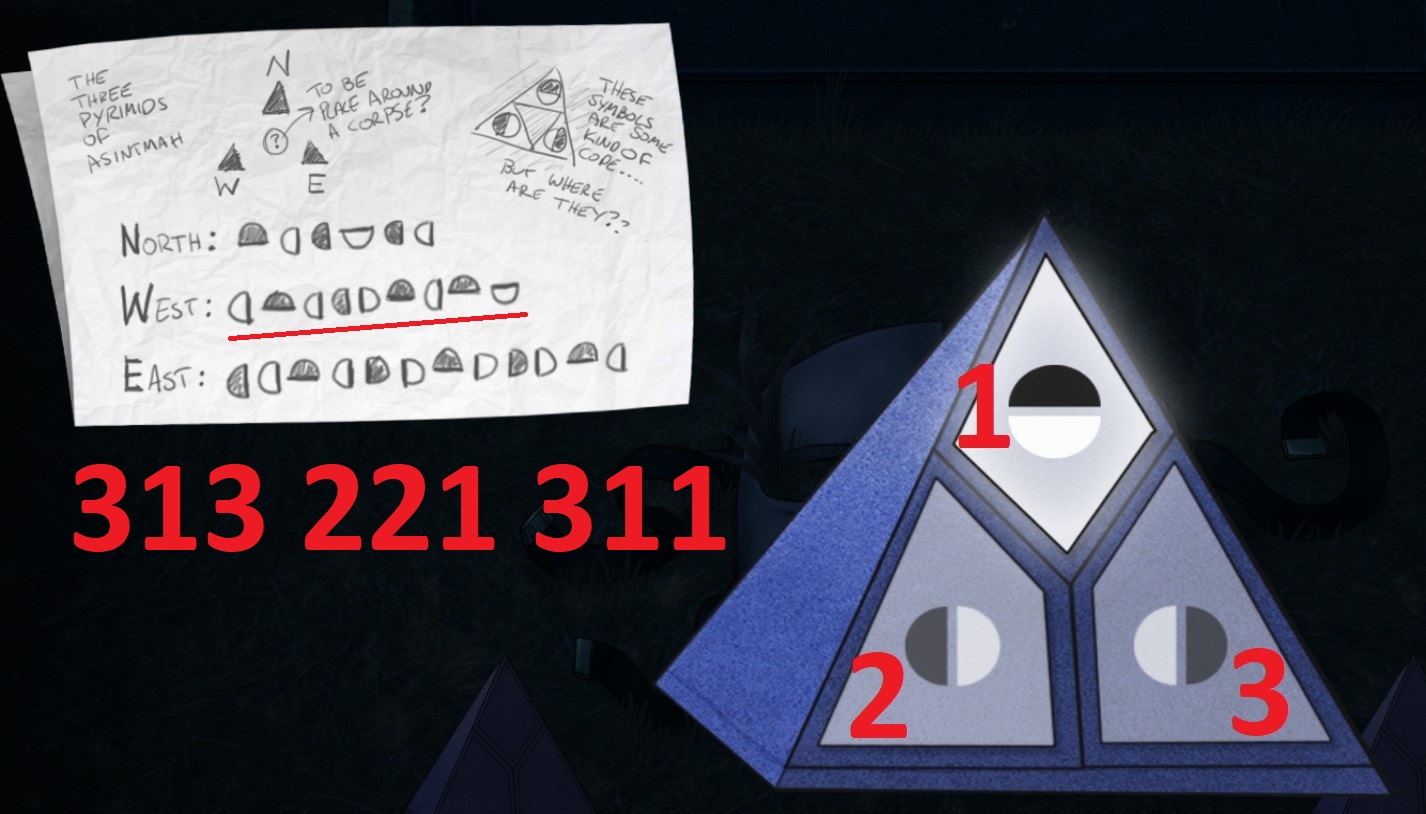
- The code is 313 221 311. Place the pyramid to activate it.

9) The Void (3)
- Go into the Black Room and then into the White Room before going upstairs.
- Use all Jim's dialogue options and go through door 1.
- Take door 4 and enter the light.

10) Tim Burton style
- Go right to find the last color piece (6 purple) and then go left to enter the cave.
- Talk to Tala Grey and then talk to her again to use all her dialogue options.
- Go left and continue into the second cave.
- On the far left, interact with the red painting to open the new puzzle.
- Solve it by turning, for example: 1, 2, 3, 3.

11) The 3rd pyramid
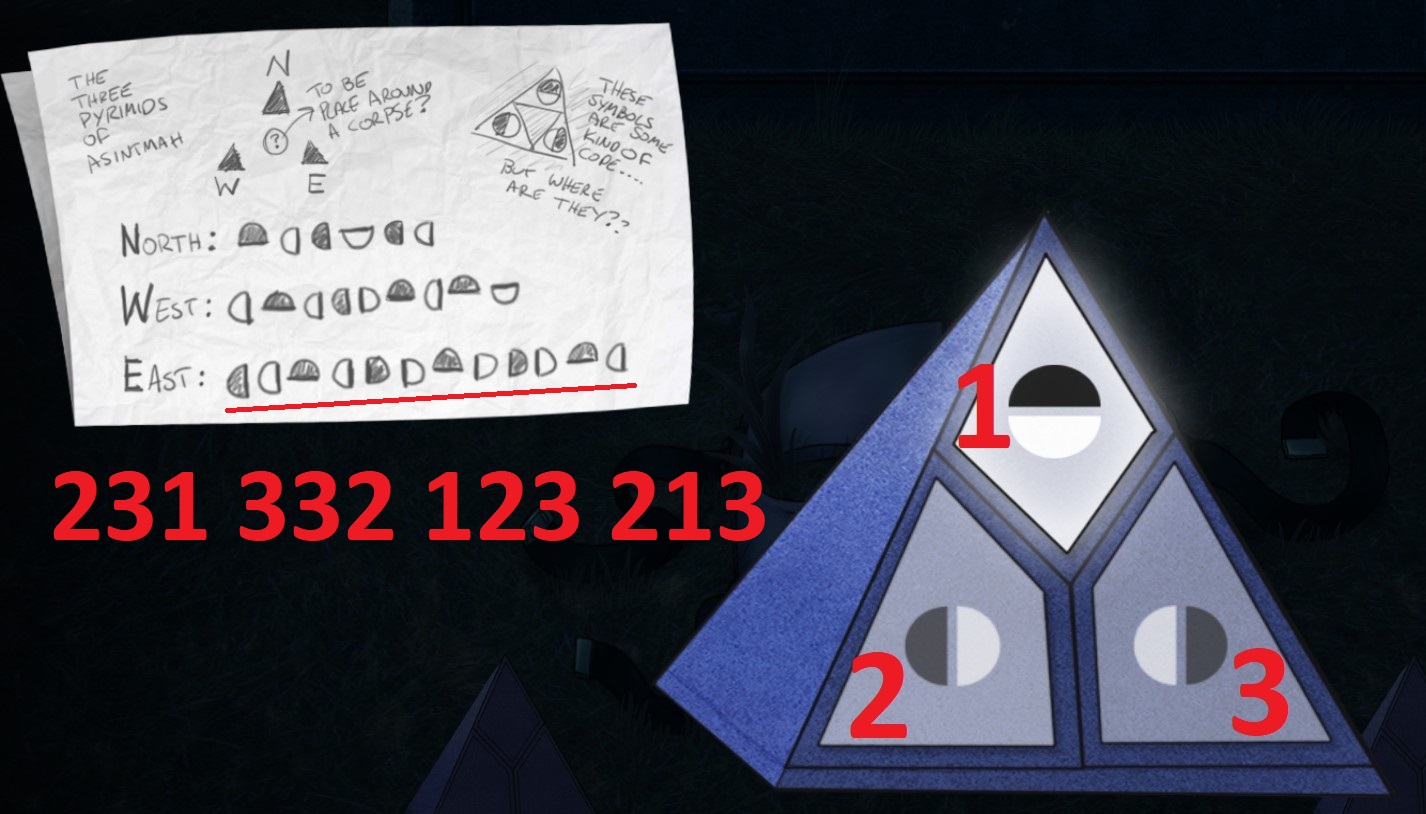
- The code is 231 332 123 213. Place the pyramid to activate it.
- In the void, keep going right.
- As Ash, try out the Blade of Osiris and then exit the graveyard.

12) The Temple
- Go left to enter the inner west hall and interact with the iron gate. As Sal, interact with the locked wooden door.

13) Claymation
- Read the notes close to the computer and open the safe with the code 1983 (according to the notes you've just read, it is the year of the 'initiation'). Now you can read the last note you need for 'Seeker of Knowledge'.
- Go interact with the shelf on the left, which will open a door. Go through it to enter the void again. (Note that once you leave the void, you can't go back.) Inside, interact with door 5. It's time to use the code from the color pieces. What's important here is the number of dots and their color. Arranging the clues in order, we have: 1 white, 2 black, 3 blue, 4 red, 5 green and 6 purple.
- So the code is: White, Black, Blue, Red, Green and Purple. Enter with O.
- Go back into the claymation room and interact with the console. I'm not sure how this puzzle works but the solution is to set the sliders to 3, 1 and 2 and the switches to down, up, down.
- Leave.

14) Final fight
- As Ash, go right to enter the Central Chamber. Kill the 4 cultists.
- As Larry, destroy 1 demon.
- As Ash, hit the eye 3 times.
- As Larry, destroy 7 demons.
- As Sal (pixel version), destroy 14 black orbs.
- As Ash, destroy 7 demons.
- As Sal (pixel version), destroy 4 black orbs and attack the tentacles' tips.
- As Sal (Burton version), attack the mouths when they're open (twice each).
- As Sal (polygonal version), hit 8 tentacles.
- As Sal (smooth cartoon version), hit 6 eyes.
- As Sal (unstable version), destroy 12 red orbs.

Congratulations, you beat the game!
Achievement Summary
Only the first achievement listed for each episode (for finishing the episode) is unmissable.


Episode 1

- 'Charley's Pony' (Finish episode 1)
- 'Go to Sleep' (Put Charley to sleep using Addison tea mixed with the sleeping aid)
- 'Irritable Bowels' (Make Charley go away using Addison tea mixed with the old laxative)
- 'Metalhead' (Listen to the Sanity's Fall song at least twice)
- 'The Unknown' (Find the hidden body, the eye on the wall and the demon in Larry's kitchen)
- 'A Dark Secret' (Get Lisa to mention Larry's curse)
- 'House of the Wretched' (Finish all the levels of your Gear Boy game)


Episode 2

- 'Conjure' (Finish episode 2)
- 'Devour' (Find the four seals in Addison Apartments)
- 'The Addison Family' (Learn more about Addison's family and Terrence's past dreams)
- 'Unseen' (Break into 403 with the crowbar to talk to Mrs. Sanderson's ghost)
- 'The Box' (Find the secret of the metal puzzle box by finding the missing piece and opening it)
- 'Best Buds' (Use all of Larry's dialogue options)
- 'In Seeking Providence' (Find and complete all the chapters of your Super Gear Boy game)


Episode 3

- 'Full of Bologna' (Finish episode 3)
- 'Dead Potato' (Interact with a blank canvas in Larry's room)
- 'Atonement' (Find Travis when he's on the toilet and talk to him to make peace with him)
- 'Messenger' (While looking for the Journal's missing pages, enter a hidden room in the Temple to find a cultist ghost waiting for you)
- 'Clumpy!' (Earn 1000pts playing 'Clumpy' by interacting with the TV in Larry's room after getting the game back from Chug)
- 'Premonition' (Solve the two timed puzzles with the symbols and the code at the start of the episode, to find the journal and be warned by the phantom)
- 'Missing Pages' (Find all 11 pages of Jim's Journal)


Episode 4

- 'Suffer' (Finish episode 4)
- 'Catching Up' (Talk to everyone in the building)
- 'Brothers' (Use all Larry's dialogue options)
- 'Teeth' (Find the five teeth)
- 'Dark Melodies' (Don't miss any notes during the destruction of the pillars)
- 'Destroyer' (Don't miss any notes during the fight against the Endless One)
- 'Her Fate' (Find the 9 VHS tapes)


Episode 5

- 'The End?' (Finish episode 5)
- 'Memorized' (use the code 4035364 (obtained in Episode 4) to open the shed)
- 'Seeker of Knowledge' (Read all the notes)
- 'Vestige' (Use all the dialogue options of Jim, the Voice from the Dark and the Voice from the Light)
- 'DOG' (Finally figure out how Diane died and what happened with Sal's face by finding all the color pieces and unlock room 5 in the void)
- 'Escaping Death' (Don't get any Game Over in the whole episode: don't get caught as Ash in the Temple, and don't touch the orbs or demons while playing as Ash, Larry or Sal)
- 'Epilogue' (Get 100% in the first four episodes and then play episode 5)

68 Comments
Cool Skull Mar 30 @ 4:23am 
Very useful guide Infinite/10
flamepanda4123 Jan 29 @ 12:08am 
I don't know if you found out yet, but to escape the forest each area has what look like stones covering each direction except where you enter and one other, and the second to last area where the stones are in a circle at the center with two spaces so if you follow the clear path you escape.
levash May 9, 2023 @ 5:30pm 
файний гайд
Space Kat May 6, 2023 @ 2:17pm 
For everyone who didn't get the "Best Friends Achievement" while following this guide precisely, here's why. It's incorrect I followed again and changed exactly one thing:

- Go talk to Todd in 202. DO NOT GO BACK IN TO TALK TO HIM AGAIN, and don't check your inventory to see that the puzzle has changed to a Rubix Cube, although it shouldn't matter if you do, but I can't confirm that.
- Go directly to talk to Larry in the basement again.

After this if you've followed the steps above up to this point precisely you should absolutely have just earned the achievement for Best Buds.
emmerald.mezzasalma  [author] Feb 28, 2023 @ 8:49am 
Ok, I changed it. It should be good now. Thank you !
shїгó Feb 28, 2023 @ 8:06am 
its the wrong episode :)
you put it in episode 4, 2) Home
it belongs to episode 5, 1) Home

you can put it before the last line:
...
- Go in Larry's room and have a look at the picture of Larry with his grandmother (important for the achievement 'Seeker of Knowledge').
- Go back into the kitchen and read the note on the table.
emmerald.mezzasalma  [author] Feb 28, 2023 @ 7:12am 
Hi shїгó, I added a line about it in the part "2) Home". I haven't play the game in a very long time but I think I placed it at the right moment. Thanks for your comment and tell me if my edit is correct ;)
shїгó Feb 24, 2023 @ 6:48pm 
duuude.... please fix the part with "photo of Larry" for 'Seeker of Knowledge'.
i played part 5 now 2 times and still dont have the achievement, and now i see in the comments that you missed one note.
Please fix, thanks
_MARZUKU Jan 6, 2023 @ 4:04pm 
only issue i have with this guide is the lack of a heads up for the achievement "Escaping Death" within the walkthrough- at least, from what I see, there was no mention until the end. I could have gotten the achievement otherwise if I knew it was a thing :( but thank you for the guide!!! was very useful, helped my experience with the game.
Mistunchin Dec 29, 2022 @ 1:24am 
Because the OP forgot to include the photo of Larry and his grandma in the room next to Sal's for the achievement, also "trash game"? More like skill issue alert.