DemonCrawl

DemonCrawl

27 ratings
DemonCrawl Basics
By Dumple
How to solve DemonCrawl (Minesweeper) puzzles
   
Award
Favorite
Favorited
Unfavorite
Introduction to DemonCrawl
DemonCrawl is a puzzle roguelike game. In each stage, you solve a "Minesweeper" puzzle. To complete the stage you must flag the locations of all monsters based on hints. Each quest has a series of several randomly-generated puzzles, inventory items, and shops.

This guide covers the basics of how to solve puzzles. If you aren't already a Minesweeper expert, this guide will help you spot some common patterns without having spend as long working out the answer or guessing. You will still need guesses in some stages, but you can avoid unnecessary guesses!

(I've cleared all the quests in Normal mode, so this guide should help take you at least that far! I may update this guide later with more info; feel free to make suggestions in comments)

Note that there's a wiki you can go to for more information, like descriptions of individual items:
https://demoncrawl.com/wiki/index.php?title=Welcome_to_the_Official_DemonCrawl_Wiki!
Solving the puzzles
Controls
Revealing: Left-click on a hidden cell to reveal it. (The first click on a brand new puzzle is always safe, so just click near the middle of the grid)

  • The revealed cell turns into a number to show how many of the 8 neighbors (up, down, left, right, or diagonal) contain a monster.
  • If the cell has zero neighboring monsters, the cell is emptied out and the game automatically clears neighbors until it gets to cells with 1 or more neighbors. This might clear out a whole chunk of the board. Hooray!
  • If you made a mistake and the cell contains a monster, the monster is revealed! This generally causes you to lose life (and if you lose all your life points, you lose the quest). Oh no!

Along the way you might also reveal other things - loot (like coins) strangers (like mercenaries), or other objects (like signposts).

Flagging: Right-click on a hidden cell to flag it as containing a monster. The objective of each level is to correctly flag all the cells containing monsters. Once all the monsters are flagged or revealed, and no extra flags are placed, the level is complete. If you notice you flagged a cell by mistake, right-click it again to un-flag it.

Chording: If you left click on a number (a revealed cell), and you've already flagged enough neighbors, the game will automatically reveal that number's neighbors. For instance, if you click on a 1 after flagging one of its neighbors, clicking the 1 again will reveal all hidden neighbors except that flagged cell. This kind of click is called chording.

Strategy: In general, you want to avoid having to guess by revealing a cell you're not sure is safe. Clear as much of the board as you can without guesses - then, if you can, use items to avoid guesses, or to prevent taking damage from a wrong guess. See "Basic flags" and "Tricky flags" for examples of how to figure out which cells to flag.

Easy flags
The easiest clues are ones where you you can flag a monster by looking at one number and its neighbors.

Here are some examples - look at the middle cell in the picture.


Flag the one hidden cell next to the 1.

or
Flag the two hidden cells next to the 2.


Flag the three hidden cells next to the 3.


Flag the four hidden cells next to the 4.

In general, if the number of hidden neighbors is the same as the number in a cell, flag the hidden neighbors. A short cut: If you right-click on a number (a revealed cell), and it has the same number of hidden neighbors, they get flagged. In the examples above, you can right-click the number in the middle of the picture to flag the monster(s).

Medium flags
Sometimes you can flag monsters by looking at two clues at a time.


The middle 2 needs two monster flags next to it. We can't flag the top two hidden cells, or else the 1 has too many flags. So no matter what, we need to flag the bottom hidden cell.


This 2 needs two monster flags next to it. We can't flag the top two hidden cells, because then the 1 would have too many flags next to it. So, we flag the cell at the bottom right. (By the same logic, we can also flag the cell at the top right...and then we can reveal the middle hidden cell)


This 2 needs two monster flags next to it. We can't flag too many cells next to the 1, so we know we need to flag the bottom hidden cell. And because the second 1 is going to have a flag next to it to its left or down-and-left, we can also reveal the top hidden cell.


The 2 with the cursor pointing to it needs two flags. Because we can only put one flag next to the left 1, we need to flag the cell down-and-left from the 2.

Now, we know that left 1 is going to get its flag from the 2 (either to its left or down-and-left), we can reveal the three neighbors above the 1 at the top of the picture.

Galaxy brain flags
Sometimes you need to flag monsters by looking at three or more clues at a time.


The cell right-and-down from the 3 can be flagged.


Other tricks
If you you click and hold a number (a revealed cell), the game will indicate all the neighboring cells that haven't been revealed yet. That can make it easier to spot places where you can easily flag cells. If you left-click the revealed cell and it already has enough neighbors flagged, its remaining neighbors quickly get revealed. When in doubt, left-click on revealed numbers!

There's a count at the upper left showing how many monsters are left to be flagged. If you're down to the last few monsters, sometimes checking that count lets you rule out a possibility and avoid a guess:


This last 2x2 grid of hidden cells is tricky. At first it looks like there's nothing to do but guess...but notice there's only one monster left on the grid. It has to be in the top left of the remaining hidden cells.
Stats, Inventory, and Strategy
Stats
As you start playing you'll notice you have several stats
  • Lives, indicated by a heart <3 icon. You start with 5 / 5 lives, and you can survive 4 damage. (Note that some monsters, especially later in a quest, do more than 1 damage in a hit!) Click on heart icons revealed in a stage to restore life if you're wounded.
  • Souls - gaining souls increases your max life. If you have 5 / 5 lives and gain a soul, now you have 6 / 6 lives.
  • Defense - indicated by a shield icon. Reduces the damage you take from a monster...but you will still take a minimum of 1 damage. For instance, if you have 2 defense, then instead of taking 1, 2, or 3, or 4 damage from an attack you'll take 1, 1, 1, or 2 damage.
  • Mana - Magic items have a mana requirement for use. They start fully charged, so you can immediately use them. You get mana for revealing cells(?) Each magic item has its own mana battery; you might have one at 100/100 (ready to use), one at 230/400 (recharging).
  • Revives - Indicated by a doubled heart icon. If you have a revive then when you lose all your life, instead of losing the game, you "come back to life" at full health, and the revive is used up. You can accumulate two or more revives if you are lucky.
  • Gold, indicated by a gold coin icon. This is useful for buying items at shops, or spending at strangers. Click on revealed coins to get +1 gold, or revealed diamonds to get +5 gold.
  • Tokens. You can use this in between quests to unlock permanent upgrades, like unlocking the next quest in the series. You can find tokens randomly in stages, or get them as a reward for leveling up.
  • Experience. You're rewarded with tokens (and cosmetic upgrades) for going up levels. You get some experience for clearing a puzzle. There are some bonus sources of experience: Clearing a puzzle with no mistakes, getting an in-game achievement, leaving loot behind in a stage)

Inventory
If you click the bag icon at the bottom right, you'll show your inventory. There are several types of item, depending on how (and if) you use them.
  • Consumable items have a highlighted background. Left-click on them to use them and consume them.
  • Equipment - head, body, or boots - grant a defense bonus and sometimes other specials. Click to up them on. Equipment can take damage over time and be broken, or be fortified.
  • Held items grant some effect just for carrying them around.
  • Magic items can be clicked to use them, then they'll recharge mana over time (as cells get revealed), and can be used again.
  • Minions will protect you from one hit. (You can also left-click them to solve a square, but I think the guaranteed defense is almost always better than a random reveal?)
Omens are held items that have a bad effect. Legendary items, colored in gold, are especially good and powerful items.

Strategy
As you play through the stages of a quest, later stages will be larger, and more densely packed with monsters, and the monsters do more damage. Balancing that out, you'll have the chance to accumulate more and better items. The most important thing for completing quests is consistently solving the puzzles with as few guesses as possible. Items can be the key to escaping from guesses or surviving the inevitable mistakes that come from guessing. Here are some tips on how to survive quests.

  • If you've unlocked masteries by fulfilling the requirements and then spending tokens, you can choose one (and only one!) at the start of a quest to boost your power. The mastery is like a "character class". The knight mastery, unlocked by completing a quest with a high defense, seems to be a very good option - you get free defense (and if the mastery is upgraded, you also get increases to defense as you spend gold). I think the spy mastery is another great option (I still have to unlock it though!)
  • You can skip the shop stage and come back to it later, when you have more gold to spend and maybe a better idea of what to spend it on. This is recommended for the first shop in a quest.
  • Items that save you from guesses are precious. Whether they reveal a square (so you don't need to guess at all) or tank damage (so you can survive a mistake) they are lifesavers.
    Prioritize getting these items, especially if they're reusable. Avoiding one guess is good, avoiding 10 guesses over the course of a quest is great.
  • If you must guess, try to make the most useful / informative guess you can - one where no matter what happens, you can start clearing more cells.
  • As in any roguelike, some runs will go better than others! You may have a run where you make optimal plays but the guesses and the omen drops don't go your way. You might follow it up with a run where you get a great combination of items that leaves you plenty of margin of error.
9 Comments
comeonandgetintheboatfishfish Aug 22, 2022 @ 9:26am 
(Incidentally, there's symmetry here. If there are 4 bombs, then the exact opposite reasoning holds and the upper right U is the safest bet, and if there are 3 bombs then everything is 50/50.)
comeonandgetintheboatfishfish Aug 22, 2022 @ 9:22am 
Another consideration when guessing is that, if two choices are equally likely, which one will give you better information? In the above example, among the four possible distributions of monsters, any guess at the leftmost four U's that doesn't result in a mistake will result in the same number. (i.e. the top left U will always be a 3 or a monster, the top middle U will always be a 4 or a monster, the bottom left U will always be a 1 or a monster, and the bottom middle U will always be a 2 or a monster. But the bottom right U can be a 1 in two cases, a 2 in another case, and a monster in one case, so not only do only have a 25% chance to lose but you also have a 25% chance of revealing a 2, which uniquely identifies the bottom middle U as the last monster, preventing you from needing to guess again.
comeonandgetintheboatfishfish Aug 22, 2022 @ 9:21am 
Not all guesses are created equal. Learning to figure out how many ways bombs can be distributed through an unknown space and figuring out that, for example, the 50/50 guess you thought you had was actually a 90/10 guess will make you a much stronger and more effective player.

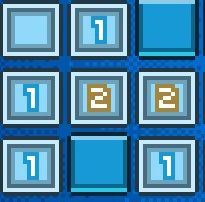
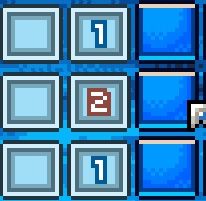
Imagine for example that there are 12 squares in a corner that look like
MM1M
UUU1
UUU1
(where M is a known monster and U is unknown)
If there are 5 monsters here, you know the upper right U is safe, and if there's 1, then you know the upper right U is the monster, but what if there are in between?

If there are 2, then there are four ways to distribute them among the 6 U spaces, and three of those ways leave the upper right U with a monster, so it has a 75% chance to be bad. Each of the other squares will only be filled in one of the four cases, so they're all better guesses.
TheTrueFinalBoss Jun 29, 2022 @ 5:00pm 
This doesn't say anything about Morality?
Artist Formerly Known as Chumgus Mar 22, 2022 @ 2:27pm 
Minor addition, but minions are VERY useful for solving forced guesses at the end of a stage. Using one or two at the right point can often save you much more life (on average) than just guessing with the minion as a safeguard.
potterman28wxcv Jan 7, 2021 @ 7:36am 
Normally souls should give you one life, in addition to one max life, regardless of whether you're hurt or not. But if you click on a soul that is on a burning cell, or you have some other effects dealing you damage, that might be why you experienced that
jordan (endotherm) Apr 4, 2020 @ 11:56am 
-question
"Souls - gaining souls increases your max life. If you have 5 / 5 lives and gain a soul, now you have 6 / 6 lives."
this only gives you one extra life (6/6 instead of 5/6) if you are at full life before you get the soul? I know i have gained souls when not a full life and my life doesn't go up as my max life does...

-idea
"Mana - Magic items have a mana requirement for use. They start fully charged, so you can immediately use them. You get mana for revealing cells(?) Each magic item has its own mana battery; you might have one at 100/100 (ready to use), one at 230/400 (recharging)."
i have come to understand that each revealed cell with a value over 0 gives mana according to its value. cell with a vlue of 4=+4 mana and so on.

-and finally the section about item background colors could be more precise or... something... idk the right word for it.

anyways, i just wanted to contribute my ideas. I think this guide is awesome
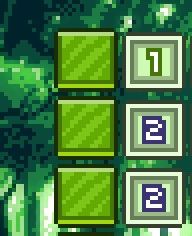
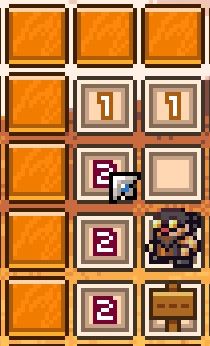
:steamhappy:
SpotterX4 Mar 3, 2020 @ 1:14pm 
Correct me if I'm wrong, but I thought Minions still blocked the hit if you use them to reveal a cell?
crustaceous Nov 27, 2019 @ 5:04am 
Good beginner's guide. I would suggest adding the following kind of constellation, which comes up reasonably often (x is an unknown slot, o is a visible slot but whose number is irrelevant for the logic here):

o o o
o 1 o
o x x
o 1 x
x x x

In this case, you can safely open the bottom four x's.