GROUND BRANCH
Оценок: 360
(OUTDATED) Individual Operator's Guide
От Major Fret
For those Ground Branch operatives who like to play by themselves.
22
5
2
7
2
7
2
2
2
   
Наградить
В избранное
В избранном
Удалить
Introduction
Welcome to the Individual Operator's Guide for Ground Branch. This is intended to be a simple guide to help solo players, and is not focused on individual maps (personally I'd recommend 'Power Station' and '747' for solo play).

Disclaimers:

1) Some tactics discussed in this guide are geared towards solo play rather than CO-OP. Some things recommended in this guide may not be ideal when working with a team.

2) This is soley my opinion, and yours may differ. Some of these things are rather subjective, and doing something different to this guide doesn't mean that person is 'wrong'. I am also open to suggestions and welcome corrections.

3) Due to the changing nature of a game in early access, some information in this guide may be inaccurate. I will do my best to keep it up to date, but I am only human.

4) All information in this guide will be based on the latest version, which includes the Community Test Environment versions of the game.
Kitting Up
Before deploying, you should check over your equipment.

Clothing:

Clothing has no effect and nor do camoflauge, so make sure to dress up as your favorite movie character/video game character/special forces team member.

Night Vision Goggles or Helmets with NVGs mounted are a no brainer for night time operations, but none of the headwear has any effect.

Mounting Platforms:
Mounting platforms (Vests/chest rigs/belts) are where you put all your spare ammo. A player can wear any combination of belt and plate carrier/chest rig. Each one has a different amount of slots for you to put ammo on, but between both a belt and a chest rig/plate carrier, you ought to have ample slots for all your kit.

As body armor has yet to be implimented, it really doesn't matter what you use to carry ammo, but once armor is added into the game, I'm confident armor will be the meta.

Be advised that only belts come with dump pouches which are the only way one can retain or collect magazines as of right now.

'Number' = Number of pouch type
PM = Primary Mag
sM = Secondary Mag
FRG= Frag Grenade
FBG = Flash Bang Grenade
DBC = Door Breaching Charge
WSG = White Smoke Grenade
BINO= Binoculars

Once body armor is properly implemented, both the assault vest and plate carrier will be incredibly useful.

As of v1032, primary pouches now only give 1 magazine to every weapon EXCEPT assault rifles. From a gameplay perspective, this further throws the meta towards assault rifles. Compared to SMGs, rifles can now carry twice the ammo per pouch and usually need half the ammo to kill a hostile.

You'll also want secondary magazines. I'd say 1 pouch is generally enough, but in maps that are close quarters focused (Small Town, Run Down), extra pistol mags can be handy. Whilst you may not use your pistol often, when you need it, there's a good chance it's because your primary is empty, so keeping your pistol with a full magazine is advisable. Having more pistol mags can allow you to swap magazines out more often and keep your sidearm full.

You may want to pack some frag grenades. I don't use them often, but they come in handy if you know where an enemy is and don't want to expose yourself to fire. 2-3 should be enough, but again, the more the merrier.

Binoculars or the Rangefinder are a good option on some longer range maps, especially to save on arm strength.

Finally, one will want to consider how much they're carrying now that encumbrance has been added. Most enemies die in a few rounds, so there's no need to carry hundreds upon hundreds of rounds per mission. I'd advise keeping your kit as light as possible to stay mobile.


For a minimal loadout, I often take:

1-2x Primary magazine pouch (90-150 rounds for most rifles) (Double the pouch amount for SMGs)
1x Sidearm magazine pouch (60 rounds of ammo for most 9mm pistols with extended magazines)
2x Frag Grenades

This has been enough for me so long I'm running 30-35 round magazines in my primary and 20-21 rounders in my secondary.
Weapons - The Basics
Weapon selection can be vital to success. As you are working alone, you will want a weapon that can do just about everything, from bad breath distance to long range.

It's worth noting that even 'less than ideal' weapons are still effective in the right hands.

Caliber and Damage

As of right now, GB's damage model is rather simplistic. This is subject to change in later builds, but for now damage works like this:

4.6x30=3-4 shots to kill
9mm/.45 ACP = 2-3 shots to kill
5.56x45/5.45x39/7.62x39 WP=1-2 shots to kill
7.62x51/7.62x54 = 1 shot kill (Thanks Thomas)
12 Gauge = 1 shot kill at short range, but more at longer ranges.

Of course, all headshots are fatal. Limbshots may incur the need to fire an additional shot to what's labelled above.

I'm pretty sure that barrel length, as of right now, has no effect on damage. That said, it will in later builds.

With that out of the way, lets talk about the various firearms in Ground Branch.

Weapon Sway:
With v1030, weapon sway has been added. This means that heavier weapons will fatigue your operator's arms faster, and in turn, makes it harder to keep your aim steady. To reduce sway, make sure to keep your weapon ported up or down, and minimize the amount of time you spend aiming down sights.

You can also hold your breath by holding the 'sprint' key whilst staying still. This is handy for long range shots, but for the most part, you won't need it.

The Basic Loadout:

This is the loadout I recommend if you just want a solid, all-round loadout. I'm not saying its the best for every situation, but it will work 99% of the time.

AK-74 MI CQB or Mk.18 or HK 416 CQB (They all behave the same for our purposes)
Silencer
SpecterDR 1/4x (ACOG 4/6x is also fine. Vudu and Accupoint are a little more complicated, but also work well.)
Flat mount RMR on top (or 45 degree offset if that's your preference)
Light on the 9 o'clock

I'd also consider the M110K1 tied best primary. It's a little longer and has lower capacity compared to 5.56 rifles, but the guaranteed one-hit kills is a big advantage.

G19 Combat or Urban
20 round magazines
X300 Light
(To be fair, pretty much any pistol except for the M1911A1 will work fine)

2 Frag grenades
3 Primary Mag Pouches
1 Secondary Mag Pouch

This loadout will be light and effective at all but the longest ranges (and even then, still capable with the right user). It also fits on any platform that's currently in the game except for the gun belt (which will be one slot short. If it were up to me I'd give up a frag grenade). Other loadouts are certainly viable, but if I could only have one load out, this is it.

Weapons - Pistols
Pistols:

At this point (v1031 CTE) there are basically two pistols. 20 round 9mm pistols and the 1911.

The 1911 holds 10+1 at most.

The others can hold 20-21+1 rounds (The M17 gets 1 extra round per magazine).

They all do the same damage.

Same goes for the Makarov PMM.

Only other noticable difference is the M9A3 cannot mount a red dot sight. Not a big deal 99% of the time as pistol sights are really easy to use anyway.

TL;DR

Use anything but the 1911 or PMM


TIP: If you get so close to an enemy that both of you are unable to fire, you can draw your pistol and fire from retention.

Weapons - SMGs
MP5 Series (9x19):

Low damage combined with a long reload and less ammo per magazine pouch make this a less than optimal choice compared to most assault rifles. Still, the iron sights are nice and open now, and a RIS handguard has been added for more customization, making it one of the better SMGs.

As of v1032, players will get a faster reload if they reload before running their weapon empty, so pre-emptive reloads become more important with the MP5.

Another problem with this weapon is the fixed sights. This means that the front sight gets in the way of any low mounted optics. Considering the best use for this weapon is close quarters combat, it certainly sucks to have to compromise between height over bore issues or having a cluttered sight picture.

MP7A1 (4.6x30):

The MP7 has a lot of strengths but is weighed down by one weakness: Power. As of right now, it takes 3-4 shots to down a tango. Compared to most assault rifles, which take 1-2 rounds to kill, you are getting less kills per magazine, despite the MP7's higher capacity.

AK-74CQB= 30-15 kills per mag
MP5=15-10 kills per mag
MP7 = 13.25- 10 kills per mag
G19 Patrol w//20 round mags = 10-6.6 kills per mag

This leads to other issues as well. What happens if you have to engage a target at range, or a target that's moving? That's 1-3 more hits a player needs to make, which you might not get the chance to get.

You might think running the MP7 on full auto would solve these issues, and whilst it may, it also adds another: Its rate of fire. This weapon fires so fast that it can be difficult to control bursts. Combined with the fact that enemies don't go down immediately, I find myself emptying 1/4th of a magazine before a tango hits the ground.

If you can deal with the low damage, the MP7 does have some advantages, including it's light weight and short length. In my opinion, neither of those advantages compensate for the lackluster damage.

MPX (9x19):

MP5 damage with Mk. 18 modularity/reload speed. Not bad but you'll need at least two shots to down a tango. Still, this is the best performing SMG and is the one I'd recommend if you insist on running a pistol-caliber primary.

UMP-45 (.45 ACP):

With some improvements in v1032, the UMP-45 now uses its bolt-release for quicker reloads. This improvement doesn't fix the limited capacity, low power, or fixed sights of the UMP-45 (which leads to a similar issue that the MP5 has).
Weapons - Assault Rifles
AK-74/AKS-74U/105s/Wz.88 (5.45x39):

AK-74s are among my favorite rifles in the game. The Alpha series is much more modular, but the AK-74M isn't a bad choice. One big plus is as mentioned with the AKS-74U, you can loot magazines from enemies, allowing you to be more 'liberal' with your fire.

Some enemies carry the AK-74M, which is a good option for battlefield pickups.

As of v1031, some enemies have been spawning with AK-74Ms equipped with 1P78-1 Kashtan 2.8x optics. This may or may not be helpful depending on your situation, as you won't have a back up sight for short range.

AKM (7.62x39 WP):

Basically the AK-74M, however, the iron sights are a little more open as of right now. As of v1032, some OPFOR can be spotted carrying this rifle on certain maps, but the potential to nab enemy magazines is nowhere near as helpful as having multiple attachment points.

M16A4 (5.56x45):

The long boi with no full auto. Still capable, but the shorter options are much better. Be aware that if you're mounting an optic, it'll need to clear the front post sight.

M4A1/HK 416/Mk.18 (5.56x45):

The M4/HK 416s are a great option. Each one of these rifles have plenty of attachment points and handle rather well, especially the short barrelled Mk.18 and HK 416 CQB. The only slight disadvantage is compared to the AK-74 MIs, you won't be able to pick up magazines from downed enemies, but this is a moot point in most situations. This is especially true considering our precious 35-round Taran Tactical magazines are back.

The basic M4A1 and M4A1 FSP do have a front post sight, and much like the M16A4. You'll need to make sure your optic clears it if you want to aim. That being said, having a lower aiming point can be a handy reference if you need to shoot an enemy behind a barrier at shorter ranges.

You can also use 20 round magazines as of v1032. Whilst I wouldn't want to take reduced capacity for CQB maps, on long range maps such as 747, I can see the benefit of lightening your rifle so arm sway doesn't set in as much.

FAL Vintage (7.62x51):
Long, heavy, poor iron sights and no room for accessories, the FAL Vintage is far from my first choice. That being said, a few OPFOR on the map 747 carry this rifle so you might be able to nab it as a battlefield pick up, but it only seems to be carried by a few enemies, so don't expect a plentiful supply.

FAL Tactical(7.62x51):

The FAL Tactical fixes most of the problems with the FAL, being much more modular than is predecessor. This allows you to attach optics, lights etc. Combined with 7.62x51 ammo, this is a nice long range option. That being said, it is still long and heavy, which means it's awkward in CQB and your character will fatigue quickly.

Compared to the Mk.14 DMR, the FAL is slightly shorter, more modular, and allows you to mount optics further back. Now that it's able to mount a silencer, there is no reason to use this over the M14 DMR.

That being said, the FAL Tactical is much longer and heavier than the M110K, and personally I'd rather sacrifice losing fully-automatic fire for a easier handling rifle. The only advantage I can think of that the FAL Tactical may have over the M110K1 is ammo, in the fact that it can carry 2x magazines per pouch rather than just 1, and that some enemies on some maps spawn in with the FN FAL Vintage and can be looted for extra ammo.

G3A3 (7.62x51):

Like the FN FAL Vintage with better sights and slightly shorter, but at the cost of a slower reload if you run empty. You can now attach optics to this rifle, making it almost as effective as the FAL Tactical and M110K. Granted, you still have less rail space than either so I'd still say the M110K is still the king of the 7.62x51 guns in the game.

I've spotted some hostiles in Compound using this rifle, but the majority seem to pack AKS-74Us and AKMs so don't expect to have an ample supply from battlefield pickups.

SCAR-H (7.62x51):

Comes in CQC and DMR flavors. Among the lightest and most modular 7.62x51 rifles in the game, making it an excellent choice.
Weapons - Shotguns
Shotguns (12 Gauge):

Both shotguns play the same, seeing as the pump-action is worked rather fast. Unlike most games, shotguns can be pretty lethal at range beyond 'bad breath distance'. Then again, you'll still have to close the distance to get reliable one shot kills.

Seeing as most enemies die in 1-2 hits from every other weapon at just about any range, the shotguns have a rather poor ammo economy. I mean even carrying an assault rifle with one magazine pouch will give you a total of 90 rounds, whereas you'd need to 11 Primary Magazine pouches (the absolute maximum) to get to 84 rounds total.

As of v1032, OPFOR on some maps (City and Rig) have appeared with the M1014. Unfortunately, you cannot unload enemy-dropped M1014s so they cannot act as an extra ammo supply for you.
Weapons - Sniper Rifles
SVD (7.62x54):

The inferior option compared to the M14, the SVD is still workable. Low capacity and long length hold it back. That being said, in the open, it works rather well when paired with the PSO-1 4x optic. The iron sights aren't bad either, if you wanna go that route.

It's also the sniper rifle of enemy tangos, and can be nice for some impromptue sniping.

Mk. 14 EBR (7.62x51):

Basically the FAL Tactical ever since v1032, but much like its predecessor, I'm unable to mount optics as far back as I'd like. I'd much rather use the M110K1 or FAL Tactical.

I'd also note that the Mk. 14 is 1 kilo heavier than the M110K1. Whilst I don't usually worry too much about weight, I feel this matters on sniper rifles as you'll probably be bolting on a heavy optic + back up red dot and possibly a silencer. All that extra weight contributes to arm sway and keeping your arms stable is critical to sniping.

M110K1 (7.62x51):

The lightest, most compact 7.62x51 rifle in the game, with its length in between the M4A1 and M16A4 (Although leaning towards the former). This length difference is further reduced when running the weapon silenced, as the M110K1's exclusive silencer is the shortest in the game, and makes the silenced M110K1 about the same length as a silenced M4A1.

Beyond silencers, the M110K1 can accept just about any accessory. The only disadvantage to the M110K1 is that its semi-auto only, but that's not a big deal when you're putting down tangos with one shot.

v1032 has introduced a new problem, and that is the M110K1 can only carry one magazine per pouch rather than two. I can't say I really understand this as the G3A3 and FN FAL can carry two mags per pouch and they look to be the same size as the M110's. Of course, this issue can be fixed by carrying more magazines, but it is something you'll want to check before deploying if you're like me and typically use 2-3 Primary Magazine pouches.

M110 (7.62x51):

M110K1 but longer and heavier. Certainly effective, but the M110K1 is better.

M24 (7.62x51):

Bolt action with small magazines. Outclassed by literally every rifle in the game.
Weapons - Machine Guns
Mk. 46 (5.56x45)

Heavy and unwieldy, the Mk. 46 brings one thing to the table, and that's 100 rounds of 5.56 per magazine. Of course, this comes with some trade-offs such as slower reloads and heavy weight. For general use, an assault rifle is likely to serve you better, but the Mk. 46 is in no way ineffective.

It's worth noting that I've seen the occasional tangos carrying this weapon. Whilst heavy, I can see the potential in it as a battlefield pick up if you're desperate for ammo. Even if an enemy's fired a few bursts, there's likely to be around 2-3x the ammo of an AK dropped by a foe.

PKM (7.62x54)

Same as above but more power, more weight, and no attachment points.
Weapons - Grenades and Misc.
Grenades:

Frag grenades are useful for 'room clearing' without entering a room. You can also lob them over cover towards an enemy position. Just be aware they take a few seconds to detonate. You are also quite vulnerable whilst throwing them if an enemy comes near.

As of v1032, grenades also 'deafen' you for a second or so, and also tend to destroy any doors in radius, which can open up sight lines for both you and your enemies.

Flashbangs detonate near instantly, and blind enemies, however as of right now it can be hard to tell if they are under the effects of due to a lack of proper animations. I believe enemies may call out 'GRENADE!' if they are under the effects of a flashbang, but I'd recommend proceeding with caution either way.

I'll need to do more testing, but in more open maps, smoke grenades could be handy to obscure your movement.

Door charges:

Take too much time to set up, and most maps don't feature enough doors to make them viable. Then again, it is a lot of fun to blast a door open.
Attachments
Attachments make all the difference to how a weapon and its user perform

Silencers:

Silencers are the best mod you can add to a weapon. Tangos who can't here you will become confused to your exact location, allowing you to flank them.

Just remember silencers somewhat obscure the sights of most sidearms (G19 Urban and M17 are the two exceptions). They also increase the length of a firearm to a significiate degree. An MP7 w/ silencer will be about the same length as the Mk.18. An Mk.18 w/ silencer will be similar length to an M4A1. An M4A1 w/ silencer will reach the length of the M16A4, and the M16A4 with silencer will be super long.

The only time this has become an issue is in some of the buildings in Small Town, which has pretty tight quarters. Even then, I still feel the benefits outweigh the negatives by a long shot, especially for a lone operator.

Lights:

Tangos can't see lights as of right now, so if you have the space, why not? All three lights (Inforce WMLx, M600L, and the M300C) behave somewhat differently, but to tell you the truth, I couldn't tell you the difference.

I'd argue the best position for a light is 12 o'clock, but this may obscure or even completely block off your sight picture. It can also take up precious space for your IR-Laser or offset sights. Mounting on the side is probably the next best option, as if a light is mounted on the bottom, it may be obscured by cover.

Lasers:

Again, tangos can't see lasers yet, so why not? The normal visible laser sight is better for day time due to it's smaller profile but the PEQ-15 is better if you're running night vision. If you can, mount a laser sight either on top or bottom of your rifle. This will mean there's only a height offset with your muzzle, not a height/width offset (it's not a big deal in most cases, but better safe than sorry). My preference is to have a laser on the bottom. That way, if I'm behind cover and my laser is beaming on it, I'm likely to have Height of Bore issues and need to push out further.

Just be aware that the visible red laser isn't the easiest to see in day time conditions.

Grips:

As of v1032, the various grips now change the way your operator grips his rifle. This has no affect on performance, but if you have a vertical foregrip, you will have a view of your operators watch when you ADS/hold the rifle in the 'mid' position.

Attachments Continued Optics Boogaloo (Curse you word limit)
Optics:

There's a lot of preference when it comes to optics, so it's best to experiment.

For mounting, I don't worry too much about reflex/red dots, although I prefer to mount them further than closer. For scopes, I like them as far back as I am allowed. That being said, when it comes to optics, you'll want to play around and favorite set ups.

Folding Iron Sights: If you insist on using iron sights on a weapon that doesn't have any, you can use either KAC Micro or the MBUS folding sights. I prefer the MBUS sights over the KACs, but neither compare to the various red dots or scopes available.

Dot Sights: This includes the ASR, Micro T1, Micro T2, SRS, MRO, RMR, PRO, and M68 CCO. These sights really shine when moving and shooting, as you don't have to line up a front and rear post. They also offer up a cleaner and more open sight picture, and are also usable under night vision goggles (same goes for OKP-7, and both HWS sights.

The RMR is the most versatile of the bunch, being able to mounted on a weapon, piggybacked on an optic, or placed on a 45-degree offset mount. It also can sit rather low, reducing height over bore issues on weapons like the AK-74 MI.

Tip: Be aware of height over bore if you're going to piggyback an optic (or just in general).

The Dot may be on target...

But the muzzle is obscured by the barrier.


OKP-7: This Russian optic has a chevron in the middle rather than a dot. This is a rather nice optic and a good option for those who want more of a crosshair than a red dot. I'd recommend adjusting the brightness on this optic to the lower end, as the chevron blurs on higher brightness levels.

HWS EXPS-3/553: These holographic sights come with a crosshair. What's nice about these sights is if you can't see the dot (or dots in the case of the EXPS-3), is that you will most likely be able to make out the circle, so you can just put a tango in the middle of the circle and fire. The dots are also finer than the typical red dot, making these sights an ideal pairing with the 3x magnifiers.

Just be aware that both these sights will sit high, causing height-over-bore issues for some weapons. Granted, you can use the lower half of the crosshair to compensate.

EKP-8-18 Kobra: This reflex sight features what is basically a crosshair with no middle dot. If I'm being honest, I just don't get the appeal of such a sight. Having no aiming reference in the middle makes aiming at long range difficult, and I've never found having a dot in the middle ever slowed me down or limited my field of view.

ACOG 4-6x/Elcan SpectrDR 1-4x: I like these optics as they are simple, yet effective. I favor the 6x overall, but both 4x scopes work rather well. I don't bother running the Elcan on 1x as it's not as smooth as a reflex sight when moving and shooting.

I'd recommend these three optics to newer players, as they are simple and easy to use.

AccuPower/ATACR/Leupold 1-8x: This is a very good optic. Like the Elcan, I'm not a fan of running it on 1x, and I tend to run it on 8x most the time. Then again, it can be advantageous to have a wider view of the area.

The only other negative of this optic is that it takes up more rail space compared to ACOGs/Elcans, but not to a degree that matters all that much.

VUDU 1-6x Optic: Basically the AccuPoint 1-8x, but only goes to 6x. Personally I'm not a fan of the reticle but that's a personal preference thing.

Mk.4 3.5-10x and 5-25x scope: On longer maps, I'm sure these optics are nice, but I've never really needed them.

Piggybacked RMR: Some scopes allow you to attach an RMR red dot on top of them. This grants you the ability to aim at close quarters or immediately switch to a wide field of view. The major con to this style of aiming is the increased height over bore, meaning your point of aim will be above the point of impact in CQC. This can be a problem when dealing with enemies hiding in cover.

45 Degree Offset Mount: This can be a nice option as it reduces height-over-bore issues compared to a piggybacked optic. It will cause the character to stick his elbow out, but I've never found this to be an issue. Finally, your field of view will be slightly more cramped when using offset sights if you have a scope mounted.

G33 Magnifier: The Magnifier offers a 3x zoom that can be toggled when using a reflex sight of appropriate height. Whilst offering less zoom, this does reduce the height over bore issue with Piggybacked optics and removes the need for your character to stick out their elbow like they do with the 45-degree offset.

The negatives include a decreased FOV when the magnifier is flipped to the side, and the low amount of zoom offered compared to scopes.

AN-PVS-22 Night Vision Scope: When used in addition to a scope, the AN PVS-22 will give you night vision. This will require some rail space. You also cannot turn off the night vision effect, so make sure you have a back up sight in case you encounter any area illuminated by light.

Be advised that night vision scopes can't be used with night vision goggles on. Again, having an alternative aiming sight is advised.

Summary:

As of right now, my ideal set up is either an HK-416/Mk.18/AK-74 MI CQB with an ACOG/Elcan/AccuPower combined with either a piggyback or offset RMR, silencer, light on the right side, and laser on the bottom. That being said, I've done terrorist hunts with all sorts of set ups and just about any combination can work in the right hands.
Gameplay Basics
In this section I'll discuss some of the basic functions of the game, and how they apply to solo play.

AI

Unlike a lot of games, the enemies in Ground Branch aren't lining up to get shot (most of the time). The AI will to cover to cover towards your last known position, and engage you when possible. For the most part this is their routine (assuming the player is in range)

1) See player
2) Shout an alert ("He's one of them." "I see enemy.")
3) Move to cover and/or fire at the player
4) Pop in and out of cover.

The AI is a little more dynamic than that, but that's the basic jist of what they'll do.

AI is most dangerous in groups. This isn't because they work together, but when they are engaged, they can split up in multiple directions. This can cause you a lot of problems if you're not quick in taking them out, as you can be dealing with multiple attacks from different flanks.

It is worth noting that as of right now, AI behaviour does not change at night time, so they can see just as well as they can in the day time.

As of v1030, the last few remaining enemies (3 or 4) on a map will rush to your position. This can be used to your advantage, as you can camp and wait for enemies to come for you, or move from your original position to flank enemies.

Camping is not a bad idea assuming you have a defendable position. A good example is the cockpit in 747, as enemies only have one approach: The stairs to the cockpit. If your position isn't easy to camp, say the out in the open, moving and flanking might be a better approach.

It's also worth noting that as of right now, enemies will get stuck on ladders if they are one of the few remaining, so checking ladders is a good plan if it seems to be taking a little too long.

Time of day:

As of v1030, players can pick the time of day they deploy. This affects lighting and the direction of the sun. This is important for a few reasons:

1) Night operations require night vision (as detailed below).
2) The sun shining in your eyes will obscure your vision, including any enemy tangos that might be lurking about.

I'd recommend sticking to afternoon (1100-1300) for the most part, as this will ensure the sun doesn't get in your eyes.

Low, Middle, or High?
Unlike other shooters, the player can select if they hold a weapon at low ready, from the hip, or at high ready.

In general, Low Ready is great as it gets the weapon out of your view, however, you can fire and aim a laser sight when holding it in the middle. However, arm sway now means that holding your rifle in this position will fatigue you more than low or high, so I only recommend doing this in close quarters. Overswing is also something to watch for. This means if you move your mouse really fast, your weapon will swing past your intended point of aim.

Seeing as you don't have to worry about muzzling anyone below you, high ready gives you a nice view of your gun, and an indication of how fatigued your arms may be.

Semi versus Full-Auto:

For the most part, I stick to semi-automatic, seeing as most enemies are going to die in 1-3 rounds. This allows me to control the amount of ammo I'm using. You can still fire pretty fast in semi-auto anyway, if you really need to.

That being said, full automatic can be useful in the following cases:

-A pack of tightly clustered enemies

When playing with high number of terrorists (20-30), they can sometime cluster as groups of 3-5. If they're bunched together, you may as well hit 'em with a lengthy burst.

-Enemies moving in and out of cover

It can be hard to accurately hit enemies when they are moving fast. A short burst can make it easier to hit targets that are moving fast. This can be doubly important if you're not using any sort of zoomed in optic.

-Wallbanging

Some walls are thing enough to shoot through, and full-auto allows me to get a nice spread that will hopefully give me the hit I need.

Retention Reload versus Speed Reload:

Ground Branch allows the player to reload via two methods:

-Reload and retain the previously loaded magazine (Retention Reloads)
-Reload and drop the previously loaded magazine (Speed Reloads)

I'm gonna be honest, I stick to speed reloads for most of the time for these reasons:

-If I need ammo, I need it NOW
-A few rounds is unlikely to make much of a difference
-I tend to carry a lot more ammo than I need

The only time I perform a retention reload is if the magazine is still reasonably full, and there's either a lull, or I'm about to enter a new area (for example, I've just cleared one of the buildings on 'Small Town' and I'm moving onto the next, or I'm about to enter the plane on '747').

In fact, I have reversed the controls for reloading, so a single tap performs a Speed Reload, and a double tap performs a Retention reload. This is because if I accidentally Speed Reload when I wanted to retain the magazine, I can always pick the magazine up, BUT if I need to Speed Reload, I may need to do it NOW.

Reload when you can, not when you need to:

Basically, if there's a lull, take the time to top off. You don't want to be the guy who runs empty in the middle of a firefight.

As of v1032, you can check your magazines by holding down the reload button. You won't learn exactly how many rounds, but you'll have a general gist of how many rounds you have. Of course, this takes time and leaves you with one round in the chamber, so I'd only recommend doing this if things are quiet.

NOTE: Shotgun reloads work slightly differently. Instead of performing a speed reload, the player will proceed to load the magazine tube until it is full. Instead of a Retention Reload, the player will just load one shell into the gun. The shotgun is a hungry beast, and I'd recommend topping off as much as possible. Loading one round doesn't take long, but it can make all the difference.

Reload your sidearm before you put it back:

If you need your sidearm, you most likely need it fully loaded. This is especially true with lower capacity sidearms like the M1911A1. Even if you've fired two or three rounds, top off your sidearm if possible before holstering it.

Height Over Bore:

Unlike most shooters, bullets come from the muzzle rather than 'hitscanning' from your optic/vision/crosshair. This means that if your sight sits significantly higher than muzzle, there will be a difference in point of aim and point of impact. As of right now, this doesn't affect combat beyond very short distances.

To be honest, I've only ever found this to be an issue when shooting around barriers. Enemies die in at most two shots to the torso, so you don't need to be all that accurate so long your shots hit your target.

Tip: If you mount a laser at the 6 o'clock position, you can use it to check if your muzzle clears a barrier. If your laser is pointing at a barrier, chances are you will hit the barrier rather than your target.


Intel Retrieval
In addition to Terrorist Hunt, v1031 has brought a long a new mode: Intel Retrieval .

Rather than kill every terrorist, the player must locate the right laptop (of 3) and then head to extraction. Whilst this does save the need to hunt down every single enemy, it does add some complications.

1) It takes 10-15 seconds to search each laptop, which is a long time when no one is watching your six.
2) You don't get to chose where your extraction point is. This may mean you'll have to think carefully about your insertion so you create less work for yourself.
3) If you're unfamiliar with maps, you might not know where exactly to look, as it's not on the pre-deployment map (granted, the laptops don't change position so once you know where they are, you know).

This mode has been updated in v1032. In the current CTE.

Rather than kill every terrorist, the player must locate a laptop in an area of the map. This area (and other potential locations) is on the map, and is usually well guarded. Upon finding and hacking the laptop, you will need to head for extraction (which is also on the map).

Taking all these into consideration, my advice would be:

1) Silenced weapons are even more important than usual, as this will allow you to slip past undetected.
2) Be sure to secure the area before attempting to search a laptop.
3) Take into consideration where your extraction is, and how to approach it once your objective is complete. Remember that the level won't end unless you reach extraction with the laptop or die. Moving whilst taking cover is highly recommended.
Night Operations
This might be out of date by v1033, but frankly, Ground Branch just doesn't hold my attention anymore and I can't be ♥♥♥♥♥♥ updating it

Night operations (or NOPS as I will refer to them from now on) add a few complications, most obvious of which being limited visibility. As of right now, the AI is not affected by darkness in any way and will detect the player as if they were in daylight.

The two solutions to seeing in the dark are night vision goggles (NVGs) and a flashlight. NVGs are the superior option for most situations, as they are not limited by range. That being said, there are some areas that are well illuminated (especially interiors) and a light may be more desirable in those situations.

Whilst using NVGs, one will have their sighting options to either a reflex sight, a normal laser sight or the IR Laser (which is a laser only visible under NVGs). Iron sights and scopes will become blurry whilst NVGs are active.


That being said, if you wish to use a scope, you can combine a scope with the AN-PVS-22 night vision device. You must flip your NVGs up before using the AN-PVS-22, and you will need a lot of top rail real estate to attach it and your scope of choice. It'll also be a ♥♥♥♥♥ once weight is accounted for.

I'd also highly recommend running a silencer during NOPS, as beyond the normal benefits, they reduce muzzle flash that can be much more pronounced during night time.

Tactics
These tactics will help you stay alive out in the field.

DISCLAIMER: Some of these tactics are geared towards solo play and may not work for co-op. I also apologise for inconsistent GIF size/quality, as Steam restricts a user to 2MBs.

Situational Awareness:

This is the biggest key to success. Keep your eyes open and look around. The guy most likely to kill you is the one you don't see.

Listen out for footsteps, gunfire and enemies chatter. This can help you get the drop on your opposition before they get the drop on you.

There is someone around that corner:

When you push up, expect an enemy to be there. This might sound obvious, but if you move thinking that you are safe, you are more likely to be caught off-guard, which will lead to you making mistakes.

Don't fixate on your sights:

This is one of my biggest sins. You don't need to be aiming down your sights all the time. In fact, this can obstruct your view quite a bit depending on your sight set up. Keep your weapon at low/high ready until you need it. Snapping to ADS is rather fast anyway. This is especially important seeing as ADS will wear out your character and cause your aim to go to ♥♥♥♥.

Dynamic Movement:

The AI in Ground Branch will move towards where they last saw you (similar to Splinter Cell: Conviction). This means that if you can break line of sight, you can flank enemies as they move towards your original position.

Enemies will often shout 'Area Secure' if they think they are safe. Use this to your advantage and prove them wrong.

Pick your battles wisely:

Every terrorist hunt starts with you undetected, and most enemies will patrol unless they can see or hear you. This will allow you to pick your battles. Before opening fire, you should try to move into a position of advantage.Ideally, this will mean you're in cover, and your enemies will be exposed when you open fire.

Game of Angles

The right angle can make all the difference. You obivously will have to expose yourself to some gunfire, but minimising the amount of 'work' you have to do can be a lifesaver. The less you're exposed, the less you have to deal with.

Enemies will also not engage you unless they can see you. This may force them to move into a position that makes them more vulnerable, possibly to a degree that they are flankable.

Slice the Pie

Speaking of angles, rather than rushing around corners/entryways, work them slowly, clearing a section at a time. This is referred to as 'Slicing the Pie'. This tactic can be rather slow, so it may not be effective if things have gone 'dynamic'.

If you are clearing a corner, make sure to stick to the outer side of the corner. This will give you the best angle possible when looking for those pesky tangos.

It should look something like this:


Look for legs:

Enemies will often move to cover, but they may not have perfect cover. If you're lucky, an enemy will stick their leg out, making them an easy kill. This also works for looking under trucks and other vehicles.


Suppress and Flank:

One tactic I've found useful is to 'Suppress and Flank'. If an enemy is behind cover, fire rapidly at their position. They won't move, but you can. This will allow you to circle around the target.


This tactic does have some drawbacks. The first is that it makes you vunerable to other enemies as you move, so you'll want to be sure the area is clear before doing so. It also will expend a fair amount of ammo, so be ready to reload/switch weapon once you're in position.

You can also use this tactic to move to a safer location if an enemy catches you off guard. If an enemy is out in the open, you might even get lucky enough to hit him with a stray round.

Battlefield Pickup:

The player is able to carry up to three primary weapons, so this allows you to grab an enemy's weapon and use it without having to ditch your own.

Depending on what map you're playing you might be able to grab magazines from dead foes, but I'd say its best to ensure you have enough magazines to get the job done.

What to do when entangled:

Occasionally, you'll bump into an enemy. At this point, this will cause both of you to point your rifles upwards. To counter this, draw your sidearm. You will be able to fire the pistol from retention and kill your attacker. This will work even with the increased length of a surpressed pistol.


Count magazines:

Whilst the prospect of counting each individual round you fire is rather unrealistic (was that burst 5 rounds or 6?), but you can to a degree estimate. For example, maybe I headshoted that first guy, but then fired 3-4 on the next guy, before another surprised me, making me fire 7-9 rounds, leaving me with about half a 30-round mag. Always estimate to the highest amount. I'd rather lose a little ammo than try to save ammo, run dry, and lose my life.

It's also not hard to count how many magazines you've used. If you keep in mind how many times you've reloaded, you can recognise how many fresh magazines you have.

Whilst v1032 has added the ability to check magazines, you can't get an exact count, and this does take time. This feature also only counts your current magazine and does not take into consideration any magazines you may be carrying.

Penetration:

Bullets can go through thin walls and even enemies. With patience, you can wait for enemies to line up whilst patrolling around to score two kills with one shot. This is rare, but can be rather effective.

It's also worth noting that enemies won't engage you unless they can see you, so thin walls can act as cover for you.


Some choices are just gonna suck:

As a solo operator, there will be times where you're at significant disadvantage. No matter what you do, there will be times where you have to expose yourself to danger. Times where you have to go either right or left into a room. Times where you'll be between two different groups of enemies, and so on and so forth.

The only piece of advice I can give for these situations is to be decisive. Sometimes pushing can give you a better angle, and sometimes retreating can be the safer option.
Комментариев: 37
#FreePuff 4 дек. 2024 г. в 3:36 
need help i am on steamdeck and the gam broke now tha screen is streched since last update
Cotton Ball Torture 9 июн. 2023 г. в 23:41 
discord.gg/hellsplayground for a great groundbranch community
Rai 29 апр. 2023 г. в 22:31 
Also, watch a few episodes of Special Ops mission to get in the mood: https://www.youtube.com/watch?v=NlYRvLjvSM8
[TW]Morris Lee #FixTF2 30 мар. 2023 г. в 10:54 
for the light, I mount the offset rail as far forward on the 12 o'clock as possible and put the light there to sort of act like a light extender like this [img.trex-arms.com]
mrflipflop 9 мар. 2023 г. в 8:50 
the 1911 is for individuals with huge chodes only.
MissNurseXochi 6 фев. 2023 г. в 9:57 
The MK-14 EBR and both of the SCAR-H variants have fun switches.
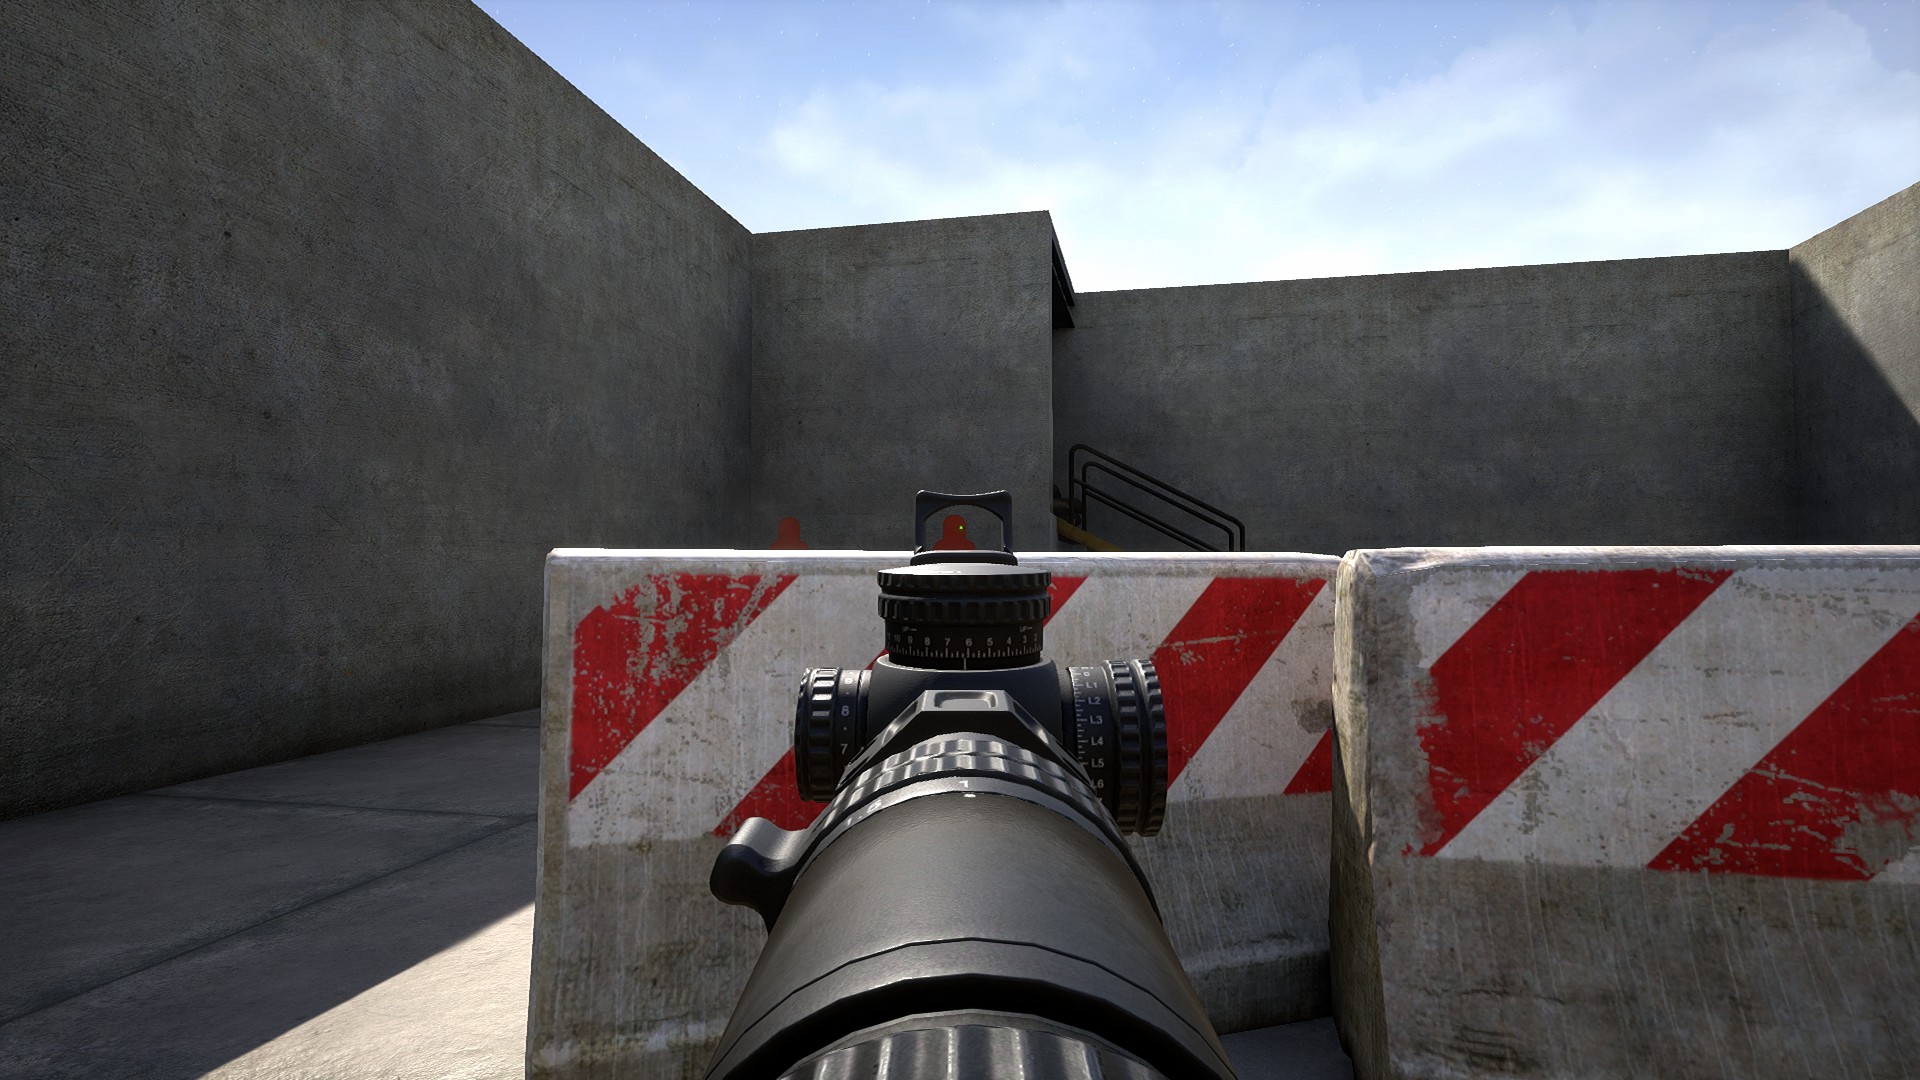
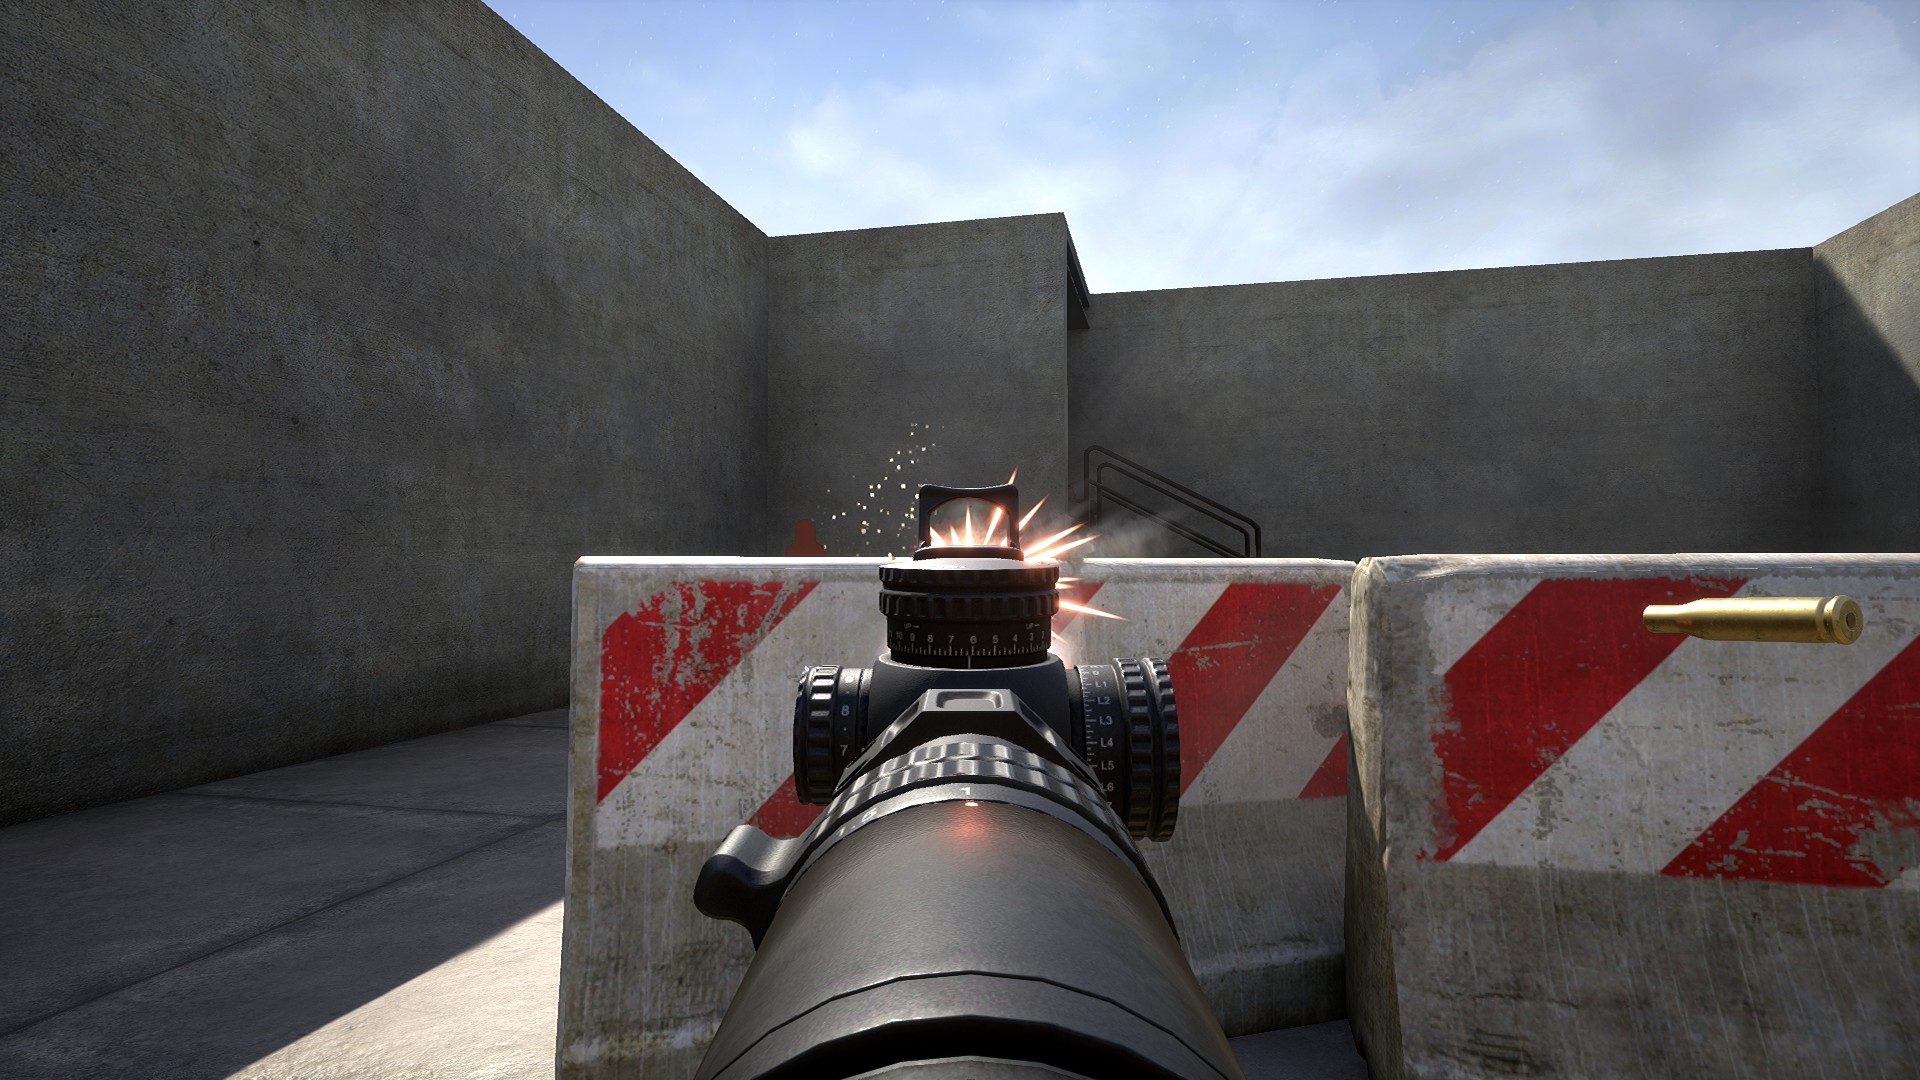
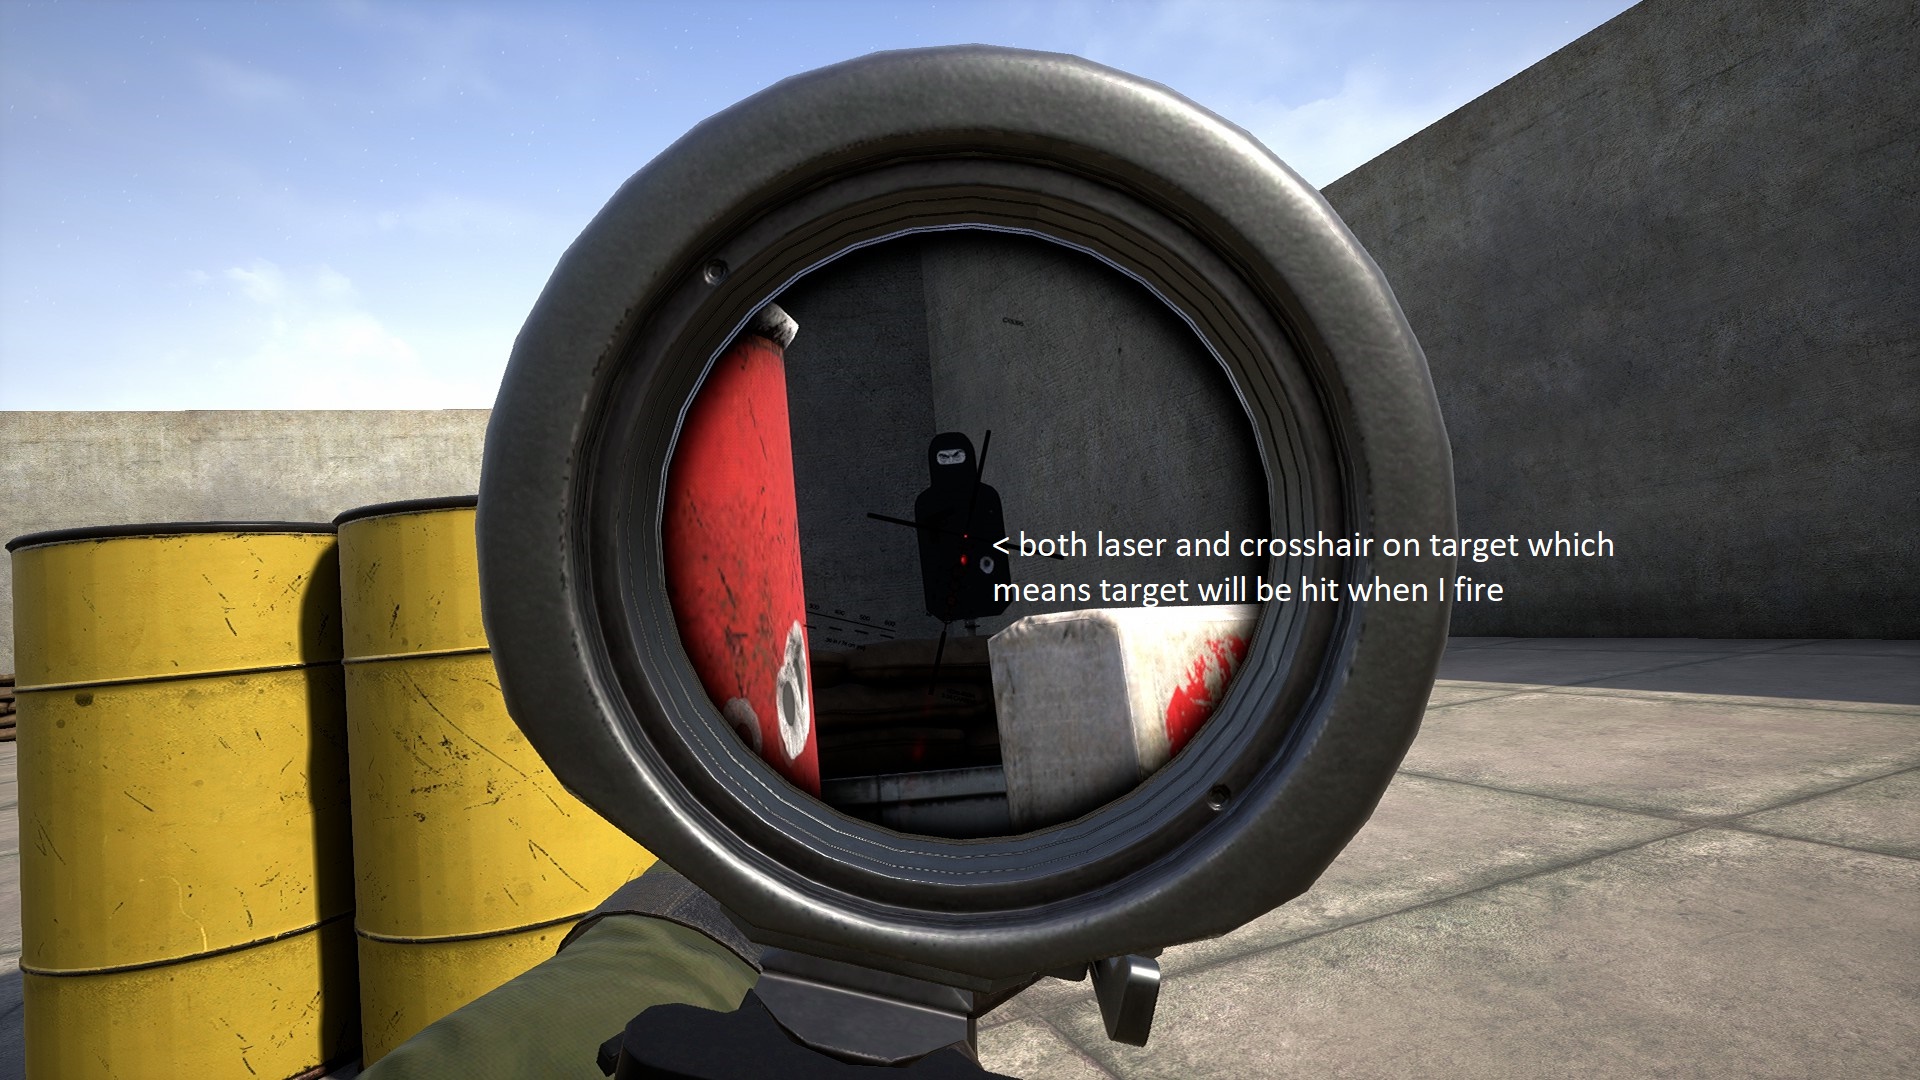
(By fun switch, I mean a fire mode selector. In other words, you can go full auto... which is really nice in a DMR/Sniper rifle lol!)
DWrek 2 окт. 2022 г. в 1:56 
I just put a silencer on my aks74u, might be worth editing in your guide. Props for the guide btw, I plan on playing by myself 100% of the time lol
Melissa 30 сен. 2022 г. в 2:25 
Appreciate the help.
Major Fret  [создатель] 29 сен. 2022 г. в 23:51 
For canted I tend to prefer putting the red dot just in front of the scope.

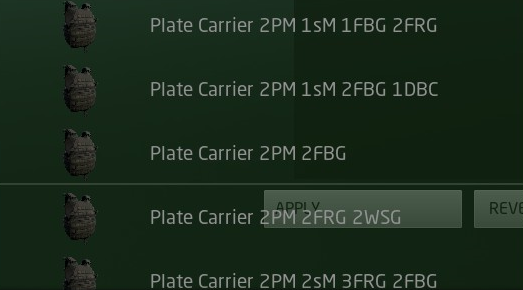
That being said, if you're already running a piggyback you should stick to just that. Having three options to cycle through can be bit of a fumblefuck if you get surprised in close quarters.
Melissa 29 сен. 2022 г. в 12:49 
Nice job, really helped a lot.
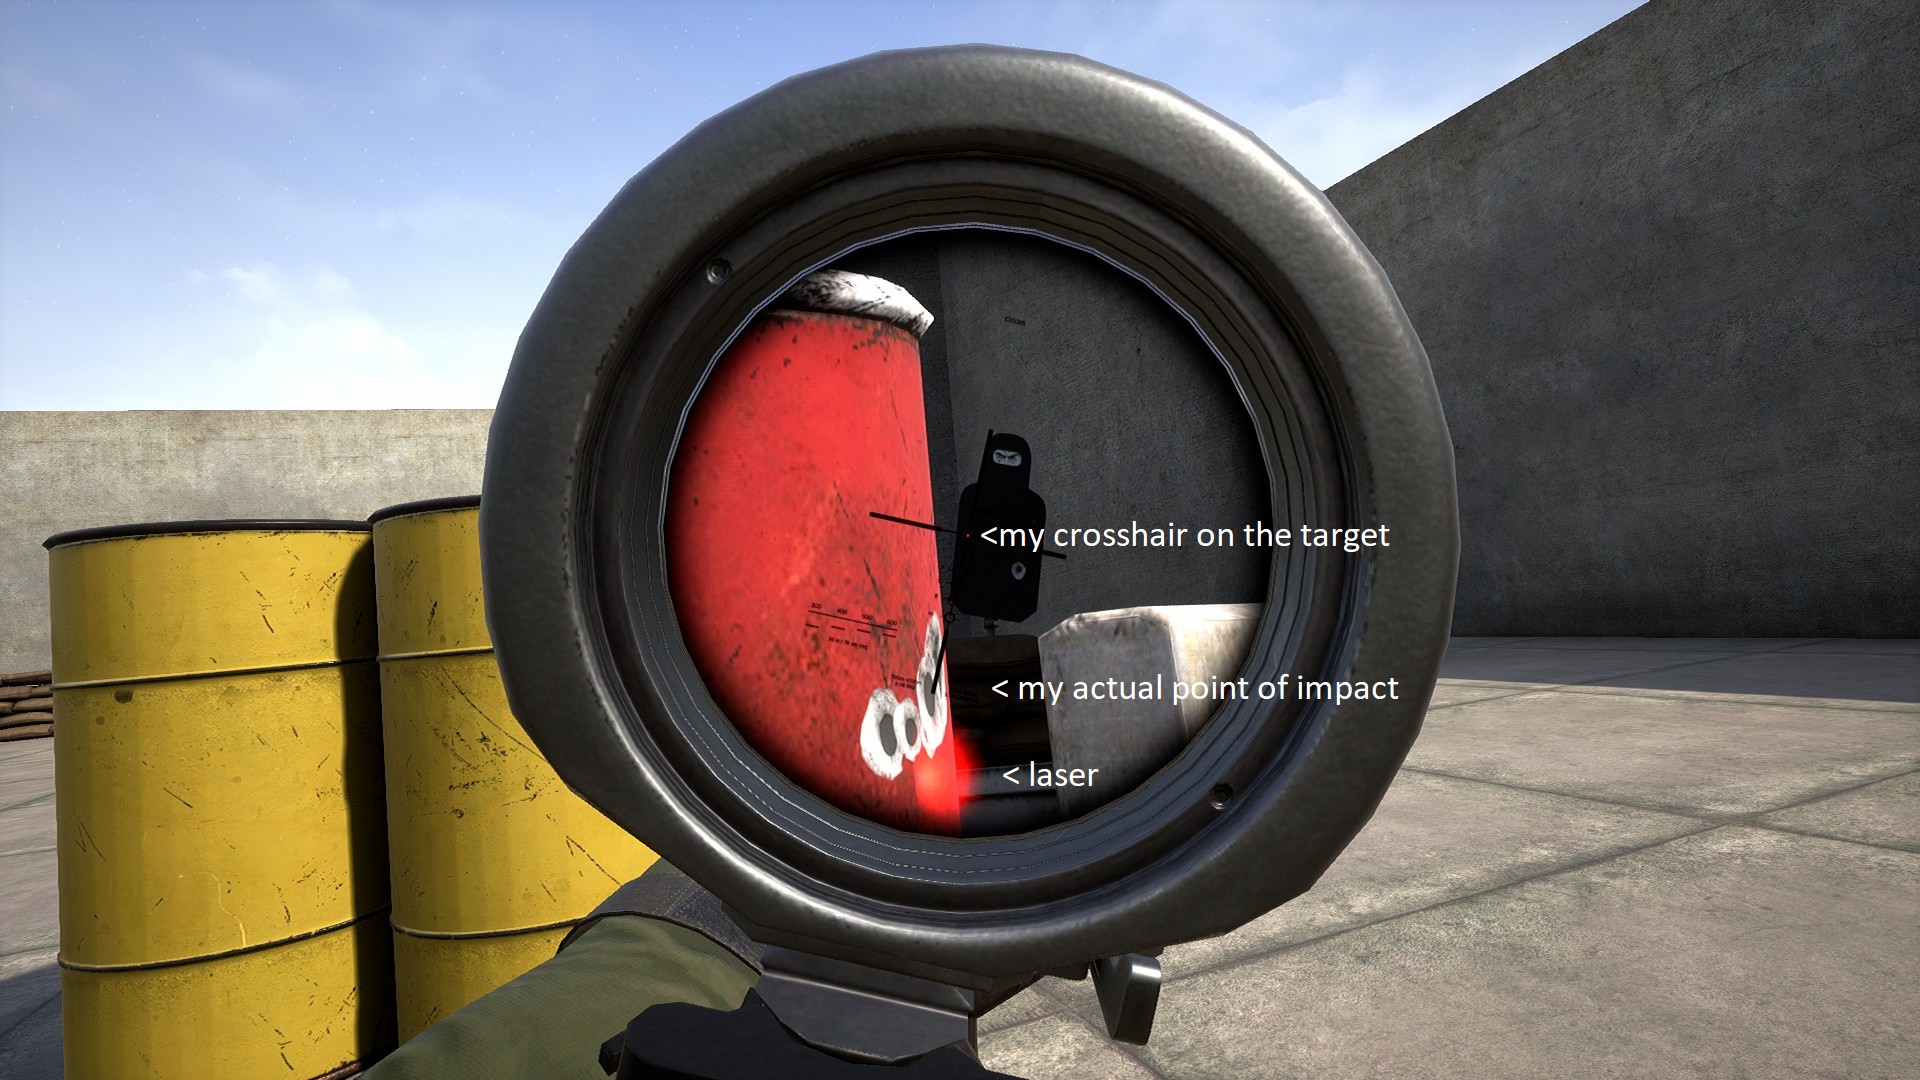
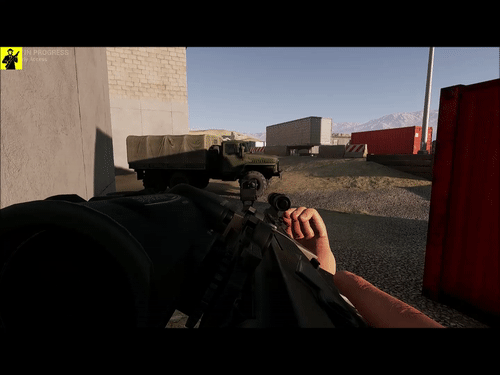
btw any suggestions on where the canted red dot optic should be placed? Behind main scope or far in front of it (like on handguard or the end of upper receiver)? My main rifle is 416D10 with Vudu 1-6x, or a piggyback RMR on the top? THX
Really nice article.