Agarest: Generations of War

Agarest: Generations of War

82 ratings
Walkthrough (Third Generation)
By Frenzy85
Basically information from the wiki that I stole so it would be more convenient to use with Steam.

Agarest wiki can be found here: http://agarest.wikia.com/wiki/Agarest_Wiki

Disclaimer: I didn't write most of the information below. I wrote a very small portion of it, and did some edits while I was playing through the game. The information below is from the Agarest wiki. Most of what I did was making it presentable in the Steam guides format. I meant to have this for personal use, because I find using the Steam browser a pain and Steam guides help with quick navigation. If enough people complain about it, I will remove it from public view and make it private. If you think I should do this, leave a comment. If more than a dozen people ask for it, it'll happen, I promise.

Also, this does take quite some time to make, and is not just plain copy and paste! If you don't believe me, give it a shot... *shrugs*
I'll even tell you some tips to speed up the process if you ask. It still takes a while.
There are a few edits here and there, that people have been unable to do in the wiki because the pages are locked.
   
Award
Favorite
Favorited
Unfavorite
Notes
  • The information below (everything, just slightly edited...) is from the Agarest Wiki[agarest.wikia.com]
  • I'm making this because I hate using Steam Browser to browse stuff. It's extremely inconvenient, in my humble opinion. Steam guides can be quite convenient for navigation...

  • If you want to go for a perfect run, and are not sure what choices to make, I marked the choices(#) that will get you a "perfect run". You'll get True End and all scenes, except heroine endings, since they're mutually exclusive. You pick your own heroine! Canon choices are those on the top left of the pictures on the bottom right of the screen during scenes.
  • You may notice that the paths that aren't part of the "perfect run" has missing info. This is probably because people who filled in the information in the wiki mostly went for the perfect run. You don't miss any scenes, iirc, so there's no reason not to. Some scenes happen in different locations, such as the choice where you help either Fyuria/Luana.
  • I lied when I said you get all scenes... It's impossible to get all scenes in one playthrough, unless you re-load at some points. There are times when you have to choose between the heroines, and the scenes for each is mutually exclusive.
  • With that said, I suggest you go one run through on Easy/Normal, picking whatever you want and not going for True End. Then go to NG+ for the True End on Hard.

  • Note that encounters in blue/orange locations are approximate and are not 100% certain.
Tips and stuff
Generation Specific
  • At some point in this generation, you will have access to what I like to refer to as tier 3 magic, that is the 16AP ones.. You can combine 3 magic of the same type for a combination attack(except Special). Personally, I'm a fan of Ellis and Vira-Lorr, so Light and Special are my go-to spells. Also, since Luna Wand happens to be the best staff I could get this generation, it all works out. I also use Zerva, giving me a surplus of Dark moves.
    Here are the combinations I use regularly:
    • Earth Nova: Ascension + Ascension Shower + Ray
    • Dark Matter: Black Mist + Dark Ray + Drain Energy
    • Ark Ray: Ray + Dark Ray
    • Judgment: Ray + Ascension + Impulse + Stardust + Atomic Hole
    • Ragnarok: Stardust + Atomic Hole + Impulse + Gravity + Ray + Dark Ray

      Ragnarok is the best move for Breaking opponents. If you can put it in the middle of your combo so that it just Breaks the opponent, even better as it gets 2 hits instead of one.

    For the elemental spells, the same applies. 3 tiers of spells of the same type is one combination attack. I don't personally use them, so I don't remember the combinations for others.


  • A boss you'll face in this generation will be significantly stronger than any of the enemies before him. I refer back to this section when in the walkthrough if you need a strategy for him. The boss I'm referring to is Midas whom you'll fight in Part 7. You get Gattling Knuckles for Overkilling him... and bragging rights. Mostly bragging rights (unless you're on NG+, in which case, this reward is lost!)

    Originally posted by Agarest Wiki:
    Note that if you are playing on hard and this is your first playthrough you will most likely not be overkilling [him], as this is a very difficult fight even though he is alone. Many of his attacks have a large radius and a long range so you will find difficulty avoiding any of his attacks (which will usually kill anyone he is attacking). A useful strategy might be to use Winfield's Hold Shot to both EX Steal from [him] as well as making him unable to move for 3 or 4 turns (you'll notice the 'shoe' icon if successful with immobilization), have a separate person for normal stealing and have everyone else stay as far back as possible, while using someone to resurrect him when necessary (if everyone else is beyond a 6x6 block radius away from [him] then they should be relatively safe). Once you have finished stealing from him, you should have saved up enough points to unleash your strongest attacks on him all at once (with everyone linked via extended areas). Depending on your party strength it might take two turns or more to finish him off (and as mentioned earlier, you will most likely not be able to overkill him unless you're playing on an easier difficulty or are on a new game+ or have unusually strong equipment). Otherwise, if you really want to ensure an overkill, you will either need to grind to level 50+ and use a Proof of Valor to get some 3rd tier EX skills (and use them in combination attacks) or combine monsters to create a Luijt (though this will cause a minor detriment to the after battle bonuses, dropping them significantly) to be a meat shield and have everyone else attack him after building up points. If you do opt for grinding, keep in mind that characters gain different skills/willpowers depending on whether you've used the Proof of Valor before or after level 52. Regardless of which strategy you choose, Winfield's Hold Shot still comes highly recommended for both EX Stealing and keeping [him] at bay.
Boss Strat 1: Luijt Method
I don't know what's the deal with the Luijt.
A user Capo_mex_303 was kind enough to point this out:
Originally posted by Capo_mex_303:
The Luijt Tip is monster combinations found here -> http://agarest.wikia.com/wiki/Capturing_Monsters

Luijt is an uncapturable monster so you must combine to get him which is pretty easy : Big Eye + Wolf Dead = Angel (x2), Angel + Big Eye = Mucrane, Angel + Mucrane = [lvl.91]Luijt

All which can be found in Gen 3 Before Midas.

The Luijt is a lvl 91 monster, who will basically wreck every enemy until quite a bit later in the game because of its level. You will however, receive very little EXP/EP/TP/Gold because of its level. I can't really recommend using it, but it works.

The basic gist of this method is to make a Luijt, and simply overpower Midas with it!

In order to get a Luijt in this generation, you will need to capture Wolf Dead x2 and Big Eye x3.
Following the method from Capo_mex_303:
1. Wolf Dead + Big Eye = Angel
fuse this two times
2. Angel + Big Eye = Mucrane
3. Angel + Mucrane = Luijt

You will have to waste a few Turns to do this, as Wold Dead and Big Eye aren't available in the dungeons before Midas.

Wolf Dead and Big Eye are both availble in:
  • Abebart, North
  • Abebart, South
  • Abolt Coast
  • Efnored Coast
  • Eraphon Animal Trail
  • Jivast Trail
  • Keeri Rykum, North
  • Keeri Rykum, South
  • Kevery, North
  • Kevery, South
  • Lattriwen Way, South
  • Valus Highland
  • Vovokas Pass

There are other areas where you can catch them, but these are where they are both in the same map according to the wiki.

Boss Strat 2: 'Sacrifice' method
This is just a general method of battling against tough enemies. You basically spend a few turns collecting SP, and then just throw in all your EX moves.

This is my preferred method, using only one person as sacrifice and not using Plum.

You can add more sacrifices for most bosses, since they usually have AoE's.
Using Plum's EX2 can also increase your SP gaining speed, but positioning gets a bit tricky. My preferred party makes it hard to integrate Plum, and my post-game choice of party members require me to not use Plum...

What you need:
  • Someone with Ressurect and low AGI.
      Needs to move after boss every turn. Ellis is a good choice if you never put points into AGI on her(mine has something like 10 AGI). The reason you can't use items is because of range.
  • Ellis(must) and someone who can outspeed the boss(optional)
      You will need Ellis so you can target your sacrifice from far away.By using Ellis you also don't have to outspeed the boss because she has a lot of range. It's recommended to have someone to outspeed the boss even if you use Ellis, as it will save some AP, and it makes positioning easier.
  • At least one person with long range Extended Area.
      Mages and BattleMages usually have these. Required to connect to the 'sacrifice'.

Getting as strong as you can:
This is probably the most important part
Check the next section for various things you may have forgotten to do that can power up your team. Aside from levelling to an obscenely high level, of course.

The fight
    1. Set one character to rush ahead, and everyone to stay far away. More than 4 blocks away, preferably. Midas will then continually kill this character over and over again, ignoring everyone else.This character should be attacking the boss with Physical attacks (physical attacks get countered, giving you extra SP). Just make sure to stop before he dies, so the boss wastes his AP killing your sacrifice.
    2. Position your characters such that your character with Resurrect can move back into the extended area after using Resurrect.
    • If your sacrifice character doesn't outspeed the boss, then you have to position in such a way that after your character moves in to Resurrect, she'll still be connected.
    3. Keep buffing and healing to accumulate SP. Let your forward character die and keep Resurrecting him. Cheese him with extra AP.
    4. Once you have enough SP to pull off your strongest EX moves, start saving up AP so you get capped next turn. (Save as much as your base)
    5. Go all in and hope for the best.
Boss Strat: A-End
Borgnine + Ellis EX3, Leonhardt + Winfield EX3, Zerva + Vira-Lorr EX3... these are the ingredients to create the perfect little girls... well not really...

They are useful for something, though.

A-End is one of the only four 6-member Secret Art in the game, and one of the three 300 AP move in the game. It's also one of the two you can perform as of Gen 3!

It is by far the better one, though, because of how much easier it is to stack ATK. The other one, Big Bang, is performed with 5 Mages + Arbol. Not a good party composition, by any stretch of the imagination.

Note that using EX3 will mean having to spend several turns building up SP, meaning your rewards will be reduced because of low rank.

Party Composition
  • Leonhardt
  • Ellis
  • Borgnine
  • Vira-Lorr
  • Zerva
  • Winfield

Requirements
  • 6 Proofs of Valor
  • Minimum level of 50 on everyone
  • Minimum gear to get 25 AP on everyone:
    • Leo - A combination of Sword + Armor + Accessory with a total of 2+ AP
    • Borg - A combination of Knuckle + Armor + Accessory with a total of 5+ AP.
    • Winfield - A combination of Gun + Armor + Accessory with a total of 4+ AP.
    • Vira - A combination of Staff + Armor + Accessory with a total of 4+ AP.
    • Ellis - A combination of Staff + Armor + Accessory with a total of 5+ AP.
    • Zerva - A combination of Scythe + Armor + Accessory with a total of 4+ AP.

Steps
1. Apply Proof of Valor on everyone.
2. Follow the Sacrifice method, until you have 250SP\
-> use up as much of Ellis' AP per turn, so she doesn't end up faster than Midas
3. Use all their EX3's in one combo to execute A-End
4. Profit

Note, that after testing the damage for A-End on Midas, I suspect you can overkill him with any combination of 6 EX3's. I was able to do 418k total with A-End, way more than enough to overkill him.

https://youtu.be/uvEq6PtLTXg
Embedded video doesn't work for me, so I'm putting this link here.
Powering up!
At this point in the game, I found that overkilling enemies isn't so easy anymore. To be fair, I do use all the characters, for variety, so they're probably at a lower level than they could potentially be. Note that I'm not using DLC gear, only the bonus points, so you may still be doing perfectly fine at this point.

Add to that one of the biggest roadblocks for people is in this generation... A certain boss near the end was a fairly hot topic back in the day Agarest came out on console.

Even if you're not having trouble, this small checklist of things will probably still be useful.

Things to note
  • Willpowers
    Certain Willpowers have a condition to activate, such as HP<25% and SP>100.

    They usually give a significant boost. For example, my Leonhardt with no DLC, and all points into STR was invincible when Unleash All was active back in Gen 1. Remember the Dark Knight fight you couldn't beat in NG? Leonhardt tanked it for me without dying even once... He learned Unleash All because I went back into Cave of Origin to find a Jumbo ♥♥♥♥.

    I'm not sure about other people, but I used to mostly ignore Willpowers when I first started playing this game... If it was active, it was. If not, then whatever. If you are the same, I suggest you start taking advantage of them.

  • Proof of Valor
    You will likely hit level 50 by the end of Gen 3. This opens up the possibility to use a Proof of Valor on your characters. You likely have a few of these from title rewards... I hope you didn't sell them...

    What this item does is give your character a Class Up. Your character will get a significant stat boost, an increase in base AP pool(!!!), and an extra 2 skill slots. It also unlocks the characters EX3, which is probably the most significant thing it provides.

    For your 5 main characters {Leonhardt and descendants}, they also change what Willpowers they learn. Most of the time, you'll want to use a Proof of Valor before level 52, as it gives you better Willpowers. I'm not sure there is any case where not doing so will result in better Willpowers.

  • Buff skills
    I find that I don't use this much, and I don't see it being mentioned much in the forums, either. There are buffs and debuffs in this game. If you despise grinding, this could help give you the extra stats to kill Midas. Personally, I rarely use them until post-game because my party doesn't have the slots for it.

    These don't give a particularly huge boost. Probably don't go out of your way to include them in your party, but it does give you a bit more damage and you can farm SP while doing something other than healing full HP characters!

  • Special Arts
    You can chain EX Moves to perform Special Arts! They do insane amounts of damage. Try to fit these in to your party if you can...

    Some people might not realize that EX moves can be combined just like regular skills. It helps your damage output a bit. It actually does increase your damage output by quite a bit.
    Check the wiki for a list of combination attacks[agarest.wikia.com].

  • Equipment
    Super important: Using EP effectively will make you that much stronger... Enhance everything. You get extra AP and a ton more stats.

    Most importantly, you should pay attention to the amount of Actives you can attach to it. Most equipment of the same tier have the same number of slots, but there are exceptions. Try to use gear with most amount of slots. DEF/RST are kinda irrelevant in boss fights(when they use their EX, you will die unless you're uber farmed), so you just want damage, and Actives are the best way to boost your damage.

  • Actives
    When you enhance your gear to maximum, you'll find that you can convert them to another item. Many of them convert to a crafting material, but there are also those that convert to stat boosting Actives.

    Use them! You won't regret it.

    For this generation, these are what you want to aim for:
    • Sledgehammer -> ATK +230
    • Halberd -> ATK +230
      • Sledgehammer is a bit cheaper than Halberd.
    • Bone Shooter -> ATK +260
      • Bone Shooter doesn't register in the shop. Not worth grinding for.
    • Large Lead Claw -> ATK +280
      • Capture Evil Fiend in Trum Coast, and Exhange in Monster Guild.
      • This is a lot of effort, for not much of a boost, and will get replaced very soon. Not worth it. Just put this here for people who REALLY want to stay capped.\

    • Rondel Dagger -> MAG +130
    • Ring of Wisdom -> INT +30 (equivalent to MAG+180)
      • Combine 4 Element of Ice to get 1 Body of Ice.
      • Combine 4 Bodies of Ice to get Crystal of Ice. (total = 16 Elements of Ice)
New Party Members
Name
Character Type
Thoma
Variable
Lavinia
BattleMage (Fighter)
Faina
Mage
Noah
Fighter
Plum*
Mage
Ganz
Fighter
Alberti
Battle Mage (Fighter)

*Plum has a very useful Extra Skill, possibly making her the best character in the game.

First 4 characters listed are the Main Character + 3 Heroines.
All characters except previous MC + Heroines will be available unless otherwise stated.
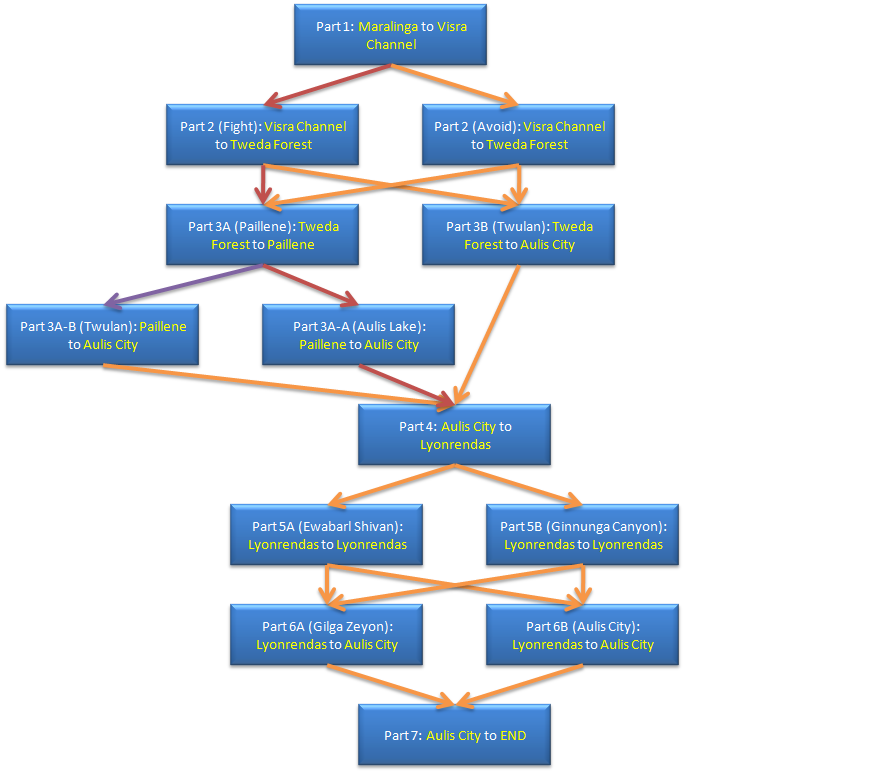
Flowchart


I miss Gen 2 already :(

To follow the perfect path, at the split in 3A, you have to follow 3A-A to Aullis Lake to get Noah, and then leave without completing the dungeon. Then start following 3A-B.
Part 1
Maralinga
  • Thoma joins the party
World Map
  • Enrimalt, North: Mercenary x4-5
  • Enrimalt, South: Mercenary x4-5
Ku Kaatje
  • Event: Story Related
World Map
  • Kesven Bypath: Mercenary x4-5
Eureka Plains (Yullika Plain)
  • Event: Story Related
World Map
  • Anastajion Field: Mercenary x4-5
  • Tweda Forest, West: Mercenary x4-5
Tweda Forest
  • Event: Story Related then Fight
  • Fight: Army Bee x2, Cat Lady x2,Tyrant x1
  • Lavinia joins the party
Ku Kaatje
  • Event: Thoma attempts to woo Lavinia
    • Continue to woo her.: Gauge moves towards DARK, Lavinia Up
    • Back off quietly.: Gauge moves towards LIGHT, Lavinia Up
    • Go in for the kill!(#): Gauge moves strongly towards DARK, Lavinia Up
World Map
  • Tweda Forest, East: Army Bee x2-3, Cat Lady x2-3, Evil Fiend x1-2
  • Hynada Plains, NW: Army Bee x2-3, Cat Lady x2-3, Evil Fiend x1-2
  • Hynada Plains, SE: Army Bee x2-3, Cat Lady x2-3, Evil Fiend x1-2
  • Fouras Bay: Army Bee x2-3, Cat Lady x2-3, Evil Fiend x1-2
Clenia Island
  • Event: Story Related
World Map
  • Diroll Snowfield: Bull Orc x2-3, Goblin Mage x2-3
Musoi
  • Event: Story Related
World Map
  • Milcrim Snow Road: Bull Orc x2-3, Goblin Mage x2-3
Schardt Bell Snowfield
  • Event: Story Related
World Map
  • Suchukelte Avalanche: Bull Orc x2-3, Goblin Mage x2-3
Quest: Frozen Woods
  • Event: Story Related

  • Re-enter for quest
  • Enemies: Army Bee, Cold Gel, Garm, Thunder Spirit, Wind Spirit, Earth Spirit, Tyrant
  • Treasure: Medium Equipment I, STR Up, Essential Arts XIII, Medium Weapons II, Forbidden Tome II, Beast Ring, Essential Arts XIV
World Map
  • Soleil Snow Road: Cold Gel x2, Garm x2-3, Thunder Spirit x2-3, Wind Spirit x2-3, Earth Spirit x2-3
Lus Soleil
  • Event: Story Related then Fights

  • Fights
    • First Battle: Musoi Soldier x4, Goblin Mage x3
    • Second Battle: Hobgoblin x2, Bull Orc x2, Goblin Mage x2
    • Third Battle: Garvel x1, Bull Orc x2, Goblin Mage x3
Icy Galleria
  • Event: Story Related
  • Faina joins the party
World Map
  • Lyril Coast: Cold Gel x2, Garm x2-3, Thunder Spirit x2-3, Wind Spirit x2-3, Earth Spirit x2-3
Visra Channel
  • Event: Choose which route to take
    • We go forward, like true men.(#): Gauge moves strongly toward DARK, Lavinia Up, Faina Up Move to Third Generation, Part 2A
    • We must live to fight another day.: Gauge moves toward LIGHT, Lavinia Up, Faina Down Move to Third Generation, Part 2B
    • Perhaps something different?: Gauge moves toward LIGHT, Lavinia Down, Faina Up Move to Third Generation, Part 2B
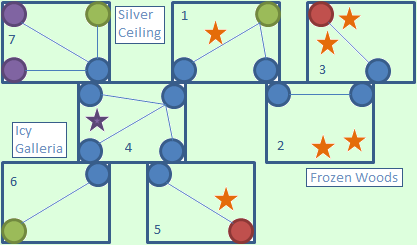
Dungeon 1: Frozen Woods / Icy Galleria / Silver Ceiling


These directions are for entering from the Frozen Woods entrance only. There are three entrances to this dungeon, each with a different name
  • 1: Cross the first bridge and take the first chest, containing MEDIUM EQUIPMENT 1. Now go to the bottom right.

  • 2: From there, follow the wall next to you to the top right of the screen to find another area.

  • 3: This area is a dead end with two chests: FORBIDDEN TOME II and BEAST RING. Head back to the second screen.

  • 2: Go all the way to the bottom right of the area to find ESSENTIAL ARTS XIII and STR UP. Head back to the first screen (top left).

  • 1: This time exit to the bottom left.

  • 4: Go across the bridge and exit to the bottom right.

  • 5: Go down a bit across another bridge and you'll find MEDIUM WEAPONS II. Return to the previous screen.

  • 4: Go left - top or bottom, either will cause a cutscene that will take you out of the dungeon your first time through.


    But you're not done quite yet! When you leave Lus Soleil, you'll need to reach the Silver Ceiling exit.

  • 1: Since you're entering from Icy Galleria this time, you'll notice you start at a different location. Go up to the next screen (top right).

  • 2: Upon screen transition, you'll immediately see the last chest in this dungeon. Open it to claim ESSENTIAL ARTS XIV. Then exit to the top left.

  • 3: Run through the screen to the top left and you're through.
Part 2A
World Map
  • Sufill Cape: Thunder Spirit x2, Wind Spirit x2, Earth Spirit x2, Tyrant x1
  • Dedon Field: Thunder Spirit x2, Wind Spirit x2, Earth Spirit x2, Tyrant x1
Zamul Fortress
  • Event: Story Related then Fights

  • Fight
    • First Battle: Hobgoblin x3, Bull Orc x2, Goblin Mage x2
    • Second Battle: Garvel x1, Bull Orc x3, Goblin Mage x3
World Map
  • Hydess Field[/i] (Hades Field): Thunder Spirit x2, Wind Spirit x2, Earth Spirit x2, Tyrant x1
  • Tweda Forest, South: Thunder Spirit x2, Wind Spirit x2, Earth Spirit x2, Tyrant x 1
    You can skip these two nodes by opening the map and selecting Tweda Forest.
Tweda Forest
  • Event: Choose which route to take
    • We make for Paillene.(#): Lavinia Down, Faina Up Move to Third Generation, Part 3A
    • We make for Twulan.: Lavinia Up, Faina Down Move to Third Generation, Part 3B
Part 2B
World Map
  • Lorevor Coast: Cold Gel x2, Garm x2, Thunder Spirit x2, Wind Spirit x2, Earth Spirit x2
  • Carvitis, Zam Area: Cold Gel x2, Garm x2, Thunder Spirit x2, Wind Spirit x2, Earth Spirit x2
  • Carvitis, Deg Area: Cold Gel x2, Garm x2, Thunder Spirit x2, Wind Spirit x2, Earth Spirit x2
  • Carvitis, Uvok Area: Cold Gel x2, Garm x2, Thunder Spirit x2, Wind Spirit x2, Earth Spirit x2
  • Masven Main Path: Cold Gel x2, Garm x2, Thunder Spirit x2, Wind Spirit x2, Earth Spirit x2
Eureka Plains
  • Event: Story Related
  • Noah joins the party

  • Item Obtained: Esoteric Book V
Tweda Forest
  • Event Choice: Choose which route to take
    • We make for Paillene.: No change, Lavinia Down, Faina Up, Noah Up Move to Third Generation, Part 3A
    • We Make for Twulan.: No change, Lavinia Up, Faina Down, Noah Up Move to Third Generation, Part 3B
Part 3A
World Map
  • Tweda Forest, NW: Mab x2-3, Lamia x2-3
  • Feband Animal Trail: Mab x2-3, Lamia x2-3
Kenna Field, West
  • Event: Vira-Lorr sobers up in a steam room
  • Item Obtained: CG 100 unlocked
  • Requirement: Before turn 45, DARK
World Map
  • Gacksart Plank Road: Mab x2-3, Lamia x2-3
The City of Paillene
  • Event: Story Related
  • Plum joins the party
  • Items Obtained: CG 109, Esoteric Book VI, and Happy Time
Path Split
  • Towards Aulis Lake(#): Move to Third Generation, Part 3A-A
  • Towards Twulan: Move to Third Generation, Part 3A-B
Part 3A-A
World Map
  • Digon Old Path, West: Mab x2, Phantom x1-2, Lamia x2
  • Digon Old Path, East: Mab x2, Phantom x1-2, Lamia x2
Quest: Aulis Lake
(#) IMPORTANT:
If you're going for the perfect run, DO NOT finish the dungeon. You're just here to get Noah. Move on to Third Generation, Part 3A-B after Noah joins. There are 2 events that will disappear after completing the dungeon!
  • Event: Story Related
  • Noah joins on the second screen if not already present
  • Item Obtained: Esoteric Book V
  • Enemies: Mab, Grand Mummy, Phantom, Lamia, Golem, Devil Tentacle
  • Treasure: INT Up, White Frame, Secret Arts VII, STR Up, Advanced Heal, Ogre Claw, Power Up+, Medium Weapons III
World Map
  • Sanini Highland: Mab x2, Lamia x2-3
  • Budis Valley Way: Mab x2, Lamia x2-3
  • Vonra Lural, South: Mab x2, Lamia x2-3
Twulan City
  • Event: Story Related
  • Ganz joins the party
  • Item: Gravity obtained
World Map
  • Vonra Lural, North: Phantom x2-3, Golem x1-2
  • Zaltos Hills: Phantom x2-3, Golem x1-2

Move to Third Generation, Part 4
Part 3A-B
World Map
  • Lorad Ard Hills: Mab x2-3, Lamia x2-3
  • Itriquim Plain: Mab x2-3, Lamia x2-3
Dusk Hill
  • Note: Be sure to have Noah equipped as you will have to fight a battle with these two characters and you will not be given a chance to equip her.
  • Note: This event disappears if you've slain the boss in the Aulis Lake Quest area.

  • Requirement: Have Noah
  • Event: Noah and Thoma search for treasure
    • We will go north.: Gauge moves towards LIGHT, Noah Up
      • Item Obtained: Mithril x2
    • We will go east.(#): Proceed to Question 2
    • Perhaps we should go back.: Gauge moves towards DARK, Noah Down

  • Question 2
    • Let us continue.(#): Proceed to Question 3
    • Perhaps we should go back.: Gauge moves towards DARK, Noah Down

  • Question 3
    • Item Obtained: CG 110
      • We will go south.: Gauge moves towards LIGHT, Noah Up
        • Item Obtained: Mithril x3
      • We will go north.(#): Proceed to Question 4
      • Perhaps we should go back.: Gauge moves towards DARK, Noah Down

  • Question 4
    • Let us continue.(#): Proceed to Question 5
    • Perhaps we should go back.: Gauge moves towards DARK, Noah Down

  • Question 5
    • We will go west.: Gauge moves towards LIGHT, Noah Up
      • Item Obtained: Dream Hazard, Beast Ring, Mithril x2
    • We will go east.: Gauge moves towards DARK, Noah Up
      • Item Obtained: Inescapable Grasp, Marine Rouge, Mithril x2
    • We will go north.(#): Gauge moves strongly towards DARK, Noah Down
      • Fig​ht: Garm x2
      • Gauge moves strongly towards LIGHT, Noah Up
      • Items Obtained: White Frame, 50 PP
    • Perhaps we should go back.: Gauge moves towards DARK, Noah Down
World Map
  • Budis Valley Way: Mab x2-3, Lamia x2-3
  • Vonra Lural, South: Mab x2-3, Lamia x2-3
Twulan City
  • Event: Story Related
  • Ganz joins the party
  • Item: Gravity obtained
Kenna Field, East
  • Event: Faina faints
    • What was your dream about?: Gauge moves towards DARK, Faina Up
    • I did not expect...: Gauge moves towards DARK, Faina Down
    • You must get some rest.(#): Gauge moves towards LIGHT, Faina Up
  • Item Obtained: Esoteric Book IX
  • Requirements: Ganz or Visiting Twulan City
    (Event went active after acquiring Ganz at Twulan City) and boss of Aulis Lake ''not'' slain.
World Map
  • Digon Old Path, West: Mab x2-3, Phantom x2-3, Lamia x2-3
  • Digon Old Path, East: Mab x2-3, Phantom x2-3, Lamia x2-3
Quest: Aulis Lake
  • Event: Noah joins if not already present
  • Enemies: Mab, Grand Mummy, Phantom, Lamia, Golem, Devil Tentacle
  • Treasures: INT Up, White Frame, Secret Arts VII, STR Up, Advanced Heal, Ogre Claw, Power Up+, Medium Weapons III
  • Boss Fight: Devil Tentacle
    • Stolen: Mithril
    • EX Stolen: Magic Stone Piece, Moon Fragment
    • Overkill: VIT Up

Move to Third Generation, Part 4
Part 3B
World Map
  • Tweda Forest, NE: Mab x2, Lamia x2
Dusk Hill
  • Note: Be sure to have Noah equipped as you will have to fight a battle with these two characters and you will not be given a chance to equip her.
  • Note: This event disappears if you've slain the boss in the Aulis Lake Quest area.

  • Requirement: Have Noah
  • Event: Noah and Thoma search for treasure
    • We will go north.: Gauge moves towards LIGHT, Noah Up
      • Item Obtained: Mithril x2
    • We will go east.: Proceed to Question 2
    • Perhaps we should go back.: Gauge moves towards DARK, Noah Down

  • Question 2
    • Let us continue.: Proceed to Question 3
    • Perhaps we should go back.: Gauge moves towards DARK, Noah Down

  • Question 3
    • Item Obtained: CG 110
      • We will go south.: Gauge moves towards LIGHT, Noah Up
        • Item Obtained: Mithril x3
      • We will go north.: Proceed to Question 4
      • Perhaps we should go back.: Gauge moves towards DARK, Noah Down

  • Question 4
    • Let us continue.: Proceed to Question 5
    • Perhaps we should go back.: Gauge moves towards DARK, Noah Down

  • Question 5
    • We will go west.: Gauge moves towards LIGHT, Noah Up
      • Item Obtained: Dream Hazard, Beast Ring, Mithril x2
    • We will go east.: Gauge moves towards DARK, Noah Up
      • Item Obtained: Inescapable Grasp, Marine Rouge, Mithril x2
    • We will go north.: Gauge moves strongly towards DARK, Noah Down
      • Fig​ht: Garm x2
      • Gauge moves strongly towards LIGHT, Noah Up
      • Items Obtained: White Frame, 50 PP
    • Perhaps we should go back.: Gauge moves towards DARK, Noah Down
World Map
  • Budis Valley Way: Mab x2-3, Lamia x2-3
  • Vonra Lural, South: Mab x2-3, Lamia x2-3
Twulan City
  • Event: Story Related
  • Ganz joins the party
  • Item Obtained: Gravity
World Map
  • Itriquim Plain: Mab x2-3, Lamia x2-3
Kenna Field, East
  • Event: Faina faints
    • What was your dream about?: Gauge moves towards DARK, Faina Up
    • I did n​ot expect...: Gauge moves towards DARK, Faina Down
    • You must get some rest.: Gauge moves towards LIGHT, Faina Up
  • Item Obtained: Esoteric Book IX
  • Requirement: Ganz or Visiting Twulan City (Unconfirmed)
World Map
  • Loray Ard Hills: Mab x2-3, Lamia x2-3
The City of Paillene
  • Event: Story Related
  • Plum joins the party
  • Items Obtained: CG 109, Esoteric Book VI, and Happy Time
World Map
  • Digon Old Path, West: Mab x2-3, Phantom x2-3, Lamia x2-3
  • Digon Old Path, East: Mab x2-3, Phantom x2-3, Lamia x2-3
Quest: Aulis Lake
  • Event: Story Related
  • Noah joins if not already present
  • Enemies: Mab, Grand Mummy, Phantom, Lamia, Golem, Devil Tentacle
  • Treasures: INT Up, White Frame, Secret Arts VII, STR Up, Advanced Heal, Ogre Claw, Power Up+, Medium Weapons III
  • Boss: Devil Tentacle
    • Stolen: Mithril
    • EX Stolen: Magic Stone Piece, Moon Fragment
    • Overkill: VIT Up

Move to Third Generation, Part 4
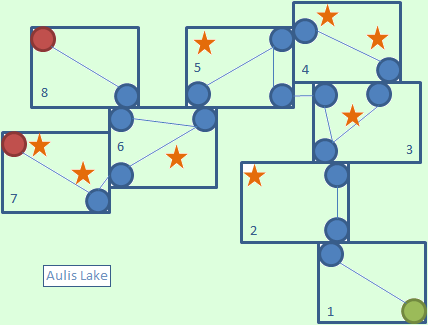
Dungeon 2: Aulis Lake


  • 1: Only one way to go, make your way through the cave to the next screen.

  • 2: A large open area. There is a chest in the top left containing INT UP. Proceed to the area by zoning to the top right of the room. The first time you visit this screen Noah will join your Party.

  • 3: Another screen with a large central room. In the center you will find WHITE FRAME . Head to the top right screen.

  • 4: Travel through the narrow passage and make sure to pick up SECRET ARTS VII in the chest. The area will soon open up and you'll see another treasure up on some steps containing STR UP . Exit to the next screen by heading left.

  • 5: This room is similar to the third screen. At the very top left of this area you will find ADVANCED HEAL in a chest down a short dead end. After you snag this treasure, head to the next screen via the bottom left.

  • 6: Another similar room. In the center you will find OGRE CLAW. Head to the next area via bottom left.

  • 7: As you come into this screen, you'll spot a treasure immediately with POWER UP+. Head farther into this area going to the top left and you will soon come on another treasure which contains MEDIUM WEAPONS III. Head back to the sixth screen.

  • 6: Head to the top left of this area. Be warned, you will enter a boss fight with a Devil Tentacle. You will miss a few events if you kill the boss before seeing them.
Part 4
The City of Aulis
  • Event: Story Related
World Map
  • Palamius Lake, South: Phantom x2-3, Devil Tentacle x1-2
Palaminus Lake
  • Event: Lavinia gets soup spilled on her
  • Items Obtained: CG 81 and CG 82
  • Requirement: Before turn 65, Neutral, Lavinia affection level must be at 2 or lower.
World Map
  • Palaminus Lake, North: Phantom x2-3, Devil Tentacle x1
Lyonrendas
  • Event: Choose which route to take
    • Ewabarl Shivan: Gauge moves toward LIGHT, Lavinia Down, Faina Up, Noah Up Move to Third Generation, Part 5A
    • Ginnunga Canyon(#): Gauge moves toward DARK, Lavinia Up, Faina Up, Noah Down Move to Third Generation, Part 5B

      You can go to either route no matter which choice you pick

(#)
Map Notes: Even though you can go take Abebart, South to the Ewabarl Shivan route, take Jivast Trail to the Ginnunga Canyon route
Part 5A
World Map
  • Abebart, South: Big Eye x2, Wolf Dead x2-3
  • Abebart, North: Big Eye x2, Wolf Dead x2-3
Ewabarl Shivan
  • Event: Story Related then Fight
  • Fight: Hooligans x7
    • Stolen: Hooligan ()
    • EX Stolen: Hooligan ()
    • Overkill: Hooligan (Mithril)
World Map
  • Eartbakt Passage: Big Eye x2, Wolf Dead x2-3, Golem x1
  • Efnored Coast: Big Eye x2, Wolf Dead x2-3, Golem x1
  • Traloraim Plain: Big Eye x2, Wolf Dead x2-3, Golem x1
Tlalocan City of God
  • Event: Story Related
  • Event: Make a deal with Midas
    • Happily accept.: Gauge moves strongly towards DARK, Lavinia Down, Faina Up, Noah Up
    • Ask about the rebels.: Gauge moves towards LIGHT, Lavinia Up, Faina Down, Noah Up
    • Ask about the monsters.: Gauge moves strongly towards LIGHT, Lavinia Up, Faina Down, Noah Down
Ewabarl Shivan
  • Event: Story Related then Fight
  • Fight: Alberti, Hooligan x5
    • Stolen: Alberti (), Hooligan ()
    • EX Stolen: Alberti (Generation Crystal), Hooligan ()
    • Overkill: Alberti (White Frame), Hooligan (Mithril)
Tlalocan City of God
  • Event: Story Related
World Map
  • Keeri Rykum, North: Wolf Dead x2-3, Golem x1-2
  • Keeri Rykum, South: Wolf Dead x2-3, Golem x1-2
Ginnunga Canyon
  • Event: Story Related
  • Alberti joins the party
Ewabarl Shivan
  • Event: Noah shows Thoma her artifacts
    • Best leave it alone.: Gauge moves towards LIGHT, Lavinia Up, Faina Up, Noah Down
    • I have to know.: Gauge moves towards DARK, Lavinia Down, Faina Down, Noah Up
Lyonrendas
  • Event: Story Related

  • Event: Choose the next destination
    • Aid Lyonrendas, our brothers in arms.: Gauge moves toward LIGHT, Lavinia Up, Faina Up, Noah Down, Move to Third Generation, Part 6A
    • To Aulis, for reinforcement.: Gauge moves toward DARK, Lavinia Down, Faina Up, Noah Down, Move to Third Generation, Part 6B
Part 5B
World Map
  • Jivast Trail: Big Eye x2, Wolf Dead x2-3
  • Eraphon Animal Trail: Big Eye x2, Wolf Dead x2-3
Ginnunga Canyon
  • Fight: Cerberus x2
    • Stolen: Beast Skin, Generation Crystal
    • EX Stolen: Phantom Bracelet, White Frame
    • Overkill: AGI Up
World Map
  • Keeri Rykum, South: Golem x1, Wolf Dread x2-3, Big Eye x3
  • Keeri Rykum, North: Golem x1, Wolf Dread x2-3, Big Eye x3
Town: Tlalocan City of God
  • Event Choice: Make a deal with Midas
    • Happily accept: Gauge moves strongly towards DARK, Lavinia Down, Faina Up, Noah Up
    • Ask about the rebels(#): Gauge moves towards LIGHT, Lavinia Up, Faina Down, Noah Up
    • Ask about the monsters: Gauge movest strongly towards LIGHT, Lavinia Up, Faina Down, Noah Down

  • Re-enter for an event
  • Requirement: Lavinia affection level 3 or higher
  • Event: Lavinia and Thoma go shopping. Gauge moves towards LIGHT, Lavinia Up
World Map
  • Traloraim Plains: Big Eye x2, Wolf Dead x2-3, Golem x1
  • Efnored Coast: Big Eye x2, Wolf Dead x2-3, Golem x1
  • Eartbakt Passage: Big Eye x2, Wolf Dead x2-3, Golem x1

    Alternatively, you can backtrack to Lyonrendas and go:
  • Abebart, South: Big Eye x2, Wolf Dead x2-3
  • Abebart, North: Big Eye x2, Wolf Dead x2-3
Ewabarl Shivan
  • Fight: Hooligan x7
  • Event: Alberti joins
  • Item: Esoteric Book VIII obtained
  • Field: Hypnotic obtained
Town: Tlalocan City of God
  • Event: Story related
Ewabarl Shivan
  • Requirement: Noah affection level 3 or higher
  • Event Choice: Noah shows Thoma her artifacts
    • Best to leave it alone(#): Gauge movest towards LIGHT, Lavinia Up, Faina Up, Noah Down
    • I have to know: Gauge moves towards DARK, Lavinia Down, Faina Down, Noah Up
Lyonrendas
  • Event Choice: Choose the next destination
    • Gilga Zeyon, and glory! (#): Gauge moves toward DARK, Lavinia Down, Faina Down, Noah Up Move to Third Generation, Part 6A

    • Aid Lyonrendas, our brothers in arms: Gauge moves toward LIGHT, Lavinia Up, Faina Up, Noah Down Move to Third Generation, Part 6A

    • To Aulis, for reinforcement: Gauge moves toward DARK, Lavinia Down, Faina Up, Noah Down Move to Third Generation, Part 6B
Part 6A
World Map
  • Cellatz Wildland: Wolf Dead x3, Big Eye x2, Spark Knight x2, Storm Knight x1-2
Gilga Zeyon

Note that these fights are all in succession, only allowing you to save between battles. Make sure to be properly stocked up on items and equipment before starting or you might find yourself stuck, having to reload a previous save.

The sequence of encounters depends on your choice in Lyonredas:
  • If Gilga Zeyon, and glory!:
    • Surprise Fight: Goblin Mage x3, Hobgoblin x3
    • Surprise Fight: Bull Orc x1, Goblin Mage x2, Hobgoblin x3
    • Surprise Fight: Garvel x1, Goblin Mage x2, Hobgoblin x3
    • Surprise Fight: Garvel x2, Bull Orc x3, Goblin Mage x2
    • Surprise Fight: Garvel x3, Goblin Mage x3

  • If Aid Lyonredas:
    • Surprise Fight: Garvel x2, Bull Orc x2, Goblin Mage x2
    • Surprise Fight: Garvel x2, Bull Orc x3, Goblin Mage x2
    • Surprise Fight: Garvel x3, Goblin Mage x3
      • Stolen: Garvel (Recovery Grass, Mithril)
      • EX Stolen: Garvel (Recovery Herb, Beast Ring)  Garvel, last fight only (Recovery Herb, Double Feather)
      • Overkilling: Garvel (Vessel of Life)

  • Event Choice: Choose the next destination
    • We make for Lus Soleil: Gauge moves towards DARK, Lavinia Up, Faina Up, Noah Down
    • We make for Musoi(#): Gauge moves towards LIGHT, Lavinia Down, Faina Up, Noah Up
    • We make for Tlalocan: Gauge moves towards DARK, Lavinia Down, Faina Down, Noah Up
World Map
  • Lattriwen Way, North: Big Eye x2, Spark Knight x1, Storm Knight x2
  • Lattriwen Way, South: Big Eye x2, Spark Knight x2, Wolf Dead x2
    These nodes can be bypassed by backtracking to the City of Aulis

Move to Third Generation, Part 7.
Part 6B
Aulis City
  • Event: Story related
World Map
  • Lattriwen Way, South: Wolf Dead x2, Big Eye x2, Storm Knight x1
  • Lattriwen Way, North: Storm Knight x2, Wolf Dead x1, Spark Knight x1
Gilga Zeyon
  • Fight: Goblin Mage x2, Bull Orc x3, Garvel x2
  • Fight: Goblin Mage x3, Garvel x3
  • Event Choice: Choose the next destination
    • We make for Lus Soleil: Gauge moves towards DARK, Lavinia Up, Faina Up, Noah Down
    • We make for Musoi: Gauge moves towards LIGHT, Lavinia Down, Faina Up, Noah Up
    • We make for Tlalocan: Gauge moves towards DARK, Lavinia Down, Faina Down, Noah Up

Move to Third Generation Part 7
Part 7
Town: The City of Aulis
  • Requirement: All heroines affection level 3 or higher
  • Event Choices: Thoma cleans up after the heroines
    • Perhaps I should refrain(#): Gauge moves towards LIGHT, Lavinia Up, Faina Up, Noah Up
    • Let the cleaning, begin!: Gauge moves towards DARK, Lavinia Down, Faina Down, Noah Down
      • I should stop: Gauge moves towards LIGHT, Lavinia Up, Faina Up, Noah Up

      • Look at table:
        • I had best leave it alone: Gauge moves towards LIGHT, Lavinia Up, Faina Up, Noah Up
        • It could never hurt to pick it up: Gauge moves towards DARK, Faina Down
          • Hide, quickly!: Gauge moves towards DARK, Faina Down
          • I have nothing to hide: Gauge moves towards LIGHT, Lavinia Down, Faina
            Up, Noah Down

      • Look at floor:
        • I had best leave it alone: Gauge moves towards LIGHT, Lavinia Up, Faina Up, Noah Up
        • It could never hurt to pick it up: Gauge moves towards DARK, Lavinia Down
          • Hide, quickly!: Gauge moves towards DARK, Lavinia Down
          • I have nothing to hide: Gauge moves towards LIGHT, Lavinia Up, Faina Down, Noah Down

      • Look under the bed:
        • I had best leave it alone: Gauge moves towards LIGHT, Lavinia Up, Faina Up, Noah Up
        • It could never hurt to pick it up: Gauge moves towards DARK, Lavinia Down
          • Hide, quickly!: Gauge moves towards DARK, Noah Down
          • I have nothing to hide: Gauge moves towards LIGHT, Lavinia Down, Faina Down, Noah Up
  • Item: Esoteric Book XII obtained
Schardt Bell Snowfield
  • Requirement: Noah affection level 3 or higher
  • Event Choices: Noah shows Thoma her letters
    • Yes, in fact, I would: Gauge moves towards LIGHT, Lavinia Down, Faina Up, Noah Up
    • Perhaps I had best not(#): Gauge moves towards DARK, Lavinia Up, Faina Up, Noah Up
    • I apologize for my intrusion: Gauge moves towards LIGHT, Lavinia Up, Faina Down, Noah Down
  • Item: Esoteric Book X obtained
World Map
  • Vovokas Pass: Big Eye x2, Wolf Dead x3, Yeti x1
Bak Mui
  • Fight: Bull Orc x2, Garvel x1, Goblin Mage x3, Hobgoblin x2
    • Stolen: Garvel (Recovery Grass, Mithril)
    • EX Stolen: Garvel (Recovery Herb, Ring of Force)
    • Overkiling: Garvel (Vessel of Life)
World Map
  • Valus Highland: Big Eye x3, Wolf Dead x2
  • Abolt Coast: Wolf Dead x2, Yeti x1
    These nodes can be bypassed by backtracking
Musoi
  • Fight: Bull Orc x4, Garvel x2, Goblin Mage x2
    • EX Stolen: Garvel (Issen, Double Feather)
    • Overkilling: Garvel (Square Cross)
Lus Soleil
  • Event: Story related

  • Re-enter for another event.
  • Event: Faina faints, Gauge moves towards LIGHT, Faina Up
  • Item: Esoteric Book VII obtained
Tweda Forest
  • Requirement: LIGHT, Faina affection level 5
  • Event: Faina runs to build stamina
  • Event: CG 83 and CG 84 unlocked
Town: Lyonrendas
  • Event: Story related
World Map
  • Kevery, South: Big Eye x2, Spark Knight x1, Wolf Dead x2
  • Kevery, North: Spark Knight x2, Storm Knight x2, Wolf Dead x2
    These nodes can be bypassed by backtracking
Town: Tlalocan City of God
Check tips section if you're having trouble with this fight.
  • Fight: Midas
    • Stolen: Lapis Noster, Bracelet of Requiem
    • Ex Stolen: White Frame, Tri-Guard
    • Overkilling: Gatling Knuckles
Quest: Mulan's Gem Cave
  • Enemies: Angel, Garuda, Spark Knight, Storm Knight, Yeti, Mucrane, Dragon
  • Treasure: Accessories 1-III, VIT Up+, Cure All, Essential Arts XVII, Crystal Spear, Secret Arts IX, Essential Arts XV, Essential Arts XVIII, Essential Arts XIX
  • Fight: Angel x4, Mandrake Root
    • Stolen: Mandrake Root (Morning Dew, Unicorn Horn)
    • EX Stolen: Mandrake Root (Generation Crystal, Marfile Seed)
    • Overkilling: Mandrake Root (INT Up)
Lus Soleil
  • Requirement: LIGHT, Lavinia and Faina affection level 3 or higher (Dissappears if you view the Hot Springs event beforehand! You've been warned!)
  • Event Choices: Thoma makes a promise to their mother
    • They deserve their privacy: Gauge moves strongly towards LIGHT, Lavinia Down, Faina Down, Noah Up

    • I must know what they're about...(#): Gauge moves towards DARK, Lavinia Up, Faina Up, Noah Down Continue to next set of choices
      • I promise to protect Lavinia: Gauge moves towards DARK, Lavinia Up, Faina Down, Noah Down
      • I promise to protect Faina: Gauge moves towards LIGHT, Lavinia Down, Faina Up, Noah Down
      • I promise to fulfill my destiny(#): Gauge moves strongly towards LIGHT, Lavinia Up, Faina Up, Noah Up
  • Item: Esoteric Book XI obtained
Frozen Wood
  • Requirement: All heroines affection level 4 or higher
  • Event Choice: Hot springs
    • Nod your head(#): Gauge moves towards DARK, Lavinia Down, Faina Up, Noah Up
      • Event: CG 70 unlocked
      • Item: Secret Album 3 obtained
    • Shake your head: Gauge moves towards LIGHT, Lavinia Up, Faina Up, Noah Down
Dusk Hill
  • Requirement: Not LIGHT, Noah affection level 5 (Will also unlock after the love adjustments if not available before that)
  • Event: Noah does her stretches
  • Event: CG 85 obtained
Bak Mui
  • Event Choice: Nine questions [check next section]
  • Perfect run choices: 2, 1, 1, 1, 1, 1, 2, 2, 2
World Map
  • Alberback Mine, West: Fenrir xARKSpark Knight x2, Storm Knight x2
  • Alberback Mine, East: Fenrir x1, Spark Knight x2, Storm Knight x2
  • Qubad Coast: Fenrir x1, Spark Knight x2, Storm Knight x2
  • Leavanes's Whisper: Fenrir x1, Spark Knight x2, Storm Knight x2
Magna Val
  • Fight: Durga x1, Garvel x2, Goblin Mage x4
    • Stolen: Durga (Ogre Ring, Magic Stone Piece) Garvel (Mithril, Nightmare) Goblin Mage (Element of Wind, Darkness Element)
    • EX Stolen: Durga (Aura Ring, STR Up) Garvel (Moon Crusher, DARK Ray) Goblin Mage (Crusher, Drain Energy)
    • Overkilling: Durga (STR Up+) Garvel (Vessel of Life) Goblin Mage (Mithril Ore)
Fendias
End of Third Generation. Congrats!
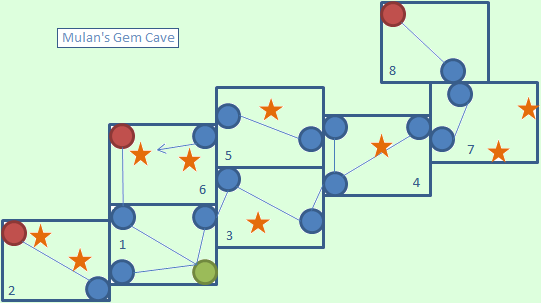
Dungeon 3: Mulan's Gem Cave


  • 1: You'll notice the areas in this dungeon are similar to Aulis Lake which should make things easier. Start off by heading forward into the center of the open room and head to the bottom left to enter the second screen.

  • 2: This screen is a dead end with a couple chests. Head through the passage and you will come upon ACCESSORIES 1-III inside a chest. Continue forward to the end of the passage to find another chest containing VIT UP+. Head back to return to the first screen.

  • 1: Go back to the center of this room and go to the top right for the next area.

  • 3: In this area you'll start in the top left of the screen. Make your way through the passage all the way to the bottom right. On the way there is a treasure lying up against the southern wall which may be hard to spot. Inside you'll find CURE ALL. Zone into the fourth screen.

  • 4: Head straight and the passage will curve immediately to your left. After some steps you'll spot a treasure chest up against some steps containing ESSENTIAL ARTS XVII. From the chest head up the stairs and to the left to the next screen.

  • 5: Another straightforward passage. Make your way through it. A little bit through you'll come upon a treasure chest containing CRYSTAL SPEAR . Continue onto the sixth screen.

  • 6: Immediately you'll see a treasure in-front of you. Inside you will receive SECRET ARTS IX. Drop off the cliff and head to the top left to spot a treasure in a small dead end that contains ESSENTIAL ARTS XV. Head back to the first screen by heading to the bottom right of this area.

  • 1: Go top right into third screen.

  • 3: Go bottom right into fourth screen.

  • 4: Make your way around the curve and when you climb the steps in-front of you, take a right this time.

  • 7: Head straight into the center of the room. To the bottom right is a chest in a small dead end with ESSENTIAL ARTS XVIII. Head back to the center and go to the top right this time to find another chest with ESSENTIAL ARTS XIX. Back to the center and now head to the top left to enter the next screen.

  • 8: A straightforward passage with no chests. Just continue on. Be warned, you will enter a boss fight.
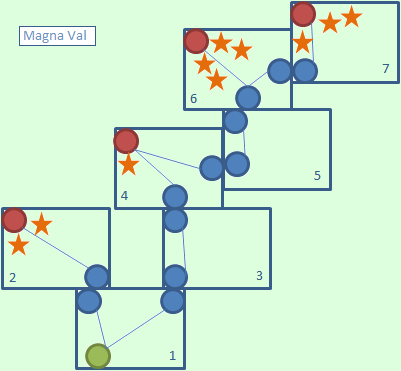
Dungeon 4: Magna Val


  • 1: As you can see, we are in a castle type setting. Head forward and you will see a broken door and two smaller doors on the left and right side of it. Go through the left door first.

  • 2: Head down this passage until you reach a dead end. Two chests will be waiting at the end containing LUNA'S WAND and PHANTOM BRACELET. Head back to the first screen.

  • 1: Take the right door this time.

  • 3: The path here is straight forward. Go straight, the path will then curve left then right and move onto the next screen.

  • 4: Head down this long stretch across a small water bridge and you will come upon some stairs. At the top you will see a bridge before you. Cross it to find a room containing SEIRYU'S SWORD. Head back across the bridge and continue down the long stretch on the second floor to the next screen in the bottom right.

  • 5: Take a short run straight around the corner and a door will be immediately on your left. Head through it to the next screen.

  • 6: As you enter this screen, there's a door immediately to your right. Head inside.

  • 7: Head straight up the stairs to the top and you'll spot three treasures: two in a small room and one by itself. The three chests contain MAGIC BLADE, PARTISAN and WHITE FRAME. Head back down the stairs back to the last screen.

  • 6: Continue down this hallway to the top left of the screen to find a throne with four treasure chests containing from left to right, REPEATER, KAMAITACHI ARM, TOSUKANOTSURUGI and BRACELET OF FEICUI. That's it for this dungeon.
Event: Nine Questions
  • Lavinia Question 1
    Answer
    Alignment
    Lavinia
    Faina
    Noah
    Then I shall be more honest with you
    Light
    +
    -
    -
    What you see is what you get(#)
    Dark
    -
    +
    +

  • Faina Question 1
    Answer
    Alignment
    Lavinia
    Faina
    Noah
    You cannot help me(#)
    Dark
    +
    -
    +
    I would like that
    Light
    -
    +
    -

  • Noah Question 1
    Answer
    Alignment
    Lavinia
    Faina
    Noah
    I cannot ask you to follow me(#)
    Light
    +
    -
    -
    Believe in me, you will not regret it
    Dark
    -
    +
    +

  • Lavinia Question 2
    Answer
    Alignment
    Lavinia
    Faina
    Noah
    Keep me warm, and I shall stay(#)
    Dark
    +
    -
    -
    I will leave when I am finished
    Light
    -
    +
    +

  • Faina Question 2
    Answer
    Alignment
    Lavinia
    Faina
    Noah
    That could be nice(#)
    Dark
    -
    -
    +
    I could never do that
    Light
    +
    +
    -

  • Noah Question 2
    Answer
    Alignment
    Lavinia
    Faina
    Noah
    I will adventure forever!(#)
    Dark
    -
    +
    +
    I am done with adventuring
    Light
    +
    -
    -

  • Lavinia Question 3
    Answer
    Alignment
    Lavinia
    Faina
    Noah
    All the women of the world
    Light
    -
    +
    +
    You, Lavinia(#)
    Dark
    +
    -
    -

  • Faina Question 3
    Answer
    Alignment
    Lavinia
    Faina
    Noah
    You must be more confident
    Dark
    +
    -
    -
    I like you just as you are(#)
    Light
    -
    +
    +

  • Noah Question 3
    Answer
    Alignment
    Lavinia
    Faina
    Noah
    A visit to your orphanage?
    Light
    -
    +
    +
    I cannot go on your adventure(#)
    Dark
    +
    -
    -

    NOTE: The + and - are not equal. Some of them affect the heroines more than others. I have had a heroine get 1+ and 1- and it resulted in loss in affection.
Choosing a Heroine
At the end of the generation, you'll (most likely) get a choice of heroines to bear Thoma's child. You can pick among the heroines if their affection level is 4 or above.

Affection level can be checked by their faces on the bottom right of the screen during scenes. Level 4 is when they have a big smile. Level 5 is when they blush.

If all your heroines are at affection level 3 or below, you will automatically pick the heroine on the upper left of the circle. [ie. Fyuria, Valeria, Lavinia, Hildegard]

It's important to have your preferred heroine at max affection. Why? Your main character will have better stats, that's why! When your chosen heroine is at max affection, your next main character will be stronger compared to if your heroine's affection is at level 4.
*they will also have different weapons

So, how exactly does the mother affect your main characters?
  • Stats
    Generally, the main attribute of your MC is dependent on his lineage and their mothers affect this the most. There's no hard formula for this, by 5th gen, there are a lot of combinations!
  • Weapon
    Same as stats, it depends on their cumulative lineage, and is mostly affected by their mother. There's no hard formula for this, by 5th gen, there are a lot of combinations!
  • Appearance
    Your main characters will look slightly different depending on who their mother is
  • Willpowers
    They learn different Willpowers based on their mothers
  • Extended Area
    Also depends solely on their mothers.
  • Skill slots
    The first 4 skill slots are based on the mothers. You get 2 more skill slots if you use the item "Proof of Valor" at level 50. One of them is based on their mothers, the other is based on their grandmothers. Only exception is 2nd gen, for obvious reasons. One of his extra skill slots is always Fire.


If you want to check out what descendants you will end up with, you can check out this awesome guide[www.gamefaqs.com] by ACasser!

There's also an online tool to help you with this, based on the guide above. Click here![www.soifon.net]
Credits, Links, all that good stuff
Credit to all wiki contributors, since I nicked the information off of them, with a small bit of editing.
The only ones I know of are Erellisae, Byuusan, Wathman(all the images) and Smurgledwerf(True End path). There are most definitely others, though!

Compile Heart & Red Entertainment, for creating the game

Idea Factory, Aksys Games and Ghostlight for publishing the game

Ghostlight again, for porting the game to PC

and you, for reading up to the credits!


Links
6 Comments
NickLionheart Jul 23, 2014 @ 2:02pm 
thanks man it helped me a lot :golden:
Meeivs Jun 20, 2014 @ 12:40am 
nice guide ^^
Frenzy85  [author] Oct 14, 2013 @ 10:13am 
It's mentioned in the quote from the wiki. I can't write anymore stuff in that section because apparently there's a word limit for each section in a Steam guide. :\

So, I'll just hope they don't skim through that part or they read your comment. ^^"
Bankaizero Oct 14, 2013 @ 10:01am 
Lol no problem I had the same problem way bay when on the PS3. Though you should note that if you do this Luijt's level will be 91 which can (and will) reduce any bonus you may get from defeating Midas.
Frenzy85  [author] Oct 14, 2013 @ 9:53am 
Ok, this is awkward... The reason I thought you couldn't make it was because I was dumb and didn't read the table headings. I thought "result" was the leftmost column. I don't know why, but I did.

So I thought you needed a Silver/Zombie Dragon, Magic Golem or Rafflesia to make it.

I actually spent a good portion of an hour looking around the wiki on how to make one of those with Gen 3 mobs. :'(

Anyways, thanks for the tip! :)
Bankaizero Oct 14, 2013 @ 9:45am 
The Luijt Tip is monster combinations found here -> http://agarest.wikia.com/wiki/Capturing_Monsters

Luijt is an uncapturable monster so you must combine to get him which is pretty easy : Big Eye + Wolf Dead = Angel (x2), Angel + Big Eye = Mucrane, Angel + Mucrane = Luijt

All which can be found in Gen 3 Before Midas.