System Shock® 2 (Classic)

System Shock® 2 (Classic)

339 ratings
System Shock 2 - OSA characters and Psionic abilities guide
By Coprofagio
OSA is considered to be the hardest class to play, and a lot of new players completely avoid it. But actually, OSA is the funniest to play, and most powerful military branch. This guide will explain how to build a good OSA character.
6
2
11
3
3
   
Award
Favorite
Favorited
Unfavorite
0.0 - Prologue


I've been playing System Shock 1 and System Shock 2 for years, and since the second one was recently released on Steam, I thought that it was a good idea to make an extensive guide for this great game, which is in fact one of my favourites, along with the first one.

It's a shame that Looking Glass Studios no longer exists. Looking Glass Studios took players seriously, in the sense that they assumed they weren't a bunch of idiots, as most of modern videogames developers do assume. That way of thinking made possible deep games such as System Shock 1, its sequel, or Thief: the Dark Project.

System Shock 2's deep gameplay mechanics, combined with its smartly designed maps, interesting plot and great atmosphere, turned it into an instant classic. The game also has remarkable flaws, such as obvious imbalances in certain gameplay mechanics, but its virtues far outweight its flaws.

One of the strongest points of System Shock 2 is that it allows you to be very creative on your character builds. There are three available classes, Marine, Navy, and OSA, and plenty of alternative ways for developing their skills.
1.0 - Playing as an OSA character
OSA is generally considered to be the hardest class to play in System Shock 2. Compared to the Marine and Navy characters, the OSA relies a lot on his Psionic Abilities, which are not always the easiest to use skills.

The first problems new players will probably detect with OSA characters are that they don't use to be good with weapons, that Psionic offensive powers tend to be weak and unpractical, and that the character runs out of PSI points at a very fast pace.

While those problems are indeed true at the beginning of the game, the OSA character tends to grow really powerful and versatile as he advances through the game. Stronger and more useful Psionic powers are unlocked later in the game, and he'll become rich enough to buy from Replicators a lot of PSI hypos for refilling their PSI points, which at first are really scarce.

OSA characters are challenging to play, since they tend to demand a deeper understanding of System Shock 2's gameplay mechanics than Marine or Navy characters, but for that same reason, they're also rewarding and fun to play. Therefore, any System Shock 2 player should at the very least try to play as one of them once, and not limit themselves to play always as the more orthodox to play Marine or Navy characters.

This guide will assume that the player is playing on Hard or Impossible difficulty, since Normal and Easy are trivial difficulties on which almost any character build can be successful.
2.0 - The basics
A System Shock 2 character has four sets of main skills. All of these skills are upgraded using Cyber-Modules. Cyber-Modules are mainly rewarded to the player as he/she advances through the game, but more Cyber-Modules are also findable by exploring the levels.

Upgrading skills on higher difficulty levels such as Hard and Impossible is far expensier than on lower difficulties, but the amount of Cyber-Modules received and found will be exactly the same, so any one playing in Hard or Impossible must be far more careful when spending them on his/her character build.

There are also other ways of upgrading the character, such as O/S Upgrades and your equipped items.

We'll discuss in more detail these sets of skills and upgrades in later sections.

  • Statistics: character's five main attributes: Strength, Agility, Endurance, Psionics and Cyber-Affinity. Upgrading these main stats is vital for any type of character. An OSA character will focus on upgrading his Psionics attribute, but he will need anyway a decent level for all of his attributes.

  • Technical: skills for hacking computers, repairing, maintaining and modifying weapons, and for researching. An OSA character should not focus too much into Tech skills, but moderately investing in some of them is heavily recommended.

  • Combat: your skill level in standard weapons, energy weapons, heavy weapons, and exotic weapons. An OSA character usually isn't as proficient in combat skills as a Marine or Navy are. Actually, a 100% pure OSA character build would not use any Combat skills, but an OSA can also try hybrid builds which use weapons.

  • Psi: this is the most important set of skills for an OSA character. Psi powers are divided among 5 Tiers, each one of them with 7 Psi powers, for a total of 35 Psi powers. A character must first unlock a Tier, which increments his maximum amount of PSI points, and then he will be able to buy Psi powers from that Tier.

    An OSA character will start the game with Tier 1 and Tier 2 power levels unlocked. He will also start with some Tier 1 powers. Higher power Tiers are very expensive to purchase, so only OSA characters tend to use them.

  • O/S Upgrades: At four points of the game, you will find a special O/S upgrade training device, which will offer you a permanent bonus ability for your character. There are 16 available O/S Upgrades, and at the end of the game, you will have selected 4 of these 16 upgrades.

    You will find the first and second O/S Upgrades quite soon in the game, but the third and fourth upgrades are not found until very advanced in the game, so you should be selecting the most important upgrades first.

  • Inventory items: you character has an inventory, and he can equip an armour, a weapon, and one or two cybernetic implants. All of those items will play and important part on how you play your character.

3.0 - Statistics
All main attributes have values between 1 and 6, but you can temporarily increase them up to a maximum value of 8 by using implants and Psionic abilities.

Since an OSA character will have to spend a lot of his Cyber-Modules on Psionic abilities, it's REALLY important to augment you Statistics by using certain Psionic abilities.


The 5 main attributes screen.

A stats upgrade station, and its upgrade screen window on the left upper corner. Notice that the Cyber-Modules cost increases when the attribute value gets higher.

  • Strength: Strength affects how hard you hit in melee, and your inventory space. Each Strength point will unlock three extra inventory spaces. Inventory is maximized with a value of Strength 6.

    Strength is also important because the armours have a Strength requirement, and you won't be able to equip the heavier armours if you don't have a reasonably good Strength value.

    An OSA character doesn't need a high amount of Strength. A mimimum value of 3 is recommended for being able to equip the very useful Powered Armour, but any value over 3 is a luxury. If you need more Strength (for example, if you need more inventory space), you can always use a +1 Strength implant, and/or the Tier 2 Psionic ability Psychogenic Strength, which grants you a temporary +2 Strength bonus.

    Getting a Strength of 4 may be still a good idea, but don't EVER get to Strength 5, it's completely pointless.

    There are really powerful melee builds for the OSA, but Strength is not actually that important for those builds, so don't worry if your character has only Strength 3 or 4. He'll hit really hard in melee, anyway.

  • Endurance: Endurance determines your Health Points. On lower difficulties, the character starts with a huge amount of HPs, and increasing Endurance is actually quite irrelevant since you already have a lot of HPs anyway. But on Impossible difficulty, a character only starts with 7 HPs, and he gains +3 HPs for each Endurance point.

    Since an OSA starts with Endurance 1, he will have 10 HPs at the beginning of the game, so he will be really weak. It's important to increase Endurance as soon as you can. A value of Endurance 4 is recommended on the long run, but if you have spare Cyber-Modules, getting Endurance 5 can be a good idea.

    As with Strength, you can increase your Endurance by using a +1 Endurance implant, and/or by using a Psionic ability to recieve a temporary +2 bonus. However, Psychogenic Endurance is a Tier 4 power, and that means that is REALLY expensive, and temporary Endurance bonuses aren't actually useful, so I completely recommend ignoring and not buying this power.

    Endurance also defines your radiation and poison resistance. It's nice to have a reasonably good Endurance when facing radiation leaks, or certain (extremely) annoying poisonous enemies.

  • Psionics: Psionics is simply essential for any OSA character. Each point in Psionics will increase your maximum amount of PSI points by 5 on Impossible difficulty, and all of the Psionic abilities will get far more powerful when you have a high Psionics value. You should get to Psionics 4 as fast as you can, and maximize it to Psionics 6 on the long run.

    As always, there is a VERY useful implant for OSA characters which gives you +1 Psionics. You will be using that implant a lot, trust me.

    And there is also a Tier 2 Psionic ability which gives you a temporary bonus of +2 Psionics, Recursive Psionic Amplification. However, that power also duplicates PSI point costs when active, so it's totally useless, sadly. You can always use the same power twice insted of duplicating the cost.

  • Agility: Agility increases your running speed, reduces fall damage, and reduces weapon kickback. An Agility value of 4 is also required for using the Laser Rapier.

    Some people consider that Agility is not that useful, but I personally think that running speed is a VERY important part of the game, since it allows you to outmaneuver your enemies and dodge their attacks. You should consider upgrading you Agility value up to 4, at the very least.

    Since you're an OSA character, chances are that you're going to use the wrench for a long time, since your Combat skills will probably suck, or will even be directly non-existant. And maybe you will even choose an OSA melee build, which are REALLY powerful, as I will detail later. Running speed is critical to a melee character, obviously. In any case, a good Agility value is going to help you a lot.

    The +1 Agilty implant is very useful for combat situations, and the Tier 1 temporary +2 Agility power, Psychogenic Agility, is extremely useful for any situation. With a base Agility of 4, the implant and the power, you can get to an impressive Agility of 7.

  • Cyber-Affinity: A useful attribute. Cyber-Affinity makes the Hack, Repair and Modify mini-game easier. Each Cyber-Affinity point decreases by 5% the difficulty for taking control of a node, and also decreases by one the amount of "dangerous" nodes.

    An OSA character shouldn't maximize the Hacking skill or his Cyber-Affinity, but he should be anyway a decent hacker, as every System Shock 2 character should be. A Cyber-Affinity value of 3 is recommended, maybe even 4.

    There is not a +1 Cyber-Affinity implant, but there is a +1 Hack, Repair and Modify one.

    As expected, there's a Tier 1 temporary +2 Cyber-Affinity Psionic ability, Psychogenic Cyber Affinity, which is extremely useful. Use it whenever you have to hack anything.

As you can see, an OSA character can easily increase Strength, Agility, and Cyber-Affinity by 2 using really cheap powers. That's one of the main reasons that makes OSA characters so versatile and powerful.
4.0 - Psionic Abilities
Psionic abilities are critical for any OSA character. There are 5 power Tiers, each one with 7 powers. Higher Tiers are not necessarily more useful than lower Tiers, but an OSA character should use powers from all or almost all of the Tiers, since every Tier has useful powers. Sadly, there is also a big amount of useless powers, as we'll see.

A PSI upgrade station, and the PSI upgrade window in the upper left corner. We can see that the Tier 2 is unlocked, and that certain Tier 2 powers have already been purchased, while others not.

Tier 3 powers are still locked. Notice how unlocking the Tier 3 is actually far expensier than purchasing its powers. This happens with every Tier.
4.1 - Tier 1 powers

Each Tier 1 power costs 1 PSI point to use. Unlocking Tier 1 powers provides you with 2 PSI points.

An OSA character will have Tier 1 unlocked by default, and some Tier 1 powers available since the beginning of the game. Tier 1 has some really useful powers, so don't undestimate it.


Psycho-reflective Screen: A very useful power. 15% of damage reduction is not really that high, but combined with a decent armour, it helps a lot. With a high Psionics value, its duration is quite nice. A power that you'll be using the whole game. You should use it everytime you enter a new area.


Neuro-reflex Dampening: A quite useless power. Weapon kickback is not that noticeable even with low Agility. You shouldn't take this power.


Kinetic Redirection: This has few uses. You will be able to get some nanites thanks to this power which otherwise there wouldn't be any way to catch, but it's not really worth investing Cyber-Modules on this power.


Psychogenic Agility: One of the best powers in the game. +2 Agility during a really long time means that you actually, under almost any circumstance, have 2 more of Agility than non-Psionic characters, and with a really small cost of Cyber-Modules.


Psychogenic Cyber Affinity: As with Agility, a great and cheap way to increase your Cyber-Affinity by 2 under almost any circumstance. OSA characters can be decent hackers since almost the start of the game thanks to this handy power.


Projected Cryokinesis: This power is important for an OSA character, but it's not really a good main weapon. Even with high Psionics, its damage is mediocre, and it's really terrible against mechanical enemies. You will also spend too many PSI points if you try to use this power as a main weapon. But, even if this power is not really that great, it has its uses. It's great for destroying cameras, and, since an OSA probably won't have Combat skills, this is the most decent ranged attack that he will get for a long time. At the beginning of the game, stick to the wrench, and don't fall into the temptation of relying too much on this power, you will waste too many PSI points if you do so.


Remote Electron Tampering: A quite pointless power. You can always manually disable the security alarms, or avoid triggering them at all. It could be useful if you're really far away from a security console, but your Cyber-Modules will be better spent in other things.
4.2 - Tier 2 powers

Each Tier 2 power costs 2 PSI point to use. Unlocking Tier 2 powers provides you with 4 PSI points.

An OSA character will have Tier 2 unlocked by default, but he won't have any powers available at the beginning of the game. Strangely enough, Tier 2 has some of the most powerful, even overpowered, Psionic abilities.


Anti-entropic Field: This can be useful if you use ranged weapons, and if you aren't good with the Maintain skill. Sometimes, It can be useful, but getting the Repair skill and constantly repairing your broken weapons will avoid that you spend PSI points by using this. It's competely useless if your character is a melee specialist, since melee weapons don't break apart.


Adrenaline Overproduction: Clearly, one of the most powerful and useful powers in the game. This power essentialy multiplies your melee damage by your Psionics attribute. Even with a simple wrench and low Strength, your character will deal huge amounts of melee damage with a high Psionics value, such as 6. This power is the main reason why OSA melee characters are so good. Get this power and demolish your enemies with melee. The only bad thing about this power is that its duration is quite low, so sometimes you will be forced to use it again in the middle of the combat.


Neural Decontamination: It protects you from most of the radiation damage, but there is already a Hazard Suit for doing that, so you should stick to it and avoid this power. And its duration is quite bad.


Cerebro-stimulated Regeneration: Another of the best powers in the game. By only spending 2 PSI points, you will recover a lot of health. That means that PSI hypos, which give you 20 PSI points, are far more efficient at healing you that Med hypos. A clearly overpowered Psionic ability. I actually avoid it, since I consider that it breaks the game.


Psychogenic Strength: +2 Strength is always useful. Clearly, its melee damage benefit pales in comparison to Adrenaline Overproduction's damage benefit, but you can always combine them and enjoy both of the benefits at the same time. The additional inventory space can also be really useful. It can also help you to use certain armours with a high Strength requirement. It's not as good as the +2 Agility and +2 Cyber-Affinity powers, but it's still a great power to have.


Recursive Psionic Amplification: It's not a good power. +2 Psionics is really nice, but doubling the PSI points cost (a Tier 2 power would cost 4 PSI points, for example) is simply too much. Just use the power twice, and don't spend Cyber-Modules here.


Localized Pyrokinesis: A great power to have. You will invoque a fire aura around you, and every enemy who gets very close to you will get hurt. With high Psionics, its damage is remarkable. If you're a melee specialist, it's even better, since you're going to approach your enemies anyway.

It has also two really nice secondary beneficial effects:

-The first one is that explosions, such as the ones from those suicidal protocol droids, or from the combat robots, won't affect you, neither the Pyrokinesis attack from the red monkeys.

-The second one is that you can combine this power with Tier 4 power Photonic Redirection, which renders you completely invisible, and enemies will stupidly die, being completely oblivious of your presence as they will be. I'm sure that the game designers didn't realize this insane exploit, which actually breaks the game, and I counsel you to completely avoid using it D:
4.3 - Tier 3 powers

Each Tier 3 power costs 3 PSI point to use. Unlocking Tier 3 powers provides you with 6 PSI points.

Tier 3 is the first one you'll have to unlock if you use an OSA character, and it's relatively expensive to do so. Electron Cascade is by far its more useful power, and you should really get it.


Molecular Duplication: Its nanites costs are too high, you will do well purchasing hypos and ammunition from hacked Replicators instead.


Electron Cascade: An excellent power, perhaps the most useful Tier 3 skill. Cybernetic implants are very important for OSA characters, and since they require energy to run, this power is very useful to recharge them when you're far away from recharge stations. The Powered Armour is the best armour in the game, specially for an OSA, since it only requires Strength 3. Its main drawback is that it requires energy to work, but thanks to this power, you will be able to use it far more often. Finally, if you happen to use Energy Weapons, this power will be even more useful. In fact, getting Energy Weapons is probably a good idea for an OSA character. With this power, you're actually converting your PSI hypos into portable batteries.


Energy Reflection: There are very few energy damage sources in the game. Keep your Powered Armour charged, and don't forget to use your Tier 1 Psycho-reflective Screen for additional protection, and you won't ever need this power.


Neural Toxin-blocker: Since it shields you from 100% of toxin damage, it can be really useful against those annoying spiders, but Tier 3 powers are already quite expensive in Cyber-Modules, and this power only has a very specific use, so I don't recommend buying it.


Enhanced Motion Sensitivity: A complete waste of Cyber-Modules. You can hear the enemies from miles away, you don't need powers to tell you where they are.


Projected Pyrokinesis: This is an upgraded version of Tier 1 Cryokinesis. It's still terrible against mechanical enemies, but it deals nice damage against organic ones. The projectile also travels much faster than Cryokinesis' one. Problem is that it spends 3 PSI points for every shoot, so it's not really efficient. Even though, I use to buy it just in case, since it can be useful from time to time.


Psionic Hypnogenesis: This power is interesting, since with high Psionics it can paralyze organic enemies for a long time, giving you time for running away, preparing an insane melee blow with Adrenaline Overproduction, recovering your life, refilling your batteries, among other things. It's not really a crucial power, but you should consider trying it.
4.4 - Tier 4 powers

Each Tier 4 power costs 4 PSI point to use. Unlocking Tier 4 powers provides you with 8 PSI points.

Tier 4 is expensive to unlock, but it has a really great power, Photonic Redirection, and some other interesting powers, so if you' use an OSA character, you should really unlock Tier 4.


Photonic Redirection: This power renders you completely invisible for a decent amount of time if you have high Psionics. You can't attack or use any other power, or you will lose your invisibility. As I mentioned in the Tier 2 section, this power can be combined with Localized Pyrokinesis to kill anyone without losing your invisibility, since the game does not consider the fire aura to be an attack. I wouldn't recommend exploiting the game in that way. Even without using that exploit, Photonic Redirection is still one of the best powers in the game, since it allows you to run away from the enemies, or to avoid any possible confrontation. A really great power to have.


Remote Pattern Detection: This game is about exploring the levels, you can completely avoid this expensive power and simply explore a bit harder.


Electron Suppression: It's the same power as Tier 3 Psionic Hypnogenesis, but this one is for mechanical enemies. Robots tend to be harder enemies for OSA characters than organics, so this one can also be useful. Photonic Redirection is anyway more useful for running away, this one is more useful for rendering an enemy helpless while you prepare a killing blow.


Psychogenic Endurance: Too expensive compared to the other "+2" powers, and Endurance is not useful if it's not permanent. Not really a good power.


Molecular Transmutation: This could be a great power, but there is an item which does the same thing without spending Cyber-Modules on buying this power, or PSI points on using it. That item is the Item Recycler, and is extremely useful. You can find more info about the Item Recycler in chapter 10.0.


Remote Circuitry Manipulation: This is not really a good power. With a Psionics value of 7, you will emulate Hack 4 and Cyber-Affinity 4, which are really decent, but this power does NOT use your hacking software, which reduces considerably the base node difficulty, so the node difficulties are extremely high in the final levels. It's only useful for hacking things from the first levels. And there's also the problem that hacking spends PSI points instead of nanites. You can easily spend 20 or 30 PSI points in hacking something from the final levels. I completely avoided Hack and Cyber-Affinity in favour of this power on an ocasion, and I was a really mediocre hacker at best. And by the way, Tier 1 Psychogenic Cyber Affinity does not work with this power, you won't receive the +2 Cyber-Affinity bonus.


Cerebro-energetic Extension: A very interesting power for melee OSA characters. It transforms your Psi Amp into a psychic sword. While this power is active, you won't be able to use other powers, so activate your +2 Agility, your Adrenaline Overproduction and the rest of your powers BEFORE using this power.

This psychic sword is the second most powerful melee weapon of the game, better than the wrench and laser rapier, but worse than the crystal shard. It's really strong, and combined with Adrenaline Overproduction, you can deal insane amounts of damage. An interesting power to have.

Be aware that if you're a 100% melee OSA specialist, you will need the Cerebro-energetic Extension or the laser rapier against the final enemy, since the wrench and, for some strange reason the crystal shard, are unable to damage it. Or you can always use your crappy Cryokinesis.
4.5 - Tier 5 powers

Each Tier 5 power costs 5 PSI point to use. Unlocking Tier 5 powers provides you with 10 PSI points.

Tier 5 is extremely expensive to unlock, and its powers are also really expensive to purchase, so only a completely dedicated OSA user should invest Cyber-Modules here. Tier 5 powers aren't generally speaking actually that great, so be aware of that.


Advanced Cerebro-stimulated Regeneration: This power is useless. It heals too much HPs, and most of the healing will be wasted anyway, specially on higher difficulties, where maximum HPs are low. Its Tier 2 version, Cerebro-stimulated Regeneration, is far more efficient at healing, and it's far cheaper to buy in Cyber-Modules, so stick to it.


Soma Transference: A nice power, since it's both offensive and defensive. It drains life from your enemies, and heals you with it. With a high value of Psionics, it deals quite a lot of damage, and it also heals you a lot. A great ranged instantaneous attack, far better than Cryokinesis or Pyrokinesis, and far more efficient at healing you than Advanced Cerebro-stimulated Regeneration. However, it only works with organics, not with robots, don't forget it.


Instantaneous Quantum Relocation: It does teleport you, which I suppose it will be great in speedruns. In a regular game, you should simply walk. When you are able to get this power, you will have high Agility anyway, and you will get to your destiny quickly.


Imposed Neural Restructuring: Turning strong enemies to your side can be fun. It's not really an important power to have, but it gets the job done. Be aware that its duration is not that great, and that it does not work against robots.


Metacreative Barrier: It creates an energy barrier in front of you. It's not particularly useful when you have better ways to run away from the enemies, such as Tier 4 Photonic Redirection (invisibility), but it has an interesting feature, and that is that Tier 5 Soma Transference can work through the barrier, so the Metacreative Barrier truly can have some fun uses after all.


External Psionic Detonation: You can use the mine for setting traps to certain enemies, but System Shock 2 is not really a game which benefits much from that kind of gameplay style. I recommend using it only for fun and for testing unorthodox ways of playing. If this mine damaged robots, then it could be actually a nice power, since combat robots tend to patrol along predefined pathways, and this mine could be a nice surprise for them.


Psycho-reflective Aura: It's the Tier 5 version of the really good Tier 1 power Psycho-reflective Screen. Since you can combine both powers, and a Powered Armour, you can become almost immune to damage. Be aware than, even with a high Psionics power, this power does not last very long, so it's best to only use it when you really know that you are going to enter some combat-intense zone.
5.0 - Combat skills and weapons
Combat skills are secondary to an OSA character, but you have to consider them anyway.

The first thing you have to know with an OSA character, is that you will be able to deal a lot of melee damage, so ranged weapons aren't actually as important for OSA characters as for Marine and Navy characters. Since the Wrench has not any Combat skill requirement, you can complete the whole game wihout spending a single Cyber-Module in Combat skills, but you can do so, if you want.

In any case, you shouldn't upgrade any Combat skill up to 6, since you're going to need your valuable Cyber-Modules for your Psionic abilities. A value of 3 or 4 in one (and only one) of the Combat skills is an already nice value. And by the way, most of the final weapons in each category tend to suck, except for the powerful Assault Rifle from Standard Weapons.


The four Combat skills

  • Standard Weapons: the Standard Weapons are the Pistol, the Shotgun, and the Assault Rifle.

    All of them are really versatile weapons. A Standard Weapons skill value of 3 allows you to use the Pistol and the Shotgun, and it's the skill value I would recommend you, or maybe 4, if you want to do a bit more of damage.

    You can't use the powerful Assault Rifle until you have 6 in Standard Weapons, but since you're an OSA, you have to do some sacrifices. The Assault Rifle is a superior version of the Pistol for gameplay purposes, and probably the best ranged weapon in the game (along with the Grenade Launcher), but the Pistol is good enough. The Shotgun is another versatile and effective weapon, and ammunition for it is abundant.

    The Wrench is actually considered also a Standard Weapon even if it is not required to have the skill to use it, so increasing Standard Weapons will increase your Wrench's damage.

  • Energy Weapons: The Energy Weapons are the Laser Pistol, the Laser Rapier, and the EMP Rifle. With a Energy Weapons skill value of 4, you will be able to use the Laser Pistol, and the Laser Rapier. You won't miss the EMP Rifle anyway.

    This is actually my favourite type of weapon to use with an OSA character, since Tier 3 power Electron Cascade is really useful for an Energy Weapons user, giving you almost infinite ammunition. OSA characters also tend to be more vulnerable against robotic enemies, and since Energy Weapons are great against them, they are a nice choice.

    The Laser Pistol is a nice weapon to have, but remember to use this weapon always with the "Charge Shot" fire mode, since the regular shot mode is really weak. Charge Shots are a bit slow, but they are also powerful and accurate, so this is the way to go with this weapon. Laser Pistol is effective against all of the robotic enemies, and is usually effective against organic enemies, but be aware that spiders are EXTREMELY resilient to energy damage, so you should use the wrench or your Psionic abilities against them.

    The Laser Rapier is interesting since it's a good melee weapon, stronger than the wrench. It's also far more effective for killing robotic enemies with melee attacks. Combined with Adrenaline Overproduction, it will be a really powerful weapon indeed.

    The EMP Rifle is powerful, but it only works against robots, so it's not actually a very interesting or versatile weapon to have. The Laser Pistol and the Laser Rapier will do well against robots, anyway. You can forget about this weapon with no remorse.

  • Heavy Weapons: the Heavy Weapons are the Grenade Launcher, the Stasis Field Generator, and the Fusion Cannon.

    I would recommend getting a Heavy Weapons skill value of 3 or 4, depending of how much you want to increase your Grenade Launcher's damage. The Grenade Launcher is actually the only useful Heavy Weapon, but is a REALLY great and versatile weapon.

    The Grenade Launcher is powerful, and has a huge number of grenade types you can use for every situation, so it's a really versatile weapon. You'll just have to be careful to not to be hit with you own explosions, but it's actually not that hard, specially if you run fast. An excellent ranged weapon, probably the best in the game along the Assault Rifle.

    You can use the Statis Generator with Heavy Weapons 3, but the ammunition type for this weapon, prisms, does not start to appear until the end of the game. It can paralyze an enemy, but you already have tons of Psionic abilities with similar uses. I guess is good for paralyzing enemies without using PSI points.

    You won't use the Fusion Cannon, since it requires 6 on Heavy Weapons, but a Grenade Launcher is actually superior, so you aren't missing anything. It also uses prisms as ammunition, which is not exactly the most abundant ammunition type.

  • Exotic Weapons: you won't be able to use Exotic weapons until you advance a bit in the game. The Exotic Weapons are the Crystal Shard, the Viral Proliferator and the Annelid Worm Launcher.

    The Crystal Shard is the most powerful melee weapon of the game, and investing points on Exotic Weapons will make it even stronger. It's extremely powerful, specially against organic enemies, but it will get the job done also with robots. Problem is that you will also require a Research skill value of 4 to be able to use this weapon, so it's an expensive investment. It's a terrific melee weapon, anyway. If you increase a bit your Exotic Weapons skill, maybe up to 3, its damage will be even better. Combined with Adrenaline Overproduction, it will kill virtually anything in one hit.

    The Crystal Shard, along with the Wrench, does not damage the final enemy, so you are going to need you OSA powers for that combat, or a Laser Rapier, don't forget that.

    The other two Exotic Weapons are simply worthless. They require an insane amount of Research skill, 5 and 6 respectively, their ammunition type, Annelid Worms, is extremely scarce, and they are actually terrible weapons which kill you faster than they kill your enemies. Forget about them. If you choose Exotic Weapons, do it only for the mighty Crystal Shard.
6.0 - Tech skills
Tech skills can be important for the OSA characters. Hack and Research are always useful, and the other skills will be also useful if you use ranged weapons, for repairing and upgrading them.


The five Tech skills

  • Hack: an important skill. It helps you to disable security cameras, taking control of automated turrets, opening supply boxes, and hacking Replicators in order to make their prices cheaper. An OSA character should hack at least a Replicator which sells PSI hypos, in order to buy them at a lower price, so Hack is an important skill to have.

    You won't need Hack to be too high, anyway. Get Hack skill to a value of 3 or 4, and that, combined with a Cyber-Affinity of 3 or 4, and your Psychogenic Cyber Affinity Tier 1 power, will turn you into a very decent hacker. You won't be able to hack certain things in the final levels, but they're secondary anyway.

    You can temporarily increase you Hack skill by 1 by using the ExpertTech implant (it also increases Repair and Modify by 1), but it's ony useful for making the mini-game easier, since this implant's skill bonuses do NOT apply to meeting minimum skill requirements.

  • Repair: Repair is important if you use non-melee weapons. Ranged weapons degrade with use, having a maintenance value between 10 and 0. When they get to 0, they become completely unusable. Repair will allow you to repair jammed weapons, and to get them to a maintenance level of 2. This is actually enough for making your weapons usable forever, since you can always continuously repair them when they get again to maintenance level 0.

    As with Hack and Modify, using the ExperTech Implant will make the mini-game easier, but won't help you to reach the minimum skill requirements.

    Most of the ranged weapons an OSA will use (read the Combat skills section) only require a value of 1 or 2 for being able to repair them. Upgrade you skill up to the minimum value that you need for repairing your weapons of choice.

    -The Pistol and the Laser Pistol require Repair 1 to repair them.
    -The Shotgun and the Grenade Launcher require Repair 2 to repair them.

  • Modify: you can do two special modifications for each ranged weapon to upgrade their damage, among other things.

    The second modification tends to require a high Modify skill value, but there is a total of four hidden items in the game called French-Epstein devices which will allow you to modify your weapons without the required skill level.

    So, a more efficient Cyber-modules approach is to get just enough Modify skill points for being able to do the first modification, and then use a French-Epstein device to get the second upgrade. You will be able to fully upgrade four weapons that way.

    Or, if you really know what you're doing, don't get any Modify points, and use your four French-Epstein devices for fully upgrading two weapons of your choice.

    -Pistol requires Modify 1 for the first modification, and 3 for the second one.
    -Shotgun requires Modify 1 for the first modification, and 3 for the second one.
    -Laser Pistol requires Modify 2 for the first modification, and 4 for the second one.
    -Grenade Launcher requires Modify 1 for the first modification, and 3 for the second one.

    As with Hack and Repair, using the ExperTech Implant will make the mini-game easier, but won't help you to reach the minimum skill requirements.

  • Maintain: Maintain upgrades the maintain value of your weapons by using disposable maintenance tools, up to the ideal maximum value of 10. You don't really need this skill, since Repair can guarantee that your weapons never get permanently jammed, but if you don't like to spend nanites in continuously repairing weapons, this is an important skill.

    A value of at least 2 or 3 is always recommended, since you will repair your weapons spending far less maintenance tools than with a skill level of 1. Investing more points into this skill is unnecessary, except if your weapon of choice has a higher minimum skill requirement. The most obvious example is the Assault Rifle, which needs Maintain 4.

    Every point in Maintain also increases the battery capacity of your implants, Powered Armour and Energy Weapons, and that's a very nice thing.

  • Research: Research is an important skill which allows you to investigate enemies' internal organs in order to increase your damage against them, and to research certain items and implants otherwise unusable.

    There is a LabAssistant Implant, which increases your Research skill by 1. This implant is different from the ExperTech implant, since this one will actually apply to meeting minimum skill requirements. You need at least 1 point in Research for completing the game, but you can actually get this point by using the implant.

    The most useful researchable things on this game (ALL of the the enemies' internal organs) only require a Research skill of 1, so I would recommend not getting Research at all, and using the implant.

    There are researchable special implants, but most of them are useless, and the default implants are actually far more useful.

    The only exception to this Research rule is if you want to use the Crystal Shard, which requires Research 4. In that case, get Research to 3, and use the implant.
7.0 - O/S Upgrades
As mentioned in the Basics section, at four points of the game, you will find a special O/S upgrade station, which will offer you a permanent bonus ability for your character.

There are 16 available O/S Upgrades, and at the end of the game, you will have selected 4 of these 16 upgrades. As with Psionic abilities, there are a lot of O/S upgrades that are useful, but others are worthless.

You will find the first and second O/S Upgrade machines quite soon in the game, but the third and fourth are not found until very advanced in the game, so you should be selecting the most important upgrades first.

One of the four special O/S upgrade stations.

These are the 16 available O/S upgrades:

  • Strong Metabolism: Damage from radiation and toxins reduced by 25%.

    You already have a Hazard Suit for avoiding most of the Radiation and Poison damage, you don't need this upgrade.

  • Pharmo-Friendly: Extra 20% Benefit from all Hypos.

    Since you're an OSA, you will use a lot of PSI hypos, which give you 20 PSI points. With this upgrade, you would gain 24 PSI points. It can be a useful upgrade, but I don't consider it to be really THAT useful. And when you get the Item Recycler, you will get a lot of nanites for purchasing PSI hypos anyway.

    I also prefer another O/S upgrade, Replicator Expert, which allows you to purchase PSI hypos at a lower price. Combining both upgrades at the same time would be complete overkill.

  • Pack-Rat: Adds three extra inventory slots.

    Not really useful. Use the +2 Strength Psionic ability, and a +1 Strength implant if you really need more inventory space.

  • Speedy: Movement speed increased by 15%.

    This can be reasonably useful, but I don't consider that it's really an important upgrade. Get a high Agility and you will already run really fast without this upgrade.

  • Sharpshooter: Each shot with a ranged (Non-Psionic) weapon does 15% more damage.

    An excellent upgrade to have if you use ranged weapons.

  • Naturally Able: One time bonus of 8 Cyber Enhancement Units.

    The worst O/S Upgrade of all. Don't EVER consider taking it. There are more than 850 Cyber-modules in the game, 8 more don't make any real difference.

  • Cybernetically Enhanced: Allows the use of two implants at once.

    A REALLY good O/S Upgrage, if not the best. Implants make your character extremely versatile, and wearing two of them at the time it's even better. Consider this upgrade seriously in any character build. It has only one limitation: you can't use two of the same implant at the same time. For example, you can't equip two +1 Strength or two +1 Agility implants at the same time, but you can mix them.

  • Tank: Increases maximum hit points by 5.

    A really nice upgrade if you're playing on Hard or Impossible difficulties. In Impossible, an Endurance point gives you 3 HP, so this upgrade is like getting almost two points of Endurance for free. On lower difficulties (Easy and Normal), this upgrade is pointless, since you have tons of HPs anyway.

  • Lethal Weapon: Increases all hand-to-hand damage by 35%.

    An excellent upgrade if you're a melee character, and chances are that you are, being an OSA.

  • Security Expert: +2 hacking skill (If you already have at least 1 point of skill) applied only to security computers.

    Useless. Security stations tend to be easy to hack, and you're going to be a decent hacker anyway without this.

  • Smasher: You can execute overhand attacks with melee weapons.

    Smasher is a special melee hit, almost identical to the strong melee attack from Thief: the Dark Project, which also uses the Dark Engine and is also developed by Looking Glass Studios. It's slower than the regular melee blow, but it provides a remarkable damage bonus. It's even better if you combine this with the Lethal Weapon O/S upgrade, which already increases melee damage by 35%.

    Due to questionable testing, the Crystal Shard is bugged when using this skill, adding FAR more damage than it's supposed to do. As if it wasn't powerful enough already.

    - Wrench
    Regular damage: 7
    Smasher damage: 9

    - Laser rapier
    Regular damage: 11
    Smasher damage: 14

    - Crystal shard
    Regular damage: 12
    Smasher damage: 27 (It was supposed to deal 15 damage, but due to a bug, the Crystal shard's smasher attack actually deals 12 + 15 = 27 damage)

    - Cerebro-Energetic Extension (Tier 4 Psionic power)
    Regular damage: 18
    Smasher damage: 24

  • Cyber Assimilation: You can extract a diagnostic/repair module from any destroyed robot. You can use this item to heal 15 hit points.

    It's a useful upgrade, but there are clearly better upgrades to get. If you're in need of additional healing, Pharmo-Friendly and Replicator Expert are far more versatile.

  • Replicator Expert: All items in replicators cost 20% less.

    An interesting upgrade, specially for an OSA, who heavily depends on purchasing PSI hypos from Replicators. On Impossible difficulty, most of the hacked Replicators sell PSI hypos for 100 nanites, but there are certain hacked Replicators which sell them for 80 nanites. With this skill, the price will go down even further, to 64 nanites. That's a great price indeed.

    I personally consider that 80 is an already good price, but if you really want tons of PSI hypos, this is the ideal upgrade. I prefer this upgrade over Pharmo-Friendly, since it's also useful for buying cheaper ammunition, if your character uses ranged weapons. And other types of hypos are also made cheaper, so Replicator Expert always has a slight advantage over Pharmo-Friendly.

  • Power Psi: Psionic burnout no longer damages you.

    Not really useful. Just be careful when using your psionic powers, and you won't suffer psionic burnout.

  • Tinker: Nanite cost for making weapon modifications is 50% cheaper.

    Completely useless. Modifiying weapons is already cheap, and you will do it like once or twice in the whole game, and only if you use ranged weapons.

  • Spatially Aware: Automap for each level is automatically filled in.

    Useless. Explore the map by yourself, this games is about exploring the levels.
8.0 - Armours and suits
Protecting youself with a decent armour is important, since enemies tend do a great deal of damage to unarmoured enemies.

Light Combat Armour


- Strength requirement: 2
- Damage reduction: 20%

You will find this armour very soon, and it's the most basic form of protection. Its Strength requirement is really low, and it will be very helpful for your first steps in the game.

However, its protection is really mediocre, so any character must aspire to use better armours than this one as soon a they find them.

Medium Combat Armour


- Strength requirement: 4
- Damage reduction: 30%

This armour's protection is decent, but it pales in comparison to the Powered Armour, which is found approximately at the same time as this one. I recommend using the Powered Armour whenever possible, but keeping this one in the inventory, just in case you run out of battery in your Powered Armour and you're far away from a recharge station, or if you don't have PSI points for using Electron Cascade.

Medium Armour's Strength requirement is also relatively high, so you'll maybe have to use a +1 Strength implant or your Tier 2 +2 Strength power to be able to use it, since, as an OSA character, upgrading your Strength value is not a big priority. You'll maybe get later to Strength 4, but it will take some time.

Heavy Combat Armour


- Strength requirement: 6
- Damage Reduction: 40%

You will find this armour when you are considerably advanced in the game. It's the best "standard" armour in the game, but it still offers inferior protection compared to the Powered Armour, and its Strength requirement is really high. As an OSA character, you'll never get to a Strength value of 6, so you will have to use your +1 Strength implant and/or your Tier 2 +2 Strength power to be able to use it.

When you get this armour, keep it in your inventory as a backup, just in case your Powered Armour runs out of battery, replacing the Medium Armour for that purpose.

Powered Armour


- Strength requirement: 3
- Damage Reduction (charged): 50%
- Damage Reduction (discharged): 0%
- 100 points of battery, loses 1 battery point each 5 seconds.

The best armour in the whole game. It offers by far the best protection, its Strength requirement is really low, and you'll find it soon in the game.

Of course, all of its virtues come along also with a big drawback: as the implants, it requires battery to work. If the armour runs out of battery, it will become useless, offering no protection at all.

It has a maximum value of battery 100 (you can get the maximum battery up by 10 points for each Maintenance point you have), and consumes a point of battery for each 5 seconds equipped. So you can use this armour for 500 consecutive seconds (8 minutes and 20 seconds).

The key with this armour is knowing well where the Recharge Stations are. And also, since you're an OSA character, making a wise use of your Tier 3 power Electron Cascade will be extremely useful. Don't forget to unequip this armour when there are no enemies close to you. Using this armour wisely, you'll notice than its drawback is actually not that important.

Don't forget also to have a backup Medium or Heavy armour in your inventory just in case you run out of battery and you can't recharge it right now.

Hazard Suit


- Strength requirement: 1
- Damage Reduction: 0%
- Radiation damage reduction: 75%
- Toxic damage reduction: 75%

The Hazard Suit is a useful item for certain irradiated areas of the game. Whenever you get to an irradiated area, remove your armour and equip your Hazard Suit, or you'll die really fast. Be aware that you can still find some enemies in certain irradiated areas, and that the Hazard Suit doesn't provide any protection against regular damage, so be careful.

The Hazard Suit is also useful when dealing with Annelid eggs, and specially spiders, who inflict a great deal of toxic damage.

Even with the Hazard Suit, you will still suffer a 25% of radiation and poison damage, so try to get a decent Endurance value, since it will also help you to reduce the radiation and poison damage you receive.

If you have enough inventory space, I recommend bringing always your Hazard Suit with you, just in case. If not, drop it in a safe and easily accesible place, and don't forget where is it, since you could need it later.

WormSkin Armour


- Strength requirement: 1
- Research requirement: 3
- Damage Reduction: 20%
- Radiation damage reduction: 30%
- Toxic damage reduction: 30%
- Provides a +2 Psionics bonus when equipped
- Continuously drains your PSI points while equipped

This armour appears really late in the game, and it's essentialy useless. Its only gives you the same protection as the weak Light Armour, and its Radiation and Toxin protection pales in comparison to Hazard Suit's protection. WormSkin tries to be some kind of "universal" armour, but it's really mediocre overall, and it also requires to have Research 3 for being able to use it.

Its +2 Psionics could be extremely interesting for an OSA character, but since it also constantly drains your PSI points, it's useless. You will do well getting a high Psionics value, and using your +1 Psionics implant. You don't need this armour.
9.0 - Implants
If you have read the whole guide, you will know by now that implants are really useful for boosting your stats and skills. Your character will become really versatile with a wise use of his implants.

The Cybernetically Enhanced O/S Upgrade is heavily recommended for any type of character, since it allows your character to equip two implants at the same time. Just remember that you can't equip two equal implants at the same time, they have to be different implants. For example, you can't equip two +1 Psionics implants at the same time, but you can equip a +1 Psionics implant and a +1 Agility implant at the same time.

As with the Powered Armour, implants consume battery when equipped, and will become useless once discharged. They have 100 batery points (you can get the maximum battery up by 10 points for each Maintenance point you have), and consume 1 battery point for each 10 seconds equipped, so they have exacty twice the battery of a Powered Armour. You can use an implant for 1000 consecutive seconds (16 minutes and 40 seconds).

Most of the implants don't have any requirements for equipping them, but there are some special implants found later in the game which require Research for being able to use them. However, these special implants tend to be of questionable use, and the most useful implants are actually the standard ones.

Regular implants

These are the implants which don't require any requisites for equipping them.

  • BrawnBoost Implant: +1 Strength bonus

    A useful implant. You will use it usually when your inventory is full, and you need some additional space, or when you want to equip and armour and you don't have enough Strength.

  • SwiftBoost Implant: +1 Agility bonus.

    A great implant. Running fast is better than running slow. Equip this implant when you know that you're going to fight enemies, or simply when you're exploring the level for moving faster.

  • PsiBoost Implant: +1 Psionics bonus

    Extremely useful for an OSA character. Your powers will get better and/or last longer the higher your Psionics attribute is, so you will use this implant a lot.

  • EnduranceBoost Implant: +1 Endurance bonus

    A temporary Endurance bonus is not really that useful, so this implant has few uses. However, there's a situation when it's useful: when exploring irradiated areas, it's nice to have a bit more of Endurance for resisting better the radiation damage.

  • ExperTech Implant: +1 to Hack, Repair, and Modify skills

    A useful implant, specially for mediocre hackers. Equip it whenever you have to hack something, since each Hack point decreases by 10% the difficulty for taking control of a node in the hacking mini-game. It will also help you in the same fashion with the far less common Repair and Modify mini-games.

    However, as I mentioned into the Tech skills section, this implant's skill bonuses do NOT apply to meeting minimum skill requirements. This implant will only help you by making the mini-games easier.

  • LabAssistant Implant: +1 to Research skill

    This implant is really useful. It's different from the ExpertTech implant, since this implant will actually help you to meeting minimum Research skill requirements.

    Most of the useful researchable things in the game only require a Research skill value of 1, so with this implant, you actually won't need to invest any Cyber-Modules on Research, except if you want to use some specific items, such as the Crystal Shard, which requires a Research skill of 4. And even then, you will only have to upgrade your skill to 3 thanks to this implant.

Special implants

  • WormMind Implant

    - Requires Research 3

    When this implant is equipped, 25% of the damage you recieve will drain PSI points instead of health points. This is a really nice implant for Marine or Navy characters who don't have any use for their PSI points and PSI hypos, but for an OSA character it's an useless implant, since PSI points are really important for your subsistence.

  • WormBlood Implant

    -Requires Research 4

    You can find often worm pools on the floor, which damage you if you step over them. By equipping this implant, you can right click on one of those pools, and "eat" it, destroying the worm pool, and healing all your health.

    This is an excellent implant, but I don't recommend spending Cyber-Modules for upgrading Research only for being able to use this implant. But if you're going to get Research anyway for using the Crystal Shard, you will be also able to use this implant, which is a nice thing.

  • WormHeart Implant

    - Requires Research 5

    It stops all of the toxin damage, and heals 1 HP every 30 seconds. If you remove it, or if it runs out of battery, it poisons you, filling your Toxin meter up, and quickly killing you if you don't spend a lot of anti-toxin hypos.

    This implant's bonuses are nice, but its drawback is annoying.

    Depending of if you can permanently sustain your implant battery (using recharge stations, portable batteries, and/or the Tier 3 psi power Electron Cascade) or not, this implant will be useful or completely worthless.

    An additional drawback is that It requires simply too much Research.
10.0 - Nanites, Replicators, Item Recycler
Nanites are System Shock 2's money currency. They're used for buying ammunition, medical hypos, PSI hypos and other items from spending machines known as Replicators.

Nanites are very important for almost all of the character builds, but specially for OSA characters, who are in a deep need of purchasing PSI hypos from Replicators for refilling their PSI points, since there are very few PSI hypos hidden in the levels. Of course, Replicators will be also useful for OSA characters who use ranged weapons, for buying ammunition if they need it.

The first rule that you must know is that Replicators prices tend to be high, but that hacking them will lower their prices. Don't EVER buy from an unhacked Replicator, that would be a waste of nanites.

Another important thing to know is that not all of the Replicators have the same stock of items, and that some Replicators sell certain items cheaper than other Replicators.

For instance, on Impossible difficulty, most of the hacked Replicators sell PSI hypos for 100 nanites, but there are certain Replicators that, when hacked, sell the PSI hypos for 80 nanites. You SHOULD find and never forget the location of one of these cheap Replicators, and ALWAYS buy your PSI hypos from them. Avoid the expensive ones.

You can further lower Replicator prices by getting the O/S upgrade Replicator Expert. Replicator Expert lowers by 20% all Replicator prices. Buying a PSI hypo from a hacked cheap Replicator will only cost you 64 nanites. 80 nanites for a PSI hypo is an already very nice price, but consider taking this upgrade if you also use Replicators for buying ammunition.

As you advance through the game, you will find a decent amount of nanites, but there is a way for earning a lot more of them, and that is using a special item that you will find relatively late in the game, the Item Recycler.

The Item Recycler is a very useful item which allows you to "recycle" ammunition, implants, and other items, transforming them into nanites. There is a Tier 4 power, Molecular Transmutation, which does something similar to the Item Recycler, but that psionic power costs Cyber-Modules to buy, and PSI points to use, so it doesn't make any sense to use it instead of the Item Recycler.

With the Item Recycler you can earn tons of nanites. Recycle any ammunition type that you are sure that you're not going to use, and also any repeated implant that you find. For example, you don't need more than one 1+ Strength implant, so recycle any new +1 Strength implant that you find.

OSA melee specialists can actually recycle ALL the ammunition that they find, since they don't use ranged weapons. They can become really rich.

Since the Item Recycler is not found until relatively late in the game, I recommend you to use a safe room for storing any items and ammunition that you want to recycle when you finally find the Item Recycler.

The first room that you visit in the Med/Sci deck, the one with the four upgrade stations, is the safest room in the game, since enemies don't spawn there, and it's the one that I personally use as a storage room. Do NOT store stuff in the Von Braun's elevator, there's a bug that sometimes makes items disappear from there for no reason. And the Med/Sci room is anyway very close to the elevator, so it's a very convenient place to store your items.

There are silly useless items such as plants, cigarettes and magazines which can be recycled, and they will grant you a few nanites, but they give far less nanites than ammunition clips or implants, and they occupy far more inventory space, so I personally wouldn't waste time transporting them to your storage room. There are also some items that you can't recycle, such as armours.

You can see here the Item Recycler in the inventory, and a big pile of multiple types of ammunition waiting to be recycled for nanites

Ignoring my own advice, there was an occasion on which I wasted time storing plants, cigarettes and other useless items. All that huge pile of items granted me less than 100 nanites.

11.0 - OSA character creation
When starting a new game, you will have to select your class (Marine, Navy or OSA). If you have read the whole guide until this section, chances are that you will select OSA :D

After that, your character will train for three years. Each year of training gives you the chance of selecting an upgrade for your character from three available options.

Marine, Navy and OSA characters have completely different default and selectable upgrades. Let's see in more detail the OSA character creation:

OSA default upgrades

These are the OSA default upgrades that you will always receive, independently of the options you choose during the 3 years training.
  • Tier 1 Psi unlocked
  • Tier 2 Psi unlocked
  • Tier 1 power Projected Cryokinesis
  • +1 Strength
  • +1 Agility
  • +1 Cyber-affinity
OSA training - Year 1

You will have to select one among these three Tier 1 powers:
  • Psychogenic Cyber Affinity
  • Kinetic Redirection
  • Psycho-reflective Screen
Both Psychogenic Cyber Affinity and Psycho-reflective Screen are really useful, and you should get both of them anyway, so grab here the one you prefer to have sooner. Ignore Kinetic Redirection.

OSA training - Year 2

You will have to select one among these three upgrades:
  • +2 Psionic
  • +1 Research
  • +2 Endurance
+2 Psionic is an obvious great choice since your powers will be decent since the beginning, but +2 Endurance is also a good option if you prefer to be tougher from the start. Both are equally viable options. +1 Research is not a good option, since you won't need Research anyway if you use the LabAssistant implant.

OSA training - Year 3

You will have to select one among these three Tier 1 powers:
  • Psychogenic Agility
  • Neuro-Reflex Dampening
  • Remote Electron Tampering
Psychogenic Agility is by far the best of these three powers. Select it.

49 Comments
Fashion_mage Feb 9 @ 3:49pm 
I sometimes wonder if I'm playing the same game these guide writers are playing, they keep saying "just use your ears" in regards to Enhanced Motion Sensitivity, but there are tons of instances where enemies literally spawn in right next to you (which you would know if you used the radar of course).

@Anguila Don't use the "System Shock 2 Tool" in other words, got it.
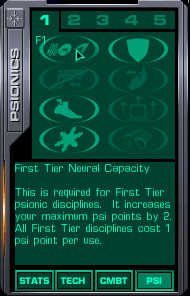
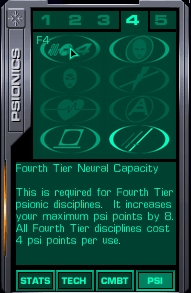
Anguila Oct 29, 2024 @ 1:11am 
Just be aware that System Shock 2 Tool (which I advise everyone to use) will remove some of the quirks highlighted in this guide. For example, Localized Pyrokinesis will not grant you resistance to explosions...
Ciaran Zagami Sep 12, 2023 @ 10:11am 
In the agility section you claim the laser rapier needs an agility of 4.
It only needs 3.
SkyBlueFox Mar 4, 2023 @ 12:29pm 
I think this may be because I'm using a couple mods (Redux and SHTUP, specifically), but in my game, the Naturally Able upgrade gives me 20 modules instead of just 8.

I imagine it still probably doesn't change its rating *that* much, but I figured I'd just ask for two cents anyway. I generally stick with Normal so it's still not that big of a deal, but hey :U
Coprofagio  [author] Jun 25, 2022 @ 11:58am 
Molecular Transmutation could be an interesting power, but, the way the game is made, it's pretty unefficient unfortunately. The reason is the Item Recycler.

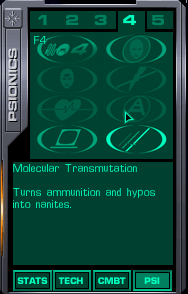
If it was a low level power, Tier 2 maybe, that you could get early in the game and spending few cyber-modules, then it would be interesting, since you could use it far earlier than the Item Recycler appears in the game.

But since it's a Tier 4 power, it will take time to get it anyway, and it will cost a lot of cyber-modules. And using it costs 4 PSI Points each time, while the Item Recycler is completely free to use.

In short, the Item Recycler is a far more efficient way to transform things into nanites. In fact, the Item Recycler is quite broken, just like so many mechanics in SS2.

Now, if you want to self-impose the limitation of never using the Item Recycler, then Molecular Transmutation becomes interesting, since its only real problem is not being bad, but being completely outclassed by the Recycler.
Jack left town May 26, 2022 @ 5:31pm 
Always invest in Molecular Transmutation for thousands of nanites recycling certain ammo types (prisms, worms and blue grenades mainly). Gotta spend psi hypos to make psi hypos.
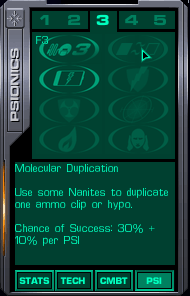
Duplication is not must have, but you get infinite psi booster shots and you can dupe worms too if you want to use annelid guns a lot.
david copperfield Aug 23, 2021 @ 8:38pm 
I've been wanting to play a PSI character for a while, and this guide finally pushed me over the edge! This is good advice for the basegame, but as I'm using the cut content patch, a lot of the OS upgrades are a bit better!
Cube Plissken Dec 12, 2020 @ 10:35am 
Turns an OSA playthrough on Impossible into a relaxed pseudo speedrun. Thank you!
o_O Oct 31, 2020 @ 1:41pm 
Very useful guide, thank you!
Styks Apr 14, 2020 @ 10:08am 
I found out about the Crystal shard not damaging "The Final" enemy the hard way, on my third playthrough of a pure melee build, I simply could not beat the game, which sucked.
I made the unfortunate decision of having to spawn in a pistol, ammo, cyber modules and using console to open the weapons upgrade and and getting standard 1.

It was on that day my pure melee build was sullied. On the upside, I didn't randomly pull out a pistol that I didn't have in the final cutscene.

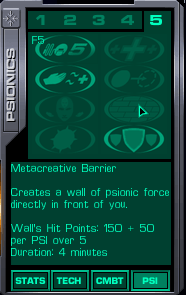
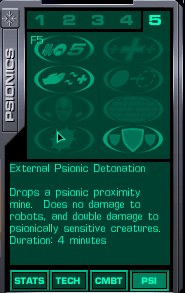
Something related to Psionics, the Metacreative Barrier is fun to annoy your friends with in multiplayer.