Fallout Shelter

Fallout Shelter

199 ratings
Expert Survival Mode Guide
By Zozano
Perfect vault layout! Powerful dwellers! Re-roll lunchboxes! and more!
4
2
   
Award
Favorite
Favorited
Unfavorite
Introduction
This guide aims to provide:
  • advanced tips
  • a comprehensive guide to vault layout
  • hidden combat information
  • how to re-roll lunchboxes

As of publishing this guide, my survival save has:
  • over 200 hours
  • obtained every achievement
  • maximised efficiency
  • kept all my dwellers alive
  • maintained a baby free zone

IMPORTANT WARNINGS
1. DO NOT UPGRADE YOUR VAULT DOOR!
2. DO NOT ALTER YOUR SYSTEM TIME!

1. The vault door cannot be downgraded. Upgrading it slows down invaders; the opposite of efficient.

2a. Your device time affects time in the game. There is a very specific way to modify system time to your advantage, but if you do it wrong, you may permanently and irreparably glitch your save.

2b. I will tell you how to do this safely in the section "Re-rolling lunchboxes"
What is Efficient?
Once you've reached the end-game content, the biggest liability is time during an incident.

There are many things you can do to reduce incident time:
  • crush rad-scorpions ASAP, they are your biggest threat
  • leave your vault door at level-1
  • send nearby dwellers to help control the incident
  • avoid upgrading your rooms, higher level rooms create powerful fires and pests
  • build your vault in a way that that eliminates the possibility of an incident spreading
The First Floor
1. DO NOT UPGRADE YOUR VAULT DOOR!

The fastest way to eliminate invaders is to let them in.
  • Occupy the vault door with two high HP dwellers, each with a Dragon's Maw.
  • Occupy the room succeeding the vault door with six high HP dwellers, each with a Dragon's Maw.
With this, ghouls and raiders will die in the vault door room, and deathclaws will die in the next.

The second room must be a 3-wide to have six dwellers occupy it, and level-1 to reduce the room depth.

As you upgrade rooms, they become deeper. A shallow room is the most efficient way of ending an incident quickly.

If an enemy loses all HP, they must walk to the foreground to die. (watching a fatally wounded enemy hobble from the back of a level-3 room to die between the doors is time consuming)

The room behind the 3-wide is free-game, I choose to train Endurance to my level-5 recruits there, as Endurance is the most important stat in the game.
323 vs 332
323 and 332 are layout preferences, it's the difference between symmetry from the second floor down, or an elevator that's connected to the end of your ground floor 3-wide room.

This is the 323 build:

I believe this is a better layout style, for every 2-wide room, is either empty or has an Advanced Reactor (level-2). This will give you enough power to negate rad-scorpion attacks, and for the dwellers to act as en emergency service to vacant rooms.
Dealing with Rad-Scorpions
The biggest waste of time is the rad-scorpion. They randomly teleport from room to room, draining your energy, and your patience.

This layout is designed to counteract the rad-scorpion foremost.
Notice that every room high-lighted in yellow is empty.
It is incredibly important to stagger your rooms in this fashion.

You want the ability to move all available dwellers on that floor to respond to any incident immediately.
Population Limit
To obtain the 200 dweller limit most efficiently, you will need:
  • 2x 3-wide Barracks (level-3)
  • 2x 2-wide Barracks (level-3)
  • 2x 3-wide Residence (level-2)
Total: exactly 200 dwellers.

However, peak efficiency is obtained well before 200 dwellers.
Also, high-level rooms invite high-level risks.
With the same 16 spaces, a more efficient layout would be:
  • 4x 3-wide Living Quarters (level-1)
  • 2x 2-wide Living Quarters (level-1)
Total: 148 dwellers

This is better, due to level-1 rooms generating the weakest fires and pests.
You do not need more than 148 dwellers.
Re-rolling Lunchboxes and Pet Carriers
Step 1 - Setup
Quit out of the game
Do the following
Then navigate to:
C:\Users\*\AppData\Local\
Replace the * with your Windows username
Find the folder FalloutShelter
Right-click > Send to > Desktop
Open the folder

Step 2 - Backup
Create a folder inside the FalloutShelter folder
Name it in this format: YYYYMMDDHHMM
Example: 201904061601
Copy the files for whichever vault you want to re-roll lunchboxes for
Example: Vault1.sav AND Vault1.sav.bkp
Paste them into the folder you just made

Step 3 - Check contents
Start the game up
Open your lunchboxes
Become disappointed in the results
Quit out of the game

Step 4 - Restore save game
Go back to the backup folder
Copy both files
Go back to the FalloutShelter folder
Paste and replace the files
Open the game again
You should have the lunchboxes you opened before

Step 5 - Patience
The contents of the lunchbox are dependant on a variable I haven't figured out
The contents of the lunchbox will re-roll over time.
Sometimes it's a matter of minutes, sometimes hours.
Open the lunchboxes again at a later time to see the contents changed
If you know the exact variable, tell me and I'll credit you in this section

Using this method, I managed to obtain over 20 legendary dwellers with only 130 lunchboxes.

Killdozer asks: Is this legal?
A: Hacking additional lunchboxes into the game is technically piracy. What I'm advocating for is not hacking. The EULA stipulates the user must not modify software files. However, the save files are found in the user directory, which means backing up and restoring files are within legal constraints.
Hidden Combat Information
The combat mechanics in the vault, and out on quests are very different.

Inside the vault, the damage output of a single dweller is the average damage of their weapon stats.
Example: A weapon with the stats 3-7, does exactly 5 damage.
All weapons share the same attack speed and it doesn't matter if their attack animations convey their attack, they do damage while standing still. There is no stagger function. All parties take shared damage from the opposing teams damage score.

Inside the vault, the only stat that influences their combat ability is Endurance; which dictates a dwellers total health, each time they level up. A level 50 dweller has no advantages to wearing a stat-boosting outfit in combat.

Wasteland explorers share the same basic combat mechanics.

While questing, the combat mechanics change drastically.
Besides the obvious critical hit multiplier, Agility affects attack speed, Perception lowers critical multiplier speed, Luck increases critical frequency.

Some weapons like the MIRV do area of attack damage, other weapons like Vengeance fire multiple rounds each attack.

The general consensus is that the Vengeance is superior to the Dragon's Maw while questing due to chance to stagger the enemy, and also switch targets mid-attack if the enemy dies with the first few shots. If you're doing low level quests it is most effective to arm one dweller with a MIRV and the other two with Vengeance's.

My questing dwellers also run with Expert Jumpsuit's (+7 Agility) to maximise DPS.
If you're bad at landing perfect critical attacks, you can change to the Heavy Vault Suit (+7 Perception) to slow down the critical multiplier even further.
High HP Dwellers
Please view this guide here for a great in depth explanation of how Endurance affects a Vault Dwellers HP; skip to "Dweller Naming and Tracking Maximum Health"
https://steamcommunity.com/sharedfiles/filedetails/?id=1277145964
gussmed essentially explains that to create a high HP Dweller, you'll need to max out their Endurance at the earliest possibility, then give them "Heavy wasteland gear" (+7 Endurance) until they hit level 50.

Personally, I don't like gussmeds Dweller naming convention, I much prefer to give each dweller a prefix of 3, 5 or 7, to denote which piece of gear they were wearing as they leveled up (obviously with max Endurance as a base stat). But how you wish to record your dwellers HP is personal preference.
Conclusion
Thank you for viewing my guide. If there is anything you think I've missed, please let me know, I will include it and give you credit. Thanks to gussmed who helped me to get to this point in the game, his guide listed above is fantastic, and should be used in conjunction with this one.
30 Comments
Zozano  [author] Apr 13 @ 4:08pm 
@GATTACA

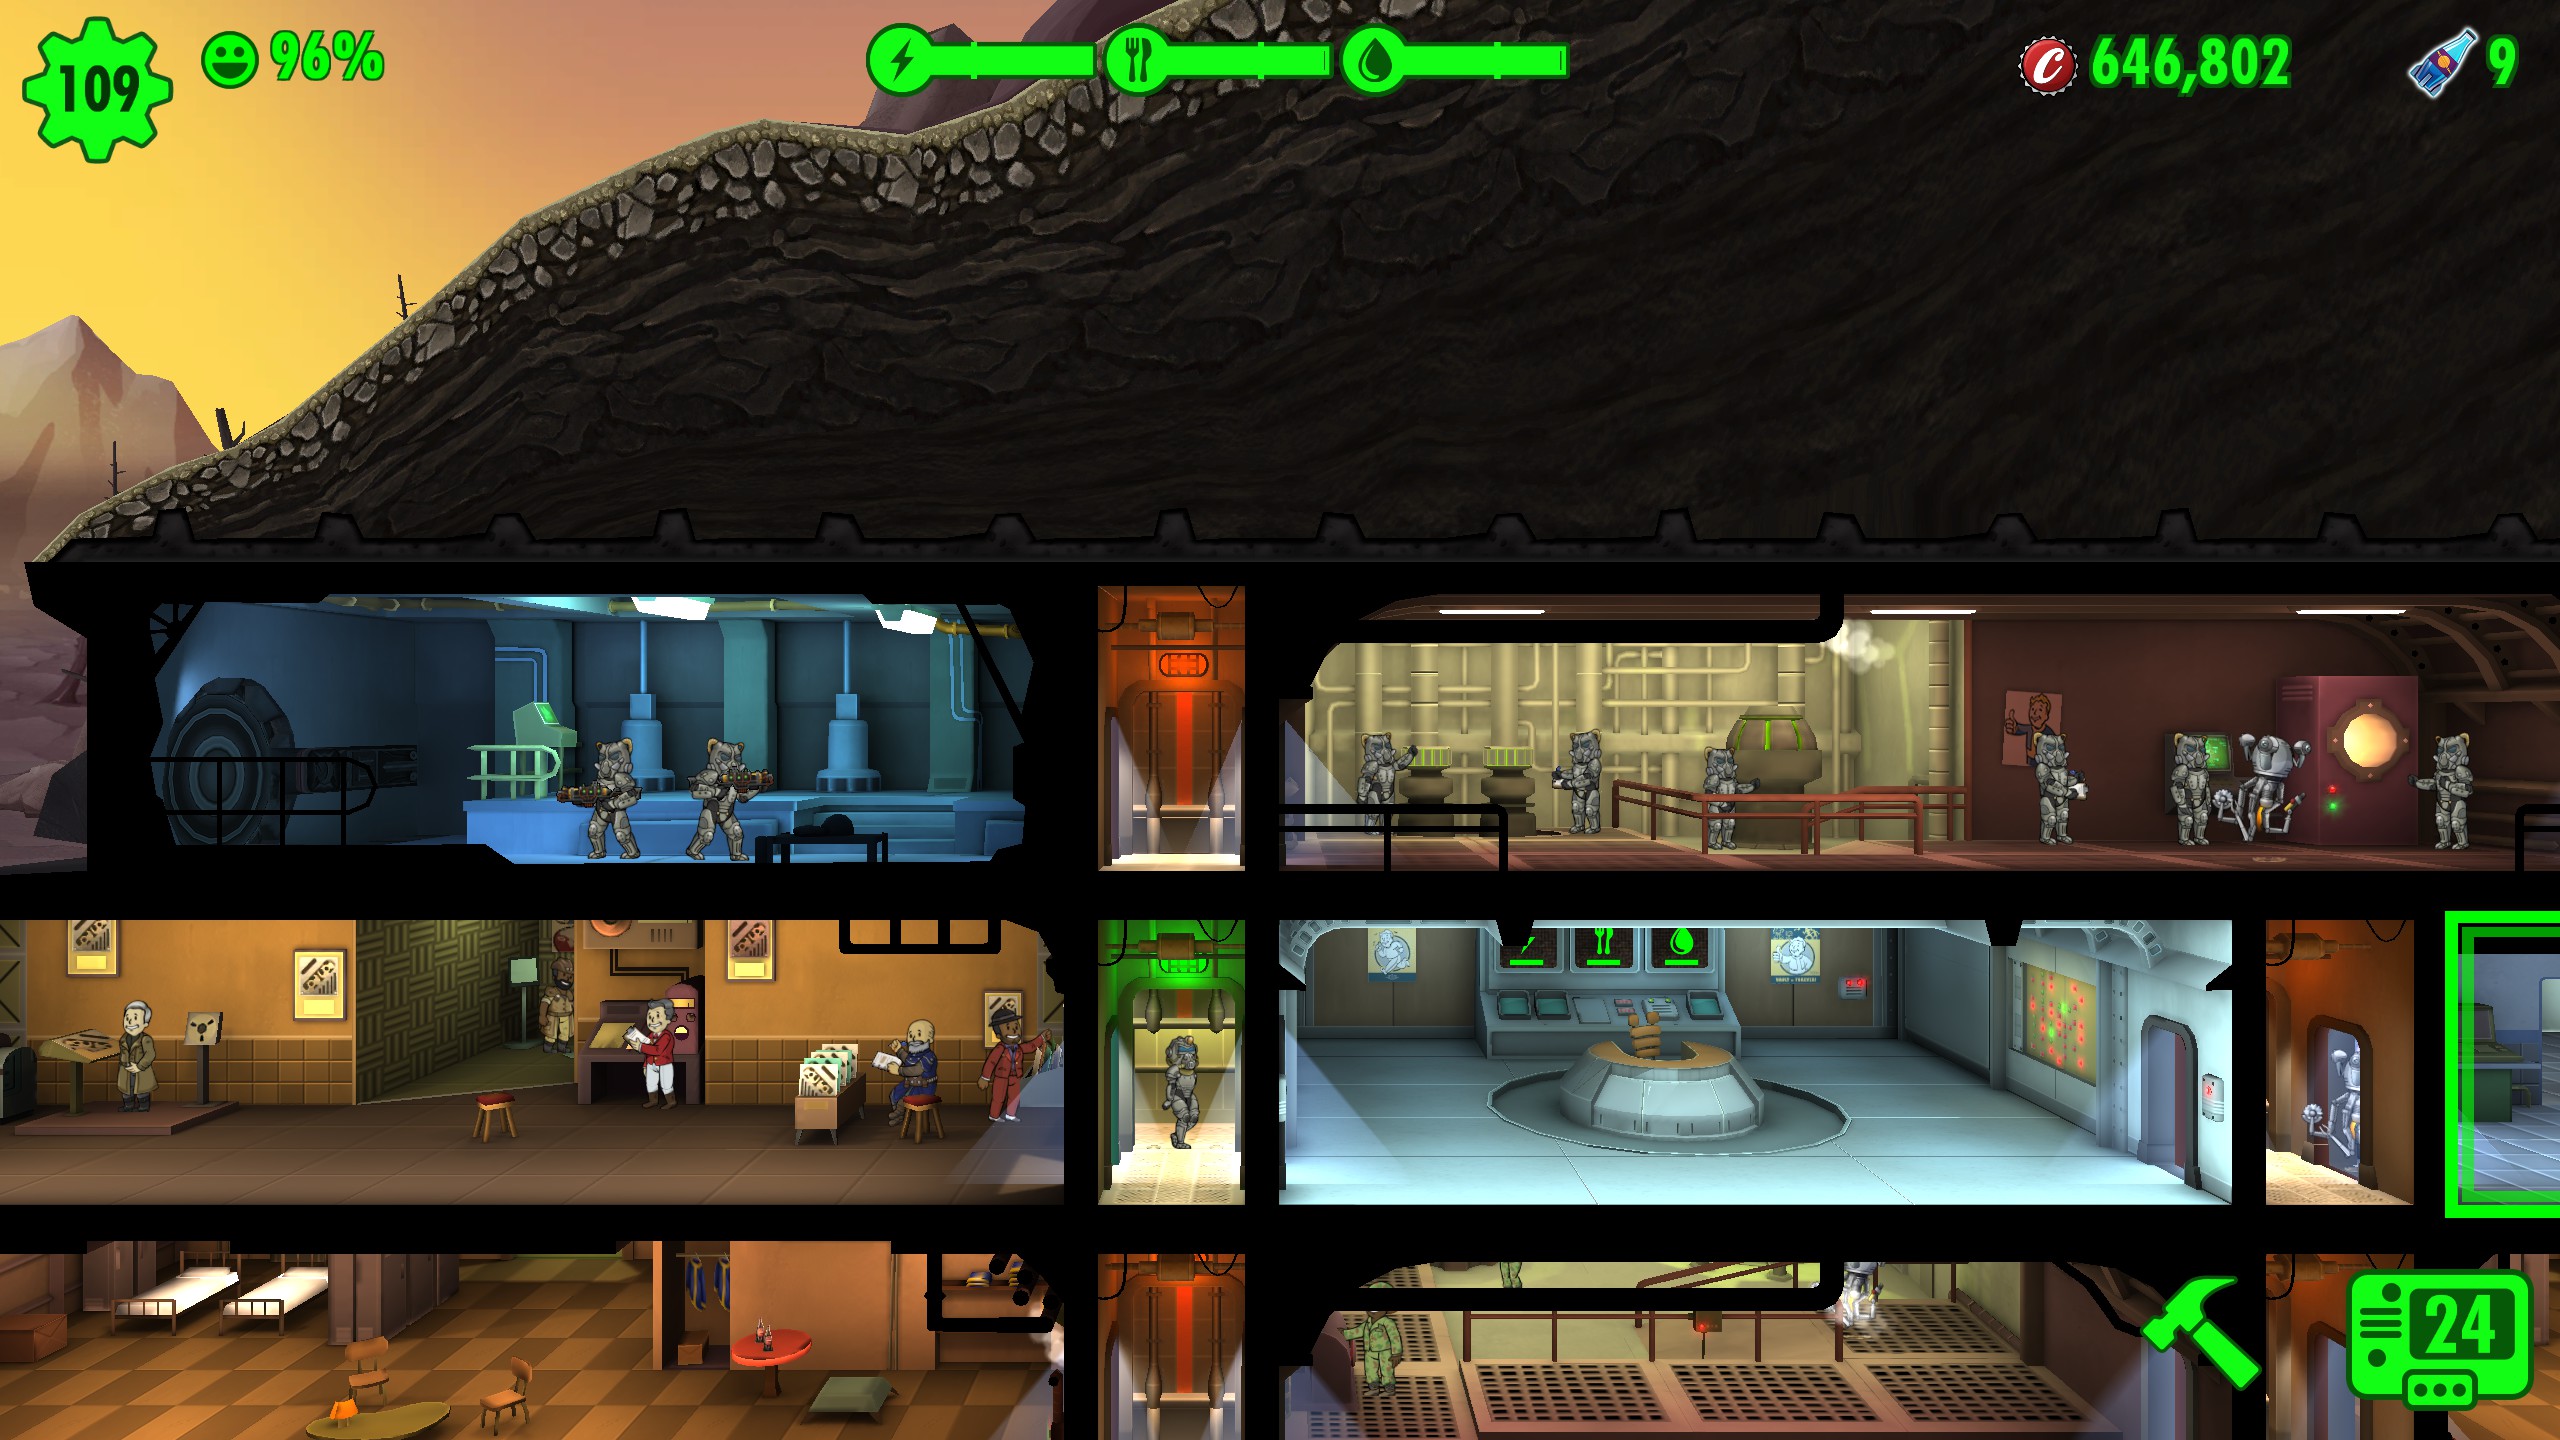
I don't have a video of the layout, but you can simply deduce the efficacy based on the principle.

There are two principles here, the first is the depth, which is related to efficiency, and the second is defence, which is related to safety.

A shallow (level 1) room, enables your dwellers to end an incident earlier than a deep (level 3) room. If an enemy moves to the far end of a room, then dies, they will hobble to the front of the room to fall down, this takes additional time.

In terms of layout, it simply speaks for itself. Enemies entering the vault will never make it past the second room on the top floor. Roaches and Scorpions need to be crushed ASAP. Having at least four dwellers in a room next to an empty room ensures minimal time is taken to intercept insects and fires, and can be eliminated before they spread.

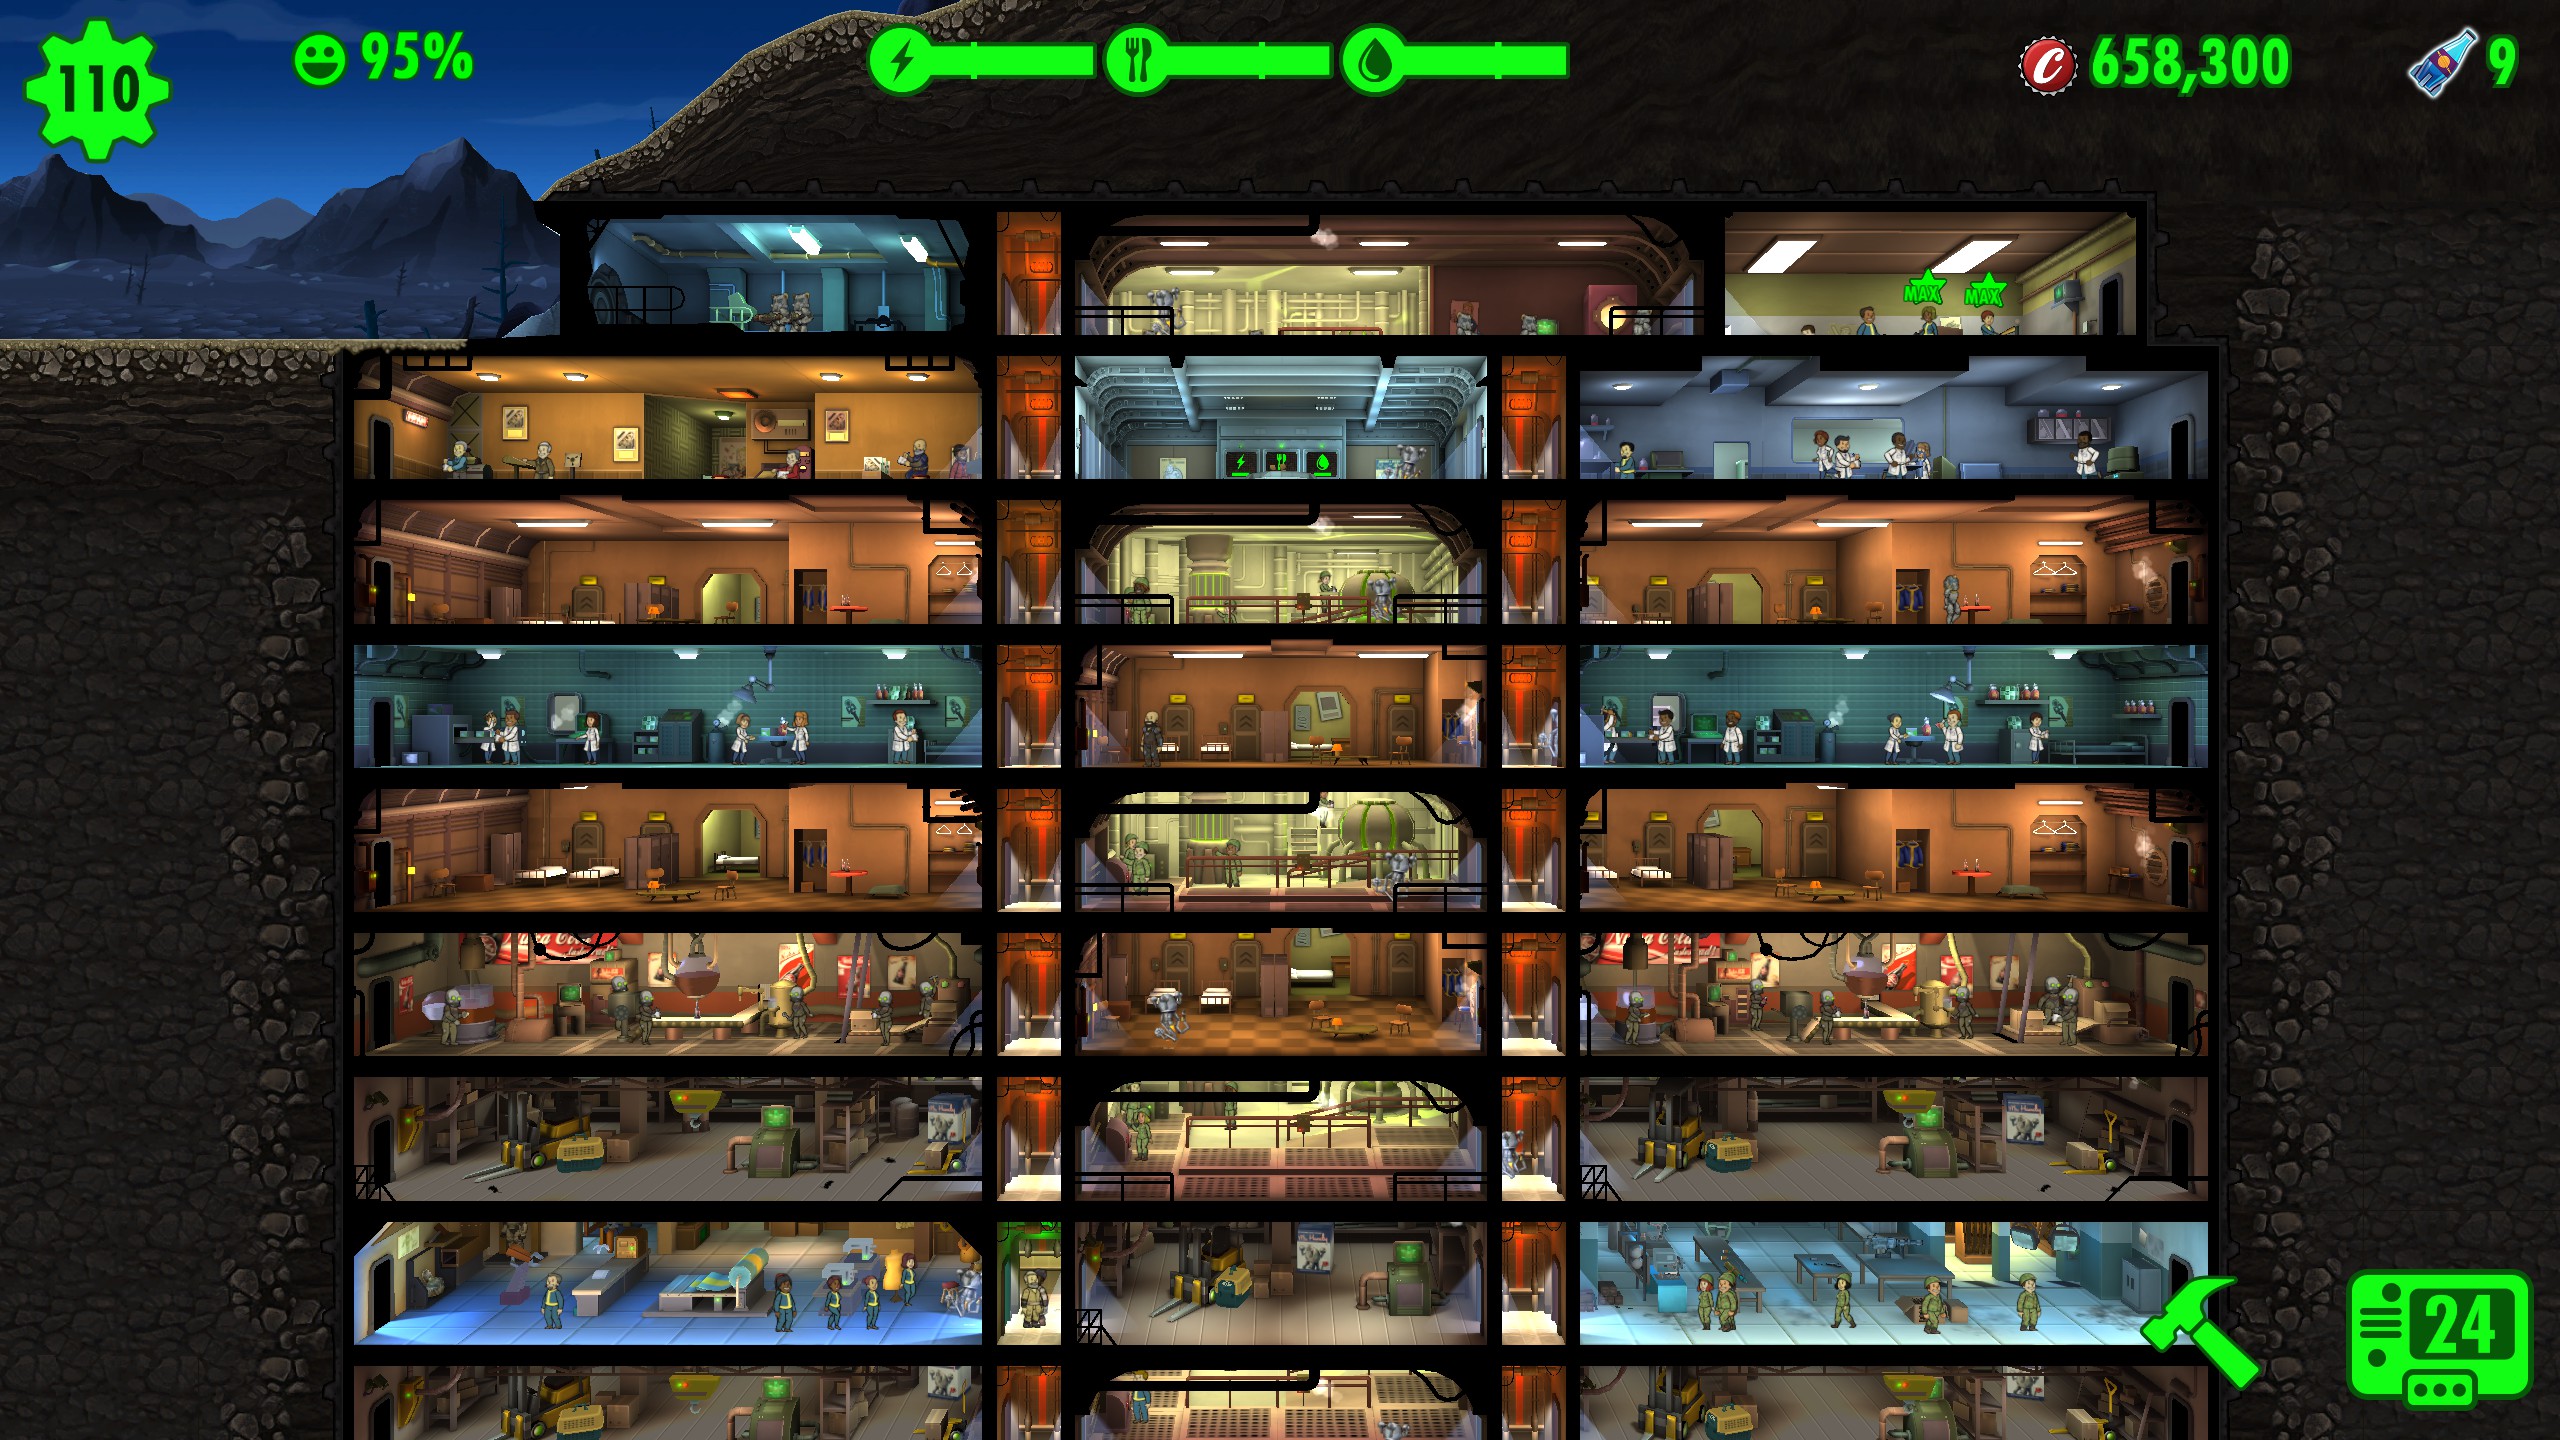
All occupied rooms generate more than enough resources, including stimpacks to heal up between incidents.
GATTACA Apr 13 @ 3:18pm 
I still don't understand your "shallow room" defense layout, is there a video for that?
Zozano  [author] Mar 23 @ 9:20pm 
@Skoglion

Just take your time downgrading and replacing stuff. Don't do too much at once or you'll find the resource economy of your vault take a nose-dive.

It might even be worth making a backup of your vault (see rerolling section) and see how stable your base is if you completely rearrange everything. If this doesn't work then you can load up your vault from before.
Skoglion Mar 23 @ 7:52pm 
I’m now worried about my base, since my base is radically different, im 35 pop with me having 3size level 3 resource building in an straight line down on the left, 2 rows of power then 2 rows of food and water, with the middle being mostly empty, the top row and second row, not connected to my resource buildings is my med section that I keep not populated so any internal incidents get auto resolved and 2 row below my med section is another not populated cut
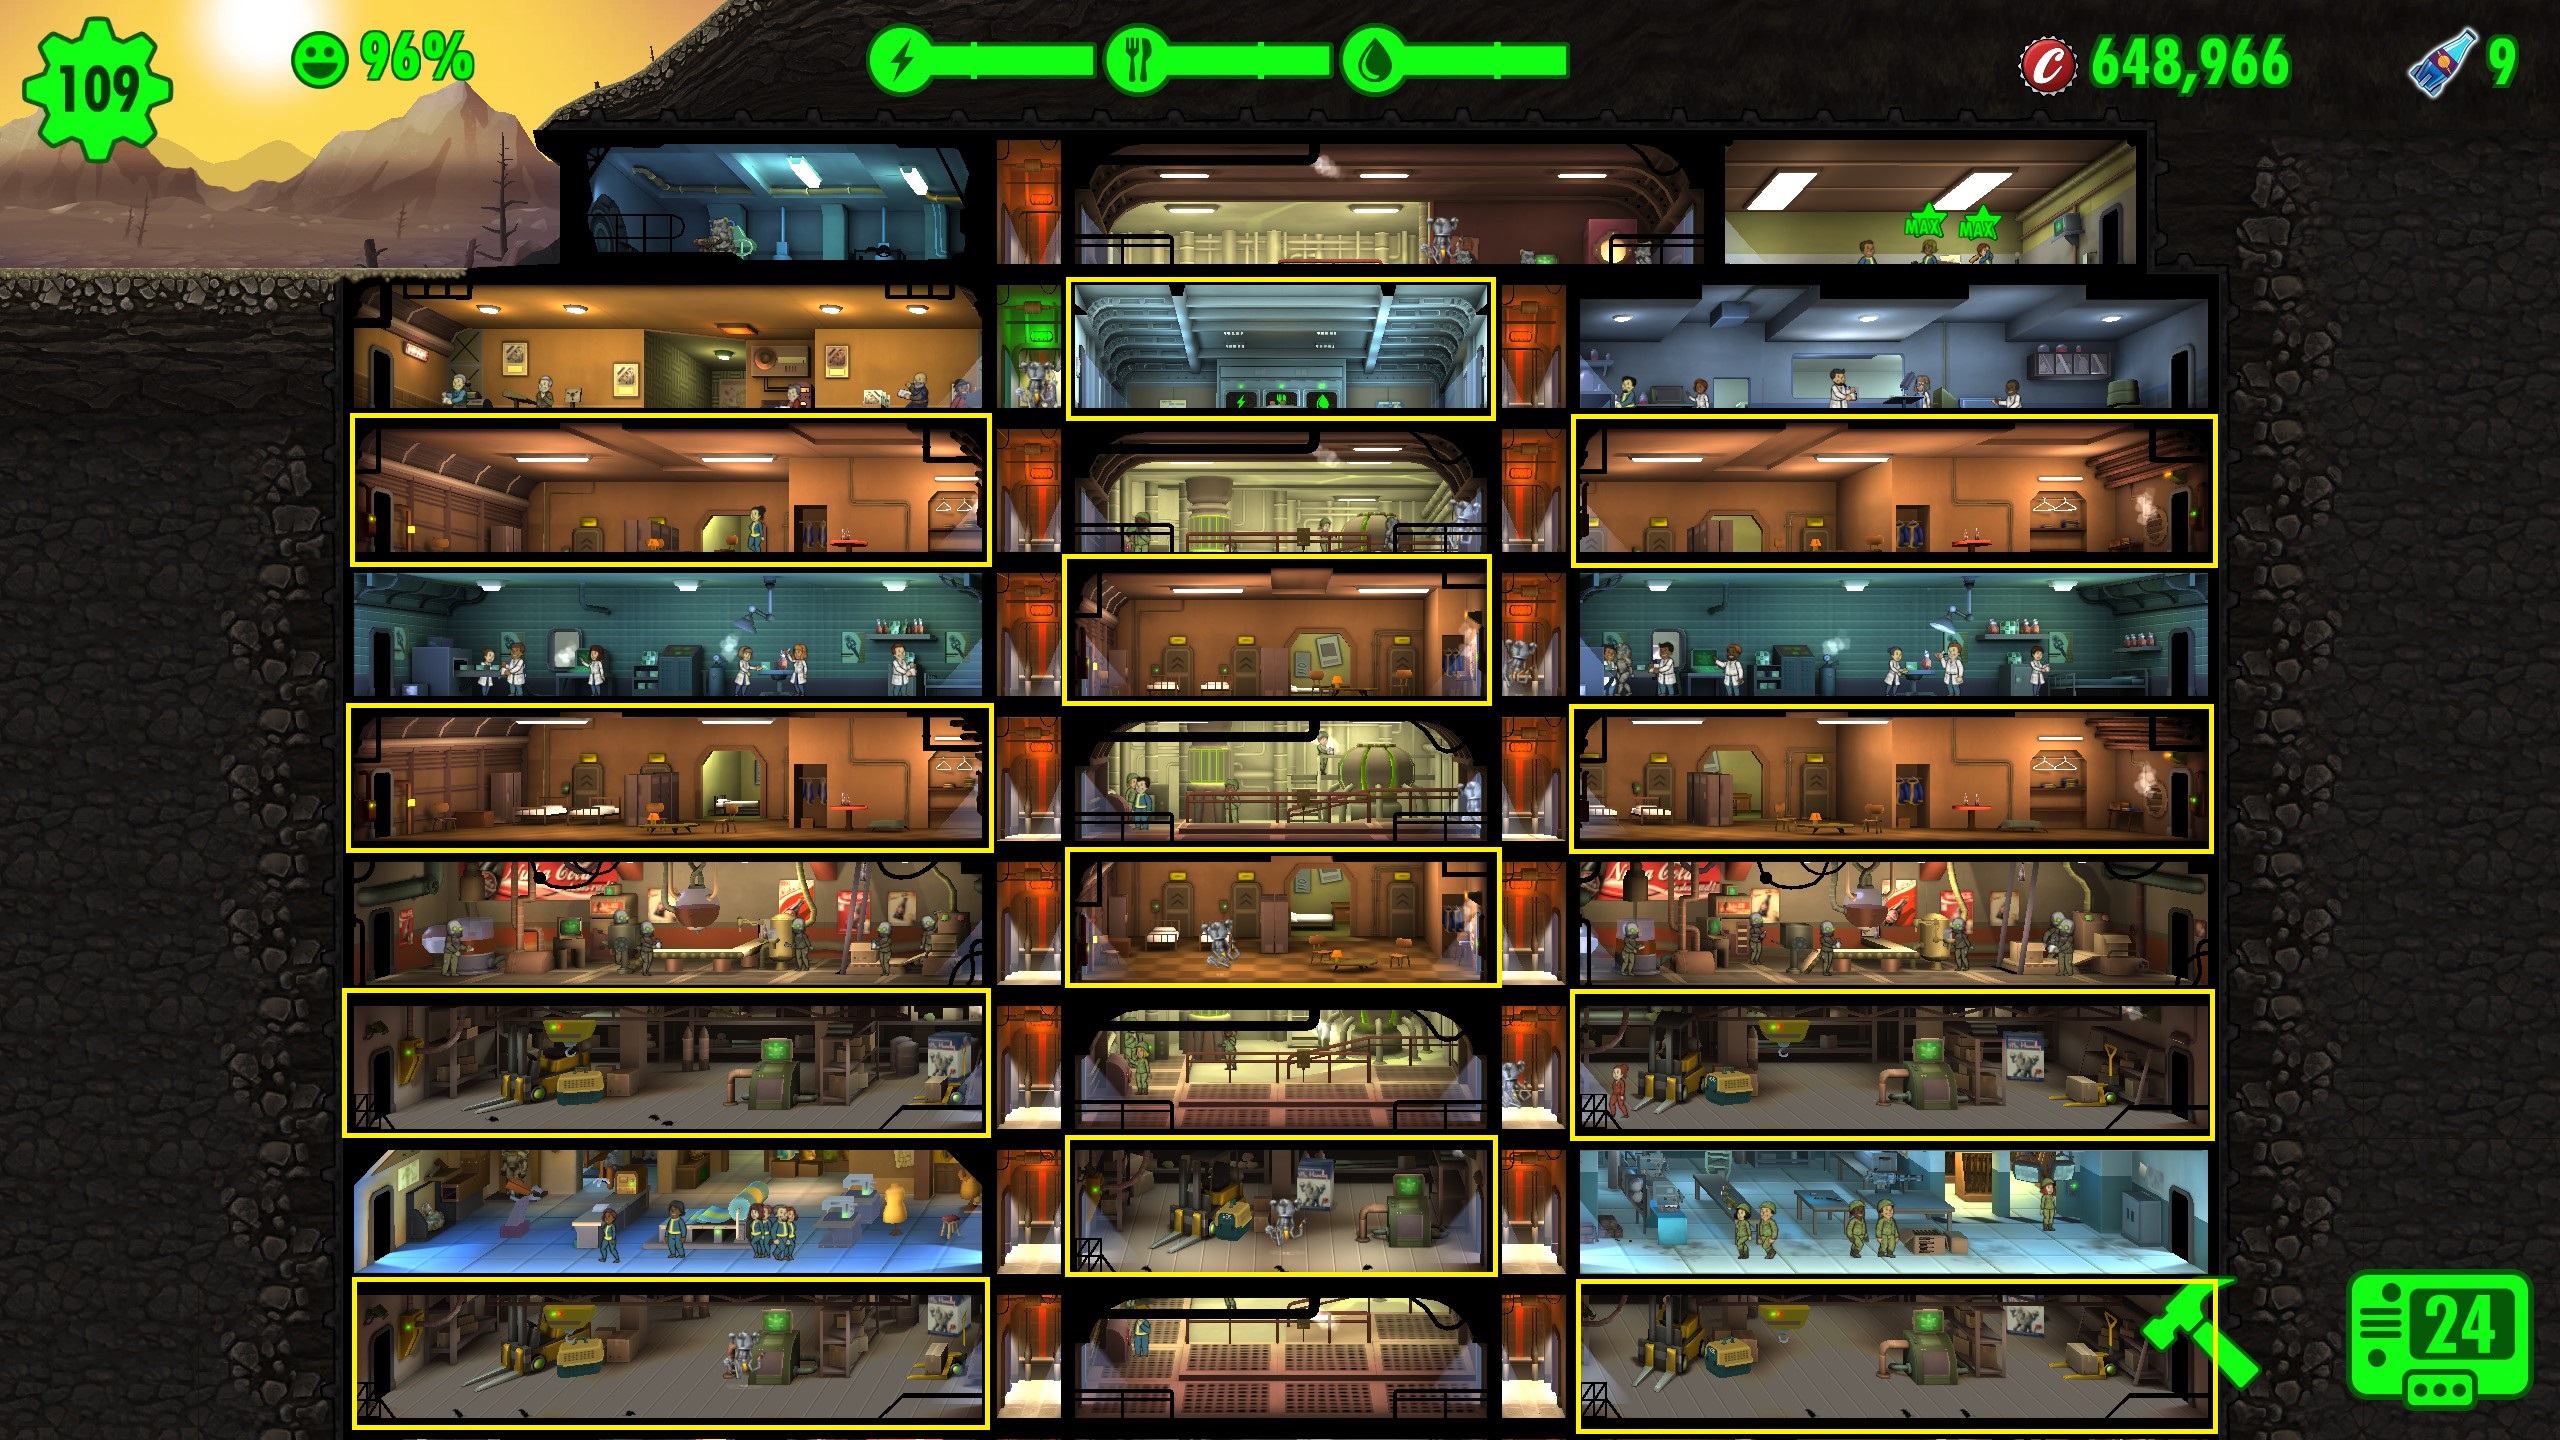
Away section with an 3 row level 3 living room, that’s connected to 3 more dead spaces before connecting to the stat upper rooms on the right side of the base, which are 2size lv1 rooms, I’m worried about radscorpions since I didn’t make my base around quick moving enemies, and I need elevators to get anywhere, I was lucky enough to get an 9 in, 8 luck dweller with an 7 luck clothing so I’m getting by through rushes and I can get 12 stimpac per rush easily
Zozano  [author] Jan 30 @ 2:50pm 
@WolfPAX I really wouldn't worry about it, since the risk of that one dweller dying is extremely high if they're there by themselves. There's no reason why your dwellers in the room opposite to the threat shouldn't be able to reach the fire/roach/scorpion before it moves.
WolfPAX Jan 28 @ 7:31am 
One thing to add is that every room should have at least one occupant...even storage...as it helps to keep the threat rating from growing too high before help can arrive.
Zozano  [author] Dec 24, 2023 @ 3:07pm 
The setup was never meant to prevent pests. It is meant to provide an efficient way to end incidents as early as possible. An incident will always spawn in a room full of dwellers, or only one room away, move your dwellers into this room to end the incident early.
SkeL Dec 24, 2023 @ 2:54pm 
The strategy to surround the vault with elevators to prevent pests doesn't work anymore?
young man ⛈ Dec 5, 2022 @ 11:42pm 
Thanks for answering my questions, your work is impeccable!
Zozano  [author] Dec 5, 2022 @ 8:32pm 
It's just aesthetics. Inside the vault, the SPECIAL stats don't increase any combat stats. The bonuses to health the Endurance outfits give only apply to when they level up. After they've reached level 50, outfits only matter for work.