PAYDAY 2
724 évaluations
PAYDAY 2 Beginners Mega Guide!
Par Nika et 2 collaborateur(s)
UPDATE: FINALLY FINISHED!: Hello new heisters! This is my beginners guide for all of you that are new to PAYDAY 2! If you are unsure about what to do and want to learn some tips and tricks before running in and robbing banks and all sorts of crazy things, then read on!
2
   
Récompenser
Ajouter aux favoris
Favoris
Retirer des favoris
Introduction
By now you should already know that PAYDAY is a first person shooter heisting game. PAYDAY 2 is the sequel to the 2011 game; PAYDAY: The Heist. PAYDAY 2 introduced new skill tree elements, weapon and mask crafting and much more. This guide is an in-depth guide of all the basic elements of PAYDAY 2 for all that are new to the game.
Main Menu
**PLEASE NOTE: "CREATE EMPTY LOBBY BELONGS TO A MOD I HAVE INSTALLED AND IS NOT PART OF THE VANILLA GAME**
Crime Net
The central station for all your heists! Crime Net will show you available heists, what difficulty they are, who the contractor of said heist is, and more. You can also filter Crime Net to show available games and their range to you, difficulty, loud or stealth, etc. You can also buy contracts from the contract broker, play the offshore PAYDAY, see information about the characters and learn all about what mods and weapons Gage has for you if you have the Gage Courier Mod DLC Pack.

Crime Net Offline
Pretty much what it says. Crime Net Offline is the Singleplayer mode.

Safehouse
Once Level 25 is reached, the new and improved customizable Safe House is unlocked! Introduced in Day 2 of Hoxton's Housewarming Party, the new Safe House is a large two story building with 21 dedicated sections throughout the house! These sections can be upgraded using "Continental Coins." Every three days the Safe House will be raided by the cops and you can either choose to defend it and your money in a survival-type, wave based map, or have your AI crew handle it.

Skills & Perk Decks
Here you will see all five skill trees and all twenty Perk Decks! Here you can buy into skill trees, purchase skills and ace skills and unlock perks in the perk decks! Remember to choose wisely as you are limited in skill points. Choose what will aid you mostly when playing and choose what fits your playing style! But if you are playing with a team, remember to also decide on what might help them too. You can also create separate skill profiles if you want to make different builds to play with.

Inventory
Here is your inventory. This will show you your weapons, masks, character, equipment, grenades, skills, and perk decks. Weapons unlock as you level up and masks come from loot drops, achievements and DLC. Equipment can be unlocked through skill trees and your character selection allows you to select your character and three other preferred characters in case your character is not available when playing a public game.

Infamous
Infamous or Infamy mode is like a prestige mode of 25 levels which allows you to reset your rank back to level 0. When doing so you will lose all your spending cash and skills so that you can spec up the Infamy tree which currenty allows you to obtain new masks (with mask effects on them), patterns, materials, colours, EXP bonuses and skill bonuses. Going Infamous costs $200,000,000 from your Offshore Account for the first five levels. The last 20 levels do not reset your spending cash or cost any offshore. You do keep your masks and weapons upon going infamous.

Steam Inventory
This is where you can see which Safes and Skins for certain guns you have obtained. You can also open safes to recieve skins and sell skins on the community market.

Crew Management
Crew Management allows you to customize the AI bots that will join you on your heists if you are not playing with human players. Here, you can customize up to 3 AI (depending on how many human players are in your game) by giving them custom masks and weapons straight from your own inventory, as well as different bonuses and effects that will help you and your crew in your heisting journies.

Content Updates
Here you can see updates on all the latest DLC that has been released.

Options
There are many, many different options that can be changed in PAYDAY 2 and I'll try to cover them all.

Video Options
Resolution: Here you can change the resolution of your game to match your monitor.
Fullscreen toggle: Here you can toggle whether or not PAYDAY 2 takes up your entire screen, no window.
Subtitle toggle: Here you can toggle the subtitles for Bain and other character's dialogue.
Hit confirm indicator: Here you can toggle whether or not you see a hit marker to confirm you have hit an enemy.
Objective reminder toggle: Here you can toggle whether or not the game reminds you of your current objective during heists.
Brightness slider: Here you can turn up or turn down how bright your game is.
Effect quality slider: Here you can turn up or turn down how nice the effects are in-game.

Advanced Video Options
Vsync: Here you can toggle whether or not Vsync is turned on. Vsync is a feature that will fix screen tearing (lines through the screen that will seperate certain frames) at the cost of frame rate.
Depth of field: Here you can toggle Depth of field on or off. Depth of field is an effect that blurs out your surrounding areas when aiming down your sights.
Texture quality: Here you toggle between low, medium or high texture quality. Lowest texture quality will give you more frames at the cost of the game's graphical textures running the lowest they can be. Highest will look the nicest at the cost of frame rate.
Anisotropic filtering: Here you can turn up or turn down the Anisotropic filtering. Anisotropic filtering is a feature that can enhance the quality of textures on surfaces depending on where they are viewed from in game. In short, this can make the game look much nicer and more crisp.
Animation quality: Here you can turn up or turn down the quality of animations for all different types of things in game.
Framerate limit: Here you can limit the framerate that your game can get. It goes from 30 to 135 in increments of 15.
Alienware light FX: Here you can toggle on or off Alienware light FX which can be used with LED's on Alienware Hardware.
FOV Adjustment slider: Here you can adjust your field of view in game (How much you can see around you.)
Use acceleration camera effect: Here you can toggle on or off the acceleration camera effect (basically head-bobbing when sprinting in-game.)
Streaming chunk KB: Here you can adjust the Streaming chunk KB from 32, doubling itself until 4096. Streaming chunk KB affects how fast you load your maps.

Sound
Music volume slider: Here you can adjust the volume of the music in-game.
SFX volume slider: Here you can adjust the volume of the sound effects in-game.
Voice chat volume slider: Here you can adjust the volume of other players speaking over the mic in in-game chat.
Voice Chat: Here you can toggle on or off the voice chat system.
Use push to chat: Here you can toggle whether or not you need to push a key down to use voice chat in-game.

Network
Packet throttling: Here you can toggle on or off Packet throttling. Packet throttling is good for those who have poor connections and want to reduce network overhead. Packet throttling is off by default.
Use compression: Here you can toggle on or off Use compression. Compression costs CPU time but when enabled reduces the network traffic. The poorer the connection, the better the compression becomes. Compression is on by default.

Gamehub
The Gamehub for the game. It is the centre of the community and is where you can discuss anything about PAYDAY 2 with people from all over the community and the world.
Latest news: The latest news and updates from Almir and other OVERKILL developers!
The Basics/Everything you need to know
Difficulties/Risks Levels
The difficulties (also called Risk Levels) are: Normal, Hard, Very Hard, Overkill, Mayhem, Death Wish and Death Sentence. For the new players, I recommend difficulties ranging from Normal to Very Hard. Once you feel like you are experienced, try tackling some Overkill and then Mayhem. Death Wish is for the really skilled players who want a challenge. The Death Sentence Difficulty is the hardest, most unforgiving difficulty that I recommend only veterans or pros of PAYDAY play. To obtain all achievements in the game, players must also complete all heists on Death Sentence with the "One Down" mutation enabled.

"One Down" is a mutation that can be enabled by the host player. This mutation alters the gamemode so that all players can only be downed once before going into custody. This is for experienced players only.

Offshore Account
The Offshore account is where majority of your money goes after a heist. So far it is used for Offshore gambling, buying contracts and the first five levels of infamy.

Continental Coins
Continental Coins are used to upgrade your Safe House or for purchasing Weapon Mods. They can be obtained by completing heists, completing daily missions, obtaining trophies, successfully surviving a Safe House Raid, or completing a Crime Spree.

Crime Spree
Crime Spree is a gamemode that involves continuously chaining heists together without failing them to build up a large reward pot for all players. With Crime Spree, you can endlessly play heists, chaining them together. As you progress through Crime Spree, it will become more difficult and more and more mutations (like increasing the amount of Special Cops or their damage and health) will be added until you can no longer continue. Failing a Crime Spree will require you to pay Continental Coins to continue. You can also suspend a Crime Spree whenever you want to stop playing.

Trophies
The full list of Trophies can be found in the Safe House menu on Crime Net. Trophies are unlocked by completing various challenges and will be displayed as physical items in your Safe House upon completion.

Pre-heist plan
This is where you and your team party up and can see each other’s armour and masks. You can modify your guns, skills, perk decks and more. After choosing a contract (a heist) you can move onto Bain’s plan. He will tell you what to do and what you are getting yourselves into and then you can choose weapons, items, armour and then ready up!

Pre-Planning Stage
The Pre-Planning Stage is a special planning screen that was introduced in the Big Bank Heist. You are given favours and can use them to change up several different assets for the heist including your vault break-in method, escape, sniper placements and doctor bag/ammo bag placements. Pre-Planning requires either a knowledge of the heist layout if you are placing any deployables or communication between the team.

Assets
Assets are special tools you can buy to help with the heist. There are skills that can be bought to help reduce costs of assets and unlock special other assets.

Loadout
This shows you and your team’s current weapons, secondary weapons, equipment, armor, melee weapons, grenades and detection risk before a heist.

Skins
Upon completing a heist, at the loot card screen, you have a chance to recieve a "Safe" as a reward. Upon opening this Safe, you will recieve one random Skin for a random weapon. These Skins are purely cosmetic camos for your weapons, though they can be sold on the community market, similar to Counter-Strike: Global Offensive.

Multi-Day Heists
A multi-day heist is a heist with multiple days. You have to go through each day completing an objective, stealing cash or other objects and then proceeding to the next day. Occasionaly, an 'escape' will happen (see: Escapes at the bottom). If a day is failed on a multi-day heist, you can always retry the day. If it is a pro job multi-day heist, you will lose the entire contract. You gain EXP from each day (most of it on the last day) and get a PAYDAY after you complete the final day.

Health
Your health is the green circle next to your name, weapons/weapon ammo and item count. The small, thin white circle around your health is your armor. When your armor is broken by gunfire, your health will then start to take damage. Your armor will regenerate when you are not being hit. NOTE: Perk Decks can effect how these work. Keep that in mind.

Ammo Pickups
When you kill Police Officers, they will drop ammo pickups on the ground. Running/walking over these pickups will give you ammo back to your primary and secondary weapons. NOTE: Other players in the game can pickup ammo pickups, these are not restricted to you personally or the cops YOU kill. Also note, some weapons can not pick up ammo from ammo pickups.

Stealth/civilians
Most heists will allow you to start with your mask off, putting you in casing mode (a mode where you can do pratically nothing except for scope out the map, though note: you can be detected by guards) Press whatever button you have assigned to put on your mask. [Default: G] This will make you suspicious to civilians/guards and pretty much everyone. Blue question marks will appear above people’s heads when they suspect activity happening around them. A red exclamation mark will mean that they have been alerted and you will need to get them down before they call the cops. You can kill them if you wish; this won’t break the stealth if you get everybody else down, but it will cost you money. So don’t kill civilians unless you can afford it!

Detection Risk
This is a pretty simple thing. The more concealed weapons you have and less armor you are carrying will make your detection risk low. This will make it slower for guards to become alerted when they see you. Use this to your advantedge. NOTE: Your detection risk also effects your dodge, especially when using perk decks such as Rogue and Crook.

Assault waves
Assault waves will happen a little bit after the police have been alerted (can be delayed by tying up hostages.) Assault waves will then take breaks every few minutes and start up again. This is where the police officers will stop at nothing to put you in custody. There will be lots of cops. So bunker down behind cover and fire back at them! NOTE: Captain Winters can keep the assault wave going forever. See: Captain Winters in the enemies section.

Custody
You will go into custody after being downed three times (four times with Nine lives skill/one time with the "One Down" mutation enabled). Your downs can be reset back to 0 with a Medic Bag. In custody you will respawn in about two to three minutes (on Normal and Hard) and will not respawn unless you are traded out for a hostage during a break in an assault wave (on Very Hard, Overkill and Death Wish, Death Sentence)

Escapes
Sometimes you will get an escape on multi-day heists and one day heists! An escape could happen which could involve you and your team having to carry bags across highways and through car parks to a safe van.

Hostages
Hostages can be obtained by tying civilians down with cable ties or dominating Police Officers. NOTE: Specials can not be dominated.
Equipment
Equipment
Doctor Bag/Medic Bag
The Doctor Bag is a very common deployable and can be upgraded in the Mastermind Skill Tree from the usual 2 charges to four by acing the "Combat Doctor" skill, this skill also gives you an extra doctor bag. The Doctor Bag is seen as an essential part of heists and is very helpful. When used it will refill your entire health and reset your down counter back to 0 again. When upgraded, the Doctor Bag's usage will go up, allowing players and yourself to use it more before it dissapears.

Ammo Bag
The Ammo Bag is a very common deployable and can be upgraded in the Enforcer Skill Tree from 1 ammo bag to 2 ammo bags upon buying the "Extra Lead" skill, this skill aced gives your ammo bags 50% more ammo. Ammo Bags, unlike Doctor Bags, use percentages instead of charges for ammo. They are seen as an essential part of heists and are very helpful.

Trip Mines
Trip Mines are a deployable which can be upgraded in the Technician Skill Treee and can be very useful. There are multiple skills found in the Technician tree that can upgrade Trip Mines and add more to your inventory. The Trip Mines can be upgraded to shaped charges which can be used to breach doors, safes and more.

Sentry Gun
Sentry Guns are a very helpful deployable which can be upgraded in the Technician Skill Tree. The Sentry Gun will kill all enemies in its detection radius and will not move onto another enemy until its current target is dead. Sentry Gun will stop working once it runs out of ammo or is destroyed. They are incredibly helpful for thinning out enemies and defending areas from cops. With the "Jack of all Trades" skill, Sentries can be even more useful, as you can also bring a second deployable (for example, a medic bag) at the cost of the deployable being halved in usage.

ECM Jammers
ECM Jammers are a very useful and commonly found stealth deployable and can be ugraded in the Ghost Skill Tree. They can be upgraded with multiple different skills, allowing them to block pagers, open doors and even help in combat against police officers. ECM's are very useful and incredibly helpful in stealth. They can be used to block civilians or guards calling the police, block cameras from detecting you, block guard pagers from going off, and can even prolong the guards long enough so that you can finish the heist without ever going loud. Though note that ECM's will not last forever, once their effect has ended, these blocked items will become a problem again.

First Aid Kits
First Aid Kits are a deployable that can be upgraded in the Mastermind Skill Tree. They can be a preferable substitute to doctor bags in some situations, with the pros of First Aid Kits allowing you to deploy and interact with them faster. The Uppers skill in the Mastermind tree allows you to carry up to 14 First Aid Kits, though they are a one time use for any player in the game. They heal your health completely, but DO NOT reset your downs.

Body Bags
The Body Bags deployable are useful for stealth and be upgaded in the Ghost Skill Tree. Body Bags allow you to bag dead bodies (guards, civilians, etc.) and place them in dumpsters and other areas to hide bodies to prevent you from being detected.

Armour Bag
The Armour Bag is a deployable found in all Perk Decks. When equipped before a heist you will enter that heist with a two-piece suit. At any time in that heist you can use whatever you have bound to deployables to activate the armour bag and change to whatever your armour was selected as before the heist. For example, if you have the Heavy Ballistic Vest selected, you will switch from a two-piece suit to the Heavy Ballistic Vest upon using the armour bag.
Skill Trees
Skill trees
Skill Trees are pretty much the basis of the entire game. They are seperated into five Skill Trees, Mastermind, Enforcer, Technician, Ghost and Fugitive. Each of the Trees have three branches in them which focus on different aspects of the tree.

Mastermind
The Mastermind behind enemy lines. This tree is basically the SUPPORT tree for you and your teammates. It contains the Doctor Bag Deployable, the First Aid Kit Deployables and skills that will help your team mates. The "Inspire" Skill is a very helpful skill that allows you to revive your team mates from a distance, instantly once every twenty seconds. It also features skills that will help you dominate Police Offiers, which can be used as hostages or converted cops that fight for you, stamina increase, health bonuses for team mates, civilians trading themselves out to get you out of custody and many more.

Enforcer
The brute force of the team, it is the ASSAULT tree and it focuses heavily on strength and shotguns. It contains the ammo bag, shotgun-oriented skills, access to the OVER9000 Saw in your secondary and the Improved Combne Tactical Vest. If you like shotguns and heavy armour then go with this tree.

Technician
The computer tech and wizard of the team. It has trip mines, sentry guns and many helpful drill upgrades. Trip mines can be converted into shaped charges which can be very helpful in a lot of heists (this allows you to blow open multiple things like safes and doors!) and Sentry guns can be very helpful at being used to defend areas and keep cops at bay. The Technician is a very helpful Skill Tree.

Ghost
The stealth and dodge class. If you are ready to stealth heists and escape with the money without leaving a clue, then choose this class! It has an ECM jammer which can jam cameras, stop guards and civilians from calling the police, open doors, harm officers with feedback and delay guard pagers. The Ghost class also has upgrades related to lockpicking safes (faster than using drills), and access to insider man assets. As well as this, Ghost has many skills that are very useful in running Dodge builds, allowing you to dodge a lot of enemy fire so that you can run and duck all over the place.

Fugitive
The Fugitive Skill Tree is a very versatile tree that focuses on great pistol skills, melee skills, and skills that will help you stay alive in a fight. The left most tree focuses on pistols, and is highly recommended for Akimbo pistol builds. The right most tree has great melee skills and defensive buff skills, and the middle tree has some very unique and powerful skills that will help you live through tough assaults.
Perk Decks
Perk Decks
Perk Decks are a system created that allow players to upgrade and choose from twenty different decks, each with nine perks, supporting playstyles. Each of the Perk Trees share the same perk at the second, fourth, sixth and eighth perk in each tree. As of the current moment, Perk Decks are not reset when going Infamous. Perks can be unlocked by using Perk Points which are obtained through converting XP gained at the end of a heist with a ratio which changes depending on your level (more Perk Points at lower levels).

Crew Chief
The Crew Chief is similar to the Mastermind Skill Tree and includes health bonuses, stamina bonuses and armor bonuses for you and your team and a very nifty shout distance range increase among more.

Muscle
The Muscle includes very powerful health and armour bonuses and the ability to draw fire away from your team mates as a meat shield and incapacitate cops by terrifying them. The Muscle Perk Deck can potentially give up to +80% health when maxed out, making it a very efficient deck in powering up one's health and armour.

Armorer
The Armorer focuses on improving armor for the player with a potential maximum of +35% armor. It does not have a wide variety of bonuses compared to the other decks, but can be used for any player who wishes to boost defense and armor.

Rogue
The Rogue is similar to the Fugitive Skill Tree and focuses on increasing dodge chance and weapon switch time. When nearly fully upgraded it can reach +45% dodge chance, which can be very helpful for any players wishing to be light on their feet. A Two-Piece suit is highly recommended in combination with this Perk Deck. To this day, Rogue is considered a high meta-perk deck and is incredibly versatile.

Hitman
The Hitman Perk Deck is sort of an opposite to the armorer, trading armour for faster armour recovery. It is recommended in combination with Akimbo weapons.

Crook
The Crook Perk Deck focues heavily on adding dodging chances for all ballistic vests. This deck is very helpful for players who like to run the lightweight ballistic vest, with the deck providing up to a +40% dodge chance. This perk can also provide faster armour recovery and an up to 65% increased bonus armor when using any of the balistic vests.

Burglar (DLC)
The Burglar Perk Deck was released alongside the Clover Character Pack and cannot be unlocked unless you own the Clover Character Pack DLC. This Perk Deck is a combination deck that focues on stealth and some dodge bonuses. For stealth it allows players to increase the speed of lockpicking, bagging bodies and answering pagers. For dodge it allows you to gain a +20% additional dodge when standing or crouching, making it suitable for a heist if you are not sure whether or not it will go loud or remain in stealth.

Infiltrator (DLC)
The Infiltrator Perk Deck was released alongside Dragan Character Pack and cannot be unlocked unless you own the Dragan Character Pack DLC. This Perk Deck is a close-quaters combat and melee combat oriented deck that focuses on bonuses to damage resistance when surrounded by enemies, damage boosts to the players melee weapons and a health-restorative ability.

Sociopath (DLC)
The Sociopath Perk Deck was released alongside the Jacket Character Pack and cannot be unlocked unless you own the Hotline Miami Digital Special Edition on Steam. This Perk Deck is very similar to the Infiltrator Deck, but instead focuses more on regenerating armor over increasing damage to enemies. It also features an ability (Showdown Perk) that spreads panic among your enemies by close range damage.

Gambler
The Gambler Perk Deck was released alongside the new heister, Bonnie. It is all about using ammo pickups from the ground to increase ammo and health for you and your team mates.

Grinder (DLC)
The Grinder Perk Deck was released alongside the Sokol Character Pack and cannot be unlocked unless you own the Sokol Character Pack DLC. This Perk Deck is very useful and when fully upgraded it can regenerate up to 56 health over 4.2 seconds when you do damage to an enemy, but only if you are wearing a Two-Piece Suit or Lightweight Ballistic Vest. The Perk Deck has other features as well like a 30% chance to pierce enemy armor and 40% more health.

Yakuza (DLC)
The Yakuza Perk Deck was released alongside the Yakuza Character Pack and cannot be unlocked unless you own the Yakuza Character Pack DLC. This Perck focuses heavily on risk and moving from cover to cover, killing enemies in close combat. Using the ICTV allows you to recover armor faster than other players, but you cannot regain health without the use of First Aid Kits or Doctor Bags past the 50%/100% mark.

Ex-President
The Ex-President Perk Deck was released alongside the Bodhi Character Pack. This Perk Deck focuses on health and armor restoration from killing enemies. Health is not granted immediately, instead, it is granted when your armor regenerates equivalent to the amount stored. Also, other team mates can contribute to this Perk Deck, though the effects will not effect them.

Maniac
The Maniac Perk Deck was released alongside the Hardcore Henry Pack. This Perk Deck focuses on killing enemies to recieve "Hysteria Stacks" which gives the user and other players a damage reduction, with a max reduction of 36 points of damage.

Anarchist (DLC)
The Anarchist Perk Deck was released alongside the Sydney Character Pack and cannot be unlocked unless you own the Sydney Character Pack DLC. This Perk Deck focuses on continuous armor regeneration over waiting for armor to regenerate. To this day, Anarchist is considered a very good meta-perk deck and is highly recommended for casual armour builds.

Biker (DLC)
The Biker Perk Deck was released alongside the Biker Character Pack and cannot be unlocked unless you own the Biker Character Pack DLC. This Perk Deck focuses on regenerating health and armor. The lower the health, the more armor you regenerate, the lower the armor, the more health you regenerate. This is a good offensive Perk Deck that focuses on regenerating health and armor based on kills both you AND your team mates get.

Kingpin (DLC)
The Kingpin Perk Deck was released alongside the Scarface Character Pack and cannot be unlocked unless you own the Scarface Character Pack DLC. This Perk Deck grants you the Injector Throwable (note: will replace your throwable). Using the Injector with your throwable key will heal you with 75% of all damage taken for 6 seconds. You can only use the Injector once every 30 seconds, however, killing enemies will reduce its cooldown. This Perk Deck also focuses on drawing enemy fire from your teammates to you. A real beseker type Deck.

Sicario
Similar to Kingpin, Sicario unlocks the Smoke Bomb throwable. Using the throwable key will deploy a smoke bomb, that when stood inside, will allow you and your teammates to dodge enemy fire. This Perk Deck is powerful but not as versatile as Rogue as it is limited to a 60 second cooldown. Effective for moving through a high difficulty heist and is very defensive.

Stoic
The Stoic Perk Deck focuses on survability. Similar to Kingpin and Sicario, Stoic unlocks the Hip Flask throwable. With this Deck, your damage is now reduced by 75%. The remaining damage is applied directly to your health. The 75% damage is applied over a period of 12 seconds. Using the Hip Flask with your throwable key will immediately negate any pending damage and has a 10 second cooldown (can kill enemies to speed up cooldown).

Tagteam (DLC)
Weapons
Weapons
I’m not going to go into any extreme detail, but here are vital things you should probably know before going in all guns blazing.

Assault Rifles – For the people who like to not be limited by range and ammo and with the right mods some of these will become the powerhouse of any loadout.

Pistols – For those of you that love to kick ass with tiny guns. There is a wide variety of different Pistols that can pack a punch, including Akimbo Pistols that can be very powerful when modified correctly. The Gunslinger branch of the Fugitive Tree can upgrade Pistols.

Akimbo - Akimbo weapons can be very fun to use. There are many akimbo variants, including Akimbo Pistols, SMGS, and Shotguns. Try them out!

SMG’s (Sub Machine Guns) – SMG's can be very handy secondaries. They are have faster fire rates then Assault Rifles, but lower damage, and can be very concealable.

Shotguns – There isn't a very large selection of these but they can be very fun and powerful. They are for the people who like getting up close and personal with the cops. High damage, low range (usually) and can definitely be very powerful when upgraded with skills from the Shotgunner Branch of the Enforcer Tree.

LMG'S (Light Machine Guns) - Heavy brute force guns with lots of ammo that pack a mean punch! These are very good for players that have ammo bags to spare. Use LMG's to mow down cops in the blink of an eye.

Sniper Rifles - There is a pretty good variety of Sniper Rifles to choose from. Snipers are pretty self-explanatory. They usually have a very slow fire rate as to be expected, but can range from high damage to VERY high damage. Though their ammo pool can sometimes be low, they are very helpful for picking off specials with ease.

Grenade Launcher - Grenade Launchers can be used for taking out or stunning big groups of cops, but is at a heavy handicap of hardly any ammo.

Special - This category is for the more, uncommon weapons a heister would use. Found in this is the SAW used for opening doors, deposit boxes, ATMS, etc. The Minigun and the RPG (both exclusive to the OVERKILL Pack DLC) and Bow & Arrows. The minigun is an LMG with a very high rate of fire that can destroy most cops. It is quite viable for lower difficulties and even Overkill if you know how to use it right. The RPG is a very powerful rocket launcher secondary that has hardly any ammo. It has very high damage and can one-shot Bulldozers on any difficulty except Death Wish and the Bows are fun to use, but not really viable for loud heists.
Police Officers and Specials
Cops
The Cops (Police, Po-Po, The Fuzz, Law Enforcers or whatever you may call them) are your enemies. There are many different variations of Police to deal with.

Security Guards
Security Guards are often found in heists that are stealthable and are usually either seen in grey (employed by GenSec) or black suits. Guards patrol the area and will spot you if you are in their line of sight for too long. They can be killed or dominated in stealth to activate their pager, which then must be answered or the heist will go loud. If the heist has a security room, usually you can kill the guard in there to deactivate the cameras.

Thugs
Thugs are seen in some heists. They do not have pagers and are very finicky when it comes to stealth, making it very difficult to stealth heists with them in it. They won't stick around for long.

Tier 1 Police officers
Tier 1 Police officers (wearing the blue shirts) are the first responders and are weak in health.

FBI and Hostage Responders
These guys aren't much of a threat. The FBI in their blue coats rarely spawn on higher difficulties and are only armed with a Chimano pistol and have low health. Hostage Rescue Teams have a ballistic vests and do quite a bit of damage. They will attempt to rescue hostages so watch out for them.

SWAT
These guys are harmful and one of your main threats on the lower difficulties. They can range from the full black uniform to the black and green uniform.

Blue and Yellow
These two variants of SWAT are the weakest types. The blue SWAT are quite annoying, making use of flashbangs and tactical fire. Though they do dissapear later on in higher difficulties. The Yellow SWAT have much more health than the Blue, though they are not as common on higher difficulties.

Green FBI
The Green FBI (also called Heavy Response Unit) are wearing green uniforms and have white helmets. They are commonly seen on higher difficulties and can employ certain tactics such as gas on Bank heists.

Heavy/Tan FBI
The Heavy FBI (also known as Tan FBI or Maximum Force Responder) are the most common enemies on higher difficulties, especially Overkill and Mayhem. They are tough and hard to kill and aiming at their chest is not an option as it is armored. AIM FOR THE HEAD!!! They are known to be very aggressive and will push forward to surround you and take you down at all costs.

Gensec Elites
These grey-camo wearing officers are found on Mayhem and Death Wish. They are the elites of Gensec (and for good reason.) They are quick to surround you and can do a lot of damage if you are not prepared. They carry JP-36 rifles and travel in packs of several.

ZEAL Swat
The ZEAL Swat are the hardest non-special enemies in the game. Encountered on the highest difficulty (Death Sentence). Their armour is black which can diguise them in the chaos and they deal very heavy damage.


Snipers
Snipers are universally hated among players. They do incredibly high damage and can down you in one-shot if you are not careful. They are usually hiding in buildings. Mark them out with [F] and aim for them carefully!

Specials
There are more than just cops lurking out there! Special Enemies are powerful unique enemies that can be marked out (using the default key: F) to warn your teammates.

Shields
Very common, they carry a giant shield that can’t be pierced unless you use specific weapons such as Snipers. Get behind them and take them out. They have two variants: SWAT shield on lower difficulties that carries a pistol and FBI Shield on higher difficulties that carries an SMG. They can very in tactics depending on difficulty, for example, they may protect Bulldozers on higher difficulties.

Tasers
These guys wear blue suits and have blue/black helmets. If they get near you they will tase you which will cause you to shoot uncontrollably and empty your mag. They are low in health (though they do have more health than the average swat) and they cannot move when tasing you. They will down you with the tase if nobody helps you. They can usually be seen travelling in two's.

Cloakers
These guys are dangerous and stealthy, they will down you in ONE hit if they kick you! They can be found hiding under cars, behind doors, etc. They will run at you extremely fast and down you with a flying kick in one hit, however, their downs do not contribute to your total downs until custody. They have quite a bit of health, but you can kill them quickly with headshots, which will multiply the damage done. They will emit a high-pitched noise when nearby and carry SMGs.

Medics
The Medic has the ability to restore any enemy's health to full health in an instant. However, they can only focus on one enemy at a time. They will try to focus on Specials if possible and will attempt to stay with other enemies instead of going off on their own. They can only spawn on Overkill or above.

Bulldozers
Found on harder difficulties most of the time, they are the tanks, the most powerful enemy type. They walk around in huge EOD suits and will down you pretty quickly if they can get a clear shot. They carry powerful shotguns (and LMGs) and have incredibly tough armour. AIM for their face! Destroy their visor and kill them.

Green-suit Bulldozer - The original bulldozer. They carry around a reinbeck shoutgun and are the weakest of the three, though they are still a threat that is not to be underestimated.

Black-suit Saigadozer - They carry around IZHMA Shotguns which are semi-automatic, have low damage compared to the reinbeck and they have have some long range so get into cover! They are certainly deadlier and more common than the Green-suit Bulldozer.

Skulldozer - The most powerful of the three, only found on Mayhem and Death Wish. They carry around LMG's and have very good accuracy. A good tip to remember is that you can stun them (or any Bulldozer for that matter) with HE rounds, Grenades, ect. Team work is essential when one of these guys approaches you. Aim for the visor and stay in cover!

ZEALDozer - An incredibly powerful, shotgun wiedling Dozer encountered on the Death Sentence difficulty.

Minigun Dozer - Encountered on Death Wish and above. They are the most powerful enemy in the game, and carry deadly Miniguns that can destroy a team easily.

Medic Dozer - Encountered only on Death Sentence. They are weak in damage, but are powerful in their healing ability. Works the same way as a normal Medic, but has all the qualities of a Bulldozer!

Captain Winters - Captain Winters will spawn randomly during a heist alongside a squad of elite shield wielding minions. He can only spawn during an Assault Wave and when he does, the Assault Wave is locked down and will not end until Winters is killed. You will know when he spawns as he will announce himself through a loud speaker. He is a special "boss" unit who will set up a defence behind his circle of shield minions that will target you and attempt to down you. His health is 8,000 on Deathwish and above. Explosives (RPG, Grenades, etc) are very useful in taking out Winters, so keep that in mind.
Tips
Delaying assault waves
Delaying assault waves can be done by tying up hostages. Tie up as many as you can to keep those bastard cops away for a longer amount of time.

Use medic bags and ammo bags wisely
You will go into custody after your third down (or fourth down, depending on if you have aced the Nine Lives Skill) and on your last down your screen will dull in color as you lose health. Use medic bags on your last or second-last down to save use! As for ammo bags, Police Officers will drop ammo upon being killed. Use this as a technique to collect lots of ammo in-between assault waves.

Speed up EXP
On the PAYDAY screen when you are receiving your EXP as it fills up your level circles, you can press space each time you begin levelling to speed up the process of the EXP.

FAQ
Can I play any character I want with any skill tree I want?
Yes you can. You can play as any character and any skill tree you want. So for example, you can play as Dallas as a Technician or Hoxton as the Enforcer. No restrictions here!

Intimidating Guards/Police?
Lower a cops Health then spam your interact key [Default: F] to intimidate Police Officers into putting their own hand-cuffs on them. When they are dominated, they can be used as a hostage or can be converted to fight on your side.

Are there any tutorials apart from the Safehouse?
As of Update #101, there are now tutorial heists which can be played by selecting them on Crime Net!

Can I upgrade all skill trees?
Nope, sorry. Afraid you can't. This is where the RPG elements come into play. You have to make choices as you will only have 120 skill points by the time when you reach the final level. You must make wise decisions and choose carefully. However, you can also combine these with Perk Decks for good combinations.

Lobbies? People kicking me? Why?
There have been countless cases of players being kicked for all different reasons. If you find this happening to you, I recommend hosting your own game if you want to. As for options that can be set:
"Public" - Anyone can join.
"Friend's Only" - Only friends can join.
"Private" - Invite only. No one can join unless you invite them from the invite system built in Steam.
There are also reputation level caps you can set on your own lobbies so that you can choose what level players can join.

What is the Offshore Account for?
An offshore account is where 80% of the money you obtain from completing a heist goes. It is is basically your retirement money and so far it allows you to buy any heist at any time, gamble in the Offshore Account Gambler, pay to go Infamous for the first five levels and buy the third, fourth and fifth skill profiles for multi skill builds.

Is there a Storyline? How can I experience it?
In Crime.Net, you will find a Storymode is now included in the game. The storymode will allow you to play through each heist in its intended order!

What is the PAYDAY 2 Steam group, how can I join it and why?
The PAYDAY 2 Official Steam group is a group created and monitored by the developers of PAYDAY 2. Just search for PAYDAY 2 on the Steam Community and join the group. There are many benefits to being apart of this group such as getting announcements from the developers as soon as they are posted and also recieving community masks, weapons and heists as well.
Thank you all, PAYDAY community!
I hope you guys enjoyed my beginner’s mega guide for PAYDAY 2! I know I went into a lot of detail but I am here to help all new players do the best they can! Send this guide to your friends if they ever need help or are new to the game. I've been working on this guide since the game's release in 2013, and after all these years, I still see that people have been able to get use out of this guide, which is what I hoped for. And now, with the ending of PAYDAY 2, I bid this guide farewell. Thank you all.

Check out the PAYDAY subreddit over at http://www.reddit.com/r/paydaytheheist for an active, engaging PAYDAY community of great people!

You can also check out the PAYDAY wiki over at http://payday.wikia.com/wiki/Payday_Wiki for more information on the game.
180 commentaires
Atriox 16 aout 2021 à 14h41 
Great guide, thanks for the helpful info :steamthumbsup:
Deaconplay 30 déc. 2020 à 16h29 
This was quite helpful. I have been trying to figure out how to play on my own with little success.
Fifooo :) 5 juil. 2019 à 18h27 
For begginers ideal, great job :vote_yes:
jadjad 3 févr. 2018 à 16h29 
Excellent Guide. I think you duplicated the "weapons" topic in the "Skill Trees" section.
Божут 19 aout 2017 à 11h40 
update the Fugitive skill tree information. It doesnt focus on dodge anymore
Nebel Weirdo 20 juin 2017 à 6h36 
Aaaaah Thanks mate :D
Nika  [créateur] 20 juin 2017 à 4h12 
@Thirty Nine
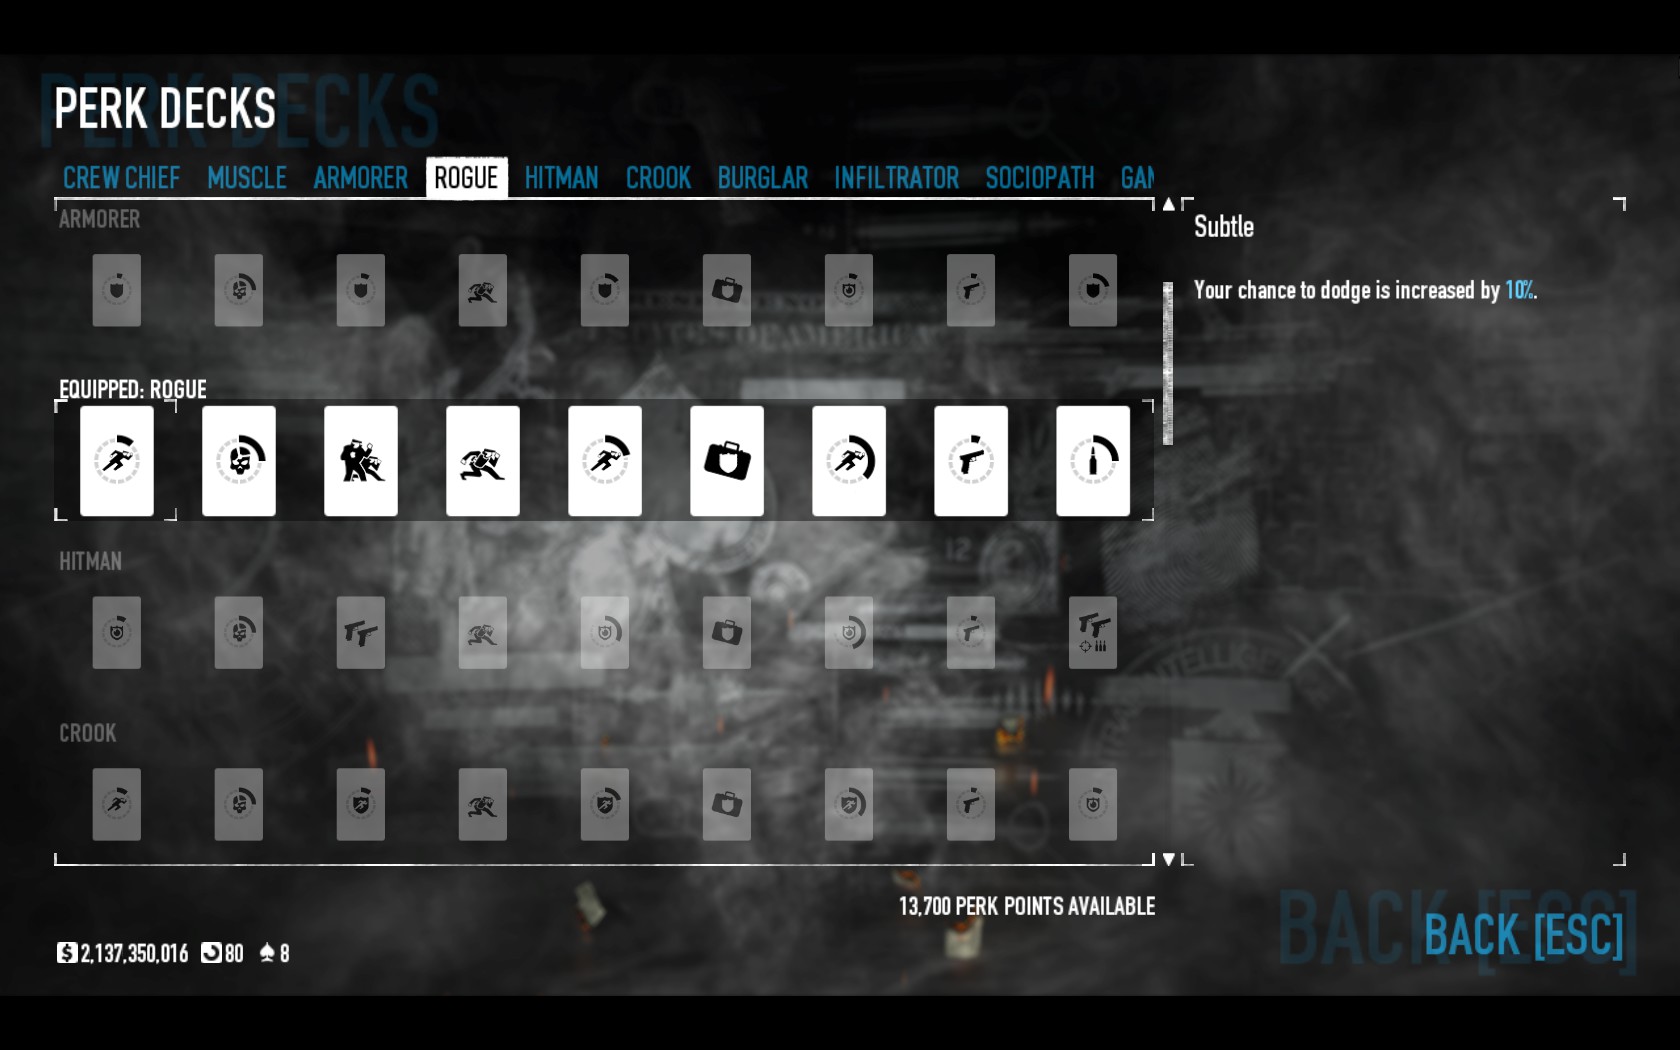
That card is your infamy card, displaying your infamy level. You can read about infamy in the "Main Menu" section of my guide.
Nebel Weirdo 19 juin 2017 à 23h55 
Hey I got a question and I can't find anything on the internet about it, probably because i'm searching it wrong.
Anyway. What is the card between your level and your detection level, yours show XXIII, and mine is like a 2 of spade or something like that. It bothers me not knowing what it is !!
Tigerust 10 juin 2017 à 7h46 
really good tutorial and about cops and etc so good work :)
asep 20 oct. 2016 à 20h21 
thanks!