Legacy of Dorn: Herald of Oblivion

Legacy of Dorn: Herald of Oblivion

61 ratings
Achievement and Choice Guide
By *Evil
In this guide I've set out to map out all the branching choices in the game in a readable way.

At the same time, I've made a list of all of the achievements and what you must do to get them.

Hope you find this useful.

PS: SPOILERS ahead!
4
   
Award
Favorite
Favorited
Unfavorite
Introduction and changelog
Hello, if you're just here for the achievements, check out the first three sections.

If you're curious about how the various choices affect your stats and what battles await you, you might find the rest of the sections interesting as well.

SPOILER WARNING: I really recommend playing through all the game unspoiled at least once! Reading through this guide before knowing what happens might lessen the experience for you and might even confuse you.

Changelog
2019-01-30 This is the initial release of this guide.
2019-06-12 Oops, finally noticed i had red spelling lines on the text of the Story Path image! Fixed that.
Game story structure and general paths
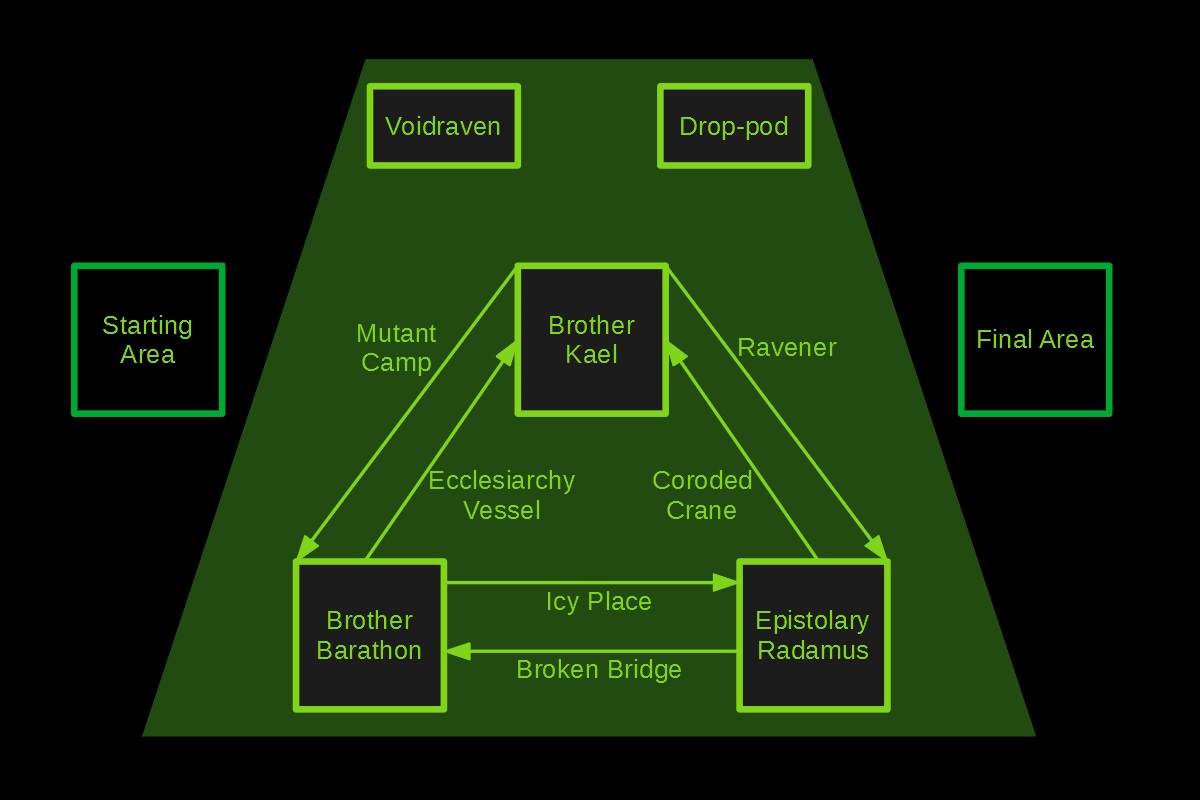
The story is structured to have a linear introduction, followed by a hefty midsection where you must complete three main areas in whatever order you choose, and finally a linear part at the end, as the story reaches its climax.


The starting area is made up of:
  • The Shield of Dorn
  • The Broodlord nest
  • Apothecary's Teleportation destination

The three battlebrother areas which can be done in any order, but must be all visited:
  • Brother Kael
  • Brother Epsitolary Radamus
  • Brother Barathon

Additionally, there are six connecting areas between the three brothers and also two key areas:
  • Icy Place (Barathon -> Radamus)
  • Broken Bridge (Radammus -> Barathon)
  • Coroded Crane (Radamus -> Kael)
  • Ravener (Kael -> Radamus)
  • Ecclesiarchy Vessel (Barathon -> Kael)
  • Mutant Camp (Kael -> Barathon)
  • Voidraven (key)
  • Drop-Pod (key)

The final area is made up of:
  • The Spear of Ophelia
  • The Sabotage Area
  • Sergeant Valerius

So this means you have 6 total paths you can take through the game, but, be warned, some of these paths seem to be buggy! [TODO: I need to do some further testing to see if there are any other key things that trigger these bugs, will make a thread afterwards to inquire about them].
Kael -> Barathon -> Radamus
Middle Section order: Kael, Mutant Camp, Voidraven, Barathon, Drop Pod, Ice Cave, Radamus

Kael -> Radamus-> Barathon
Middle Section order - if you don't skip the Ravener fight: Kael, Ravener, Radamus, Voidraven, Drop Pod, Rock Bridge, Barathon
Middle Section order - if you skip the Ravener fight: Kael, Ravener, Voidraven, Radamus, Drop Pod, [BUG - END OF SECTION - missing Rock Bridge and Barathon!]

So, for some reason, at this time (2019-01-28) Skipping the Ravener fight makes the game bug out and after the drop pod section, you'll end up directly on the Spear of Ophelia!

Radamus -> Barathon -> Kael
Middle Section order: Radamus, Voidraven, Rock Bridge, Barathon, Drop Pod, Ecclesiarchy Vessel, Kael

Radamus -> Kael-> Barathon
Middle Section order: Radamus, Voidraven, Coroded Crane, Kael, Mutant Camp, [BUG - END OF SECTION - missing Barathon and Drop Pod!]

At this time (2019-01-28) after the Mutant Camp section, you just end up on the Spear of Ophelia for no good reason at all!

Barathon -> Rdamus -> Kael
Middle Section order: Barathon, Ice, Radamus, Voidraven, Drop Pod, Coroded Crane, Kael


Barathon -> Kael-> Radamus
Middle Section order - if you don't skip the Ravener fight: Barathon, Ecclesiarchy Vessel, Kael, Ravener, Radamus, Drop Pod

Middle Section order - if you skip the Ravener fight: Barathon, Ecclesiarchy Vessel, Kael, Ravener, Drop Pod, Radamus

NOTE: I suspect these paths are a bit buggy too as they are the only ones where you don't get to visit the Voidraven, which seems to bring some important exposition and probably shouldn't be missable! (Although as far as gameplay goes, it's no big loss I guess - actually, the story probably makes sense just fine without it as well...)

Bonus Buggy Paths
Now, even though i said there are 6 paths, practically there are 2 more paths that are possible due to a bug (again, at the time of 2019-01-28).

In order to trigger this bug, simply pick Brother Barathon first, but then be a coward and don't step through the portal to the Tombship.

Now, for your third brother, you will be able to have a second chance at Barathon! But this means you will actually miss out on your third brother!


Barathon -> Kael -> Barathon
Middle Section order: Barathon, Ecclesiarchy vessel, Kael, Mutant Camp, Drop Pod, Barathon

Barathon -> Radamus -> Barathon
Middle Section order: Barathon, Ice, Radamus, Voidraven, Drop Pod, Rock Bridge, Barathon

If anyone can confirm or deny the bugs I've mentioned above, please let me know in the comments.
Achievements - Part 1
Starting Area
[Achievement: Sword of Ancients]
Find the Relic Blade

How to get it: After teleporting, stay to fight the Broodlord.

[Achievement: Apothecary Ordyss]
Find Brother Ordyss

How to get it: Part of the main story, can't be missed.

Brother Kael
[Achievement: Saxon Harold]
Find the Master-crafted Storm Bolter

How to get it: After fighting the Mekaniak (can't miss this fight), be sure to pick the option "Take a few moments to make a thorough search of the chaber"

[Achievement: Brother Kael]
Find Brother Kael

How to get it: Part of the main story, can't be missed.

[Achievement: Adamantium]
Find the Lightning Claw

How to get it: You find it on Brother Kael. Part of the main story, can't be missed.

[Achievement: Get to tha' Stompa!]
Get inside an Ork Stompa

How to get it: Part of the main story, can't be missed.

Brother Barathon
[Achievement: Brother Barathon]
Find Brother Barathon

How to get it: Part of the main story, but it technically can be missed if you choose to not enter the Tombship. However, You can't finish the area without finding Brother Barathon.

[Achievement: Toasty Falsetto]
Find the Heavy Flamer

How to get it: Same as above, you find it on Brother Barathon.

Epistolary Radamus
[Achievement: Epistolary Radamus]
Find Librarian Radamus

How to get it: Part of the main story, can't miss.

[Achievement: Fist of Dorn]
Find the Thunder Hammer

How to get it: After finding Brother Epistolary Radamus and defeating the Hive Tyrant, be sure to pick the choice "Recover Epistolary Radamus's wargear first"

Connecting Areas - Drop Pod
[Achievement: Zathael's Fury]
Trick a dreadnought to its doom

How to get it: In the area where you find the Iron Warriors' Drop-Pod (should be impossible to miss this area as it is part of the main story) - Open the Drop-Pod and then when confronted with Zathael, pick "Try a different tactic", next you have to pass a <Wheels of Fate> roll with 2 or 3 Fists!

Connecting Areas - Mutant Camp
[Achievement: Hidden Archeotech]
Find a Signum.

How to get it: First of all, you need to go to Brother Barathon immediately after Brother Kael's area. This will make you encounter the Mutant Camp. Search all the corners of the mutant camp to find the Signum. Choices:
Go in search of the Mutants' camp
Make the element of surprise and attack the guard
Keep searching the camp to see what else I can find

Connecting Areas - Icy Place
[Achievement: Come Get Some]
Find the Chainsword

How to get it: First of all, you need to go to Brother Epistolary Radamus immediately after Brother Barathon's area. This way you will come across an Executioners' Vessel trapped in ice. Descend into it and you will find the Chainsword! Choices:
> Smash through the ice
> Descend the ice-cliff
> Use my lightning claw OR > Climb down the crevasse pass a <Wheels of Fate> roll with 2 or 3 Fists
(NOTE: It is easier if you have the lightning claws, otherwise you can die if you fail the wheels of fate roll.)
Achievements - Part 2
Final Area - Spear of Ophelia
[Achievement: Gordon's Alive]
Find the Blessed Blade

How to get it: Part of the main story, can't be missed. Once you reach the Spear of Ophelia, choose to "Examine the blessed blade"

[Achievement: Anything Formed]
Find the Plasma Gun

How to get it: Part of the main story, can't be missed. Once you reach the Spear of Ophelia, choose to "Examine the plasma gun"

Final Area - Sabotage
[Achievement: Sabotage Reactors]
Sabotage the plasma reactors

How to get it: After contacting Sergeant Valerius, choose "Regardless of the impossible task, I will attempt to destroy the space hulk" and then choose "Head for the battleship's engine reactors" It's pretty straight forward from there.

[Achievement: Sabotage Warps]
Sabotage the ancient warp-field generators

How to get it: After contacting Sergeant Valerius, choose "Regardless of the impossible task, I will attempt to destroy the space hulk" and then choose "Seek out the warp-field generators" It's pretty straight forward from there.

Final Area - Endgame
NOTE: For all the following achievements you need to have already met the requirements for the achievement Zathael's Fury in your current playthrough, in other words, you need to successfully trick Zathael into falling off.

[Achievement: Unlikely Ally]
My enemy is my friend!

How to get it: First of all, choose to go after Sergeant Valerius (before or after sabotaging the battleship) You will meet Archon Tenebrax Nox and if you managed to trick Zathael, you will have the option "I believe that a strange fate has come to my rescue" - this gets you the achievement.

[Achievement: Sergeant Valerius]
Find Sergeant Valerius

How to get it: After getting the previous achievement, you must defeat Archon Tenebrax Nox - in order to do this, you need to have at least 25 PURITY! Otherwise you will die before getting to fight him.

[Achievement: Sword of Omens]
Find the Power Sword

How to get it: Same as previous achievement.

[Achievement: Brothers In Arms]
Find all of Squad Scipio

How to get it: You get this at the same time as the previous two achievements, BUT only if you've also found Apothecary Ordyss, Brother Kael, Epistolary Radamus and Brother Barathon. Basically, the first three are impossible to miss if you've reached this point, so just be sure to not skip Brother Barathon.

[Achievement: Herald of Death]
Destroy the Herald of Oblivion

How to get it: First of all, you must be sure to sabotage either the Reactors or the Warp-Drives! Then, you must have reached Sergeant Valerius. If those conditions are met, fight the Talos Pain Engine, but instead of destroying it right away, make sure at least 10 turns have passed! After the 10 turns pass, you must win the battle. Though you are victorious, the hulk is destroyed and you die with it.

[Achievement: Herald of Shame]
Escape the Herald of Oblivion

How to get it: First of all, you must NOT sabogate the Reactors nor the Warp-Drives! Instead, immediately go after Sergeant Valerius as soon as he contacts you! Afterwards, you must actually reach Sergeant Valerius. Next, fight the Talos Pain Engine and win.

[Achievement: Herald of Life]
Destroy the Herald of Oblivion and live
How to get it: First of all, you must be sure to sabogate the Reactors or the Warp-Drives! Afterwards, you must actually reach Sergeant Valerius. Next, fight the Talos Pain Engine and win.
The Shield of Dorn & The Rogue Trader
<SoD 1>
The first choice you are faced with
> Get clear of the ancient teleportation device as quickly as possible
Go to <SoD 2>.

> Stay as Brother Clavis commanded
Go to <SoD 3>
<SoD 2>
A second chance
> Throw myself clear of the teleport
Congratualtions, you just died! Game over, you played yourself.

> I would rather now do as Clavis commands
You LOSE 1 PURITY for being a coward. What kind of astartes would behave so dishonorably?! Are you perhaps some heretic? Anyway, Go to <SoD 3>
<SoD 3>
Teleportation
Unless you just killed yourself, the story will continue and you will end up on The Herald of Oblivion, more precisely, on a Rogue Trader!

But before that, you must roll <Wheels of Fate>
0 or 1 fist - "Your mind reels..." Go to <RT 1>
2 or 3 fists - "Your vision blurs..." Go to <RT 2>
<RT 1>
You just got teleported on the Rogue Trader...
> I will enter into Ranged Combat with the Genestealers
FIGHT 4 Genestealers

> I will charge the Genestealers and engage them in Close Combat
FIGHT 3 Genestealers

> I will remain motionless, in the hope that the Genestealerspass by without ever becoming aware of my presence
FIGHT 4 Genestealers (they attack first)

Regardless of what you fight, go to <RT 3>
<RT 2>
You just got teleported on the Rogue Trader...
> Lash out with my power fist in my left hand
FIGHT 2 Genestealers

> Bring my storm bolter to bear
LOSE 2 WOUNDS, and FIGHT 3 Genestealers

Regardless of what you fight, go to <RT 3>
<RT 3>
So you managed to defeat the genestealers, you are now faced with a choice:
> I will start searching for my battle-brothers
You LOSE 1 PURITY and you must return to the <TL>

> I will hunt down the Genestealers' Broodlord
Go to <RT 4>
<RT 4>
You come across a bulkhead door...
> Try walking the machine-spirit
<Purity Check: 5>
If you fail you can't open the door and you will be faced with the next two choices again. If passed, you manage to open the door - go to <RT 5>

> Use my power fist to tear the hatch from its hinges
FIGHT 3 Genestealers - after which, go to <RT 5>

> Give up on your hunt for the Broodlord and start searching for the rest of Squad Scipio
You LOSE 1 PURITY and you must return to the <TL> (shaking my head at you indecisive coward)
<RT 5>
Surprise attack on the Genestealers nest in the cargo hold!
>Start firing with my storm bolter on full auto
You pretty much murder everyone, but you have to FIGHT the Broodlord

> Seal the door again while the Genestealers are still waking up
You have to FIGHT 2 Genestealers, after which you FIGHT the Broodlord and 2 more Genestealers

>Flee the Genestealers nest as fast as the Emperor will allow
LOSE 2 PURITY, FIGHT 4 Genestealers, afterwards FIGHT the Broodlord and 2 more Genestealers (That's what you get for being a coward!)

So now that you've finished off the Broodlord, you GAIN 2 PURITY, find 3 Clips of 20 Bolter Rounds each, and the ancient RELIC BLADE!

[Achievement: Sword of Ancients]
Find the Relic Blade


Now you must go to <TL>
<TL>
You come across Apothecary Ordyss's signal, but you have a choice:
> Carry out a more comprehensive scan
You find Ordyss' corpse stuck in the wall... If you have more than 6 PURITY, you will extract his essence and GAIN 2 PURITY, otherwise you have to roll the Wheel of Fate and get at least 2 Fists on it!

> Follow the signal I've picked up already without further delay
You find Ordyss still alive, but dying, stuck in the wall... He tells you the CLANDESTINE CODE for extracting Geneseed from your fallen brothers, you extract his geneseed and GAIN 2 PURITY

[Achievement: Apothecary Ordyss]
Find Brother Ordyss


Regardless of choice, you will get Ordyss' gear: 3 Clips of 20 Shots each, the Narthecium, with 5 uses to fully restore your wounds. However, if you don't get the CLANDESTINE CODE, you'll have to roll the Wheel of Fate more later on...

You now have to choose what brother to look for next:
> Search for Brother Kael
> Hunt down Epistolary Radamus
> Attempt to join up with Brother Barathon

Each of these choices will take you to a new area!
Connecting Areas
Connecting Area: Voidraven (Key area)
NOTE: I think this is a "key" story area and shouldn't be missable, however as of 2019-01-28 there is one possible path combination that makes you miss this area!

<Weapon Check: Lightning Claw>
> Use my lightning claw to grab hold of something
> Grab hold of the nearest thing i can
You will have a <Purity Check: 12> and if you fail you DIE!

End of Area.

Connecting Area: Iron Warriors' Drop Pod (Key area)
NOTE: This is a key story area that shouldn't be missable. However, as of 2019-01-28 there is one possible path combination (that also leads to another bug) that makes you miss this area!

Choice
> I want nothing to do with the unopened landing craft
End of Area.
> Try to open the drop-pod
<Purity check>
If you have less than 15 Purity, you won't be able to open the pod! Actually, you'll attempt to fire at it, but it won't work.

Zathael
> Test my mettle against the Dreadnought - I believing in my faith of the emperor and the righteousness of my cause
Obviously, you FIGHT Zathael, he's a tough guy! You GAIN 2 PURITY upon victory and then can continue on your merry way through the hulk!
> Try a different tactic
You will have a <Wheels of Fate> roll:
0 or 1 Fists - Your tricks bacfire and you LOSE 4 WOUNDS but then you REGAIN 3 WOUNDS, so it seems you only lose 1.
2 or 3 Fists - Your tactics work and you trick the dreadnought into falling to its doom and get an achievement!

IMPORTANT NOTE: If you want to successfully defeat the final antagonists in the final stage of the game, you MUST win this wheels of fate roll! Sometimes, no matter your efforts, if fate isn't on your side you can not achieve victory.


[Achievement: Zathael's Fury]
Trick a dreadnought to its doom

End of Area.

Connecting area: Mutant Camp
NOTE: You can only reach this area by going to Brother Barathon immediately after Brother Kael.
NOTE: As of 2019-01-28 there is a bug where in a specific path order you will not arrive at Brother Barathon's area after finishing this area - The Radamus, Kael, Barathon path. Instead Brother Barathon's area will simply be skipped!

<Purity Check: 9> If you fail, you will LOSE 5 WOUNDS!

After the check, you will FIGHT 6 Bilge Mutants.

Choice
> I don't want to waste time hunting for more of the xenos-loving freaks - continue with my primary mission
If you choose this, you'll have a <Wheel of Fate> roll and if you roll 0 or 1 Fists, you'll have to FIGHT 1 Bilge Spider. Afterwards, go to the next Brother Barathon section.
> Go in search of the Mutants' camp
Self explanatory.

Mutant Camp Entrance
> Mutants' camp - continue my quest to find Brother Barathon
Go to the next Brother Barathon section.
> Make the element of surprise and attack the guard
FIGHT 1 Scalie. You'll get 6 clips of 20 bolt rounds soon after.

Mutant Camp
> I would rather continue your search for my lost battle-brother
[NOTE: the phrasing is exactly like this in the game, guess this one slipped past QA!]
Go to the next Brother Barathon section.
> Keep searching the camp to see what else I can find
You find a signum and get an achievement!

[Achievement: Hidden Archeotech]
Find a Signum.


You're done here! Go to the next Brother Barathon section.

Connecting area: Ravener Encounter
NOTE: You can only reach this area by going to Epistolary Radamus immediately after Brother Kael.

> I would rather not risk battling the monster in its lair
End of section. Go to Epistolary Radamus
> Follow the Ravener into the tunnel
FIGHT 2 Raveners.

End of section. Go to Epistolary Radamus

Connecting area: Ecclesiarchy vessel
NOTE: You can only reach this area by going to Brother Kael immediately after Brother Barathon.

FIGHT 2 Arco-flagelant then move on to Brother Kael

Connecting area: Icy place
NOTE: You can only reach this area by going to Epistolary Radamus immediately after Brother Barathon.

Executioners vesel trapped in the ice
> Continue trekking across the glacial vault
Go to the next Epistolary Radamus section.
> Smash through the ice
You get to explore the vesel...

Second thoughts? You can change your mind about exploring.
> I do not want to be side-tracked any longer
Go to the next Epistolary Radamus section.
> Descend the ice-cliff
Down you go!

Dangerous descent!
<Weapon Check>
> Use my lightning claw
You safely descend
> Climb down the crevasse
You roll the <Wheels of fate>
0 or 1 Fists - "You slowly descend..." - you safely descend!
2 or 3 Fists - "The ground trembles..." - you rush the descent and you DIE!

You find the chainsword! Nice! If you choose to take it, you GAIN 1 PURITY!


[Achievement: Come Get Some]
Find the Chainsword

You are done here, so go to the next Epistolary Radamus section.

Connecting area: Rock Bridge
NOTE: You can only reach this area by going to Brother Barathon immediately after Epistolary Radamus.


> Cross the rock bridge regardless
<Purity check: 11> Failure means you LOSE 4 WOUNDS. Go to Brother Barathon
> Fire on the spore mine with my bolter
<Wheels of Fate>
0 or 1 fists - "Ftoom!" You succeed, nothing bad happens. Go to Brother Barathon
2 or 3 fists - "Boom!" The bridge gets destroyed. You can not proceed to brother Baratheon this way anymore!

> Avoid having to cross the gulf and search for another battle-brother
Only if Epistolary Barathon was the first brother you searched for and Brother Barathon is the second. You can choose to go after Brother Kael instead.

Connecting area: Coroded Crane
NOTE: You can only reach this area by going to Brother Kael immediately after Epistolary Radamus.

>continue along this path
Nothing bad happens. Go to Brother Kael

>search for one of mmy other brothers
Only if Epistolary Barathon was the first brother you searched for and Brother Kael is the second. You can choose to go after Brother Barathon instead.

NOTE: You can get an infinite loop going where you change your mind about going to either Barathon and Kael forever! Neat, huh?

Brother Kael - Adeptus Mechanicus Vessel
Start
If you have the Flamethrower from Brother Barathon, you will have an extra option here.
<Weapon Check: Heavy Flamethrower>
> Use the heavy flamer
You destroy the orc fungi.
> I have nothing to burn the fungi enough to eradicate them entirely
This will come back to bite you later.

You will come to a point where you can
> Head west
You head closer to Brother Kael - Go to <West 1>
> Head east
You head away from Brother Kael - Go to East 1
<West 1>
If you head closer to Brother Kael, you will come across some ork machines...
> Issue the greenskins with a formal challenge
Go to <West 3> (Trukk n Warbike)
> Try taking out the fuel dump to get their attention
<Wheels of Fate>
0 or 1 fists - You look to the left: Go to <West 4> (Deathroller)
2 or 3 fists - You look to the right: Go to <West 3> (Trukk n Warbike)
> Target one of the mobs
Go to <West 2>
<West 2>
Choose orks to target
> Target the blue Orks
Go to <West 4> (Deathroller)
> Target the Orks with the red vehicles
Go to <West 3> (Trukk n Warbike)
<West 3>
Ork vehicles are rushing you
> Target the Trukk
Go to <West 4> (Deathroller)
> Target the Warbike
Jump over to East 1!
> Try to get out of their way
<Wheels of Fate>
0 or 1 fists - You Target the Warbike anyway - Jump over to East 1!
2 or 3 fists - You Target the Trukk anyway - Go to <West 4> (Deathroller)
<West 4>
The Deathroller
> Stand and face the monstrous machine
You LOSE 4 WOUNDS
> Turn and run before the clanking battlewagon's charge
You LOSE 4 WOUNDS and LOSE 2 PURITY

Regardless of what you do against the Deathroller, you will get knocked the F out. Go to <Stompa 1>
<East 1>
If you head away from Brother Kael, you will come across a pipe...
> Enter the pipe to investigate
FIGHT 1 Squig and are faced with another choice. Go to <East 3>
> Proceed along the route i am currently following
FIGHT 4 Ork Boyz and then go to Vast vaulted ante-chamber
> Re-trace my steps to the junction and head the other way
Go to <West 1>
<East 2>
Back at the pipe entrance
>Keep heading east
FIGHT 4 Ork Boyz and then go to Vast vaulted ante-chamber <East 5>
>Turn left and head west at the T-junction
Go to <West 1>
<East 3>
In the pipe...
> Continue to advance along the pipe
Go to <East 4>
> Retreat and exit the pipe
Go to <East 2>
<East 4>
Beyond the Pipe
No matter what you do here, you will end up fighting some Orks in a Vast vaulted ante-chamber, but some different stuff can happen along the way
> Escape the sump by scaling the corroded wall
FIGHT 1 Sump-Lurker; go to Vast vaulted ante-chamber <East 5>
> Try to open the door
You have to fight off the door's defences

<Weapon check>
> Use my storm bolter
LOSE 8 WOUNDS
> Use my relic blade
Nothing bad happens

Beyond the door you can choose to
> I would rather leave the dead be, exit the forgotten chamber and start to make my way out of the bilges
FIGHT 1 Sump-Lurker; go to Vast vaulted ante-chamber <East 5>
> Search the chamber
You find some sort of info that helps you murder Tyranids better (??? does this really help?)
After getting this, you can also search the bodies!
> Search the bodies
FIGHT 1 Dead Tech Priest and then...


> Locked? Perhaps the digi-wand will be useful here
> Exit the Tech-priest's final resting place and try to escape the bilges of the Mechanicus ark
FIGHT 1 Sump-Lurker; go to Vast vaulted ante-chamber <East 5>


> Pass through this new portal to face whatever lies beyond
After the two choices above, you find the cyber-skull of Magos Vorrich and you also end up in the Vast vaulted ante-chamber, but are forced into the better tactical choice there. Go to <East 5>.
> Exit the Tech-priest's final resting place and try to escape the bilges of the Mechanicus ark
FIGHT 1 Sump-Lurker; go to Vast vaulted ante-chamber <East 5>
<East 5>
Orks in the "vast vaulted ante-chamber"
> Charge into the fray, blasting away screaming my Chapter cry
FIGHT 5 Ork Gretchin, 1 Ork Nub, 4 Ork Boys - this wasn't very smart now was it?
> Man one of the emplacements and use the autocannon mounted there to fire into the Ork host
FIGHT 3 Ork Gretchin, GAIN 1 PURITY (NOTE: You will be forced into this choice if you have the cyber-skull of Magos Vorrich with you)
Regardless of how you deal with the Orks, you will LOSE 4 WOUNDS and get knocked unconscious!

Go to <Stompa 1>
<Stompa 1>
No matter what you did before, you will end up having to FIGHT 1 Ork Mekaniak after which...
> Take a few moments to make a thorough search of the chaber
You find Brother Kael's stormbolter!
[Achievement: Saxon Harold]
Find the Master-crafted Storm Bolter

> Leave in pursuit of the Gretchin
Nothing of interest

Next, you FIGHT 1 Ork Painboy, after which you can choose to recover Brother Kael's Lightning Claw.
[Achievement: Brother Kael]
Find Brother Kael


[Achievement: Adamantium]
Find the Lightning Claw


You will attempt to extract Brother Kael's geneseed, if you have the code, you just GAIN 2 PURITY, otherwise you have to pass a <Purity Check: 6> and if you fail LOSE 1 PURITY instead!

Next you'll FIGHT 2 Ork Boys and you'll have to destroy an Ork Stompa!
> try to create a distraction of some kind
It works!
> try the more direct approach and charge the orks
You FIGHT 6 Ork Boys!

Destroying the Stompa
[Achievement: Get to tha' Stompa!]
Get inside an Ork Stompa


> Head down, into the belly of the beast
It's the right way!
> Head higher into the structure
FIGHT 1 Ork Shaman and LOSE 3 WOUNDS, after which you have to go down regardless.

Down in the belly of the Stompa you'll FIGHT 1 Ork Mekaniak and 5 Ork Gretchin! If you kill the Mekaniak first, you win and don't have to kill the Gretchin.

<Wheel of Fate>
0 or 1 Fists - FIGHT 1 Killa Kan with a 5 TURN time limit!
2 or 3 Fists - FIGHT 1 Ork Boy with a 3 TURN time limit!

After destroying the Stompa, you GAIN 3 PURITY!

If you didn't previously destroy the fungus, you FIGHT 6 Squigs!

Now you can
>Set off in search of Brother Barathon
>I choose to go in search of Epistolary Radamus[/table]

Brother Barathon - Tombship
There's already a cool guide for this section, so check it out:

Necron portal-pool
> Attempt to pass through the portal-pool and see where it takes me
You enter the maze!
> Turn back now while I still can, before Brother Barathon's fate becomes my own
You LOSE 2 PURITY and then you can go look for another Brother. (You gonna turn your back on them too?!)

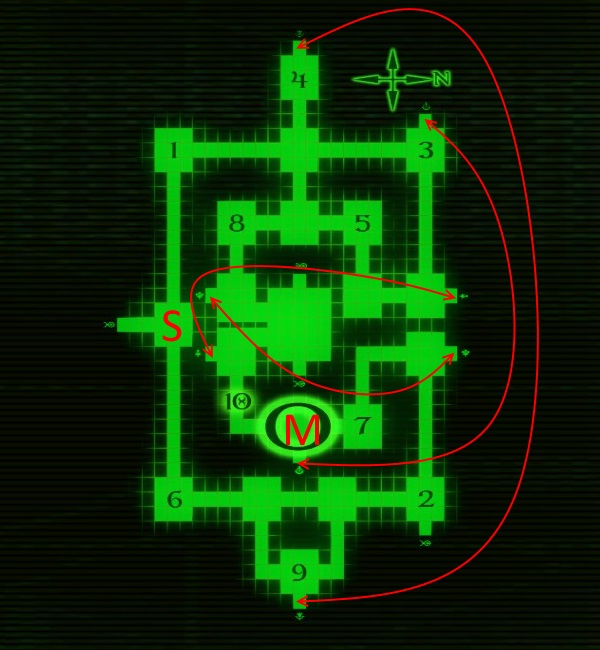
Map of the Maze

Node 1: If you try to fight the alien weapon you just DIE! RIP. Game over man. <PURITY Check> If you leave but have less than 8 PURITY, you LOSE 3 WOUNDS!

Node 2: On your second visit, FIGHT 3 Necron Warriors. If you try to leave through the eastern portal, you die.

Node 3: FIGHT 1 Canoptek Spyder each time you visit.

Node 4: FIGHT 5 Necron Warriors the first time you enter. FIGHT 4 Necron Warriors each time you visit afterwards.

Node 5: <Purity Check> LOSE 2 WOUNDS if you have less than 12 PURITY. FIGHT 1 Canoptek Wraith

Node 6: You find some info that you should destroy the Crystals if you check out the trader's corpse.

Node 7: If you chose to destroy the crystal FIGHT 1 Necron Warrior and LOSE 3 WOUNDS.

Node 8: FIGHT 1 Canoptek Scarab Swarm.

Node 9: On your second visit, FIGHT 1 Necron Immortal.

Node 10: Brother Barathon is here, and he has a Flamethrower for You! ALso some Plasma Bombs that you will need if you are to survive this place. If you return here, LOSE 4 WOUNDS each time. If you manage to extract his gene-seed (either you have the CLANDESTINE CODE or you pass the <Wheels of Fate> by rolling 2 or 3 fists, you will GAIN 2 PURITY, otherwise you LOSE 1 PURITY.


[Achievement: Brother Barathon]
Find Brother Barathon


[Achievement: Toasty Falsetto]
Find the Heavy Flamer


Central Room: FIGHT a pair of Tomb Stalkers and then...

Harbinger of Woe
> Flee from the chamber in the face of this Harbinger's chilling wrath
You die. You should have learned by now what happens to cowards.
> Attack the gigantic Necron
LOSE 5 WOUNDS! Afterwards you can choose:
>> Persist with my attack on the Harbinger
You just die.
>> Attempt to destroy the crystal instead
> Attempt to destroy the pulsing crystal
You will face a <Weapon check>
>> Fire on it using Brother Kael's storm bolter
You LOSE 1 PURITY and you have to try something else:
>>> Flee the sepulchre
You die.
>> I would rather take the fight to the gigantic Necron.
You LOSE 5 WOUNDS and afterwards you can choose to persist (and die) or try to destroy the crystal again. Note: you can end up in an endless loop here and just keep on losing wounds until you die :)
>>> Use my plasma bombs i found on Brother Barathon
>> Use my plasma bombs i found on Brother Barathon
The only right choice!
<Check>
If you destroyed fewer than 4 crystals, you will just ♥♥♥♥♥♥ DIE!

Escape
> Run through the shimmering portal in the western wall
The only right choice. You GAIN 3 PURITY!
> Escape via the portal int he eastern wall of the chamber
You end up on the Necrontyr homeworld with no way back, so you'll just die.
> Flee back through the Tombship the way I came
You guessed it - you DIE!!!
Epistolary Radamus - Tyranid bio-ship
<Start>
<Purity Check: 13>
If you pass you manage to contact Brother Radamus!

...Epistolary Radamus is somewhere ahead but which branch of the passageway will you take to him?
> Go Left
Go to <L>
> Take the right branch
Go to <R>
<L>
Left - Another junction...
> Follow the passage to the left
Go to <LL>
> Follow the passage to the right
Go to <LR>
<LL>
Left - Left (Breezy tunnel)
> Take the right-hand exit
Go to to <LLR>
> Choose the wider tunnel to the left
Go to <LLL>
<LR>
Left - Right (Spore Mines)
> Return to the last junction and go the other way
Go to <LL>
> Open fire ont he spore mines using my bolter
LOSE 3 WOUNDS
> Try to pass through the chamber without disturbing any of the mines
<Wheels of fate>
0 or 1 fists - "You stumble..." you LOSE 5 WOUNDS
2 or 3 fists - "You inch forward... another roll!
<Wheels of fate>
0 or 1 fists - "You hesitate..." you LOSE 5 WOUNDS
2 or 3 fists - "You run!" yet another roll! The third time's a charm!
<Wheels of fate>
0 or 1 fists - "You hesitate..." you LOSE 5 WOUNDS
2 or 3 fists - "You run..." you GAIN 1 PURITY! Wow, all that for 1 Purity?! Rough times...

After dealing with the spore mines...
> Follow the curving passageway away to the left
Go to <LLL>
> Head right, through the sphincter-door
Go to <Pits>
<LLL>
Left - Left - Left
<Weapon Check: Lightning Claw>
> Use my lightning claw to get a firmer grip
Go to <LLR>
> Brace myself for the ride
If you don't have the lightning claw, you must pass a <Purity Check: 10> - If you fail this, you DIE! If pass the purity check, go to <LLR>
<LLR>
Left - Left - Right (Carnifex)
> Open fire on the Carnifex while it is still unaware of my presence
FIGHT the Carnifex
> Proceed on my way through the gallery
<Spore mine check>
> Yes, sadly i triggered a few!
FIGHT the Carnifex
> No, I was extremely careful
<Wheel of fate>
0 or 1 - "You edge along carefully..." no fighting...
2 or 3 - "You push on..." FIGHT the Carnifex

After the Carnifex, there's the Pyrovore
> I will charge in and tackle the Tyranid in close combat
LOSE 3 WOUNDS
> I will engage the Pyrovore in combat from afar

Regardless of choice, you do FIGHT the Pyrovore; after defeating it:
<Wheels of fate>
2 or 3 fists - "Boom!" You LOSE 5 WOUNDS!
0 or 1 fists - "Tsssssssss...."
<Weapon Check: Lightning Claw>
> Use my lightning claw to get a firmer grip
Nothing bad happens.
> Brace myself for the ride
<Wheels of fate 2>
0 or 1 fists - "You slip..." and you DIE! Game over.
2 or 3 fists - "You hang on..." and nothing bad happens.


Regardless, you end up in the Rending Pits! Go to <Pits>
<R>
Right - Parasitic gut dwellers
> Proceed along the passageway without doing anything to draw attention to myself
Go to <RA>
> Avoid this passageway altogether, return to the last junction and take the left-hand branch
Go to <L>
> Attack the parasitic gut-dwellers
FIGHT the Tyrannoforms after which you have the same previous choice:

> Proceed along this tube-like tununel
Go to <RA>
> Retrace my steps to the junctiona nd take the left-hand branch
Go to <L>
<RA>
Right - Ahead - In time the fleshy pipe you are traversing branches again...
> Go Left
Go to <RAL>
> Go Right
Go to <RAR>
<RAL>
Right - Ahead - Left - Tentacles!
> Backtrack and go a different way
Go to <RAR> instead.
> Advance towards the tentacles
FIGHT the Ripper Tentacles and then...

Sphincters
> Choose the sphincter on the left
Go to <RALL>
> Choose the one on the right
Go to <RALR>
<RAR>
Right - Ahead - Right
> Return to the last junction and follow the gill-fronded passageway instead
Go to <RAL> instead.
> Enter this new tunnel and descend further into the belly of the beast
Go to <RARD>.
<RARD>
Right - Ahead - Right - Down - Thorny corridor
<Purity Check: 9> If you fail you LOSE 2 WOUNDS.

After this, you FIGHT 1 Lictor.

After the fight you can go to <Pits>
<RALL>
Right - Ahead - Left - Left
<Weapon Check: Lightning Claw>
> Use my lightning claw
Go to the <Pits>
> Brace myself for the ride
<Wheels of fate 2>
0 or 1 fists - "You slip..." and you DIE! Game over.
2 or 3 fists - "You hang on..." Go to the <Pits>
<RALR>
Right - Ahead - Left - Right
<Wheels of Fate>

0 or 1 Fists - "You hear a distant chitter..." FIGHT 1 Fleshborer Hive
> Leave via the left-hand upward sloping tunnel
FIGHT 1 Venomthrope (5 TURN limit) then go to <Pits>
> Leave via the right-hand descending passageway
Go to <RARD>

2 or 3 Fists - "All around seems quiet..."
> Choose the upwardly sloping path to the left
FIGHT 1 Venomthrope (5 TURN limit) then go to <Pits>
> Choose the steeply descending tunnel to the right
Same as rolling 0 or 1 fist
<Pits>
Rending Pits
Depending on how you did in the Tyranid bio-ship, you'll have one of these options:
> One organism
FIGHT the Ripper Swarm
> Two or three organisms
FIGHT 4 Termagants (They go first!)
> Three or more denizens of the Hive Ship
FIGHT 2 Tyranid Warriors

After the fight, you have a <Purity Check: 7> If you fail you LOSE 5 PURITY! If you pass you GAIN 1 PURITY!

So anway, you're finally reunited with Epistolary Radamus!


[Achievement: Epistolary Radamus]
Find Librarian Radamus

Hive Tyrant
> Grant Epistolary Radamus the Emperor's peace and put him out of his misery
Without Radamus to help you against the Hive Tyrant, you DIE!
> Attack the HIve Tyrant using my own wargear
You LOSE 2 WOUNDS!
> Attempt to recover Epistolary Radamus' Wargear in order to use the Force Hammer and Storm Shield
You LOSE 3 WOUNDS and then you also LOSE 2 WOUNDS!

So you defeated the Hive Tyrant!
> Recover Epistolary Radamus's wargear first
You'll probably want to do this first! You can choose between the other two options afterwards.

[Achievement: Fist of Dorn]
Find the Thunder Hammer

> Turn tail and flee immediately
You LOSE 3 PURITY and gain NOTHING!

>I don't want to go anywhere until I've been able to recover his gene-seed
If you do this first, you won't be able to get Radamus' wargear! But regardless, you'll GAIN 2 PURITY if you are sucessful!

And with that, you are almost done here!
<Lictor kill check>
If you didn't kill the Lictor in the Tyranid ship, you'll have to roll the <Wheels of Fate>
0 or 1 Fists - "The rumbling increases..." You get digested by the ship and you DIE!
2 or 3 Fists - "The rumbling passes..." You escape unharmed...
Sergeant Valerius
<Ophelia>
Spear of Ophelia

You GAIN 3 PURITY and all your WOUNDS RESTORED! Nice!

> Examine the blessed blade

[Achievement: Gordon's Alive]
Find the Blessed Blade

> Examine the plasma gun

[Achievement: Anything Formed]
Find the Plasma Gun

Once you're done, you go to <Valerius>.
<Valerius>
Sergeant Valerius - First Contact
<Item Check>
If you have the Signum from the Mutant Camp you can improve your vox reception and talk to your captain.

> Go after Sergeant Valerius
LOSE 2 PURITY and go to <Endgame>
> Regardless of the impossible task, I will attempt to destroy the space hulk
The right choice, this is your mission after all! Go to <Destruction>
<Destruction>
Destroying the hulk
> Head for the battleship's engine reactors
Go to <Reactor>
> Seek out the warp-field generators
Go to <Warp>
> Make finding Sergeant Valerius my priority
You LOSE 2 PURITY, go to <Endgame>
<Reactor>
Reactor
FIGHT a Donorian Clawed Fiend

<Purity Check: 14> Regardless of outcome, you FIGHT a Beastmaster and he goes first, but if you have fail the check, in addition to this fight, you only have 2 actions for the first 3 turns.

Rigging the reactors to blow

[Achievement: Sabotage Reactors]
Sabotage the plasma reactors


> Evacuate the derelict as quickly as i can
You escape, and you destroy the Herald of Oblivion, but this isn't one of the proper endings, since you were a coward and didn't go after your Sergeant! What kind of Astartes would just give up on his brother-sergeant like that?!

> Go after Sergeant Valerius
Go to <Endgame>
<Warp>
Warp-Field Generators
FIGHT 2 Khymeras.

<Purity Check: 22> If you fail, you LOSE 6 WOUNDS!

FIGHT the Mandrake. Upon victory, you GAIN 1 PURITY and an achievement for sabotaging the warp field generators!


[Achievement: Sabotage Warps]
Sabotage the ancient warp-field generators


> Evacuate the derelict as quickly as i can
You escape, and you destroy the Herald of Oblivion, but this isn't one of the proper endings, since you were a coward and didn't go after your Sergeant! What kind of Astartes would just give up on his brother-sergeant like that?!

> Go after Sergeant Valerius
Go to <Endgame>
<Endgame>
Endgame
<Wheels of fate>
0 or 1 fists - "The Signal fades..."
2 or 3 fists - "The signal grows stronger..."

For some reason, it doesn't seem to matter what the outcome of this roll is...

Archon Tenebrax Nox
> Resist the Archon's forces, even though such an action may appear futile
You FIGHT 4 Wyches with a 3 TURN LIMIT, you might win, but you are still in a predicament.
> Accept the truth of the situation and surrender in the face of overwhelming odds
You LOSE 2 PURITY!

Plot twist?
> I am at a loss - my fate is sealed
Indeed, this is game over for you!
> I believe that a strange fate has come to my rescue
You can unlock this if you manage to trick Zathael into falling earlier in the Iron Warriors' Drop Pod encounter! You'll get an achievement for it and most importantly, you get a chance to fight for the best possible ending!


[Achievement: Unlikely Ally]
My enemy is my friend!

<Wheels of Fate>
0 or 1 Fists - "A hulking reptilian mass bars your way..." You FIGHT Sslyth
2 or 3 Fists - "A shadow darts across your path..." You FIGHT Lhamaean

<Purity Check: 25>
If you fail this you just get OWNED by Archon and DIE! Game over! Oof.
If you pass the check, you FIGHT Archon Tenebrax Nox.

Upon victory you GAIN 3 PURITY and a bunch of achievements!


[Achievement: Sergeant Valerius]
Find Sergeant Valerius


[Achievement: Sword of Omens]
Find the Power Sword


[Achievement: Brothers In Arms]
Find all of Squad Scipio
NOTE: You only get this if you found all other brothers in this playthrough!

Talos Pain Engine
> Ready myself to take on this behemoth
> I cannot bring myself to attack my erstwhile Sergeant
You LOSE 5 WOUNDS

Either way, you FIGHT the Talos Pain Engine with a 10 TURN LIMIT!

Turn Limit Failure
If you are victorious but take more than 10 turns, the Herald of Oblivion is destroyed and you go along with it. For this, you get an achievement.


[Achievement: Herald of Death]
Destroy the Herald of Oblivion

Victory
> Activate Valerius's teleport homer and return to the strike cruiser
> Pursue the fleeing Haemonculus - I will have my revenge!
FIGHT 2 Wracks and then you activate the teleporter anyway.

if you failed to previously sabotaged the reactors or the warp-field generators you get the achievement Herald of Shame! You survive, but you failed in your mission to destroy the hulk!


[Achievement: Herald of Shame]
Escape the Herald of Oblivion

If you sabotaged the reactors or warp-field generators, then congratulations, you just got the best possible ending!


[Achievement: Herald of Life]
Destroy the Herald of Oblivion and live


THE END.
7 Comments
ActiveMars828 Jul 30, 2020 @ 4:08am 
You can miss Get to tha' Stompa if you find the Arch-Magos and he goes and gets the Warhound Titan to destroy the Stompa for you.
El Henrico Jul 16, 2020 @ 1:59am 
I did not get the Stompa achievement either. I just watched it fighting the Warhound and blowing up.

Anyway many thanks for this very helpful guide!!
Narcissistic Cannibal May 28, 2020 @ 9:14am 
Thanks for this comprehensive guide!
*Evil  [author] Mar 23, 2020 @ 3:42pm 
Huh, that's odd... Been a while, but I don't think that should happen.
MasterionX Mar 23, 2020 @ 9:08am 
[Achievement: Get to tha' Stompa!]
Get inside an Ork Stompa
How to get it: Part of the main story, can't be missed.

Well, there was a miss for me :steamsad:
die peacefully Jun 11, 2019 @ 9:55pm 
luckly I checked this guide right before I picked 2nd route after Barathon route. Thanks! :blacklegion:
Seed of Power May 19, 2019 @ 8:21pm 
Thanks for making this. :pitiless: