Epic Battle Fantasy 5

Epic Battle Fantasy 5

Not enough ratings
Final Boss Guide [Epic Difficulty] [v1.2]
By Traysandor
Tired of getting your butt kicked by the final boss of Epic Battle Fantasy 5? This Guide is here to help you win the day! Done on Epic Difficulty, but strategies will work on lower difficulties too. CONTAINS SPOILERS!
   
Award
Favorite
Favorited
Unfavorite
Introduction
Welcome to this Epic Battle Fantasy 5 Final Boss Guide. This is written and compiled to help players defeat the final boss. While the Guide is written for Epic Dificulty, the strategies and tactics will easily work for lower difficulties as well.

It goes without saying that from here on, this guide will contain SPOILERS for the final boss, so if you want to try this on your own and not be spoiled, please do not read any further

Version History:

v 0.1 - January 4, 2019 - Guide Construction Started, Work In Progress
v 1.0 - January 7, 2019 - Construction Completed, Initial Public Launch


Without any further delay, let's get on to why you're here. You're having trouble with the final boss who keeps wiping your party out... This Guide was assembled to help you give the best chance at coming out victorious!
Characters
Work In Progress

This section covers the individual characters and their respective Base Abilities, or what you will most likely be using during the final battle. This section only focuses on what starting abilities each character has that would be most effective in the final battle. Additional Skills and Abilities will be covered in the next section.

Rundown is given by Order of Appearance in the Game

Matt

- Spinning Cyclone (Phase 2 and 3)
- Unleash
- Revenge
- Legend
- Seiken, Cataclysm, Typhoon, Eruption, Iceberg, and Overgrowth

Limit Breaks:
- Cleaver
- Ragnarok


NoLegs

- Final Cutter, Tornado Tantrum, Water Whirl, Bolt Boogie, Divine Divide, Twilight Tango

- Blade Blitz
- Star Blast
- Nine Lives (IMPORTANT)
- Sushi Cat

Limit Braks
- The Destroyer
- The Creator


Natalie

- Fire, Ice, and Thunder Storm
- Dark Pulse, Pulsar
- Holy Light, Judgement
- Rainbow Blast
- Syphon

Limit Breaks:
- 7th Heaven (IMPORTANT)


Anna

- Piercing Shot
- Arrow Rain (Phase 2 and 3)
- Combo Shot
- Razor Leaf
- Lumber
- Hurricane
- Elemental Arrows (Holy, Electric, Water, Ice, Bomb)

Limit Break
- Mighty Oak


Lance
- Unload
- Plasma Field, Bullet Hell
- Antimatter Flux
- Air Strike
- M.O.A.B.
- Health Strike
- Hyper Beam (After Limit Break)

Limit Breaks
- Oblivion
- Ion Cannon (Charges Lance's Hyper Beam when used)
Skills, Abilities, and Equipment
Work In Progress

Additional Skills and Abilities That Can Help In The Final Battle. I've listed the character that benefits the most from having the equipped ability, but feel free to tinker around with these.

Purify [Anyone but Lance] - AoE Status Ailment Heal- This works on Enemies too and will be absolutely critical to dispel status ailments for Phases 2 and 3, so don't forget it!

Surge [Matt] - Single Target Electric Damage
Purging Flame [Anyone but NoLegs] - Dispels Target and Debuffs MAtk
Giga Drill [Lance] - Earth Attack, stronger if enemy is buffed or Defending
Gaia Blossom [Natalie or Anna] - Magic Earth Attack. May cause Tired debuff
Energy Barrage [Natalie or NoLegs] - Magical Bomb Damage that may Stagger Targets
Debilitate [Natalie or Lance] - Reduces Enemy Defenses.
Dispel [Anyone but NoLegs] - Removes Buffs/Debuffs
Bind [Matt, Lance, Anna] - Lowers Evasion of All Tasrgets
Healmore [Anyone but Lance] - AoE Healing Spell.
Revive [Natalie or Anna] - Revives Target. Gives Auto-Life if target is already alive.
Power Metal [Lance] - Wind Attack plus heals everyone
Screamer [Anna] - Dark Magic + Debuff Attack


Equipment

This should be obvious, but for taking on the final boss, you want all your equipment to be Level 5 if possible. Flair only goes up to Level 3.

SWORDS
- Heaven's Gate [Holy]
- Berzerker [Non-Elemental]
- Inferno [Fire]
- Ice Needle [Ice]
- Lightning Shard [Electric]
- Sapphire Saint [Water]
- Black Fang [Dark]
- Giant Slayer [Non-Elemental]
- Hyper Drill [Earth]
- Devil's Fork [Fire/Buff]
- Crimson Razorback [Wind]
- Fusion Blade [Bomb]


STAVES
- Dragon Wings [Fire]
- Elder's Wisdom [Earth/Buff Bonus]
- Obsidian Staff [Dark]
- Celtic Cross [Holy]
- Dark Tooth [Dark]
- Paper Fan [Wind]
- Shooting Star [Non-Elemental]


GUNS
- Nitro Bomber XL [Bomb]
- Hellfire Shotgun [Fire]
- Thunder Core [Elecrtic]
- Deep Blue [Water]
- Vortex Cannon [Wind]
- Shadow Blaster [Dark]
- Heavy Claw [Bomb]
- Accelerator [Non-Elemental]
- Heartstopper [Electric]
- Gungnir [Non-Elemental]

BOWS
- Cold Steel [Ice]
- Aquamarine [Water]
- Gaia's Gift [Earth]
- Crimson Dragon [Fire]
- Iron Tusk [Bomb]
- Fernir's Jaw [Non-Elemental]
- Juggernaut [Bomb]
- Eagle Eye [Non-Elemental]
- Chieftain's Horns [Wind]
- Regal Turtle [Holy]
- Black Widow
- Earth's Whisper [Earth]

TOYS
- Steel Buckler [Non-Elemental]
- Bandit Blade [Water]
- Neon Lightbulb [Electric]
- Riot Shield [Dark]
- Dog Sausage [Fire]
- Icecream Sandwich [Ice]
- Godly Book [Holy]
- Pixel Popper [Non-Elemental]

MALE HATS
- Knight's Helmet [Summon]
- Spartan Helmet [Morale]
- Army Helmet [Healing]
- Officer's Hat [Summon]
- Space Helmet [Regen]
- Wizard's Hat [Protect from Syphon, Phase 1]
- Headband [Brave]


MALE ARMOR
- Captain's Coat [Summon]
- Heroic Armor [Defense]
- Viking Fur [Summon]
- Spartan Curiass [Summon]
- Dragon Armor [Elemental Resistance]
- Camo Jacket [Summon]
- Officer's Jacket [Summon]
- Wizard Robe [Protect from Sypon, Phase 1]
- Turtle Gi [Stat Buff / Morale, Phase 2/3]
- Priest's Tunic [Auto-Revive]


FEMALE HATS
- Red Ribbon [Auto-Revive, Elemental Resistance]
- Amber Bobble [Morale Summon] [RECOMMENDED FOR PHASE 2]
- Fur Hat [Summon]
- Cat Ears [Summon]
- Ice Shards [Summon]
- Slime Bunny [Summon] [Helpful for Phase 2/3]
- Rubber Duck [Buff Bonus] [RECOMMENDED FOR NATALIE]
- Ice Shards [Summon]
- Blue Elephant [Summon]
- Holly Hairpin [Healing?]

FEMALE ARMOR
- Fur Dress [Haste Summon] [RECOMMENDED]
- Dark Gown [Dark Bonus]
- Camo Skirt [Healing Summon] [RECOMMENDED]
- Sami Dress [Buff Bonus] [Can't Go Wrong]
- Casual Skirt [Buff Bonus] [Can't Go Wrong]
- Santa Skirt [Healing?]


FLAIR

Flair can be mixed and matched depending on your needs, so feel free to mix and match to the best of your ability.

- Flame/Lightning/Ice Badges
- Pearl Necklace
- Surgical Mask
- Angel Pin
- Iron Cross
- Battle Paint [RECOMMENDED]
- Lucky Clover
- Hoop Earrings
- The Tr*force
- Fairy
- Pocket Watch [RECOMMENDED]
- Angry Faic
- Balance Badge
- Tentacle
- Amethyst Earrings
- Fat Fly
- Big Eyebrows
Summons
Work In Progress

Summonable Allies will help you dutring the final boss fight... You probably know that already if you've made it this far, but if you're missing some really helpful summons, fear not!

The Summon Locations I have compiled for the final boss battle can be obtained regardless of where you are in the game and what other encounters you have already completed, as the following encounters will respawn when you leave the area. So you accidentally defeat the monsters in question or they surrender and run away before they can be caught, you can just try again!

Summons will always 100% hit a target and always inflict whatever assorted buffs, debuffs or status effects / ailments that are associated with the summon in question.

Putrid Worm - Wild Tropics B-5
Summon Cost: 16
Effect: Minor Damage + Massive Single Target Evasion Debuff. The evasion debuff will come in handy on Phase 1.

Dirt Boulder - Wild Tropics B-5
Summon Cost: 32
Effect: Minor Earth Damage + Makes All Enemies Tired. Tired targets lose Evade and Accuracy every turn, which can help in Phases 2 and 3.


Stumpy Gloop - Anna's House K-2
Summon Cost: 24
Effect: Gives Allies Morale. If Allies' HP is over 50%, no single attack can KO anyone, regardless of how much damage it does. If an ally would be KO'd by a powerful attack, they are instead left with 1 HP. Useful when Phase 2 does an ultimate attack.


Yellow Flybot - Iron Fortress J-5
Summon Cost: 27
Effect: Inverts buffs of all enemies. Positive buffs become negatives. It should be obvious the usefulness of this summon.


Angel Mirror - 30-Medal Room in Grand Gallery
Summon Cost: 27
Effect: Immunity to magic will help against an ultimate attack in Phase 2. Note that this does come at the cost of becoming weak to physical attacks, so you may wind up getting KO'd by physical attacks in exchange for avoiding a big magic attack.


Pink Squid - Rainbow River [K-7]
Summon Cost: 86
Effect: Strong Dark Damage + Gives Invisible Status to Enemy
- Invisible targets are immune to Physical Attacks... But take Double Magic Damage! This summon will prove very helpful against the final boss, but you will likely only be able to cast it once (Maybe twice if you're lucky) during the fight, so make sure you MAKE IT COUNT!!!

Optional Dungeons
Work In Progress

"SUPER ALERT: This is an optional area, which means there's some different rules!
Enemies don't give EXP here, and their level is scaled to yours. This means you can play through this area whenever you want, but it may be easier if you come back later when you have more skills, equips, and knowledge. Brace yourself for some challenges ahead!"

- Posted Sign

This section covers Optional Dungeons.

As stated, they aren't required to defeat the final boss on Epic Difficulty, but every new skill and piece of equipment you find, any extra Summons you may capture, Steroids and additional loot you find - all of it will only help you in your quest to take down the final boss.

Optional Dungeons I Cleared:

Freezeflame Dungeon (Ice Cave)
- Bosses are weak to Fire and Ice

Crystal Caves (Redpine Town)
- Fire Boss is weak to Water, Ice, Bomb
- Crystal Boss is weak to Fire, Earth, Electric, and Bomb

Mineshaft Maze (No Man's Land)
- Boss is weak to Earth, Bomb, Electric, Ice, and Water. See the other Guide already posted by someone else if this one gives you trouble.

Deathly Hallows (Hope Harbor, by Forgotten Ruins Entrance)
- Boss is weak to Fire, Wind, Holy

Partial Clear:
Forgotten Ruins (Did not open the door, but cleared everything else)
Battle Preparation
Work In Progress

LEVEL AND MONEY GRINDING

My first successful clear of the final boss (On Normal Difficulty) was done at Level 36
My first legitimate attempt at the final boss on Epic Difficulty was done at Level 38 with several extra Bonus Dungeons cleared.

If you feel you are short a few levels, or you need some extra money for upgrading your equipment:

When you enter The Beyond, immediately to the left there is a respawnable fight against 3 Cosmic Monoliths.


They are extremely evasive (You may want to use Putrid Worm or other evade debuffs), but are weak to Electric and Water attacks.

Taking out the three rewards you with about 1.1 Million EXP and 50,000 Gold. Even at Level 35 and higher you should be able to Level Up after a handful of fights against these enemies.

The common drop from defeating the Cosmic Monoliths is Dark Rune, which sells for 5000 Gold each at the Forge Shop. Use the one in Redpine Town - It has all the loot from across the entire game, so anything upgradable from just loot drops can be done there.


PARTY SETUP FOR THE FINAL BATTLE

Here is the equipment I used to start the battle. All equipment listed was upgraded to the maximum level (5 for equipment, 3 for Flair)

This is just the stuff I used. Feel free to experriment and test around to find a battle strategy that suits you.

Matt Lv 38:
- Fusion Blade
- Wizard Hat
- Heroic Armor
- Hoop Earrings
- Frost Badge
- Balance Badge

Extra Skills:
- Surge
- Bind
- Purify
- Shredder


Natalie Lv 38:

- Paper Fan
- Rubber Duck
- Fur Dress
- The Tr*force
- Lightning Badge
- Emerald Earrings

Extra Skills:
- Heal More
- Energy Barrage
- Revive
- Gaia Blossom
- Tsunami [Limit Break]


Lance Lv 38:

- Nitro Bomber XL
- Army Helmet
- Wizard Robe
- Surgical Mask
- Chrome Earrings
- Balance Badge

Extra Skills:
- Debilitate
- Giga Drill
- Purging Flame
- Power Metal
- Ion Cannon [Limit Break]
- Black Hole [Limit Break]


Anna Lv 38:

- Chieftain's Horns
- Slime Bunny
- Camo Skirt
- Bandage
- Flame Badge
- Pearl Necklace

Extra Skills:
- Dispel
- Protect
- Snow Cats
- Screamer


NoLegs Lv 38:

- Bandit Blade (Or Dog Sausage)
- Headband
- Dragon Armor
- Angel Pin
- Iron Cross
- Fairy

Extra Skills:
- Barrier
- Lock On
- Fire Spin
- Vines


STOP! Before you initiate your attempt with the final boss:

- Make sure you have AT LEAST 30 minutes to an hour of dedicated gaming time for the final boss. Yes, this battle will take a long time... So if you're short on time, you may want to do a little more grinding, sidequests, or upgrading instead and come back when you have enough time to actually do the final fight.

When you feel completely ready, drop a Save off in front of the Cosmic Gigalith and let's go on to the main event!
Boss Phase 1: Cosmic Gigalith
As a reminder, this will be a rather long final boss fight. Make sure you have at least 30 miutes to an hour to dedicate to this fight - otherwise you may run out of time and have to start the fight over at a later time.

If you run into an unwinnable situation and have to try the fight over again, QUIT THE GAME IMMEDIATELY WITHOUT (AUTO-)SAVING! DO NOT SAVE OVER ANOTHER FILE AFTER A FAILED FINAL BOSS ATTEMPT! Seriously, you will lose whatever resources you spent on the final battle, so reloading your previous save is preferred.

If your party dies during the fight, take a break and try again! The RNG can be somewhat unforgiving on Epic Difficulty, so it may take you numerous tries before you're successful!


THE BOSS, PHASE ONE: COSMIC GIGALITH, LEVEL 36

ON YOUR FIRST ENCOUNTER WITH THE BOSS, SCAN IT AND RUN AWAY!

Boss Health is randomnized slightly between encounters, so the figures given for all enemies are approximate, and they usually have a little extra health than the numbers listed here in the Guide.

Boss Health:

~ 4,200,000 (Epic)
~ 3,400,000 (Hard)
~ 2,600,000 (Normal)
~ 2,000,000 (Easy)
~ 1,450,000 (Zero)

Stats:

Defense 9
Mag Def 9
Evade 202(!)

Yes, Cosmic Gigalith has a ludicrous amount of Evasion. Thankfully you have a Putrid Worm that should make your enemy considerably easier to hit attacks with.

Elemental Weakness:

The Elemental Weakness is chosen at random when you initiate combat with the final boss. It will pick one of the 10 main elements of the game as it's initial weakness. If you do not like the current weakness, the best thing to do is just run away and retry until you get an elemental weakness favorable to your party's equipment and skill setup.

I chose BOMB as the initial weakness for the Cosmic Gigalith, as four of the five characters can gain access to Bomb skills or can use high damage Bomb Skills when added to a Weapon.

The elment you personally choose for Cosmic Gigalith's initial weakness is your choice. Dark is a great choice too. Other elements are up to your personal preference.

This is why you want to scan Cosmic Gigalith, on your first round you'll be able to see what it is weak to and determine whether you want to fight or run away.

Hard and Epic Difficulty:
One random element will be picked out of the 10 to recieve a -300% Weakness
All Other Elements gain +150% Resistance

Zero, Easy, and Normal Difficulty:
One random element will be picked out of the 10 to recieve a -300% Weakness
All Other Elements gain +100% Resistance

Status Ailment Resistance
Stun 100%
Chill / Freeze 100%
Poison / Virus 100%
Death /Doom 100%

Debuff Resistance
Attack 50%
Defense 50%
Mag Atk 50%
Mag Def 50%
Accuracy 50%

---------------------

"What the hell? It isn't your turn to attack, you stupid rock!"
- Matt

"...Is that a counter attack? We best choose our attacks wisely..."
- Lance

Cosmic Gigalith will hit your party with a counter attack every time your attack hits it. Yes, this also includes any counterattacks, bonus attacks, or allies summoned to the field to cause damage during the fight, even between combat rounds! You want to minimize the number of attacks Cosmic Gigalith gets, so adjust your equipment accordingly - otherwise your party may get destroyed in a series of counterattacks before you get a chance to heal!


Counter Attack List:

Normal Attack (Dark Element)
Eruption
Surge
Iceberg
Overgrowth

Status Ailment Counters:
Syphon
Enchantment (Immune to Magic Damage, but 2X Physical Damage)

Normal Attack List:

- Can cast any Counter Attack as an Attack that targets all three active party members

- Barrier Change - Changes Elemental Weakness, Gains Bonus Evasion (25% Epic/Hard, 15% Others). You will want to summon Putrid Worm immediately on the next round to reset the evasion debuff, then change your tactics accordingly depending on the new elemental weakness.

Under 50% HP:
- Casts Magic Based AoE Multi Hit Dark Attack, causes Scorch.

Final Attack When Reduced to 0 HP: [Epic/Hard Difficulty]
- Magic Explosion (Massive damage to all party memebers)
-- This attack doesn't actually cause damage on Normal, Easy, or Zero difficulty.

GENERAL STRATEGY

Once you find a weakness you think you can roll with:

Turn 1:
Cast Putrid Worm
Natalie and one other character: Both use Orange Juice to buff the HP of the two party members you want to keep in.

Turn 2:
Natalie uses 7th Heaven Limit
Other two characters either use Limits or Elemental Attacks on Cosmic Gigalith

Turns After:
- Switch Natalie for another ally (If necessary) and buff their HP
- Focus dealing as much elemental damage as possible through Limit Breaks and Skills
- Heal as needed. If heals are on cooldown, use Food to heal instead. Also use Garlic to immediately heal Syphon if anyone is hit with it.
- If anyone get's KO'd, use a Cappucino to fully revive them and gain +50% extra HP.

When Cosmic Gigalith uses Barrier Change:
- Cast Putrid Worm immediately to negate the Evasion buff.
- Changing equipment shouldn't be too necessary, but you may need to change party members in order to exploit the new Elemental Weakness.
- Keep attacking and healing as necessary.
- Cosmic Gigalith should soon be whittled down to under 300,000 HP, and at this point, read the next section.

STOP! BEFORE YOU TAKE DOWN THE COSMIC GIGALITH AND ENTER PHASE TWO...
CAUTION, On Hard and Epic Difficulty: When the Gigalith is reduced to 0 HP, its final explosion will deal massive magic damage to the active party, so be sure you Summon an Angel Mirror before dealing the final hit to negate the damage, or have Morale or Auto-Revive set up to tank the attack.
- This final attack does not actually deal damage on Normal and lower difficulties.

TACTICS: Spend some time to change your equipment for Phase Two. Changing gear in a battle costs your action for the turn when you select CONFIRM on the gear changes. You will want mostly weapons and armor that primarily boost Holy and Dark Damage. If you don't have any or they aren't levelled up, use things that increase one of either Fire, Electric, or Ice Damage instead. Any weapon, armor, or flair that has a counter attack or casts a bonus action between rounds (Healing, buffs/debuffs, damage summons, extra attacks) ... You will want as much help as you can get to take on Phase Two.

Equipment I used for Phase Two and Three

Matt:
- Heaven's Gate
- Officer's Hat
- Heroic Armor
- Lucky Clover
- Pocket Watch
- Big Eyebrows

Counter Attack: Unleash
Random Summon: Tank Cannon

NoLegs:
- Pixel Popper or Steel Buckler
- Knight's Helmet
- Captain's Coat
- Angel Pin
- Iron Cross
- Fairy

Counter [Steel Buckler]: Blade Blitz
Random Summons: Rice Ball Bomb [Pixel Popper], Cat Warrior, Pink Squid


Natalie
- Celtic Cross
- Rubber Duck
- Fur Dress
- The Tr*force
- Fat Fly
- Emerald Earrings

Counter: Holy Light
Random Summons: Viking Monolith, Fly Boimb


Anna:
- Black Widow
- Slime Bunny
- Camo Skirt
- Cat Tail
- Angry Faic
- Crossbone Pin

Counter: Normal Attack
Support: Refresh, Purify, Medipack

Lance:
- Shadow Blaster
- Army Helmet
- Officer's Coat
- Surgical Mask
- Battle Paint
- Balance Badge

Counter Attack: Dark Shot
Random Summons: Medipack, Machine Guns


When the Cosmic Gigalith is reduced to 0 HP, it will explode and reveal the true culprit behind this whole mess... On to Phase Two!
Boss Phase 2: In The Eyes Of....
With the Cosmic Monolith finally out of the way, it's time to move on to Phase Two of the fight, as the final boss reveals itself! ... Of course, this one brings backup, and we'll cover those before getting to the big kahuna itself.

BOSS STATS - All Enemies Are Level 36

Note - After the Tentacles are defeated, they will typically respawn a round or two after being defeated and act the turn after respawning.

Slimey Tentacle

Defense 9
Mag Def 9
Evade 163

HP
~410,000 Epic
~340,000 Hard
~260,000 Normal
~210,000 Easy
~150,000 Zero

Elemental:
Fire, Electric, Ice: -80% Weakness
Poison: +150% Resistance

Status Resistance:
Stun: 50%
Chill / Freeze: 100%
Curse / Bad Luck: 50%
Weak / Tired: 50%
Death / Doom: 50%

Debuff:
Attack: 20%
Defense: 20%
Mag Atk: 20%
Mag Def: 20%
Accuracy: 20%

ATTACKS:
- Dark Magic / Attacks All

When Tentacle is Cut Off:
- Poison Attack / Attacks All (can Poison or Curse allies)


Eyeballl (There are two of them during the final fight)

Defense 9
Mag Def 9
Evade 172

HP
~340,000 Epic
~275,000 Hard
~210,000 Normal
~165,000 Easy
~120,000 Zero

Elemental:
Dark, Holy: -80% Weakness
Water: +50% Resistance
Poison: +150% Resistance

Status Resistance:
70% Death / Doom

Debuff:
Attack: 50%
Defense: 50%
Mag Atk: 50%
Mag Def: 50%
Accuracy: 50%

ATTACKS:
- Normal Attack / Single Target (Can cause target to become Stuffed, cannot eat food to buff/recover)
- Dark Magic Arrows / Target All
- Inversion / Single Target (DANGER: INVERTS BUFFS)
- Healing Magic

When Phase Three Begins:
- Super Buff (Casts on Main Body, gives +30% to All Stats)

Spikey Tentacle

Defense 9
Mag Def 9
Evade 225

HP
~420,000 Epic
~355,000 Hard
~260,000 Normal
~210,000 Easy
~150,000 Zero

Elemental:
Fire, Electic, Ice: -80% Weakness
Poison: +150% Resistance

Status Resistance:
Stun: 50%
Chill / Freeze: 100%
Curse / Bad Luck: 50%
Weak / Tired: 50%
Death / Doom: 50%

Debuffs:
Attack: 20%
Defense: 20%
Mag Atk: 20%
Mag Def: 20%
Accuracy: 20%

ATTACKS:
- Giant Swipe / Target All

When Tentacle is Cut Off:
- Poison Magic / Target All

And last but certainly not least, we finally get to the being behind the curtain itself... without further ado, time to take on the eye of...

THE DEVOURER

Defense 9
Mag Def 9
Evade 123

HP
~6,500,000 Epic
~5,400,000 Hard
~4,200,000 Normal
~3,400,000 Easy
~2,400,000 Zero

Elemental:
Holy, Dark: -80% Weakness
Poison: +150% Resistance

Status Resitance:
Stun: 100%
Chill / Freeze: 100%
Syphon / Disable: 100%
Curse / Bad Luck: 50%
Weak / Tired: 50%
Dispel: 50%
Death / Doom: 100%

Debuffs:
Attack: 50%
Defense: 50%
Mag Atk: 50%
Mag Def: 50%
Accuracy: 50%

ATTACKS:

- Giant Blade / Target Active Partyl / Multi Hit
- Eyeball Beam / Target Active Party / Multi Hit
- Magic Blast / Target Active Party / Multi Hit
- Multi Tentacle / Random Party Targets / Multi Hit
- Charge / Minor Magic Damage / Target Active Party
-- Will use Earth Splitter next turn after Charged. MAKE SURE YOU PREPARE IMMEDIATELY OR YOU WILL ALL DIE!

Super Attacks:
- EARTH SPLITTER / Insane Damage / Target All
-- NOTE: Occasionally The Devourer will cast Earth Splitter without warning, so make sure at least one character is prepared to take it.
-- Use an Angel Mirror summon to negate or Stumpy Gloop summon to survive the Earth Splitter attack.
- Phase Three Super Attack [If the boss uses this attack, skip ahead to the Phase Three portion of this Guide]

General Strategies

The equipment you want to change into for the second and third phases of the fight are focused on a few primary ideas:

- Reduce Dark and Poison Damage as much as possible
- Character Equipment Counter Attacks
- Equipment that Heals the players between rounds
- Equipment that has a random chance to Summon between rounds

- Staying as buffed up as possible (Use Natalie's Limit Break as soon as you have access to it)
- If anyone gets Confused or Syphoned by an attack, heal it if possible ASAP
- Revive anyone that dies with Cappucino as soon as you're able to.
- Pummel the boss and its minions with Dark and Holy attacks.
- If you get a chance, Freeze one of the tentacles to take it out of the fight for a few rounds.

On Hard and Epic Difficulty:
After losing about a million or so HP, the boss will begin to spread the Virus status on itself, the tentacles and you. The Virus will heal The Devourer and the tentacles every round for a lot of HP (Especially if stacked higher than 5), so if it gets too high, cast Purify on the boss to get rid of Virus. Use Food to reset the cooldown of Purify if necessary (Also to heal yourselves of Virus if it becomes a problem).

Once the Devourer is damaged to around 25% of its HP (Or around 2 million HP on Epic Difficulty), you can be sure that Phase Three will come very soon, and you -WILL- know when this happens, and when it does, it's on to Phase Three...
Boss Phase 3: [Deleted]
Work In Progress

The third and final phase of the grand finale is triggered when The Devourer is reduced to about 25% of its starting HP (Or around 2 million on Epic Difficulty). This will be clearly telegraphed by the special animation that will use its action for the round when its turn comes up. This attack literally deletes the Planet from existance, hence the name of this Third Phase.

After the Planet is Deleted, the fight becomes a frantic race to the finish! The special animation puts your party on a time limit starting the round after [Deleted] is cast, and all party members will take more damage after every round that passes once Deleted takes effect (In addition to the attacks the boss and its helpers will make on your party), so it's up to you to take down The Devourer once and for all before your party is wiped out!

Additionally, the Eyeballs gain a new attack that buffs The Devourer's stats up by 30%. This is what you brought your Yellow Flybot for - summon it and turn those buffs into penalties!

Finally, we will want to break out our final tool for Phase 3... Pink Squid!
Not only does this Summon deal good damage to the boss, it will also turn The Devourer Invisible, allowing us to slam it as hard as possible with magic attacks - so follow it up with your most powerful Dark and Holy attacks and watch that HP melt away!

If you've survived this far to Phase Three, there isn't really anything else I can tell you that is going to help in a situation like this. Just use every last resource yuo have to hit it as hard and as many times as possible!

If you manage to reduce the Devourer's HP to 0.... CONGRATULATIONS, YOU WIN THE GAME! Any tentacles left alive will die instantly when the main boss is defeated.
Post- Battle Wrap-Up: Closing Thoughts
Work In Progress

Now that The Devourer has finally been defeated, enjoy the ending and the subsequent unlock of New Game+ mode. Do note that all Epic difficulty achievements become permanently locked in New Game+, so you will need to complete any Epic-based achievements on your first pass through the game if you want to be a completionist.

New Game+ refreshes all the chests in the game, so additional Steroids and things can be found as you re-adventure across the world!

However, what you do after the final boss goes down is up to you - whether you want to move on to another game or keep adventuring in EBF5 for more achievements and sweet loot! Maybe you're crazy enough to go challenge the ultimate superboss... But that's for another Guide and not this one!

As for this Guide, you've now slain the final boss and reached the end of the game, and this Guide is now finished. If you have any comments or strategies I haven't thought of, please post them in the comments section and I'll take a look when I have the time.

- Miles Traysandor, January 2019
20 Comments
Kenji Mar 26, 2019 @ 3:16pm 
I think it would be better for to change the image, since i think that players that are in mid game also see guides, and don't want to see spoilers
brickey.8 Mar 25, 2019 @ 7:52pm 
Oh yeah, one last tip: When using multiple limit breaks in a row, always use Oblivion followed by the one you actually care about. It doesn't even matter that they're not weak to bomb, because it's guaranteed to stagger everyone so it'll double the next person's limit break.
brickey.8 Mar 25, 2019 @ 7:46pm 
Oh, and one more tip about the summons: The eye has 0 status resistance, including Syphon. When he summoned two eyes in preparation for the final phase I just cast mass syphon to stop them from buffing him for the first two turns. If he summons a single eye by itself, you can syphon it and then ignore it for the next 5 turns, but I didn't actually have opportunity to try that.
brickey.8 Mar 25, 2019 @ 7:46pm 
As long as there's no summon that attacks after him, or you can paralyze/freeze that summon, his charged attack is actually a blessing in disguise. Cast Stumpy Gloop and suddenly the whole party gains 2/3 of their limit break meter. If that puts Natalie at 100%, she can use her limit break to give everyone back their health and their dispelled buffs. This method also takes less SP than Angel Mirror, and the buff lasts 3 turns so you don't care if he delays the spell.

For the last phase, just spam limit breaks (starting with 7th heaven) and use chili peppers to spam more limit breaks.

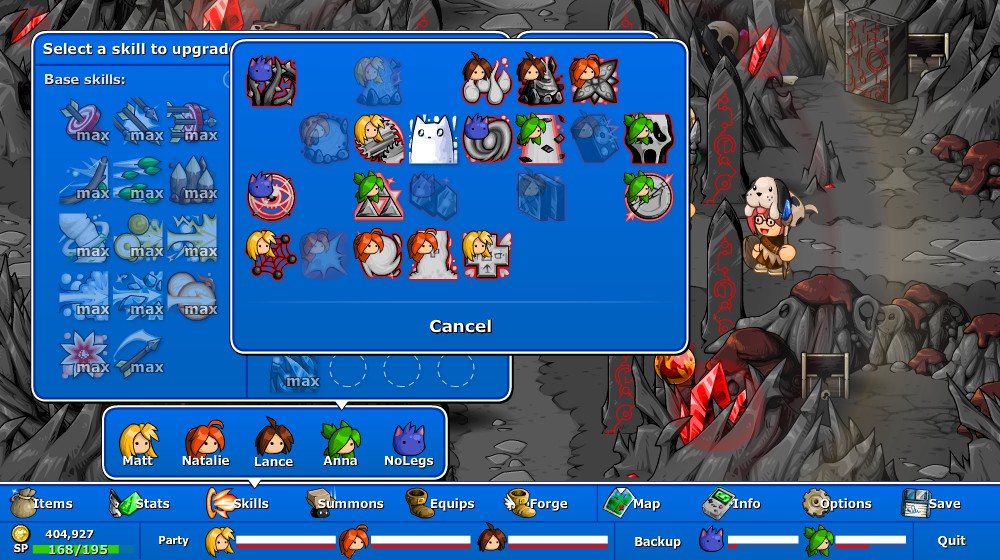
In addition to the squid, there's slightly cheaper Gloop summons that inflict enchanted and invisible respectively; not as cost effective because the squid's own attack is strong, but good if you don't have 86 left or if you want to double Matt's Cleaver.
brickey.8 Mar 25, 2019 @ 7:45pm 
I won on my third try at level 36, with time to spare in the 3rd phase, due to a combination of the guide's basic info and @TheJazMaster's great extra info. Since I knew from the comments that two of his biggest attacks were fire and bomb, I picked gear that gave everybody 100% dark resist and at least 50% fire and bomb resist, plus as much as I could manage for confuse, dispel and syphon (not the whole party). I'm not sure dark matters at all, and in hindsight dispel isn't important, but that's what I won with.

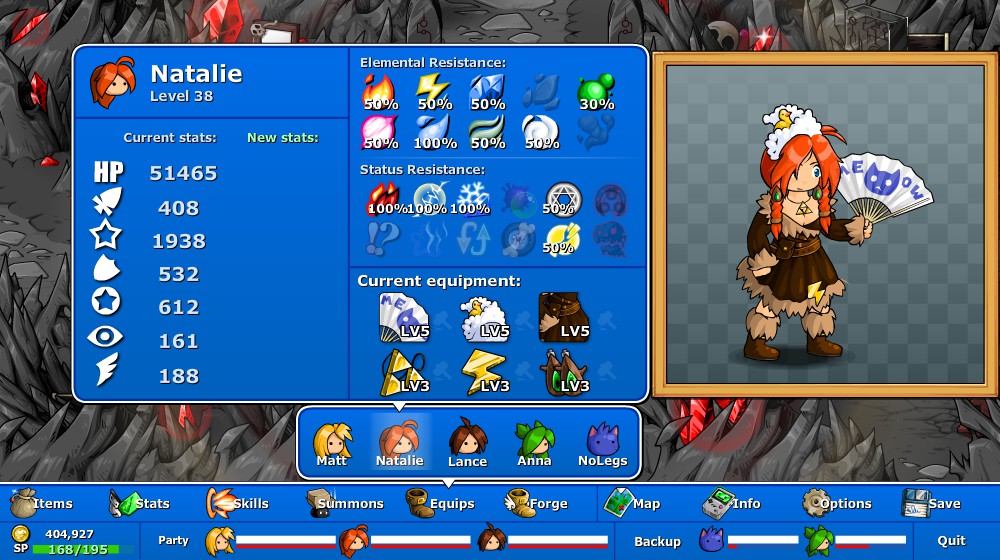
Weapons were Anna's Angel Wing, dark for all 3 guys, and the Dragon Wings for Natalie (gives good resists, a good counterattack that inflicts free burning, and occasionally does a very good summon).

Strategy for part 2 was to kill summons ASAP. Spam limit breaks if he has 2 or more, and focus attacks on the summon when there's one. As long as he has no summons, and you have fire/bomb resist, you can heal more in one action than his damage output for the whole turn.
Traysandor  [author] Feb 2, 2019 @ 10:27am 
Thanks for the tip, anothrgamer. I wouldn't have known about that one unless it was mentioned.

Real Life's been in the way a lot lately, plus KH3 is now out, so this Guide is gonna be put on hold for a while until things clear up.
anothrgamer1234 Jan 26, 2019 @ 9:07am 
There's one important note that you should add: for every optional boss defeated, The Devourer's stats are increased by 1% of its base stats. It also gains that boost when you have a total of 50, 65, and 80 medals, for a total of a possible 15% base stat increase.
Traysandor  [author] Jan 19, 2019 @ 6:43am 
I got walled on a few fights so I grinded a little extra. And once I reached the endgame I got fed up with things and lowered the difficulty, as at that point I had killed every enemy in the game at least once anyways. (Besides bosses, which I restored the original difficulty for).

Also, because of a giant storm, I've been stuck at work, so an update has had to wait while Real Life is dealt with.
TheJazMaster Jan 15, 2019 @ 1:41pm 
Partaking in each optional and necessary fight once should leave you at mid-36s
I can provide a level 36 save with almost 100% completion, if it would help
And of course information
Traysandor  [author] Jan 15, 2019 @ 8:28am 
@TheJazMaster I'm sure the fight is doable on a lower level than when I entered it at 38. When I had finished most of the bonus content my EXP was upper Lv 37, which at that point you might as well gain the extra level anyways.

To do a lower level playthrough I'd have to either load my casual Any% Lv. 36 clear on Normal or do a completely new playthrough focused on a low level clear. The game doesn't seem to care what level you are as far as achievements are concrened, so it's pretty much use all the resources you have available.

This Guide is still in an early public version, so any help would be appreciated.