The Emulator

The Emulator

Not enough ratings
The Emulator Walkthrough
By Alma Nova
A guide for the game "The Emulator"
   
Award
Favorite
Favorited
Unfavorite
Intro + How the Guide Works
Welcome to my walkthrough on the game “The Emulator”. This guide, like my other guide I wrote for the game Concluse, isn’t going to include things you can pick up and read for some of the games backstory. You should explore the game to its fullest outside this guide to find the little notes and letters to read.

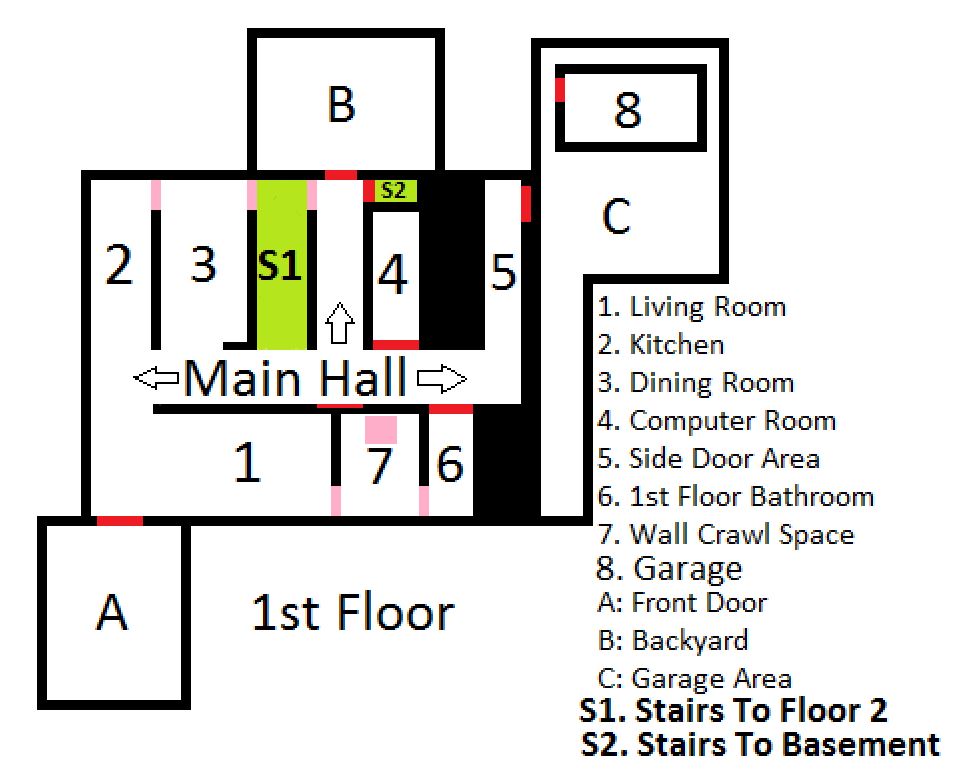
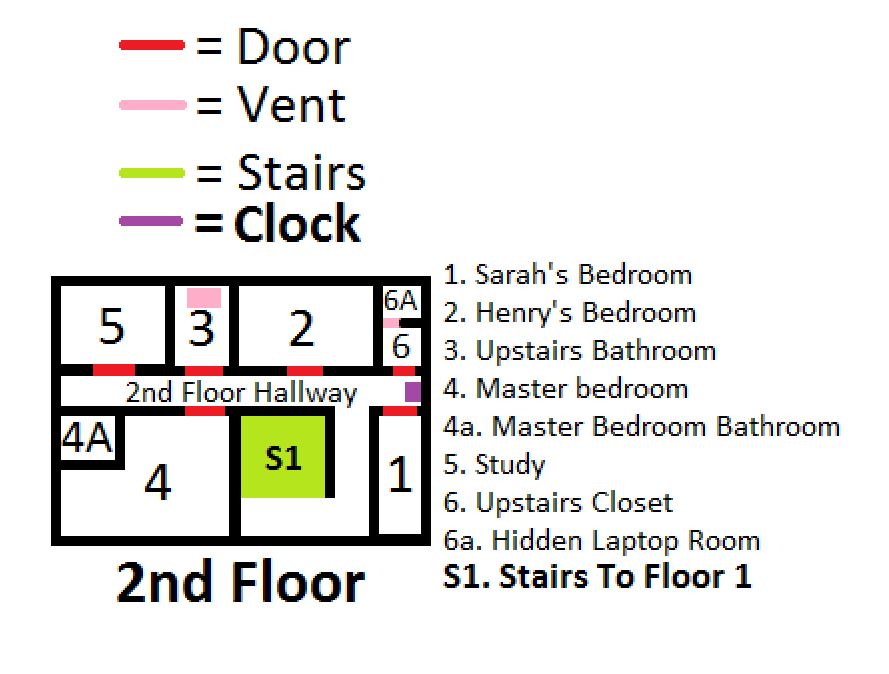
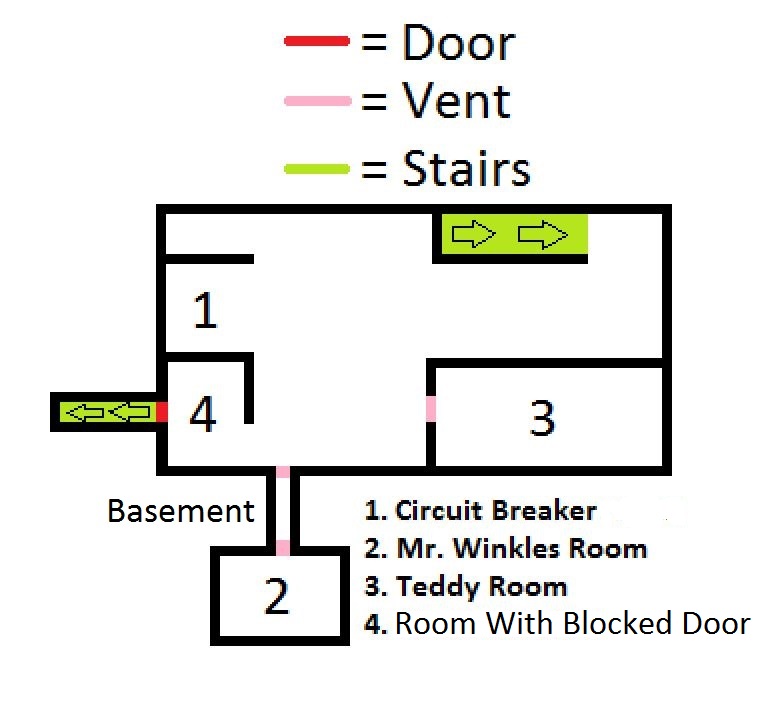
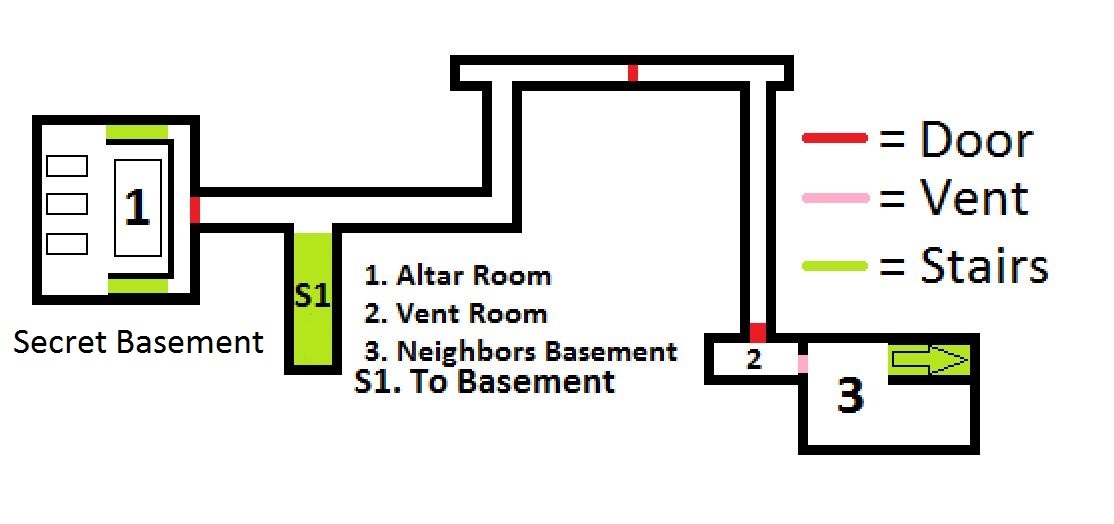
Because of how non-linear this game in compared to a game like Concluse I will be using my map as a way to guide you around the house. So for example I might say “Now head to Floor 2 Area 3”. A quick glance at the map will show you how to get to Floor 2 Area 3 and from there the walkthrough will continue. I might also do something like “F1A1” Which is short for Floor 1 Area 1. It shouldnt be too hard to understand what I mean when I make it short like that. I would also suggest having the map open on your Shift-Tab steam menu or on a browser tab considering its required for this walkthrough. I will provide links to all 4 maps just before the guide starts and if any of the images ever go down for whatever reason please contact me. Sound good? Lets start!

There are 4 endings to this game and I will be doing each one in this walkthrough from what I feel is easy to hard. The first 2 endings are fairly easy, the third one is sorta hard to get, and the last one is the hardest but is, what I feel to be, the true ending.

Need to visualy see where the items are or just want a quick items guide? Check out this guide here!

https://steamcommunity.com/sharedfiles/filedetails/?id=1599951405
The Maps for the Guide
Here are the maps you will need for the guide:


Ending A
1st Floor - Area A

You start off at the front door of this house. From here walk inside and get a good look around the first floor to get yourself accustomed to its layout. Go outside too to the backyard (F1AB) and the garage area (F1AC) as well. Right now you will have nothing to worry about anyways. When you are done you should then open up the door leading to room 6, this could help later when the real problems start happening. When you got every door you could open going head to the kitchen!

1st Floor - Area 2

Right when you head in here you want to look slightly left to see the refrigerator. On it you will see a note that has a wifi password on it. Take that note and lets get out of here. Head upstairs to floor 2 using the S1 stairs.

2nd Floor - Hallway and Area 1

From here go into room 1. When you walk in walk to the right side of the bed from how you come in facing in. In the first drawer there is a key to the computer room. Once again open every door you can up here then head back to the 1st floor.

1st Floor - Area 4

The moment you walk in here you get a big surprise! We have all had Unreal Tournament and CS 1.6 matches like this havent we? Jokes aside something is definitely messed up and our goal at the top now changes to tell us to go to the front door after we get a closer look at the body BUT before you do look to the left of the room as you are coming in on the desk. To the right of the printer you will see a screwdriver. Pick it up and lets head to the front door.

QUICK BREAK!

So, now after you look at the body and get the message to go to the front door, you have unleashed the beast. The emulator now spawns randomly around the house and when you walk near it will spring alive and try to stab you to death. If you are playing in normal mode you can only take 4 hits. One hit kill mode and well...I think you get the idea of how that mode works. In this guide I will be talking as if you will never run into him, but you will.

When he spawns you want to get a good distance away from him. The easiest way to dodge him out is to take vents, sprint away fast using side moving since it is a bit faster, or hiding in isolated rooms like F1A7 and BA2&3. As far as I know he cant show up in the Secret Basement Area, but I could be wrong.

He also REALLY loves to spawn after you uncover a vent, making the 2 way vent in F1A3 to F1Hall beside the basement door a real pain to get going sometimes if you need a fast exit from him. Its not mandatory but it helps a ton when your doing a particular ending.

You will slowly learn how this killer works and the common areas he will show up in but I will try to point out the areas he loves to be in as I write this. ANYWAYS lets go on!

END OF BREAK!

1st Floor - Hallway (On the way to Area A)

As you get out of the room I can offer a good tip here. Try poking your head into room 6. Remember I said to open that? If you do there is a good chance he will spawn in that room and when you poke your head in he will spawn and run to you. This is your chance to run quickly to Area A and lose him just as you get there, to get some peace as you take in what your about to see.

1st Floor - Area A

When you get here you will see a dead body, not just any body though its Sarah! Well this is just getting worse isnt it? Duck by hitting the C key and pick up the key beside her. Get up and head back into the house.

1st Floor - Area 1

In this room you are going to head right as soon as you come in and open the vent with your new screwdriver. Take out each screw on each corner and use it to go in. Is the emulator there when you try to go there? Just run to room 6 and unscrew the vent in there. You should lose him by the time you get there.

1st Floor - Area 7

Welcome to a safe zone. If the emulator is chasing you dont worry about a thing. Stay in here until he stops and look left if you came in from room 1 or right if you came in from room 6. On the roof of this room should be another vent you can open up. Open it up and head on up to open up a shortcut to Floor 2 and to get into this room you couldn’t get into before.

2nd Floor - Area 3 and Area 4

When you get in look right to the bathroom mirror above the sink. Open it up and grab the key inside. Open the door and then open the door directly across from this door. It will lead you to room 4. Another dead person, not the best day for this family sadly. In this room head to the right, but NOT inside room 4A. Instead go around it to the left keeping close to the wall to run into a safe on the ground. Ontop if it is a credit card, snag it and lets get out of here.

2nd Floor - Hallway and Area 5

After exiting room 4 head left and take the door leading into room 5. Go to the cases on the left side of the room and duck down to the door level and open the left door on the third case left from the door. If this isnt clear enough just open all the lower level doors on the bottom of the shelves until you find the basement key. Get out of this room and take your new shortcut back down to the 1st floor if you want too.

1st Floor - Hallway and S2

When you get here you want to use your key to open up the door leading to the basement, S2. Head on down.

Basement - Area 1

Head to area 1 on the map to see a dead person on the ground, pretty torn up. Ow. Look at his hand, he was holding a fuse but dropped it. Pick it up and look on the wall beside him to the right to find a fuse box. Slip the fuse in and get that power back up. Now lets walk all the way back to the 2nd Floor and head to Room 6.

Note: if the emulator spawns at the top of the stairs it might be a bit tricky to get rid of him. Just back off, run downstairs, try again. You could also get him down there and circle around him if you are good enough.

2nd Floor - Area 6

When you get here pop open the vent in the back of the room a little to the left on the back wall. Go inside to find a hidden laptop. If you got the wifi password in the kitchen (F1A2), got the credit card from the master bedroom (F2A4) and turned on the power (BA1) then when you use the computer you should put in an order for a clean up! When you do that you are no longer in danger and have only one goal left, leave. Leave through the front door (F1AA) and just keep walking down the path opposite of the house. There you go! Ending A is yours!
Ending B
1st Floor - Area A

You start off at the front door of this house. From here walk inside and get a good look around the first floor to get yourself accustomed to its layout...again. Do what you did in ending A and open all the doors BUT before we get this show started we have a few items to get while the storm is calm. Head to F1A2

1st Floor - Area 2

As soon as you walk in look a little to the right on the counter, you should see a lighter sitting on there. Grab it and head up to floor 2.

2nd Floor - Area 2

In this room you want to grab the book on the bedside desk to the right of the bed when you come in the room. What a very evil looking and sounding book BUT we will need it! This is all you will need to get from this room so back to the hallway.

2nd Floor - Area 1

When you walk in walk to the right side of the bed from how you come in facing in. In the first drawer there is a key to the computer room. Once again open every door you can up here then head back to the 1st floor. Wait I just copied and pasted this from ending A didnt I? Sadly since a lot of the steps are the same you might see this pop up BUT PLEASE make sure you still read each area fully. I might add more steps to the copy and pasted note. If I do Ill try to add much more text to make it obvious there is more to read.

1st Floor - Area 4

Same idea as ending A. Be shocked, grab the screwdriver on the left desk to the right of the printer, and head outside towards the front door again.

1st Floor - Area A

Same idea here as well. Look her over and duck to get the key BUT this time look more towards her hair, neck area. The game will prompt you to pick up a bit of her hair. Do so and go back inside.

1st Floor - Area 1

In this room you are going to head right as soon as you come in and open the vent with your new screwdriver. Take out each screw on each corner and use it to go in. Is the emulator there when you try to go there? Just run to room 6 and unscrew the vent in there. You should lose him by the time you get there.

1st Floor - Area 7

Welcome to a safe zone. If the emulator is chasing you dont worry about a thing. Stay in here until he stops and look left if you came in from room 1 or right if you came in from room 6. BEFORE you follow the steps to enter the 2nd floor bathroom you must pick up the candles in this room. It’s on the floor in this room and not hard to miss at all. You should easily see it coming in from the vent in the first floor bathroom but if your coming in from F1A1 then you need to look a little left and on the floor. Pick it up! Now then, on the roof of this room should be another vent you can open up. Open it up and head on up to open up a shortcut to Floor 2 and to get into this room you couldn’t get into before.

2nd Floor - Area 3

When you get in look right to the bathroom mirror above the sink. Open it up and grab the key inside. Open the door and then make a right towards room 5 right away. Go to the cases on the left side of the room and duck down to the door level and open the left door on the third case left from the door. If this isnt clear enough just open all the lower level doors on the bottom of the shelves until you find the basement key. Get out of this room and take your new shortcut back down to the 1st floor if you want too.

1st Floor - Hallway and S2

When you get here you want to use your key to open up the door leading to the basement, S2. Head on down.

Basement - Path to Area 2 and Area 2

Go down the basement and head towards area 1 like last time but this time hang a left and go right to the back wall. You should see an open crawl space that is half covered by some plywood. Get in there to find a room with a dead animal, sadly. When you enter look left and on the ground to find some spray paint. Pick it up and head back out back to the basement.

Basement - Path to Area 3 and Area 3

After you pop out of the vent go right to the right wall of where you are and open the vent on that wall. After you pop it open and go inside you will see a Lockpick on the left side of the room on the floor and a teddy bear on the right. Well for this ending go up to the teddy bear. If you have the lock of hair from F1AA, the necrobook from F2A2, the candles from F1A7, and the spray paint from BA2, you will be all ready to use the bear! After you use it you dont need to worry about getting attacked anymore. Head out, go to F1Hall and hang a left towards F1AC, you wont get far though and get Ending B!
Ending C
Floor 1 - Area A

You start off at the front door of this house. From here walk inside and get a good look around the first floor to get yourself accustomed to its layout...again...again. Do what you did in ending A and open all the doors you can. Head to Floor 2.

2nd Floor - Hallway and Area 1

From here go into room 1. When you walk in walk to the right side of the bed from how you come in facing in. In the first drawer there is a key to the computer room. Once again open every door you can up here then head back to the 1st floor.

1st Floor - Area 4

Same idea as ending A. Be shocked, grab the screwdriver on the left desk to the right of the printer, and head outside towards the front door again.

1st Floor - Area A

Same idea here as well. Look her over and duck to get the key. Back in we go!

1st Floor - Area 7

Welcome to a safe zone. If the emulator is chasing you dont worry about a thing. Stay in here until he stops and look left if you came in from room 1 or right if you came in from room 6. On the roof of this room should be another vent you can open up. Open it up and head on up to open up a shortcut to Floor 2 and to get into this room you couldn’t get into before.

2nd Floor - Area 3

When you get in look right to the bathroom mirror above the sink. Open it up and grab the key inside. Open the door and then head to F2A5.

2nd Floor - Area 5

Go to the cases on the left side of the room and duck down to the door level and open the left door on the third case left from the door. If this isnt clear enough just open all the lower level doors on the bottom of the shelves until you find the basement key. Get out of this room and take your new shortcut back down to the 1st floor if you want too.

1st Floor - Hallway and S2

When you get here you want to use your key to open up the door leading to the basement, S2. Head on down.

Basement - Area 3

Head down to the basement and make your way to area 3. Inside is the bear you got to burn from ending B but THIS time we are not going to do that. To the left of the bear on the ground is a lockpick. Take this lockpick and get out of the basement and head all the way back up to F2A4.

Floor 2 - Area 4

You remember the safe you picked up the credit card from? Use the safe to open it with the lock pick and grab the grandfather clock key. Head back to the 2nd floor hallway.

Floor 2 - Clock

On the map I made you will see a purple mark between Area 1 and Area 6. Thats where the grandfather clock is! Open it up and grab the key to the garage inside. Now head to Floor 1 and lets go check out the garage.

Floor 1 - Area C and Area 8

Go outside and take the path left towards the side of the garage facing the house. You should see a door. Open it up and head right in to end up in Area 8. There is only one thing you need here for this ending and its the crowbar that is on the desk to the left of the room just as you come in. Its on top of a book on the desk. Grab it and head back down to the basement.

Basement - Area 4

Get into this area in the basement and look to the wall with the wood over it and 3 planks holding it closed. Use the planks to use the crowbar to pry each one out then use the wood to open it. Head on down to the Secret Basement.

Secret Basement - Heading to Area 2

When you head down the stairs make a right and head towards Area 2 on the map. This is pretty straight forward and there is no way to get lost so just follow the path and open the gate that is halfway to area 2. Head up the stairs before Area 2 and once again use the crowbar on the 3 planks on this door just like last time and open it. Make a left in this room and unscrew the vent you will run into and go into another person basement. Take a good look around the room then head up the stairs and open the door to get Ending C! My personal favorite ending :)
Ending D
Note: The path to this ending is almost exactly the same as Ending C. There is one small change at the start but other then that I will be copying and pasting most of Ending C to this up to the point where you enter the garage for the crowbar. Incase you dont want to dig at the start for the small change, you have to get the necrobook from F2A2. I also strongly suggest you try to open every vent you can find for an easy way to get around the house for this ending, you might need it depending on your luck with how the emulator spawns. With that said lets start Ending D!

Floor 1 - Area A

You start off at the front door of this house. From here walk inside and get a good look around the first floor to get yourself accustomed to its layout...again...again...AGAIN! Do what you did in ending A and open all the doors you can. Head to Floor 2.

2nd Floor - Hallway Area 2 and Area 1

From here go into room 2 and grab the necrobook from the desk beside the bed like Ending B. When you get that head to Area 1. When you walk in walk to the right side of the bed from how you come in facing in. In the first drawer there is a key to the computer room. Once again open every door you can up here then head back to the 1st floor.

1st Floor - Area 4

Same idea as ending A. Be shocked, grab the screwdriver on the left desk to the right of the printer, and head outside towards the front door again.

1st Floor - Area A

Same idea here as well. Look her over and duck to get the key. Back in we go!

1st Floor - Area 7

Welcome to a safe zone. If the emulator is chasing you dont worry about a thing. Stay in here until he stops and look left if you came in from room 1 or right if you came in from room 6. On the roof of this room should be another vent you can open up. Open it up and head on up to open up a shortcut to Floor 2 and to get into this room you couldn’t get into before.

2nd Floor - Area 3

When you get in look right to the bathroom mirror above the sink. Open it up and grab the key inside. Open the door and then head to F2A5.

2nd Floor - Area 5

Go to the cases on the left side of the room and duck down to the door level and open the left door on the third case left from the door. If this isnt clear enough just open all the lower level doors on the bottom of the shelves until you find the basement key. Get out of this room and take your new shortcut back down to the 1st floor if you want too.

1st Floor - Hallway and S2

When you get here you want to use your key to open up the door leading to the basement, S2. Head on down.

Basement - Area 3

Head down to the basement and make your way to area 3. Inside is the bear you got to burn from ending B but THIS time we are not going to do that. To the left of the bear on the ground is a lockpick. Take this lockpick and get out of the basement and head all the way back up to F2A4.

Floor 2 - Area 4

You remember the safe you picked up the credit card from? Use the safe to open it with the lock pick and grab the grandfather clock key. Head back to the 2nd floor hallway.

Floor 2 - Clock

On the map I made you will see a purple mark between Area 1 and Area 6. Thats where the grandfather clock is! Open it up and grab the key to the garage inside. Now head to Floor 1 and lets go check out the garage.

Floor 1 - Area C and Area 8

Go outside and take the path left towards the side of the garage facing the house. You should see a door. Open it up and head right in to end up in Area 8. There is now two things you need here for this ending. The crowbar that is on the desk to the left of the room just as you come in AND the key that is in the drawer where the crowbar is. Its a weird spikey black key so you cant miss it when opening the drawers to look for it. Grab both items and head back down to the basement.

Basement - Area 4

Get into this area in the basement and look to the wall with the wood over it and 3 planks holding it closed. Use the planks to use the crowbar to pry each one out then use the wood to open it. Head on down to the Secret Basement.

Secret Basement - Area 1

Head down the stairs and make a left this time and use the key you found on the keyhole to the right of the door. This will open it and allow you access to the altar room. Head down the stairs on either side and read the note on the middle stone bed. You new mission is now given to you, you have to find the bodys of Sarah, her mother, and her brother, and bring each one to a specific altar. So head to each of these areas to grab each body:

Sarah: F1AA. The second body you see at the front door.

Sarah's Brother: F1A4. Head in the computer and the first body you see.

Sarah’s Mother: F2A4. She is on the bed and has her hand sticking out.

Get them all and try your best not to get hit from the emulator as you do. Opening all the vents, like I pointed out before starting this ending guide, is a good way to open a ton of shortcuts to help with this mission. After you bring the third body to the stone bed you will get a cutscene showing a creature emerging from the liquid and telling you your next mission. You have to grab the sword on the plate near the liquid pool opposite of the stone beds and find a way into the secret area to kill the true evil, the queen.

Floor 1 - Area B

This next part is going to be very tricky. You have to get the emulator to chase you so that the secret area pops up in the backyard at F1AB, somewhere we havnt even stepped foot into yet. Keep the backyard door open and try your best to lure him towards that door so you can make a mad dash for the blood like door that appears in the backyard when hes chasing you. With some luck you can use the door and get teleported to the last area of the game.

??? - ???

This is the final area of the game. Turn around after using the door to see your not in the house anymore, or even anywhere on earth it looks like. This is a straightforward path so just follow it. When you get to the end you will see a...well I wont spoil it. All you have to do is get close to this thing and use your sword on it. You did pick it up right? With that said and done you got Ending D and have officially seen every ending this game has to offer as far as I know!
The End! What Do I Do Now?
You could play 1 hit death mode to get more achievements! There are also a ton of notes and things to read I didnt even mention here that I will be including in a secrets guide so come back in the coming days, or even day, to see if that guide is up! Take care and thank you for reading :)
3 Comments
Alma Nova  [author] Mar 22, 2020 @ 1:21pm 
@Robbie_Gull I didnt make the guide but there isnt much else in the game. Glad I could help though!
Robbie_Gull Mar 22, 2020 @ 10:15am 
Great guide - helped me figure out the one ending that alluding me.

Did you get round to making that secret guide in the end? Even though I've achieved all the endings there are maybe some items i've never found.
Raincoat Dec 23, 2018 @ 6:19pm 
That was a very nice guide!