Silent Hunter 5: Battle of the Atlantic

Silent Hunter 5: Battle of the Atlantic

213 voti
XallZalls Ultimate U-Boat Guide (2023 Update)
Da XallZall
This guide covers the tools used for submarine warfare, interception methods, attacking and defensive maneuvers, evasion and many more general information to provide the Captain the means for a successful hunt.
19
7
8
2
11
5
5
2
3
   
Premio
Aggiungi ai preferiti
Preferito
Rimuovi dai preferiti
Introduction
The Silent Hunter U-Boat Guide - By XallZall
Designed for the Steam Overlay and for World War II U-Boat & Submarine Simulators.


“He who sees first, has won!” - German U-Boat School Proverb.

This is a comprehensive guide that covers a wide range of subjects that I learned over the years from reading books, forums, watching documentary films, tutorials videos, as well as from personal experience.

While guide is primary designed for Silent Hunter 5 using the Wolves of Steel Mega Mod and for the Steam Overlay (Shift + Tab while in-game) the contents or tools used, can be applied to any other Submarine Simulator games, such as Wolfpack, Crush Depth, Uboat etc.

This guide includes:
  • Quick condensed lists that are often used for hunting & plotting
  • Technical information of the submarines and weapons used
  • Interception and approach methods & tactics
  • Tactical & Historical torpedo firing solutions
  • Defensive & stealth maneuvers
  • In-depth explanation of tools and charts
  • Important notes regarding the Wolves of Steel mega mod

Origins of this guide:
As the various information I gathered were from all corners of the internet and various books and videos, certain methods having many steps involved, I often had forgotten something and had to find and review them again and again, becoming fed up with having to find something for the X'th time I began writing down notes on paper. Once I accumulated several pages I found myself shuffling the various pages around, I grew tired of this too.

Soon after I switched over to writing my findings and notes in a simple notepad document on the computer. Even so after a while the notepad document began to become lengthy, and no matter how hard I tried to organize it I could not find a format to settle on for a clean and easy overview, and I was constantly scrolling up and down since it was a large wall of plain text.
Longing for a better oversight, lead to the creation of this guide.

Originally published back in 2018, I merely copied and pasted my notepad writings which was written in a way that was addressed to myself personally, it was after all a collection of personal notes, now 5 years later in 2023, I finally found the time and motivation to completely rewrite, reformat and improve the entire guide so that it is now presented in a way meant for not just for myself but also for you dear reader. I hope that it is useful and helpful to you as it is to me.

Words to the Captain:
Some of the methods discussed in this guide will be complicated and may require many steps to be taken. In my attempts to write to an audience, I written in a way to be as specific and clear as possible, I also tired to keep it as brief as I could but that was a secondary consideration, so some methods will be lengthy despite my best efforts.
Do not let the "Wall Of Text" discourage you, once you understand a method clearly, they can be preformed rather fast, learning it first however may take some time.
Navigational Charts
This information can be used generally, but is most useful for BDU contact reports.

Compass True Bearings:
North = 0°
East = 90°
South = 180°
West = 180°
NE = 45°
SE = 135°
SW = 225°
NW = 315°
NNE = 22.5°
ENE = 67.5°
ESE = 112.5°
SSE = 157.5°
SSW = 202.5°
WSW = 247.5°
WNW = 292.5°
NNW = 337.5°

Speed Estimates:
Speed
Silent Hunter 5
Historical
Slow
2 - 6 Knots
4 - 6 Knots
Medium
7 - 12 Knots
7 - 9 Knots
Fast
13 and above
10 - 12 Knots

Online Notepad:
You can use this for notes, logs or even as a Journal, it saves the session, meaning you can close it and come back to it any time and it wont discard what you written.
https://www.rapidtables.com/tools/notepad.html

Online Calculator:
Added this for ease and quick access, useful for certain calculations or attack methods.
https://www.desmos.com/scientific


Complete Kriegsmarine Grid World Map. Click to enlarge the image.


In Uncharted, this is the location of El Dorado, see if you can find it on the Grid Map.
Terminologies


Depending on your level of experience with naval simulators, you may or may not understand certain terminologies or abbreviations which this guide will often use, so if you come across something that you do not understand, it should be listed here.

360 Minus Rule:
A formula to obtain the degrees when looking at the port side.
Example, when looking through the periscope straight forward at the zero position, finding 45 degrees on the right is pretty easy, just turn the scope till you find bearing 45.
But how much degrees do we need to rotate from the zero position towards the left for bearing 308?
We use the 360 minus rule, 360 - 308 = 52 degrees left.

AOB:
Angle On Bow

ASDIC:
ASDIC stands for a made up term by the British Admiralty for "Allied Submarine Detection Investigation Committee" is a sonar location device.

BDU:
Befehlshaber der U-Boote; English: Commander of the U-boats
This is the Submarine HQ giving us contact reports via wireless radio messages

Bow:
The Front section of the U-Boat / Ship.

Constant Bearing:
Also known as a Collision Course.
Say the U-Boat is moving at 3 knots submerged, and is looking at a ship with a bearing of 45 degrees to the right, if the viewed target bearing does not change, it is remaining constant, the U-Boat and the observed vessel will collide at some point.

Crush Depth:
Also known as the Collapse Depth, this is the depth where the U-Boat is at risk of imploding.
For German U-Boats this is generally between 200 to 280 meters.

DC:
Short for Depth Charge.

Decks Awash:

A depth where only the conning tower and deck gun is exposed, speed is reduced but the U-Boat is much more difficult to see and is ready to dive much faster. Additionally the diesels can still run without the need of a snorkel.

Knots:
Nautical Miles per hour.
One Knot is
1.852 Kilometres per Hour or 1.150 Miles per Hour.

Overhauling:
Rushing ahead of the enemy target or convoy, while keeping a safe distance, where only the top section of the mast of the enemy can be seen.

Port:
Left Side of the U-Boat / Ship.
Often Color Coded as Red in Dials.

Relative Bearing:
The Bearing from the U-Boats perspective, regardless of the True Bearing.

Starboard:
Right Side of the U-Boat / Ship.
Often Color Coded as Green in Dials.

Stern:
The Back/Rear section of the U-Boat / Ship.

TDC:
Stands for Torpedo Data Computer, the device used on the U-Boat that takes AOB, Speed and Range inputs to compute the Gyro Angle required for the Torpedoes Course for a successful hit.

True Bearing:
North is always 0 degrees.
Tools Manual


Listed below are documentations of tools used for gathering information to plot various pieces of information for setting up an ambush and torpedo solutions.
RAOBF - General Information
The RAOBF is a tool placed on the Periscope that a is used to find:
  • The targets Range
  • The targets AOB
  • The targets Speed

It consists of 3 parts, with the middle ring being rotatable.
🔴Ship Mast & Ship Length


🟠Range (Meters x 100) & Optical Range


🟡 AOB


🟢Speed Pointer (Knots)


🔵6X Zoom (Top) & 1.5X Zoom (Right) Pointer


🟣 Optical Vertical & Horizontal Cross Hairs
RAOBF - Range
Using the RAOBF for obtaining a targets range.

Requirements:
  • Identification of the target ship.
  • Moving at low speed or remaining stationary.
Advantages:
  • Very fast and accurate range reading.
Disadvantages:
  • The target has to be identified for accurate range readings.
  • Difficult and inaccurate in rough sea conditions due to rocking of the U-Boat, making optical observations of the mast height prone to errors.

Example Setup:
Target Ship
Draft (Meters)
Length (Meters)
Width (Meters)
Mast (Meters)
Max Speed (Knots)
Crew
Cimmaron Class Tanker
10.5
190.6
41.8
29.9
12
30

1. Ensure to be moving at a low speed (2-3 knots) or come to a halt and identify the target ship.

2. Place the (🟣 Cross Hairs ) on the water line and count the Vertical Ticks going up to the highest mast (8).

3. On the middle (🟠Optical Range) disc, on the inner section, look for the Vertical Ticks (8) and rotate it towards, to the (🔵6X Zoom) or (🔵1.5X Zoom) pointer depending on the zoom level.

4. On the (🔴Ship Mast) Disc, locate the targets Mast Height (29.9) and read off on the middle (🟠Range (Meters x 100)) Disc the distance.

In this example the Range is 1470 meters.
RAOBF - AOB
For acquiring the AOB of a target using the RAOBF disc, the Range, using the RAOBF must already be found.

Requirements:
  • Identification of the target ship.
  • Moving at low speed or remaining stationary.
  • Range found already with the RAOBF disc.
Advantages:
  • Once the Range is found using the RAOBF disc, obtaining the AOB is really fast and easy.
Disadvantages:
  • The target has to be identified for accurate range readings.
  • Difficult and inaccurate in rough sea conditions due to rocking of the U-Boat, making optical observations of the mast height prone to errors.
  • Range on the RAOBF must be found prior to plotting the AOB.

Example Setup:
Target Ship
Draft (Meters)
Length (Meters)
Width (Meters)
Mast (Meters)
Max Speed (Knots)
Crew
Cimmaron Class Tanker
10.5
190.6
41.8
29.9
12
30

1. Ensure the U-Boat is moving at a low speed (1-2 knots) or is at a halt.
Also Ensure that the Range of the target has already been obtained using the RAOBF disc.


2. Find the Range to the target on the (🟠Range (Meters x 100)) disc and rotate it so that it lines up with the ships length (190.6).

3. Place the (🟣 Horizontal Cross Hair) to the waterline and count the Ticks (19). [Tip 1]

4. On the (🟠Optical Range) Ring, find the Ticks (19) and read off just below it on the (🟡 AOB) disc the AOB. [Tip 2]

In this example the AOB is 22.5 Starboard.

Tips:
1. If using (🔵 X1.5 Zoom) multiply the Horizontal Ticks by 4.

2. If the target is moving away, the AOB is 180 minus the AOB found.
Ex. 180 - 22.5 = 157.5
RAOBF - Speed
Using the RAOBF for obtaining a targets speed.

Requirements:
  • Identification of the target ship.
  • Moving at low speed or remaining stationary.
  • Stopwatch
Advantages:
  • An accurate way of determining the Targets speed.
Disadvantages:
  • The target has to be identified for accurate speed readings.

Example Setup:
Target Ship
Draft (Meters)
Length (Meters)
Width (Meters)
Mast (Meters)
Max Speed (Knots)
Crew
Cimmaron Class Tanker
10.5
190.6
41.8
29.9
12
30

1. Ensure the U-Boat is moving at a low speed (1-2 knots) or is at a halt.

2. Put the (🟣 Optical Vertical Cross Hair) just before the target ship, lock the periscope in place and start the stop watch the moment the ship moves into the vertical cross hair.

3. End the stop watch the moment the target has passed the cross hair and note the time (47 seconds).

4. Find the target ships length (190.6) on the (🔴 Ship Length) Ring as well as the time in seconds on the (🟠Range (Meters x 100) & Optical Range) disc and rotate it so that the time lines up with the ships length.

5. Read off the speed On the (🟠Range (Meters x 100) & Optical Range inner ring, at the (🟢Speed Pointer).

In this example the target speed is 7.8 Knots
Attack Disc - General Information
The Attack Disc (German: Angriffsscheibe) is a plotting device used for:
Note: It has many other functions, that will not be listed here.
  • Finding the AOB (Angle On Bow)
  • Finding the targets True Course

The front section consists of 5 parts:

🔴Relative Bearing to the target Disc


🟠Compass Rose Disc


🟡Attack Course Pointer


🟢Bearing & Lead Angle Pointer


🔵Internal Indicating Angel on the Bow Pointer
Attack Disc - Plotting AOB
Calculation of the AOB by means of the Attack Disc

Requirements:
  • Knowledge of Own Course.
  • The Targets Bearing.
  • The Targets Course.
Advantages:
  • Having Accurate AOB readings allow for setting up accurate firing solutions without the need to be in a perfect 90 degree angle to the targets course.
Disadvantages:
  • Unless you got an accurate BDU contact report radio message, you have to plot the Targets Course by other means, most methods that can plot the Targets Course tend to also allow you to find the targets AOB, making the use of this method by this tool somewhat limited.

Example Setup:
Own U-Boat Course
Relative Bearing to Target
Target Course
040°
50°
170°

1. Rotate the Compass Rose (B.🟠) so that the U-Boats Own Course (040°) is opposite of the White Triangle found on the 180 degree mark on the Relative Bearing Ring (A.🔴).

2. Rotate the Bearing & Lead Angle Pointer (D.🟢) to the Relative Bearing to the Target (050°) found on the Relative Bearing Ring (A.🔴).

3. Rotate the AOB Pointer (E.🔵) to the Targets Course (170°) found on the Compass Rose (B.🟠).

4. Read on the AOB Pointer (E.🔵) where the Pointer intersects the Bearing & Lead Angle Pointer (D.🟢).

In this example the AOB is 100 degrees starboard.
Attack Disc - Plotting Target Course
Calculation of the Target Course by means of the Attack Disc

Requirements:
  • Knowledge of Own Course.
  • The Targets Bearing.
  • The AOB (can be estimated).
Advantages:
  • This method allows for positioning the U-Boat to very specific and any desired angles towards the target.
Disadvantages:
  • Unless you can plot by some other means the AOB of the target accurately, the AOB often has to be estimated, which inevitably leads to various degrees of inaccuracy.

Example Setup:
Own U-Boat Course
Relative Bearing to Target
AOB
040°
50°
60° Port

1. Rotate the Compass Rose (B.🟠) so that the U-Boats Own Course (040°) is opposite of the White Triangle found on the 180 degree mark on the Relative Bearing Ring (A.🔴).

2. Rotate the Bearing & Lead Angle Pointer (D.🟢) to the Relative Bearing to the Target (050°) found on the Relative Bearing Ring (A.🔴).

3. Find on the AOB Pointer (E.🔵) the AOB (60° Port) and rotate it so that Bearing & Lead Angle Pointer (D.🟢) intersects it.

4. Read on the Compass Rose (B.🟠) where the AOB Pointer (E.🔵) intersects it.

In this example the Targets True Course is 330 degrees.
TADS Computer - General Information
The TADS Computer (Time Angle Distance Speed) is not a historical device, but are often included in the Silent Hunter games.
Note: It has many other functions, that will not be listed here.
  • Multiplication & Division
  • Converting Kilometres to Nautical Miles
  • Finding target speed based on relative bearing

The front section consists of 3 parts:

🔴Sin Scale


🟠Speed (Knots), Lead Angle & Distance


🟡Time Logarithmic Scale
TADS Computer - Multiplication
Using the TADS Computer for Multiplication

Requirements:
  • Locating the number 10 and a Single Rotation of the Disc.
Advantages:
  • This is a much more immersive way doing multiplications than using a modern calculator.
Disadvantages:
  • The multiplication numbers are limited.

Example Setup:
Let us find what 7 times 8 is.

1. First locate the Number 10 on the Time Logarithmic Scale (C.🟡)

2. Next find the First Number to be multiplied (7) on the Speed (Knots), Lead Angle & Distance Ring (B. 🟠) and rotate it so that it lines up with the number 10 on the Time Logarithmic Scale (C.🟡).

3. Now look for the Second Number (8) on the Time Logarithmic Scale (C.🟡) and read off the number just above it on the Speed (Knots), Lead Angle & Distance Ring (B. 🟠).


In this example the result is 56.
TADS Computer - Division
Using the TADS Computer for Division

Requirements:
  • Single Rotation of the Disc.
Advantages:
  • This is a much more immersive way doing division than using a modern calculator.
Disadvantages:
  • The division numbers are limited.

Example Setup:
Let us find what 47 divided by 3 is.

1. First locate the First Number (47) to be divided on the Lead Angle & Distance Ring (B.🟠).

2. Next find the Second Number (3) which is used for division on the Time Logarithmic Scale (C.🟡) and rotate it so that it lines up with the first number found on the Lead Angle & Distance Ring (B.🟠).

3. Now look for the Number 10 on the Time Logarithmic Scale (C.🟡) and read off the number just above it on the Speed (Knots), Lead Angle & Distance Ring (B.🟠).


In this example the result is 15.6.
TADS Computer - Speed Plot via Constant Bearing
Using the TADS Computer for finding the Speed of a Target by means of a Constant Bearing
To achieve a constant Bearing alter the U-Boats speed and course.
Very similar to the Ausdampfverfahren Attack Method.

Requirements:
  • Own Speed.
  • Target Bearing.
  • Target AOB (can be estimated).
  • Achieving a Constant Bearing towards the target.
Advantages:
  • This method is very fast and easy to calculate.
  • U-Boat does not have to remain stationary.
  • Since the U-Boat is on a collision course with the target, the range becomes less with time and the Captain can decide at what range to open fire.
Disadvantages:
  • Having to achieve a constant bearing can be difficult.
  • Constant observations have to be made to ensure the bearing does not change, means that the periscope has to be exposed often, risking detection.
  • If the U-Boat has to travel at great speeds to achieve a constant bearing, it risks being detected by sound or by the water wake that is caused by exposing the periscope at a high speed.

Example Setup:
U-Boat Speed
Target Bearing
Target AOB
3 Knots
60°
30°

1. First find the U-Boats speed (3 Knots) on the Speed (Knots), Lead Angle & Distance Ring (B.🟠).

2. Find the AOB (30) on the Sin Scale (A.🔴) and Rotate the Speed (Knots), Lead Angle & Distance Ring (B.🟠) so that the U-Boats speed lines up with the targets AOB.

3. Rotate Time Logarithmic Scale Pointer (C.🟡) towards the targets Bearing (60).

4, Read off the speed on the Speed (Knots), Lead Angle & Distance Ring (B.🟠) where the Logarithmic Scale Pointer (C.🟡) intersects it.


In this example the targets speed is 5.2 Knots.
TADS Computer - Speed Plot via Changing Relative Bearing
Using the TADS Computer for finding the Speed of a Target by means of a Changing Bearing.
Very similar to the Auswanderungsverfahren Attack Method.

IMPORTANT NOTE:
This is highly experimental, I obtained the method from a tutorial that was using a different TADS Computer Interface, very similar but somewhat different. The results of this calculation, which I tried to replicate to the best of my abilities using this TADS Computer interface and attempting to replicate the results as close as possible still was off by 0.3 knots.
The results that I managed to get in this particular example, may not necessarily work with different bearing or time readings.

Requirements:
  • Own Speed.
  • Target Bearing.
  • Stopwatch.
  • Moving towards the target.
Advantages:
  • U-Boat does not need to achieve a constant bearing.
  • Faster than the "TADS Computer - Speed Plot via Constant Bearing" method as no constant bearing must be achieved.
  • U-Boat does not have to remain stationary and can move freely towards the target at various angles and speeds.
Disadvantages:
  • Very complicated compared to other methods, making it more prone to errors.
  • Less accurate than the "TADS Computer - Speed Plot via Constant Bearing" method.
  • May require taking notes to keep track of various pieces of information for later computation.

Example Setup:
U-Boat Speed
Selected Time
Target Bearing 1
Target Bearing 2
Target Range
Target AOB
3 Knots
60 Seconds
45°
40°
2000
55 Port
Note that steps 2 - 5 are incidental to the "TADS Computer - Speed Plot via Constant Bearing" method.

1. Note the U-Boats speed, then plot or estimate the targets range, note the viewed bearing (B1), select a time, ex. 60 seconds and start the stop watch, after the time passed, note the new bearing (B2) and plot or estimate the targets AOB.

2. On the TADS Computer, find the U-Boats speed (3 Knots) on the Speed (Knots), Lead Angle & Distance Ring (B.🟠).

3. Find the AOB (55 Port) on the Sin Scale (A.🔴) and Rotate the Speed (Knots), Lead Angle & Distance Ring (B.🟠) so that the U-Boats speed lines up with the targets AOB.

4. Rotate Time Logarithmic Scale Pointer (C.🟡) towards the targets Bearing (60).

5. Read off the speed on the Speed (Knots), Lead Angle & Distance Ring (B.🟠) where the Logarithmic Scale Pointer (C.🟡) intersects it and take note of the speed (2.35). We will call this SP1.

6. Find the Range (2000) on the Speed (Knots), Lead Angle & Distance Ring (B. 🟠) and line it with the time in seconds (60) on the Time Logarithmic Scale (C. 🟡).

7. Next Rotate the Sin Scale (A.🔴) so that the AOB (55) is intersected by the Time Logarithmic Scale Pinter (C. 🟡).

8. Now find the bearing change (+5, which becomes 60) from the Sin Scales (A.🔴)s and read off the speed on the Lead Angle & Distance Ring (B.🟠). We will call this SP2. [Tip 1]

9. Finally add SP1 and SP2 together for the target speed.

In this example the targets speed is (SP1 6.6 + SP2 2.35) 8.95 Knots.

Tips:
If the target has been moving away, Subtract instead, SP1 - SP2. You will often get a negative value, turn that positive and that will be the speed of the target.
TADS Computer - Speed Plot via Doubling Mast Height
Using the TADS Computer for finding the Speed of a Target by means the targets mast doubling in the periscope scale marks (periscope tick markers).

Requirements:
  • Own Speed.
  • Target Mast Height.
  • Stopwatch.
  • Approaching the target at 0 degrees head on.
Advantages:
  • Very simple way of obtaining the targets speed.
Disadvantages:
  • Must position well ahead of the target and achieve a 0 degree head on approach, making this a very specific setup.
  • Mast height must be known, so identifying the target is required. Although estimations of mast height could work as well.

Example Setup:
U-Boat Speed
Target Mast Height
Time for doubling
Target Range when doubled
3 Knots
35 Meters
9 minutes 30 seconds.
2800 meters
Example ships mast top is 2.5 ticks on the scale mark when starting the stopwatch, the result will be for 6x zoom magnification.

1. Ensure you are well ahead and closing in on the target who is at a 0 degree AOB. Identify the target to plot its mast height or estimate the mast height.

2. Use the periscopes scale marks found on the left side and count the scale mark ticks from the water line to the targets mast top (2.5) and start the stopwatch. [Tip 1]

3. Wait for the mast height to double on the scale marks (2.5 x 2 = 5 ticks) and note the time taken (9 minutes 30 seconds). [Tip 2]

4. On the TADS Computers, Speed (Knots), Lead Angle & Distance Ring (B. 🟠) find the plotted or estimated Mast Height (35 meters) and divide it by the doubled scale marks (5) with the Time Logarithmic Scale Ring (C. 🟡).

5. On the Time Logarithmic Scale Ring (C. 🟡), find the numerical value 10, and where it crosses over to the Lead Angle & Distance Ring (B. 🟠) note the distance reading (7000), this would be the distance in meters for 1.5 Zoom.

6. For 6x zoom, we multiply the distance by 4, by simply looking at the number 4 on the Time Logarithmic Scale Ring (C. 🟡), read the distance where it crosses over to the Lead Angle & Distance Ring (B. 🟠), in this example its 2800 meters.

7. On the Time Logarithmic Scale Ring (C. 🟡) find the time taken for the mast to double on the periscopes scale marks ticks (9 minutes 30 seconds), and rotate the disc so that the Time is lined up with the Distance.

8. Where the Time Logarithmic Scale Pointer (C. 🟡) intersects the Lead Angle & Distance Ring (B. 🟠), read off the middle section for the Closure Rate (9.5 Knots).

9. Subtract the U-Boats speed (3 Knots) from the Closure Rate (9.5 Knots) for the targets speed.

In this example the targets speed is 6.5 Knots.

Tips:
1. Try starting the stopwatch when the target is at a scale mark tick that is easy to keep track of when doubling, so whole numbers if possible.

2. During the time that one must wait till the mast doubles, consider checking the torpedo setting, pistol, depth, speed.
Lagenwinkelscheibe - General Information
Lagenwinkelscheibe Calculating Disc - General Information Edit

Angle on Bow Disc German: Lagenwinkelscheibe is a plotting device used for:
  • Finding the AOB (Angle On Bow)
  • Finding the targets True Course

It is in many ways a simplified Attack Disc consisting of three rotatable parts.


🔴Compass Rose


🟠Target Course / AOB


🟡Target Bearing


Translation of German Text written of the Device:
Pfeilung = Bearing
Lage = AOB

RW. Pfeilung = ???
Not sure about this one but RW could stand for RechtsWinkel, meaning Perpendicular.
So it could be mean Perpendicular Bearing. Feel free to let me know what this means.
Lagenwinkelscheibe - Usage
Calculation of the Target Course by means of the Lagenwinkelscheibe.

Requirements:
  • Knowledge of Own Course.
  • The Targets Bearing.
  • The AOB or Target Course.
Advantages:
  • Fast and easy to use.
  • If the target AOB is known, you can find the target course, if the target course is known you can find the AOB.
Disadvantages:
  • The target AOB or Course is usually the most difficult pieces of information to be obtained, and the methods that allows you to obtain them usually already give you the AOB or target course as well already, meaning there is no real use for this tool in those cases.

Example Setup:
Own U-Boat Course
Relative Bearing to Target
AOB / Target Course
090°
40°
70° Starboard / 240
The example gif animation will plot the targets course using a known or estimated AOB.
But the written example will cover both AOB and Target Course Plotting as in both cases, the movement and rotations are identical.

1. First ensure parts of the disc are straightened out and are pointing in an upward position.

2. Rotate the (🟡Target Bearing) pointer towards the targets bearing (40).

3. Next rotate the (🔴Compass Rose) so that your course is aligned with the small red triangle pointer at the very top.

4. Depending on what you know, the AOB (70 Starboard) or the target course (240), rotate the (🟠Target Course / AOB) disc accordingly to line up with the (🟡Target Bearing) pointer for the AOB or with the (🔴Compass Rose) for the target course.

In this example the Targets AOB is 70° Starboard or True Course is 240 degrees.
3-Bearing AOB Finder - General Information
The 3-Bearing AOB Finder is a non-historical plotting device created by Pisces (From SubSim) which is used for as the name implies:
  • Finding the AOB (Angle On Bow)

It consists of a single rotatable disk.


🔴AOB Reading


🟠Bearing 2 to 1


🟡Bearing 3 to 1
3-Bearing AOB Finder - Usage
Instructions Manual

Requirements:
  • 3 Bearing Readings.
  • A time interval.
Advantages:
  • A relatively simple way to obtain the AOB of a target
Disadvantages:
  • Must remain stationary
  • Target must be closing, will not work if they are moving away
  • The time intervals need to be at least 10 minutes for accurate AOB readings, meaning that if a target is closing in fast, there may not be enough time to conduct the calculations.

Example Setup:
Time Interval
Bearing 1
Bearing 2
Bearing 3
10 Minutes
270
276
283

1. Make sure to write down the 3 bearings taken after the time intervals.

2. Take note between the change of bearing between B2 and B1 (6) and between B3 and B1 (13).

3. Find the number found on the inner ring (🟡Bearing 3 to 1) and rotate it so that it lines up with the number found on outer ring (🟠 Bearing 2 to 1).

4. Read off the AOB (🔴AOB Reader)


In this example the targets AOB is 50 degrees.
Triangle Map Plotting Tool (WIP)
The Triangle Map Plotting Tool is included in the Wolves of Steel Mega mod for Silent Hunter 5.

It is a tool used to obtain the speed of a observed target by moving in a parallel course and measuring the distance to the target in a given time interval.

I have not found any documentation about its use besides from Silent Hunters III Hitmans GUI Mod. According to its manual, the map scale (Zoom Level) is to be set to 5000 meters and range and bearing is to be provided by the Watcher Officer.

Two problems arise, one is that, despite my best efforts I can only get the map scale to 6000 meters with the tactical map in Silent Hunter 5.
The second is that the range estimations using the Wolves of Steel Mega mod is highly inaccurate and the Watch Officer usually only gives crude estimations.

So the viability of this method of obtaining the speed of a target is questionable.
Perhaps it can become useful by manual range calculations, however without the accurate range calculations from the Watch Officer this can be a risky business, as according to the manual, we are to be in parallel course, exposing the entire broadside of the U-Boat, and for manual range calculations, we ought to be close enough for any range finding tools to be accurate.
Unless this method is fine with taking rough range estimations, which I have not yet tested.
But I am not so sure about the fact that the map scale is off by 1000 meters.

Regardless it is an interesting tool and for completion sake I will include this here.


I welcome anyone to let me know how this can be used in Silent Hunter 5, in that event I will update this section.
Nomograph - General Information
The Nomograph is a simple tool, that is used for plotting when two out of three pieces of information is known. All that is required is to draw a line connecting the two known information, which will give you the third.
It is used for:
  • Plotting speed.
  • Plotting distance over time.

It consists of 3 lines with numerical values.

🔴Minutes


🟠Kilometres


🟡 Knots
Interception Methods


Listed below are interception methods for finding a target or a convoy, determining the range, speed and course. These methods tend to be complicated but allow to plot all the necessary information for setting up an ambush and a firing solution.
Intercepting Method - BDU Radio Contact Report
Sometimes the BDU or nearby friendly units will send you a contact report.
These reports usually will contain estimations of the a target or a convoys speed and heading.
This method will allow you to plot an interception course in order to set up an ambush ahead of the target or convoy.

Requirements:
  • A contact report
  • Map plotting
Advantages:
  • Allows for accurately intercepting a target and setting up an ambush ahead of the target or convoy.
Disadvantages:
  • This method solely depends on a contact report and requires a fair amount of map work, which may not be easy to memorize.


Example Setup:
BDU Contact Report
Ship Type
Course
Speed
Range
Bearing Relative / True
Merchant
North East
Medium Speed
86 Kilometres
114 / 304


Part 1: Locating the Targets Position

1. Determine the U-Boats position on the map and place a marker on it (MK1).

2. Draw a line in the direction of the target using either the Relative (114°) or True Bearing (307).

3. Using the Compass Tool, set it on (MK1) and expand it till it matches the targets range (86 KM).

4. Place another marker (MK2) where the line and compass line intersect. This is currently where the target or convoy is located.

Part 2: Using the Multiplication Factor

5. Starting from (MK2) draw a line in the direction of the targets course (East North East, Estimated as 67.5).

6 A. Next we need to set up a Multiplication Factor (MF for Short), this example will suggest using 2 or 10 as those are easy to calculate instantly.

6 B. The bottom section will cover custom Multiplication Factors. [Tip 1]

7. Estimate the ships speed if there is no specific speed given in the contact report, in this example we will estimate Medium Speed to be 6 Knots.

8. Use Multiplication Factor 2 for short range, and 10 if the target is further away and use it to multiply the targets speed with it. For this example we will use 10, so its 6 Knots times MF 10 = 60.

9. Starting from (MK2) draw the result of Step 8 (60) and where the compass intersects the Targets Course Line (Step 5.) place another Mark (MK.3)

10. Next use the same MF on a desired U-Boat speed, this example will use 15 Knots. 15 Knots times MF 10 = 150.

11. Starting from (MK3) use the compass and extend it to match the result of (Step 10) which is 150.

12. Where the compass intersects the Bearing Line (Step 2.) place another marker (MK4).

Part 3: Plotting the Interception Course

13. Now use the Protractor starting from (MK2) towards (MK4) and finally (MK3), this will give you an angle, in this example that angle is 31 degrees.

14. Use the Protractor again starting once more from (MK2) now to (MK1) and reproduce the angle found in (Step 13.) which was 31 degrees and where the Protractor intersects the Targets Course (Step 5.) Place another marker (MK5).

15. This is the direction that the Submarine needs to move at a speed of 15 Knots to intercept the target. In this example the course is 338.

Tips:
1. Custom Multiplication Factor:
Formula is as follows: TARGET RANGE / 100 x MULTIPLICATION FACTOR
Example: 86 / 100 x 3.33 = 2.86
You then would use this MF to multiply the ship speed and U-Boats selected speed.
Intercepting Method - Simple Contact Report Interception
This is a simple form of the previous "Intercepting Method - BDU Radio Contact Report", which can also be used to simply check if an interception is even possible.
It is best used with a timescale upwards to 12 hours, anything beyond that greatly reduces this methods accuracy.

Requirements:
  • A Contact Report.
  • A Speed Chart.
  • Map plotting.
Advantages:
  • A very simple interception method.
  • Can be used to check if a interception is feasible.
Disadvantages:
  • This method depends on a BDU contact report.
  • This method is allot less accurate and much more limited than the BDU Radio Contact Report Method.
Example Setup:
BDU Contact Report
Ship Type
Course
Speed
Range
Merchant
North
Slow Speed
218 Kilometres


1. Take out the Speed Conversion Table and pick a time frame (TF) that you think is suitable depending on the distance to the target. [Tip 1]

2. Next take the compass tool and starting from the BDU Target Marker, draw a circle (C1) representing the distance (TF) by means of the circle selected in Step 1, and the Targets Course (North) by means of the Line Section of the Compass Tool. [Tip 2]

3. At the end of (C1) where the circle and line connect, place a marker (MK1).

4. Now make another circle (C2) starting from the U-Boats position and drag it all the way to (MK1), and read off the distance.

5. Using the Speed Conversion Chart, looking the selected time that you selected in Step 1, choose a speed that comes closest to that found in Step 4. [Tip 3]

6. You now just need to set the appropriate speed and set the course to head towards (MK1).
In this example the U-Boat needs to travel at 12 Knots for 10 Hours in direction 42.


Tips:
1. The higher the time frame, the greater the error and chance that the target alters speed or course. So limiting it to 12 hours is advised.

2 A. In the Silent Hunter games, the compass tool both draws a circle and a line, use the circle section for the distance and the line for the targets course.

2 B. If you are playing a different submarine simulator and the compass tool differs from the Silent Hunter games Compass tool, simply use a combination of the compass and line tool, or just the line tool itself as this is adequate on its own.

3. Go a bit more ahead or a bit faster than what you plot, as to arrive slightly ahead of the target, which will give you time to prepare an ambush.
Interception Method - The Four Bearing Method
The Four Method Bearing, is a way to obtain all the necessary information by means of the hydrophone to set up an ambush ahead of a target or convoy.
It requires allot of steps and may be confusing, but for the most part the U-Boat remains submerged and concealed.

Requirements:
  • Remaining stationary
  • Submerged (30 meters)
  • Sound contact
  • Map plotting
  • A time interval


Advantages:
  • Plots target course
  • Plots target AOB
  • Plots target speed
  • Remain totally concealed submerged for the majority of the plotting


Disadvantages:
  • Allot of map work and steps involved
  • Easy to get confused or forget a step
  • U-Boat needs to surface and reposition for the final (true bearing) reading


Example Setup:
U-Boat Course
First / Second
Time Interval
Bearing 1
Bearing 2
Bearing 3
Bearing 4
North 0 / 229 Degrees
15 Minutes
54 Degrees
62 Degrees
74 Degrees
229 Degrees


Part 1: Obtaining the Targets Course

1. Submerge to 30 meters and come to a halt, mark your position (MK1) and listen for a sound contact.

2. Once a sound contact is found, determine if its closing or moving away and settle on a time interval accordingly. [Tip 1]

3. Take note of the first bearing, start the stopwatch and draw a 50 kilometre line (B1) representing it on the map. [Tip 2]

4. Wait the time interval (in this case 15 minutes) and do the same as in step 3 for the second bearing (B2).

5. And do the same for bearing 3 (B3) once more after the time interval.

6. On the 2nd bearing (B2) place a mark (MK2) somewhere in the middle of it.

7. Using the compass tool, create parallel lines of (B1) & (B2), we shall call these (C1) & (C2) respectively.

8. Next drag (C1) & (C2) onto (MK2) so that (C1) intersects (B3) and place a mark there (MK3) do the same with (C2) which intersects (B1) and place another mark there (MK4).

9. Draw a line starting from (MK4) to (MK3) and extend it. This is the targets course. [Tip 3]

Part 2: The Predicted 4th Bearing

10. Place a mark (MK5) where the target course line intersects the bearing line (B2).

11. Draw a circle (C3) starting from (MK5) and extend it so that the radius touches both (MK3) & (MK4).

12. Drag (C3) onto (MK3) and place another mark (MK6) on the Target Course line.

13. Draw a line (PB4) starting from (MK1) to (MK6) and extend it. This is a predicted 4th bearing.

Part 3: Repositioning & Finding the True Target Position

14. Surface and move at flanking speed in the direction of the Targets Course.

15. Once the next time interval is coming up, submerge a 3 minute or so early so that you can be submerged again at 30 metres and come to a halt. Find the sound contact again.

16. Plot the U-Boats new position, and at the next time interval note the new bearing (B4) and draw a line starting from the U-Boat representing it. This is the true 4th bearing. Where it intersects (PB4) place a new mark (MK7). This is the true position and distance to the target.

17. Make a parallel line of the Target Course with the compass (C4) and drag it onto (MK7) to for the real Target Course.

Part 4: Plotting the Speed

18.Note the distance between (MK.3) and (MK.4) and find it on a distance over time chart to find out the speed. [Tip 4]


Tips:
1. If the target is closing, you can set a longer time interval, which

2. Start at time which is a whole number like 12:05, 12:10 etc to keep track of the time intervals more easily.

3. This gives us the Target Course, but we do not know where exactly and just how far the target is situated.

4. Mark (4 - 5), or (5 - 3), or (3 - 6), any of these will give you the speed based on the time interval, you can also double the distance and double the time, for example from (MK4 - MK3) for more accurate speed readings.
Interception Method - Moving Four Bearing Method
The Moving Four Bearing Method is similar to the standard Four Bearing Method, it is also much more historically viable, as Submarines in general rarely remained completely stationary.
However, this method is by far the most complicated in the entire guide.

This is the only remaining method that I have not altered ever since the complete remake of this guide, because of its complexity. In other words, I have to revisit the tutorial and relearn it to a degree where I can simplify the process.

In the Tips section you will find a nearly 1 and a half hour long video tutorial explaining this method.

It may take a while, but I hope that I will eventually rework this section and also add a GIF animation to it.

Requirements:
  • Submerged (for best results 32 meters underwater)
  • Clock with time intervals (for best results 20 minutes and higher)
  • Allot of plotting with map tools
Advantages:
  • Allows you to move submerged at low speeds (depending on target range, if closer, you can move faster while not completely blocking out the hydrophone with own noise.)
  • Very safe and stealthy as you remain underwater for the entire calculation if desired.
  • Gives you Targets True Position, Distance, Course and Speed.
Disadvantages:
  • Time consuming.
  • Very messy and tedious plotting required.
  • Easy to forget all steps and often requires revision of steps.


Initial Preparations
1: Dive to 30 Meters or so.
2. Set a low speed, (1.5 Knots or lower preferably.)
3. Listen for Sound Contacts.
4. Once a Sound Contact has been found, lock and follow that sound contract.
5. Turn towards the sound Contact.
6. Set Dive Planes to Neutral/Straight
7. Wait until you are done your turning and established a constant speed.

Pre-Map Work
8. Decide on a Time interval depending on the Targets direction and speed. (Tip 1)
9. Using the Speed Charts, draw a Compass Radius, the Radius is based on the Distance Traveled based on your Speed and Time Interval. We will called this Compass Radius [C1]

First Bearing Reading
10. Plot Map Position and plot your Course Heading.
11. Take your First Sound Bearing Reading [B1], and immediately start the Stop Watch. (Tip 2)
12. Draw a line from your Plotted Position towards the bearing reading. (Tip 3)

Preparations while waiting for Second Bearing Reading
13. Drag [C1] (drawn in Step 9.) to your Plotted Position on the map.
14. On your Course Heading Line, where the [C1] intersects it, place a Mark [MK1].
15. Move the Center of [C1] onto [MK1].
16. On your Course Heading Line, where [C1] intersects it, Place a Mark [MK2].
16. Draw Two Parallel Lines [P1] & [P2] using the Compass Tool of [B1].
18. Place these new Parallel Lines somewhere aside for now.

Second Bearing Reading
19. Once the Time Interval has come, take the Second Bearing Reading [B2] (Tip 4)
20. Draw a line starting from [MK1] representing [B2].

Preparations while waiting for Third Bearing Reading
21. Draw Two Random Lines [RL1] & [RL2], that Cross both [B1] and [B2]. (Tip 5.)
22. Draw Two Circles, [C2] Starting from where [B2] & [RL1] Intersect until it Reaches [B1], and
[C3] Starting from where [B2] & [RL2] Intersect each other until it Reaches [B1].
23. On [RL1] where [C2] intersects it, Opposite of [B1], place a Mark [MK3], and on
[RL1] where [C3] intersects it, Opposite of [B1] place another Mark [MK4].

24. Place [P1] & [P2] (from Step 16) onto [MK3] & [MK4] respectively.

Third Bearing Reading
25. Take the Third Bearing Reading [B3], and Immediately go to Flank Speed. (Tip 6)
26. Draw a line starting from [MK2] representing [B3].
27. Determine a new Fast Speed that you can Maintain. Recommend 6 Knots. (Tip 7)
28. Keenly Observe and Measure the Time Passed to Reach your new Constant Speed. (Tip 8)
29. Draw a New Circle,[C4] starting from [Mk2] and Draw its Length based on Step 28. (Tip 9)
30. Where [C4] Intersects our Course Heading Line Place a New Mark [MK5].
31. Draw another New Circle [C5] Starting from [MK5] and draw its length based on the Time Interval and New Constant Speed, SUBTRACT the time and distance required to Accelerate. (Tip 10.)
32. Where [C5] Intersects our Course Heading Line Place a New Mark [MK6].

Preparations while waiting for "True" Fourth Bearing Reading
33. Check if [B3] Intersects [P1] & [P2], If not see (Tip 11)
34. Place two new Marks [MK7] where [B3] and [P1] intersect and [MK8] where [B3] and [P2] intersect.
35. Readjust [C2] & [C3] so that the Pointers face the new marks [MK7] & [MK8].
36. Move the Center of [C2] to [MK7] & Move the Center of [C3] to [MK8].
37. Place two more Markers [MK9] & [MK10] to the Tip/End/ Pointers of [C2] & [C3] Respectively.
38. Draw a line [FB4] that Intersects both [MK9], [MK10] and our Course Heading Line. (Tip 12)

Fourth Bearing Reading
39. Once the Time Interval has come, take the Fourth Bearing Reading [B4].
40. Draw a line starting from [MK6] (from Step 32.) representing [B4] in a manor that it intersects the Line [FB4].

Targets Position
41. Place a Mark [TP] where the Line [B4] and [FB4] intersect. This is the Targets Exact Location. (Tip 13)

Targets Distance
42. Draw Line [D] Starting from [MK6] to [TP] to find the current distance to the Target.

Targets Heading
43. Draw a Random Line [RL3] Starting from [TP] in a manor that it intersects [B3].
44. Where [RL3] Intersects [B3] place a mark [MK11].
45. Draw a circle [C6] starting from [MK11] onto [TP]
46. Place a mark [MK12] where [C6] intersects [RL3] opposite of [TP].
47. Using the Compass make a Parrallel Line [P3] of [B3].
48. Move [P3] onto [MK12].
49. Where [P3] intersects [B2] place a Mark [MK13]
50. Draw a Line [TC] starting from [MK13] and passes through [TP] and extend far beyond it. This is the Targets Course.

Targets Speed
51. Grab the Line [TC] starting from [MK13] and Drag and Extend it so that it is placed on [B1].
52. Place a Mark [MK14] where [TC] now intersects [B1].
53. Draw a new Circle [TS] Starting from [MK14] onto [MK13].
54. This find the distance of [TS] in the Speed Chart Manual based on your Selected Time Interval, this is the Targets Speed.

Plotting an Interception Course
55. Note the Time Passed from your interval, after finishing Step 54, and plot your and the enemies new position, and from here on out, you can plot an interception course.
Interception Method - Moving Four Bearing Method (Tips Section)
Tips:
1.
If the target is closing a longer interval 15 minutes + is recommended.
If the target is moving away, a interval of 15 minutes or less is recommended.


2.
For a more precise bearing reading, Start the Timer only after a Bearing Change.

3.
You can do this by by means of the Protractor (Using Degrees) or using tools (ex. Attack Disc) to find the True Bearing. Also draw the Bearing Line to 30 Kilometers or more to give yourself some workspace.


4.
To get a more accurate Second Bearing Reading, keenly pay attention to the Bearing about a minute before your First Time Interval comes to pass, notice if there is any bearing change during this time, and try to observe the Hydrophone Bearing Needle, it may happen that the Needle is reading for example a Bearing of 5.5 rather than just 5. So this Bearing could now be 5 or 6. You can also wait a little bit after the Time Interval to see if a change in the Bearing happens, then make your best educated guess if the bearing is 5 or 6. You can also decide to try to be more accurate and call the Bearing 5.5 and try to plot it as such.

5.
Make sure the Random Lines are a bit away from your current position, and that there is ample space between the two random lines.
They should be somewhat perpendicular to B1 or B2.


6.
We go to Flank Speed only to Accelerate faster.

7.
Consideration is required based on your Battery Levels, your Speed drops as the Batteries Deplete, so going Flank Speed for example, will not allow us to achieve a constant speed as the Batteries cannot maintain it.
As the Type 7's Maximum Submerged Speed is around 7.6 Knots, it is recommend to go at a Speed of 6 Knots as this Speed can be maintained for a sustained period of time, provided you have your Battery Charge Levels at 100%.


8.
Should be around a Minute.

9.
We are trying to factor the Acceleration Time to the new Constant Speed for maximum Accuracy.
If we were moving at a Speed of 1.5 Knots and our new Speed is 6 Knots, we need about a minute or so to Accelerate and Reach 6 Knots, we have to estimate how much Distance we Traveled and How much time has passed until we Reached 6 Knots.


10.
If we took a time interval of say 15 minutes, and it took around a minute to Accelerate from 1.5 to 6 Knots, then we must subtract this minute from our Speed Calculations from Step 31 to give a more precise calculation on the Submarines Position.

11.
If [B3] does not Intersect [P1] & [P2], then Re-adjust [P1] & [P2] so that they both intersect [B3] and their Respective Marks, so for example, [P1] Intersects both [B3] and [Mk3].


12.
This Line is if we would have taken the Fourth Bearing Reading While not altering our Speed. This is a Predicted Fouth Bearing.

13.
Mark [TP] Target Position, gives us the Targets Position and the distance of how far it is from our U-Boat.


Credits: Tonci87
https://www.youtube.com/watch?v=z2nr2G2SRGY&t=5231s
Plotting Methods


Listed below are plotting methods that are used to obtain Range, Speed and AOB.
These are usually the next steps after a successful interception and an ambush zone is set up.
Plotting Range - Periscope Estimations
You can use the periscope and divide the vision port into 3 sections, depending on how much space the target is taking up, you can estimate the distance quicky.

Requirements:
  • Visually imaging 2 lines.
Advantages:
  • Quick and simple way to estimate the distance to the target.
Disadvantages:
  • Very rough estimation, not precise.


Space Taken
1.5x Zoom
6x Zoom
3/3
400 Meters
1 KM
2/3
800 Meters
2 KM
1/3
1000 Meters
3 KM

For more accurate estimations, you can use this chart, which is useful if you can estimate the target size or target type.


The chart requires you to have the target taking up all the periscope space so 3/3 on either 1.5x (left side) or 6x zoom (right side).


The top section is for range estimation, the bottom section is for AOB estimation.
Plotting Range - Periscope Graticles
This is a mathematical way using the periscope graticles (ticks or scale marks) to find the range of a target.

Requirements:
  • Identifying the target for the mast height, or estimating the mast height.
  • Counting Periscope Ticks.
  • Mathematical Formula.
Advantages:
  • Easy and immersive way of range finding.
Disadvantages:
  • Target Mast Height must be known.
  • Not always easy to do mentally, may require a calculator.


Important Note:
In Silent Hunter 5, using the Wolves of Steel Mega mod, a periscope scale mark (tick) has a numerical value of 2. So the scale marks are listed as 2, 4, 6, 8 and then you see the numerical 10 scale mark on the left side of the periscope.

Formula for Range finding is:
For 6x Zoom:
TARGET MAST HEIGHT / SCALE MARKS x 1000 = TARGET RANGE IN METERS

For 1.5x Zoom:
TARGET MAST HEIGHT / SCALE MARKS x 1000 x 3 = TARGET RANGE IN METERS

Mast Height Averages
Destroyers & Small Escorts
Merchants
For Estimations
25 Meters
20 - 25 Meters

This example is for 6x zoom:

1. Identify the target and note its mast height, or just estimate it.

2. Place the periscopes horizontal cross hair line on the water line of the target, and count the scale marks on the left side vertically to the highest mast.

3. Divide the Mast Height by the Vertical scale marks.

4. Multiply the result by 1000 to get the range in meters.

Tips:
1. You can use the Horizontal scale marks for the torpedo spread angle when using 1.5x Zoom for a torpedo spread attack.
Ex. 3 scale marks = 3 Degrees Spread Angle.


Silent Hunter III
This section is for Silent Hunter III using the Grey Wolves or Ace War Campaign Mega Mods.
Each scale mark here is 10.

1.5x Zoom:
TARGET MAST HEIGHT x 1000 / SCALE MARKS = TARGET RANGE IN METERS

6x Zoom:
TARGET MAST HEIGHT x 1000 / SCALE MARKS x 4 = TARGET RANGE IN METERS
Plotting Speed - U-Jagd
The U-Jagd is a Stopwatch with several length indicators (5, 75, 100, 150 and 200 meters) which is used to determine a targets speed.

Requirements:
  • Identifying the target.
  • Remaining stationary or at low speed (1-2 knots).
  • U-Jagd Stopwatch.
  • An angle close to 90 degree of the target.
Advantages:
  • A fast and easy way to plotting the targets speed.
Disadvantages:
  • The target must be identified.
  • Target needs to be close to 90 degrees, the less the target is away from 90 degrees, the less accurate the speed reading becomes.

Example Setup:
Target Ship
Draft (Meters)
Length (Meters)
Width (Meters)
Mast (Meters)
Max Speed (Knots)
Crew
Cimmaron Class Tanker
10.5
190.6
41.8
29.9
12
30


1.Ensure to be moving at a low speed (1-2 knots) or come to a halt and identify the target ship. In addition to that ensure that the targets AOB is close to 90 degrees.

2. Once the target is identified (Cimmaron Class Tanker) note its length (190.6 meters).

3. Bring up the U-Jagd, and find the length line closest to the target (200 meters).

4. Put the periscope cross hair before the target, and start the U-Jagd the moment it enters the cross hair.

5. Stop the U-Jagd the moment the targets stern leaves the periscopes cross hair and read off the speed where the clock pointer intersects the length of the target. [Tip 1]


Tips:
1. Note the targets maximum speed, if the U-Jagd goes over it, then its an obvious error. Or it can also mean that the target identification is incorrect.
Plotting Speed - Ausdampfen
This is a method that requires the U-Boat to be moving at a parallel course of the target at a safe distance over 5 to 15 minutes and adjusting the speed to achieve a constant bearing, thus matching the targets speed and thereby plotting its speed.

Requirements:
  • Moving at a parallel course of the target.
  • Altering speed to achieve a constant bearing.
Advantages:
  • This is a pretty simple and straight forward method.
  • A useful method to plot speed during an overhaul maneuver.
  • Realistic historical immersive method which gives accurate speed readings.
  • No need for identifying the target.
Disadvantages:
  • More often than not the U-Boat needs to be surfaced and be at a safe distance, due to its low underwater speed.
  • Achieving a constant bearing can be time consuming and requires allot of alterations of speed.

1. Locate a target and try to determine its course by either estimation or a method that allows to plot its course.

2. Once the course is known or estimated, position the U-Boat to be on a parallel course.

3. Achieve a constant bearing by altering the U-Boats speed so that the bearing of the target does not change, and try to maintain this bearing for 5 to 15 minutes, the longer it is maintained the more accurate the reading is.

4. After 5 to 15 minutes, if a stable constant bearing has been achieved, the speed of the target is the same as the U-Boats speed.
Plotting Speed - 3 Minutes 15 Seconds Method
This method is primarily for obtaining a targets speed. Its fast and effective and provides allot of other information as well that can be used for an attack.

Requirements:
  • Remaining stationary.
  • Identifying the target.
  • Map plotting.
  • Stopwatch.
Advantages:
  • Very easy and fast to execute.
  • Plots target Range.
  • Plots target Course.
  • Plots target Speed.
  • Can also be used to figure out AOB
Disadvantages:
  • The target must be identified.
  • Calculations of the target bearing and distance have to be precise, failure to do so will mean huge inaccuracies in the data obtained.

Example Setup:
A merchant is spotted closing from the port side (left side).


1. Come to a halt and identify the target ship.

2. Note the bearing and calculate its distance, start the stopwatch immediately thereafter.

3. Open the map and plot the U-boats position (MK1).

4. Draw a line starting from (MK1) representing the U-Boats Course.

5. Use the protractor, draw from the U-Boat Courses line to (MK1) and then alter its angle so that it is equal to the bearing of the target. [Tip 1]

6. Starting from (MK1) draw a circle (C1) and extend its range to the targets range.

7. Where (C1) intersects the protractor on the target bearing angle, place a marker (MK2).

8. Now wait until 3 minutes and 15 seconds have passed.

9. Once the time has passed, take another bearing and range reading.

10. Alter the protractor so that it matches the new bearing and place another Circle (C2) starting from (MK1) representing the new target range.

11. Where (C2) intersects the Protractor Bearing Line, place another marker (MK3).

12. Draw a line from (MK2) to (MK3) and extend it. This is the target course.

13. Draw a circle (C3) starting from (MK3) and extend it to (MK2), this will give us the range in meters that the target has done during the 3 minutes and 15 seconds time period.

14. Divide the distance in meters by 100, this will give you a number for example 0.74, this will translate to 7.4 knots.


Tips:
1. If the enemy is on the port (left side), to find the angle on the protractor, use the rule = 360 minus the observed bearing.
Ex. 360 - 325 = 35 degrees.
Plotting Speed - Hydrophone Propeller Count
If the target is identified, it is possible to make out its speed by means of the hydrophone and counting the propeller rotations for one minute. This method of obtaining the targets speed can be useful in poor weather condition.

Requirements:
  • Submerged (30 meters for best sound clarity).
  • Stationary or moving a low speed (1-2 Knots).
  • Ship propeller speed charts.
  • Stopwatch.
Advantages:
  • Immersive way to obtain targets speed.
  • If the targets AOB is close to 0, this method of obtaining the speed is more accurate than other means.
  • With experience it may be possible to identify ships without visual contact and by sound alone.
  • Useful way to obtain targets speed in poor weather conditions when visibility is poor.
  • Calculations are done submerged, remaining hidden.
Disadvantages:
  • If the target can be observed, which is required for identification of the target, other methods may be better to obtain the targets speed.
  • It may be difficult or impossible to single out a target in a convoy setting due to noise interference from multiple ships.


1. Establish visual contact and identity the target, note the bearing.

2. Submerge (preferably to 30 meters if possible) and come to a low speed (1-2 Knots) or come to a complete halt.

3. Use the Hydrophone and point the needle to the bearing noted on the periscope.

4. Now, get a feel for the rhythm of the propellers of the target. You will notice a Loud "Chug" followed by several more quite "chugs". Example: ONE... 2... 3... 4.... ONE... 2... 3... 4...
Take note of the "ONE's" as that is a single propeller rotation.

5. Once you are in the rhythm start the stop watch and count the rotations for exactly one minute. [Tip 1.]

6. After the time is up, note the amount of rotations, and use one of the charts listed below for the identified target.

7. Find the closest number to the amount of rotations you counted, and determine the speed using the chart.


Hydrophone Range:
In Silent Hunter 5 the player can listen further than the Sonar Man.

Character / Estimations
Player
Sonar Man
Short
Medium
Long
Listening Range
34KM
20KM
0 - 1000m
1000m - 3000m
3000m +

Manual:


Small Vessels:


Merchants Page 1:


Merchants Page 2:


Warships:


Attack Methods


Listed below are attacking methods, some historical and some non-historical ones. These methods usually require the U-Boat to have already overhauled ahead of the enemy and know the targets course.
Attacking Method - Night Surface Attack
The Surfaced Attack is risky, but offers the advantages of high speed, maneuverability and great visibility.

Requirements:
  • Being surfaced.
  • Cover of the night.
Advantages:
  • High speed, maneuverability and visibility.
  • Enemy sonar is rendered useless.
Disadvantages:
  • Late war radar makes this method extremely risky.
  • Exposed to gun fire if spotted.

The U-Boat is a comparatively small naval vessel, only the Conning Tower, deck gun and a bit of the deck itself is above the water level, making it difficult to detect.
Even more so when it is coming directly towards or away from you, as in those cases only the Conning Tower is visible.
Under the cover of darkness, the difficulty of seeing the U-Boat is further increased.
If the U-Boat approaches with the moon in front of it, the moonlight has the smallest area to hit, making detection very difficult.

There is no real way or instructions for carrying out a Surfaced Attack, instead these are more of guidelines to increase the odds of a successful attack.


1. If possible, position the U-Boat so that when the approach begins the moon is in front. [Tip 1.]

2. Avoid using the Deck Gun, it does not have enough fire power to sink a ship with a single shot, its loud bang will piece through the silence of the night and its muzzle flash can give away the U-Boats position, additionally it may cause a fire on a ship which can illuminate the U-Boat.

3. Enemy Sonar is useless when the U-Boat is surfaced, and the many ships in a convoy moving at speed renders the enemy hydrophones ineffective, the only real threat is Radar. [Tip 2.]

4. Once a torpedo strikes the entire convoy will be alarmed, therefore, try targeting ships in the center of a convoy, as the most vulnerable and valuable ships will be located there.

5. When retreating, go either with the moon directly in front or behind the U-Boat to retain maximum stealth.

6. If spotted, attempt to escape at high speed, before submerging.

Tips:
1. As the night makes observation difficult, and leads to usually overestimating the targets distances, keep at all times one torpedo tube flooded and ready to fire, in the event something unseen or unexpected should occur, allowing the Kaluen to react quickly.

2. While visual and audio detection of a U-Boat is very difficult for ships to make out, there is exists a chance of noise detection, by the hydrophone or the diesel engine as well as the wake the U-Boat creates at higher speeds. Switch to Electric motors, and if possible approach from an angle where the speed does not have to be too high, this way you will be less likely be detected by sound location.
Attacking Method - 90 Degree Shot
The 90 Degree Angle Shot, also known as the "Fast 90" is a simple and very accurate way of attacking.

If the U-Boat is perfectly 90 degrees perpendicular to the targets course, and the speed of the target is properly measured, attacking an entire row of a convoy is possible and also allows for extreme long range shots.

Therefore this method of attack is used best when planning to attack multiple targets or setting up a long range shot.

Requirements:
  • Having the targets course plotted.
  • Plotting the targets speed.
  • Firing range of 3000 to 500 meters.
  • Being ahead of the target and at a perpendicular course (90 degrees).
Advantages:
  • When at close range, 800 meters or less, this method has an error threshold of 1 Knot and 10 degrees of AOB, making it a reliable way of ensuring torpedo hits.
  • A simple way of attacking that is very accurate.
  • Very easy to hit multiple targets at once, allows for attacking an entire row.
  • This method allows for long shots, if you get good enough with it, 5 kilometre shots are possible.
Disadvantages:
  • Input data, speed and being properly positioned must be accurate, any deviation or slight errors, will greatly impact the accuracy of this method at mid ranges and especially at long ranges.
  • Enemy escorts know this attack pattern well, and tend to rush to the flanks of the convoy, meaning that when fired at a medium range, 2000 - 1000 meters, escorts will often expect you at this location.


Translation of the Chart:
Knoten = Knots
These are for the 3 torpedo speed settings 30, 40 or 44 knots.
And goes up to 30 Knots for the enemy speed.
Bug = Bow
Achtern = Stern

1. Come ahead of the target, achieve a perpendicular to the targets course, submerge and determine the range you want to fire from. [Tip 1]

2. Enter the Attack Periscope and set the view to Bearing 0. Turn the TDC to manual input mode and set the AOB to 90 Degrees Starboard or Port depending on from where the target is coming from.

3. Plot the speed, which is of great importance and estimate the range, input these into the TDC and turn the TDC back to tracking mode. [Tip 2]

4.Flood the torpedo tubes and setup the torpedo settings to your liking.

5. Twist the Periscope until the Gyro Angle becomes 0. [Tip 3]

6. When the target enters the periscopes cross hair at the 0 Gyro Angle, open fire. [Tip 4]

Tips:
1 Check the "Useful Information" Torpedo Ranges section when determining the firing range.

2. The range input will only tell us when the torpedo is to be expected to hit the target, it is not important otherwise.

3. You can use the chart provided above to aim the periscope at the bearing required depending on the targets speed for a 0 gyro angle shot.

4. A Zero Gyro Angle Shot is firing the torpedo at bearing so that the torpedo does not have to alter its course, essentially just going straight.
Attack Method - Submerged Hydrophone Attack
If you know how to do a "Fast 90" Torpedo Attack of by heart, it is entirely possible to do a complete underwater attack, without visual contact using only the Hydrophone.
In many ways this is the same attack method as the "90 Degree Shot Attack Method" (Fast 90), the main difference is that one is submerged at depth, and the hydrophone is substituted for the periscope.

This method will allow you to attack while being submerged at 30 meters, the maximum diving depth where torpedoes can still be used, as torpedo itself cannot withstand as much water pressure as the U-Boat. Being at 30 meters, escape and evasion also becomes more easy, and is a good method to use when the seas are rough and maintaining visual contact is difficult, or one is at risk of being exposed due the depth of the waves.

Requirements:
  • Strong understanding of the 90 Degree Shot Attack Method.
  • Submerged 30 meters or higher.
  • Speed of Target.
Advantages:
  • Completely hidden.
  • Being already at 30 meters depth means that escaping and evading is much more easy.
  • Good Method to use in rough weather conditions where visibility is poor and deep waves threaten to expose the U-Boat.
Disadvantages:
  • Speed of the Target Must be known, either by contact reports, visual plotting or hydrophone propeller count which often requires the target to be already identified.
  • Not seeing the target means that precise placement torpedo shots cannot be made, therfore targeting weak points is not possible.

1. Find a target to be focusing on and determine its speed. Be already at a perpendicular course at a preferable range of 1000 meters or less.

2. Submerge to 30 meters and locate the targeted ship by the hydrophone and order the hydrophone operator to lock and track it, so that he keeps telling you the bearing changes.

3. Prepare the torpedoes like you would with the fast 90 attack method, set AOB to 90 (Starboard or Port), Speed, estimate the Distance, set up the Torpedo Pistols, Speed, Depth, etc.

4. Once the TDC input has been made, rotate your periscope so that the Gyro Angle of the Torpedo becomes 0, meaning its a straight shot and note the bearing on the scope. [Tip 1]

5. Once the Hydrophone man tells you the bearing that your scope is set to, open fire. [Tip 1]

Tips:
1. You can also use the straight shot torpedo charts (See 90 Degree Shot Attack Method) and just place your periscope to the appropriate bearing based on the torpedo speed settings.

2. The hydrophone is pointed directly at the propeller of a ship as that is where the sound source is the loudest, meaning that you want to shoot a bit early, offsetting the bearing a bit.
Attack Method - Ausdampfverfahren
The Ausdampfverfahren was a historical attack method employed by the German Navy.
In addition to this method, you can also use "TADS Computer - Speed Plot via Constant Bearing" to obtain the speed as they are very similar.

Requirements:
  • Altering Speed & Course to achieve a constant bearing.
  • Being ahead of the target.
  • A calculator, a modern one or the Attack Disc.
Advantages:
  • A very immersive way of attacking.
  • Accurate at long ranges, and due to a collision course, can be fired at any range, even point blank (350 meters).
  • AOB only needs to be roughly estimated.
  • Range only needs to be roughly estimated.
Disadvantages:
  • Mostly only effective on a single target, altering the scope bearing will throw off the calculations.
  • Having to achieve a constant bearing can be difficult.
  • Constant observations have to be made to ensure the bearing does not change, means that the periscope has to be exposed often, risking detection.
  • If the U-Boat has to travel at great speeds to achieve a constant bearing, it risks being detected by sound or by the water wake that is caused by exposing the periscope at a high speed.

The Ausdampfsverfahren is when the U-Boat is ahead of its target, and closes in, altering its course and speed to achieve a constant bearing or a collision course. Once this is achieved, calculations can be made to determine the targets speed. The AOB and range are usually estimated. As the U-Boat is on a collision course, the Kaleun can wait till the very last moment to fire torpedo's at a very close range, thus greatly increasing the probability of a hit. Before the torpedo's are fired a final range estimation is given to compensate for the parallax between the periscope and the torpedo tubes.


1. Ensure the U-Boat is ahead of the target, is submerged and moving towards it.

2. Alter the U-Boats course & speed until a constant bearing is achieved. [Tip 1]

3(A). Once a constant bearing is achieved, note the U-Boats speed & the targets bearing and plug in the values for the following formula:

3(B). U-BOATS SPEED x SIN(BEARING) = SPEED INPUT

3(C). You can either use the chart posted above for the sin of the bearing.
Ex. Sin of bearing 30 = 0.5000, Sin of bearing 30.5 = 0.5076
Or you can use a modern calculator and use the sin function and input the bearing.


4. Once you plotted the speed, input a rough AOB and Range estimation.

5. Just before firing, update the range once more with a rough estimation and fire immediately after.

Tips:
1(A).Try to alter the course more than the speed, the less speed you can get away with the less wake you will cause when the periscope is above the water.

1(B). If the targets bearing does not change for around 3-5 minutes one can confirm that it is a constant bearing.

Alternative Method Without Formula:
This is a more simple way preforming the Ausdampfsverfahren, without the need of a formula or a calculator, with the drawback that the targets actual speed will remain unknown and as such the speed of a convoy remains unknown as well.

1. Achieve a constant bearing and keep the periscope on the target for the inputs.

2. Set the Target speed as the U-Boats current speed.

3. Set the AOB as the scope bearing in degrees. Ex. Bearing 330 = AOB 30 (Starboard or Port).

4. Input Range (rough estimations are fine) and Fire.
Attack Method - Auswanderungsverfahren
The Auswanderungsverfahren was a historical attack method employed by the German Navy.
It is similar to the Ausdampfverfahren, but instead of maintaining a constant bearing, the change in bearing is observed over 1 minute and a firing solution is devised from that change in bearing.

Requirements:
  • Being ahead of the target.
  • A Stopwatch.
  • A calculator, a modern one or the Attack Disc.
  • Estimation of the targets range.
Advantages:
  • A very immersive way of attacking.
  • Unlike the Ausdampfverfahren, a constant bearing is not required and is therefore faster to preform.
  • AOB is set to 90 degrees, not needing any specific input.
Disadvantages:
  • More complicated and math heavy than the Ausdampfsverfahren.
  • Mostly effective on a single target, may be somewhat inaccurate when trying to fire on multiple targets.
  • Is not the most accurate attacking method unless firing from close range.

The Auswanderungsverfahren is a method of attack where the U-Boat is ahead of the target and closes in. While its closes towards the target, it notes the change in bearing over a course of one minute. This change in bearing is then used in a mathematical formula to plot the speed which is to be entered into the TDC.


1. Ensure you are ahead of the target, submerged and are closing in a manor where both the targets and the U-Boats bow are going in the same direction. [Tip 1.]

2. Estimate the targets range or identify the target and plot its range by other means.

3. Lock onto the target, note the bearing (B1) and start the stopwatch. [Tip 2.]

4. After a minute has passed, unlock/un-follow the target and do not move the periscope until all calculations are completed, note the new bearing (B2). Calculate the difference between the two bearings (B1) & (B2) we will call that value (BC). [Tip 3.]

5. Formula 1 =
U-BOAT SPEED x SIN(B2) = SPEED 1


6. Formula 2 =
TARGET RANGE / 100 x 6000 / 1820 = NAUTICAL MILES

7. Formula 3 =
NAUTICAL MILES x SIN(BC) = SPEED 2


8. Add SPEED 1 and SPEED 2 together for the speed input to the TDC. [Tip 4.]

9. Set TDC to manual input and set the AOB to 90 degrees (Starboard or Port depending on the targets course direction), update the Range (can be estimated) to correct the parallax between the Periscope and Torpedo Tubes. Set up the torpedo settings as well, speed, depth & pistol.

10. Set the TDC to tracking mode, take aim and open fire.

Tips:
1. The bows of both the target and the U-Boat can be opposing, however the math formula changes from addition to subtraction. Instead of Adding SPEED 1 & SPEED 2 in (Step 8), subtract instead.

2. Start at a bearing which is easy to memorize, ex 315, 320, etc. whole numbers.

3. If the bearing readings are on the port side, do B2 - B1, example 340 - 310 = 20 degrees change.

4. Subtract if Bows of the U-Boat and Target opposing instead of going in the same direction.
Stealth Tactics


Listed below are Stealth Tactics that can be employed to reduce the chances of being sighted, and remain undetected.
Stealth and surprise is the biggest advantages of the U-Boat, and should be maximized.
Stealth Tactics - Getting in or near a Convoy
When a large convoy with escorts are detected, some Captains want to be inside the convoy to wreck maximum havoc form within.

Others may want to attack from the outer parameters, in both these cases, in the former the escorts must be passed, in the latter they tend to come dangerously close.

To reduce the odds of being detected, when an escort comes near, go slow and go deep, the deeper you are the less effective their sound locating gear become, be it active or passive equipment.

Listen in with the hydrophone and wait till they pass, give them some time to create a distance and proceed to up again to periscope depth, now you can continue making your way more deeper into the convoy or start attacking without having to worry about possible detection.
Stealth Tactic - Periscope Usage
U-Boats are equipped with two periscopes, the attack and observation periscopes.
Both of them differ from each other and used for different situations.

The Attack Periscope:
It extends much higher than the observation periscope, has a much more slender neck making it more stealthy than the observation periscope and is tied directly to the TDC, allowing torpedo data inputs.

The Observation Periscope:
While shorter than the Attack Periscope, it has a wider range of motion, and can look much higher than the Attack Periscope.

Its wider lens also means that more light is captured and vision is therefore much more brighter, making it more suitable for night operations. It lacks input to the TDC and its Wider Neck and Wider Lens makes it more detectable than the Attack Periscope. In rough sea conditions, the limited height compared to the Attack Periscope means that it will be more often be submerged by waves.

When stalking an enemy, at a range 4000 to 5000 meters, the periscope can be freely exposed without having having to worry about being spotted. At closer ranges, the Periscopes must be used sparingly, exposing the tip only for brief moments and only at low speeds.

Avoid exposing the Periscopes at high speeds as it will create a Wasserfahne (Water Flag) creating a very detectable water wake.

At Dawn or Dusk or when the moon is about, having them behind the periscopes, the glare and shimmers of the sea camouflage the periscope.
Stealth Tactics - Remaining Hidden After An Attack
Once the enemy is alerted after a torpedo attack, the position of the U-Boat is compromised.
Depending on the type of Torpedoes used, its wake and the side of the target it struck, the escorts will have a general idea where the U-Boat attacked from.

As such, the area where U-Boat is positioned, a radius of 1,000 to 2,000 meters will generally be searched, therefore it is advised to leave this zone as soon as possible and gain distance from the convoy in an effort to remain undetected.
Stealth Tactics - Aircraft In Cloudy Weather Conditions


When the sea is calm and visibility is great, the U-Boat and its wake can be easily detected by aircraft, and while this possibility exists, the U-Boat should not submerge as its mobility and therefore its opportunities of attacks are greatly diminished.
In such clear weather conditions the U-Boat also can also detect enemy aircraft more easily and dive early to a safe depth.

While cloudy weather conditions can conceal and make spotting U-Boats more difficult, the same goes the other way around, and there is a real possibility of being caught off guard and by complete surprise, making evasion or submerging in time an impossibility.
It may be advantages to remain submerged and prevent surprise air attacks in such weather conditions, especially when operating in known hostile waters.
Stealth Tactics - Sea Floor
If the U-Boat is operating in Shallow Waters and can reach the sea floor, it can blend in the ground, greatly reducing the effectiveness of the ASDIC sonar pings.

This stealth tactic is best used when the destroyer is still at a distance, move away at flank speed submerged as much as possible and lay low.

Depending on the type of sea bed, clay, bolder, the U-Boat can become invisible to ASDIC, but still can be heard by hydrophone, so Silent Running is advised.
Stealth Tactics - Silent Approach
Generally, when the U-Boat is on the surface, the enemies hydrophone and ASDIC are greatly limited in their detection capabilities, by the proximity of their friendly units who also produce noise as well as the wake of the sea. However, hydrophone and sonar detection still are possibilities especially when the sea is calm, or if its a lone escort.

The diesel engines are much louder than the electric engines, therefore when approaching the enemy and speed is not of the utmost importance and battery levels are good, switch to electric engines to close in, this will reduce the odds of being sound located.

This applies also for the surface noise, enemies even without any sound locating devices, may still hear the diesels in calm sea conditions during the silence of the night when you are close to them, at around 3 kilometres or less depending on how fast your diesels are are running, which also of course create more of a wake, which is also audible.
Stealth Tactics - Spotting Aircraft & Keeping Mobility
The aircraft is always bad news for the U-Boat, it usually means it is time to submerge, potentially losing out on intercepting a convoy or a target, and generally losing out on attack opportunities due to the low underwater speed and range of the U-Boat.

If you find yourself in a situation where an aircraft is sighted at long range and you have still plenty of time to submerge, if its not directly coming towards you, before diving, turn the U-Boat in a manor that you are moving directly away or towards the aircraft, in order to present the least amount of visible surface and then slow down the engines to reduce the wake trail that the U-Boat produces.


Continue observing the aircraft, if it is not coming directly at you and is leaving, it has not spotted you, but the moment you think its altering course to come directly at you, start running at flank speed to build up speed and begin crash diving immediately thereafter, go to a safe depth and do a hard turn starboard or port.
Stealth Tactics - Sun and Moon
When approaching the target or a convoy, placing the Sun or the Moon in front of the U-Boat means you are approaching from the dark side of the horizon, the Sun or Moon light also has the smallest area to light.

Having the sun directly behind can also make spotting the U-Boat or its periscope more difficult due to the glare.

Try using Dawn and Dusk to your advantage, and when leaving the scene, try returning the same way you came when possible, or having the Sun or Moon directly behind.
Stealth Tactics - Torpedo Usage
It may not be obvious, but one should be consider the type of Torpedo to be used and the time of the day of its use.

The T1 Steam propelled torpedo is generally more reliable early in the war, has longer range and is much faster than the T2, however it leaves a visible wake that can be detected.

The T2 on the other hand, while it lacks the range and speed, it leaves no visible wake making it more or less invisible.

With these in mind, when trying to remain hidden and retain maximum stealth capabilities, use T2 wake-less torpedoes during the daytime and T1 steam torpedoes at night where the cover of darkness makes the wake much more difficult if not entirely impossible to detect in time.
Stealth Tactics - When to Submerge


As a principle, in clear weather, it is always better to submerge too early, than to submerge too late. At the latest, a U-boat must submerge when the funnel top of the enemy ship is sighted.
Defensive Tactics


Listed below are defensive tactics that can be taken in the worst case scenario; when the hunter becomes the hunted.
Defensive Tactics - Anti Aircraft Gun Use
In almost all circumstances you generally do not want to be fighting Aircraft, it may be funny at times of how badly they just missed, but all it takes is one good hit and suddenly it becomes a very serious situation.

As such it is almost always advisable to dive, when it seems like an aircraft is closing in.

There are however instances where you may find yourself in such a situation that diving in time is simply not possible, this is the moment when the Anti Aircraft Guns come into play.
Try to avoid the attacking aircraft by altering speed and course and attack it with the Anti Aircraft Guns, this is both a means to shoot down the aircraft and to put pressure on them and to throw their aim off.

If the aircraft is shot down during this period, good, if not it will have passed you, hopefully missing its strafing run or bomb drop, once it passed over your U-Boat, run flank speed to build up speed and prepare to dive immediately thereafter.
Defensive Tactics - Effective Decoy Use
When a destroyer depth charge is underway, run at flank speed and drop a decoy.
Turn 45 degrees to starboard or port, drop another decoy when the turn is complete and reduce speed to 0.5 Knots.

When turning, try to keep a general straight course towards a selected compass bearing in order to create a distance from the area that the destroyers are sweeping.


If the destroyers start dropping depth charges on the decoys, use the sound of the explosions to mask the engines and run at flank speed again, immediately slow down once the explosions stop and run silently.
Defensive Tactics - Evading Accurate Sonar Pinging
When forced underwater and being hunted by destroyers, try positioning the destroyer so the stern (rear) of the U-Boat is pointing towards the destroyer, or if you must the bow (front), in order to present the smallest surface profile to the sonar, this makes it much more difficult to accurately locate the U-Boat.

If the possibility presents itself, try to position the U-Boat directly behind the enemies propellers, as here the propeller and the wake it creates makes both the hydrophone and ASDIC sonar less effective.

Something also to be aware of is that Sonar Pings are mostly useless at extreme close ranges.

The tactics discussed in this section will not work if you are being hunted by multiple escots.
Defensive Tactics - Decoy Straight Run
Run at flank speed, and dive as deep as your hull allows. Once the preferred depth is reached, keep running for another 15 seconds and drop a decoy, continue running for another 15 seconds and drop one more, finally run for 5 more seconds and then go to silent running.

If the destroyer pings you, repeat the process.
Defensive Tactics - Destroyer Sonar
Destroyers and Coastal defense vessels are equipped with ASDIC a sound locating device that sends a high frequency sound. If this sound strikes the U-Boat, it gets reflected back and gives the ASDIC operator bearing, distance and depth of the U-Boat.

The scanning range of these devices are typically between 1,000 and 2,000 meters.

If a destroyer sends out a sonar ping, it means that it is suspecting you as they only do this if they are reasonably sure that there is a U-Boat about and want a better fix its position.

Pinging has the side effect of reducing the accuracy of the hydrophones.
As such the effectiveness the hydrophone is diminished proportionally to the rate of active pinging.

An increase in the rate of sonar pinging is a strong indicator that the destroyer is seeing something and is preparing for an attack run.

As the sonar pings are reflected back to the destroyer, in shallow waters where the U-Boat can reach the sea bed and therefore blend in its surroundings, the effectiveness of ASDIC is greatly reduced, depending on the type of sea bed, be it clay, bolder, etc.

If the U-Boat is being actively pinged, Silent Running becomes useless and moving at slow speed is detrimental as the destroyer already knows where the U-Boat is.
Defensive Tactics - Keeping Count


The Chalkboard can be used for counting the amount of depth charges expended or for counting propeller rotations to determine the targets speed.

Function:
Keys:
Chalkboard
Shift+B
Add Mark
Shilft+I

Knowing how many depth charges have detonated may serve to you to better evaluate the risk factors of certain maneuvers or actions that you may be considering. For example; if you know the destroyer has expended most of their depth charges, you might attempt more riskier escape strategies.

Typically a Destroyer carries around 30 depth charges.
If you are however unlucky you may come across a dedicated Anti-Submarine Destroyer with 300 depth charges at its disposal.
Defensive Tactics - Manual Diveplanes
In Silent Hunter 5, when you are submerged the Diveplanes, which are like wings of the U-Boat are automatically controlled in an effort to keep the U-Boat at an ordered depth.

However, 9 times out of 10, they will be at an angle, and the greater the angle the greater the water resistance, which in turn means the greater the speed loss will be.

When submerged and being hunted, it is of great importance to create distance from a danger zone or from a destroyer, having the diveplanes straight means lower water resistance and greater speed and acceleration.

Note that, while having the diveplanes set straight, your boat may begin to sink or surface.
Whenever you order a new depth, both the ballast tanks and diveplanes are used to head to that depth, so you can still control depth, by means of using the ballast tanks while being in manual diveplane mode.
Defensive Tactics - Multiple Escorts
Having multiple escorts on you is the worst situation to be in.
The only good news here is that only one destroyer will be usually doing the depth charging, the others will be pinging and listening, passing on this information to the depth charging destroyer.

At times they all might be listening and triangulating your exact position, so trying to run at flank speed will only be exposing your position.

The only thing you can do in these situations is to dive to a depth where your crew starts to get nervous, and trying to remain as silent as possible.
Extras


Listed below are additional information that can be helpful to know and to be aware of.
Rough Sea Conditions
When the sea is rough, everything changes.


In extreme weather conditions, attacking a target becomes exceptionally difficult. More often than not, it is better to wait out the storm or relocate to an area with calmer seas.

Rating
Wave Height
0 Calm (Glossy)
0 m
1 Calm (Rippled)
0 - 0.10 m
2 Smooth
0.10 - 0.50 m
3 Slight
0.50 - 1.25 m
4 Moderate
1.25 - 2.50 m
5 Rough
2.50 - 4.00 m
6 Very Rough
4.00 - 6.00 m
7 High
6.00 - 9.00 m
8 Very High
9.00 - 14.00 m
9 Phenomenal
Above 14.00 m

Here are some factors to consider when operating in heavy sea conditions:
  • Deck and flak guns become inoperable.

  • Early War Torpedoes were exceptionally effected by rough sea conditions and often malfunctioned. Failure rate can be as high as 45%.

  • Magnetic Pistol Settings on the Torpedoes will almost always fail in such extreme conditions.

  • The high waves create essentially walls, torpedoes set at the wrong depth will bounce and ram these water walls which often will cause premature detonations.

  • The high waves rock and pitch the surface ships, meaning that even with a perfect torpedo shot, there is still a good chance the target will be lifted by the waves on one side and the torpedo will go under it harmlessly.

  • Hydrophones for both the U-Boat and Escorts are rendered nearly useless at near surface levels.

  • High waves can completely conceal and obscure the U-Boat or any potential targets, while this can help keep the U-Boat hidden, when escorts are near, the high waves will also conceal them and you may get caught off guard.

  • When submerged, the height and depth of the waves will often submerge the periscope, and often expose the conning tower. Submerging deeper can help with preventing exposure of the conning tower but the periscopes visibility will be further reduced, due to its lower position.
    20 meters depth is advised to remain completely submerged.
If you know how strong the winds are, you can use the chart below for setting the torpedoes to a depth where they are deep enough to not be effected as much by the waves.

Safe Torpedo Depth Settings
Wind Speed
Depth 1
Depth 2
0 m/s
0 m
0 m
1 m/s
0.25 m
0.4 m
2 m/s
0.5 m
0.8 m
3 m/s
0.75 m
1.2 m
4 m/s
1 m
1.6 m
5 m/s
1.25 m
2 m
6 m/s
1.5 m
2.4 m
7 m/s
1.75 m
2.8 m
8 m/s
2 m
3.2 m
9 m/s
2.25 m
3.6 m
10 m/s
2.5 m
4 m
11 m/s
2.75 m
4.4 m
12 m/s
3 m
4.8 m
13 m/s
3.25 m
5.2 m
14 m/s
3.5 m
5.6 m
15 m/s
3.75 m
6 m
Enigma
The Enigma is a machine used to encrypt and decipher messages, allowing safe wireless radio transmissions. It has an estimated 150,000,000,000,000 (150 Million - Million) possible combinations.
Both the German Army and Navy used it. While the Germans thought it could not be cracked, the U-Boat arm nevertheless took extra measures encrypting their messages.

It is a fairly complicated piece of machinery which is quite difficult to explain, so there is a video link found at the bottom. This section serves more as a revision in case a step has been forgotten.

Note that, the Enigma requires charts, which should be already provided inside of the U-Boat Simulator, I will not be listing all of them here as this section is already very lengthy, however I have included a GIF animation and most important charts which should help locating the proper charts.


Example Message:
Date: 01/04/1941 06:00
From: Befehlshaber der U-Boote
To: Player U-Boot

BDU 0500/1/4/41 21
NBHU FFFS FVRE GWBR FQBQ LNP TETK UUPT KKFO YWEM EIPH SVTM SNHA UFGJ QLKE JVHA MCMD VMJA XPKV NBHU FFFS


1. Understanding The Encryption Message Format
Date: 01/04/1941 06:00
The Day, Month and Year is to be noted as they are required for finding the appropriate codex.

BDU 0500/1/4/41 21
Here the Day, Month and Year is given once again, but note the 21 at the end, this indicated the total amount of words in the message, starting from NBHU and ending at FFFS for a total of 21 words.

NBHU FFFS
You will notice that both the first two and last two words are the same, they are used for priming the Enigma at a later stage and also indicate that the message sent is completed, you can view them as brackets. [Message In Here]

2. The Month and Year Codex
We open the chart for the Months and Years, and examine the operational code name for the current Month and Year, which in this example; April 1941 happens to be "Quelle".

Inside we find a pink sheet containing paired letters, going both horizontally and vertically from A to Z.

We now need the first two "Word Blocks" from our message, which is NBHU FFFS, we divide both in half an get the following four pairs: NB, HU, FF and FS.

Look for them in the sheet, and translate them. In this case they become:


NB =
PD
HU =
AD
FF =
JZ
FS =
ET

Write them vertically like so:

PD
AD
JZ
ET


3. Group List
Now that we have translate the two "Word Blocks" read vertically, the second letter of each pair like so:

P
A
J
E


Now remove the first letter at the top:

A
J
E


In the Group List Chart, we now search for this 3 letter combination, AJE is equal to 106.


4. Allocation List
In the Allocation List Chart, we now look for the numerical list which 106 falls into, in this case, it falls into 71 - 110 which falls under the code name "Hydra".

5. Cipher Areas
In the Cipher Areas page, we then look for "Hydra".
This will give us information to where Hydra is relevant, as different areas have different Code Names.

"Hydra" is for U-Boats operating in the North Sea, British Coast, Norwegian Sea, Baltic Sea and the Arctic.

6. Configuring the Enigma Machine
Now that we know the Day (1), Month (4), Year (41) and Cipher Area (Hydra) we use the relevant chart and input these pieces of information.

We then get the configuration charts for setting up the Enigma, for the specific field of operations, day, month and year.
We simply search on the left hand side the relevant day bracket and since this is the first day of April its at the very bottom of the list.

We open up the Enigma, remove all the wheels or drums inside it, and place a new set accordingly to the chart, note that each wheel also has an initial starting character which is also to be altered according to the chart.


The wheels that are to be place in this example are:
Beta which is to be set to A
Nr. 4 which is to be set to U
Nr. 1 which is to be set to S
Nr. 6 which is to be set to L

Turning to the Second Page, looking for the matching day once more, we set up the plug pairings on the enigma. In this case its:
14/1 13/21 8/24 6/16 2/17 19/23 9/25 15/4 22/10 11/5

Just next to this set of information, on right, is the wheel starting position that is to be set, so after the plugs set, twist the 4 wheels we just set inside the enigma to K O C S.
(Looking at the very first image posted in this section, you can see the initial wheel position is originally set to A A A A)

7. Setting Up The Wheel Position Based On The Message
With the Enigma Machine set up, we have to now refer back to our translated code in Section 2, and read the first letter of each pair vertically.
In this example it is:

D
D
Z
T


Now carefully type these four letters with the enigma, and it will light up keys, it will return 4 different letters back; in this case typing DDZT will give you QFCK.
Now rotate the four wheels once more, and set them to be QFCK.

The Enigma Machine is now Primed.

8. Deciphering
We are now ready for deciphering the message.

Beware that If you mistype up a single letter, the rest of the code will be ruined, in the event that does happen, set the wheels back to QFCK and start over from the start of the message.

Ignoring the first two and last two "Word Blocks" NBHU and FFFS in our message start typing in the letters:
FVRE GWBR FQBQ LNP TETK UUPT KKFO YWEM EIPH SVTM SNHA UFGJ QLKE JVHA MCMD VMJA XPKV

The message should read:
ALLUBOATSINVOLVEDINOPERATIONMAREMOSTRUMXYOURBASEHASCHANGEDTOLASPEZIA
Note that you just have to imagine where the spaces are, and X is often used as the period key.

So in this example, having the coded message cleaned up it reads:
All U-Boats involved in operation Mare Mostrum. Your base has changed to Laspezia.

Credits: Taff in Exile
https://www.youtube.com/watch?v=t-7-FrBU4fY
Useful Information Part 1
Here I will list some helpful information that one may not be aware of, which you the Kaleun can take advantage of.


ASDIC
The sonar device that destroyers use. It sends a high frequency ping, making a PING type of sound. When the ping hits a solid surface, it is reflected back, making a PINGaahh type of sound. This sound will tell the operator that the sonar is detecting something. Direction and depth can be plotted by the bearing and the time taken of the returning pinging sound.
Destroyers of course use this for submarine hunting, but it can detect shipwrecks as well.
The effectiveness of the sonar pining is greatly reduced when the U-Boat is on the Seabed as the ping will be striking the sea floor, and can become indistinguishable from the U-Boat.

Blowing Ballast
The greater the depth you are operating in, the more compressed air is required to empty the tanks due to the external water pressure. Additionally, you can blow the ballast several times in Silent Hunter 5 to have a faster surfacing time at the expense of more compressed air.

Browning Shot
A Torpedo Salvo fired into a convoy at 4000 meters at the center of its mass at a 90 degree angle.

Dead Slow Speed
U-Boats rarely remained fully stationary when submerged, exceptions would be when try tried to remain absolutely silent while being hunted by a destroyer.

A stationary submerged U-Boat was subjected to the tides of the water which would cause it to drift and turn, not ideal when trying to set up for an attack. Moreover it lead to depth keeping issues, as stabilization and depth keeping by means of the dive planes would not be possible and would often lead to the gradual rising or sinking of the boat.

It was not entirely impossible to maintain depth by being completely stationary, but for all intent and purposes it was highly impractical, as even the slightest change in weight distribution, such as a single crewman moving from one end to the other of the U-Boat could throw off the ballast trimming.

Dead Slow is around 1.7 Knots..

Decoys
The U-Boat decoy is a small canister containing chemicals which produces bubbles and causes noise.
The bubbles themselves cause sonar deflections, giving false and inaccurate sonar readings.
It is best used before or after being attacked.
It lasts for around 10 minutes. When deploying it close to the surface the large bubbles can be used to confuse enemy aircraft as well.
Depth Charges
A depth charge is a barrel filled with explosives with several depth settings.
The early war Depth Charges typically had a maximum depth setting of 90 metres.
Destroyers usually carry around 30 Depth Charges.
A Depth Charge has an effective kill radius of 4 metres.

Down the Throat Shot
One or two torpedoes shot at an advancing enemy who's AOB is from 0 to + - 20 degrees. This was primarily an American Tactic.

Early War Torpedoes
Something to be very mindful of is that both the American and German Submarines/U-Boats had extremely faulty torpedoes early on in the war. In rough seas, the torpedoes are at high risk of malfunctioning, especially when setting the Pistol to Magnetic or having the depth set too shallow. They also often ran too deep. Ideally attack in calm weather conditions in the early war stages, in rough seas it is probably best to fire more than a single torpedo, given the high failure rate in those conditions.

Fan Shot (Fächer Schuss)
Essentially firing more than one torpedo using a spread angle. To find the proper angle for a torpedo Fan Shot, use one of the Periscopes, set it to the lower zoom level and center the scope on a target, next count the horizontal scale marks (periscope ticks) that fit onto the target and that is the spread angle to be used.

Faster Underwater Acceleration
It is possible to accelerate faster underwater if you set the Dive Plane Controls to Manual and Set them to be to be straight.

Final Torpedo
There are times when a ship refuses to sink, even after being struck by one or more torpedos. Typically in these cases the U-Boat would move away to a range of 3000 meters and close in at a low speed, this way, it will become apparent if the damaged ship is still moving at a very low speed, which may not be immediately noticeable.
At 500 to 400 meters the Final Torpedo is released.

Deck Gun

The deck gun on a U-boat for the most part is a defensive secondary weapon, to be used for fighting unarmed or poorly armed targets and finishing off already crippled targets in an effort to save and conserve torpedoes.
Due to the U-Boats poor sea keeping qualities on the surface, it is practically unusable in rough weather conditions due to the extreme rocking of the boat which makes it difficult to aim it, as well as the low waterline which exposes the deck gun crew to waves, as such it is inferior to any surface vessel as a gun platform and should avoid a gun duel against strongly armed vessels.

If it is to be used, it should be used at close range, 4000 meters or less in calm sea conditions and directly behind a target.

By positioning the U-Boat directly behind a target, the U-Boat can break off the attack and escape much more easily by turning away from the target in and create distance much faster by travelling in opposing directions. It also limits the targets weapons to that of its stern.
While gun duels are generally not advised, one can maximize the the effectiveness of the deck gun by being at close range in calm sea conditions and reduce the enemies effectiveness by remaining directly behind it at close range under the cover of darkness and zigzagging, however, even in these ideal conditions, the target should be only lightly armed, and the moment enemy shells start to fall dangerously close, 200 meters or less, the attack is to be called off and the U-Boat should submerge.

AP (Armor Piercing) shell are best used to sink an enemy target, by means of firing on their hull close to the waterline and shooting ideally at the stern or rear of the target, as in these areas the the resulting flooding will create an imbalance of the ship, pulling its bow or stern down increasing the flooding rate greatly.

While HE (High Explosive) shells lack the penetration qualities of AP shells and are therefore less suited for sinking a ship, it has some good use cases where they can become invaluable.
During night operations, U-Boats typically fired 6 to 10 HE shells onto the deck or command tower of a target in an effort to set fires and thereby illuminating the target, the fire makes it very easy to track and keep the target in sight as well as improves the aiming as the ship features from the resulting fires now become greatly visible.
Firing HE shells into the tower also can disable the steering systems as well as the radio equipment and thus limit its maneuverability and prevent it from calling in potential nearby reinforcements.
It is also useful for taking out any lightly armored deck guns a surface vessel may be armed with.

Hundekurve (Dogs Curve)
The Hundekurve is a method of approach towards a target, in a way so that the Bow (Front) of the U-Boat is always pointed directly at the target. This way, you are presenting the least amount of the U-Boats silhouette, thereby being more difficult to get spotted.
Useful Information Part 2
Magnetic Torpedo Pistol
The magnetic pistol on a torpedo has a detection range around 2 metres and is highly unstable in rough sea conditions.
In calm sea conditions (Wind less than 4 m/s), setting it 1 metre below the draft is ideal.
In Moderate conditions (Wind 4-8 m/s) 1.5 metres.
And in heavy conditions it is generally not recommended, but you can experiment around for a good depth setting.

Manual Dive Planes
Set them straight for greater speed when submerged, or set them upright on the surface to create a higher platform for the deck gun or watch crew at the expense of speed.

More Accurate Course Heading
In the Radio Operators Room, there is a Large Compass, this compass has a inner ring with large numbers displayed, use your rudder controls and fine tune the course for a more accurate underwater navigation, handy for certain tactics, such as the Moving 4 Bearing Interception Method.

Oxygen Consumption
In Silent Hunter 5 it is possible to remain submerged for 1 and 2/3 days before CO2 reaches deadly levels.

Ramming Safety Depth
After being submerged for a prolonged period of time, before surfacing, preform a all round sound sweep at a safe depth of 20 metres.

RPM Control
In the Command Center, near and above the Dive Plane Controls you can see the Engine RPM Dials. Adjust your speed to get the desired RPM count.
Ex. 1.2 Knots should be 50 RPMs submerged.

Seeing Smoke

When sighting smoke on the horizon for the first time, the range to the target or convoy is usually around 12 to 15 kilometres depending on visibility.

Shallow Waters
If caught here, it was usually a death sentence, U-Boats historically hesitated operating in shallow waters, but often did in fact enter them when actively hunting a target or a convoy.

You should be aware that in shallow waters:
  • In calm weather conditions a submerged U-Boat may still be spotted by aircraft.
  • There is little to no time to evade anti-submarine counter measures, which usually means the end for a U-Boat if the escorts got a proper position fix on them.
  • There is no thermal layer here which otherwise would greatly reduce the effectiveness of the hydrophone and sonar pings.
  • While laying low or on the seafloor can greatly reduce the effectiveness (provided the seabed has allot irregularities and obstacles) of active sonar pings, there is no way to reduce the effectiveness of the hydrophones, so the slightest of noises (crew, dive planes, rudder, ballast, propeller screws, etc.) can become detrimental.
When operating in shallow waters, consider:
  • If the enemy defense is weak, that is to say that only a few armed merchants are protecting a small convoy, or a single destroyer or coastal vessel is guarding them, taking out the escort or armed merchant should be prioritized, if an attack is to be made.
  • When discovered, the U-Boat should try to run at flank speed to a location or a spot with deeper waters.
Typically U-Boats only operated in shallow waters if they were actively hunting down targets or if they were just really daring.

Stern Torpedoes
Something that I personally did not appreciate until much later is the stern torpedo tubes.
While they are often used as a secondary consideration, or when there is no more forward torpedoes remaining, the stern torpedo tubes are actually more easier to use than the forward ones.
Check out the WW1 attack tactics section below (specifically the right side of the chart), and its really as easy as moving directly head to head with the target and turning away at the last moment left or right and firing a torpedo.

The only disadvantage of the stern torpedo tubes is the limited amount of tubes, limiting the amount of targets that can be attacked at once if a U-Boat even has stern tubes to begin with that is.

Thermal Layer:
The Thermal Layer below 40-60 meters underwater, here the water is much colder and any sonar pings that destroyers use become deflected and bent.
Staying below 40-60 meter underwater will blind escorts, however they still can hear you.


Torpedo Firing Ranges:
Firing from a long range (3000+ meters) allows to remain undetected and escape more easily, at the cost of a higher probability of missing.

Firing from a medium range,(2000 to 1000 meters) is the ideal range, as it allows for good accuracy and still allow for striking multiple targets. The drawback is that destroyer escorts suspect the U-Boat to be located at this distance and tend to search there first.

Firing form a close range (300 to 1000 meters) greatly increases the odds of striking a target. At this range it is also possible to hide under the convoy, the noise and close proximity of friendly ships make it difficult for destroyers to find and get to the U-Boat, historically they also hesitated dropping depth charges if there were survivors on the surface. The dangers at this range is the possibility of being rammed and if the convoy leaves the area and the destroyers are determined, the U-Boat is at risk of being surrounded by several destroyers.

Wasserfahne (Water Flag)
When moving at high speeds submerged, exposing the periscope causes a water wake that looks like a flag, this is very visible and can easily give the U-Boats position away, alarming the enemy.
Therefore when closing towards an enemy, a low speed much be achieved before exposing the periscope.
Target Identification Indicators
It can be difficult to identify a target when not knowing what to look out for, the following chart should be helpful to narrow down the target that is to be identified.


World War One Tactics
While World War One U-Boats lacked the Torpedo Data Computers that World War Two era U-Boats, they had interesting methods of approaching and attacking.

In the chart below you will find some of the tactics used, note the position of the U-Boats before launching the torpedoes, they could only shot straight so the positioning at the proper angle was key.


In World War One, the torpedoes had much less explosives packed into them and as a result the U-Boats of that era shot a point blank ranges.

The torpedoes of World War Two have much more explosives so they are equipped with a safety delay where it will only arm itself after 300 meters in order to prevent the explosion accidentally damaging the U-Boat.
Technical Details
Periscope and UZO recticle marks:
Optics
Zoom Level
Small Marks
Large Marks
Periscope
X1.5
1 Degree
4 Degrees
Periscope
X6
0.25 Degrees (Or 0.15)
1 Degree
UZO
X7
0.2 Degrees (Or 0.12)
1 Degree

Maximum Range at Fuel Efficient Speed & Maximum Speed
U-Boat Type
Max Range
(Surfaced / Submerged)
At Speed
(Surfaced / Submerged)
Maximum Speed
(Surfaced / Submerged)
II B
3100 / 43
8 / 4
13 / 7
II D
5650 / 56
8 / 4
12.7 / 7.4
VII B
8700 / 90
10 / 4
17.2 / 8
VII C
8500 / 86
10 / 4
17.2 / 7.6
IX B
1200 / 64
10 / 4
18.2 / 7.3
IX C
13450 / 64
10 / 4
18.3 / 7.3
IX D/2
23700 / 57
12 / 4
19.2 / 6.9
XXI
15500 / 340
10 / 5
15.7 / 17.2
XXIII
2600/ 194
8 / 4
9.7 / 12.5

Periscope & Snorkel Depth
U-Boat Type
Periscope Depth
Snorkel Depth
II B
11
-
II D
11
-
VII B
12
11,5
VII C
12
11.5
IX B
12
11.5
IX C
12
10 / 4
IX D/2
12.5
12
XXI
16
15.5
XXIII
-
-

Maximum Safety Depth / Storm Conditions
U-Boat Type
Max Safe Depth
in Meters
Stormconditions from
Windspeed in M/S
II B
152
7
II D
157
7
VII B
225
8
VII C
247
8
IX B
216
11,5
IX C
216
9
IX D/2
235
9
XXI
285
13
XXIII
180
-

Thank You For Reading
Hopefully I did a good enough job that you are now having a more easy time finding, attacking and escaping merchants and destroyers alike, and most importantly, having a much more immersive and enjoyable experience.

I would like to give a shout out to the many great Captains over at SubSim, it is where I learned many of the tactics discussed in this guide. I would go as far as to say that this guide would not even exist without Subsim community.

Likewise I would like to express my gratitude to the amazing Submarine Modding Community, no matter the franchise, without their contributions most Submarine Simulators would be much more basic and limited, it is only thanks to the modding community that we are able to use actual historical tactics employed by the contemporary navies of the time.

It also goes without saying, thanks to the developers of the various franchises for creating these games for us all to enjoy and in turn allow us to experience and relive in a small way the realities, hardship and heroism of the brave men and women who were involved in the most destructive war in all of human history.

Lastly,
Ahoy and Happy Hunting out there Herr Kaleun!
49 commenti
XallZall  [autore] 15 nov 2024, ore 4:42 
@Pancake
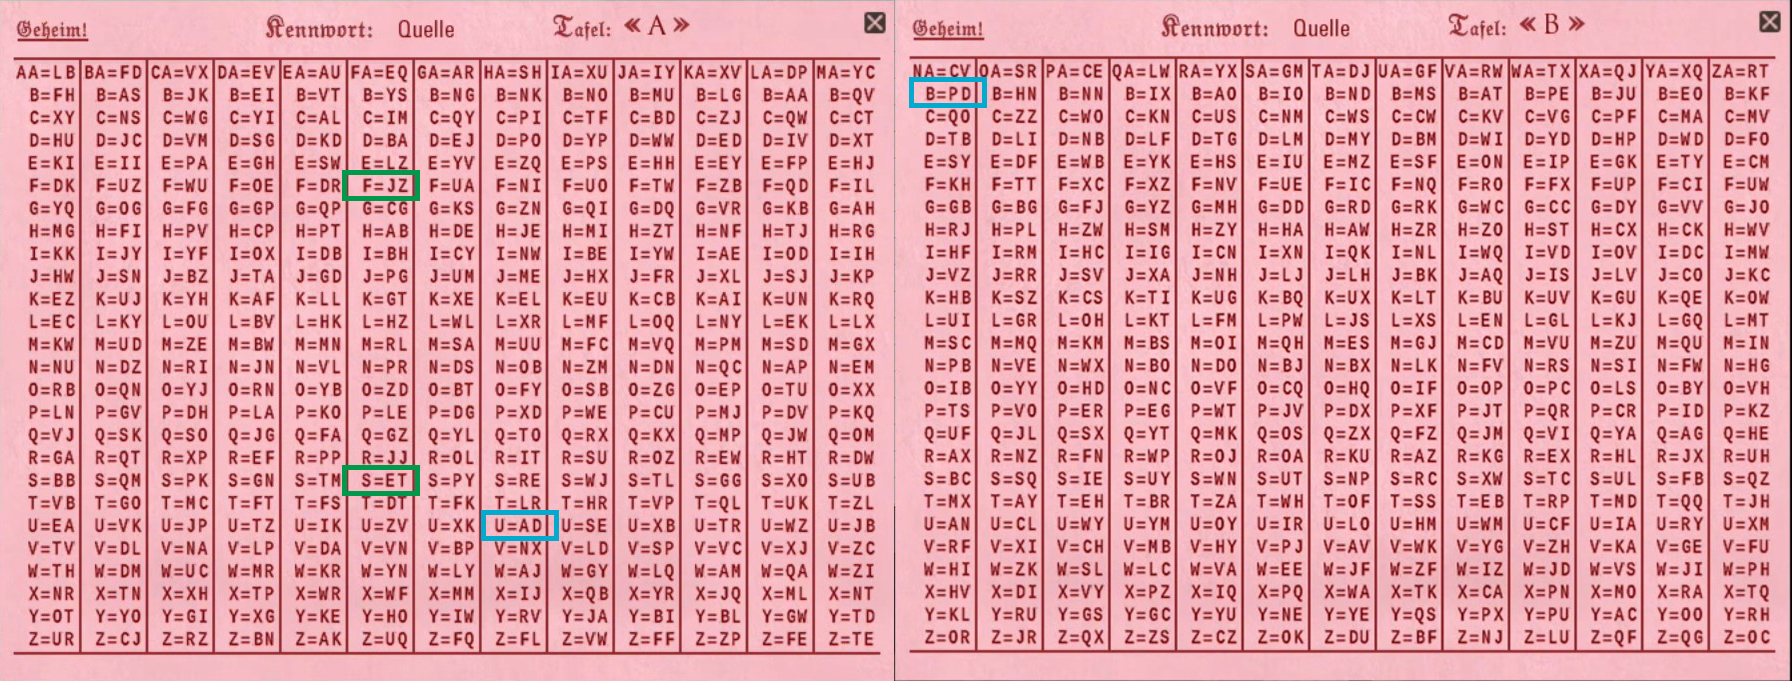
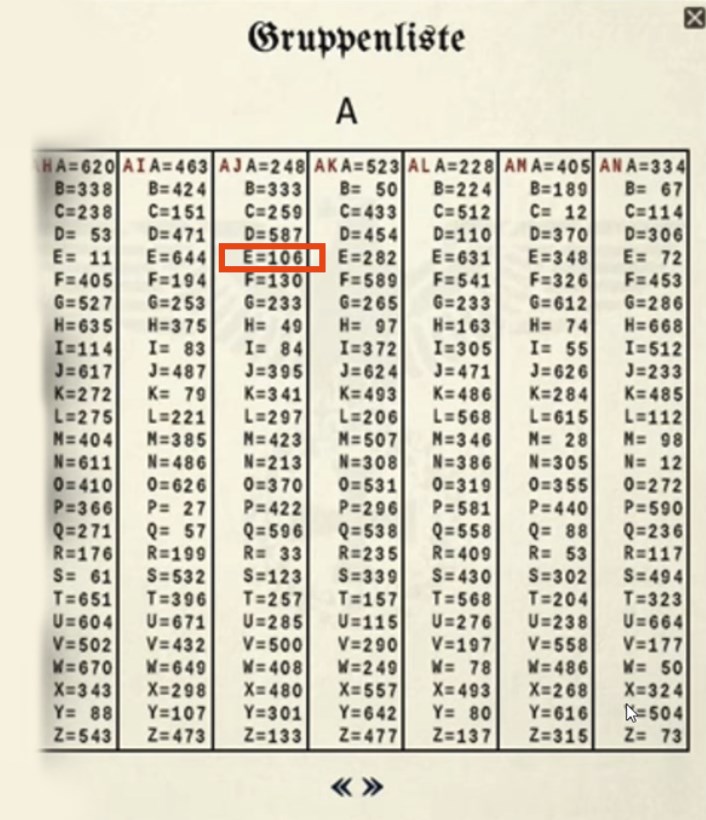
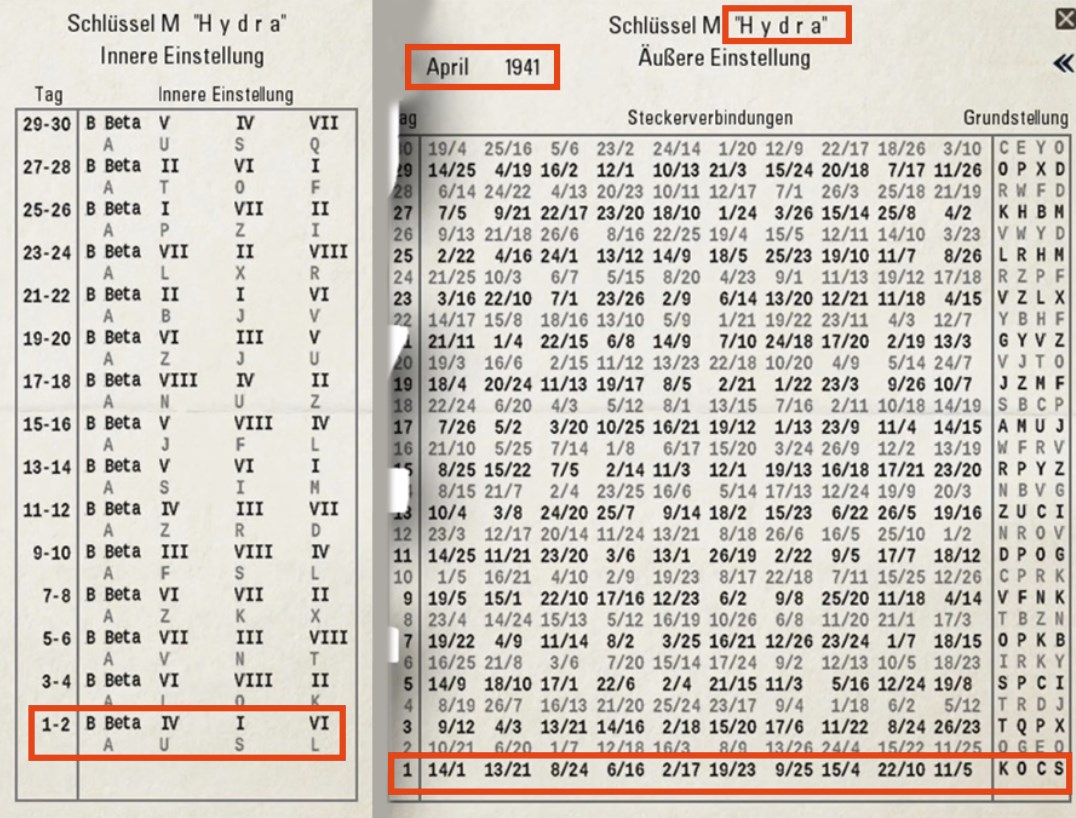
I think you can find them in the mod files of SH3, OneAlex mega mod surely has it.
As for standalone use...

Yes its possible but someone would have to create an app or something similar.
Or you can do a physical disc, but you would need to print out the files.
XallZall  [autore] 15 nov 2024, ore 4:39 
@lolsukj
Your wish might become true.
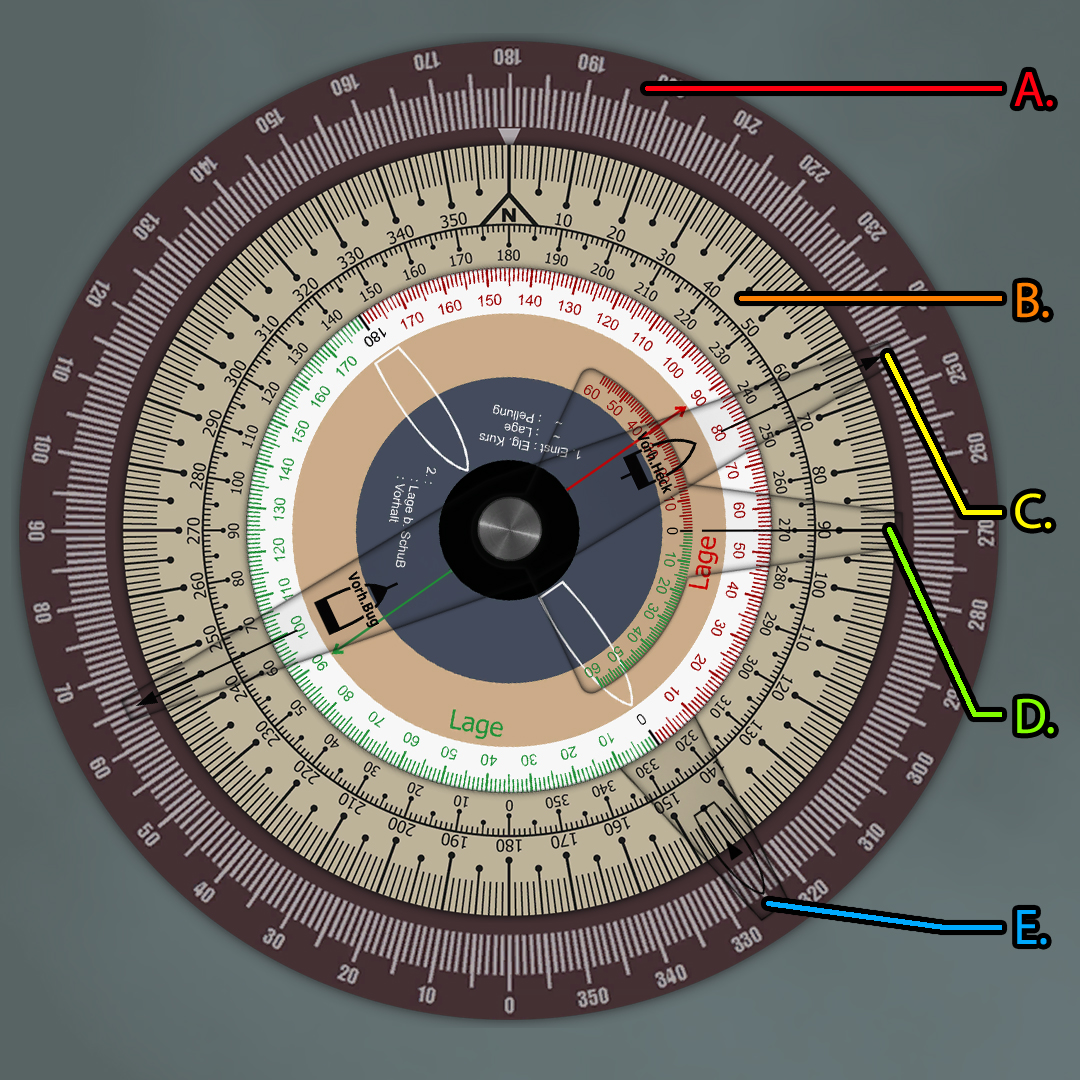
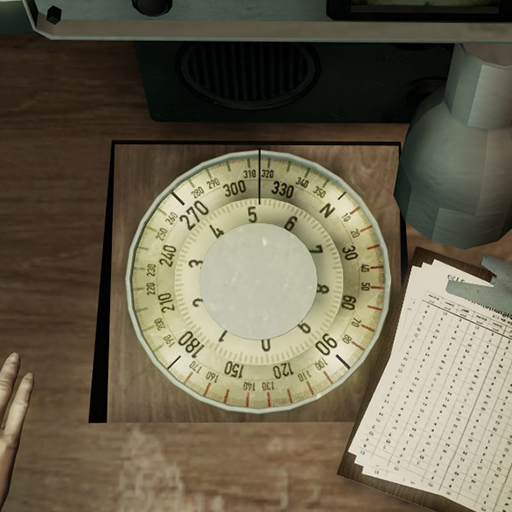
I been playing UBoat and SH3 again and been looking extensively into the moving 4 bearing method.

I think I am close to getting it perfected. I seem to be some kilometers off, but always end up finding the target and the speed and course is accurate.

Might be doing a significant guide update soon after all.
XallZall  [autore] 21 ott 2024, ore 17:46 
@lolsukj
Don't wait my friend, as I might never get around to make it.

I have to have the time, energy and mood to update that section of this guide and make a gif for it.
Plus I have to probably relearn it myself since it is probably the most complicated hunting method.
It might take years before I get around it, if I ever do.

Also; I been cautious with updating this guide, as there are automated check systems and probably due to the historical symbolism contained within this guide every time I updated it there has been some issues, there is a real chance it might get removed knowing how our culture is today.
lolsukj 21 ott 2024, ore 11:11 
Good guide, but i waiting for moving four bearing .gif
Pancake 13 set 2024, ore 9:39 
Hey there! Great guide buddy. Just a quick question - any idea if the 3 bearing tool is available stand-alone or possible to do manually? Wanted to use it in UBOAT :) Thanks!
70shelby89 9 set 2024, ore 21:45 
I what to add a Mod how do you add it to this Game????
XallZall  [autore] 11 giu 2024, ore 3:01 
@Rudi Mentär
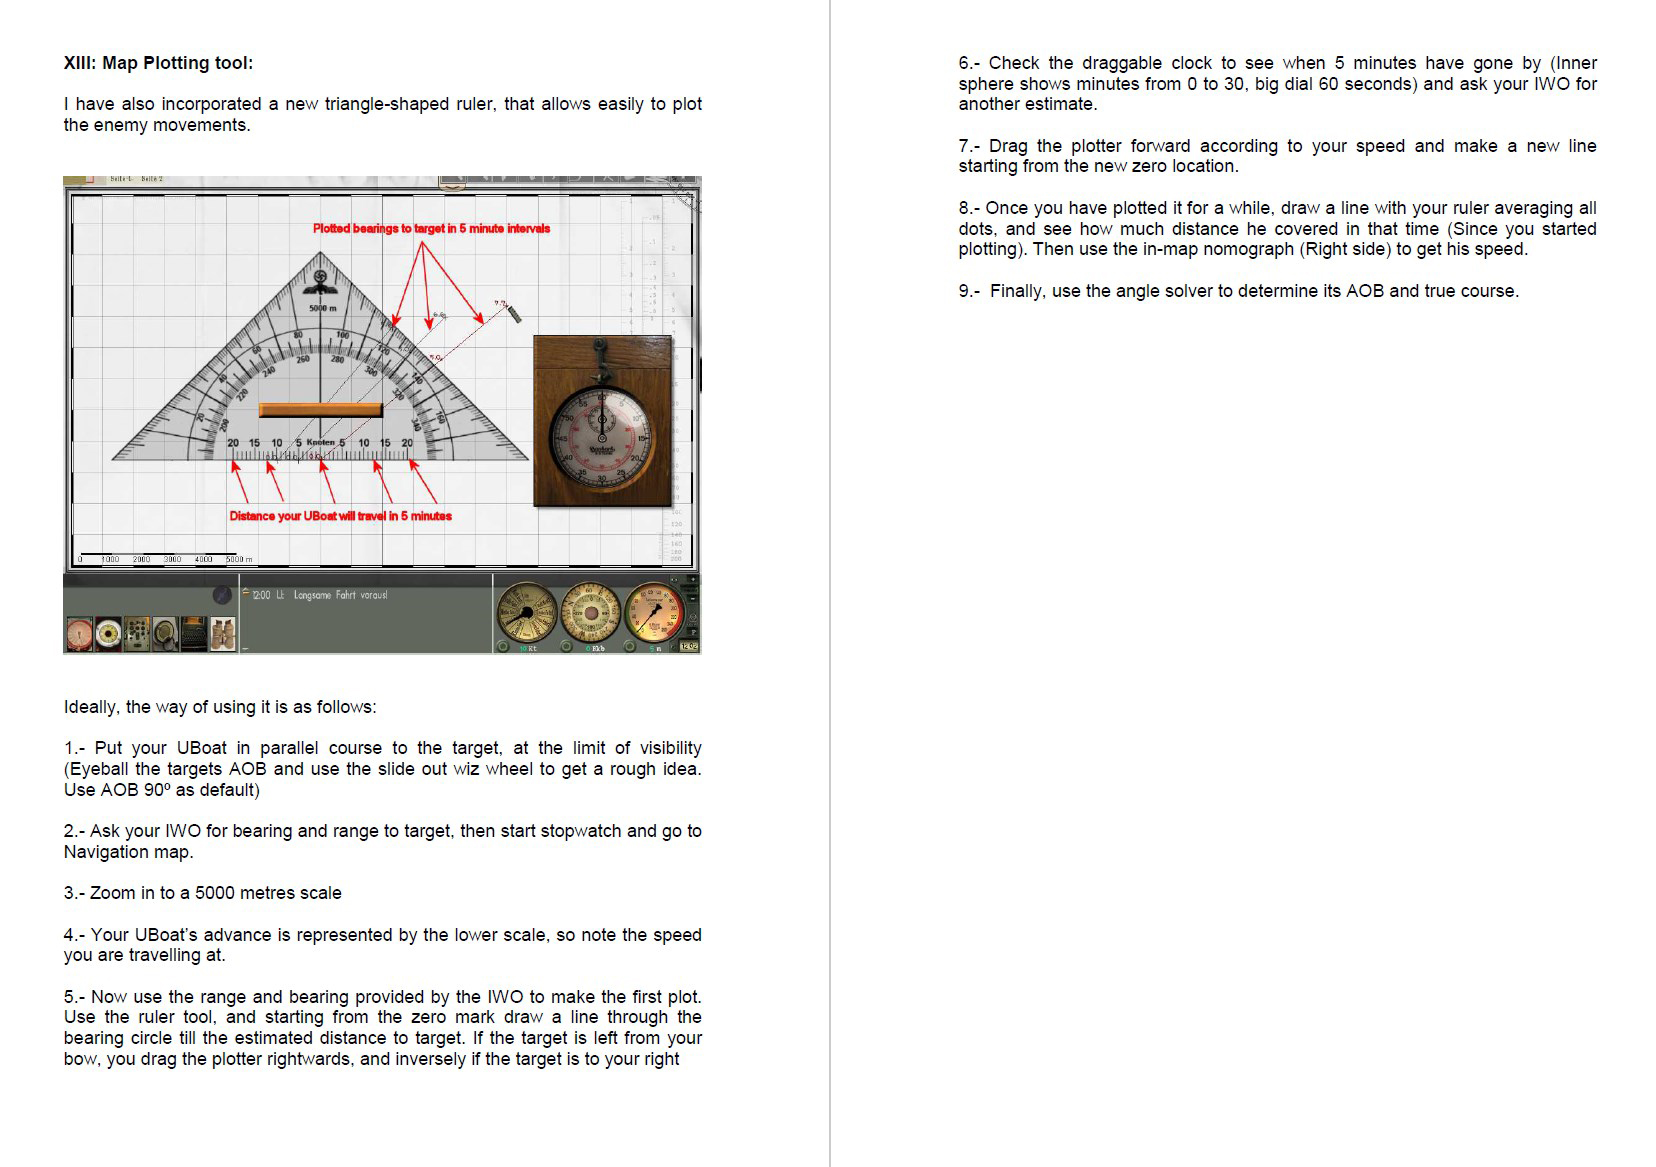
If you have not tried yet, open this guide in a web browser and download it by using the "Save Page As..."

Worked for me using Firefox.
XallZall  [autore] 11 giu 2024, ore 2:54 
Hi @Valen!
Thank you for mod and for your corrections.
When I update the guide next I will correct this o7
Rudi Mentär 9 giu 2024, ore 7:39 
Is it possible to download this great guide with working animated GIFs? How to?
Valen 31 mag 2024, ore 3:47