Digital Combat Simulator: A-10C Warthog

Digital Combat Simulator: A-10C Warthog

51 ratings
DCS A-10C Startup For Nooblets
By Charvet
Guide on how to start your aircraft, taxi it, and take off. Puke Bags NOT included.
   
Award
Favorite
Favorited
Unfavorite
Main Menu
Before anything is done in DCS A-10C, you must know what each menu button does in the main menu. Heres a quick breakdown.


Pretty much as Vanilla A10C menu, this one is from DCS World (free version that links all DCS games so you can play them together, you must buy seperate games though) only differance is bottom logos on left.

Instant Action- This option lets you start off flying in mid air with the aircraft.The missions are pre generated, and are in order from easy to hard. You also may select the season for each difficulty. Each mission is approximatley 30 min - 1 hour long.

Create Fast Mission- This option is alot like Instant Action, but instead of going straight into the fray, it lets you oultine parameters, then generates the mission how you like. It also gives you a chance to move or tweak anything once the mission is generated.

Training- Training missions for DCS, pretty self explanatory, I highly reccomend doing all of these missions, as DCS if a very, VERY, complicated game as it is nearly an exact simulation of flying a combat aircraft. DCS is not the type of game where you learn on the fly very well.

Mission- Lets you select from any missions you have: Downloaded, saved or created

Campaign- Lets you play the premade campaign as an American A-10C pilot in the Russian - Georgian War. Very fun, missions increase in difficulty as you go.

Multiplayer- Play with others. Stats are not tracked, clicking this will minimize the game and go to another screen.

Editor- Start creating a mission from a blank slate, lots of advanced functionality and features. Will let you literally replicate any military scenario accuatley and with ease.

Campaign Editor- Like the editor, but instead of creating single missions; this lets you link multiple missions together into a whole custom campaign. I reccomend you learn to use the Editor fluently before even looking at this.

Encyclopdia- List of every unit, sprite, object and anything else in DCS, along with stats, info and description.

Logbook- Profile for your SINGLE PLAYER profile. This profile and its stats are only affected by single player missions (including the editor). The pilot can die if you crash unless it is set to unvunrable. Your pilots stats, medals and achievents are shown here. This is not afffected at all in multiplayer. SO go crash there.

Options- Game options and stuff.

Exit- Self Explanitory
Starting The Plane
Starting the plane is the first thing you must do before flying, derp. Here's the neccesary steps to starting your plane and becoming an ace of crashing.


1- On the right panel of your plane (On the picture go down from the 2 to the end of the screen directly below it, then go right to the furthest switch on the closest row to you) And turn on the battery.

2- Turn on the inverter switch (Up one from the battery and to the right)

3- Turn on radios to proper modes (Look at 4, the top and very bottom knobs circled should be to TR, and the middle to main)(The middle one [UHF], can also be set to BOTH mode, meaning you'll be able to tansmit and recieve. I reccomend this mode)

4- Next enable the 4 fuel boost pumps. (Look at the throttles on left, go to the end of them and they are the 4 switches above it) Turn them to on (Pointed forward)

5- Next start the APU, by going beside the throttles (about midway and to the right) and hitting the APU switch, it should say APU start above it, and have 2 switches forward of it and one button behind.

6- Enable the APU Generator (Next to inverter switch)

7- Enable the 2 engine generator switches (right below APU Generator)

8- Start the left engine with Right Alt Home (Idle position for left engine)

9- Look at gauges untill they stabilize, or untill you hear or see the left engine fully spool up, then hit Right Cntrl Home (Idle position for right engine)

10- When both engines are started, turn off the APU Generator and then the APU

11- Now for Navigation you'll need to enable EGI and CDU, click on the two switches with the #1 on them on the bottom right of the picture

12- Close the canopy, go to oxygen control, (Below battery switch) and hit the green spin thing so it is pointed forward.

13- Activate counter-mesures by flicking all the switches at 2 on then setting dial to standby. You can make it auto for flares and chaff to deploy, but then they will deploy on lock rather then launch, causing you to waste alot of flares and chaff

14- Enable Radar-Altimiter, by hitting the switch at 5, it may be hidden by throttle sometimes, just click in general area

15- Enable all the SAS switches at 6 on the picture. Then hold the TO trim button below untill the mini screen lights up

16- The front dash, lower-left, where you find the switches for CICU, JTRS and IFFCC. Set the first 2 from the left to enable, and set the third to the middle (Test) position, these are marked by the number 8 on the picture

17- On your HUD, when you look straight out the front of the aircraft, it will ask to engage preflight bit, Hit enter on the buttons below the hud, (NOT ON PICTURE). Once that is done, switch the IFFCC switch to ON, (click it again) Refer to step 15 if you cant find IFFCC

18- Look at the two big screens on your front dash, click the knob on each at the bottom right of them twice, then hit load all on both

19- Once all the menus on the screens have little stars next to them, you can change menus on the screens, as they all have been loaded.

20- Below the left screen, enable the Master arm switch, Gun Arm switch, Lazer Arm Switch and TGP

21- Go to your right screen, click on CDU, wait untill you see INS NAV READY flashing, once you see that, hit NAV on the screen so it switches. Then enable the EAC switch next to the radar altimiter from step 14

22- Now you should be ready to go. If nothing is beeping or the master caution is off, youve done well. If it is, click on the master caution button to shut it up, and then look at the screen below the flares to see whats wrong.

23- Next hit insert to enable nosewheel steering, throttle up a little to get speed to taxi (STAY BELOW 30-50) and use Z / X to turn left and right respectively.

24- If you plan on using mavericks, make sure to go to the MAV page on right screen, and click EO to on.

P.S Also make sure to arm ejection seat by clicking switch at number 3. Hit left Cntrl E 3 times if you want to eject

Taking Off!
Well ♥♥♥♥♥♥♥♥♥, you have gotten past the hardest part of DCS; starting the plane. Now when you are taxied to the runway, line up direct middle. Hold W (Brakes) and throttle to max (Hold +). Once engines are to max, release the brakes, and turn off nosewheel turning after 50 KPH. At around 120-130 start pulling up. Watch your tail, do not bang it. When nosewheel turning is off, the Z and X keys turn into your rudder controls. Make sure after liftoff to controll your wobble, dont let a wing hit the ground. Raise your gear with G or hit the lever.

19 Comments
Cyber^Punk Jul 27, 2023 @ 7:59pm 
End of the world baby! :Uranium:

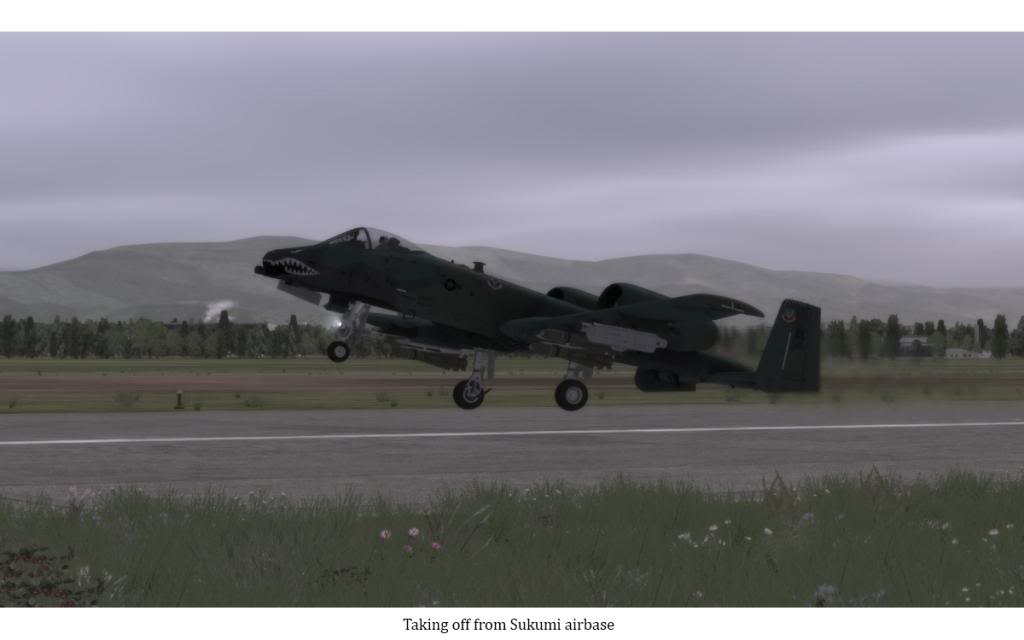
Fighting our way to a military base, only way out is a hog. :cybereye:

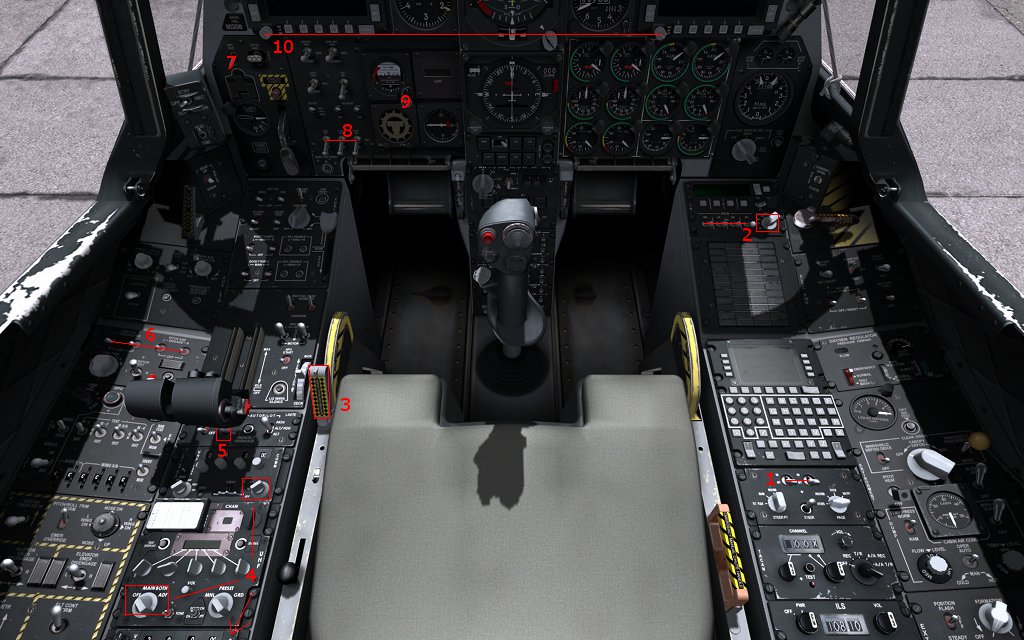
No one knows how to start it. :The_Program:

Thanks Charvet, you da man. :steamthumbsup:
Charvet  [author] Oct 6, 2014 @ 5:51pm 
They were just there for reference, it was borrowed with permission
Roundpixel Oct 6, 2014 @ 3:27pm 
Since the text on the picture is too fuzzy to read, it would be useful if the humbers on the picture corresponded to the steps you mention.
Madhukori Feb 10, 2014 @ 2:51pm 
Now could you please make a very detailed guide on the following ones:
1. Gun and bombing tutorials
2. How to use SOI on MFCDs, HUD
3. How to use the radio very effectively (ex. in a game how to use the radio and when to use it for what purpose)

Thanks
yuhan11020 Dec 22, 2013 @ 3:41am 
good work
Charvet  [author] Oct 3, 2013 @ 6:28pm 
np :)
vcxy6b7n Oct 3, 2013 @ 6:15am 
Fun game, haven't touched it in awhile and I forgot the little memos I wrote on how to start up, so this is a help for getting back into the air. Thanks.
LOMAC Jul 21, 2013 @ 1:20am 
on my desktop it took a good night to install but on my new laptop i really dont know but thanks anyway
Charvet  [author] Jul 21, 2013 @ 12:46am 
its streamlined tho
Charvet  [author] Jul 21, 2013 @ 12:46am 
hour i think, mine was slow