Sonny
59 ratings
Sonny - Physiotherapy Achievement Guide
By MrJxt
I have just recently completed the physical only, no re-spec, and no training achievements in a single save file. This is a guide to help others obtain these achievements.
2
3
3
   
Award
Favorite
Favorited
Unfavorite
Basic Overview
Save your money for new shop gear, do not upgrade your gear until you reach the last zone.

Stat Priority

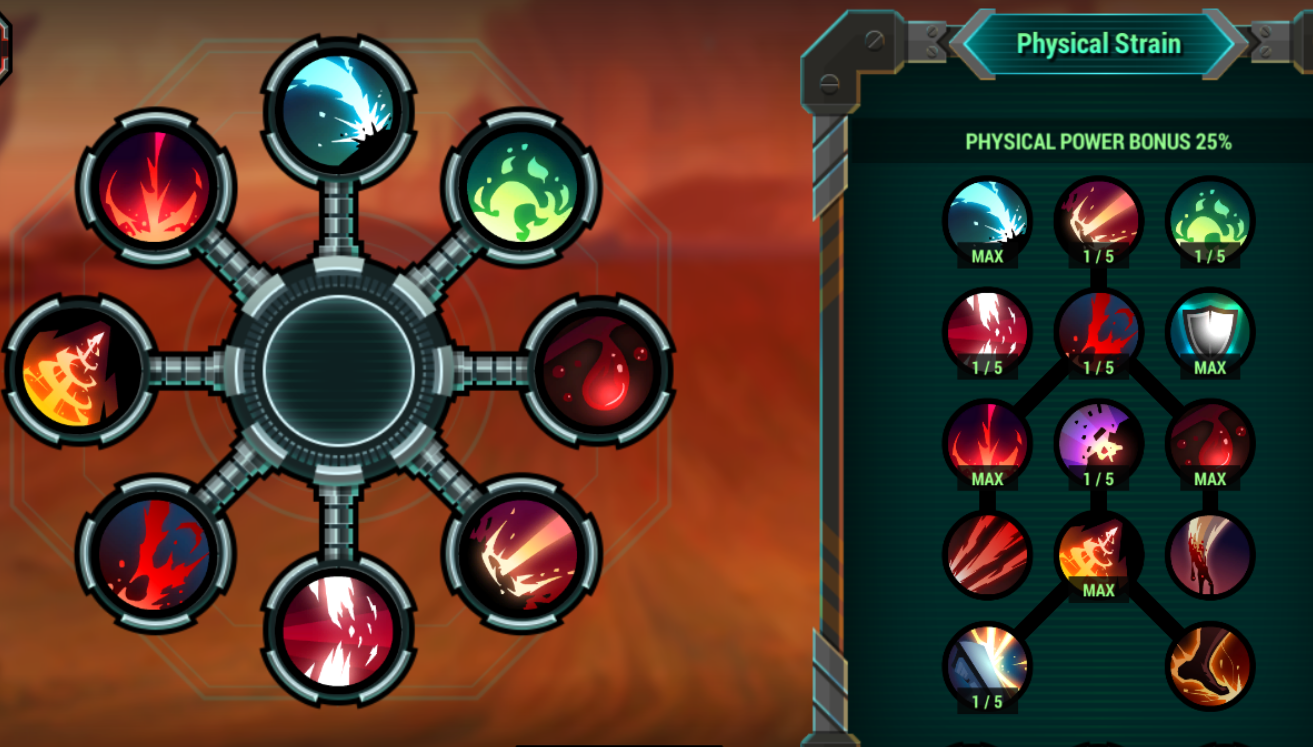
Speed > Vitality > Defense/Power

Higher speed = attack more often = faster ability cooldown.

Vitality for more health, you're useless if you're dead.

Power and Defense is useless to build because using abilities more often also contributes to your damage and survivability.

Abilities

Cripple: Slowing an enemy = they attack less often = debuffs last longer.

Wound: Extra damage per hit that bypasses armor, your allies will focus wounded enemies, use this to prioritize targets for your allies.

Drill Strike: Great against heavily armored enemies and ignores enemy Chroma shield protection buff. Massive damage against enemies below 35% hp. Max this third.

Iron Slam: Reduces healing by 70%, must have for certain fights.

Cruelty (passive): +12/14/16/18/20% crit chance. More crits = more damage. Max this fourth.

Blood Bath (passive): Lifesteal, good synergy with Drill Strike to get a massive self heal. Max this second.

Quick Strike: Great for building your evolution bar quicker. Max this first after you have unlocked the abilities listed above.

Regenerate: Emergency heal for you or an ally and to remove a dangerous debuff, use tactically. Can target your whole team with one of the evolutions.

Break: Stun, save it for an enemy that has a one-turn damage buff that can one-shot or if an ally needs healing.

Guard: Very situational. Might be useful in Zone 6 against executioners and during that zone's final boss.

Replace Cruelty or Drill Strike with Iron Slam when needed.


Typical ability rotation: Situational abilities > Slow > Bleed > basic attack


Your Allies

Veradux: Healer, he is only good in a few fights.

Dr. Herregods: Bring him in every fight. He is the jack of all trades, master at none.

Kara: High damage but provides no team support. She is great against Chroma shield protection.

Zakk: Slowest but provides the most debuffs and the only one who can stun and slow.


Zones
Zone 1

Buy these items from the shop:
    Iron Slasher, Storm Cloak, Fighter helm, Lucky charm

This zone is easy, clear the fights, level up, and unlock your abilities.


Zone 2

Buy these items from the shop for your team:
    Explorer's Hat, Jungle armor, Claw of Venom, ring slot optional


This zone has a lot of healers so using iron slam to reduce their healing is recommended but not needed.

Slowing the treants lowers their threat significantly.

Drill Strike is very effective against the rock enemies because it ignores their high physical defense.

Continue unlocking your abilities and start maxing Quick Strike.

You'll unlock your second strain after the final boss fight. Choose any strain you like but don't allocate any points into it.


Zone 3: Firewell Factory
Buy these items from the shop for your team:
    Blast Suit, Heat Shield, Rogue Scarf, Ignition Mace


The fire defense from your gear should help you survive every encounter.

You will unlock Kara in this zone and I'd recommend bringing her and Dr Herregods to clear zones quickly.

Consider switching Kara with Veradux against the mid-boss to offset the health loss from attacking with melee.


Zone 4: The Hidden Forest
Buy these items from the shop for your team:
    Shatter Blade, Thermo Shell, Survival kit


Lots of enemies use frost damage here so the extra frost defense will greatly improve survivability.

Wolves do more damage after they have been attacked so focus them one at a time.

When fighting the mid-boss, kill the wolves asap or else he will sacrifice one of them and become super strong.

Against the final boss, do NOT kill the mana orbs that heal him until he does the AOE attack because killing a mana orb will fully heal your team. Consider swapping break with iron slam because the mana orbs heal him and stuns can be resisted.

Zone 5: Thunder Labs
Buy these items for your team:

    Riot Headset, Divine Shroud, Orb of Thunder, Katana


Some lightning damage is this zone but lightning defense isn't necessary here.

Kill the birds first.

Save your stun when the shield guys go berserk for one turn. If there are two of them, use slow on one and dps the other. Bring Zakk so he can help with debuffs.

Drill Strike and wound work well against the scientists' high defense.

Damage samurais below half health quickly to stop their passive power up.

Consider bringing Zakk against the mid-boss Raptor to lock it down with debuffs.

Final boss is easy. New Strain but don't put points into it.

Zone 6: Blackhall Keep *
THE MOST ANNOYING AND DIFFICULT ZONE IN THE ENTIRE GAME!

Buy these for your team:

    Assault Rifle, Phantom Mask, Shadow Cloak, Mist Lantern

* Shadow Cloak is the highest speed stat torso gear.
** Equip Chrono Crystal on Sonny once you obtain it.


Kill the midget Hex Witch asap, they do lots of damage, debuff healing, and become super strong if you heal with the Shadow Hex debuff. Chroma shield buffs their armor by 250% against the protected element so Drill Strike effectively ignores it even if physical damage is being protected. Kara + Dr Herregods is good because they alternate between fire and nature elementals often with no cooldown.

Executioners are stupidly unfair with that execute attack. Consider bringing the Guard ability just to survive against it, otherwise pray they use it on your ally or if they have been debuffed with weaken and you're high HP. Consider bringing Zakk when fighting against multiple executioners.

Plague Doctors are annoying and strong with high speed, damage, and debuff abilities. Use Regenerate to dispel and heal their venom attack, slow them down, and kill them quickly before they use their high damage blind debuff against your whole team.

Ghosts will reflect on-hit attacks back to you and have low cooldown heals. Apply wound and use low damaging attacks, iron slam to reduce their healing and keep your team alive. Kara can kill herself easily with her shadow blade and EMP blast.

Mid-boss: The Count

Kill the axe guys first and kill him quickly before he powers up too much. Kara is good here.


Final boss: The Baron and Baroness

Your team composition matters greatly in this fight. I would not recommend Zakk because of his triple ice attack and mostly physical attacks against Baron's power up passive and Chroma shield. So pick either Kara or Veradux with Dr Herregods.

With Veradux, the Baroness is very easy to take down but Baron becomes much more difficult due to mostly physical attacks being protected against. Drill Strike is necessary with this team setup. Focus the Baroness and use Drill Strike on the Baron whenever it comes off cooldown.

With Kara, the Baroness is very difficult to take down because Kara will literally kill herself (Reflect damage). I'd recommend switching Drill Strike with Guard and casting it on Kara to lower the reflect damage she takes. If Kara manages to survive taking down the Baroness then the Baron becomes very easy.

Another tactic with Kara + Dr. Herregods is to kill the Baron first. Baron's Chroma shield protection is useless since this team composition uses three different elements; physical, flame, and nature. Use Iron slam on the Baron to reduce his healing received from the Baroness. You'll kill him quickly before he powers up too much.

Another tactic with both team compositions is to split the focus. Wound Baron so your allies focus him while you focus on attacking and slowing the Baroness. Doing this will force the Baroness to heal herself instead of the Baron.

Replace Cruelty (crit chance) with Iron Slam. Use iron slam to reduce the Baroness' healing, Maxed Blood Bath reduces health loss from attacking the Baroness, don't use Drill Strike against the Baroness.

You may need to attempt some fights a few times because this zone is requires a bit of luck.

Zone 7: ZPCI Stronghold
Shop items in this zone are not worth buying, save your $$$.

This zone is easy compared to the previous zone.

Iron slam against your target if there is a medic.

Hit snipers once each turn to lower their damage. Try and stun them at around half HP to prevent them from using their first aid kit and heal to full HP while clearing all debuffs.


First mid-boss: Ltn. Farsight

Slow her and hit her at least once per turn while focusing the medics. Zakk is better than Kara here.


Second mid-boss: Cpt. Vendara

I struggled with this fight but after swapping Kara with Zakk it became very easy.
Stun after he marks an ally, use iron slam before he reaches half HP. Try not to waste your stun with Zakk's stun.
Make sure your slow debuff does not expire after he uses his aoe slow otherwise you'll most likely lose.


Final Boss: ZPCI Praetor

Similar to Captain Vendara but use iron slam more often. Kara is better than Zakk here because the boss can resist stun attacks and has very high armor that Shadow Blade will ignore.


Zone 8: The Red Pillars
The final zone.

Buy these items for your team:

    Pulse Katana, Aimer Scope

* Consider buying Oracle orb to maximize your allies' speed and damage if you're willing to give up 15% physical def.
** Consider upgrading Sonny's gear to Maximum and upgrading your allies' armor gear since you've already purchased the best shop items.
*** Sell all the other items you've obtained that you don't use to fund upgrade costs.


This zone is actually not that bad if you're good enough to make it this far. The strategies you've used up to this point remains mostly the same. There aren't any enemies here who have a significant healing ability that require Iron Slam. So you can swap Iron Slam with Cruelty to increase your critical chance.

Spartans: Very high armor but very slow. Drill Strike is useful. Be warned, their fireball can one shot you if it crits.

Blue guys: Try and kill them first or second, otherwise their frost AOE can wipe your team if left alive too long.

Warlocks: The Plague doctors of this zone. Slow them and kill asap. There is one fight with 2 suicide bots and a Warlock, kill the suicide bots first before killing the warlock or else you lose.

Mid-boss Apollo and Artemis:

** You must kill these two within a few turns after killing one of them otherwise the survivor's power doubles each turn, effectively one shotting you after 1-2 turns.

Zakk is good here because of his AOE weaken, AOE slow, and single target stun.

Veradux is also a good choice for maximum survivability but the fight will take longer.

Kara is not recommended because these two can hit pretty hard and puts more pressure on you and Dr. Herregods to keep her alive.

Focus on slowing Artemis because she has significantly higher speed than Apollo.
Alternate Wound with each of them to keep their HP relatively the same.
Use Break to stun Apollo after he goes Berserk.
Make use of Drill Strike and Blood Bath to get a significant heal for yourself while doing armor ignoring damage.
Save Regenerate until after Apollo uses his AOE fireball attack to heal and dispel the damage over time. I would recommend evolving regenerate so that it heals and dispels your whole team.


Mid-Boss Robot Trio

wave 1: Big robot, easy, it will use an AOE ability silence for 25 turns at around half HP.

Wave 2: *** Do NOT let Sonny get the last hit on this guy. Unfortunately one of your allies will have to sacrifice themselves to kill this enemy.

Wave 3: Slow, Stun, Wound and dps with Quick Strike. Try and evolve your Quick Strike to get an additional hit or deplete focus with each hit. This enemy will lose focus everytime it gets hit but their attack will one hit you. Strongly recommend critical chance passive.

I would recommend Kara for this fight.

Final boss: Carbon

Kara + Dr Herregods destroys this guy.

Similar to Baron, Carbon has Chroma Shield Protection that alternates elemental protection. Cripple for slow. Wound for damage, Stun his Berserk buff. Drill Strike for massive armor ignoring damage.

Carbon gains armor above 75% hp and power below 25% hp each turn. However, with this team setup, he dies very quickly.


True Final boss: Carbon's True form

Kara/Zakk + Dr Herregods.

The only thing you need to watch out for is the lightning buff that reflects up to ten attacks for one turn. Make sure you stun him or else he can one hit you if he manages to land an attack with only 1 speed. Consider bringing Guard for Kara because she might kill herself with Shadow Blade or EMP Blast.

When he uses his Shadow AOE attack. He will take signifcantly more damage for 3 turns but will also power up. Instead of healing, make sure he is slowed, wounded, and focus on DPS. I'd recommend evolving Drill Strike to deal more damage or regenerate to heal your whole team.

glhf

14 Comments
Joller Jan 15 @ 1:00am 
I have the same question regarding using Train..?
Stan Aug 10, 2023 @ 12:30pm 
Now you say you did this without using train but there is no achievement for it for not using it so i guess its okey to use it and it won't prevent from getting any other?
Blackmist Jan 4, 2023 @ 10:07pm 
You sir are the bees' knees, thank you so much for helping me 100% this game!

For the baron fight:
- Use Kara and Doc, you need every hit to count.
- Focus fire on the Baron first. Yes, I said it. Make sure you outspeed him, cripple him to start and make sure Doc pacifies him. I cannot stress this enough. The growths in power and speed from hits and speed absorb are based off of the reduced amounts, as well as any amount contributed by Marie's Shadow Heal.
- If your Drill Strike is on CD and you have nothing better to do, hit Marie with an attack - she panics and heals herself instead. Suppress helps, but your damage will outscale anyways so I suggest you use Guard.
- Speed Absorb is used about every 4 turns, plan around that.
- When the Baron is at roughly 50% hp, opt for Quick Strike, watch for Area Forbid.
- Pray.
- When you kill the Baron, take a deep breath and buy a lottery ticket, you lucky son of a bitch, for it's smooth sailing from there.
Fluffy Enigma May 5, 2021 @ 12:26pm 
I recommend taking Blood Strike. It deals insane amounts of damage when upgraded to max. I actually got physiotherapy achievement about 5 minutes ago. I did need to grind a bit, but I only really got stuck once. Also Veradux might a bit underrated. I used him and Herregods in my run. I guess his healing abilities get stronger when he levels up?
Matt1yu Aug 20, 2020 @ 2:02pm 
Thanks for the guide, couldn't have done it without it. Zone 6 was definitely the most troublesome, seemed like you really need RNG on your side. The very last boss was also tricky, since as mentioned Kara wouldn't stop killing herself with Reflected damage. As soon as I swapped her and her gear with Zakk, it was a breeze. Thank you!
Nephew Pablo the Engie Newbie Aug 3, 2020 @ 4:33pm 
Only one thing, zone 7 actually has decent gear. The headset and rifle gives more speed than the stuff you would get by zone 8. Also that fight right before Carbon was the 2nd hardest fight (after the fucking Baron).
Celok Jan 6, 2020 @ 11:28am 
Absolutely brilliant guide
Ragingfenix Dec 10, 2019 @ 1:17pm 
FYI the mid boss on the robot trio can be killed with barrier active (the null shield evolution) and no one will need to die.
Thanks
CultLeader Mar 29, 2019 @ 10:04pm 
Nvrmd, i just had to do one fight after the Final Carbon fight and it gave me the achievements, ffs.