Staxel
141 vurderinger
Staxel 1.3: the ABC and a bit more
Af thorthonesch
The following guide will give you the necessary tools to ensure a great start in the world of Staxel: from optimising crops (on a yearly basis), to working out the profitability of recipes (mainly for cooking, but also for crafting), and further to planning compact yet functional designs for your building projects.
3
2
4
   
Pris
Føj til foretrukne
Gjort til foretrukken
Fjern som foretrukken
Overview
Staxel is an open world simulation game with a skeletal story—after all, the game is in early access!—yet, an engaging enough story to take you into the second year, by which time, in my experience at least, the game becomes too repetitive.

But what a thrilling first year… First up, the world of Staxel is undeniably charming and rich: amongst a “Minecraft-like blocky” scenery, which changes with the seasons, you will find an adequate variety of creatures (bugs and fish). The town also includes a good number of villagers (more can be invited in later), each with their own hobbies. And then there is the farm, where you can plunge in various activities: from farming proper to animal husbandry to crafting.

So, what goals can be achieved in Staxel? What kind of mechanics will make you want to invest hours and hours of play? As mentioned above, Staxel has enough ingredients (farming, fishing, crafting, building… no fighting though, which I don’t mind) to keep you occupied for a good while. But once you figured it all out (or else, you have read this guide), how and to what end should you apply all your findings? And here is where Staxel, in its current state, lacks the depth to take you for the long haul.

If you’re not a newbie to the game, you must have worked out the main to-do list, which is invariably the same:
  1. Catch bugs (and/or fish) to make money to plant crops.
  2. Plant crops (and berry bushes and fruit trees) to make more money to invest into crafting stations and building.
  3. Craft and/or buy materials to build and complete the tasks handed to you by the NPCs.
  4. And that’s it: rinse and repeat in order to tick all the achievement boxes. Other than this, there are two festivals (in autumn and winter) to break the repetitiveness. The 1.3 update introduced a third, and very charming, festival in spring. There are also random side-quests from the NPCs (lost items, usually.) Such items need to be returned to their owners the same day they're found. You may talk to Rowan and see if he's heard any rumours that may help identify the owner in distress.
Yet, for me, the enjoyment came from the journey itself rather than the destination. Working out the rotation of the crops or the design for house building gave me enough hours of fun*, albeit with pen and paper in hand, outside the digital universe of the game. As the story-line will develop with future updates, Staxel has the potential to offer a most gratifying experience… who doesn’t find satisfaction in seeing the farm and town grow and know he/she was the mastermind behind it all?

(*Note: Working out the selling price for items, on the other hand, is not much fun. You have to check each item individually by placing it on one of the selling stalls from the vendors in the market. Countless trips to the town, and so many days later, I thought my toils were over. But then, just as I was about to publish this guide on Steam, I found out something disturbing. I was having a chat with Maximilian, the mayor of the town, to see if he has any more building contracts for me (he didn’t), when he whispered something to the effect that the economy in Staxel is fluctuating. What? He literally told me that if I sell too much, prices will go down and it will take some time for the markets to slowly recover. Again, what? What is too much? 10, 100, 1,000? And by how much will the prices go down? Will they also go up? Does this mean that if I buy 500 white sugar, the next day I’ll pay more? That much, I know: no, I’ll still pay the same amount.
Well, if you’re reading this devs, or if you know someone who knows someone who knows a dev… for this to work, something’s gotta give. I don’t mind a dynamic economy, but... When prices fluctuate in correlation with supply and demand, they do so by going either up or down; and they further affect not only the selling but the buying too. Also, and most importantly, there has to be a way, in game, to see the default selling price for items. It allows players to make predictions, work out a strategy, make comparisons, or even assess if they encountered a bug. It allows people like me to collect data and publish it for others to use.
I thought I should mention this aspect from the very beginning in case you might notice price discrepancies compared to your own game.
...
Since I initially published this guide, I've put in a good number of hours playing/reading about the game, and I can tell with some assuredness that market fluctuations are commodity linked. What this means is that selling, say, 600 sweet potatoes will lower the prices only for the sweet potatoes, leaving the rest unaffected. This may pose a problem for those who, especially in later years, plan on monochromatic crops; see my suggestions in Farming_Part 4.)

The following guide is not meant as an encyclopaedia of Staxel, though it will touch on all aspects of the game. It came to be as a by-product of the many hours of (out- and in-game) research I dedicated to figuring out how to best play the game. It’s not so much that there isn’t enough data available on Wiki or other online resources. The fact is that whatever data is to be found remains too fragmented and, if you get it wrong, the game may “punish” you, especially since there is no load option.

This guide is an attempt to weave the disparate fragments into a neat(er) story. As more content is added to the game, I'll try, as much as possible, to weave in more strands, as I've done with the latest 1.3 version. But it takes a long time since there is little feedback in game and even less resources online to help you figure out whether all the new content has been exhausted. (1.3 update promises so many new quests, but I'm yet to trigger any of them. As for friendship with NPCs, things get even foggier. You can gift them, but get no feedback whether they liked the gift or not. So I keep doing what I did before the update: talk to them and inquire with Rowan about daily grievances. If I learn more, I might introduce sections dedicated to friendship and quests.)

But for now, let's get things going, shall we?
The Nuts and Bolts
Once upon a time there was you (whoever you chose to be, just make sure you chose third-person in the ‘Options’), and you found yourself in a voxel-kind-of village facing Farm Fan. So, let’s go on with the introductions, make sure you answer “Sounds perfect!” when the time comes (so that you start the Tutorial) and… and keep going up to the point of using the Magic Water bottle on the beetroot seed you’ve just planted. Now stop and take a breath. At this point in the game, the time is stopped, so let’s take advantage of it!

No, I don’t mean for you to cheat blatantly, as in forage the whole map of all the goodies it can offer, sell them and be done with the game by the end of spring. I only meant to stop and look around your farm, get your bearings as it were. Try to become a storyteller yourself: visualise how it will all look in a year’s time—here I’ll have my barn and there I’ll rebuild my house; my crops go there, next to them my orchard and so on. Planning ahead right from the start will pay off in the long run. Moving the crop fields is rather difficult as some crops carry over from one season to the next. So, mark where the crops will be (say, by hoeing the corners of the plots), because you’ll do some planting before you go to sleep tonight, most probably in the dark. (Now, if you insist, I can turn a blind eye if you start hoeing a bit more than needed for marking the plots. In which case, I suggest you first scythe the plants and gather any mixed seeds they might drop. But don’t push your luck and go dismantling houses—including your own—while Farm Fan is patiently waiting for a meagre beet. Do it on your own time, when the clock is ticking!)

It’s time to insert my first Appendix to the story.
Here is the mapping out of the farm you inherit.


And here is my planned final design.


I have tried to keep as close as possible to the original boundaries (drawn in red), as you can see from overlapping the two.


The images above were drawn on a grid of 1x1 block, hardly visible, but still visible I hope. (Steam only allows a max size of 2MB for images.) It shouldn't be too hard to count how many blocks each item occupies.

In redesigning the farm boundaries and the farm house, I followed a few basic criteria:
  • Keep as much as possible to the original boundaries. This way, there isn’t much need for moving around too many fences or extensive terraforming.
  • I have intentionally designed the crop plots as a multiple of 3x5. Charging the hoe/scythe to maximum covers an area of 3x5. I prefer bigger plots than just 3x5 or even 3x20, because land is at a premium if you keep to the original farm outline. The blocks separating too many plots are wasted land. Also, watermelons and pumpkins only grow in a 2x2 square; a bigger plot allows for better crop organisation. (Recently, sprinklers have been added to the game—no mods required, hurray!—and the 9x20 plots can be easily switched to 10x20 by removing the inner rows of pathway. Each 10x20 plot will accommodate 8 of the largest and most expensive sprinklers: treat them like iridium sprinklers in Stardew Valley, that is, covering 2 tiles away from the centre in each direction. You'll overlap the odd extra tile, but at least you can place the sprinklers in a neat arrangement. I wish the devs would stick to 24 adjacent tiles and take the steep price down a notch. You could also try 15x20 or 15x25 plots, though going any bigger will get messier: they will no longer qualify as plots, and crops are harder to manage.)
  • Instead of rebuilding the farm house in a total different location, I chose to keep it in position and just extend it. The extension will start by building a brand new kitchen (the most important room of the house, as in real life), while leaving the rest unaffected by construction work.
  • I placed the barn in close proximity to the house because my daily routine starts with caring for the animals, moving on to beekeeping (every third day), then watering the crops and checking the orchard and/or berry bushes.
  • I considered the orchard organisation very carefully. The idea was to have the trees fruiting in a particular season in close proximity to one another. The coconut trees (which fruit in three seasons) had to be easily accessible too. And there were two more aspects I had to take into consideration. First is that coconut, banana and cocoa trees require a 4x4 plot (as opposed to the rest which grow happily in a 3x3). Second is that lemon, coconut and peach are the first trees to plant quite early in the game, by which time you couldn’t have cleared much of the farm and redrawn all the boundaries. So they had to be planted in spots that were easy to measure (from the lake, in this case). Oh, and keep in mind: you’ll need at least a 2-block-wide path to walk between trees.
    End of Appendix.

    Once you’ve decided what goes where, you can complete the tutorial… time resumes in game and Farm Fan goes to the Tavern where she spends her days from now on. We’ll have reasons to visit her there several times in the future.

    Upon completing the tutorial, you have acquired a few tools (hoe, watering can, and hammer) from Farm Fan. Handing in your Farm Registration Letter to Maximilian will give you the first task (build a barn), a shovel and some light wooden blocks. Talking to Aliza will give you an axe. After chopping some trees, you can return to Aliza and she’ll give you everything else you’ll need to start tackling the barn-building chapter of our story… but this is a tale for another day! For now, there is no time for tree chopping or anything else other than bug catching and crop planting. (You might have noticed that time passes by while talking to NPCs, which I find somewhat unfair, because, man!, they like to talk.) Let’s go out into the wild.
Foraging: Into the Wild
With the money (more precisely, petals, the local currency) Farm Fan gave you, first order of business is to purchase a Bug Net and a Scythe (maybe even a Pickaxe, though it can wait for a day or two) from the General Store, which are the last remaining tools. Then off you go bug catching, the most profitable endeavour in the early game. Having chosen to play in third-person (as I urged you to) makes it easier to spot bugs and, in effect, do anything else, because you’ll see the world from higher up.
  • There are different types of bugs: butterflies/dragonflies/bees hover over the ground, crickets/mantises/snails sit on the ground (crickets will alert you to their presence by the sound they make), while ladybugs/rhino beetle/cicada/stick bug/star jelly can be found on trees. There are also mushrooms, creature buds, fossils and acorns and lots of shells on the beach, at the outskirts of the map.
  • All bugs can be lifted by pressing LMB with the bug net equipped. Star jelly, snails, acorns, mushrooms can be picked by pressing RMB (no need for a tool to be equipped). Fossils can be picked with LMB and the pickaxe equipped. The most efficient way to forage the beach is to have the bug net equipped and, while continuously pressing RMB, point towards the item to be lifted before moving to the next.
  • Bugs (and other forage) spawn in the same location, but they do so by rotation. At the same spot, one day you may pick up a white butterfly and the next day a queen bee. Crickets may be replaced by mantises or fossils. Same with the bugs found on trees. Also, some bugs are seasonal: flies and green/brown cicadas can only be found in the summer. (Look for cicadas in spots on trees where you have previously found other tree bugs.) Fairies (mischievous or not) can be found only during the Spring Masquerade Festival at butterfly spawning spots. The same goes for Will-o’-the-wisp during the Pumpking Festival in autumn. The latter are easier to spot at dusk but they too will spawn by rotation at designated spawning spots. Especially with these harder to find bugs, it’s a good idea to keep one of each in storage to add to the museum displays.
On the first day, though, you should limit your foraging only around the town and farm, as there isn’t time for much else. Try to memorise the spawning spots in these surroundings by configuring them in a mental itinerary. For most of spring, following this itinerary after finishing the chores on the farm will become your daily routine and steady income. (In my latest run, I had a map with 1,000-1,500 worth of petals just by circling my farm and town.)

The following days, you can venture further afield. Keep a lookout for spots reach in resources (some parts of the map may have a cluster of spawning spots). If you need to physically mark such places on the map (say, by placing blocks in a cross), don’t build anything too close as it will destroy them. In fact, you shouldn’t operate any changes in their proximity (whether cutting trees or scything grass/flowers). If not too far away from town/farm, you can integrate the new spots into your daily foraging itinerary.

But let’s not get ahead of ourselves, and return to our story. It’s still the first day of spring, and getting rather dark outside.
Farming: Get down to business_Part 1
With the catch of the day (butterflies, crickets, mushrooms etc.), head to the vendors in the town square, where you can sell everything. But just because you can, you shouldn’t quite sell everything. Keep a hold of the following: queen and worker bees, mushrooms (optional) and 2 rhino beetles. Sell everything else. (Bees will become another steady source of income; you’ll need 1 queen bee and up to 10 worker bees per apiary; for more information, see Beekeeping below in Farming_Part 6 section. A couple of rhino beetles are needed for constructing the fishing spot requested by Riah; for more information, see Fishing in Farming_Part 6 section. I usually like to keep a hold of all mushrooms I find, but that’s just me. There is an achievement for gathering 100 mushrooms and I like to know how far behind I am before completing it. Or, as I found out recently, you can go to "Options", select "Gameplay" tab and, under "UI", tick "Active Achievement Tracker": this will keep track of any achievement you've selected and it will display your progress in the upper right corner of the screen.)

Then buy seeds either from the vendors here or from the General Store. At these locations, you can only buy seeds in packets of 3 (consequently, the price shown is for 3 seeds). (By pressing ‘Shift,’ you can buy 10 times more, namely, 30.) The vendors will only stock seeds appropriate to the current season, but they may not stock all available seeds for that season. Later on, you’ll be able to buy a catalogue and a shipping station. From the catalogue you can order everything there is in the game and in precise quantities. Keep in mind that the catalogue lists individual items and the prices are calculated accordingly: ordering 1 packet of lettuce seeds means exactly 1 seed and not 3. (You can sell up to 6 items from the shipping station and the money will arrive in a box the next day; unlike orders you put from the catalogue, there is no expedite option to receive your money the same day. Also, you cannot increase the number of sellable items beyond those 6. Buying more shipping stations doesn’t work that way: you’ll still be selling items from one station only!)

But what seeds to buy? How long does it take them to grow? Do they regenerate? Are some crops more profitable than others? Should you even bother planting crops? Maybe you’re better off raising animals or fishing or even stargazing? … Aha, the plot thickens!

1. Crops

Farming the land is the most lucrative activity in Staxel. Some crops can be sold off as you harvest them; others will give you a greater return by processing them further into, say, jams and marmalades. As a rule of thumb, it is almost always more advantageous to further process them into various recipes than sell raw. Yet, crafting is very time consuming; choosing what recipes to craft is very important. (See also the Crafting section.)

I’ve worked out a crop calendar for the first year, such that you’d get to plant every possible crop in the game. Second year and the following can be devoted to the most profitable crops in their specific seasons.
The idea was to maximise on the most profitable crops from very early on and leave the lesser crops—which don’t bring as many petals, but grow across seasons or all year round—for the winter time or the change of seasons. As with similar games, you’ll start by working on a very tight budget, when money is in dire need, and you’ll need a financial plan to make it work.

I have compiled all my findings in a spreadsheet; it includes dedicated sheets to crops, bushes and trees, and recipes for both cooking and crafting. The formulae (where applicable) are linked to the corresponding ‘Raw Materials’ sheet. If you download the spreadsheet for your own use, you can easily adjust prices there, if they’ll change with future updates to the game. (Then again, as the market is fluctuating, there may be no need for that. How to measure prices at 100% market value?)

‘Crops_Bushes_Trees’ sheet organises the crops by growing season and, for each season, from the most to the least profitable. Fruit trees are organised according to fruiting season (which is not necessarily their growing season). All trees grow in spring, summer, and autumn (except for tangerine and pear, which grow all year), but fruit only in specific seasons. Once planted, berry bushes and fruit trees will survive from one year to the next, which means that their profitability keeps increasing in time. This is the reason why I did not calculate the "profit per day" for them. It may be useful to know that trees give 3, sometimes 4, fruits at each harvest.

You can access the spreadsheet here
Staxel: Farming and Crafting[docs.google.com]

(Note: The prices were retrieved with no mods installed. I’ve only tried two mods—the sprinkler and the auto stations—and I’ve noticed that the prices were dramatically altered, but I don’t know which one was the culprit. I’m quite sure that the altered prices were not due to the market being down. I have uninstalled and reinstalled my game afterwards (the only way to undo the changes!) and stayed away from any mods since then.)

Before advancing with our story, a few tips regarding farming in general:
  • Hovering the mouse over a seed packet in your inventory or the catalogue (but not when displayed in store) will give information about the growing season, time to maturity and the regeneration rate, if applicable. Time to maturity does not include the day of planting!
    Example: Sweet potato takes 6 days to grow in spring. The last day to plant sweet potato is Spring 10 and not Spring 11, as you might infer by counting the days left in the season. Or, if you’ve just harvested cucumbers on Spring 11 and they regenerate in 3 days, the next harvest will be on Spring 14 and not Spring 13.
  • Berry bushes and fruit trees that don’t die when out of season do not reset at the beginning of the new growing season. At least that’s what I could infer from their strange behaviour. Let’s say you harvest the last crop of blackberries or peaches on Summer 15. Next year, your first crop can be harvested on Summer 2. My inference may be wrong though. All I know is that I took great care in calculating the last day of planting fruit trees to have them ready to fruit on the first day of their fruiting season and, to my surprise, that did not always happen (more specifically, with lime, orange and mango trees, which cannot be harvested in the first year spring). But by the second year, that is less important anyway.
  • The profitability of some crops could be raised if it allows switching to another crop at the end of the season. Sunflower is the best example. It grows in all seasons and, if planted on Spring 1 and then replant it all year long, the last harvest is on Winter 16. This amounts to 2.25 harvests per season with a profit of 14.22 petals per day. Yet if planted starting with Summer 1 and replaced by beetroot only on Winter 11, the two crops together will give a profit of 20.94 petals per day. (See spreadsheet for further details.)
Farming: Get down to business_Part 2
  • How to use tools efficiently. 720 seeds, 2 trees of each type and 100 berry bushes, all topped up with 20 apiaries and 11 animals, plus a cat, may seem too much to handle. Yet, I managed pretty well with enough time left to do other tasks, like building. A lot of it has to do with using the tools efficiently.
    — The scythe and hoe can be charged in 3 stages, each covering more ground: 1st stage covers 3 blocks counting ahead from the targeted block; 2nd stage extends to 5 blocks ahead; 3rd and last stage adds two rows of five blocks, one on each side of the targeted block for a total cover area of 3x5 blocks. To charge the tool, you need to press LMB and not depress it; each charge is marked by a specific sound. You can depress LMB at any stage is convenient for your specific purposes.
    If you planned your plot as a multiple of 3x5 (I prefer plots of 9x20), you can hoe it all at maximum charge.
    — Harvesting non-regenerating crops can be done with the scythe. The crops fall on the ground and can be easily picked up. If possible, it is a good idea to plant crops as a multiple of 3x20 rows, which will make harvesting a lot quicker by charging the scythe to maximum.
    But using the scythe to harvest regenerating crops may destroy some of the plants if you accidentally double-click, so it's not advisable. It's also difficult to pick them up from among the plants. If harvested by hand (by pressing RMB and, without depressing it, moving from plant to plant) it will take a bit longer, but the crops go straight into your inventory. I harvest watermelons and pumpkins only by hand; since I’m not an adventurous spirit, I just couldn’t bring myself to try it on such expensive crops.
    Be careful when harvesting crops next to other crops that are not yet ready. Remember to point the scythe to the middle row of a 3 row wide. Since there is no key or mouse button to press in order to cancel an action, you only need to redirect the mouse to the right target without depressing LMB. Remember that depressing LMB completes the action!
    You can also use the scythe to destroy crops which have died with the change of the seasons or no longer have time to ripe in the days remaining in the season. You should always aim to clear the plots on the last day of the season after harvesting was done, to leave yourself more time for planting and watering the next day at the start of a new season. After 1.3 update, scything regenerating crops after harvesting gives you back seeds; one more reason to do it!
    — You cannot charge the watering can. Yet, watering is done quickly if you press LMB and, without depressing it, just move the mouse around. The watering can has a far reach and this method works best on newly hoed blocks or low growing plants, which allow you to see any spots you might have missed. Cucumbers, sugar cane or sunflowers, on the other hand, especially if close to maturing, can only be watered by walking along the rows while pressing LMB. If you discover the next day that you missed a spot, you can revive the plant by adding manure to it (see the recipe in the online spreadsheet). Yet, you still lose 1 day of watering, which makes it not a very useful recipe. (Otherwise you'll lose 2 days before crops revive?)
    — Planting seeds is done quickly by pressing LMB and, without depressing it, moving the mouse from one block to the next. If you planted a seed in the wrong spot you can recover it by using the shovel on that seed (make sure the outline of the seed is targeted and not the dirt block).
  • Mixed seeds, which are dropped by scything grass and flowers on your farm or in the wild, will give a boost to your early farming. To find out what crops you get, plant them, and then shovel the seeds out in order to replant in the appropriate spot.
    I don't invest too much time early on in the game collecting mixed seeds, other than in clearing my farm land. The drop rate is low and I prefer hunting bugs to buy the seeds I need. Also, since inventory space is limited, you get to clog it up with almost worthless petals of all possible colours.

Getting back to the questions raised earlier… Yes, get to planting, it’s worth it! As for what to plant in Spring, year 1: lettuce, cucumbers, sweet potatoes, and, with 1.3 update, coffee*. That’s it… well, in a certain order, see below.
And of course, if you gathered any mixed seeds, you can plant them, shovel them up and see what you get. Any seeds (other than the three already mentioned) can be planted separately. But don’t replant them afterwards: the idea would be that, by the end of spring, you have filled all your plots with about 60 lettuces, 60 cucumbers and the rest sweet potatoes or a combo of sweet potatoes and other crops.
(*Coffee was introduced with 1.3 update. I treat it as a bush because it survives across seasons; actually, it keeps producing in all seasons. Unlike berry bushes though, coffee needs watering! It's almost impossible to find it on the vendors' stalls, but you might strike lucky and find it in mixed seeds. Otherwise, wait until you can afford the catalogue and shipping station. It is the only regenerating crop to produce in all seasons and it's quite profitable: 36.31 petals profit/day calculated for an entire year. Too bad it cannot be brewed into coffee... yet!)

Spring Crops
Day of Planting – Harvests/Replanting
Lettuce
1 – 8 – 15 – 6 Summer – 13 carrot – 16
→ this crop will carry over to summer, so plant it on the side of a plot
Cucumber
2 – 11 – 14 – 1 Summer – 4 – 7 – 10 – 13 – 16
→ cucumbers will regenerate after 3 days
→ you can add more on 5 Spring to have them all harvestable at the same time
→ this crop will carry over to summer, so plant it on the side of a plot, other than the one
with lettuce
Sweet Potato
4 – 10 – 16
→ Combos:
5 – 11 beetroot – 16
6 – 12 potato – 1 Summer
7 – 13 onion – 1 Summer
Fruit Trees
Day of Planting – Harvests
1 Lemon Tree
2 – 15
→ the second Lemon Tree can be planted on 5 Summer and needs to be bought as
well. There is no way you’ve milked a cow 100 times by then in
order to claim the reward from Farm Fan.

Other fruit trees that need to be planted in spring, yet they’ll fruit in the coming seasons:

2 Coconut Trees
4 – 8 Summer – 12 – 16 – 4 Autumn – 8 – 12 – 16
→ if you happened to clean the beach of 100 shells by 4 Spring, Farm Fan will
reward you with 1 Coconut Tree, and you’ll only need to buy one. Otherwise,
buy just one, and add the second either on 8 or 12 Spring.
2 Peach Trees
4 – 1 Summer – 4 – 7 – 10 – 13 – 16
→ if you happen to have caught 100 bugs by this time (which may be hard), you
get 1 Peach Tree as a reward from Farm Fan. Otherwise, buy both trees since
they’re not overly expensive.
1 Banana Tree
8 – 12 Summer – 16
→ start with one. You can add the second (which you get for free from Farm Fan
once you’ve planted 500 seeds) no later than 16 Autumn.
2 Cocoa Trees
10 – 10 Summer – 13 – 16
→ you should have enough money to buy both. Or you can wait to get the second
from Farm Fan once you’ve cooked 100 recipes (most probably strawberry jams).
2 Kiwi Trees
11 – 1 Autumn – 4 – 7 – 10 – 13 – 16
→ both need to be bought. Farm Fan will reward one when you plant 1,000 seeds.
You think you can do it by 11 spring?
2 Cherry Trees
15 – 1 Autumn – 4 – 7 – 10 – 13 – 16
→ if you have already started working for your barn, you must have placed 100 blocks,
which is rewarded by Farm Fan with 1 Cherry Tree, so you’ll only need to buy one
Farming: Get down to business_Part 3
Spring year 1 is a special season, because it will take some time for you to populate all the fields (around 720 seeds), but if you do so, your financial struggles will be over; you’ll have all the cash needed for planting everything on the 1st of summer. That's why I’ve included another Appendix, in Farming_Part 5 section, detailing my first spring in Staxel (once I understood how the game works). I don’t claim that it is the best strategy; take it as a point of reference.

And here are the crops (and number of seeds for each) for the following seasons.

Let’s start with Summer. Total: 84,780 petals (The sum covers all crops and bushes to be planted on the 1st of summer. It does not include the fruit trees. If you manage to get the free berry bush seeds from Farm Fan, you will save 5,400 petals.)

Summer Crops
Day of Planting – Harvests/Replanting
30 Watermelon
1 – 14 carrot – 1 Autumn
→ this crop requires 2x2 blocks for each seed: 30 seeds will occupy a 6x20 plot. Plant
them next to the cucumbers
180 Strawberry
1 – 7 – 10 – 13 – 16
→ strawberries will regenerate after 3 days; plant them on a plot of their own
→ keep all the strawberries and make them into jam in the late hours, when there is nothing
else to do
100 Sugar Cane
1 – 8 – 15 – 6 Autumn – 13 sugar beet – 1 Winter
→ though you can boil sugar cane into sugar, it is more profitable to sell it as is, and buy the
sugar needed for making jams
80 Eggplant
1 – 10 – 14 – 2 Autumn – 6 – 10 – 14
→ eggplants will regenerate after 4 days, and carry over to autumn
→ plant them next to sugar cane, in the remaining spots
60 Tomato
1 – 8 – 10 – 12 – 14 – 16
→ tomatoes will regenerate after 2 days; plant them next to the carried over lettuces
60 Sunflower
1 – 8 – 15 – 6 Autumn – 13 – 4 Winter – 11 beetroot – 16
→ sunflower will carry over to autumn and winter
→ plant them next to tomatoes and lettuces in the remaining spots
→ when buying sunflower seeds to replant them, buy only 30 since they’ll also give seeds
back at harvest (there is a 50% chance to get seeds)
60 Cucumber
1 – 4 – 7 – 10 – 13 – 16
→ carried over from spring
60 Lettuce
6 – 13 carrot – 16
→ carried over from spring
Berry Bushes
Day of Planting – Harvests
40 Blackberry Bush
1 – 10 – 13 – 16
→ you only need to buy 35. Farm Fan rewards you 5 Blackberry Bush seeds for
planting 100 seeds.
30 Blueberry Bush
1 – 12 – 15 – 2 Autumn – 5 – 8 – 11 – 14
→ you only need to buy 25. Farm Fan rewards you 5 Blueberry Bush seeds for baking
a pie, which will be a Lemon Pie. Now you know why you were in such a hurry to plant a
lemon tree. You may keep the pie in storage; I know of one strange creature who will
have a craving for it.
30 Raspberry Bush
1 Summer – 9 – 12 – 15 – 2 Autumn – 5 – 8 – 11 – 14
→ you only need to buy 27. Farm Fan rewards you 3 Raspberry Bush seeds for cooking
a preserve, which will be a Lemon Marmalade. Now you know why you were in such
a hurry to plant a lemon tree.
Fruit Trees
Harvests
2 Coconut Trees
8 – 12 – 16 – 4 Autumn – 8 – 12 – 16
2 Peach Trees
1 – 4 – 7 – 10 – 13 – 16
1 Banana Tree
12 – 16
2 Cocoa Trees
10 – 13 – 16

Other fruit trees that need to be planted in summer, yet they’ll fruit in the coming seasons:

2 Apple Trees
4 – 1 Autumn – 4 – 7 – 10 – 13 – 16
2 Dragon Fruit Trees
9 – 1 Autumn – 4 – 7 – 10 – 13 – 16
→ you only need to buy one. Farm Fan will reward you the other one, when you plant
1,000 seeds.
2 Pear Trees
15 – 1 Winter – 4 – 7 – 10 – 13 – 16
→ you’ll need to buy both. Farm Fan will reward you one after you gathered 100 mushrooms,
but this will take a looong time!
2 Lime Tree
15 – 1 Spring, 2nd Year – 4 – 7 – 10 – 13 – 16
→ if you like fishing a lot and managed to catch 100 of them, then you’ll get 1 Lime Tree as a
reward from Farm Fan. I advise you to buy both trees instead.
2 Orange Trees
15 – 1 Spring, 2nd Year – 4 – 7 – 10 – 13 – 16

(Since you’re well off financially by now, you might consider finishing up the entire orchard at this point; no need to follow the planting schedule for the remaining trees.)

Starting with summer, you should keep a few of each crop in storage for cooking/gifting. In the online spreadsheet, I have specified how many items of each crop are needed to cook 1 of each recipe. As a rule of thumb, I never sell any fruits, but keep them for crafting.

We now go into Autumn. Total: 23,100 petals

Autumn Crops
Day of Planting – Harvests/Replanting
10+80 Pumpkin
1 – 9 sugar cane – 16
→ this crop requires 2x2 blocks for each seed. I first plant 10 pumpkin seeds, water them
and feed each one a bottle of Magic Water, then harvest them. This way I have more than
enough pumpkins ready by the time the festival starts on autumn 5th. With some update post 1.3 version, Magic Water can no longer be bought from the catalogue. Which is fine: you'll have the pumpkins ready on the last day of the festival.
→ I plant the 80 pumpkin seeds on two separate plots, on a 8x20 section for each.
40 Corn
1 – 8 – 10 – 12 – 14 – 16
→ corn will regenerate after 2 days; plant it on the remaining 2 rows next to the pumpkins
60 Oats
1 – 5 – 9 – 13 sugar beet – 1 Winter
→ plant them next to the sunflower carried over from summer
60 Potato
1 – 6 – 11 – 16
→ plant them next to the oats in the remaining spots
60 Sunflower
6 – 13 – 4 Winter – 11 beetroot – 16
→ carried over from summer
100 Sugar Cane
6 – 13 sugar beet – 1 Winter
→ carried over from summer
80 Eggplant
2 – 6 – 10 – 14
→ carried over from summer
Berry Bushes
Harvests
30 Blueberry Bush
2 – 5 – 8 – 11 – 14
→ carried over from summer
30 Raspberry Bush
2 – 5 – 8 – 11 – 14
→ carried over from summer
Fruit Trees
Harvests
2 Coconut Trees
4 – 8 – 12 – 16
2 Kiwi Trees
1 – 4 – 7 – 10 – 13 – 16
2 Cherry Trees
1 – 4 – 7 – 10 – 13 – 16
2 Apple Trees
1 – 4 – 7 – 10 – 13 – 16
2 Dragon Fruit Trees
1 – 4 – 7 – 10 – 13 – 16

Two more fruit trees that need to be planted in autumn, if you haven’t done it already, yet they’ll fruit in the coming seasons:

2 Tangerine Trees
4 – 1 Winter – 5 – 9 – 13
→ you only need to buy one. Farm Fan will reward you the other one, when you plant
1,000 seeds.
2 Mango Trees
1 – 1 Spring, 2nd Year – 4 – 7 – 10 – 13 – 16
→ if you managed to gather 100 wool from your sheep, then you’ll get 1 Mango Tree as a
reward from Farm Fan. I advise you to buy both trees instead.
Farming: Get down to business_Part 4
And, finally, we get to Winter. Total: 24,540 petals (The sum covers all crops to be planted on the 1st of winter.)

Winter Crops
Day of Planting – Harvests/Replanting
360 Beetroot
1 – 6 – 11 – 16
→ I gave it two whole plots since they’re the most profitable crop in winter, if you (like me) don’t
plan to have cabbages carried over in the next year’s spring. If planted in both seasons (winter
and spring) cabbage gives 26.56 profit/day, and 21.25 if planted only in winter. By comparison,
beetroot gives 25.31 profit/day.
180 Turnip
1 – 4 – 7 – 10 – 13 – 16
60 Onion
1 – 5 – 9 – 13 – 1 Spring
→ plant them next to the sunflower carried over from autumn
60 Cabbage
1 – 7 – 13 turnip – 16
→ plant them next to the onions in the remaining spots
60 Sunflower
4 – 11 beetroot – 16
→ carried over from autumn
Fruit Trees
Harvests
2 Pear Trees
1 – 4 – 7 – 10 – 13 – 16
2 Tangerine Trees
1 – 5 – 9 – 13

And there you have it. You should have in storage by now every possible fruit and vegetable that can be found in the world of Staxel. Ok, I admit it: you have to wait for the beginning of spring, year 2, to get a taste of the limes, oranges, and mangoes you planted.

In the next year, if you’re still around, you can do whatever you fancy… maybe give stargazing a serious thought, at least until the next big update… or not. (Actually, if you're an involved builder, you may easily reach year 3, or even 4, toiling at the perfect, most grandiose project. And crops are the way to finance it!)

Here is what I would do. I would throw a good handful of cucumbers or eggplant (or both) in the seed maker to get some gold seeds (actually, 3 gold seeds; that was the maximum I ever got for a given crop... at some point, 80 eggplants gave me no gold seeds! See also below.) I would then plant them in spring and summer accordingly, with some magic water for good measure. (Don’t be tempted to further put the gold crops in the seed maker to get more gold seeds. It doesn’t work that way; you’ll only get 5 regular seeds for each gold vegetable.) Why these in particular? Because they regenerate and carry over two seasons.
In spring, I would add to the cucumbers a whole lot of sweet potatoes. But if I only plant sweet potatoes, then I wait till the end of season (if not hard-pressed for cash) to sell them all at once; by spring following year the market will recover after selling close to 1,500 sweet potatoes. Alternatively, I could plant a combo of sweet potato, followed by beetroot, followed by onion to be harvested on the last day of spring.
In summer, to the aforementioned cucumbers and/or eggplant I would add watermelons and strawberries.
Pumpkins for autumn, followed by sugar cane.
And in winter I’ll probably call it quits, pack my million and go on vacation or, as I've already mentioned, commit to building a "grand design."

Here are some pictures of my farm in different seasons, years or runs.

You can see my crop arrangement in autumn, year 1 and next to it in summer, year 2:


Then, my orchard on the left and berry bushes on the right, both in summer year 2:


Last but not least, a few more general tips regarding crops:
  • Should you chop or not? The answer is a definitive NO! It used to be more profitable to sell cut crops (veggies and fruits alike), but this is no longer the case. Actually, it’s the other way around: investing more time into chopping the crops, drastically devalues them. (See ‘Raw Materials-Cooking’ sheet in the online spreadsheet.) The world of Staxel seems to be governed by different economic principles then our own, which is fine by me, since I spend too much time in the kitchen anyway boiling hundreds of jams.
  • Seed-making is crop-wasting! So, I advised you before to put cucumber and eggplant into the seed maker. That was mainly for fun and, more seriously, to get the achievement for it. Otherwise, the seed maker is another trap. Let’s look more closely: you put 9 potatoes into the seed maker and get back 16 seeds. A bargain, you’d say. Not so fast! 9 potatoes sell for 1,260 petals; buying 16 potato seeds only costs you 560 petals. The seed maker gives anywhere between 1 to 3 seeds. In our experiment, it should give you consistently 4 seeds for each item just to break even! Of course, you can get gold seeds, but the ratio is unforgiving... actually, I wasn't even able to approximate what the ratio is. I advise you keep adding 10 seeds at a time and see what you get. It could also be that gold seeds are not chance- or ratio-based. I say that because I never got more than 3 gold seeds for a particular crop, if I got them at all, after feeding 60 items to the seed maker.
    All in all, the seed maker is best dumped in a corner and then forgotten.

Let's get back to our story... Where were we? Ah, it's still the very first day, running home in the dark, with a few lettuce seeds in our backpack. Plant them, water them and go to sleep. You should always try to go to sleep (use the "teleport home" option if you're far away; that is, after the first night when you set a new home position). If you don't, you wake up later the next day and, as you might have noticed, time is an expensive commodity.

What you do next, depends a lot on what you're preferences are, but one thing is certain: you'll need money and quickly! Which means you don't, in effect, have that many options. Below is my strategy for the first spring.
Farming: Get down to business_Part 5
Appendix: “Deconstructed” Spring

The following is modelled on the log I kept in my third (or was it fourth run?) of the game, when I finally started with a fully-worked-out game plan.

Spring 1
→ first thing: buy Bug Net, Scythe (optional: Pickaxe) and hunt bugs. Sell all except for bees (queen or
worker) and 2 rhino beetle.
→ talk to Maximilian to get your Shovel, light wooden blocks and the barn quest
→ talk to Aliza to get your Axe
→ I had enough money remaining for planting 22 lettuce
Spring 2
→ farm chores: for now, just water crops. Also, hoe the plot for lemon tree.
→ you may deconstruct your bathroom (you don’t need it anyway!) and kitchen, together with the
remains of the barn structure on your farm and sell everything except for the light wooden blocks
you’ll use to build the barn
→ bug hunt; maybe venture on the beach to gather shells
→ if you find a Queen Bee (as I did), pay a visit to Farm Fan who will reward you with an Apiary.
Place it together with the queen bee and any worker bees you found. The queen bee will start
gathering worker bees, one per day, until it reaches 10. Then, it will take another 3 days to
produce honey, and it will keep producing every third day. Make sure you buy a smoker and an
empty jar before honey is available.
→ if you haven’t done it already, buy a Pickaxe and of course 1 Pet Food. Always try to have at
least 1 Pet Food in the inventory
→ I had enough money remaining for planting 60 cucumber, 1 lemon tree, and 20 more lettuce (If
you don’t find a Lemon tree to buy, you can order any 2 fruits from the catalogue at the end of
spring in order to craft the preserve and pie needed to get the free berry bush seeds.)
Spring 3
→ farm chores; more bug hunting and/or shell gathering; no need to plant anything
→ if you stumble upon a mine in your travels, you can strip it of crates, blocks etc. for a very good
profit. Actually, too good of a profit, and that’s why I don’t do it, because it unbalances the game
experience.
→ talk to Riah to get the next quest: building a fishing spot. You may also talk to Emily to get the
quest for the patisserie if she is in town; though it will be some time before you’ll have the
finances to build it.
Spring 4
→ big day ahead. You know the drill, so I won’t mention it again from now on: farm chores;
hoe the plots for coconut and peach trees; bug hunt
→ I had enough money for planting 1 coconut tree, 2 peach trees, and 21 sweet potato.
Spring 5
→ planted 15 more sweet potato, to be replaced by 15 beetroot on 11 spring.
→ around this time, you should start working on the barn, a little each day, after the bug catch for
the day. You can use the Assembly Station at Aliza’s to craft the two troughs. You’ll need to do a
lot of tree chopping to craft all the required light wooden blocks. Do not place the cows until you
have surrounded the place with 2 rows of blocks (whether barn walls or fence). When the barn is
done, talk to Maximilian to get 2 cows in a crate, place them in the barn and talk to Farm Fan to
get your free milker. From now on, you have to make sure you buy Trough Food, along with Pet
Food, as needed. You can start milking the cows two days later, but you should pet and feed
them every day.
Spring 6
→ planted 15 more sweet potato, to be replaced by 15 potato on 12 spring.
Spring 7
→ planted 24 more sweet potato, to be replaced by 24 onion on 12 spring.
Spring 8
→ harvested the lettuce and planted 60 more in a spot where they’ll carry over to summer
→ planted 1 banana tree
→ bought Shipping Station and Catalogue
Spring 9
→ harvested more lettuce
→ planted 60 sunflower seeds, 2 kiwi trees, and 2 cherry trees. Why? Just because I could.
Spring 10
→ harvested sweet potato and planted 90 more
→ planted 2 cocoa trees
Spring 11
→ harvested more sweet potato and cucumbers
→ planted 255 beetroot
→ bought the following stations: 1 Mixing, 2 Boiling, 1 Chopping, 1 Carving, 1 Combining, 1 Baking
Spring 12
→ harvested more sweet potato
→ planted 90 potato and 105 onion. At this point all four plots (720 seeds in total) are planted.
→ bought 1 Assembly Station and 1 Saw Station
Spring 14
→ bought materials for and crafted 19 apiaries. By now, I had collected 19 queen bees
and quite a handful of worker bees. I ordered, from the catalogue, the remaining worker bees
to reach 190.
Spring 15
→ placed and filled all 19 apiaries. (Try to do this on the day you harvest honey
from the existing apiary, so they are all in sync.)
→ planted 1 more coconut tree
→ made lemon preserve and lemon pie and claimed my free berry bush seeds rewards
→ built fishing spot
Spring 16
→ harvested everything I could (and sold in town) and ordered all the necessary seeds
for the 1st of summer from the catalogue
→ hoed the spots for the berry bushes
End of Appendix.
Farming: Get down to business_Part 6
2. Raising Animals

You’ll be able to raise animals once you have built a barn. Building the barn is the first task you’re given, right after you hand in your farm registration letter to Maximilian.
The minimum requirements for the barn are not at all demanding, except you’ll need a lot more than that to build a proper barn. Yet, initially, you can raise the skeleton of the barn, construct and place a couple of empty troughs and start raising animals. You can get back to it later and lavish whatever building materials you want on it.
Oh, oh, stop right there: don’t just run to Maximilian and herd your two cows back home! The barn, like everything else, needs proper planning. Here are some tips:
  • You should allocate it plenty of space: both to the barn as such and some surrounding field where they can roam free. (I’ve built my barn on a plot of 13x21 blocks; the additional land for the enclosure was 12x21 blocks. See my barn location and plot allowance in The Nuts and Bolts section above.) If the barn is not big enough, some animals cannot access the food and they’ll give you no products, since “they’re busy” trying to get to the food. Fair enough!
    Also, it’s a good idea to scythe any flowers and grass from the whole plot, and then revert all blocks to dirt by using the pickaxe. It loses that “natural feel,” but products left on the ground (cow splats, bacon and eggs) will be easier to spot. (I never put flooring in my barn as I like the look of dirt blocks; but if you choose to do it, then you’ll need to dig out a row and replace it with flooring.)
  • Once you’ve decided on the final measurements and location of the barn, start building it in stages, as follows. For the barn as such, lay the first 2 rows of the walls. Then choose one of the walls (closest to where you placed the sign for the barn) and continue building it vertically to the intended height, and then place a few roofing blocks. Check if you’ve met the requirements for the roof. You can then construct and place the required 2 empty troughs. Though the barn is “finished” at this point, you’re not ready to add any animals just yet.
    You need to enclose the entire allocated space for the barn in some sort of fence that is 2 blocks high, so that animals cannot escape. The easiest way to do this is by placing light wooden blocks around the perimeter and, on top of them, some of the existing low fence on your farm. Repurposing the existing fence this way looks rather neat.
    Alternatively, you can either buy or craft Rough Wooden Fence, but this will take a lot of time and petals to finish.
  • Only now the barn is ready to receive animals. You can get to it later and finish it properly. When you’re ready to add more animals, increase the number of troughs accordingly. (Have at least 1 trough for each animal. The same applies for the chicken feeding areas.) Try not to place any items (troughs, feeding areas) close to the fence as the big animals (especially cows) might climb on them and still escape.
  • Most players choose to build their barn out of light wooden blocks. There is no need to break with tradition for several reasons. They can be easily scavenged from around the village: interior walls in your house which you don’t need since you’ll rebuild it anyway; the remains of the barn on your farm; plus a couple of dilapidated houses you can find in the wild. They’re also rather cheap to craft: you only need lumber and glue. And you’ll get to craft quite a few: the barn will require some 200+ blocks and probably just as many roof blocks.
There are 4 types of animals you can raise in Staxel:
  1. Cows. They give milk, 1 per day, starting with the 3rd day from the moment they were added to your barn. You’ll need a milker, which you can get for free from Farm Fan (as an achievement reward) once you placed a cow in your barn. I keep all the milk I get. You’ll need a lot of it if you intend to cook all possible recipes (see the online spreadsheet). Any extras are better to be crafted into yoghurt and then sold; yoghurt is the most profitable dairy recipe.
  2. Sheep. They give wool, 1 per day, starting with the 3rd day from the moment they were added to your barn. You’ll need sheep-shears, which you can get for free from Farm Fan (as an achievement reward) once you placed a sheep in your barn. I usually sell all the wool I get.
  3. Pigs. They give bacon, 1 per day, starting with the 3rd day from the moment they were added to your barn. Keep in mind that pigs eat (the same trough food as cows and sheep) only from a slop trough, which can be bought from the catalogue. You don’t need any special tool to bring home the bacon… go figure! And home you’ll bring it and not sell it. You can use some of it to make your own pet food or to make bacon sandwiches, though the latter is not very profitable. On second thought, you may sell the extras: your pet couldn’t possibly eat that much food.
  4. Chicken and/or Rooster. Chickens (the rooster is only for aesthetic purposes?) give eggs, 1 per day, starting with the 3rd day from the moment they were added to your barn. Yet, to add them, you’ll need first to craft or purchase a Chicken Coop. They eat only from special feeding areas, which you can craft or buy. You’ll need a good stock of eggs to complete all recipes, but you can sell the extras. I usually don’t bother to fry or boil them. When storing the eggs, keep in mind that they only stack in 12, unfortunately.
  5. The animals will give produce every day, provided that: a) you feed them regularly, and b) you pet them every day (press RMB for interaction). I like to take care of the animals first thing in the morning, because I’ve noticed that items on the floor tend to disappear after a certain period of time… and I’ve learnt that the hard way (!), but I keep this story for later. That is not a problem with cows and sheep (only pigs and chickens), but then they don’t stay awake till the dark hours of the night either, to be milked and sheared.

Here is my barn and apiary farm:

Farming: Get down to business_Part 7
3. Beekeeping

When you first capture a queen bee, you can go to Farm Fan to claim an apiary as a reward. All other apiaries you want to add to your collection need to be crafted or bought (see the recipe in the online spreadsheet).

If you place 1 queen bee in an apiary, it will start rallying worker bees to the hive, 1 per day, until it reaches the maximum of 10. (You can hurry up the process by manually adding worker bees.) It will take another 3 days for the honey to be harvested by first calming the bees with the smoker and then using an empty jar to collect the honey. The apiary will continue to give honey every third day in all seasons. (Be very careful where you place the apiaries. Trying to move them to a different location or replace the tile underneath will end up in a disaster. When you break an apiary with a hammer you loose both the queen bee and all worker bees!)

I aim for 20 apiaries which give me a steady income of 4,000 petals every third day. (Honey sells for 210 petals—or 240? Oh, the misfortunes of a fluctuating economy! I think it sells for 240; yet sold in bulk of 20, it takes the price down to 210. 1 empty jar will cost you 10 petals).

Before the 1.3 update, my strategy was to place the apiary I got for free from Farm Fan and then start gathering the remaining 19 queen bees till the end of spring. By then, I would have also harvested enough wood to craft my own apiaries. I would then order from the catalogue alll the worker bees I needed and, presto!, over night I would have 20 working apiaries, all in sync. No more! Bees (or any other "wild life" for that matter, fish included) can no longer be ordered from the catalogue. So, it's advisable to buy/craft apiaries as you capture queen bees, and let them do the hard work of rallying bees. (This also means that if you want to complete the museum collection of all bugs and fish, you have to put in a lot of hard and grinding work!)


4. Fishing

Fishing becomes available after you’ve built the fishing spot requested by Riah.
The quest is not too involved, yet it will require you to purchase a Carving Station and a Combining Station in order to build the fish rack and the bait box; you’ll also need 2 Rhino Beetles for the latter (see the online spreadsheet for recipes).
After it is built, Riah will spend most of the time fishing there, so it’s a good idea to place it somewhere near your farm or the village, if you ever need to find her easily. You only need to build one fishing spot to be able to fish anywhere you want, whether in the lakes or the ocean. Riah will give you a fishing rod as a reward.

You can also make your own lake and/or small ocean and build a fishing spot engulfing both. Actually, if you have the money to spend on sponges, it is actually a great idea that will save you a lot of time later on. Water tiles (whether lake or ocean) cannot be purchase from the catalogue. But with a lot of sponges (around 50 say, depending on how big you plan the lake(s) to be) you can soak water tiles from existing lakes and the ocean and use them to fill in the excavation site you've built in a more desirable location. You'll get your sponges back afterwards so they can be reused. If you go for fewer sponges, it will require more trips back and forth until you'll fill in your artificial pond.

I personally don’t spend too much time fishing. I think you’ll make more money bug hunting than fishing. Still, there are some incentives for me to go fishing: at Snowdust Festival in winter and in order to complete the achievement for catching 100 fish. Correction: things have changed with 1.3 update. There are a handful of quests that will send you fishing (especially to the ocean) in order to craft several recipes. And since you can no longer order fish from the catalogue, you'll be very glad you brought the ocean closer to home (if you went for the artificial pond, as I advised). Or you can plan to build one now, or at least before you plan on befriending Riah!
Crafting: My twopence worth
Let me start by saying that you don’t need to purchase the recipe in order to craft a specific item. At the same time, crafting that item will not automatically add the recipe in your library. The thing is that there are just too many recipes, and they add up pretty quickly to thousands and tens of thousands of petals. There are close to 70 cooking recipes and many more crafting recipes.

As I mentioned above, I compiled a spreadsheet that details all cooking recipes, plus a handful of crafting recipes, but only for those items that I found useful in my game. I link it again below.

You can access the spreadsheet here
Staxel: Farming and Crafting[docs.google.com]

For the spreadsheet, I crafted all cooking recipes, checked their selling price at the vendors in the village, just to find out, a couple of seasons later, what I’ve already suspected: preserves trump everything else. I just wish the boiling stations would work as smoothly as the others: it takes several RMB clicks for the animation to start (a bug?). (The recipes—both cooking and crafting—are listed in alphabetical order and not in relation to profit. I thought they’ll be easier to find that way.)

The idea behind my efforts was, firstly, to assess if cooking was indeed as profitable as one of the in-game tips advertises. It generally is with some exceptions. Secondly, I wanted to be able to gauge which will give the biggest profit. So, what was my reasoning?

For each cooking recipe, I input the selling price, the production cost (the combined price of its ingredients*, see Note below) and the net profit gained from selling the crafted recipe rather than the individual ingredients. (I’ve also included the buying price. As expected, with the exception of white sugar—whether crafted from sugar cane or sugar beet—, it pays to craft it rather than buy it.)
But net profit won’t tell you the whole story or the right story. Let’s look at the following example: you get 418 petals in profit from Apple Pie and 410 petals from Apple Sauce. So, it’s more profitable to bake the pie, right? Wrong! How about the cost of the ingredients relative to net profit (to say nothing of the fact that you only need to boil the sauce as opposed to mixing the pie crust, combining it with the apple and then baking it)?

This is what I call “profit percentage”: the percentage of the ratio between net profit and cost price (in our case, the cost of ingredients). It turns out that the profit percentage for Apple Pie is 61.3% (anything above 50% is pretty decent), but for Apple Sauce is 157.7%. It’s self-explanatory, don’t you think?

(*Note: When I calculate the cost of production, I don’t simply input the selling price for the raw material. For example, if a recipe requires butter, the cost of ingredients reflects the price I would get from selling the butter, rather than the price for milk.
At the same time, I look at both the selling price and the production cost of any ingredient, and input the highest of the two. For example: vegetable pie has two ingredients, pie crust and vegetable medley. The production cost for it is 1,112 petals, which is the sum of the production cost for pie crust which is 652 (and not the price I would get by selling the pie crust, which is 620 petals; pie crust is a loss-incurring recipe) and the selling price for vegetable medley, which is 460 petals.)

Most preserves will score 150% profit percentage or thereabouts, and they require the minimum of effort. Berry and cherry jams need only to be boiled along with white sugar; all other fruits need to be cut first.
It is important to take into account how many steps are involved in preparing a recipe, since the cooking stations need to be operated manually. (The only automatic stations in the game are the Saw, the Seed Maker and the Fossil Polisher. Of course, you can install the mod for auto-stations, but I prefer not to, for reasons I have already explained.)

So from mid-summer on, I start making lots of preserves, especially at night, before I fall to sleep on the kitchen floor. That’s dedication! But, when the time comes to build the Patisserie, I get to bake all pies and cakes, mix all the smoothies and craft a few more sweets to put on display there. Emily should have some competition, I think; besides, I get to tick some more achievements at the same time. Another day spent to boil all the soups and the last cooking achievement is accomplished as well. And then back to preserves (strawberry jam is my favourite), whenever I need some capital infusion for my building projects.

And speaking of building… I always get to buy all the blocks, furniture, fixtures etc. needed in my building projects. I find it too grinding and time consuming to craft my own doors, roofing etc. Besides, by the time I tackle building, I’m usually in a stable financial position with my strawberry preserve business.
Yet, there are some recipes that I always get to craft. Some are required for completing the initial quests (troughs, bait box etc.); others are more for fun (capture crate if ever needed, book shelf for when I run out of storage space). I believe that making your own apiaries, especially if you plan for a lot of them early on in the game, is worth it. The 19 apiaries I crafted at the end of spring, saved me around 7,000 petals.
Building: Let’s not fly blind!_Part 1
I just cannot decide: is Staxel ultimately a farming or a building game? Of course you're free to choose whatever side you appreciate most. But what does the logic of the game dictate? There are 5 big building projects that you’re requested to do: Emily wants a Patisserie, Vorlen aka the mysterious butterfly dreams of a Museum, and Maximilian wants to put the band back together and asks you to build 3 houses. (Who the 3 repatriates are may differ; it depends on who populates the village initially. I never got more than three house-building requests, but then again I never made it further than summer, year 2. Still, I believe that the last three incomers complete the NPCs collection: 13 in total not counting the vendors, Caren who only makes an appearance at Snowdust Festival, and Cirahna).

To get back to my question… Building is maddeningly (exactly, how often do you get to use this word?) expensive. Only farming (and preserve making, which is still farm-based) could finance it. Bug-hunting is just to start off the farming business.
So once you get to farm properly, you can throw the bug net on a shelf. And once you get to erect five buildings you get to…? I guess wait for the next game update. One can only hope that in such a future update there will be something to crack this “chicken and egg problem” open. It cannot just be that “I farm therefore I build; I build therefore I farm some more”. And when there is nothing more to build, what happens then? Do I stop farming, do I stop existing? Cooking could be given a more prominent role other than making more money. (The latest character, Cirahna, seems to have opened this path, but there should be more.) Building too could be diversified and integrated more into the village life etc.

But let’s get to building and the maddening aspect of it. Cost is the first determent. Then comes the building as such. If you decide to fly blind and just start adding blocks and see what comes out, the project is bound to fail. Then you take it apart and rebuild it, then you get frustrated and so on.

There has to be a method in madness. And that’s exactly what I’ve done over a few too many dozens of hours. I’ve sat and designed a project for each type of building; the design was to be compact and functional, yet not feel too cramped. You can find some inspiration for your own projects, or at least get an idea of the amount of blocks and cash needed before its completion.

The biggest problem I had was the lack of information about the space required by various items. I still seem to have gotten it wrong: beds seem to fit in a 2x2 space but sometimes they need 3x2? The diagonal gazebo is either a 2x2 or 1x2 or 1x1… long story short, I can only fit 2 diagonal gazebos neatly together, the third is always off… And then there are other problems: not all blocks are equal in dimensions. Some will obtrude more than others: you might have noticed already how a 1-block-wide cobblestone path looks against any other dirt blocks: it’s like walking on a tightrope. The same goes for other blocks and they’ll look awkward in the house you’ve just built. But by then it’s too late to take them all apart and try your luck again. And there are other more or less annoying quirks: lamps or candles do not light up when placed on side tables (hence my preference for floor/ceiling lamps and wall torches). The same goes for the cash register (or, say, a lemon pie stand) placed on top of shop counters: it’s not registered by the Patisseries sign. The game is in early access after all, so don’t get discouraged by this; you’ll find a way around it.

Before taking a look at particular designs, let’s start with the process of building. I like to build in stages, always following a certain order:
  1. I check the map for a relatively flat spot, which would not need too much, if at all, terraforming and which, ideally, doesn’t have too many spawn spots for bugs that will get destroyed. It should also be close to the village. Next, place the sign and toggle on the boundaries for the building. You should try to build, more or less, within those boundaries. That is, any requirements for completing the house (fixtures in the kitchen/bathroom, furniture etc.) have to fall within those boundaries.
  2. Set the perimeter according to your design. Before starting to dig out the foundation (one block deep), you might consider the following if you have the patience for it. First scythe the plants (the mixed seeds will count towards the 100 mixed seeds achievement); then make all blocks into dirt blocks by using the pickaxe (you can charge the pickaxe like other tools, but it’s a bit more difficult to control the area it covers); and only afterwards dig out the foundation. This way all the blocks you’ll pick up will stack nicely.
  3. Build a staircase (preferably 2 blocks wide and 6 or 7 blocks high, depending on the height to roof) with the dirt blocks you’ve dug out, at 2 blocks distance from any side of the excavated site. Try to place it close to a corner.
  4. Now you’re ready for building. Start by laying 1st row of foundation blocks only on the perimeter. Put the exterior door in the appropriate place and continue with the 2nd row of foundation.
  5. Next, lay all the flooring inside. I prefer to work with one type of flooring for all rooms and have no headache.
  6. Place just 1st row of outer wall blocks. Then, place all the windows in the appropriate place.
  7. Now it’s time to finalise the outer walls. Go up the dirt staircase, and start placing blocks, vertically, to the required final height for the outer walls. In my design for a house for NPCs, that means adding another 4 rows. Once you’ve got with the wall close to the staircase, jump on the wall and continue: one step forward, look down, and place 4 blocks; one step forward and 4 more clicks or 2 if you reached a window. And so on for the whole outer wall.
  8. Go back inside and start laying the inner walls/doors according to the design. The inner walls should reach the same height as the outer walls.
  9. Next, place the ceiling blocks by attaching them to the last row of the outer walls. Or you can skip this step if you mean to leave the roof exposed, as I did with the Museum.
  10. Now on to the roof. From the ground level looking up, start placing the regular triangle roof blocks, by attaching them to the last row of outer wall, as follows. Starting from any corner, place (that is, press LMB) the block and rotate it (use mouse wheel) until it’s properly oriented. Go on to the other side of the corner and place a roof block. When you try to complete the corner, the block should automatically be selected with the proper orientation. Continue placing the roof on this side of wall. When you reach the next corner, don’t place the last block. Go to the other side, place first one there and then the corner which will be selected automatically. Continue until you’ve completed the first row of roofing.
    Up the staircase, and pop onto the roof. The next row is made of regular triangle blocks too. Repeat the process, starting from a corner, by placing the blocks on top of the outer walls.
    For the third and all following rows of roofing, you first have to attach some blocks (I prefer full blocks) on the inside perimeter of the existing roof. The third row of regular triangle blocks goes on top of the full blocks. Continue in this fashion for the final height of the roof.
    Close in the roof with full blocks.
And that’s it; you can dismantle the staircase and go furnish the house to your heart’s desire and size of your pockets.

Here are some images detailing the building process:


Building: Let’s not fly blind!_Part 2
Farm House

→ after building the barn and the fishing spot, the first building project I like to venture on is rebuilding my own farm house. That’s mainly because, by midsummer, I’ll be in dire need for a bigger kitchen. Most probably it will take me the best part of summer to completely finish it.

The farm house is a special building project, because I still intend to “live” there, so the building will have to be done in stages.

I start by building the kitchen which, according to my design, falls just outside the existing house. When I’m getting close to the existing structure, I start tearing it apart. Be careful, though, when you knock stuff down with your hammer as things may turn pretty badly pretty quickly… I mentioned before that items fallen on the floor tend to disappear. Well here is the full story. I accidentally knocked a book shelf containing all my veggies. It was very late at night and my inventory was full. I woke up the next day and decided to first take care of all the farm chores. By the time I got back to recover the veggie collection it was gone! That was game over for me. I decided to start another run. With a game that automatically saves the progress but has no load option, small mistakes can have devastating effects. I wish the game would save your daily progress, like Stardew Valley and My Time at Portia.

The kitchen in my farm house only houses cooking stations (no nonsense like fridge, sink etc.) and storage for the ingredients. Similarly, I could do just fine by not having a bathroom. I’ve included it in my design, though I haven’t entered that room ever again after furnishing it.

Some final remarks about storage: I prefer book shelves which can store 4 rows of 6 items each. The shelves that attach to the wall can only store 1 item each. The shop shelves, though white and prettier, only store 3 rows of 6 items each.

And here is the "architectural drawing" for Farm House.


And some interior design.


House for NPCs

→ Having toiled all summer long at my house, while also living in it (have you tried that in real life, because I did… an “unforgettable” experience), next on my list is to build a house the proper way. By now, Maximilian must have given you a post sign, and reminded you several times about it.

I designed a generic house that should cover most of the requirements no matter who the owner is. Some may want a sofa or more lamps on top, but there is plenty of room in the living room for any such additions.

But this is only for a Tier 1 house. I find that the Tier 2 requirements (which can be accessed from the arrow at the bottom of the sign post) are a bit too excessive. Besides, it will most probably require a two-storey building and I have problems constructing a nicely looking staircase. On top of it all, the design has to be very carefully done so that all requirements fall within the boundaries recognised by the post sign… easier said than done.

First the "architectural drawing".


A two-way rendered façade of the same design.


Using different blocks for outer and inner walls creates a mosaic look. It would be probably better to use the same blocks or match them better. (It's one thing to look at what the catalogue has to offer and imagine the final product, and another when everything is built!)


The Victorian bed is 2 blocks high and obturates the window. (You may find that some arhitectural adjustments need to be made after placing down the furniture; like moving windows.)


Museum

→ I like to vary my building projects: build a house, then the Museum, then another house, followed by the Patisserie, and the third and last house.

The museum is the tallest building in my designs, with the most imposing windows. It’s just large enough to house the entire bug and fish collection. I display the dinosaur fossils outside or scatter them around the village.

Being the tallest building, lightening the place may be a challenge. I’ve tried two methods: floor lamps and ceiling lamps, and I think the latter look neater though they don’t give as much light. I wish I had more choices when it comes to ceiling lamps.

Let's start with the "architectural drawing".


Then the façade:


The museum with floor lamps looks a bit too cluttered.


The museum with ceiling lamps only is not as brightly lit.


The Patisserie

→ The most expensive of my designs, due mainly to my choice for furniture, the Patisserie is quite fun to build. I’ve always imagined it as a place where villagers would gather at weekends to taste Emily’s treats, maybe take a seat on the patio if weather permits. Alas, no one else steps inside other than Emily. Then again, there aren’t any weekends in the world of Staxel, so how could they?

The "architectural drawing".


I imagined the shop windows will make the Patisserie look more like a store than a repurposed house, but it only made it look kind of boring. And the dinosaur does nothing to elevate it.


Yet, the patio on the side looks quite inviting, I think.


And now let's get in and have a taste: are you a cake or more of a pie kind of guy?


Building Grand Designs_Part 1
… or, at least, grander.
I have showed you above how to build quickly and efficiently. Yet such ready-made designs do not fulfil too many aesthetic criteria and repeating the same stereotype in all four corners of the village paints a pretty conventional canvas.

Initially, I was just too scared of the building aspect of the game. But once I figured out in what order to proceed and got a bit more familiar with the blocks available, my designs became bolder.

The first lesson I learnt was to build each room individually from A to Z. I still start by choosing the blocks for walls, ceiling and flooring, but the building as such takes place in stages at the building site and not with pen on paper.

I place the sign down to have some idea of the recognisable boundaries, but I always go beyond them… not by too much though. (Keep in mind that all requirements have to fit within the designated area and it makes no sense to crowd everything in the middle and have empty space around it.) When I extend the site, I try to do it unevenly and thus escape the pitfalls of building a mere cubicle.

The best way to start is from a corner. I lay some of the flooring and enough of the walls to create a sizeable room. I lay the furnishings for that room—say it’s the bedroom: bed, wardrobe, night stands, lamps etc. Then I figure out where to place the windows so as to look good from inside the room. This usually involves moving around furniture, rearranging the walls. I also check the overall effect when seen from the outside, which could trigger more rearranging… It’s a lengthy process, but then there is no rush, only pride in doing things the right way.
When I consider myself satisfied I move on to the next section. Along the way, I might come up with new ideas which almost always require revising some of the finished work. But that’s the fun: look at what you’ve built from all perspectives (inside and outside), see how and if it fits together, experiment, search for solutions. It’s a worthy endeavour.

I’ve decided to make a few short videos of my latest, more experimental building projects. You’ll be able to read better the design than if I were to upload a series of pictures.

None of the designs below were worked out beforehand on paper. Upon starting the construction, I had no “big picture” in mind beyond some general idea of what goes where… and, maybe, not even that. I knew for sure that Emily’s house should be pink (you can all agree on that!) and I was totally fixated on the idea of building a fireplace in every house. But other than that, I didn’t have much else. So, I started building, by tackling the bedroom first.
You might notice that all three houses have the bedroom in the right corner of the building. That’s the first thing they have in common. The second is that I prefer an open or semi-open plan, because inner walls just don’t look good, or else I don’t know (yet!) how to make them look good. All other ideas took shape as I was building.

Emily’s house was my first outside-the-box project. It’s not big, definitely not grand. But it was the first project to be built organically, such that both interior design and façade create a unified whole. It may look rather simple, but it involved a lot of taking apart… take my word for it. (The fridge doesn't block any windows, the bed and night stands align just right with the windows... that kind of simplicity.)


Jamie’s house totally took me out of my comfort zone, because I wanted a second floor, which meant figuring out a staircase. And then, at some point, I realised that I loved building towering fireplaces way to much, so I decided to showcase one by opening up the second floor with a gallery. After all, that’s where Jamie spends most of her time playing video games on her three (!) computers, so she deserves a relaxing view. (Why three computers? Because that’s how I managed to make the game recognise I had placed the two computers required by Tier 2.)


Having worked out my first staircase, I grew even bolder. I took a break from house building, and turned my attention to the commercial: Emily’s patisserie. I knew from the very beginning that I wanted an outdoor spiral staircase leading to a terrace. It took me some time to figure out where to start placing the steps so as to land at the proper wall height. It was the most expensive project: furnishing it all up in the Pastel range took a lot of crop-selling and jam-boiling.


Then it was time for Rosemary’s house and I got curious: were the boundaries extending downwards to allow for a basement? Unfortunately, no; but I built one anyway. Mainly because I wanted to showcase again my newly found hobby horse—the spiral staircase. I was very pleased when I came up with the idea of incorporating firefly jars to introduce light in an otherwise very tight and dark area. The checkers and chess mock-up boards are just for fun and having too much space at my disposal. It was the most frustrating project because it just seemed never ending. When I eventually furnished the whole house, it took me even longer to polish the front side of the house. Whenever I look at it, I feel it still needs some work…


In a previous run, I took it upon myself to build the museum on a hill. It was actually a mountain that I had to shave off significantly… almost the entire upper half. The digging took an entire season. Replanting everything, and making it look kind of natural, took yet another season.
It was my first grand design. So grand, in fact, that I had to take the sign indoors to make it register all the required displays. Which is fine, because I pretend it displays the exhibition program for the current season. Still, keep this in mind when you tackle large projects.


I considered the above museum design a success. I liked having the dinosaurs looking down on visitors from the gallery. I’ve decided to make it rather smaller and I incorporated some columns to make it more imposing. It turned out that I actually did need the extra space to fit in all the dinosaur fossils. As it is now, it looks like the T-Rex might dash at any moment out of the door and work havoc upon the village.

Building Grand Designs_Part 2
With the 1.3 version, I've started a brand new world. Not only that I wanted to experience the update in full, but I wanted to experience a new way of building houses. This time around I was less interested in making them big, as much as I wanted them to integrate more with the environment.

You might say I started building for the love of wood. I worked with a variety of wood blocks, though I steered away, as much as possible, from those that cannot be broken with a hammer (like Wood or Forest Wood blocks that need an axe to be removed). My favourite blocks were: wooden beams (both vertical and horizontal), wooden house block, and the various types of textured wood.

I didn't have a plan how the house would look like, but got inspired more from the surroundings.

Eris' home was the first house I built in this brave new world and I took advantage of having a rather big tree nearby. It seemed a neat idea to somehow link it to the house through a deck, which will then spiral down the trunk back to the ground level. The interior of the house was also worked out on different levels with the middle area open. Each "room" stands slightly higher than the previous one. It took a lot of work to get the levels right, but I was pleased with the result. Not that Eris spends too much time inside...


Then it was time for Cecile's house. There was a rather tall hill at the back of my farm house and I thought it would be appropriate for Cecile and her experiments. This is a house I dug dip in the hill, which turned out to be just tall enough for my design. I still had to come with a few touch-ups in the end: I've tried, rather unsuccessfully, to rebuild parts of a big tree I took down while working a corner of the house. I had more success in building a couple of small pine trees on the top of the hill. But almost everything else on the hill was left intact.
I had a pretty good idea of how the interior design would work for Cecile: a dungeon for the bedroom and bathroom en suite; a messy kitchen yet fully stocked on bottles (have you noticed the pans hanging on the wall? ... Cecile's weapon of choice!); a spotless laboratory, with a fridge nonetheless (who knows what she preserves in there?); access to the house through a spooky cemetery. And here is the result:


Farm Fan's house just had to be nearby my farm, next to the fields and barn. I like the rustic feel of it, and especially the veranda which overlooks the crop fields... Well, you could have admired the fields if only I had the heart to cut down the tree in front... I meant to, but then I decided to give Farm Fan some privacy. And, guess what? Farm Fan does spend her entire day inside and once I even found her on the veranda! I wish I made a video on that occasion.


With Cirahna's house there was no way around it: I had to work with wood blocks. This meant ordering big batches, because you lose the block when taking it down if placed in the wrong spot. I started from what appeared to be a big hollow-trunk tree. The inside space was only big enough for a hallway. The most difficult part was to preserve the existing spawning spots on the tree: I had around 4 or 5 that can be seen in the video (2 ladybugs, 1 rhino beetle, and 2 stick bugs).
And then I made my way towards another smaller tree nearby. I even found space for a treasure spot, which seemed appropriate for a witch.


And last of all, Goth Mushroom's house—Cirahna's old friend who never made an appearance. This was meant to be a house shaped as a mushroom. The end result is far from it. I should have worked with wood blocks instead? Or maybe the problem is one of scale and perspective: both the stem (the house proper) and the cap (the roof of the house) should have been much bigger to "read" them as a giant mushroom from the ground level.
Still, I gave it lots of mushrooms: "mushroom trees" I built outside; real mushrooms I "planted" on the ground (those are not real spawning spots of course; I placed shelves on the raised soil tiles which got hidden by the soil tile underneath and so the mushrooms stand on invisible shelves); and plenty of mushrooms lights inside.
I was slightly disappointed with the giant mushroom seed from Cirahna. I reserved plenty of space for it in the middle of the house to make it the focal point... but the mushroom is barely one block high.

Festivals: Are we having fun yet?
In its current state, Staxel has three festivals: the Pumpking Feast from the 5th to 9th of autumn and the Snowdust Fair from the 3rd to 7th of winter. The 1.3 update, added a new spring festival, that lasts from the 9th to the 13th.

Of the original two, I enjoy the Pumpking much more than the Snowdust. The autumn festival has a lot of depth to it: a maze, a handful of recipes, special bug hunting… busy, busy, busy. And Riah with her doppelgänger is such a nice touch. Correction! The fairy festival in spring is my new favourite. Yes, I know, it's all "pretty-in-pink" kind of thing, but it's so much fun and also... educational!

The fairy festival is cleverly placed in spring. Not too early in the season, so as to give you some time to get accustomed to the surroundings and start building up your crops. It doesn't require any preparation for it, and it aims to teach you, in a fun and engaging way, how things work. At least that's my take on it.
The Fairy Festival is a puzzle-solving mini-game. You need to put the fairy house back in order after the mischievous fairies made a mess of it. In doing so, you'll learn a thing or two about building and bug hunting. Plus, the rewards are so... well, cute, like everything else in Staxel. I'm sure many of you will hardly wait afterwards to go redecorate your house. If you want to know what to expect from it, see below:

  • There are a number of rooms (4 on the 1st floor, 4 on the 2nd floor, plus the garden outside to the left of the entrance) that are missing stuff. Make a note of all requirements for a specific room by activating the room sign, then go inside and knock down whatever fey furniture doesn't belong there. (Fey furniture is shaped of leaves and flowers and is easily recognisable in comparison with the other Victorian furniture.) Go to the next room and repeat the procedure. You'll find that the extra furniture pieces were misplaced in other rooms. They usually work in pairs: rooms 101 and 104, for example, have between them all the necessary furniture.
    The only "problematic" room is 108, which is the garden outside. It requires a fey lamp and a fey sofa. The sofa is easy to find: search the immediate surroundings in the garden. The fey lamp can be taken from the town square (the easy and desperate way). Alternatively, if you found enough mischievous fairies, you get to eventually exchange 1 for a fey lamp.

  • Three of the rooms on the 2nd floor are also missing some blocks: more precisely, white and pink stone blocks from the walls and wooden plank flooring from the ceiling. You may go and buy them, but you definitely don't afford the expense so early in the game. Instead, go catch at least 2 mischievous fairies: they're red, not blue! Leave the blue (and well behaved) fairies alone, I mean it! (I didn't follow my own advise, and thought to see what happens. I'm not totally sure, but it may be that if you catch a blue fairy it destroys that spawning spot? Irrespectively, if you hold them in your inventory and talk to the fairy, she'll admonish you and release them.)

    The first exchange will reward you all the stone blocks you'll need (and some extra); the second exchange will give you 300 flooring blocks, enough to fully repair all the ceilings.
  • Once everything is repaired you'll be rewarded with a Flower Watering Can (it doesn't replace existing watering can) and Flower Crown (headwear)... both very pretty!
  • The 3rd exchange will reward you some fey furniture, but with the 4th exchange, if I remember correctly, you'll be able to choose what fey furniture type you want. I was quite lucky with my world which is very rich in spawning spots. I think I got around 18 mischievous fairies; I could open a fey furniture store.
  • Also, keep an eye for any treasure chests hidden in the corners of the rooms. They can be looted for much needed petals. There is also a small room at the very top of the building, that can only be accessed by climbing the roof, and than knocking down a window and two adjacent blocks (replace them when you get back out). Inside, you'll find quite a few treasure chests and piles of gold that can be sold for good cash.

For those who like to keep it a surprise, I blacked out the rewards you can get from the Pumpking Feast:
  • The doppelgänger Riah will whisper something to you about Will o’ The Wisp if you persist long enough. For every 3 of them, she may reward you: creepy tree light, small tombstone, broken tombstone, big tombstone, pumpkin vine. I advise you catch as many as you can for the duration of the festival, and go talk to her for the exchange only in the last day. I think you’ll get more varied rewards this way. Also, don’t forget to keep one Will o’ The Wisp for your Museum collection; they can only be caught during this festival.
  • Riah, the Pumpking’s Emissary, will give you a Pumpkin Carving Station in exchange for 4 pumpkins. I like to make the exchange on the first day, that’s why I planted those pumpkins with magic water at the beginning of autumn. Otherwise, your first pumpkin harvest will be on the last day of the festival, and that’s cutting it close if you forgot to water your crops one day.
  • Place the station somewhere near, and carve a pumpkin into Jack O Lantern, then go talk to her again. She’ll give you in exchange a Pumpkin Hat. So remember to take 5 pumpkins with you on the first day of the festival!
  • The aforementioned emissary Riah will also give you two recipes: Toffee Apple and Candy Corn. You’ll get 1 bottle of Magic Water in exchange for either 3 Toffee Apples or 2 Candy Corn. You can exchange as many items as you wish. I’m not convinced the exchange is good enough to justify spending my festival days in the kitchen, cooking loss-incurring recipes in themselves. Toffee Apple has a net percentage of -11.5%; for Candy Corn it is -19.6%. Compared to buying the Magic Water yourself for 1,000 petals, there is some small profit to be made: 3 Toffee Apples cost you 780 petals to make, and 2 Candy Corn amount to 920 petals. For me, it just isn’t enough. Correction: since you can no longer order Magic Water from the catalogue (after some post-1.3-version update), the festival is the only source for it; so, it's definitely worth it!
  • You can venture in the maize if you’re an adventurous spirit. Alternatively, you can build yourself a staircase on the side of the maze and find your way towards the centre from the top. A Riah doppelgänger will reward you with Pumpking’s vine. Teleport out of the maze back home and then go talk to Riah, the emissary, who will magically change your scythe into a Pumpkin Scythe.
The Snowdust Fair is only a fishing affair, unless I’m missing something. There are a couple of lakes next to the shrine, where you can fish for festival specific fish: snowdust koi and golden snowdust koi. The ratio is quite unforgiving: 1 golden type for every 10-15 regular. I’ve read somewhere that you don’t get to catch another golden snowdust koi if you already have one in your inventory and, given the ratio, I was never tempted to test it out. I exchange it the moment I catch one. It usually takes me 3 days of fishing to catch all the golden types I need: one of each type will also go to the museum collection.

Here are the rewards:
  • You can exchange 3 snowdust koi for either a Red Lantern or a Yellow Lantern.
  • You’ll need 4 golden snowdust koi to claim all possible rewards, one for each: Kabuto Helmet, Takoyaki Recipe, Small Shrine, and Taiko Hammer (it doesn’t replace the hammer in your inventory).
Achievements: Keep half an eye on the prize!
Below is a list of all achievements that give rewards redeemable from Farm Fan. (There are a few other achievements that don’t reward you anything.)

I find the rewards mechanics to be a nice addition to the game, another side-goal to follow. The problem is that very few can be worked out into a working strategy. To put it differently, some can be achieved so late in the game that the reward for them becomes almost meaningless.

To place my first apiary on the 2nd of spring felt like Santa came to town. Or, in other words, it was an in-game feedback that I was on the right track. The same with getting my free milker and sheep-shears, or the free berry bush seeds: I just had to follow the crumbs to find the path I was supposed to walk.
Yet, by the time I managed to gather 100 mushrooms, I already have plenty of ripe pears in storage. As for the hat collection… well, I think I prefer the wind in my hair.

I think some of the rewards should be reworked relative to the stage in the game at which they become achievable. But this will depend to a large extent on the direction the game will take from here.

Here is a list in no particular order; I highlighted the rewards I found to work for my game strategy:

Find 10 mixed seeds
→ 10 Sugar Beet seeds
Find 100 mixed seeds
→ Grass Skirt
Plant 10 Seeds
→ 10 Onion seeds
Plant 50 Seeds
→ 20 Beetroot seeds
Plant 100 seeds
→ 5 Blackberry Bush seeds
Plant 500 seeds
→ 1 Banana Tree seed; Straw Farmer Hat
Plant 1,000 seeds
→ Dragon Fruit Tree seed; Kiwi Tree seed; Tangerine Tree seed; Golden Farmer Statue
Gather 100 mushrooms
→ Pear Tree seed; Mushroom Hat
Reap 10 seeds in the Seed Maker
→ 3 Watermelon seeds
Reap a gold seed
→ 5 White Rose seed
→ The white rose is a unique item; it cannot be bought from the catalogue.
Make sure you plant them in the right spot for aesthetic purposes.
They don’t require watering.
Gather 100 shells
→ Coconut Tree seed; Beach Sandals
Place 100 blocks
→ Cherry Tree seed; 2 Ranch Window; 1 Basic Door Frame
Place 1,000 blocks
→ Construction Hat
Catch 10 fish
→ 3 Oat seeds
Catch 100 fish
→ Lime Tree seed; Fishing Hat
Catch 100 bugs
→ Peach Tree seed; Bee Hat
Catch 1 Queen Bee
→ 1 Apiary
Harvest honey
→ 3 Sweet Potato seeds
Chop 1,000 raw wood
→ Lumber Jack Shirt
Mine 100 raw stone
→ Mining Lantern
Mine 1,000 raw stone
→ Mining Helmet
Place a cow crate
→ Milker
Place a sheep crate
→ Sheep-shears
Milk a cow 100 times
→ Lemon Tree seed; Milkman Hat
Sheer a sheep 100 times
→ Mango Tree seed; Wool Jumper
Pick up 1 egg
→ 3 Eggplant seeds
Pick up 100 eggs
→ Egg Hat
Place a pig crate
→ 3 Cabbage seeds
Order 100 items from the Catalogue
→ Mango Tree seed
Cook 100 items
→ Cocoa Tree seed; Chef Hat
Cook a preserve
→ 3 Raspberry Bush seeds
Bake a cake
→ 3 Cucumber seeds
Bake a pie
→ 5 Blueberry Bush seeds
Cook some soup
→ 3 Pumpkin seeds
Fossils: Puzzling over the puzzle, mya?
For so many games, a Museum serves one main purpose: it’s an incentive for the player to imbed himself/herself in some aspects of the game that otherwise would be ignored or forgotten. So you go out there, with either your hoe in Stardew Valley, or pickaxe in Staxel and My Time at Portia, and dig out artefacts or fossils or relics. Then you donate them to the museum and you might get more or less useful rewards in exchange. The (sometimes) doubtful usefulness of the rewards tells you that the journey matters more than the destination.

It just so happens that reaching such a philosophical stance is not in and of itself too big a reward to justify the tedious journey towards it. Players who embark on the journey do it for more mundane reasons: they’re not explorers (of the world or the mind) but completionists.

Some players won’t even bother to donate to the Museum Collection in Stardew Valley beyond the free cauliflower or starfruit seeds. The incentive needs to be stronger, to be somehow integrated into the storyline. Stardew Valley’s answer was to introduce the Rusty Key that reveals Krobus, who lives in the sewers, which is a whole new area to explore etc. etc. In My Time at Portia, mining for relics is even more seamlessly weaved into the fabric of the story: after all, it is a story about a world whose future depends on deriving the right lessons from its past. Some relics are mere decorations, but others are also useful tools.

In its current state, Staxel doesn’t have a story to tell about its fossils. They remain a puzzle to be solved later, much like the village itself and its inhabitants. Here is a world populated by a combination of elves, humans or cat persons! A world where people have a genuine appreciation for bugs and pay good money for their capture. A world where you can scatter dinosaur fossils around and everyone finds it normal, as if they’ve always woken up next to a T-Rex in their backyard. They all look so cute and quirky and a bit strange and kind of silly, and we love it. The question is whether it warrants to be eccentric in a world that is already eccentric to the bone. Do Caiths always end sentences with mya?

I’ll leave it to you to answer that question. For those who are more of a completionist, the following is a list of all the polished fossils. Some can be assembled into two- or three-piece sets, others come as individual pieces. If you gathered anywhere between 100 to 150 fossils, you should be able to retrieve all of them, probably twice over.

Dinosaur Sets:
  1. Mammoth: upper + lower
  2. Mosasaurus: upper + lower
  3. Parasaur: upper + lower
  4. Plesiosaur: head + body + tail
  5. Ptera: body + left wing + right wing
  6. Stegosaurus: upper + lower
  7. T-Rex: head + body + tail
  8. Triceratops: upper + lower
  9. Velociraptor: body + tail
Other Polished Fossils:
  1. The Predator
  2. Ammonite
  3. Mysterious Footprint
  4. Ancient Trinket
  5. Fossilised Amber
  6. Unknown Egg
Friendship: L’amour toujours or tous les jours?
The latter, is the answer! Gifting will become part of your daily routine. It takes so long to get friends in this village. Come to think of it, it takes forever in any village, whether Stardew Valley, Portia or… real life villages and towns.
At least in Stardew and Portia you can count how many friendship hearts, or get feedback on the value of gifts. We need a similar in-game feedback here that something is actually happening. I mean… what is that dot? Is that really a red dot at the bottom of the heart? Is it a graphical glitch? Oh, no, that does measure my progress in getting people to love me! And then it suddenly jumps to a half-red heart…

These were some of my ruminations when I started a new world in honour of the 1.3 update. I had been giving people daily gifts for almost a week and nothing seemed to make them warm up to me.

And then, what to gift? Any clues? Hey, Eris, do you like bugs, maybe the fancy ones like star jelly or queen bees? No? Oh, okay. Ah, Farm Fan, I know exactly what you like: how about this delicious Mug O’ Sap? Still no? Hmm… One last try: Riah, you must like fish, right? You do? Oh, I could kiss you right now…

That sums it up. So, I decided upon a universal gift, which wouldn’t be too expensive, nor too cheap, and which I had plenty of. Remember my jam factory? Well, I took a break from it, but I still had two stacks of 999 strawberries. So, I advertise my strawberries to everyone around… let’s bring Wimbledon to Staxel!

Of course, a quicker way to make friends is to fulfil daily requests. But this is not necessarily easier. In my run, there were almost no voxelboys, socks or phones lost on my farm grounds—the easiest place to find them. And other than Jamie who, all in all, asked for 4 or 5 computers (is he opening an internet café?), no one else had any grievances.

Later on, someone pointed to me that I can take a peek in certain game files and find favourite gifts for various NPCs. Not all NPCs have a favourite gift, though. For those who don’t, I keep gifting them strawberries and it… kinda seems to work.
I've also discovered some other game files that list gifts according to personalities, so I've updated the gifts with my new findings. Yet there is no definitive in-game feedback to see if these gifts really work, so I put them with a question mark.

I compiled a table with all NPCs I have encountered so far in my game and specified, where applicable, their favourite gifts. It looks like gifts translate into a number of friendship points and that there are at least three stages in friendship: acquaintance, friends, and best friends. Yet, I have no idea how many points each status require.
I’ve also specified what quests they’re involved in. Of course, if and when I meet more people, I’ll update this table. The same goes for triggering new quests.

Villager
Favourite/Liked Gifts
Quests
Aliza
(female)
brick (3); ?cake carrot (3)
Building 101
Friendly Competition
Sustainable Building
It's Just Business
Boisterous Tourist
Cecile
(female)
?cake carrot (3)
It’s a Lab!
It's a Pinch!
It's a Monster!
Cecile Monster
candy corn (4.5)
Cirahna
(female)
?sweet (5)
Maybe Sorbet?
Bring in a Fungi
Forest Witch
The Hundred Farmer
Emilia
(female)
banana (4.5)
Sweet Dreams
The Apprentice
The Royal Wedding
Princess Bride
Eris
(female?)
?banana (4.5); ?chocolate cake (3)
An Ancient Evil?
Farm Fan
(female)
?
Starting Out
Building Dream Homes
It’s Not Junk
Surprise!
The Master
Forest Bunny
carrot (5)
Jamie
(male?)
?computer (4.5); ?toy (3.5); ?chocolate cake (3)
Leif
(male)
?construction (3.5)
Maximilian
(male)
treasure (5); ?office chair (4.5); marble (3);
?cake carrot (3); gold (2); clock (2)
Fixing Up the Barn
Funding Round
Bountiful Harvest
It's Called Art
Oscar
(male)
?cake carrot (3)
All Cleaned Up
Junk Artist
Fight the Power
Junk Queen
Prince
(male)
?
Princess
(female)
?
Quiet Tourist
Rainbow Butterfly
Riah
(female)
fish (5)
Let Them Eat Fish
Hooked
Three Green Bottles
Lost
The Call of M'yah
Rosemary
(female)
toy (3.5); carrot cake (3); fish (-1)
Pet Store
Pet Rescue
Pet Problems
Best Friend
Rowan
(male)
potato (4.5); bread (3); apple pie (3); pot (3)
Rowan’s Parcel
Nectar of the Gods
Elixir of Life
Food for the Soul
Smart Tourist
Stray Cat
fish (4); pet food (4); ball (2)
Trash Fairy
Vorlen
(male)
painting (5); fossil (2)
Dawn at the Museum
Collector
Lepidopterist
Rainbow Butterfly
Quests_Part 1
The following is a list of all the quests I have encountered up until now in my run. There are still quests that I haven’t yet triggered but, as I do so, I’ll be updating my guide.

The quests predating the 1.3 update are main quests that trigger automatically, independent of the friendship points (or lack thereof) you have with the villager who requests them.
Then, there are a series of side quests that get triggered once you’ve reached enough friendship points with that villager (see also the Friendship section above). Not all villagers have side quests, at least thus far in the development of the game. But those who do will reveal some aspects of their personalities and make your overall experience of the world of Staxel more vivid and enjoyable.

Before going on, I have to confess something that annoys me a little about the quests; actually, about any prolonged conversation in the game. And most quests, as you’ll see, have long dialogues. Time doesn’t stop while conversing with people! Why, oh, why? How many times has it happened, at least in the beginning, to pass out just as Aliza was so intensely explaining, in her funny accent, how to build a barn? It was downright embarrassing, devs! Given her first impression of me, no wonder she took me for a window-shopper later on.
You’ll learn, pretty quickly, to just click away as fast as you can through the conversations and then take your time and read them, as they were meant to, in your Journal (press ‘J’ to access). But this takes away something from the game experience. I do hope developers will address this issue in the future.

To come back… I took the time to transcribe the dialogue for each quest in full, because I think it puts the quests into perspective and it gives full scope to the character of each villager. Read in a hurry during game time, you often miss telling details and focus only on completing the mission. As I was transcribing, I was surprised to notice how many details I overlooked: Rosemary’s timid stammer, Riah’s polite yet friendly mannerisms, Farm Fan’s sassy character etc.
Wherever I had some tips about completing the quest, I’ve also added my own comments, though I blacked out possible spoilers.

I. Main quests:

There are about 10 quests that I consider to be connected with the main storyline; all of them predate the 1.3 update. There is first the tutorial, then the barn and fishing spot requests, which introduce the player to the first and easiest building projects. Then building becomes more complicated with the patisserie and museum projects.
And, lastly, there are three new villagers who are eager to join the village; they may differ depending on whom you started with in the first place. In my latest run, the missing villagers were Eris, Cecile, and Rosemary, in this order. The requests for building their homes will not come all at once, but one after the other is finished. (For this very reason, you might end up building the Patisserie quite late in the game if you haven’t started with Emilia, especially if she is the last to join the village.)

1. Starting Out — Farm Fan


→ This is the tutorial that I spoke about in the beginning of my guide. It is meant to not only introduce you to farming (which is the main source of income) and equip you with the proper tools for it, but also tell you a few things about building. You learn that different blocks can be rotated before placed, broken with a hammer and replaced in a more convenient place.
→ The tutorial doesn’t mention anything about bug-hunting and what a lifesaver the bug net is in the early game. This has been probably the best kept secret for a while in playing Staxel. How to initially finance farming? A lot of players jumped straight into barn-building just to discover that the profit margin was rather small after subtracting the initial investment in trough/chicken food… Still, bugs are everywhere and sooner rather than later everyone would be intrigued and try to catch one. Eris, if in town initially, will also tell you to do so.

2. Rowan’s Parcel — Rowan


→ This quest takes place during the tutorial above. It is meant, I believe, to give you time to familiarise yourself with the centre of the village and shops’ stock, at least Leif’s supermarket, as it requires to go back and forth. Time is still paused at this time.
→ It will also bring in an important piece of information that is usually ignored by players: go to sleep in your bed, rather than pass out. If you don’t, you’ll lose a good part of the morning and time is crucial if you want to get things done in a timelier manner.
→ And, last but not least, this quest tells you, indirectly, about socialising and that he, Rowan, might hear rumours about the life in the village. This means that in a particular day, there may be some errands you can run for villagers (just as you ran an errand for Rowan) and they will increase your friendship with them. Such little quests (lost items, but not only) have to be completed the same day! If purchasable items are requested that you can’t find at Leif, then you can order them from the catalogue (if you have one) and expedite the shipment so that you complete the quest the same day.

3. Fixing Up the Barn — Maximilian


→ Your first building project: yet, don’t just plunge ahead! Read my suggestions in Farming_Part 6; it may save you a nose-dive.

4. Building 101 — Aliza


→ The name of the quest says it all: it really teaches you everything you need to know about building. You put the sign down and orient it the way you like it, checking how the “glowy bits” (the recognisable limits of the building sign) are aligned. Then you start building it block by block—walls, doors, roof and all—checking the sign if all the requirements are met. You may craft the blocks yourself by purchasing recipes and using various crafting stations, or you may purchase them from shops (or the catalogue). Learnt recipes are listed under the blueprints tabs of your inventory (the last two: one for cooking recipes, and one for crafting recipes). Clicking the circle in front of a recipe pins it in the game window.
You may build beyond the glowy bits, but all requirements must fall within the sign’s limits.
→ Of course, this crash course about building will not teach you how to build (a barn or a house) that you’ll be proud of. Or how to deal with the roof. Or what blocks you should use; which blocks combine well together etc. Or how to introduce as much light as you can, a very important aspect of proper building. All this will come with experience, many trials and errors, guaranteed frustration and, occasionally, some pride! Just keep at it…
→ Another, though indirect, lesson you might draw from this quest is this: manage your inventory! I’ve seen so many players complaining they’ve never got the blueprint for troughs or baitbox etc. That’s because their inventory was full when triggering the quest and all the recipes went down on the floor. When this happens, go and empty your inventory (sell items or place them in storage on the Book Shelf) and come back quickly to retrieve them. Yes, be quick about it, because items fallen on the ground will disappear after a time (I don’t think they’ll ‘survive’ a whole day, though I cannot be more precise).
Quests_Part 2
5. Let Them Eat Fish — Riah


→ This would have probably been the first thing you built, and quite early in the game, if it were not for two reasons. Firstly, it requires you to purchase two stations (carving and combining, 1,000 petals each), which are not supplied in Aliza’s shop. That’s a tough choice when you could plant so many crops with 2,000 petals. Secondly, there is no comparison, when it comes to profitability, between fishing and bug-hunting. Fishing takes tooo long, and there is also so much one-petal-worth trash you clog your inventory with. (Fishing should also be revisited by the devs; the animation, both before and after catching the fish, is way too long!) So, Riah might cry a bit before she’ll be able to fish, but she’ll survive.
→ Speaking of Riah: don’t build your fishing spot on the ocean! Riah will go fishing for most of the time (except on some festival days). So any future interaction with Riah (and there will be some!) will require long trips to the beach. Instead, build it on a lake next to your farm (where you don’t plan to build anything else) and have her come to you, smart right?
→ And one more thing: don’t build anything very near or on the same tile where you have a spawning spot for bugs. This applies to all building projects! When you decide on a building site, do it when you haven’t yet gathered resources from there. Move the sign or make adjustments to the plan, but try to preserve as many spawning spots as you can. You won’t do much bug hunting later on, but there will still be need for some bugs, especially the festival-triggered type. Besides, the world is so beautiful with flapping butterflies in the air and chirping crickets on the ground!

6. Sweet Dreams — Emilia


→ If you’re into building grand designs, the Patisserie is the most forgiving building of all. The requirements for it make sense to be all amassed together on one side (counters, shop register, a few stations, a table and chairs), leaving you the freedom to extend as much as you fancy on all other sides. You want to put all desert recipes on individual displays? You can do so outside the glowy bits. You want to make it look ‘real,’ with ample seating space, maybe a terrace, a toilet too? Nothing will stop you.

7. Dawn at the Museum — Vorlen


→ This quest is triggered when you pick up a mysterious butterfly (which will happen sometimes in the summer season) and you place it on the ground.
→ Now, the museum requires it to be grand, especially if you plan to bring in all the fossils. Hence, the difficulty in settling on a working design: it requires that some bug, fish, and fossil displays fall into the covered area, besides clocks and paintings. This might be difficult if you want to separate bugs from fish from fossils. Then again, who doesn’t like a challenge!

The following are three requests for home building. As the villagers moving in vary, so do their desires for furnishings. What’s more is that you can only find the extras required for Tier 2 after you have completed Tier 1. Still, with all their differences, they have quite a lot in common: bedroom, kitchen, bathroom and, I’d suggest, some other room that could accommodate unforeseen requests. I usually furnish each home in excess of the requirements; mainly because I’ve came upon a common-denominator scheme that suits all. (Sometimes I need to replace the wardrobe with a credenza or vanity, or add an extra sofa which can be easily done. For inspiration, see my Building sections.)

8. A New Challenger — Maximilian


9. Professor Cecile — Cecile


10. By Any Other Name — Rosemary


II. Side quests

The following quests require to have reached a certain level in friendship in order to unlock them. (See my Friendship section above for hints on gifting.)

I have grouped the quests around the villager requesting them, rather than the order they were registered in my journal. The order you’ll unlock them will depend on whom you socialise with first and often. As you advance in the socialising tree, from acquaintance to friends to best friends, new quests will be triggered.

All Cleaned Up — Oscar


→ The map should show all the markings: one set of markings looks like a black garbage sack, the other looks like bluish broken bottles. But if you have problems completing the quest, start looking everywhere around the village; don’t need to venture much into the wilderness.

Junk Artist — Oscar


→ Trash may be hidden in buildings too; check the map and you shouldn’t have any problems with the first part of the quest.
→ The second part requires you to distribute some brooms; you should be able to give them through the dialogue. If you have another quest already started with one of the targeted NPCs and you cannot make them enter the dialogue for this quest, you might need to finish first that other quest before finishing this one.

Fight the Power — Oscar


→ You should have no challenges with this quest.

Junk Queen — Oscar
→ I’ll start right off the bat by saying that this is the one quest that I was unable to complete. I have transcribed below the incomplete journal entry for this quest:


→ So something got messed up with this quest and I’m unable to finish it. Corroborating all the resources I could find on the subject, the quest should have unfolded along these lines: Oscar complains about someone, most probably Maximilian, vandalising his signboard and sends you to clean up the mess.
At that point lots of garbage sacks will appear on the map. As you sweep them with your broom, you’ll find a fairy dust. (This was my first mistake: I haven’t realised I got that item from this quest, having other five or so quests in progress.)
Supposedly, talking to Oscar again should trigger a new dialogue where he sends you to Cirahna to investigate the fairy dust. (This never got triggered for me. Oscar kept saying to go clean up the mess which totally confused me since there were no more garbage sacks to be found anywhere.) But, maybe the dialogue will only be triggered after not only removing the trash but also taking down the vandalised signs, all 10 of them? (I got to do this part only after I accidentally talked to Cirahna which resulted in me losing the fairy dust. Again, this is just a presupposition since there is no way to test it without starting another world.)
In case I’m right, having cleaned up both trash and signboards, you go to Cirahna who reveals the Trash Fairy on the map. And then I’m not too sure but the Trash Fairy might give you a letter for Oscar which, in turn… (I’ve been talking to the Trash Fairy so many times and all I get from her is the same line wondering if she should see him again herself, where ‘he’ is Oscar, I presume? I’m almost friends with the Trash Fairy by now, since I gift her on each occasion.)
→ I have reported my problems with this quest on Steam, but got no response so far. If you have any ideas I’d appreciate your comments.
Quests_Part 3
Hooked — Riah


→ Go fishing in the ocean until you catch a message in a bottle. It might take a while or you might strike lucky and fish it quickly. (Remember to keep the fish either for recipes or as gifts for Riah. You can see what fish are used in various recipes by checking the online spreadsheet.)

Three Green Bottles — Riah


→ Again, go fishing in the lake, ocean and the blue mushroom area of the mines. You should have discovered the mine by now, but if you didn’t, start looking around the farm (the map could help you locate the big hole in the ground.) When you go to the mine, you might consider taking some lights or else grab a torch from the upper levels of the mine.

Lost — Riah


→ Just when you thought you were done fishing for Riah, this quest might send you back to the ocean, unless you have in storage the necessary fish for crafting the lure (black bass, blowfish, eel, and octopus). Otherwise, the quest is pretty straightforward.

The Call of M’yah — Riah


→ Just a warning: this fish is a bit difficult to catch, close to Golden Snowdust Koi. You might need more than one attempt.

Collector — Vorlen


→ First off, and this applies to other requests of the same type: you don’t really need to expand the museum, in the sense of knocking down walls to enlarge the building. All you need is to check the requirements for Tier 2 by clicking on the signpost and then clicking on the little arrow at the bottom of the window. If you can find place for the required items within the “glowy bits,” you’re all set.
→ Just out of curiosity: have you too wondered how the painting arrived on Vorlen’s doorstep, when he has no place to call home?

Lepidopterist — Vorlen


→ I’m not sure what’s the purpose of this quest… but it’s an easy one, so I don’t complain.

Rainbow Butterfly — Vorlen


→ Nothing out of the ordinary about this quest… One observation, though. Talking to Cirahna after receiving the rainbow flower seed and before handing it to Vorlen will prompt Cirahna to keep giving you those seeds again. The rainbow flower will make for a nice decoration around your farm, if you don’t harvest it. So you might take advantage; I don’t know if it’s a bug that will be fixed by the devs at some point.

Funding Round — Maximilian


→ A straightforward quest.

Bountiful Harvest — Maximilian


→ This quest threw me off a bit. Nothing seemed to be happening at the small festival area, but then it so happened that I accidentally spoke to Farm Fan and I got the whole thing to advance.
→ I didn’t experiment too much exchanging crops for gifts; I looked in my storage and chose the most expensive I happened to have (golden coffee and eggplant, and a normal watermelon and pumpkin). I don’t know if the festival will repeat in the future, but if it does, I’ll try to be better prepared with more golden crops.
→ I don’t know if the giant turnip seed is received automatically or some other factors are involved (like the type and/or number of crop exchanges). But once I did get it, I was sure not to wait five days to have it grow; instead, I ordered and expedited a bottle of Magic Water and concluded the quest that same day.

It’s Called Art — Maximilian


→ A straightforward quest.

Nectar of the Gods — Rowan


→ I didn’t order honey from the catalogue, but gave Rowan one of my own production. Don’t know if he would be able to spot the difference.
→ I was glad my recipe collection got bigger… but then again, why do I need to craft Mug O’ Sap? Judging by her reaction, Farm Fan doesn’t seem to be much impressed with the gift.
→ Don’t know if it’s a bug, but “ordering” secret ingredient from Rowan costs zero petals. If it’s so secret why does he give it for free?

Elixir of Life — Rowan


→ I was really hoping for a recipe for coffee. But it looks like Rowan will be the only owner of a coffee brewer in the village. Anyway, ‘A Cup of Joe’ (that is, a cup of coffee) can be purchased from Rowan from now on for 230 petals (the same price as in the catalogue).

Food for the Soul — Rowan


→ First off, expansion means meeting all the requirements for Tier 3 Tavern. Check the tavern signpost outside. I didn’t actually enlarge the tavern; instead, I’ve made a staircase and an opening into the loft from the first floor. After a bit of “dusting-off” and rearranging all the barrels/crates, chairs and tables there, I had enough room to fit the rest of the requirements. Then I placed the tavern menu on the wall behind Rowan’s counter and, presto!, kitchen on second floor, serving tables on ground and first floors… Things worked out well!
→ But things didn’t worked out as well with the deliveries. Besides, Leif and Farm Fan (though their dialogue is not registered in my journal and I don’t know why) seemed almost convinced to work part-time… Anyway, so I had the first order and it took me so long to find the right person! There are two things you need to know if you have problems: “Almost Raw Fish” is for Riah! Ok, it makes sense… Riah bragging all the time about fishing! But then, you need to gift the order, rather than expect her to take it through a new dialogue. And the second order, “Ultra-Strong Coffee,” is for Aliza.

Friendly Competition — Aliza


→ This is an embarrassing confession: it took me about a whole season to figure out this quest. I thought I did all that was required but I couldn’t get Aliza to acknowledge it. I even went on Stream and reported “the problem.” Yet no one answered. Which, in hindsight, was a good thing. My problem was that I wasn’t aware that there is a Tier 3 for the store. So, click twice on the little arrow at the bottom of the signpost window, and you’ll see exactly the requirements.
→ Whenever I read the dialogue in Staxel it seems to me there are little ironies and double entendre everywhere. So, when I finally figured it all out a season later, Aliza’s reply really made me laugh: “I jus’ gotta blink and suddenly the work’s all done.” You've gotta love Staxel

Sustainable Building — Aliza


→ A straightforward quest.

It’s Just Business — Aliza


→ No problems here; just make sure to check you’ve met all requirements for both the Airship Dock and the Communications Tower.
Quests_Part 4
Building Dream Homes — Farm Fan


→ Nothing surprising here; just build yet another house!

It’s Not Junk — Farm Fan


→There are four parts to this quest. With the first part comes the first puzzle: what is a fossilised slime? I looked for it everywhere (in-game and online researching for it)… to no avail. Then I just decided to follow a line of reasoning, and it turns out that what she wanted was The Predator fossil. You should be able to find the paw shell by foraging the beach.
→ The second part requires you to pick up more fossils from the ground until you find the Tractor Fossil.
→ The third part sends you fishing in the lake until you hook Lost Fishing Tools.
→ The fourth and last part is another puzzle. Who has accumulated ten million? I am in year 3 (or is it 4?) and have a bit more over one million: right, I took a break from jam making in this run with so much building and gifting to be done. But still… seven zeroes? Of course, you’re not supposed to come up with the goods… so don’t just go sell everything you ever owned!

Surprise! — Farm Fan


→ Everything should go smoothly with this quest. It helps to have a clean inventory before receiving all the gifts. Your gift for Farm Fan should be Legendary Farmers book.

The Master — Farm Fan


→ This is such a nice and well crafted quest! It’s like the artists’ hidden signature in a corner of their masterpiece… or the opening credits, but not out in the open, rather at the end of a long story beginning and ending with Farm Fan. Of course you all know what I mean by this, don’t you?!
→ Yet, if you do have trouble locating all bobbleheads, there is a very useful guide on Steam that you should check out: “Staxel Bobblehead Easter Egg Guide.” It gives precise information of everything you need to do in order to get them. The only missing bobblehead—Lambda Bobblehead—has its location revealed in the comments section; or you can find it here: on the lower branch of the tree outside the Town Hall.

The Apprentice — Emilia


→ So, craft the stations, place them somewhere where they’re registered by the signpost and you’re done. Then, craft the cake according to instructions; just be aware that it requires a whole (not chopped!) lemon.

The Royal Wedding — Emilia


→ Everything went fine and dandy with this quest except for the fact that I had to wear a huge patissier hat that made it almost impossible (mind you, I play third person!) to deal with shelves. I couldn’t see anything.
→ Unrelated, but… What did Emilia mean by not wanting to be recognised? Aha, the plot thickens!

Princess Bride — Emilia


→ A straightforward quest. When the quest is done, the Prince and Princess will leave the village.
→ And now we know what the mystery and disguise was all about! We have royal blood in the village. That will surely drive the real-estate market up.

Pet Store — Rosemary


→ What, more building? Oh, well, the things you do to get a new pet.

Pet Rescue — Rosemary


→ Guess what?! Rosemary’s still thinking and I’m still waiting for my rabbit. Maybe, in the next quest that I haven’t yet unlocked? But let’s get back to this quest. No hope to catch the cat first time around; you need to talk again to Rosemary. Only then you can give it gifts and befriend it: two gifts of pet food, made it quickly climb in my backpack.

Pet Problems — Rosemary


→ What? Still no bunny of my own?! I cannot even gift Poopsy a carrot or pet food! Oh, well, at least I get to watch Rosemary walking through town with a hopping rabbit on her tail.

Best Friend — Rosemary


→ A simple final quest for Rosemary. If you find that it wasn’t as involved as other final quests, you’ll feel more than rewarded watching Rosemary walking through the village with not one but two hopping bunnies trailing after her. Oh, the cuteness is real!
→ After this quest, you can have a rabbit as a pet. The rabbit will eat Pet Food like any other pet.

It’s a Lab! — Cecile


→ I’m totally with Max on this: give Cecile her own scientific lab? It cannot end well. Good that I happened to build her home just behind my farm and have Cecile at all times under my nose. Wait… maybe it wasn’t such a good idea after all. What if she burns down her lab and my farm along with it?
→ I also happened to have built her house with a lab from the very beginning, without suspecting she’ll later ask for one. But again, you don’t actually need to expand the building as such. Just place the machines and check that you’ve met all requirements under Tier 3. (Yes, Tier 3! I’ve explained more in my comments to Aliza’s quest “Friendly Competition.” Actually, it was while completing this quest that it suddenly hit me how to complete that other quest.)

It’s a Pinch! — Cecile


→ A straightforward quest. One observation: the journal includes one last line from Maximilian which has more to do with Cecile’s next and last quest, rather than this one. I’ve moved it there.

It’s a Monster! — Cecile


→ So going back and forth between Cecile, merchants, Leif and Max should see you through with the quest. Just don’t forget to take Candy Corn with you before tackling the monster.
Quests_Part 5
An Ancient Evil? — Eris


→ The quest is triggered relatively early in the game; to be precise, right after the completion of the museum. I’ve placed it here because, though it is Eris’ quest, it’s more about Cirahna. And I am yet to trigger any of Cirahna’s new quests. I haven’t gifted her enough because she’s almost never around in town.

Maybe sorbet? — Cirahna


→ This quest shouldn’t give anyone a headache. There is no mystery who the father really is: Vorlen, of course.

Bring in a Fungi — Cirahna


→ Yet, another house to build. But! This house is special in that it requires being away from the village. Go some distance away from the village, place the sign and check if it’s far enough. If it isn’t, continue looking for a suitable spot. (Building this project will take longer because you need to travel a long distance; make sure you always go to the construction site with enough building materials for a day. It is a good idea to take with you a book shelf to store all required building materials on site.)
→ If you kept in storage all the mushrooms you found so far, you should have no problem crafting the required furniture yourself. Alternatively, you can buy it from the catalogue though it is quite expensive. And, of course, you should have a clean inventory upon receiving from Cirahna 6 recipes for furniture.
→ The seed for giant mushroom grows in all seasons. If you have Magic Water to spare, you can finish the second part of the quest the same day. (Too bad that Magic Water can no longer be purchased from the catalogue; instead, you can only obtain it during the Pumpking Festival in exchange of either 2 Candy Corn or 3 Toffee Apple.) The Giant Mushroom is not so “giant” after all; it will be rather hard to make it the main attraction point in the newly built house (it occupies just 1 block).
→ And, finally, guess what? No one shows to live in it after all this trouble. Or no one put an appearance in my run, after one year or so. Grrr!

Forest Witch — Cirahna


→ Just a “small hut,” right? And in a tree, which is not close to the village… How difficult can it be? A lot and then some… So, the requirements are more for a normal house than a hut. I was lucky to find a big tree (with a hollow trunk) south of the farm in the meadows, far from the village but not too far away from my farm. Of course, the hollow space in the trunk was big enough for a small hallway. I had to extend it significantly using wood blocks (which are a pain to work with, since you get only raw wood back when breaking it with an axe). At the same time, it was a lot of fun to build it… at least for me! And then Cirahna doesn’t spend time in her new tree house… what a shame!

The Hundred Farmer — Cirahna


→ A quest in two parts. Firstly, check the requirements for Tier 2 in her newly built house. You can either craft the new recipes or buy the items from the catalogue. Still, Cirahna just won’t go live in her house!
→ Secondly, read carefully the instructions for the wand. After crafting the Petal Wand Core you need to further combine it with the star jelly, any butterfly, and the lumber in order to obtain the Magicless Wand. Then you take the latter and present yourself to Cirahna for the reward. What to do with the reward? I only know what I would have like the wand to do for me: turn crops into the golden variety, or at least act as magic water… but no, it does nothing of the kind of course. So, I dumped it on a shelf. Grrr, again!
57 kommentarer
Firemixer 7. dec. 2024 kl. 13:25 
what software did you use to make the shematic blueprints for all your builds shown in this guide?
Yak of All Trades 27. juni 2022 kl. 19:42 
Are you supposed to be able to craft the Display cases for the museum? I'm trying to build mine and right now it's looking like I'll have to rotate the shop until the Large Fish and Small Bug display come in...
Saundra 22. maj 2022 kl. 13:30 
Love.This.Guide. (wish I could copy and print maps tho, (more for reference than straight up copy)) Thanks so much!
GraiXS 15. mar. 2020 kl. 4:12 
@JMeJ This guide is a few versions old, seed making used to be a lot less profitable as the ration was usually 1:1.
JMeJ 13. mar. 2020 kl. 20:10 
This is great. However, I disagree whole heartedly with your statement 'Seed-making is crop-wasting' I turn in around 3 to 5 crops, I always get back at least 2 or 3 per and usually 5 back for 1 pumpkin, and always get at least 1 golden seed for each. The selling price for each is WELL worth it. Also, you get back 2 to 5 more regular seeds per crop and with the gold variant it is undeniable, seriously though... see list:
JMeJ 13. mar. 2020 kl. 20:08 
Gold beet sells for 1520 vs 180
Gold onion sells for 1080 vs 81
Gold carrot sells for 450 vs 90
Gold cabbage sells for 900 vs 210
Gold coffee bean sells for 1810 vs 170 (repetitive price)
Gold corn sells for 830 vs 82
Gold cucumber sells for 1175 vs 130
Gold eggplant sells for 1810 vs 170 (repetitive price)
Gold lettuce sells for 2620 vs 280
Gold oats sells for 1940 vs 210
Gold onion sells for 1080 vs 81
Gold potato sells for 2550 vs 140
Gold pumpkin sells for 1150 vs 600
Gold onion sells for 1080 vs 81
Gold strawberry sells for 387 vs 260 (repetitive price)
Gold sugar beet sells for 1360 vs 140
Gold sugar cane sells for 4600 vs 560
Gold sweet potata sells for 4200 vs 420
Gold tomato sells for 410 vs 41 (repetitive price)
Gold turnip sells for 900 vs 75
Gold watermelon sells for 2600 vs 1400

Berry bushes:
Gold blackberry sells for 256 vs 54 (repetitive price)
Gold blueberry sells for 256 vs 46 (repetitive price)
Gold raspberry sells for 256 vs 28 (repetitive price)
thorthonesch  [ophavsmand] 18. okt. 2019 kl. 22:24 
@oct To answer your question, yes I did use a software... it was fun.
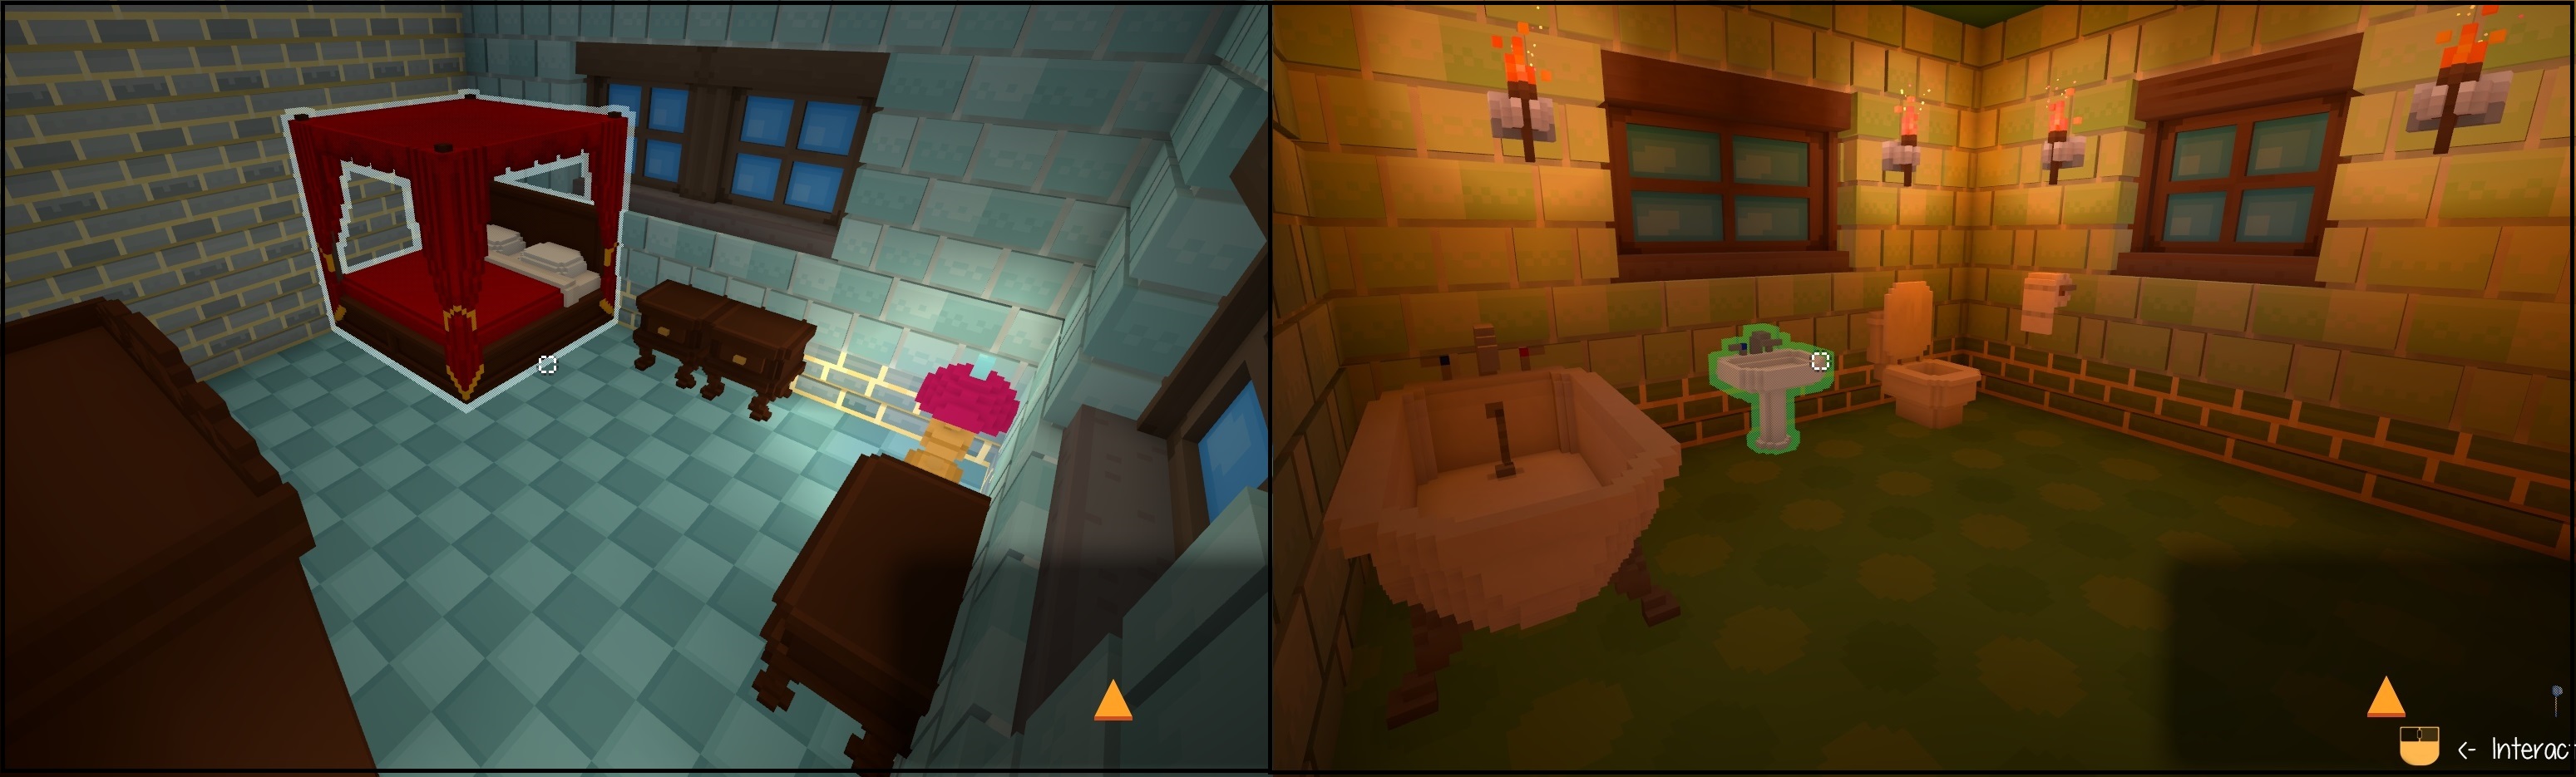
As for the game, give it a try. I hope you'll find my guide useful, though a few things have changed since I wrote it. It should still give you the backbone strategy, but I suggest to try and befriend Leif from the very beginning. That's how you'll get possession of the catalogue. And, with the recent changes in the game, the most important item in the catalogue is the magnifying glass (using it on blocks around you, will give you access to those blocks). Also, try to collect those two starbits every day: you'll need them later on for crafting (tools most importantly) but also in purchasing new blocks from specific vendors... Happy gaming!
oct 18. okt. 2019 kl. 18:52 
honestly i'm just here because i got this game in a humble monthly bundle a few months ago and I was thinking about playing it. this guide is amazing.

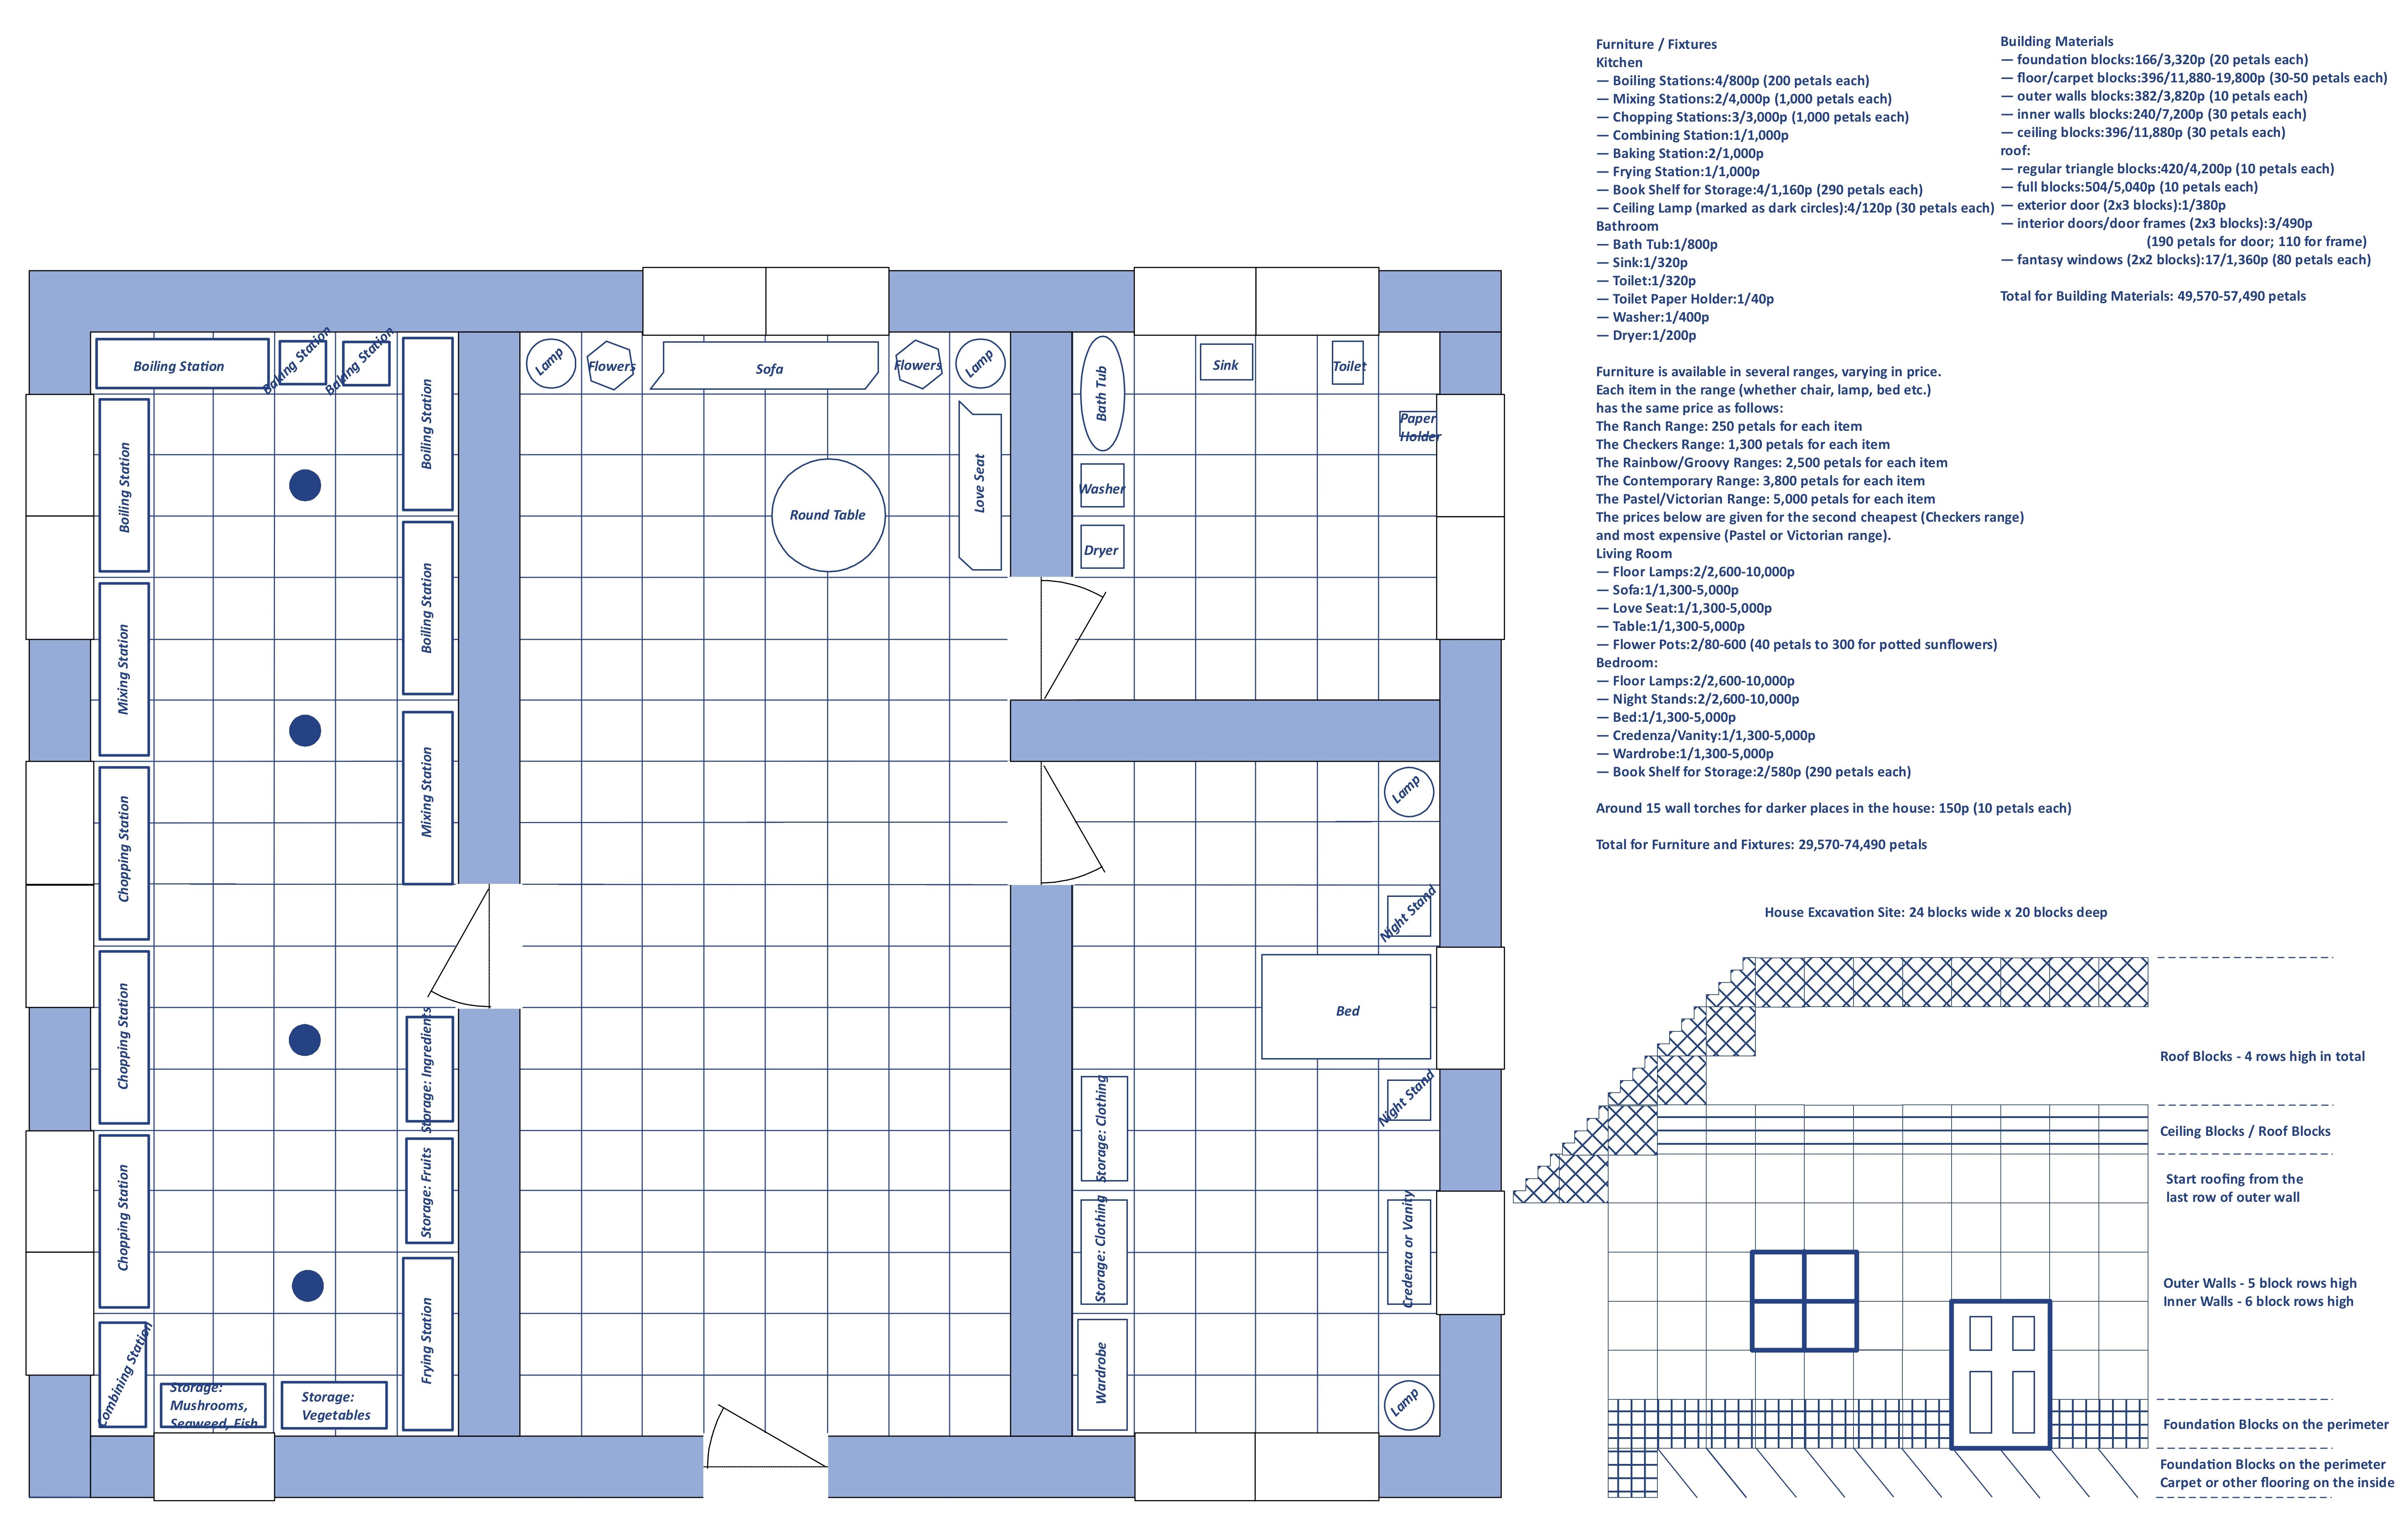
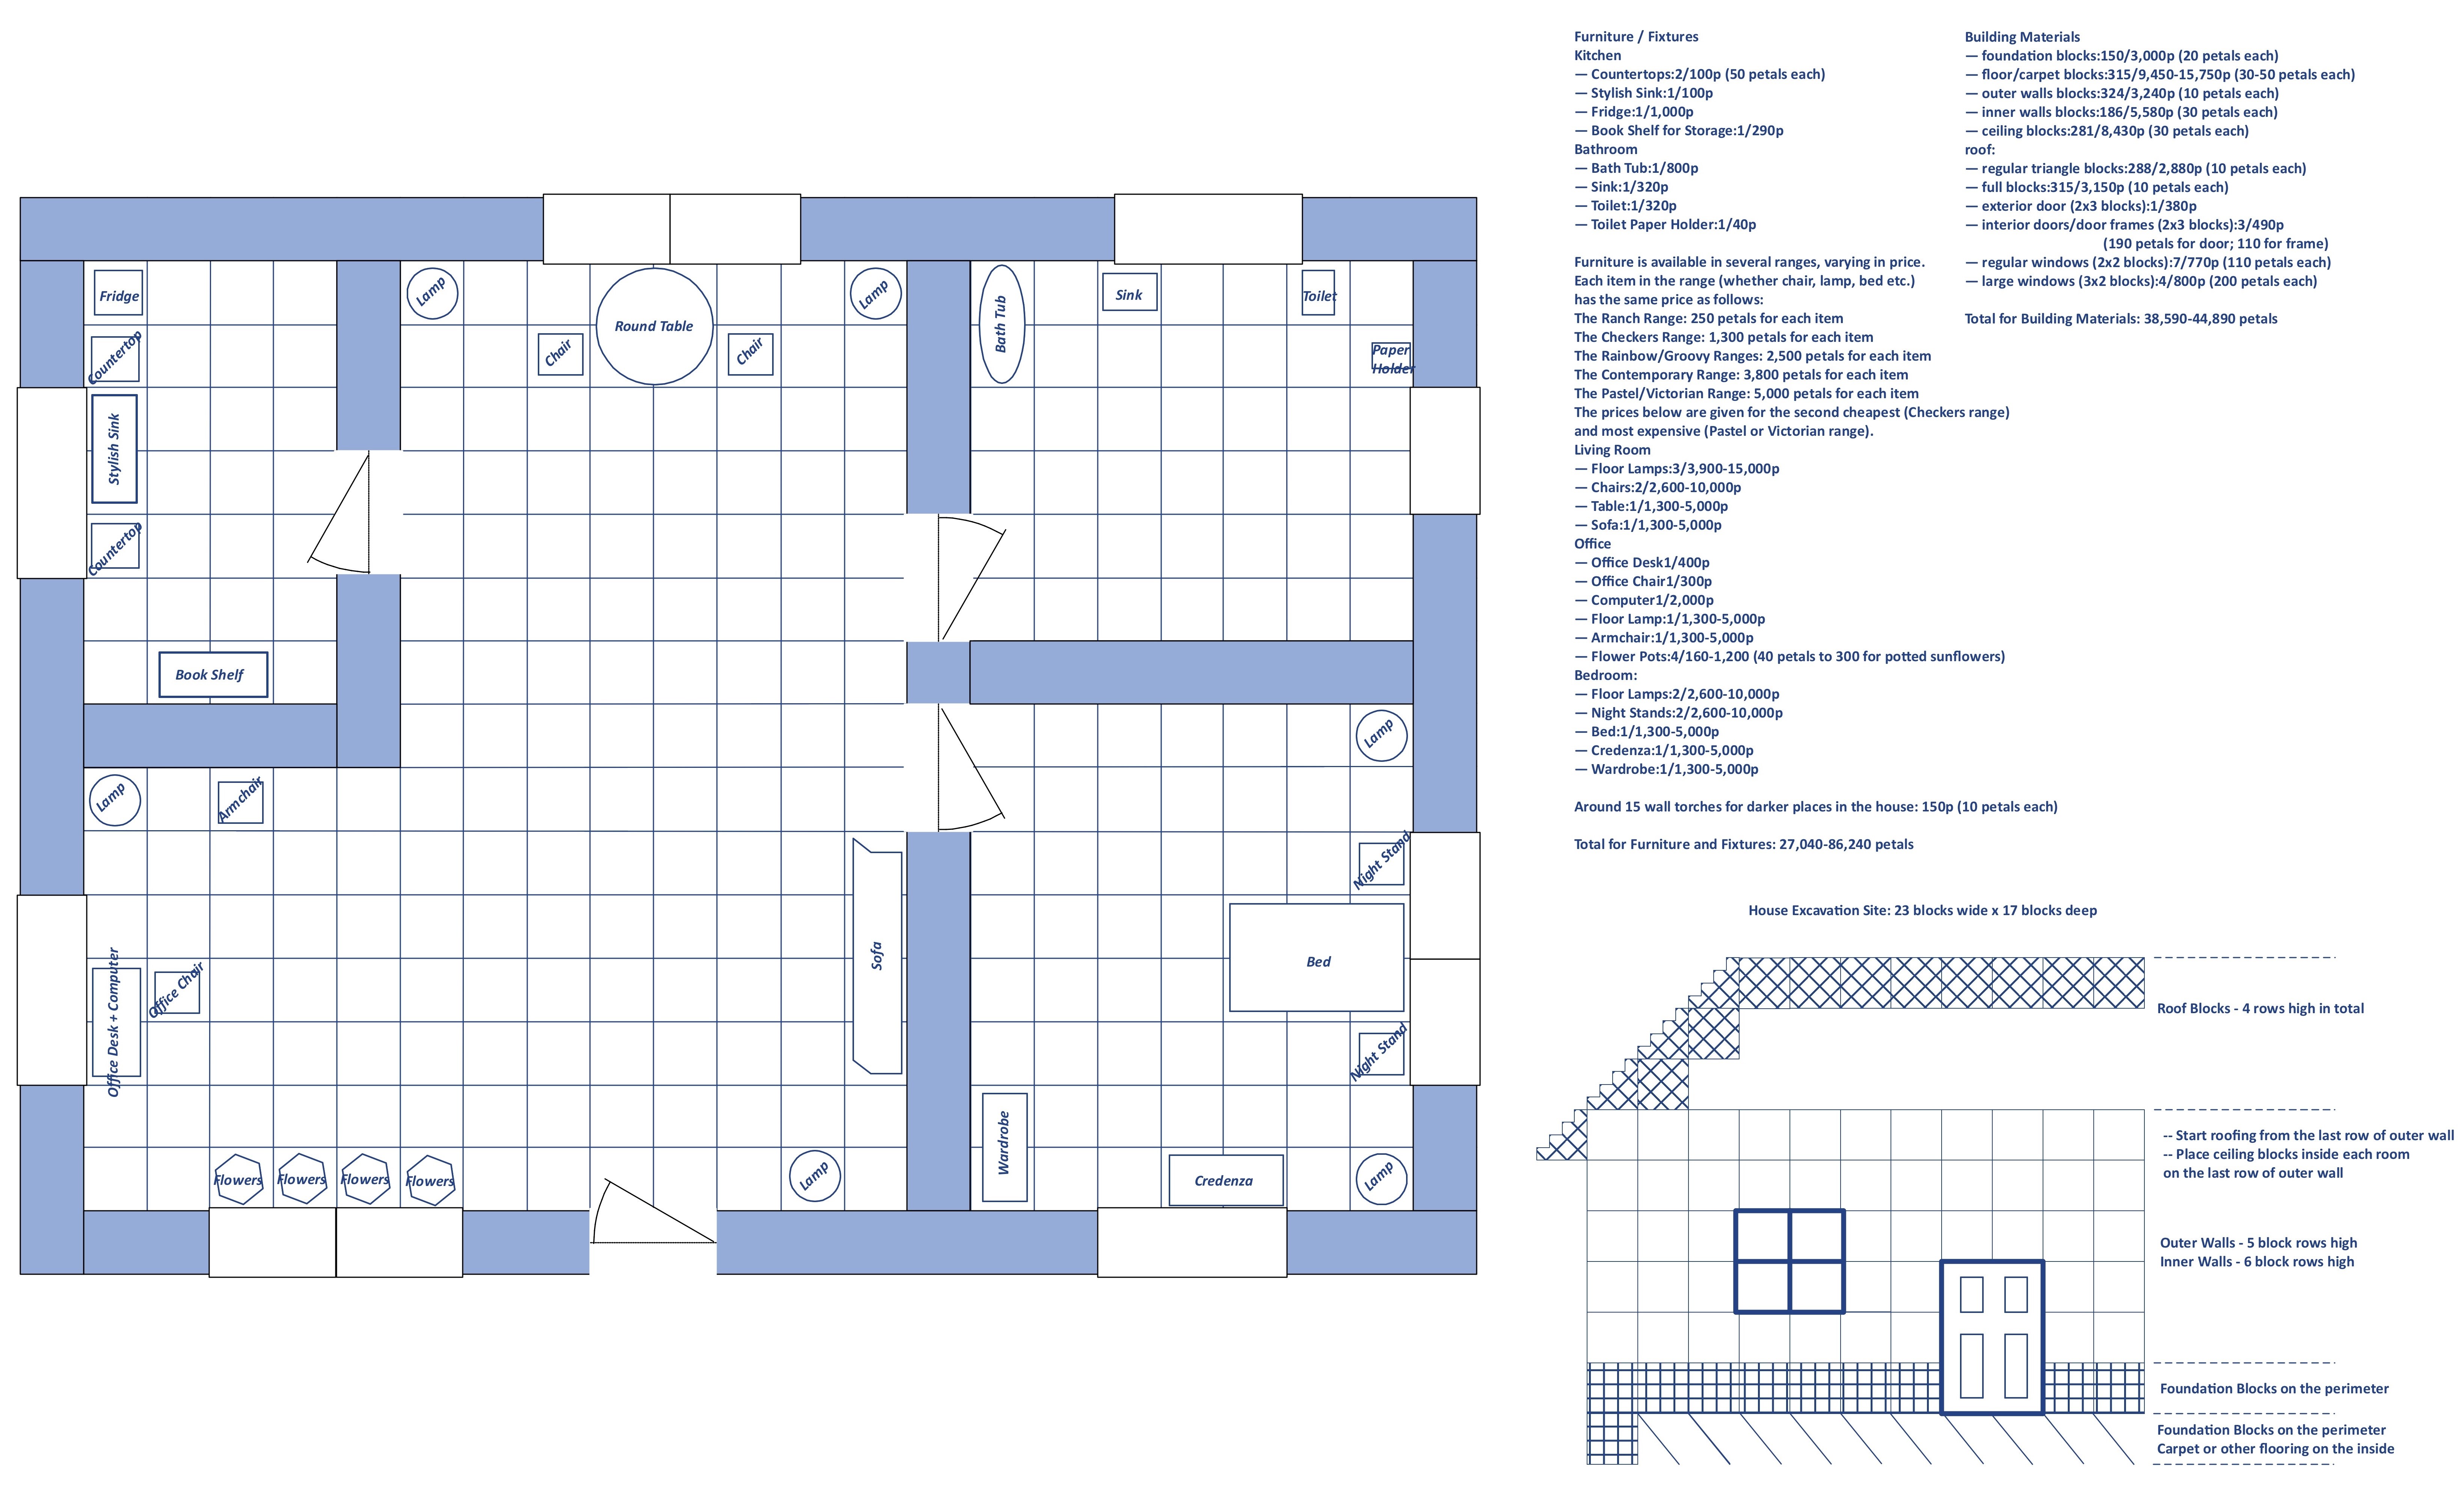
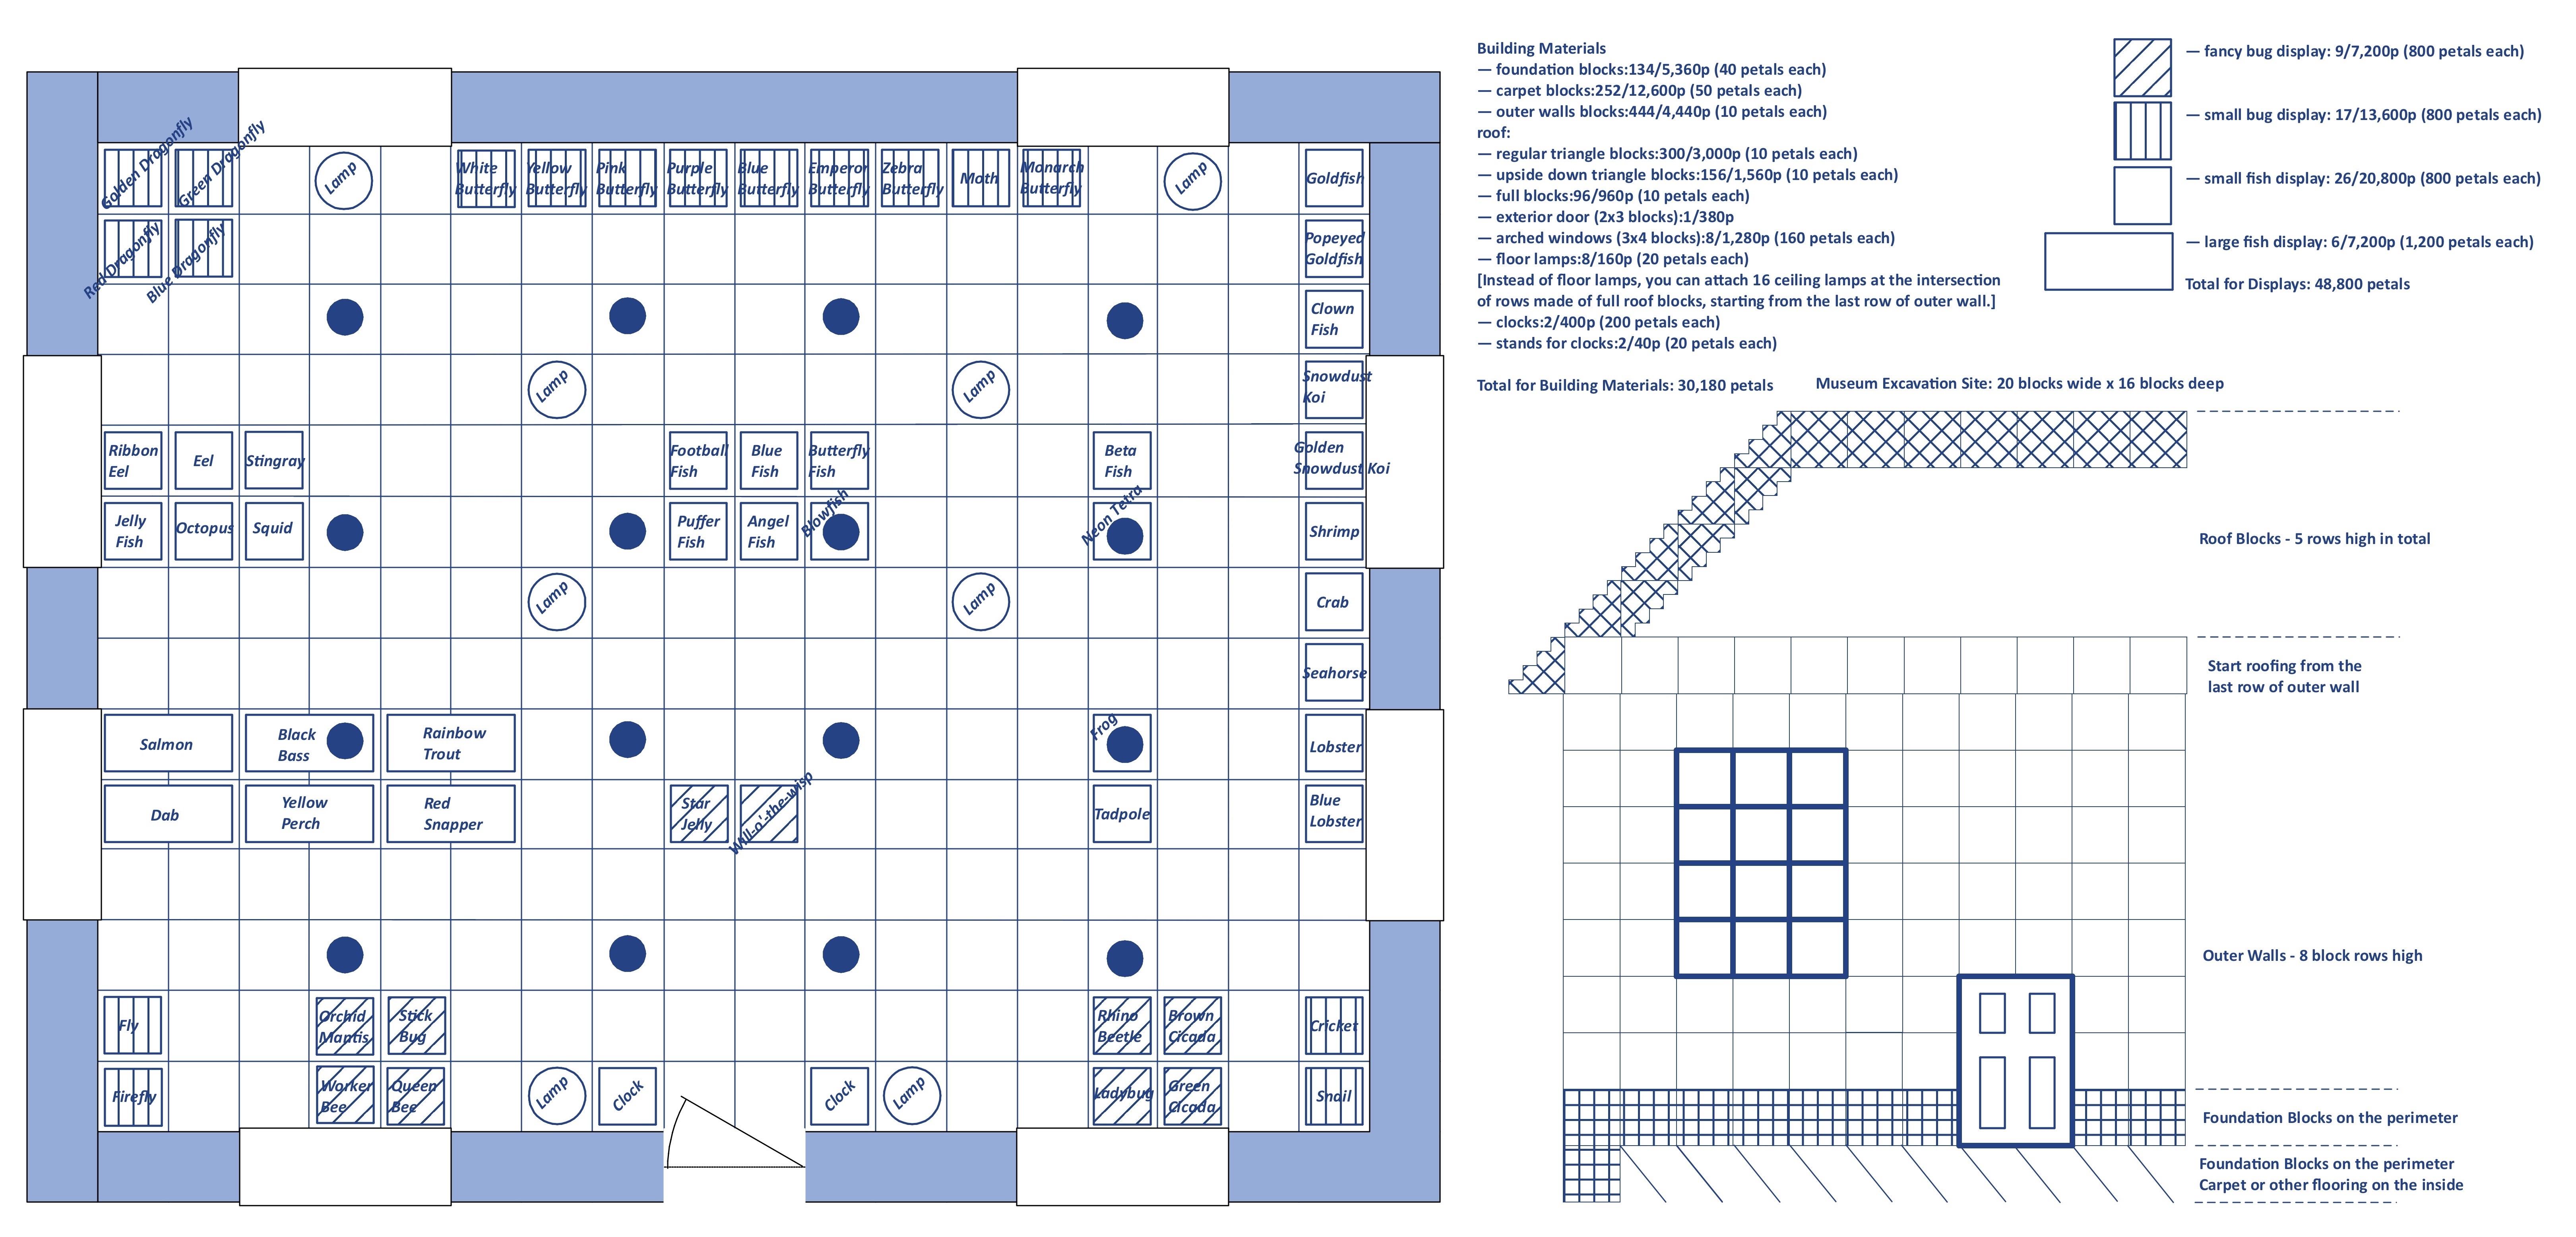
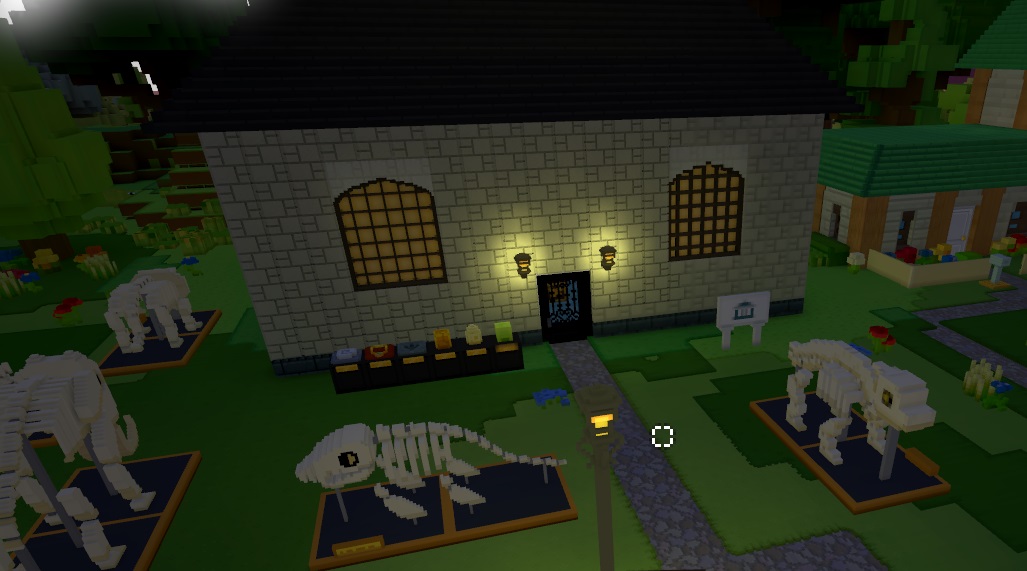
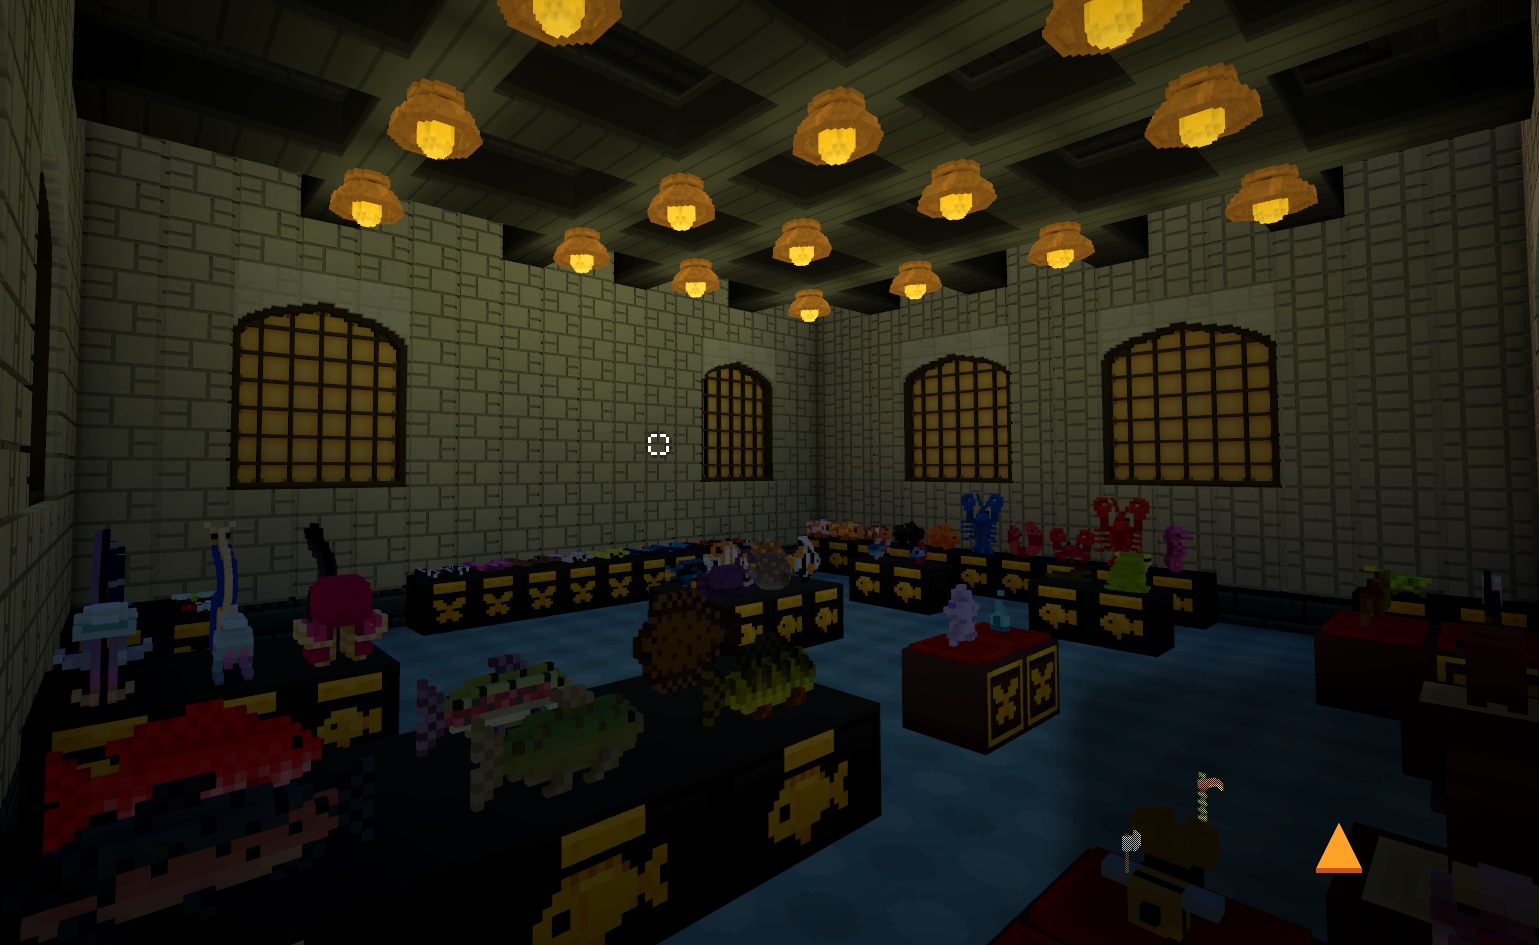
how did you create those 1x1 grid blueprint drawings? did you use some sort of software?
thorthonesch  [ophavsmand] 3. okt. 2019 kl. 8:19 
@TurretAngel I'm sorry I cannot help you. I haven't played the game in some time, so don't know how things changed and if. But I do remember that any new encounters (villagers, animals, fairies, etc.) will show on the map. If the rabbit doesn't, maybe there is something else you need to do first.
Whisper 3. okt. 2019 kl. 7:58 
Can't find the rabbit for Rosemary, and I've combed the island. Wish it would just show up on my map!