Blossom Tales: The Sleeping King

Blossom Tales: The Sleeping King

77 ratings
Blossom Tales: The Complete Story (Walkthrough)
By Estragon
This guide is a 100% walkthrough of the game, covering all items, areas, achievements, puzzles, and other details.
3
   
Award
Favorite
Favorited
Unfavorite
Introduction
This guide applies to both the Steam and Switch releases.

Blossom Tales: The Sleeping King is the story of a grandfather telling his grandchildren a bedtime story of a brave young knight named Lily who becomes the hero of Blossom Kingdom. This guide offers a point-by-point route through the game from start to finish, with minimal backtracking. It's possible to earn all achievements in a single playthrough.

If you haven't completed the game or still want to look for things on your own then you probably don't want to read this, as it will give away most details of the game. This guide is effectively spoilers from start to finish.

The overworld is an 11x7 grid. I use a simple reference system to point out where items are on the map, using A-K for the column and 1-7 for the row, where A1 is in the upper left and K7 is in the lower right. Throughout this guide, most paragraphs are prefaced with a coordinate indicating the destination described.

Update 7 April 2018: Along with some minor edits, maps for dungeons are now included.

Update 19 May 2018: Changed the title to hopefully make this guide more favorable for search results. Solutions for the glyph stone puzzles were added to the Puzzle Solutions section for quick reference, instead of needing to search through the entire guide to find the answers and explanations.

Update 18 September 2019: Fixed a couple direction indicators and one puzzle solution that indicated the wrong block number. Thanks to LetsPlayNintendoITA for bringing these to my attention.
Gameplay Basics
Health
Lily begins with 3 hearts of health, and can gain more health (up to 20 hearts) by defeating bosses and collecting heart pieces. Enemies and environmental hazards deal a half heart of damage at a time. Health potions will fill her health to full completely, and small hearts that heal for 1 heart can sometimes be found by slashing grass or smashing pots. There are some pots in dungeons that always drop hearts.

Energy
Lily has an energy bar that is consumed when using most weapons. This bar can be increased by finding energy crystals. After using an item that uses energy, the energy bar will begin to refill automatically. If the bar is depleted completely, it will take a bit longer to start refilling. The sword and shield don't consume any energy when used.

Interaction
The sword button will change to a command when Lily is near certain objects and NPCs. Lily can pick up many objects, and can also drag certain heavier objects like tables and stone pillars. If Lily is carrying an item, she will put it down gently when standing still but she'll throw it in the direction she's facing when she's moving.

Slashing at grass and breaking pots and some furniture items can be lucrative. Lily can get both coins and hearts. Cutting grass is also useful since it will slow Lily down if she tries to walk through it. Additionally there are achievements for being appropriately destructive.

World Map
A world map is available in the menu (see image in the Introduction section). Only explored areas are visible. Lily's current position is showed as a flashing red dot, and a yellow border is drawn around her objective location whether the area has been visited or not. When Lily is in a dungeon, the world map is unavailable, and is replaced with a map of the dungeon.

Item Trading
There are several items dropped by enemies throughout the world that can be traded to specific NPCs. The first trade of 20 items will result in a useful item, and subsequent trades will give coins in most cases. The fifth trade with each NPC will give some extra dialog, along with an extra coin bonus. See the companion All Items and Collectibles guide for more details on NPC trades.
Puzzles
Throughout the land are many puzzles for Lily to solve. Some lead to treasure. Others are required for progression through dungeons.

Sokoban
These puzzles are based on a classic block pushing game. Push all the blocks onto the target squares to solve them. Blocks can only be pushed into open spaces and can't be pulled. Stepping on the border tiles will reset the puzzle. Detailed solutions for these puzzles are included in the solutions section at the end of this guide.

Path
The idea is to walk along tiles lighting them all up and getting to the end. Stepping on a border tile or trying to backtrack onto a lit tile will reset the puzzle. Detailed solutions for these puzzles are included in the solutions section at the end of this guide.

Block Sliding
Similar to the Sokoban puzzle, pushing a block will move it but it will continue going until it collides with a wall or another object. Each of these puzzles has a switch that resets it. Detailed solutions for these puzzles are included in the solutions section at the end of this guide.

Singing Stones
The stones will play notes and Lily must strike each corresponding stone in order to repeat the sequence. With each successful round the sequence adds another note.

Glyph Stones
Symbols on four stones must be arranged in the correct order to solve the puzzle. Each has nearby clues which describe the order for the stones. A symbol can be changed by hitting the stone with Lily's sword. The directions "up", "down", "left", and "right" are used in this guide to describe the glyphs, indicating the direction the open tail of the symbol points:


Button Puzzles
Button puzzles involve activating all the buttons at the same time.

Switch Puzzles
This type of puzzle requires activating a group of switches so that all are active at once. There are several variations that may require different solutions.
The Story Begins: A New Day
[Opening scene] Grandpa is snoozing in a chair in front of the fireplace. Lily and Chrys wake him up and ask him to tell them a story. He then begins the story of the Kingdom of Blossom and a girl named Lily.

The game begins with Lily asleep in bed with her Grandma waking her up. It's a
special day, and talking to Grandma reveals that Lily needs to go to the castle. Before leaving, there's a note on the table that foreshadows some possible treachery afoot.

Lily begins in a house in <E5>, and going outside reveals the map and shows that she needs to go to the castle at <F4>. Continue north and east to the castle. You can talk to NPCs along the way but they won't have much to say. As you enter the castle, step on the portal stone. These will become important and very useful later.

<F4> Enter the castle to find that Lily makes it just in time for the ceremony, where King Orchid dubs her DameSir Lily, Knight of the Rose. She gets her first equipment, a sword and shield.

The Knight Commander assigns the duty of clearing rats out of the castle dungeon, and Lily is left by her fellow recruits to take on the job.

Head down and to the left and enter the library. You can go up to the shelves and interact with them to read some lore about the land. Notice that one table in the lower left has nothing on it. Stand next to it and drag the table to reveal a hole. Fall in and collect coins from four chests. Go back to the light to return to the library.

Continue left to the next hallway and find stairs going down. Before going down, continue left to the barracks. Find the bed in the upper right and move it to reveal a chest. Open to get a heart piece (1/48). A book on a table at the south end of the room has information about healing items.
The Castle Dungeon

Room 1: Kill two rats and hit the switch to open the gate to the next room.

Room 2: There are several rats, and a chest in the middle of the room. Open the chest to get a health potion. Note a suspicious crack in the north wall. You can't do anything with it just yet. The way forward is still blocked. Notice the four statues. Standing next to one reveals they can be dragged. Move the one in the lower left to remove it from a switch, which opens the way forward.

Room 3: There's not much to do here right now besides killing some rats and smashing pots and barrels for coins and health. Continue on.

Room 4: This room introduces crumbling floors. These tiles will flash when Lily steps on them then fall away. Move quickly across them otherwise she'll fall and take half a heart of damage. Head down, then push down to drop off the ledge when prompted.

Room 5: Lily gets a brief introduction to the roundhouse and jumping strike maneuvers. Try using them to defeat the rats to unlock the gates and move on.

Room 6: Arrow traps. Use the shield to block projectiles as you work your way up the pathway. Be careful not to get knocked into the abyss. Lily won't change directions when her shield is drawn, so use this to your advantage.

Room 7: The crypt. In the first section, drag the lower right statue off a switch to lower the first gate. In the second section, drag the upper right statue to lower the second gate. In the third section, drag the lower left statue to lower the last gate. Head up to find a portal stone, which you can use if you decide you want to go back outside. You can quickly return here after using the other portal stone. Smash pots for health in case you need it, then head up to the first boss fight.

Rat King

Room 8: The Rat King is up on a platform and will toss bombs. Pick them up and throw them back to defeat him. Three good hits should be enough to finish him off, but he will summon rats to liven up the fight. Stairs will appear on the side of the platform. For winning, Lily gets a full heart. A giant chest will drop down. Open it to get the bombs. Note the suspicious crack in the back wall. Use a bomb to open it, since the door you entered is still blocked.

Room 9: Head into the passageway to find the secret lab of Crocus, the king's wizard and brother. Open the chest on the left to get an energy crystal (1/16). Read the large scroll on the upper table to see what Crocus is up to, which will trigger a cut scene. Lily runs off to warn everyone but she's too late, and Crocus has King Orchid under a spell that put him to sleep.

The three Disciples of the Rose give the Knights orders to find three sacred ingredients for a potion that will lift the curse. However, as a new recruit Lily is ordered to stay at the castle and continue training. But we know how that works, don't we? Grandpa says that she must go to a place called Golem's Haven to find Fairy Clover. But first, exploration.
Blossom Town
There is plenty to be found around town before continuing on.

From the throne room, head right. Talk to the chef, who needs mushrooms. He'll ask you to bring him 20 mushrooms.

Continue right to the training hall. Here you can talk to the Knight Commander, who will tell you how many creatures you've removed. You can check back here occasionally, and when you reach 1000, he'll give you an item that allows you to do an automatic sword slash when equipped.

There are doors in the barracks and training hall that lead out to the castle rampart. Explore around to find four chests, each of which gives a modest number of coins.

<F4> Exit the castle down the main stairs, head right, and find an abandoned house. The only things in here are a candle and a table, but dragging the table reveals a hole. Drop in to find a hidden room with six chests. Five chests contain coins, but the top middle one contains a scroll (1/20) with part of a story. The purpose of these will become clear soon.

<G4> Leave the house and follow the path to the right. Two buildings are immediately visible. The one to the right is the Bouncing Flower Inn. You can go there and talk to the NPCs but there's not much to do there yet. Go into the house to the left to talk to four redheaded sisters. There's also a book on the table to read. In the upper left corner is a chest. Open it to get a heart piece (2/48).

<G5> Continue down and to the right to the next area. Go left to the house with pots in the yard and go inside. Talk to the brother and sister and you'll know what to do. Smash everything! Eventually you'll uncover a chest with a heart piece (3/48).

After you're done, leave and head down to the post office. Talk to the postmaster to start the mail delivery quest, which can be done throughout the game. The first letter is for Carmine, who lives in the house just south of the post office.

Go ahead and deliver it to her. She has a book on the table about vacation getaways. Also go upstairs and find two chests in her attic with a few coins.

Return to the post office for the next letter, to Jennifer on Golem's Haven.

Leave the post office and head to the left, but notice a giant rock. Bomb it to reveal a hole. Jump in. Break some pots, then open the chest to get a heart piece (4/48).

<E5> Keep heading left and you'll end up back at Grandma's house where you started. You can talk to her, but she just gives reminders where you need to head next.

Head up a bit and find an odd house blocked by rocks. Bomb the giant rock to clear the path and head in. Open the chest to get an energy crystal (2/16). The table can be dragged to reveal a hole. Jump in and collect some coins from the three chests. There's a second exit, but for now just head back up the way you came.

To the right is a house with a pink haired girl outside. Go in and open a chest to collect a scroll (2/20). On the table is a book about kids playing in the graveyard.

<E4> Head north to find the Blossom Castle Chapel, and inside is Elissa, who asks you to find her scrolls. If you talk to her again, she'll tell you how many you've found.

To the right is another small house, which contains a chest with a few coins in it.

<F4> Head up and take the path to the right. You'll be back next to the castle steps and here you can find Gambling Gabby's house. For 30 coins, she'll let you pick one of three chests, which may have heart pieces (5/48) (6/48) or energy crystals (3/16) (4/16). You may have enough money to try your luck now, but it's probably better saving these for later.

<F5> Walk due south from the castle steps to the next area. To the left is the Blacksmith. He needs a silver ingot, a steel gear, and 20 druid feathers. Nothing to do here yet.

Head to the right to the shop. You can buy a heart piece (7/48) for 250, a health potion for 100, or the steel gear for 200. You probably have enough gold by now, so grab the heart piece and the gear, then the health potion if you can afford it. You can also go upstairs and open a chest, but Grandpa will scold you for snooping.

Let's move on!
South Blossom
Head out the main gate of the castle to start exploring.

<G5> Start by heading to the right and find a narrow path between the trees. Follow this path around and up the side of the castle wall to find a chest with a heart piece (8/48). Return the way you came.

<G6> Head south and meet a few new characters. The first is the Archaeologist, who will be crossing paths with you throughout the game. A family has set up camp, and have some things to say. Step on the portal stone to activate it for later use.

Notice the mushroom enemies in the area. This is a good time to start collecting. Kill them until you collect 20 mushroom items. You can leave the screen and come back to make them respawn. After collecting 20, use the portal stone to warp back to the castle then give the mushrooms to Chef to get a bottle of mushroom soup, which will be useful shortly. Warp back to South Blossom.

<E6> Go to the next area to the left. If the time on your computer's clock is between 9AM and 5PM, Stan the traveling salesman will be here. Talk to him to buy goods. The first offer is a heart piece for 100 (9/48). Buy it if you have the money. As you buy things, he'll eventually get new items in stock, which are usually better deals than you can find in shops.

While walking toward Stan's camp, you'll have noticed four odd buttons that click when you step on them. The trick is to hold all of them down at the same time. Stan's camp has pots and barrels you can use. Clear out the mushrooms then go to the camp, get a pot, carry it back and set it on a button. Repeat two more times then step on the last switch to reveal a chest. This chest will have random loot, usually either coins or a potion.

<F7> Head south then east to find the first race course. Talk to Race Lady and pay 10 coins to enter. Make it to the end in time to open the chest and collect a heart piece (10/48). Use your sword to chop grass and bombs to blow up rocks in the way to finish on time.

<D7> Go back north, then west past Stan's camp to the next area. Head south and you'll find a hillside with a cracked wall. Inside is a chest with a heart piece (11/48).

Continue southwest to find a Ferryman docked on the river edge. Talk to him to proceed to Golem's Haven.
Golem's Haven - Village
<B7> Go west into the town to find that something is amiss. Lily and Chrys argue about the invading force, and you get to choose between archers and golems. Dispatch the enemies and save the town. The Elder Druid will invite you in and give you direction where to head next to find the Fairy Clover.

Let's explore first. Head back down and activate the portal stone.

Bottom level left house: Open a chest to get a scroll (3/20).

Bottom level middle left house: Read a book about a lazy druid. Open a chest for a health potion.

Bottom level middle right house: Open a chest for a blossom spirit.

Bottom level right house: Talk to the Relic Hunter. If you give him your mushroom soup, he'll give you an earthquake medallion in return, which allows Lily to stomp and shake the ground when equipped.

Middle level left house: Deliver the letter to Jennifer here. Talk to her again and her speech is... interesting.

Middle level middle house: Open a chest for a resurrection flower.

Back From the Dead
Use a Resurrection Flower

Note: You can attempt to get ths achievement now by leaving the village and letting Lily get attacked repeatedly by enemies, or just wait until later when you've collected more resurrection flowers.

Middle level right house: Open a chest for an energy crystal (5/16).

Upper level left: Fletcher's house. Collect feathers and turn 20 in for a monetary reward.

Upper level middle: The Elder Druid's place, where you ended up after defeating the invaders.

Upper level right: The Old Clover Shop. For sale are a scroll (4/20) for 100, an energy crystal (6/16) for 250, and a silver ingot for 200.
Golem's Haven - Area
<A7> There are two exits from the town. Take the exit to the west in front of Fletcher's house to the next area. Walk down a couple flights of stairs then work around to the left and back up until you spot an area covered by spider webs. Hack away at the webs (and the spiders) and jump in the hole.

Remember that Archaeologist guy? Here he is again. Talk to him and he'll tell you that he's looking for his shovel. Hit the switch with your sword, set a bomb next to it, then walk over the barrier that just lowered. The bomb will go off and toggle the barriers again, giving you access to the chest. Open it to find the shovel. Head back across the path using the same method, then talk to the Archaeologist. He has a spare shovel, so you get to keep this one.

You may have noticed dark spots on the ground. These are dig spots and show up randomly all around the world. Using the shovel on these can turn up treasure which could be coins, potions, butterfly spirits, or resurrection flowers. Very handy.

The most common enemy in this area is the golem. You won't be able to damage it with the sword, so throw bombs to destroy them.

<A6> Now continue north. Reach an area surrounded by giant rocks. Use bombs to get past them. Talk to the Tree Lord, who tells you about a dark mage who has cursed the tree spirits. There are ten in total.

<B6> Go back down the stairs and follow the path east to the next area. More buttons? There are three. Dispatch the golems then place the pots onto two of the switches and stand on the third to reveal a chest with a heart piece (12/48).

Just to the left of the chest is the first cursed tree. Use bombs against it to deal the most damage. If you get hurt, don't worry too much since curing the tree will give a full heal.

<C6> Go east past the tree to the next area. There's a giant rock blocking a door in the hillside, but ignore it for now. Follow the path down and back up to the east to find another cursed tree. Throw bombs at it to heal it.

<D5> Continue north then exit to the east. Follow the path to a hole in the ground. Jump in and talk to the Fairy, who will give you a heart piece (13/48). The water will also heal when you stand in it.

Back outside, drag the stone pillars at the top of the staircase to open a shortcut that leads back to a bridge connecting South Blossom.

<C5> Return west the way you came and notice that you passed a pond with a waterfall at the top. Walk around in the shallow (light blue) area and enter the waterfall. Play along with the singing stone puzzle (match 3 through 8) to get some loot and a scroll (5/20).

<B5> Leave the pond and continue to west to find Stan. If he's around and you bought the first heart piece, he should be selling a health potion for 50.

But don't leave just yet. On the left side of the camp are two barrels. Break the upper one and walk into the trees. A hidden path leads through the woods to the first ancient statue, Ancient Knight. Talk to the statue to get a heart piece (14/48).

<A5> Walk outside the camp and continue west once more to find a portal stone. Step on it to activate it. You've arrived at the entrance of Runestone Temple.
Runestone Temple, Part 1

Walk up the stairs to find knights whacking away senselessly at the four giant stones which intermittently play notes. The Mage of the Black Rose appears and smites all the knights after taunting them... except for Lily, of course.

Play the singing stones (only 5 rounds) to open the entrance to the dungeon and step inside.

Room 1: Near the top is a green gate, but the switch is on the other side? Look for another way around. Head to the left side and go through the door.

Room 2: Dodge the slow moving spike balls and rats to get to the far side.

Room 3: Similar to the last, navigate through the spike balls. At the top of the room is a crack in the wall. Bomb it and go inside to get a scroll (6/20).

Room 4: Spike balls move up and down here at different rates. Find a way through them to the other side.

Room 5: Hit the red switch to lower the red barriers. Jump down the ledge and go out through the lower door.

Room 1 (again): Hit the green switch to lower the green barrier. Head down and to the right and go through the door.

Room 6: Another spike ball gauntlet, now with floor spikes. Time your steps and get to the other side.

Room 7: Still more spike balls, this time with collapsing floors. Head up as quickly as possible avoiding the traps while trying not to get hit. If you fall, you end up back at the bottom and take half a heart of damage.

Room 8: Golems, lots of golems. Throw bombs to destroy them. When they're cleared, a chest will drop. Open the chest to get a health potion and open the doors. Continue left.

Room 5 (again): Hit the blue switch to lower the barriers. You can now exit to the north. But first open the chest on the right side of the upper walkway for a resurrection flower, and the chest on the left side for a health potion.

Room 9: A switch puzzle. The gate closes and the way forward is blocked. Throw carefully timed bombs to get all three switches active at the same time.

Room 10: This room contains four cursed trees. Hit them with bombs but beware the roaming archers. At the top of the room is a chest with a scroll (7/20). The door to the left is locked, so head through the door on the right.

Room 11: Step inside and the doors close again. You'll be attacked by a larger tougher golem. Throw bombs to destroy him and a chest will drop. Open the chest for a key. Go back out to the previous room, unlock the door to the left, and go through.

Room 12: The doors will close behind you and you'll be attacked by wind mages. While it might be possible to hit them with the sword, just throw bombs to kill them.

Room 13: More spike balls and collapsing floors! Seems to be a running theme here. You know what to do.

Room 14: The first path walking puzzle. Start at the entrance and walk along the dark tiles lighting them all up, finishing at the exit. Walking on pink tiles or backtracking resets the puzzle. {D1P1}

Room 15: Something important nears. Go up to find a locked door. Step on the portal stone to activate it, then hit the green switch to lower the barrier, leave through the door to the right.

Room 16: There's more to this room but the only way right now is to the right.

Room 17: More spike balls. Hoof it across.

Room 18: This area is infested with golem snakes. Avoid them or throw bombs at them to get rid of them. Make your way up and to the right and destroy another big golem. Bomb the cracked wall and open the chest inside to find a heart piece (15/48). Hit the blue switch to lower the barrier, continue down, then open a chest to get a key. Hit the red switch to lower the barrier, then backtrack west to room 15.

Room 15 (again): Break pots to regain health if needed. Use the portal stone to go back to town if you feel like you might need supplies, then return when ready to press forward. Unlock the door and head in to the first midboss battle.
Runestone Temple, Part 2
Room 19: Meet the Dragon. It's like a cross between Dig Dug and Bomberman. Throw bombs at him to hit him. Kill him and you will be rewarded with the bow.

Room 16 (again): Now in the upper half, equip the bow and fire a shot at the switch across the pit to open the gate to the north.

Room 20: More basic bow skills. Step onto the moving platform and hit both green targets to open the barrier blocking the way.

Room 21: Another gauntlet room with wind mages. This time is a bit easier since you can snipe them with the bow.

Room 22: This is a puzzle room. You can't solve it quite yet so make your way up to the door in the northeast corner and head through.

Room 23: This puzzle room makes the previous room possible. At the center of the room is a lit pyre. Stand below and fire an arrow upward to light the pyre above it, then use that one to light the pyres to the left and right. At the center of the room are four glyph stones but how should they be set? Use the four outer pyres to burn off the vines on the walls, which reveals (from left to right): UP, DOWN, RIGHT, LEFT. Hit the four stones in the middle of the room to match this solution and the door on the left side opens.

Room 22 (again): Use the pyre to burn the vines, and follow the trail around the room to the door on the east side, using the flaming arrows to clear the vines from that door.

Room 24: Enemy gauntlet. Clear out the bandits. You can use the bow or sword. Bomb the cracked wall to the north and open the chest inside to get an energy crystal (7/16). Continue east.

Room 25: Solve a path walking puzzle to go forward. {D1P2} Solve a second path walking puzzle. {D1P3}

Room 26: Enemy gauntlet. Eliminate the golem snakes.

Room 27: This is a large room with several pyres to light. There are also plenty of spike balls to avoid and collapsing floors. There's a lit pyre in the lower left corner. Start by firing an arrow through it to the right. Continue to the next pyre and repeat. The remaining shots will be in these directions: up, left, up, right, down, right, up, left. The last pyre will now be lit, so use it to burn the vines off the doorway and go up.

Room 28: In this room are the two more cursed trees. Give them the business with bombs while avoiding (or killing) the enemies wandering around. A big golem is roaming around, and it might be a good idea to take him out first. He's able to be damaged by arrows, but bombs are still more effective. There are also some glyph stones in the center of the room, but the solution is further in. There are two path walking puzzles to open the gates on the left and right sides of this room. {D1P4a/D1P4b}

Room 29 (left side): This room has a cursed tree in it. Throw bombs to dispel the curse, then notice the pyres. Use the lit pyre near the bottom of the room to light the pyres to the side then the ones up top. Use the lit pyres to burn off the vines and get the first half of the glyph sequence: UP UP

Room 29 (right side): Go back to the previous room then go through the door on the upper right. This room is roughly the mirror image of the left side room, so heal the final cursed tree then do the same thing to reveal the second half of the glyph sequence: LEFT LEFT

Friend Of The Trees
Rescue the cursed tree spirits.

Room 28 (again): Return to the main room and strike the glyph stones from left to right to open the door ahead: UP UP LEFT LEFT

Room 29 (center): Go up the center passage and find a portal stone. Step on it to activate. You can warp back to a previous place if necessary, or just push onward. Some jars are here to smash in case you need a bit of health.

Golem

Room 30: This boss probably requires the most coordination out of any of the bosses in the game. The idea is to throw a bomb into his mouth to stun him then use the bow to shoot the red gem on his forehead. While this sounds simple enough, he has several attacks you'll need to dodge, his mouth is sometimes closed or protected behind his fists, and hitting the target requires timing and good aim. Go a few rounds and you should be able to take him out, gain a new heart, and win the Fairy Clover.

The Magical Ingredient
Defeat the First Golem and obtain a Fairy Clover
Return to the Castle
<F4> Lily is warped back to the king's chambers. The attending disciples ask her not to interrupt them, but are surprised when she produces the Fairy Clover. Impressed with her work, they direct her to her next task, assisting the knights headed to Boiling Caverns in search of the second ingredient, Old Snapdragon.

<G5> But since we're in the area again, let's do more exploring! Return to the postmaster to collect a payment for the previous delivery, then pick up the next letter, for a lumberjack named Jack.

<F5> This is a perfect opportunity to improve the bow even though we just got it. Make sure you've bought the ingot in Golem's Haven and the gear in Blossom Town. If you didn't get the ingot yet, use the portal stone near the entrance of the castle to make a quick side trip. You probably also have well over 20 feathers by this point. Head over to the Blacksmith and talk to him to change the bow into the Tri-Bow. This improved weapon now shoots three arrows at a time.

Tri-Bow
Upgrade your bow with the blacksmith

<G4> Head east to the Bouncing Flower and go inside. Talk to William standing near the fireplace. He tells you that he needs a prop for his act and asks you to get him a skull. It will be a long while before that's possible, but remember to return here later. Go down to the bottom left table and drag it to reveal a hole. Jump in and put the bow skills to use. A platform is moving back and forth over the pit. Stand on it and fire at the three targets. Get all three targets flashing at the same time to lower the barrier. Go up to a small clearing and open the chest to get another heart piece (16/48). Return to the inn and go back out.

What's a Zelda-like game without some grinding? This is an ideal time to scout the area looking for digging spots. Equip the shovel and dig up any spots you find. Warp to Golem's Haven, where the spots seem to appear more often, though they're random and require searching. As you're exploring, try to hack away at grass and shrubs as much as possible. Not only does it turn up change now and then but it also helps Lily move faster since she slows down considerably in the tall grass. Once you earn about 750 coins, you should be good to go for a bit.

<B7> Go back to town and check the shop. A second heart piece (17/48) for 250 may be available. Buy the energy crystal if you haven't already.

Stop by Fletcher and turn in 20 feathers to get an energy crystal (8/16). Each additional 20 feathers you give him will earn you 50 gold.

<A6> Return to the Tree Lord and collect your reward for purifying the trees, a heart piece (18/48).

Stop by Stan's place and buy a heart piece (19/48) for 80 gold.

<C6> Return to the first tree and head east again. Bomb the door blocked by a giant rock and head in. Throw a bomb across the gap (be careful not to fall in) then quickly shoot it with an arrow to bounce it closer to the giant rock. When the bomb explodes, it reveals a red switch. Shoot the red switch to lower the barrier. Cross over to the right side then shoot the blue switch on the left. Go back to the blue switch, set a bomb down, then go back to the other side and cross over the blue barrier before it raises. The upper blue barrier will lower and you can open the chest to get a heart piece (20/48). Step back behind the lowered barrier then shoot the blue switch next to the chest to leave.

<C7> Head down and to the right to find a staircase blocked by pillars Drag the pillars out of the way to make a shortcut back to the dock at the entrance of Golem's Haven.

<F5> Warp to Blossom Castle and head down to the shop. An energy crystal (9/16) should be available, which you can buy for 250.

<E7> Warp back to South Blossom. Due south of Stan's camp is a path through the woods head down, then in the next area head down and slightly to the right to find a giant rock. Bomb it to reveal a hole. Inside is a barrier puzzle. Hit the red switch and the blue switch once each. Place a bomb next to the blue switch the walk down as far as possible across the lowered barriers. Stand between the red and blue barriers and fire the Tri-Bow to the left, hitting the red switch. Open the chest to collect a heart piece (21/48). To return, set a bomb down next to the red and blue switches on the right side, then walk across the bridge as far as possible. When the bomb goes off, the barriers will reverse and you can leave.

<G7> Return north then head back east to the crossroads where the South Blossom portal stone is. Follow the path east then turn south to find the lumberjack camp. Find Jack on the right side of the camp and deliver his letter. Just above him is a chest. Open it to find another scroll (8/20).

Continue south to a path covered by spider webs. Hack away at the webs and spiders then continue east to the next area.

<H7> Go down the stairs to the right and bomb the giant rock to open a hole. Jump in. Find a cave with a lot of bats. Bomb the rocks blocking the way then take out the bats with arrows, or wait for them to come near and slash them with your sword. There will be some crumbling bridges. Make your way across while avoiding getting shot by arrow traps. In the next room, hack and slash at more webs and spiders, then open a chest at the end to get an energy crystal (10/16). Take the exit above the chest and find yourself on a hillside in South Blossom.

<E7> Jump down the hill to the east, and bomb the giant rock. This uncovers a chest and inside is a scroll (9/20). Head north then east back to the South Blossom crossroads.
Bandit Camp
<G6> Head east to find an area surrounded by a large fence with a gate. Shoot the target above the gate to enter.

Go nuts and smash anything that's not nailed down. Near the upper left side of the camp is a chest with some coins. To its right is a giant rock you can bomb to uncover another chest with more coins in it. Near the center of the area is a giant rock. Bomb it to reveal a hole and jump in. There are plenty of breakables to smash, and nine chests to open. The outer eight have lots of coins in them and the one in the center has a heart piece (22/48).

Head back up. All the breakables have respawned, so feel free to smash them all to gain a few more coins. Just from this area there's a good chance you've pocketed somewhere around 500 additional coins.

<H6> Go east to find what appears to be a smaller fenced in area. Step inside and discover it's a trap. Once again Lily and Chrys will argue about the next mini boss, so choose between the Bandit Ninja and the Pirate Queen. The gates close. Defeat the boss to earn a heart piece (23/48) and open the path ahead.

<H7> Heading south from the arena will lead to a smaller bandit encampment. There's a chest with coins, and a red switch on a stump that lowers the barrier to the south.

<H5> North of the arena is another encampment which has more breakables, a chest with a few coins at the north end of the camp, and three more chests with a few coins each in the southwest part of the camp. Additionally, there's a doorway in a hillside. There's a chest, but approaching it causes the barrier to go up and some rats attack. Since destroying them wasn't so hard, bats appear. Still not enough of a challenge, Lily encounters zombies for the first time. Defeat them and the barrier drops. Open the chest to earn a large amount of coins.

<I6> Now that Lily's loaded, head back south to the arena and east. Step on the portal stone to activate it. Welcome to the Gasping Marshes.
Gasping Marshes
This place can be a little tricky to navigate at first, so let's get down to some business. Lily can't move through the swamp quickly, so try to stick to the stone paths as much as possible.

The main enemies in this area are spirits. Kill them and they may drop souls which, oddly, look a bit like soda cans. They won't move and you can't hit them when you're facing them, so turn away, charge your sword, and swing at them when they're right behind you.

<I5> Head north to find a small house. Outside are piles of skulls. Bomb the one on the left to find a chest with a few coins in it.

Inside the house is Scarrel, a witch of dubious nature. Talk to her and she'll tell you she wants 20 souls. You can also talk to her dog Buckett but he doesn't have much to say. Open the three chests to get mushroom soup, a health potion, and sunshine in a bottle. There's also a book on the table to the left that you can read which raises some questions about her character.

<J5> Leave the house and follow the path east. In the next area go north to find Swamp Guy on a small raised island. Talk to him and he'll tell Lily he needs her to protect him from ghosts while he cooks mushroom soup. Indulge him and keep the spirits away while he cooks. Unlike the other spirits in the area, these enemies charge directly without trying to hide. If you finish successfully, he gives Lily a necklace that helps her walk through rough terrain. It allows faster travel through tall grass and the swamp water, so it's no longer necessary to stick to the stone paths. Lily still won't be able to walk through the darker water though.

Ghostly Goulash
Help the Swamp Guy cook his soup

<I5> Kill enough spirits to collect at least 20 souls. This area has two summoners who will keep spawning more spirits, so use this to your advantage. Go back to Scarrel and trade them in to get an energy crystal (11/16). Further trades will earn 50 coins each trade.

<J6> Go back east where the Swamp Guy is and head south to the next area. You'll notice a couple switches here but there aren't any pots to put on them. What to do? We'll come back to this later.

<I7> Keep going south, then turn west to the next area. There's a raised area here. Climb the ladder and talk to the Archaeologist. He'll tell you he discovered a mythical fairy but she won't talk to him. He also mentions a wishing well, a statue, and Boiling Caverns. Drop into the hole, talk to the fairy, and she'll give Lily a heart piece (24/48).

<J7> Head back east and you'll see the wishing well. Climb up and talk to it. It will offer goodies at ever increasing prices:
  • 10 - mushroom soup
  • 50 - resurrection flower
  • 100 - scroll (10/20)
  • 250 - energy crystal (12/16)
  • 500 - heart piece (25/48)
  • All donations after this are 150 coins and will provide loot
So much for that giant windfall from the bandit camp.

<K7> Continue east to the next area to find a heavily wooded area. Near the bottom is a path hidden by trees. Follow it to the left and up to a clearing where you'll find the second statue, the Ancient Mage. Talk to it to get a heart piece (26/48). Return to the entrance of the hidden path and go north.

<K6> You might notice Stan has a camp here as well. There's a ladder to the west to climb up and reach him. He probably won't have anything interesting available so let him be for now. Work your way up the left side of this area and notice there's a chest sitting under a tree partially obscured by reeds. Open the chest to get a scroll (11/20).

<K5> Go north and we've reached our destination. Sort of. Up the stairs is the entrance to Boiling Caverns but it's closed tight. Step on the portal stone to activate it. There are five pyres but none of them are lit. Go back down the stairs then notice a slightly hidden area off to the left. Go in and find a lit pyre. Fire an arrow through it to the right to light the pyre on the path. Go to the pyre on the path and fire an arrow through it upward to light the middle pyre in front of the door. Use the middle pyre in front of the door to light the remaining four pyres and the dragon's head will open.
Boiling Caverns, Part 1

Room 1: This is a large room with a locked door at the top which needs to be unlocked to progress. Six more doors connect to other areas. The room is filled with flame spirits. Hack away at them or just avoid them. The only way to go is the room on the top left so go that way.

Room 2: This room has three barriers: blue, green, red. Getting deeper into the dungeon will require lowering all three. There is a path through the lava that will sink and rise. Walk over these when they're above the lava to travel safely. Falling into the lava isn't fatal but Lily will take damage. The blue and green switches are on the path, so hit them as you walk by and continue through the door on the lower right.

Room 1 (again): The red switch! Er no, a red switch. This lowers the red barriers in this room. You can backtrack to the previous room to see that the red barrier there is still up. The switch for that barrier is on the upper platform blocked by the locked door. Instead, just make your way back down this room and go through the now open door on the lower left.

Room 3: The Tri-Bow will be very useful here. Shoot the flame spirits then make your way through the flame grates in the floor. Go up and around to the exit.

Room 1 (again): Hit the blue switch here to lower the barrier on the other side of the room. Jump off the ledge and go across through the lower right door which is now open.

Room 4: This is a lava room with more sinking paths. Time steps across the path to avoid falling in the lava, occasionally shooting at flame spirits when necessary. At the end of the path is a chest. Open it to get a key. Leave through the door here.

Room 1 (again): Jump off the ledge and unlock the top center door. Go through.

Room 2 (again): Hit the red switch and the third barrier is open. Drop off the ledge and leave through the north exit.

Room 5: This is the first Sokoban puzzle {D2S1}. See the puzzle section for details on how these work. Complete the puzzle to open the door at the top and go through.

Room 6: There is a lava lake here with platforms moving back and forth. Shoot the flame spirits and ride the platforms to the raised area on the left. Hit the red switch to lower the red barrier in the center. Return to the moving platform and ride across to the raised area on the right. Hit the blue switch to lower the blue barrier in the center. Return to the platform and ride to the stairs in the center. Head through the north door.

Room 7: This room has dragon heads on the wall that shoot flame pillars. Step through them when they're off. There are also skulls that will start to move and attack when Lily gets too close. Keep the Tri-Bow at the ready and snipe them before they become a problem. At the top of the first section of the room is a cracked wall. Bomb it and go inside to get a scroll (12/20). Continue down and back up to the right, using the same strategy as before.

Room 8: Solve the Sokoban puzzle {D2S2} to continue on.

Room 9: Ride the platforms down through the river of lava to get to the south exit.

Room 10: Step inside and the doors close. Four skeletons dig themselves out of the ground. Defeat them and press forward south.

Room 11: This is a winding horizontal corridor with a number of traps. Make your way to the far end. Be careful around the barrels here. They're explosive, and accidentally hitting one with your sword might be a little painful. However, they can be useful for taking out enemies from afar. Exit to the top right.

Room 12: Solve the path walking puzzle {D2P1} to open the gate. Step on the portal stone to activate it. By now you probably know what's next. Head through the door when ready.
Boiling Caverns, Part 2
Room 13: Take on the dungeon's midboss, the Flame Mage. While he tells Lily to draw her sword, she can more effectively fight him with arrows and bombs. Dodge his flame attacks and fire at him whenever there's an opening. Watch for the tiles around the edge of the room since many of them will collapse into lava. Upon defeating him Lily will get a boomerang from the giant chest that appears. If necessary, there are plenty of pots in the previous room to break for free healing.

Room 14: This is a large room with a number of switch puzzles. Equip the boomerang and put it to use. Notice that there's a red barrier on the platform at the center of the room, but the barrier is in front of it. Throw the boomerang at it, but quickly move up and to the left or right otherwise the boomerang will hit the switch again on its return trip and raise the barrier. This is an important detail with the boomerang that will be required to make use of. As Lily moves left or right relative to the direction of the boomerang, the boomerang will follow. There are three ways to go, so start with the moving platform to the left. While moving on the platform throw the boomerang to hit both switches to lower the barrier. There are platforms going up and down, but neither leads anywhere yet. Go through the door to the left.

Room 15: There's a barrier here and six red switches on the other side. Start at the top and throw the boomerang, then walk downward so that the trajectory hits all six switches and lowers the barrier. Head up and solve the Sokoban puzzle {D2S3} to open the gate. Step out onto a ledge and use the Tri-Bow to shoot the arrow target here (the boomerang won't work). This lowers the first of four barriers blocking the top center door. Go back in and head to the lower half of the room. Avoid or kill the demons and go out the door.

Room 14 (again): Shoot the green target to lower the third barrier blocking the center door, then drop down and ride the platforms back to the center of the room. Now ride the platform heading to the right. This time there are four switches to hit with the boomerang. Get all four active at once then go through the door on the right.

Room 16: Another barrier with switches behind it, this time thirteen arranged in a horseshoe shape. This one's a little trickier and may take a couple tries to get right. Start facing the top switch, throw the boomerang, walk up a bit then down toward the lowest switches then up slightly. Go up to solve a path walking puzzle {D2P2} to open the gate. Step out to the previous room, shoot the purple target to lower the second barrier, then return. Go down and solve another Sokoban puzzle {D2S4} to open the gate and go through the door.

Room 14 (again): Shoot the target to lower the red barrier blocking the main door, then ride the platforms back to the center and head up through the center door at the top.

Room 17: This room is similar to the first room of the dungeon. The door at the top is locked. The flame spirits here continuously spawn, so it's a good idea to just head for the only available exit. Doors are open to the left and right. Head left first.

Room 18: Lily steps in and the gate closes. Fight three dragon enemies, weaker versions of the midboss of Runstone Temple. A chest drops. Open it to get the key.

Room 17 (again): Lily can choose to go through the right door.

Room 19: The door closes, and there are more dragons to fight. The reward chest contains a red potion. This room is optional and isn't required to complete the dungeon. Now that we've seen the sights, head back out.

Room 17 (again): Use the key to open the door and go up.

Room 20: Barrels. Lots of barrels. Step inside. The doors close and fire mages appear. You can just shoot them with arrows but shooting barrels when they're near them may be a bit more satisfying. Dispatch the mages and go north.

Room 21: There are several exits here but all are blocked. Clear out the enemies then notice there's a switch on a raised platform. This one's a little different from previous switches. The trick is to throw the boomerang past the switch without hitting it then move so it hits the switch on the return, otherwise it will hit the gate twice which makes it open then close. When the gate is open, leave to the left.

Room 22: Navigate through flame traps to get to the exit at the upper right. Shoot enemies while using the exploding barrels to your advantage.

Room 23: A giant lava lake with more moving platforms. Ride the platform moving right, then down, then to the left, down, back to the right, then down. Head out the door to the south.

Room 21 (again): Shoot the target to lower the red barriers. The exit to the upper right is now available. Navigate through the traps and flame spirits and leave.

Room 23 (again): This is the walkway above the lava lake. Kill the enemies, avoid the traps, and head through the exit to the north.

Room 24: There's a crack in the wall to the north. Bomb it and go inside to collect a heart piece (27/48). Make your way across more sinking paths while shooting enemies in the way. Exit downward on the left end of the room.

Room 25: Follow the path around the upper part of the room to the right. There's a barrier and a portal stone here. Step on the portal stone to activate it. Platforms move through the lava both down and to the right. Take either one and travel around the room. There are four switches. Shoot all four to lower the barrier blocking the door in the upper left. Fortunately, they're not timed like previous switch puzzles, but constantly spawning fire spirits will make it easy to miss shots. When ready, head through the door to the upper left for the boss fight.

Flame Guardian

Room 26: Again, bombs will be most effective against this guy. He'll throw fireballs and summon flame spirits which can get in the way. There are pots around the room which will give hearts for healing if needed. Defeat him to get a full heart and claim the Old Snapdragon.

The Fiery Ingredient
Defeat the Flame Guardian and claim an Old Snapdragon
Blossom Castle and Exploration
<F4> Lily returns to the castle. The disciples think she's given up but again she surprises them by giving them the Old Snapdragon. Lily isn't sure where to look for the third ingredient. The disciples tell her that she needs to find an Ice Orchid in Snowfall Summit, and that a lift will take her there. Additionally they ask her to draw her sword. She does, and they imbue it with the ability to do stronger roundhouse attacks.

<G4> Head south to the throne room and take the hallway east to the training hall. Check in with the Knight Commander. There's a good chance you've defeated over a thousand enemies by now, and if so you'll get an item you can equip to perform an instant roundhouse rather than having to charge it first.

Beware The Blue Dress!
Kill 1,000 enemies

The castle gates leading to North Blossom are now open, but it's a good opportunity to catch up on some stuff. Head back west to the throne room, cross through the library and go down the stairs into the dungeon to collect a few items that weren't available earlier.

In the second room, bomb the cracked wall and go inside for a chest containing a heart piece (28/48). In the next room shoot the target to open the cells, and show the enemies no mercy. In the cell on the right is a chest containing a lot of coins. Continue deeper into the dungeon to the crypt. There are three sarcophagi here that can be bombed. Each reveals a chest. The one on the left has a health potion, the middle one has coins, and the one on the right has more coins. (Possible random loot?) Use the portal stone on the right side of the room to exit back to the castle.

<F4> This is probably a good time to stop by Gambling Gabby and spend away until you win all four of her prizes. The best approach is to choose one chest and only open that chest. It's random, but following this method will usually earn both heart pieces and both energy crystals spending 200-300 coins total.

<D6> Go to the odd house in the southwest part of town. Jump into the hole, cross through the basement, and leave through the other exit, ending up on a hillside in South Blossom. Jump down to the left and head south. Keep heading south until you find a giant rock blocking a doorway. Bomb the rock and go inside. There's one lit pyre in the upper left and plenty of unlit pyres. Light all the pyres with arrows. This can be done with the basic bow, but the Tri-Bow makes it easier since multiple pyres may get lit at the same time. Open the chest to get a scroll (13/20).

<G5> Head east through South Blossom back to the crossroads. Use the portal stone to return to the castle. One more diversion, head into town and visit the postmaster again. Collect the 50 coins for delivering Jack's letter and pick up a letter for James. Head back up to the castle. It's time to press on.
North Blossom
There are two exits north from the castle. Both connect up, but let's start with the east side. Leave the castle through the north door between the mess hall and the training hall.

<G3> Follow the main path north to the next area. Wander off the path to the east and find an open hole between some trees. Jump in. Oh hey, a boomerang switch puzzle. Toss the boomerang to hit all eight switches and lower the barrier. Open the chest to get a scroll (14/20). Return to the surface.

<H3> Continue east. In the next area is a house with a water wheel (not particularly effective in a marsh, but whatever). Go inside and talk to Botanist Langford. He explains how the marsh helps his plants grow but that he also uses fertilizer made from feathers, skulls, mushrooms, honeycombs, and zombie brains. Lily has some of these ingredients, but not all. Not much to do here, so remember it for later.

<H4> Go south to the next area. There's something hidden in the fog, which turns out to be a house made of candy. Go inside and talk to Baker Jenn. Her special recipe is cupcakes, which she happens use giant butterflies as a secret ingredient. She'll give you a butterfly spirit. If you ever run out of butterfly spirits, you can talk to her again and she'll give you another. Open the chest in the upper right to get a few coins. There's a recipe on the table which you can read. Cupcakes usually sound tasty but Lily might want to skip these.

<H5> Going south there's a switch that will open the north gate to the bandit camp. You can do this if you like, but most of the good stuff should be cleaned out already. Head back north.

<H2> Keep going north past the Botanist's house to the next area. Notice a giant stone off to the left surrounded by flowers. Bomb it and jump in. Solve the Sokoban puzzle {NBS1} to lower the barrier blocking six chests. Five chests have coins, and the top middle chest has a heart piece (29/48). Exit and continue north to the next area.

<H1> There's another house here. Go in and speak with Sage the Mage. Play his singing stone game for a heart piece (30/48).

<G2> Leave the house and return south and head west past the hole in the ground. There's not much to do here now, but there's a portal stone just south of the cemetery here. Step on it to activate it.

<F2> Follow the path west around the cemetery. In the next area there's a path that leads up through the forest, but there's nothing that can be done with the cave there for now. Continue west instead.

<E2> Here's the second race course. Go around to the top and talk to Race Dude to enter for 10 coins (it's no longer possible to sneak into the course). Make it to the end to earn a heart piece (31/48).

<F3> Head down the path south of the race course, then in the next area bomb the giant rocks blocking the stairs, and go east and a bit north through the tall grass. In the next area is a giant rock surrounded by flowers. Bomb it to reveal a hole and jump in. Open the chest for a heart piece (32/48). Exit and head back to the race course area.

<D2> Follow the path west from the race course to a new area. There's another portal stone here. Step on it to activate it. Just north is the village of Winterthaw.
Winterthaw
Visit the house in the lower left and talk to the Bomb Maker. Pay him 300 gold and he'll upgrade your bombs.

In the house above there's a girl named Danika. You can talk to her, but she seems a bit odd. Don't worry about her, just open the chest and grab some coins.

Up some stairs is a tavern with a couple villagers in it, but there's not much to see here.

There's a door in the hillside. You can go in, but the stairs are blocked by vines. Again, nothing to see here (for now).

In the final house resides a villager who has a secret basement. Drag the table on the right side of the room to reveal a hole. If you want to jump in and attempt his challenge you can. While it's technically possible to complete now, getting another item will make it a little easier later. Lily must quickly navigate a winding path that's collapsing to make it to the far end to gain a heart piece (33/48). The problem is that there are some bats lurking that can be distracting and might cause Lily to fall into the abyss. If you succeed, you'll end up elsewhere in North Blossom well south of the village.
Toward the Lift
<D3> That's everything to see in Winterthaw for now, so leave the town and head south. Talk to the Beekeeper. He's got a bee problem and needs 20 honeycombs. Help him out by smashing all his beehives and collecting enough honeycombs to fulfill his request. You might need to leave the area and come back a couple times to respawn more hives to collect enough. This is the only area in the world where honeycombs are obtainable. Turning 20 honeycombs in earns Lily the honeycomb medallion which can summon bees to attack enemies when used. Also note the hole up on the hillside on the left side of the area. This is where you'd exit if you complete the crumbling floor challenge in Winterthaw.

<D4> Head south to find a farm overrun by mushrooms. If you get close enough to Farmer Bob he'll stop you and insist that you help him with his problem. Eliminate all the mushrooms. Once they're all gone you can talk to Farmer Bob again and he'll give you a resurrection flower. If you ever run out of them and want another, he'll give you one if you talk to him when you don't have any. Stop inside the house to read a book that talks about trading items, and open the chest for a few coins.

<D5> If you head out the gap in the fence on the southeast corner of the farm, the path continues south, and there's a green target you can shoot that opens a shortcut back to South Blossom. However, that's not the right way to go, to go back up, exit the farm on the north side, and continue west.

<C4> Just above the entrance to this next area is a cracked wall. Bomb it and go inside. There are four targets with a moving platform. Similar to the puzzle under the Bouncing flower, get all four targets flashing at once to lower the barrier. Open the chest to get a heart piece (34/48) and head back out.

<B4> Follow the path west but don't leave the area quite yet. Just off the path is a staircase going up the hill. Climb the stairs and follow the upper path west to the next area. At the end of the path is more stairs which lead up to a hole. Drop into the hole. Solve the path walking puzzle {NBP1} to lower a barrier blocking a chest. Open the chest to find a scroll (15/20). Head back up and jump down the hillside to return to the main path and continue west.

<A4> At the end of the path is the lift. Step in and take the ride up the hillside to Snowfall Summit.
Pinecone Village
<A2> Walk north and Lily arrives in Pinecone Village. Step on the portal stone to activate it. Time to look around.

The first building is the gallery. It's an archery range. Pay 25 gold to play. Lily gets 5 shots to hit 5 targets, but hitting a bullseye will get 25 gold back. Failing to hit a target ends the game. Take your time and lead your shots. For completing the first round Lily gets a heart piece (35/48). The second round is a bit faster and costs 50 gold, and will earn Lily an energy crystal (13/16).

To the right is the Frozen Daisy Shop. For sale are mushroom soup for 100, a resurrection flower for 500, and 20 feathers for 20. You'll want to buy all three eventually, though the flower is a bit overpriced.

The building on the right on the second level of the town is the North Chapel of the Disciples of the Rose. Go inside and open the chest to get a scroll (16/20).

Just to the left is the lab (house?) of Dr. Zombehz. Talk to him and he'll tell you he needs brain to, uh, study. Read the book on the table to the right. It talks about magic running shoes. What's that about?

On the left is the Council of the North. Go inside and talk to the Council Lady at the top middle of the room. She needs a health potion for her sick mother, so give her one and get a heart piece (36/48) in return. Also open the chest to the right for a scroll (17/20).

On the top level are two houses. Go into the one on the left and open the chest for a heart piece (37/48).

Go into the house on the right and talk to James. Deliver his letter. Drag the table on the left out of the way to reveal a chest. Open the chest for a heart piece (38/48).
Postal Service
<G5> Go back to the bottom of the village and use the portal stone to return to Blossom Castle. Go back to the Postmaster, collect 50 gold, then get the next delivery to the bard in Golem's Haven. Return to the castle and warp to Golem's Haven.

<B7> Go to the top of the village and go into the middle building. The Flower Bard is in the upper right corner, wearing purple. Give him his letter then return to the post office.

<I5>Collect 50 coins, then get the next letter for Scarrel in Gasping Marshes. Warp to Gasping Marshes Bridge, deliver the letter, then return to the post office.

<D2> Earn 50 more coins and get another letter. This one's for Danika, that weird girl in Winterthaw. Warp to North Blossom, deliver her letter, and return to the post office.

<A2> Get 50 coins, then get one more letter (for now). This one is for Stan, but he needs it delivered to his tent outside Pinecone Village. We haven't found it yet, but we're caught up for now and we can find him on the way to our next destination. Warp back to Pinecone Village.
Snowfall Summit
<A1> Go through the village and leave through the north exit. This is the graveyard. As Lily walks up, Crocus appears and launches into a monologue, as any proper villain would. He then raises the dead then disappears, leaving Lily to fight off a horde of zombies. Hack them with your sword. You can use bombs, but blowing up the tombstones will awaken skeletons who won't be particularly happy about the situation. Collect at least 20 brains (leaving the area and returning may be necessary to spawn more zombies) and make a quick trip back to the village to trade them to Dr. Zombehz. For the first 20 he'll give you a heart piece (39/48). Return to the graveyard.

There's a building to the north but a wall of ice blocks it for now. Don't worry about it and head to the east, breaking through the snowball barricade.

<B1> Continue east. Just above there's a familiar looking cart. Go up, and sure enough the Archaeologist is here. Talk to him and he'll tell you he's looking for buried treasure but whenever he tries to dig he gets accosted by zombies. Agree to help him out and keep the zombies away while he digs. If successful, your share of the loot will be 500 coins.

Archeology Student
Find all the Archeologist encounters

<B2> After chopping up zombies, head back down the stairs and follow the path through the woods to the south. This is the third and final race course. Talk to Race Dude and pay him 10 coins to enter. Make it to the end in time and get the magical running shoes.

Fastest In The Kingdom
Complete all 3 races

<C2> Leave the course and find an exit near the southeast corner to get to the next area. This is the hot springs. Lily can stand in the water to regain health and talk to some NPCs. There's a disciple here who tells Lily he's here to collect healing water for the monastery, which is to the south. Head south into the forest.

<C3> There's a monastery here, but getting to it requires your way through a maze-like path through the woods that weaves between this area and the one to the west. Reach the end and go inside. The disciple here will give Lily an energy crystal (14/16). Jump off the ledge to the right of the building and follow a shortcut leading north that returns to the entrance. Return to the hot springs.

<C2> There are stairs up the right side that lead up the springs. Go all the way to the top. There are also two exits here. The one to the left leads back to the graveyard where the Archaeologist is, and the one to the right goes further in. Take the exit to the right.

<C1> The path leads upward and stairs go up the hillside. Climb three flights of stairs to find a lone house. Go inside and talk to the Mountain Hermit. He gets depressed and could use some sunshine in a bottle, so give him one. In return he gives Lily an energy crystal (15/16). There's also his bucket list on the table to the right if you want to read it. Go back outside.

<D1> Go down two flights of stairs then go east to the next area. Continuing east, you'll find Stan's camp. Talk to him and deliver his letter. If you still haven't bought out his stock, you can talk to him again and get a deal. Go west a bit outside of Stan's camp then walk south. There's a hole in the ground here. Drop off the ledge and jump in.

Walk down the stairs and find a chest. Open it for a few coins. Shoot an arrow through the pyre to burn the vines and unblock the path. This is the shortcut to Winterthaw. It's not needed right now, so climb back to the top and head out.

<E1> Go down around the trees and head to the east to find a clearing. Find where the path leads upward again until there are some stairs. The stairs will lead up to Stan's camp. Instead of going up the stairs, go east to the next area.

There are a couple ice golems here. They're not that bright and will charge into things and stun themselves. You can take them out with bombs or just avoid then and go into the cave in the hillside they're guarding.

Approach the chest and the barrier rises. Grandpa puts Lily through a series of puzzles. The first is a path walking puzzle {SSP1}. The second is singing stones, which only requires 5 notes. The last puzzle is rotating glyph stones. The solution is posted on the wall, viewed from Lily's perspective. Clockwise around the room starting at left wall, the positions for the stones from left to right is UP DOWN RIGHT LEFT. This lowers the barrier and Lily can open the chest to get a large amount of coins. Go back out.

<F1> Jump off the ledge to the right and find a path east to the next area. There's nothing of interest in this area, just zombies and skeletons. Continue east.

<G1> Head up a bit and Lily has arrived at the entrance of Frostroot Shrine. Step on the portal stone to activate it. The door is blocked, and four frozen knights are standing guard. Some help they are. Notice there are four tiles on the ground then look closely at the four knights. Their poses are oddly similar to the markings on the tiles. So maybe they're useful after all. Drag each knightsicle onto its respective platform. Each time a knight is positioned correctly one of the lights above the door will light up. When all four are in the correct locations the door opens.
Frostroot Shrine, Part 1

Room 1: What an odd place. The only apparent exit is a closed gate at the top of the room, and no switches in sight. There are twelve sarcophagi here. When in doubt, try bombs. There's a switch under one of them in the lower right. Hit the switch and open the gate.

Room 2: This is a large room with paths to the left and right, but both are blocked by piles of skulls. Bomb the skulls to clear the way, then fight off the skeletons that spawn. Both paths lead around across collapsing floors to the upper area. The door to the north is locked, so take the door to the south.

Room 3: Lily walks in and the gate closes. An ice dragon spawns. Bombs are most effective, but they'll also break the large jars which can spawn additional zombies and skeletons to fight. After defeating the enemies a chest will drop. Open it to get a key and raise the gate.

Room 2 (again): Unlock the north door and move on.

Room 4: More jars and sarcophagi, and a locked door at the top. Doors on both sides lead to adjacent rooms. Let's start with the upper right and work clockwise.

Room 5 (upper right): The door closes and two ice golems appear. Let them charge, move out of their way, and hit them with bombs. Open the chest to get the key and unlock the exit. That makes the next three rooms completely optional.

Room 6 (lower right): There are jars and sarcophagi here. There are already plenty of zombies to fight.

Room 7 (lower left): The door closes and several ice mages spawn in. Take them out with the bow and a chest drops. Open the chest to get a health potion and unlock the exit.

Room 8 (upper left): The door closes. Defeat all the skeletons in here and get a chest. Opening the chest provides a pittance of coins. Gee, that's just great. At least the exit is clear.

Room 4 (again): You can pick a fight with the undead, or just unlock the door and move ahead.

Room 9: This room loops around on itself. The exit to the right is blocked by a barrier, so go to the left and up. There's an eye enemy here that will fire at Lily if she gets in its gaze. Shooting it with an arrow is effective. Cross upward over the collapsing floor then again heading to the right. Hit the switch to lower the barrier. Head down and to the right to the exit.

Room 10: Most of the room is collapsing floors. Defeat the eye enemy while trying not to fall in order to unlock the doors and continue.

Room 11: There's a winding pathway of collapsing floors. Navigating across while avoiding the eyes. Using the bow to take them out is possible but a little risky. Make it to the far end and exit north.

Room 12: This is a hub room that will be revisited several times. On the left side of the room is an unlit pyre in front of ice blocking a doorway. Head left across an ice field while avoiding rolling snowballs of various sizes. Go up the stairs on the far end and find a lit pyre. Fire an arrow through it to the left to light the first pyre. The path to the right is blocked, so head back across the ice field to the left. Shoot an arrow up through the pyre to melt the ice and go through.

Room 13: Hack through zombies to reach a larger area with a new type of block sliding puzzle {D3B1}. Slide the blocks to get two of them onto the target squares and lower the barrier. Hit the white switch below the puzzle to reset the blocks if needed. Go up across the crumbling floor and to the right. Clear out the zombie in the narrow corridor and bomb the cracked wall. Go inside to grab a heart piece (40/48). Return to the main room and exit to the east.

Room 14: Another winding path of collapsing floors patrolled by eyes. Hurry through and exit to the south.

Room 12 (again): Lily is now on a ledge above the ice field in the hub room. Shoot the target to open the door to the south, then jump off the ledge and go through the door.

Room 15: This is a long vertical ice field populated by spike balls and ice mages. Avoid the spike balls and shoot the ice mages while navigating to the bottom. If you have a problem with Lily sliding too much, equip the shovel and use it to stop immediately and regain control.

Room 16: The doors close and Lily gets locked in with three ice dragons. Take them out with bombs to move on to the west.

Room 17: Solve the path walking puzzle {D3P1} to unlock the gate to the south.

Room 18: A door is open to the east but bombing the ice golem will open the door to the south. Do that then go through the door to the south.

Room 19: Lily's on a tiny platform. Shoot the switch to lower the barrier then return to the previous room.

Room 18 (again): Go out the door to the east.

Room 20: Keep moving and avoid the falling icicles. Go through the door to the south.

Room 21: Still more collapsing floors patrolled by eyes. Follow the path down and around to the left and go through the door.

Room 19 (again): Open the chest to get a key. Return to the previous room.

Room 21 (again): Cross the collapsing floor and get to the door on the right side. Note that from these side doors, there's a good shot at sniping the eyes before they can cause trouble.

Room 22: Kill the three ice mages to get a chest that gives a health potion and unlocks the door. Leave.

Room 21 (again): Return to the north exit.

Room 20 (again): Dodge the icicles again and take the east door.

Room 23: Step into the room and the door closes. Defeat all the skeletons. Step on the portal stone to activate it. It's time for the midboss. Unlock the door and go through when prepared.
Frostroot Shrine, Part 2
Room 24: Take on the Ice Worm. He'll summon falling icicles and create columns of ice spikes. He can also tunnel and leap around. Once in a while he'll stop and poke his head up while staying still. Use that as an opportunity to smack him with bombs. It's also possible to hit him directly with a bomb while he's leaping. Defeat him to get a big chest with the fire medallion in it. Exit to the north.

Room 25: Snowballs are raining down here. Weave back and forth while moving up to avoid them and exit at the top.

Room 12 (again): We're back in the hub room again, this time on the right side of the barrier. There's another block sliding puzzle {D3B2} but the blocks are encased in ice. Bombs won't even break them free, so equip the fire medallion. Stand next to each ice block and use fire to melt the ice and free the blocks. Solving the puzzle opens the gate to the north and lowers the barrier. Go north.

Room 26: This is a large open room with lots of enemies. The exit to the north is sealed. Circle the room and eliminate all the enemies, and when all are gone the door will open. Continue onward.

Room 27: The floor here is completely ice. Step inside and the doors close Lily in with three ice golems. Eliminate them to open the doors and proceed.

Room 28: The room is a long horizontal hallway with enemies and barriers. Remove the enemies and hit the switches to lower the barriers to reach the left end. Before leaving, bomb the cracked wall, go inside and open the chest to get a scroll (18/20).

Room 29: Another long horizontal hallway. Just get to the other side by dodging the rolling snowballs and exit to the left.

Room 30: This is a large open room with a winding ice path and bottomless pits around it. Equip the shovel and the bow. Slide along the ice and use the shovel to stop when it's time to change directions. It's also possible to navigate the path by moving slowly but where's the fun in that? The path begins going upward. At the top of the path is a portal stone and a barred door. Step on the portal stone to activate it and continue to the left and down. Continue along the path until a switch comes into view. It's not necessary to go all the way to the end of the path since you can just shoot an arrow to activate the switch which will open the exit. Make your way back to the exit. You can follow the path back or just jump into the abyss and take half a heart of damage to respawn at the beginning of the room. Head north through the exit for the boss fight when ready.

Spirit of the Monks

Room 31: This birdlike boss can fly and summon ice spikes. He'll also summon waves of zombies which can get in the way. The best approach is to throw bombs when he's on the ground. Once defeated, Lily gets a full heart and obtains the Ice Orchid and gets warped out of the dungeon.

The Spiritual Ingredient
Defeat the Spirit of the Monks and receive an Ice Orchid
No Longer Sleeping
We should be back at the king's chambers, right? It turns out that Crocus has just unleashed his orc army on Blossom Kingdom and we witness them storming the gates. Crocus destroys the gate, ordering his minions to attack. The orcs storm through the town and enter the castle, making it to the king's chambers where he's sleeping. The Knight Commander and a squad of knights fend them off as best they can.

<F4> Just as it seems all hope is lost, Lily returns and gives the disciples the Ice Orchid. The disciples use all three special plants to awaken the sleeping king. King Orchid arises and uses his power to smite every last orc invading Blossom Kingdom. The wizard failed but it's not over yet.

We return to the king's chambers, where King Orchid learns of his brother's treachery and bestows a royal power upon Lily's sword that allows her to fire beams (which only work when she's at full health, in classic Zelda style, of course). The king directs Lily to go to the Wastelands and put an end to the traitor Crocus.

We've heard rumors, but where is that exactly?
Tying Up Loose Ends
The valiant knight has a mission. So the obvious thing to do is to focus like a laser and go straight for our target, right? Of course not! There's still loot to find.

<G5> First let's head south to the postmaster again and finish the job. Talk to the postmaster and he'll inform Lily that the service is shutting down thanks to technology making mail delivery obsolete. Collect a full heart as a reward.

Letter Carrier
Deliver all of the Postmaster's letters

<J6> Head back to the portal stone and warp to Gasping Marshes Bridge. Go to the area east of here where the two buttons are. Clear out the enemies then equip the magical running shoes and bombs. Stand between the two buttons but close enough to one that throwing a bomb will land on it. When the bomb is on the switch, use the magical shoes to dash to the other button and press it before the bomb explodes. Open the chest that appears to get heart piece (41/48).

<A2> Return to the bridge and warp to Pinecone Village. Stop at the shop and check the inventory. There should be an energy crystal (16/16) for sale. Buy it for 250. Leave the shop and exit the town north through the graveyard.

<A1> The building north of the graveyard can now be entered. Equip the fire medallion and use it near the ice barricade to melt it, then head inside. Solve the block sliding puzzle {SSB1} to lower the barrier and retrieve the fireball medallion from the chest.

Return to Pinecone Village and check the shop again. There should be a heart piece (42/48) available for 250.

<F2> Warp to North Blossom Cemetery then head to the area to the west. There was a path through the trees that we paid little attention to previously because the path was blocked. Go up through the forest to the door blocked by vines, use the fire medallion to burn away the vines, then step inside. Follow the winding cave passage to the end where there's a lone chest. Bomb the rocks blocking the chest then open the chest to get the magic ring. This is a passive accessory that allows loose items to be pulled toward Lily. Return to the entrance and go back outside.

<E3> Keep going west to the race course then immediately turn south. Looking around this area, there are four glyphs on various walls covered by vines. Use the fire medallion and burn the vines away. Going from left to right, the glyphs are DOWN LEFT RIGHT UP. Up and to the left is a giant rock. Bomb it to reveal a hole and go inside. There are four rotating glyph stones and a chest behind a barrier. Use the sequence found above ground to lower the barrier. Open the chest for a heart piece (43/48).

<G2> That's it for now, on with the mission. Head back to the North Blossom Cemetery portal stone.
Breaking Into the Wastelands
Checking the map indicates that the entrance to the Wastelands is nearby. Make sure Lily is at full health then head up the stairs at the top of the cemetery to the blocked door between two large angel statues. Swing the sword to fire a beam at the barricade to smash it and go inside.

Inside is a switch puzzle with eight total switches that need to be activated at the same time. Two are off to the sides and six are circled around the center. The easiest way to solve this is to throw a bomb at each switch then time a roundhouse swing right as the second bomb explodes. The barrier will lower. Of course, the only thing here are three sarcophagi. Bomb all three of them, revealing two chests and a hole in the ground. Open the left chest for some coins, then open the right chest for a scroll (19/20). Jump in the hole.


There is a cave leading to the Wastelands. There is no map available in game, but the path is fairly straightforward. The cave is divided into five smaller areas. One chest can be found in the second area, and six chests are in the third area. All contain coins. There are plenty of enemies to fight. The final two areas have bottomless pits, but other than that there are no traps. Navigate to the end of the caves and emerge in the Wastelands.
Exploring the Wastelands
<J4> Well now this looks a bit grim. Start by stepping on the portal stone to activate it. The enemies here are meaner and piles of skulls are scattered around the area. Bomb the pile directly to the right of the portal stone for a chest with a few coins, and bomb another pile above and to the left for a chest with a few more coins.

Enter the house here and talk to Grunda. She needs skulls for a project. You can trade her 20 skulls for a resurrection flower, then trades are for 50 coins. Remember to keep at least two on hand, one for William and another for the Botanist. The piles of skulls in here can be bombed to reveal three chests with loot in them.

<K4> Leave the house and head east to an orc camp. Above the west end of the camp is a pile of skulls. Bomb it to reveal a chest with some coins in it. Just below the camp on the east end is the third statue, the Ancient Axeman. Talk to it to get a heart piece (44/48). Bomb the rocks blocking the stairs above the camp and go up. There's another pile of skulls that can be bombed for a chest with coins in it. Continue up the stairs and go north.

<K3> Jump down the hillside to find another camp. On the east side are four barrels covering a chest. Move or bomb the barrels and open the chest to get a scroll (20/20). Go to the area to the west.

<J3> There's another camp here. There's nothing of interest so continue west again.

<I3> Near the middle of this area is a raised section. Open the chest to get some coins then clear the barrels from the hole and jump in. There are four chests here. Three have coins, and the upper right has a heart piece (45/48). Return to the surface and head south.

<I4> Clear out the enemies here but try to avoid destroying all the pots and barrels. There are four switches here. One is hidden under a pile of skulls, and two are hidden under shrubs. Locate all four, place pots or barrels on three of them, then step on the fourth. A chest will appear in the center of the camp. Open the chest to get a heart piece (46/48). Leave to the east and return to the portal stone.
One Last Treasure Hunt
<H3> Use the portal stone to warp to North Blossom Cemetery. Leave to the east then go south to the Botanist's house. Talk to him and give him his fertilizer ingredients and collect a heart piece (47/48) as payment. Return to the cemetery and use the portal stone to warp to Blossom Castle.

Botanist's Apprentice
Fulfill the Botanist's request

<G4> Leave the castle and head east to the Bouncing Flower. Talk to William to give him the skull he wanted. Get the final heart piece (48/48).

Maximum Health
Find every heart piece

<E4> Go back outside and go west to the opposite side of town and enter the Blossom Castle Chapel. Talk to Elissa to tell her you've found all her scrolls. As a reward, she gives Lily a full energy container.

Maximum Energy
Find every energy crystal

Elissa's Hero
Return all of Elissa's scrolls

We've now collected everything we can, so it's time to quit stalling and fulfill our mission as a knight. Return to the portal stone and warp back to the Wastelands.
Entering the Wastelands Castle
<J2> While there are still some undiscovered areas on the map, there's little to note there, so feel free to explore those areas on your own or just head due north until you reach the front gate of the wizard's fortress. Most chests in the area only contain coins.

The gate is closed. To the right of the gate is a conduit puzzle. Rotate the pieces of the puzzle by hitting them so that the power signal connects to the end point. Once the gate opens, head north through another orc camp.

<J1> Continue north to the front steps. Go up the stairs and step on the portal stone to activate it. There are ramparts to the east and west but all paths are blocked by barriers. There's only one way to go, so head into the ominous looking door above.
Wastelands Castle, Part 1

Room 1: There are lots of orcs here milling about some rather menacing looking electrical pylons. There's a chest of coins in the northwest corner of the room. Doors lead off in all directions. The door to the north is blocked and the door to the east is on a ledge that can't be reached. The only way to go is west. Duck through the electric current when it's off and exit.

Room 2: The path to the left is blocked by a barrier, so the only possible route is a collapsing floor heading downward. Skull heads on the walls will shoot projectiles that can knock Lily into the abyss. Step carefully to avoid them. It may be necessary to stop now and then to avoid getting hit. On the middle platform is a new type of enemy that seems tough to kill. Use the boomerang against them and they'll go down in one hit. Continue to the second section of collapsing floors, heading back upward. At the top, there's a switch that will lower the barrier. Gee, thanks. Exit to the west.

Room 3: There are four devices here with glowing symbols above each one. Hitting them rotates the symbol between square, triangle, cross, and circle. There's no obvious solution here, so leave through the door to the north, the only other exit currently available.

Room 4: There are some orcs here, and skulls on the wall that will fire if you get too close. Bomb the plasma ball in the middle of the room to reveal a switch. Stepping on the switch lowers the barrier blocking the west exit, but getting off the switch makes it rise again. Place a bomb on the switch and use it to lower the barrier long enough to get across. On wall above the center platform are two symbols, triangle and cross. On the left side of the room is a cracked wall partially hidden behind a pylon. Bomb it and go in to find ten chests that have coins and some potions. Go through the exit to the south.

Room 5: Beat up the orcs here. This room introduces a new floor type, a conveyor. Stepping on it will move Lily in the direction it points. There are three switches in the center of a conveyor loop. Hit the switches so that all three are active at the same time to open the southeast door. It can be done with two carefully timed boomerang throws while moving horizontally. Exit to the southwest.

Room 6: There are more plasma balls here, as well as a barrier blocking the right half of the room. Bomb the lower left plasma ball to reveal a switch that lowers the barrier. Go up onto the center platform when the mini pylons aren't charged, and notice that there are two more symbols on the wall, circle and square. On the right side are more plasma balls. Bomb the one on the lower left to open the exit gate. Leave to the north.

Room 3 (again): We now have the solution to the four devices. Hit them so that the symbols are triangle (upper left), cross (upper right), circle (lower left), and square (lower right). This opens the gate to the west. Exit through that door.

Room 5 (again): Shoot the target here to open the door to the west. Jump off on the ledge and ride it over to the far end of the room then exit to the west.

Room 7: Solve the sliding block puzzle here {D4B1}. This opens the southeast door. Go out that way.

Room 8: Run past all the brutes or knock them out with the boomerang. Navigate up the conveyor floor on the left side of the room while avoiding the electrical fields.

Room 7 (again): Now on the other side of the sliding block puzzle. There's a chest above with a health potion. Exit to the west.

Room 9: Solve the conduit puzzle {D4C1} to turn off the generator, which reduces the power to the powered gate back in the first room. Exit to the south for a bit of fresh(?) air.
Wastelands Castle, Part 2
(Outside) hit the switch to lower the barriers on the west side of the ramparts. It's possible to return to return to the center area now, but follow the rampart to the south to find another doorway.

Room 10: Solve the path walking puzzle {D4P1} to open the north door. Exit to the north since the other doors here are closed.

Room 11: Collapsing floors and conveyors, what could possibly go wrong? Aim for the high end of conveyors and push against the flow to make traveling easier. Try to avoid over-correcting to accidentally slip into the abyss, and use the solid platforms for a rest. Falling will send Lily to the start of the room. Follow the path to the left, up, then to the right to get to the east exit.

Room 12: Lily steps in and the door closes. Defeat the big orcs using the boomerang and take out the spiders to open the doors. Continue east.

Room 13: Again the door closes behind Lily, and this time she's locked in with several brutes. Use the boomerang against them and a chest drops. Open it to get a health potion. Go south.

Room 14: Lily gets locked in yet again. At least this time it's singing stones, er, skulls. Fortunately, it's only six rounds. A chest drops. Open it to get a key then leave to the west.

Room 12 (again): Navigate through the pylons and get to the left side of the room with out getting completely fried.

Room 10 (again): A merciful respite from getting stomped, shocked, and shot. There are some pots on the far side of the room for a bit of health, otherwise unlock the southeast door and go through.

Room 15: Ride the conveyor across. It seems simple at first, and then there are skulls on the wall firing energy spheres. Running quickly can save Lily's life here. Exit to the east on the other side.

Room 16: A large open room with lots of enemies. Chests around the upper level have coins and potions. Bombing the cracked wall next to the left skull at the top of the room reveals a room with ten chests containing lots of coins and some potions. Locate the switch in the lower right of the room to open the gate to the east. Fight your way to the lower level and step on the portal stone to activate it. Go through the door when you're ready to take on the midboss.

Room 17: It's the Mage of the Black Rose. We ran into this guy outside Runestone Temple. It's time to show him the business. The floor has a conveyor ring and pylons, so trying not to get zapped will be important here. He can teleport around, create clone decoys, and shoot electric balls. Exact some justice for your fallen comrades with your weapons of choice. Upon defeating him, open the giant chest to get the lightning medallion. Continue to the east.

Magic Master
Find all 5 magic spell medallions
Wastelands Castle, Part 3
Room 18: Head down a long corridor while avoiding electrical fields and fighting enemies. Shoot the orcs with the Tri-Bow and watch out for spiders. Exit to the east.

Room 19: This large room has three exits to the east. Going through the middle exit will lead to a dead end, so go through the northeast exit.

Room 20: Hit the red switch to lower the red barrier. Return to the previous room.

Room 19 (again): Go through the southeast exit.

Room 20 (again): Hit the blue switch to lower the blue barrier. Drop off the ledge and solve the Sokoban puzzle {D4S1}. The gated door to the east open. Continue through.

Room 21: Solve the conduit puzzle {D4C2} to turn off the generator. Again, the power to the electrified barrier in the first room is weakened. Take the door to the south to head outside again.

(Outside) The rampart leads west and north here. The path to the west is a dead end so head north. Hit the switch to lower the barriers. It's possible to return to the main area now, but instead head up the stairs to a door that leads inside again.
Wastelands Castle, Part 4
Room 22: The layout of this room is a bit like a figure eight. There's a barrier to the right, so the only way to go is to the left and up. The door here is blocked by a purple barrier. Get onto the center platform from above then hit the switch to lower the red barrier. Drop off the lower ledge then continue to the right. Hit the switch to lower the purple barrier. Leave through the north door.

Room 23: Navigate the serpentine path of conveyors and collapsing floors. Get shot at by skeletons. All in all a fabulous time. Exit to the west.

Room 24: More winding paths of conveyors and collapsing floors. While being shot at by skulls. The first step is especially tricky. Course correct by walking left against the conveyor to reach the first collapsing floor. Expect to take a lot of cheap shots. Exit to the south.

Room 25: New shiny stuff. There are laser walls here, and there are also teleporters. Use the teleporters to jump past the laser walls to get to the far end of the room. Exit to the north.

Room 26: Where there are teleporters there must also be teleporter mazes. The shortest path through is right, lower right, lower left. Exit to the west.

Room 27: One more conduit puzzle {D4C3}. Shutdown the generator and the gate in the first room is now open. Leave through the door to the west.

Room 1 (again): We've come full circle and the room Crocus sealed himself in is waiting. Jump off the ledge and head north.

Wizard Crocus

Room 28: If you need any supplies, retreat to the portal stone at the entrance of the fortress, otherwise step off the ledge to begin the final confrontation. Crocus will start on the dais protected by charged pylons, but he can teleport around the room and launch plasma ball attacks. He can also turn himself into a cloud of bats, summon lightning, launch bolts from his staff, and fire a laser beam. Lily can use the lightning medallion to zap him while he's on the dais and give him a taste of his own medicine. Eventually the stained glass windows will explode and pillars of electricity will roll through the room.
The End
After defeating Crocus, Lily is transported back to the Blossom Castle throne room for a hero's celebration. The king rewards Lily with a special bracelet she can use to activate portal stones from anywhere in the world.

A final scene plays with Grandpa finishing up the story and returning to his nap... so how much of that tale was true?

The End
Complete Lily's story

After the game ends, loading the save will allow continued exploration of the world, so it's still possible to keep playing, collect any missed items, and complete any remaining achievements.
Other Achievements
There are three additional achievements not mentioned in the main story sections of the guide:

I Love Gold
Collect 5,000 gold coins

Lawnmower Woman
Cut 1000 patches of grass

Lily the Butterfly Slayer
Kill 100 butterflies
Puzzle Solutions
Notes

Sokoban: Puzzle solutions are the directions Lily should move, one step at a time. If a step is lowercase, she'll move to and empty tile. If a step is uppercase, she'll push a block in the direction indicated. Solutions were generated from puzzles reconstructed in JSoko[sourceforge.net].

Block Sliding: Refer to the blocks as they are numbered in the respective diagrams. Each solution step is a block number followed by the direction the block should be pushed.

Path: Follow the path described by the red line in the image. Some of these puzzles can have multiple solutions other than the ones shown here.

Runestone Temple

{D1P1} - Room 14

{D1P2} - Room 25

{D1P3} - Room 25

{D1P4a} - Room 28 (Left Side)

{D1P4b} - Room 28 (Right Side)

Boiling Caverns

{D2S1} - Room 5
urruruulDDrdLuuuluulllddRRRllluRRdrUUrruuLL

{D2S2} - Room 8
rrrdrrruuUdddllullluuurrrrRddddddrrruuulLrdrddllulullullluuurrrrrddDDlddrruLLLdlUUruLLrdrrruuuulllllddDDDuurrdddrrrrrruLuuruulLruLLLLLLrrrrrdrrddllluU

{D2P1} - Room 12

{D2S3} - Room 15
urrrrrrrUluuuurrdddLLLLdLdlUUUruLLrrurRR

{D2P2} - Room 16

{D2S4} - Room 16
ddddLdlllUUUdddrrUUUruLddrrrrdLLdlUUruurDDrdLuuurrrrdddlL

North Blossom

{NBS1} - Cave in <H2>
uUUrruullDllllldlddrrrrRllUUddllluururRRldddrrurUdlLdlUdllluururrrDDlUruLLrdddllluurRurrddrdLLL

{NBP1} - Cave in <B4>

Frostroot Shrine

{D3B1} - Room 13
3U 1D 1L 1D 1R 5U 5L
4U 2D 2R 2D 2L 6U 6R

{D3P1} - Room 17

{D3B2} - Room 12
1U 1L 1U 1R 1D 1R 1U
2U 2R 2U 2L 2D 2L 2U

Snowfall Summit

{SSP1} - Puzzle cave in <E1>

{SSB1} - Building in <A1>
2R 2U 2L 1R 1U 1R

Wastelands Castle

{D4B1} - Room 7
1U 1L 2U 2R 7D 7L 8D 8R
4L 4U 4L 5R 5D 5R
3U 3R 6D 6L

{D4C1} - Room 9

{D4P1} - Room 10

{D4S1} - Room 20
rRRdLulDrrrRUrrRlllddddrrrruuuUlldRurUUddDDDuullLulUUddDDDuuuLLLdlDDuuUUU
(Note: This puzzle has two entry tiles. The solution sequence begins on the upper tile.)

{D4C2} - Room 21

{D4C3} - Room 27

All Glyph Stone Puzzles (Summary)

  1. Runestone Temple: In room 23, there are four glyphs covered by vines. Burn them to reveal UP DOWN RIGHT LEFT.

  2. Runestone Temple: In room 28, glyphs in the next room (north) show: UP UP LEFT LEFT

  3. Snowfall Summit: In <E1> a cave has a sequence of puzzles to solve. Glyphs are on the wall and the solution is displayed clockwise around the room starting on the left wall as viewed from Lily's perspective. The order here is: UP DOWN RIGHT LEFT

  4. North Blossom: In <E3> vines on the hillsides hide glyphs that indicate the solution for the cave in this area. Burn the vines then order them from west to east: DOWN LEFT RIGHT UP
20 Comments
brandmullins91 Apr 3 @ 12:32am 
I checked the shop again after getting the last ingredient and the shop inventory didnt changed. I brought all those items, went to different location, quit the game and reload but the store inventory still hasnt changed. Why is that?
Gueunard Dec 12, 2022 @ 3:37am 
for the f3 cave here is the order : D L R U (the direction correspond to the hole in the stones)
thaliel Oct 3, 2022 @ 4:13pm 
how do I gat to the chest in the cave located at F3? I couldn't find a clue how the 4 stones need to be positioned to lower the red blockade
LetsPlayNintendoITA Jun 8, 2022 @ 6:29pm 
hey Estragon, quick question, isn't it better to grab the heart piece with bombs in the first room of the rat dungeon immediately to get a heads up with it?
Admiral Fleischfrühling[ger] May 27, 2020 @ 6:35am 
thx thumbs up
astrose2 May 12, 2020 @ 7:39am 
For {NBS1} - Cave in <H2>, is it not much easier to write: UUU RR UU LL D LLLLL D L DD RRRRR LL UU DD LLL UU R U RRR L DDD RR U R U D LL D L U D LLL UU R U RRR DD L U R U LL R DDD LLL UU RR U RR DD R D LLL (Hope I did not make a mistake.)
It was so hard to follow, I really had a hard time ^^
Bigliest of Macs Apr 22, 2020 @ 10:41pm 
The Archeologist thingy in the snowy graveyard is so easy when you spam the bees.
{A51} Xanthor Dec 28, 2019 @ 4:33am 
op: the area where u bomb the sarcophagi, just to confirm, the loot is random.
LetsPlayNintendoITA Sep 18, 2019 @ 7:12am 
i tried it out myself dont' worry. thanks :) i finished the game hundo thanks to you!
Estragon  [author] Sep 18, 2019 @ 6:16am 
Thanks for the corrections. I checked my draft notes and these were errata I missed while editing. Credit will be added to the update notes in the intro section shortly. I'm not sure why but I have a habit of occasionally mixing up left/right and west/east but generally have no issue with up/down and north/south. I never realized how often I did that until I was editing the guide and found myself fixing directions here and there.

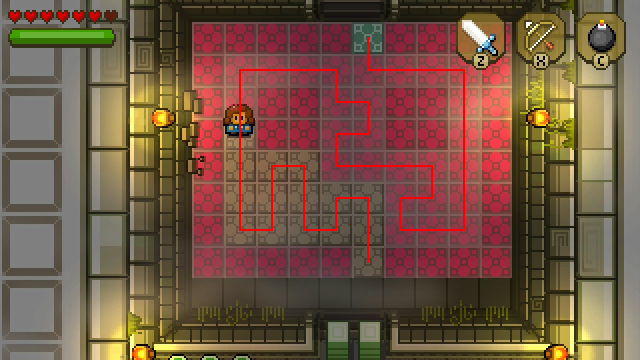
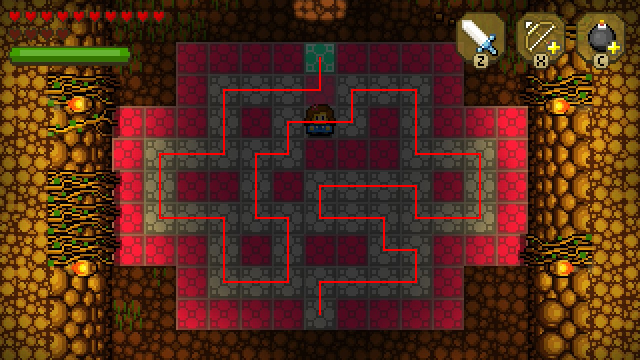
As for the switch puzzle in the castle, I suppose the sword beam might also get the job done but it requires being at full health. Even when creating a 100% playthrough guide, it's always possible there will ways to solve certain scenarios that won't be accounted for. I'd try it out to see how it works but I'm currently on Linux where the game isn't supported.