Command Ops 2 Core Game

Command Ops 2 Core Game

157 avaliações
Quickstart Guide for Command Ops 2
Por Bie
So you want to be a WW2 commander? Charging the bridges at Arnhem, making a desperate stand at Bastogne and basically leading your men to epic victories. Yet it seems that your men are just standing around, not following orders and generally holding you back from greatness.

This guide explains a few crucial concepts and aims to get you started playing Command Ops 2 as quickly as possible. It will only cover the extreme basics of managing your forces. So, let's get past that first hurdle shall we?
2
7
2
2
2
2
2
   
Premiar
Adic. a Favoritos
Nos Favoritos
Desfavoritar
Basic concepts
If you plan to play Command Ops 2, you first have to understand two crucial concepts:

Chain of command:
Command Ops 2 places every unit in a realistic chain of command. A core building block of this is the company. Most of the time if you see counters on the map, they’ll be companies. Following military structure companies are grouped together and assigned to a headquarter unit. These HQ’s are in their turn subordonate to higher headquarter units. Depending on the complexity of the scenario these links can go four or five levels deep. So basically every unit in the game is linked to an HQ. Except the top HQ ofcourse, which is basically you (and your staff).

Why is this important to know? Short answer: it has huge impact on how you give orders.

Long answer: you can give orders to companies individually, but this is very tedious and not really what this game is all about. Alternatively you can give orders to your HQ’s. They will formulate a plan to best suit your order and let its subordonate units execute the order. Depending on how far up the chain of command you go, this one order will result in setting in motion dozens of companies.

Which brings me to the next concept...

Orders delay:
Every order you give to any of your units will take time to be processed. Ordering large groups of soldiers about doesn’t happen in an instant. Even your building block, the company, constitutes most of the time of about 100 to 120 men. So even if the company is represented as one counter, in reality it is a group of soldiers led by a couple of officers.

Imagine giving an order to a company: basically you give orders to its commander. The company commander will in turn brief his platoon leaders, who in their turn brief their squadleaders until finally the soldiers get their orders and ultimately the order as a whole is executed. This all obviously takes time and is modeled in Command Ops 2 as "Orders Delay“. For companies this results in a typical orders delay for about 30 ingame minutes.

If you give orders to higher level HQ's this results in higher orders delay as more echelons need to be passed through for the orders to reach the soldiers. Also the amount of coordination between the subordonate forces is way higher and needs to be accounted for. A whole division for example can take up to an hour or an hour and a half to fully process its orders.
Understanding the chain of command
  • Battalions:
In Command Ops 2 the lowest echelon HQ unit is at battalion level. Due to its flexibility and ease of use most players tend to give orders at battalion level. So if the company is the building block, the battalion is your trusty Swiss Army knife, compact and versatile. Let's look into this a bit further shall we?

Battalions are considered to be quite small formations, but what kind of footprint do they have on the battlefield? That depends on what orders you give them and what kind of terrain they are in. Here are some examples of battalions on the ingame map:

2nd Para Battalion

3rd Para Battalion
  • Brigades/Regiments:
Next up the chain of command is the brigade (or regiment for some nations). The brigade HQ typically commands a couple of battalions and will normally have a couple of support units of its own. Taking earlier the battalion and adding its brigade this translates to the following order of battle:

Brigades can already take up quite some space and are definitely a force to be reckoned with. Orders can be given at brigade level. Though considering the amount of units that the HQ has to coordinate, this is most of the times quite unwieldy and takes quite some time to set up.
1st Para Brigade
  • Divisions and up:
In Command Ops 2 higher level formations include divisions, corps and sometimes even armies. I won’t go into detail in this guide, but suffice to say that giving direct orders to divisional HQ‘s and up is not really useful.
1st Airborne Division in all of its glory
  • Detaching units:
Detaching and attaching units is a constant routine in Command Ops 2. If you give direct orders to a company it will be detached from its battalion, if you give direct orders to a battalion it will be detached from its brigade and so forth... The detached unit (be it a single company a battalion or even a whole brigade) will operate independently until reattached to its superior HQ. Detaching units will basically let you decide on the spot how much forces you need to get the job done.

So, why not let your units be constantly detached? Detached units get linked the highest HQ. Although you are the one giving the orders, ingame this HQ will still technically be the one that gives the orders. The command load of having lots of detached units linked to your highest HQ will result in an overloaded, inefficient headquarter. This will also result in a higher than normal orders delay.
Getting to grips with orders delay
By now you should have a vague understanding of the chain of command and how it is implemented in Command Ops 2. This is important as it also ties in with how orders delay plays out in the game. As a rule of thumb the amount of orders delay depends on how high the unit is in the chain of command. Lower level HQ’s will have lower orders delay, whereas higher level HQ’s will have higher orders delay.

Getting units in motion then takes time. The opposite is also true, but to a lesser extent. Once a unit is executing its orders, it won’t immediately stop when you tell it to. It will take at least a couple of ingame minutes for the units te recieve the orders and react accordingly. For example: if a battalion is ordered to stop while it is already attacking the HQ unit will be the first one to recieve the order and be the first one stop. Meanwhile its subordinate units will still be executing the original attack order as it takes time to go through the chain of command. Only a couple of minutes afterward the new orders will trickle down to the lower level units. At that time they will stop and will eventually carry out their new orders.


Orders delay is a two edged sword. You must keep in mind that time will pass before your units move, but you must also be sure that your orders are given correctly as altering them mid-execution will take even more time. Correct observations and careful planning are in order then, as a badly thought out plan might easily result in catastrophe.
Your first steps ingame
Right, on to actually playing the game. Don't worry if you didn't understand every detail from the previous sections it will become much clearer over time and while playing the game. For now it is important that you have a notion about those concepts.


To start of with I'm going to select the St Vith scenario, which is the tutorial scenario for the game. The scenario is not a tutorial in the usual sence though. It is more of a simple introductory scenario with an interesting mix of units and an advantageous Allied starting point. Lots of tutorial video's have been made using this scenario, so I'll stick to that one for now.

I'll keep all scenario settings as is and choose the Allied side. Be sure to keep the orders delay to realistic. It adds a lot to the game, as explained earlier.

For this quickstart guide I'm going to mainly focus on the absolute basics: moving your units across the map and giving them basic orders. Therefore I'm going to forgo explaining the user interface, map and other features in detail. That will be explained later in other guides.
- A movement order

Glancing at how my forces are situated I decide to bring up an AA company from the back of my lines to a strategic position on top of a hill. How do I do this in Command Ops 2?

First click on the unit. Notice it will light up and have a brighter colour than usual. It will also show its footprint as shown by the bracket beneath the counter and any superior or subordinate units. Then press the "Cntl", "Ord“ and "1TE“ buttons on the taskbar. It will pop up the Control, Orders and Edit Task dialogs. Slide them anywhere on the map.

Press the move order button or use the "M“ key and click on the hill. A move box with the footprint of the company and a line between the current location of the unit and its destination should now be shown on the map.


For simplicity's sake we are not going to change anything to the move order. Though we can already see on the Edit Task dialog that our company is expected to arrive at its destination at 06:54h by looking at the "End" time.
There we go, our AA company is now in position to start shelling the enemy. Easy enough wasn't it?
- An attack order
Moving on to the attack order. My forces are poised to strike an important river crossing but German troops are in the vicinity and they will surely impede my advance. I'm planning to go straight through them and seize that bridge. Seeing that there is quite some opposition I'll be using a battalion to do the fighting. Let's see how to order this assault.

It is important to understand that an attack order in Command Ops 2 optimally has two waypoints. The first waypoint will be used to organize the units and is called the form up point. The second waypoint is the actual target location.

First select the battalion HQ. Notice that the whole battalion lights up. Now pick the attack button in the Orders dialog or merely press the "A“ key. Then keep pressing the shift key as it will allow you to create waypoints. Finally click on a part of the map where your form up point will be and click a second time on the map where your target is situated. The game will automatically assign the first waypoint to a reorg order and the second one to a attack order.


Now I can already hear you say: Why have two waypoints? Why not immediately charge ahead? While it is possible to do so, this will result in the units charging off from their current positions. With a single company this is not a problem, but with a battalion or anything higher level this is very disadvantageous as it will result in an uncoordinated attack. But if your units are already in a good position, and frankly they were in this example, you can save quite some time. So in a pinch, you can pull it off.


Congratulations commander! You have just captured your first objective.

Now keep in mind that the execution of this order can have many different outcomes. In this case the battalion HQ sent C Company all the way to the northeast, leaving A and B Company to fend for themselves. If you recreate this specific order this might not happen and another plan might have been formulated by the HQ. It all depends on the actual situation on the battlefield.
- A bombard order
The last order I'll touch on is the bombard order. With our troops attacking that crucial bridge I want to give them the proper support they need. I want to take one of the brigade's artillery batteries and start pounding the enemy companies at the bridge.

Setting up the order we'll first click on the bombard order button or just press the "B" button. Then chose a position on the map. Notice that around the target there is also a yellow box. In the previous orders this indicated the footprint of the unit at the end of the order. In this case it is the area where the artillery will drops its shells.

In this instance I'm not going to change anything to the order. Notice that the Edit Task dialog lets you change the duration of the order. Standard duration of a bombardement is 11 minutes, which is ok for me in this example.

Let's look at this in action, shall we?
Done! We've bombed the enemy to smithereens and turned the landscape to a barren wasteland. Well..., while artillery definitely causes casualties, it is best used to demoralise dug in enemies so they start to flee or to dissuade enemies from taking certain routes. But that is for another time...
Closing notes
This Quickstart guide to Command Ops 2 is herby at an end. I know it is not really that "quick", or rather not as quick as I had hoped, but this is the bare bare minimum you need to start playing the game. If you want a deeper guide, consider checking out my Basic Guide to Command Ops 2.

To close off, here are some useful links:
Command Ops 2 introduction walkthrough - This video shows the basics of the game. It also includes the developer's opening moves in the Return to St Vith scenario.

TortugaPower's Let's play of the Return to St Vith scenario - An excellent playthrough of the St Vith scenario. Well explained and can basically be considered an in depth guide to the game.

The Command Ops 2 manual[forums.lnlpublishing.com] - All details concerning the game can be found in the manual. It is a hefty tome, but it explains just about everything of the game.

A downloadable PDF version of this guide can be found here [forums.lnlpublishing.com]
51 comentários
AbsolutMauser 29 de fev. às 7:28 
CCA 4 Am Div HQ is your "Brigade HQ," the US Army just didn't use brigades during WW2. If your parent unit is an infantry division, you may see RCT instead of CC for Regimental Combat Team, which would be a brigade-sized unit consisting of an infantry regiment plus supporting units, usually including units from an armored division.
AbsolutMauser 29 de fev. às 7:26 
Nevermind, they do have combat command HQs. Your HQ in the St. Vith tutorial is Combat Command A of the 4th Armored Division. The Combat Command is brigade-sized unit that will have core units from 4th Armored Division plus supporting units other divisions.
AbsolutMauser 29 de fev. às 5:45 
@Rinky The US Army didn't use brigades in WW2. The infantry used Regimental Combat Teams and the armor used Combat Commands. Command Ops doesn't have HQs to represent either of those, so I think they are using Divisional HQs as stand-ins. Someone else may know better than I!
Rinky 19 dez. 2023 às 8:49 
I started playing the first tutorial scenario and I am confused. I have essentially a brigade (3 batallions and a couple of support units), but HQ is Div HQ. 3 batallions is too small for division, no?

Later I start to get reinforcements, all of them are similarly sized and all have their Divisional HQs. I end up with like 3 divisions on paper when really it is 3 brigades.

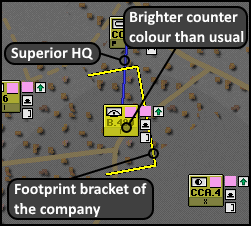
Also for some reason all of this reinforcement Divisional HQs can be reattached (order button is active) to other Divisional HQs, so I end up with Division HQ which is superior to two other Division HQs.

I don't understand what is happening and how should I play this.

If these divisions were brigades with one division hq over them it would make sense
steele 14 nov. 2023 às 12:21 
This is an amazing tutorial. Thank you.
Warlord 6 6 out. 2023 às 14:15 
Bie, excellent work! Is there a way to combine all your guides into one downloadable PDF file, or are you thinking about making one available for folks? I'm old school and like to have PDFs and print them out.
Don Cossack 24 abr. 2023 às 16:28 
Bie, you magnificent bastard, I played your scenarios!
Grit 10 jan. 2023 às 13:57 
GG
Cult of Ass 22 set. 2022 às 21:10 
Blessings to you helpful man