Legend of Grimrock

Legend of Grimrock

307 ratings
Grimrock Secrets - Map Guide
By Raxyz
Guide adapted from Gamepressure Guides[guides.gamepressure.com], if it were possible I'd just save an bookmark within Steam Overlay, but since it isn't here we are. This guide will only show a screenshot of the map and description of the secrets, for a more complete walkthrough, I'd reccomend visiting the source here[guides.gamepressure.com].
3
2
6
5
   
Award
Favorite
Favorited
Unfavorite
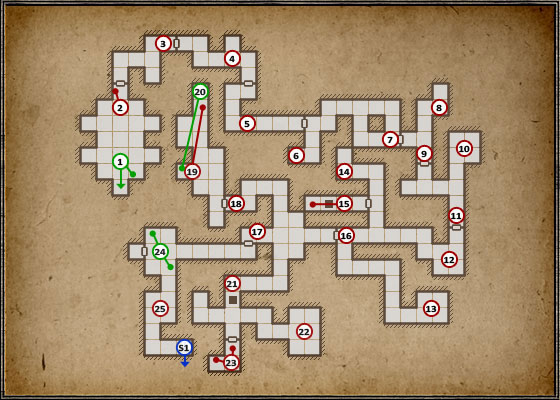
Level 1
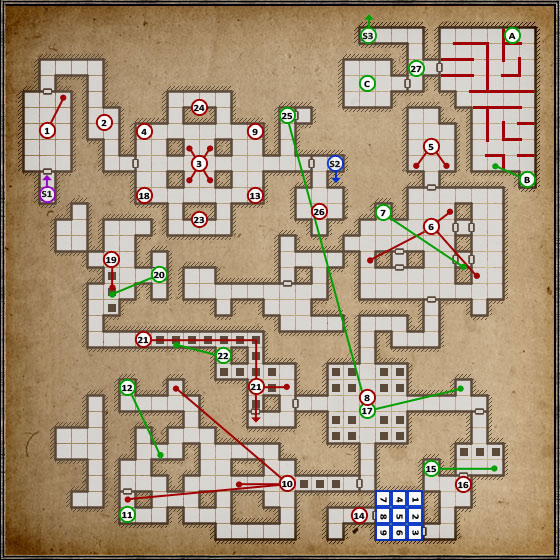
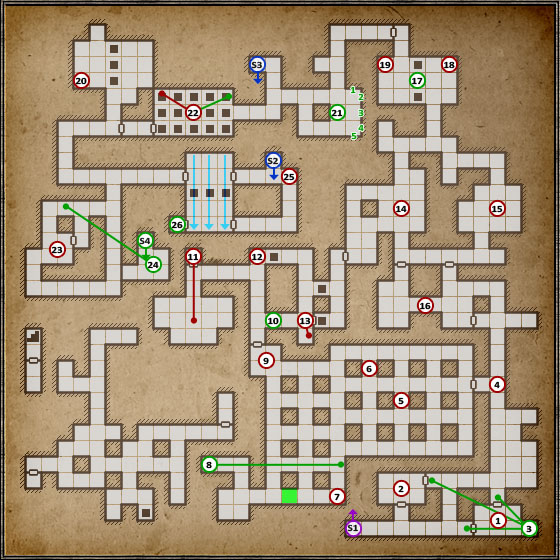
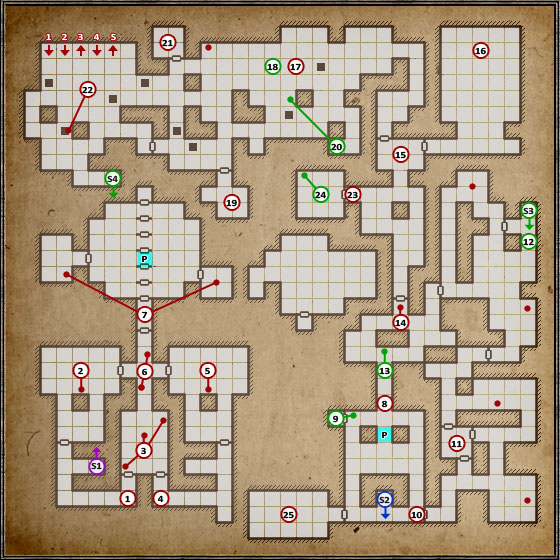
Green outlined orbs represent the secrets. I'll ignore everything else.


1
You'll be placed beside the very first secret right away. In order to reach it, turn around and on the left wall you will find a broken stone, the smaller part of which is a button. Press it to open a wall behind which there's a Shuriken and Lurker Boots. Both might be very handy for a Rogue in your team. If the darkness makes it difficult for you to find the hidden button, you should start off by heading to point (2).

20
The button in the cell (19) opens the room in which you will find a Dagger, Tar Bead and two Cave Nettles - another alchemy ingredient. The Dagger is a successor to the blunt knife that one of your characters has been using up until now.

24
The Iron Door and at the same time a secret and a collectible, as they count to the end statistics. In the alcove on the left side of the door you will find an enigmatic hint on how to open them. In order to do that, you will need to find two buttons hidden in the chamber's walls - one on the right side of the door and the second on the left side of the alcove with the Scroll. On the other side of the Door you will find the Whitewood Wand for you mage and a Scroll with its description.
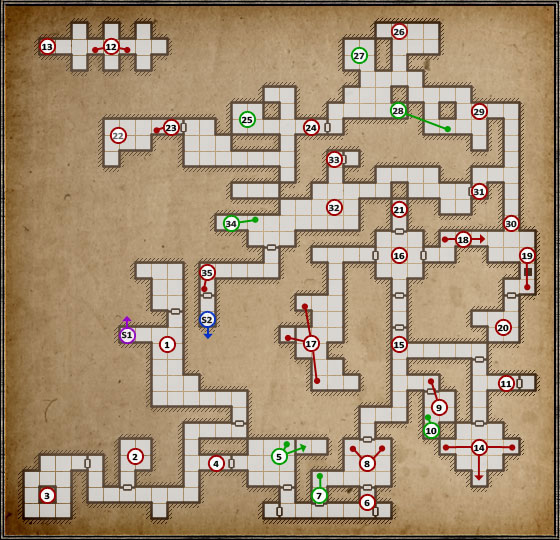
Level 2
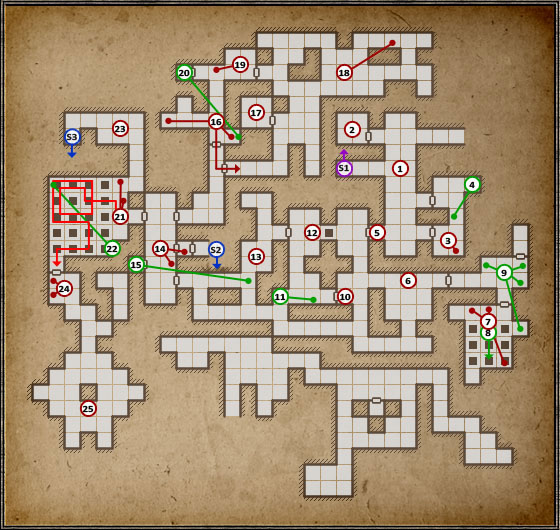
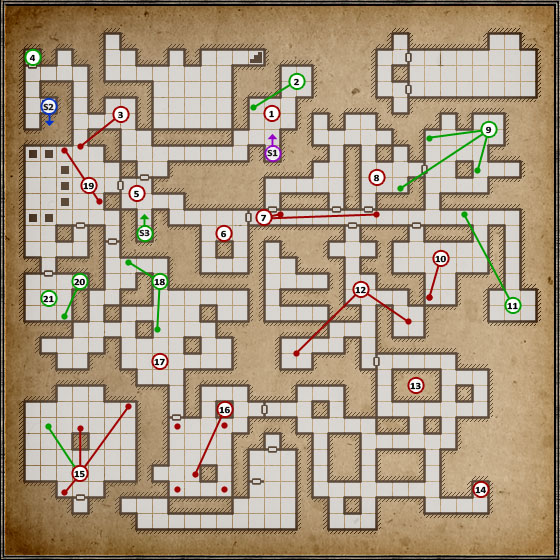
Green outlined orbs represent the secrets. I'll ignore everything else.


5
In the corner of this room you can find a secret. In order to open it, you need to put the torch in the marked handle. Inside the newly unlocked room you will find the Iron Basinet. It's a heavy armour, equipping which requires the skill of using such items.

7
After entering the room, turn into the dead corridor on the left (you can find a Rock inside). On the marked wall you will find a hidden button which opens access to a cell with Poison Arrows.

10
Inside the "no weapon" room there's also a secret which you can reach after pressing a stone on the wall in the corner. Inside you can find the Pointy Shoes.

25
Inside the room from which the Herders came you will find a Sling which throws Rocks which much higher force and you should have some of them with you.

27
After eliminating the enemies who came out of this room, search it to find a Phalanx Helmet, Leather Pants, Tar Bead and a Skull. Skulls are unique items which count for the end statistics. Additionally it's an item which enhanced the damage dealt by minotaurs with Head Hunter status.

28
Inside the hall beside the last secret you will another one, though the button which opens the room can be found beside the pillar nearby point (29). Inside the room there's a Treasure (one of seven), in the form of the Golden Chalice.

33
At this spot you will find the second Iron Door in Legend of Grimrock. In order to open them, you need to wait a dozen seconds or so while standing on the pressure plate beside the sculpture on the wall. After the door opens, a Skeleton group will come out, so back out to the main chamber to have room for dodging.

Behind the Iron Door you will find three Fire Bombs (which by the way are great against such groups of enemies) and complete another secret.

34
Inside the same room you can find yet another secret. Just look for the button in the wall opposite to the entrance to open a short corridor, inside which there's a single Skeleton and a Wooden Box. Boxes (just like Sacks) increase the capacity of your inventory, but weight a bit themselves. Inside this Box you will find a Healing Potion, Leather Brigandine and the Scroll of Poison Shield.
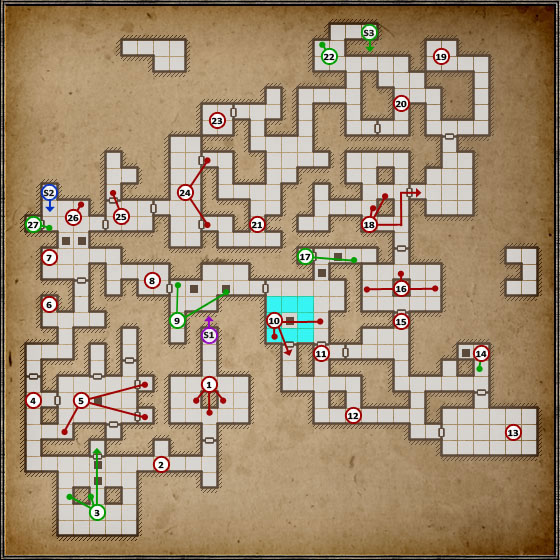
Level 3
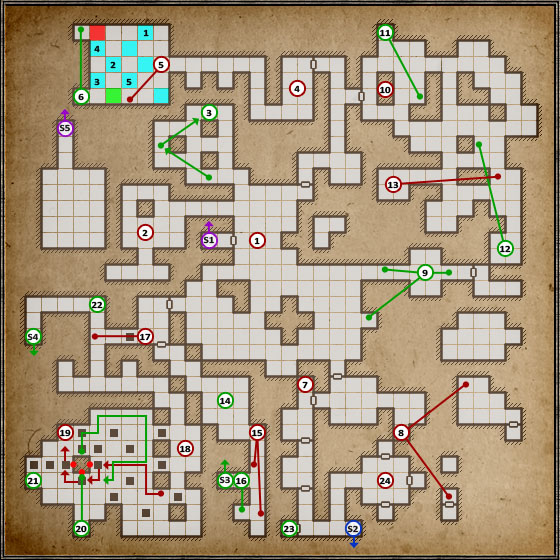
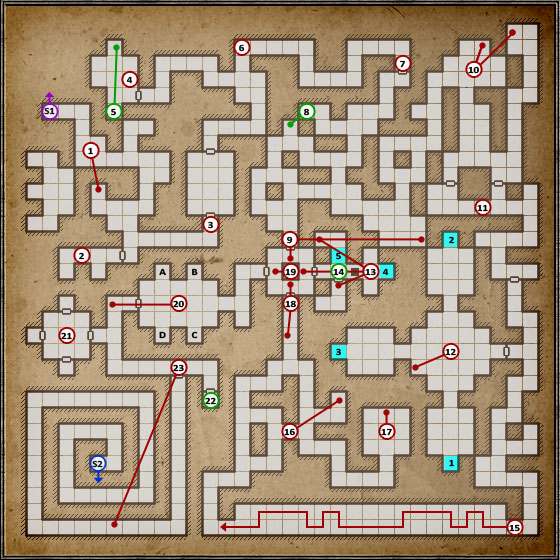
Green outlined orbs represent the secrets. I'll ignore everything else.


3
Inside this room you will also find the first secret. The wall in the middle has two pillars connected by walls, which can be picked up. For that, you first need to find the rather obvious button on the west side of the wall. After pressing it, one of the walls will raise and uncover a small room with a Shuriken and another button on the opposite wall. After pressing it, another wall between the pillars will raise, letting you throw an item above two trap doors into the alcove, inside which a grate has also raised. When the item falls down on the other side, the trap doors will lock and you will be able to cross them to the other side to collect the Bow and Arrows - a treasure for your Rogue.

That's however still not all. Pick up the item from the pressure plate and jump down to one of the trap doors. You will find yourself inside a corridor with Slimes. Kill them and look around to find a Skull for the minotaur and the Tar Bead. In order to get out of the trap, just pull the lever found there and a teleport which can take you back up will appear.

9
Inside the next room with two trap doors you will find a secret - and in fact three. In order to reach it, you have to press the rectangular button on the wall beside the first trap door. It will cause the trap doors to lock for about 5 seconds. In this time you have to quickly press the metal button above the second trap door. Afterwards a corridor with a teleport leading to a secret room will open opposite to the first button. Inside it you will find a Shuriken and the Tome of Health (permanent +25 HP for the character who reads it).

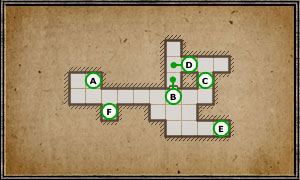
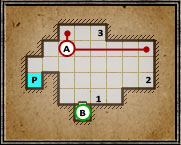
Time for another 2 in 1 secret. After using the teleport to return to the corridor with the trap doors, jump into one of them. In the area where you landed you should find a pressure plate (A). Place any item on it. Stand opposite to the door (B) and put an item on the plate on the other side of the grate. Use the button (C) to activate the teleport behind the grate and place one more item on the plate behind the grate (D). The gate (B) will open and on the other side you will find a Serpent Bracer which gives you protection form poisons (it will come in very handy!).

In order to find the secret-in-secret here, press the button once again (C) and return to the re-activated portal where you found the Bracer. You will be taken to a secret alcove (E) inside of which you can find the Scroll of Invisibility. Pull the lever to return to the main room and onto level 3 using the portal (F). Phew...

17
Now, that you have opened the secret tunnel, inside of it you should find a lever which will open the Iron Door found nearby the room with the moving portals. In order to reach them, you need to return there (10) and take the weight off the pressure plate in the west. You will therefore lock the trap door which prevented you from approaching the door before. Inside you will find the Huntsman Cloak and beside the door itself a Nettle.

22
Now return back to around point 20. A couple Spiders came out of the unlocked secret area, including one which has a key to a secret at the end of the level - Gold Key. Look for it after killing each one of them. After reaching the room itself (22), collect the Tar Beads found there and look around the nearby wall for a hidden button which opens a passage to a set of stairs (S3) leading into an isolated area of the underground. More on that in the description of Level 4.

27
You still have one thing to do on this level. Right beside the stairs there's a door with a golden lock. Open it using the Golden Key which you have found by the corpse of one of the Spiders nearby the secret at point 22. Inside the room you will find the Knoffer Mace and Ring Boots.

S3
Descent to the secret part of level 4.
Level 4

7
Inside the southernmost cell there's a button hidden in the wall. Press it to open the northern alcove in the northern corner, where you can find Leather Boots, Bread and Ring Gauntlets.

11
Inside the same cell inside which the last pressure plate is, you will find a button on the wall which can open a secret. Inside there's a Sack (inside a Burrow Rat Shank, Tar Bead and Leather Gauntlets) and beneath it a Bone Amulet.

12
The next secret is an alcove with a stone button marked on the map. After pressing it, you will first have to face a group of Skeletons which you have freed this way. After killing them, press the button once again and quickly head towards the marked room, as it opens only for a short while. Inside you will find the Flarefeather Cap and a Fire Bombs.

[h]15[/h1]
Start off with the secret found in this room. On the wall on the right there's a hidden button which open the alcove in the corridor before the door. Inside you will find the Venom Edge.

17
Here there's a secret thanks to which you can open the Iron Door on this level (25). Below the portal on the "crossroad" (8) there's a trap door. Press the button hidden in the alcove and run towards the portal which is temporarily turned off and the trap door opened. You will fall onto the lower level where you can find the Gear Key. The description of the level can be found at point (28).

20
The portal above the locked trap doors can be used to reach the secret room behind the grates. Place an item on the "ticking plate" and stand on the second trap door. Inside the secret area you will find the Book of Infinite Wisdom.

22
This secret is much easier if you have already gone through the trap doors once, killed the Crowern and left yourself an open gate at the end of the corridor. Once again head to point (21), but this time look right when you're on the second trap door and press the button there. It will open a branching in the tunnel. Turn right into the newly opened passage, look right, quickly take the Chitin Mask and keep following the closing trap doors.

25
It's the door for which you need the Gear Key obtained in point (17). Use the key on the gear-shaped lock and inside you will find the Chitin Greaves.

27
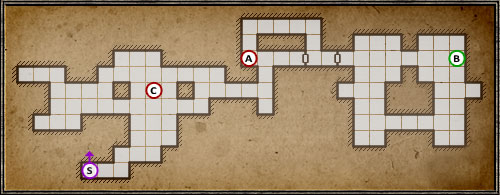
Return onto the third level and use the previously found stairs (S3). You will reach an otherwise inaccessible part of level 4 known as the Slime Dungeon. The name isn't random, as you will meet new enemies - Slimes - here.

The mini-map doesn't show grates which create an easy labyrinth of corridors here, but I marked them with dark red. Carefully examine this underground, searching for plant resembling cabbages. The Slime Bell is a new ingredient needed for alchemy. Thanks to it you can brew an antidote.

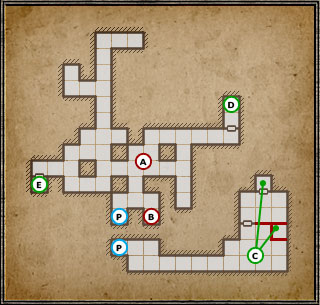
(A) - at this spot you can find the another Treasure, the Golden Deity Figure.

(B) - here you can find the Green Gem, needed to open the door at point (C). In order to open the secret room, you will have to press the stone button on the nearby wall.

(C) - in order to enter this room, you will first have to "feed" and demonic statue sticking out of the wall. To do that, just place the Green Gem into its mouth. Inside you will find a prize for crossing the Slime Dungeon - a Crossbow, Poison Quarrel and Poison Bomb. As you leave the dungeon, don't forget to take the Green Gem with you.

S3
Stairs to level 3.
Level 5

4
Inside the passage between the cells you should find a hardly visible button on the wall, which can open a secret room with the Scaled Cloak.

8
Before returning to the corridors however, jump down into one of the trap doors. Here you can find a secret, though take a rest and regenerate your strength, as you will have to fight the same set of reptiles as before. Luckily here you have much more space to avoid the Wyvern's attacks. Once you're done sleeping, find the button hidden on the right wall beside the portal. Behind you a room with the enemies as well as a secret will open. Inside you can find the Lightning and Fire Bombs.

9
Inside the room beside the trap doors puzzle you have probably noticed a lever and two buttons - one beside the grate behind which the puzzle was and one by the wooden door. In order to open the wooden door, you will need to proceed as follows: pull the lever down, press the button by the grate, pull the lever up and down several times (pulling it up in the end) and press the button by the wooden door. Two Herders - Small and Adult, so both highly toxic - will come out. Inside the secret room there's a Conjurer's Hat for you mage and some food.

11
Right behind the door you will find a button hidden on the wall. Pressing it will grant you access to the alcove, inside which you can find a great weapon for your Rogue: the Fist Dagger. Note the herbs growing right beside the hidden button.

15
In order to reach the content guarded by the Iron Door, you need to take a rest in the spot marked on the map, beside point (13). At this point the sights of two dragon statues cross (you will come across the second one at point (19)). After a short nap, the door will open and one the other side will find the Lurker Vest.

20
After you pull the lever at (16), immediately return to the room with the dragon. If you make it in time before the ticking stops, you will find an open cage and inside a secret with some Arrows and the Huntsman Cloak.

22
On your way to the other side of the trap doors you might have noticed a rather well visible button on the wall - if you press it while walking along the trap doors, you might be able to reach a small shelf with the Brace of Fortitude. Grab it quickly before you fall through the trap door which will open soon. On the lower floor you will have to fight your way through a couple types of Skeletons. Search the room after the fight to find some herbs and food.

Level 6

3
Inside this room there's an interesting secret. Cross the corridors once in accordance with the hints on the map and a stone will appear before you. Cross them once again and the stone will be replaced by a Skeleton. Do it once again to finally solve the secret and receive a Sack with the Speed Potion and the recipe for it.

6
Inside the alcove beside the key you will find another button in the wall. Press it and enter portals 4 and 5. The portal marked as green will be deactivated, so you will be able to reach the second alcove and find one of the most interesting artefacts: the Spirit Mirror Pendant, which increases the rate at which the wearer gains experience.

9
Now, having access to the Crystal of Life, you will be able to approach this secret without much risk. Place a torch in the handle which you can find inside the alcove north of the Crystal room. Three squares further north a new corridor will open, inside of which there's a Skeleton and two Fire Bombs.

On the left wall you should find a stone with a carved runic sign. Press it and the corridor will open even more. You will find yourself inside a small room with a portal which you cannot go though. Place an item inside the portal (put it down, don't throw) and a gate will open on the other side. Behind it you will find a good item for the Mage - the Orb of Radiance.

Unfortunately the biggest trouble is just waiting for you. After you pick up the Orb, you will be trapped inside the room with two Crabs, which will additionally most likely pin you down inside the narrow corridor, without leaving any space to manoeuvre. You need to give it everything you've got to avoid seeing the GAME OVER screen. It's a good idea to freeze the Crab which you fight with bombs/spells. If you managed to retreat from the Orb corridor fast enough, you might be able to return to the main room after killing the first Crab and therefore defeating the second will be just formality.

In order to leave this room after the fight, find the runic stone again and press it.

11
On the walls inside one of the corridors you will find a hidden button which opens the alcove in the north. Inside it you should find (surprise) more Skeletons, a Heavy Shield and Ring Boots.

12
Behind the pillar, a bit further south you will find one more button. It opens the room in the south, freeing two Archers and containing a prize: the Frostbite Necklace.

14
After eliminating the Crabs lurking in this area, you can jump down into the trap door right now or first solve the other puzzle on this level. A full description of this multi-part secret can be found in point (21).

16
The newly opened alcove is a secret as well. Inside it you can find yet another hidden button which opens a secret staircase inside the previous alcove. You can use them to reach a spot which you have already seen in the secret part of level 4, but a grate has been blocking access there. Collect the Plate Cuirass and Plate Gauntlets - yummy.

Unfortunately nothing comes free. You will come across Uggardians, capable of casting fireballs, for the first time. These guys are no joke - they're tough, fast, levitating (trap doors don't work on them) and their attacks hurt, hurt pretty badly. If your Mage can use Fire Shield, now might be a very good time to use it.

20
It's not the end of this chamber. The first secret found here will require you to follow the whole red track once again, though this time it will be prolonged by two additional buttons (green track on the mini-map). The time limit is even strict than last time, but the prize is well worth it. After you press the last button, a hidden room will open and another Uggardian will come out. After killing it, you will find the Ring Mail and Sword of Nex - a great weapon for your swordsman and at the same time the key to a secret (22).

21
Jumping into this trap door will end up with landing at a seemingly dead end with a cage ((E) on the map below), from which a crustacean is smiling at you sincerely - wait a bit and the cage will open. After the fight, collect the third out of seven Treasure in the game - the Crown of Kings.

As seen on the map, this secret is pretty much a dungeon of its own - a two level one. In part (A) - which you can also access through trap doors at points (17) (18) and (19) - you will find only Crowerns, Wyverns and some items: two Tar Beads, a Wooden Box (containing a Healing Potion and an Antidote) and a couple Peasant Breeches and Sandals. On the nearby shelf (A) you will also find a scroll with a hint on how to find the Crown, but you've already don't that.

The trap door at (B) will take you even lower, where quite the prize awaits you.
Point (C) contains a small puzzle and there are also some Frost Bombs lying nearby. You will come across an iron door with some Scavengers on the other side. To open it, place any item you like on the pressure plate behind the grates, but precisely where I marked. Kill the lizards and head inside. Being on the other side, pick up the item that you put on the plate. This way you will close the gate and open a secret alcove which hides the Full Helmet (heavy armour). To get out of here, repeat the process with putting weight on the plate and use the nearby (P)ortal to return onto the upper level. The portal at part (A) will take you back to level 6.

There's still one more secret left in this underground (D), accessible only by jumping into the trap door at point (14) on level 6. Here you will find the Lurker Pants and a Shuriken.

The order at which you discover the rooms found here is entirely up to you.

22
Inside the nook behind the demon statue you should easily find a familiar block with a runic sign. Press it and a corridor leading to the "Fighter's Challenge" - a secret very worthy of your time and at the same time one of the hardest fights in the game - will open. The corridor and stairs will lead you to a demon statue, though you shouldn't approach it just yet. If you have the Sword of Nex with you, the statue will teleport you to a large room, inside which a vast amount of Scavengers awaits you. If you think you've seen enough of them by the end of level 4, you're very wrong - here, there's 10x more of them.

Before teleporting, you should rest, regenerate, prepare a tactic and as many Healing Potions as you can. If you have a Speed Potion, give it to your best and fastest warrior - it will come in handy.

After teleporting, you will find yourself in the very middle of the Scavengers group. Fight your way through them with everything you've got and use any breach there is to reach the corner of the room. I would advise doing so normally, but in this case it's the only way to protect your back and therefore the weakest party members. Don't worry even if 3 of your party dies - I finished this challenge having one, barely living warrior - you don't need anything more. If you can't handle this fight, just let go. You will be able to return here anytime with higher level characters. If you managed to survive, congratulate yourself and search the room for the Gold Key and some Bombs lying on the ground. The Gold Key can be used to open the only door found here, behind which you will find the excellent Shield of Valor.

A teleport will appear in the middle of the room, which will take you back to the upper level, but don't use it just yet! On the western wall of this room you will find a hidden button which opens a secret alcove containing the fourth Treasure, the Ancient Apparatus. It's a prize well worth the effort. Now head back up, hug the Crystal of Life and be ready for some more prizes.
Level 6
23
If you have gathered all the Round Keys, you should still have one left. It fits the Iron Door here, behind which you can find the Chitin Mail (second to last part of the whole).

S3
Stairs to the secret basement at level 5.

S4
Stairs to "Fighter's Challenge"
Level 7

3
In order to open this alcove, you will have to complete a very easy activity, i.e. open all the doors in rooms (1) and (2), apart from the southern ones in (2). Inside the alcove you will find the Ring Greaves, Throwing Knives and a Battle Axe.

8
Press the button in the wall at (7) and the wall will raise, giving you access to a portal (marked with green) which will take you to a secret room with Herders. After killing them, search the room for Throwing Axes, Crossbow Quarrels and food.

On one of the walls you will also find a stone with a carved rune. Press it and another wall will raise, behind which you can find some Frost Bombs.

10
This area is swarming with Uggardians, additionally it's rather narrow and therefore it's hard to avoid their fireballs. It's best to lure them to point (9) and eliminate one at a time there. Jump into the trap door here to reach a secret containing the Bracelet of Tirin. The nearby portal will take you back upstairs.

17
Inside the room with two portals and trap doors. Jump down and you will find yourself in a peculiar, though dangerous room, the floor of which is almost completely filled with pressure plates. Each place releases a poisonous projectile from the demon head found on the other side of the room. Move carefully through the plates so that you're not killed before reaching the other side of the room. There you will find the Boots of Valor (part of a set).

Beside the demon heads you will find a lever which frees Spiders and Crabs from behind the grate in the spot where you landed. Defeat them, search the alcoves from which they headed out in search of food and use the portal to return upstairs.

21
Here you can find a rather easy secret. On the walls there are five levers which need to be arranged in the below order:

1 - up

2 - however

3 - down

4 - however

5 - down

Placing levers 1, 3 and 5 in the right position will be confirmed by a click. After you set them all correctly, you will be able to take the Assassin's Dagger - a great weapon for the Rogue.

24
Nearby the room with the Flail you will find a runic stone on the wall. Press it and quickly run south through the corridor to reach a room with a staircase. It leads to a secret part of the lower level - the Dismantler's Vault, inside which one of the most powerful weapons in the game can be found.

26
In the end there's still the Iron Door, opening which requires some reflex and dexterity.
Once you enter the room, the demon heads on the other side will start spitting light projectiles. If whichever reaches its socket, you will be immediately taken back to the door and will have to start from the beginning. Face the demon statues and block the incoming projectiles with your own body and keep in mind that they will gradually gain speed. When the statues finally stop, the Iron Door will open, granting you with the Chitin Boots (last part of the set!) and the Scroll of Enchant Fire Arrow.

S4
Stairs to the secret part of level 8.
Level 8

2
On the wall in the first room you will find a button which grants access to a very special snack - a piece of cake. Apparently, "the cake is not a lie" in this game ;] You will also find some herbs and a Grim Cap here.

4
Right beside the stairs to the next level you will find the Iron Door. In order to open them, you will need the Gear Key which can be found deeper into the crypt, at point (11).

Behind the door you will find the Helmet of Valor (another piece of this set) and the Frost Quarrels.

9
After clearing the rooms, search the nearby walls for buttons which open the alcoves with pressure plates. Hold down the plates with something and the walls in the marked spot will rise. There you will find the Plate Gauntlets and Plate Boots.

11
Before leaving point (10), find the button hidden in the wall. It opens a tunnel at the end of the electric corridor right beside the demon head (you will find Lightning Bombs beside it). Inside there's an Ogre to defeat, in return for which you will receive the Lightning Rod and the Gear Key which opens the Iron Door at point (4).

18
On the western pillar and beside the northern door at point (17) you will find hidden buttons - both open a passage in which you can find a Wooden Box and Axes and Quarrels inside.

20
The crypt, finally. However wait a bit before picking up the sword and search for a button in the corner of the room. It will open an alcove, inside which you will find the next treasure: the Golden Dragon.

21
Time to get the desired loot, the best sword in the game - the Dismantler. Do however note the demon heads around the crypt - to avoid getting killed by them, act as a real adventurer would and place something in place of the sword before picking it up. Afterwards you will be able to safely take it and head to level 9.

S3
Secret stairs to level 7.
Level 9

5
Inside the Armory, there's also a secret to be discovered. Destroy the boxes in the northern alcove and another one will open in the south. One more Uggardian will come out of it and after you defeat it you will be able to collect the almost-best axe in the game, coming under the name of Norja.

8
A small secret can be found here. In order to open it, locate the button on the wall behind the corner. Here you will find an interesting item - the Pit Fighter Gauntlets. Apart from that, you can also collect two Bombs from here.

14
If you haven't fallen into the basement in the previous point, do it now as another secret - and a quite good one at the same time - can be found here.

To solve this puzzle, you will need three torches and two stones.
In order to open grate (B), you need to place three torches into the empty handles on the walls of the basement (1, 2 and 3). Once you do it, take a look around and find a place on the ground where the shades cross and create a darker spot (A). Stand on it and throw a stone east and then north. Voila, the grate becomes open and in return you will receive the Cuirass of Valor.

In order to return upstairs, just use the portal (P).

22
The last collectibles on this level can be found behind the Iron Door. In order to open them, just place a Bone Amulet (you should have two) on the nearby shelf. Behind the door you will find the most powerful artefact for the mage: the Zhandul's Orb.
Level 10

9
At this spot you will come across the last Iron Door in the game. Opening it won't be a problem, if only you've collected the Red Gem from point (3). Tear off the banner beside the door and place a rock on the shelf found there. Behind the door you will find the most powerful ranged weapon in the game: the Crookhorn Longbow and also Throwing Axes.

12
Jump into the trap door here and you will end up in a small dungeon inhabited by Giant Crabs. After defeating them, search each corner thoroughly in search of herbs and bombs. Return upstairs using the stairs here (S3) and you will end up on the other side of the trap door which you jumped into.

The prize for your effort will be the Shield of the Elements, giving you splendid defence against... the elements, of course.

13
The next secret can be found in the secret room behind the Crystal of Life. Find the button on the marked wall and collect another Toorum's Note, Fire Quarrels and a couple herbs. You will also gain access to the Crystal of Life on this side of the tunnels.

Right beside the secret you will also find a Full Helmet lying on the ground nearby.

18
Every trap door in "The Caverns" leads to the same basement, though only one into its secret part.

By jumping into the marked trap door, you will land at point (A), from which a short walk will take you to the most powerful Mace in the game: the Icefall Hammer. Right after you collect it, the room will fill up with Crabs and all types of Herders, so make good use of the weapon you've collected. After the fight, you will be able to rest and search the recesses to find Throwing Knives and herbs.

Use the door beside (A) to reach part (C), where all other trap doors in The Caverns lead. On your way, collect the last Skull for the Minotaur which can be found inside the alcove south of point (A). In this part of the dungeon you will have to fight your way through a band of Slimes. In the alcoves of this part of the dungeon you will find bombs, herbs and food. The stairs at (S4) will take you back to The Caverns.

20
Time to meet with Toorum himself. In order to enter this room, press the button found on the marked pillar. As you can see, Toorum - who managed to get so deep into Grimrock, while you find it challenging with a four-man party - has eventually become a victim of this dungeon. You will find his remains, two last paged of his notes, the Phalanx Helmet and the Ancient Axe - the most powerful weapon of such type in the game.

Toorum's soul is still trapped inside his remains - use them on the Crystal of Life to free the fallen hero's soul. That's however not all! From now on, Toorum will be a playable character. More on that in the Gameplay Modes chapter.

24
However before entering the portal in the above room, examine the marked wall to find a button which turns off the portal and opens a trap door beneath it. After jumping down, you will reach a small dungeon in which you can find the Scaled Cloak and a bag with herbs and food. Don't however pick up any of them until you neutralise the demon head looking at them, as it would shock you with lightning otherwise. On the wall opposite to the return portal you will find a button which locks the statue behind the wall.

S3
Stairs to the secret basement.

S4
Stairs to the basement at (18).
Level 11~13


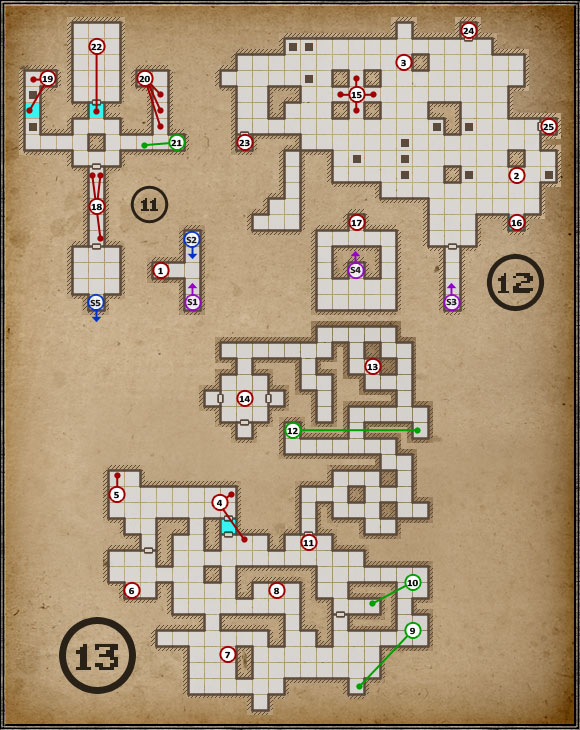
[h1]9[/h1] Inside the south-east alcove there's a button on the wall. It opens the first of the secret room on this level. You will find some food there, as well as Fire Bombs. [h1]10[/h1] In the dead end behind the grate there's another button which opens a secret room. Inside you will find a Wooden Box with alchemy ingredients. [h1]12[/h1] To open the room here, you first need to find the button on the wall of the nook on the other side of the corridors. The second to last Treasure in the game can be found there: the Globe of Tetharion. [h1]22[/h1] Before leaving this corridor, examine the southern wall to find a stone with a carved runic symbol. Press it and in return you will receive the last Treasure of Grimrock: the Goromorg Miniatur
9
Inside the south-east alcove there's a button on the wall. It opens the first of the secret room on this level. You will find some food there, as well as Fire Bombs.

10
In the dead end behind the grate there's another button which opens a secret room. Inside you will find a Wooden Box with alchemy ingredients.

12
To open the room here, you first need to find the button on the wall of the nook on the other side of the corridors. The second to last Treasure in the game can be found there: the Globe of Tetharion.

22
Before leaving this corridor, examine the southern wall to find a stone with a carved runic symbol. Press it and in return you will receive the last Treasure of Grimrock: the Goromorg Miniature.
13 Comments
Manusoka Apr 14, 2024 @ 7:06am 
Amazing guide, thanks!
♡Alice Cousland♡ Feb 28, 2024 @ 4:56am 
Helped me a ton! Thank you for the map, it was great to have alongside the walkthrough :masterworks:
Đeath’ş Aļļ | Horst Fuchs Dec 5, 2023 @ 2:42am 
Level 5 nr.15 doesnt work this way every time.
In my first walkthrought this worked as you write. But years later in my second play nothing happened when i slept in that point, so I checked few gameplay videos where this also worked.

So there must be some other condition for open door or there must be a bug.
Traslo Mar 1, 2023 @ 2:53pm 
On level 3 at 14, there is a secret found if you put an identical item back into the sacrifice pit after it gives you it back. You get Nomad Mittens.
Alcator Jan 1, 2023 @ 9:51am 
Level 5, Item 22: This has been patched and the platform from which you access the Bracers of Fortitude doesn't open -- instead, the whole sequence gets restarted so that you have enough time to collect the bracers and hop onto the sequence.
Pixel Face Dec 9, 2022 @ 4:04pm 
Another missed secret: Level 7, near #16, where the other side of the cave-in is, there's the Shaman Staff next to the grate. It's for Earth Mages.
I, Claudius #StandWithRussia Feb 21, 2022 @ 2:21am 
The Game Pressure guide this is taken from, does not cover all the secrets, so as a result neither does this guide.
Copper Boltwire Aug 24, 2021 @ 2:49am 
Level 5 map has no markers in the pit you can fall into.
I know this guide is a weee old, but i'm currently playing through the game, trying to get all secrets this time around, and this guide is apparently not 100% complete. the irony.
eZiio Jun 22, 2020 @ 3:30am 
Im playing on my second playthrough and playing on Hard + Old School mode so this guide is very helpful.