Startopia
63 평점
RTSC Startopia Guide Re-upload.
Yazra 님이 작성
Transcription of the Startopia guide that was once found on RTSC.

All credit goes to the original author.
3
   
어워드
즐겨찾기
즐겨찾기됨
즐겨찾기 해제
Startopia


Hey! It appears this guide's original author has put it back online along with the rest of the RTSC site as a zip archive for anyone to grab. Quicker to access than Wayback Machine and less messy than my attempt to recreate it for Steam, I for one am really happy about that and will definitely be using it again in future. I'll leave this up of course in case anyone finds it useful, but I heartily recommend grabbing the original from the authors site[rakrent.wordpress.com], especially for the nostalgia. Thanks H0t_Air_Buff00n for posting about it.

Startopia is a British game developed by Mucky Foot and published by Eidos Interactive. (Alas, Mucky Foot has been shut down in what seems to be part of a disturbing trend in the British game industry...) Set in a fantasy sci-fi future, you play the part of a space station administrator operating in a galactic civilisation ravaged by a recent space war. The action takes place in a spectacular and unusual game environment - the interior of a huge, torus shaped spinning space station. Inside, you are trying to develop and maintain a utopian environment for nine alien species, each with their own skills, personalities and foibles: a Startopia. The recent war has wrecked planets and destroyed ecosystems; its up to you to help rebuild interstellar civilisation and provide a home for the dispossessed.

Quite simply, Startopia does an excellent impression of a bustling space station. It feels like an actual place.

Startopia's amazing Bio-Deck. A couple of Peeps take in the scenery and have a dip. They're hardly units anymore, more like the Sims in outer space. Just around the curve of the Station is a Zedem Temple, and the small brown spots in the water are fish and butterflies. You also can pull the camera through the panoramic windows and see all this, plus the rest of the (incredibly detailed) station from outer space.


This is simulation management rather than real time strategy although Startopia is a little unusual for a sim in that it has strategic elements that actually give it a point of focus. That is, it plays as a game with a definite start, middle and end, and there's a goal to it - recolonising an entire (derelict) space station - that makes it eligible as a networkable strategy game between players. You can play to win, or you can use it like an ant farm in Sandbox Mode, poking it with a stick and watch it burble away in its own simulated world forever. This is a free wheeling, do-anything-you-like scenario where you can run the default game with whatever conditions and objectives that you like.

And that's the great thing. You can play you Station any way you like, and there's about three ways you can do anything. As games go, Startopia is a refreshing departure from the usual mindless carnage. While a good wreckage binge in Total Annihilation or a big clash of fleets in Homeworld is all very well, Startopia's theme of reconstruction and reconciliation is a nice change of pace. There's a strong vein of wry British humour at Startopia's core; a 2001 piss take, a generous dose of the Hitchhiker's Guide to the Galaxy, a glass of Red Dwarf and even a dash of Minder's Arfur Daley chucked in for good measure, reincarnated as the interstellar trader of dubious repute, Arona Daal. You get to stop plagues, reform criminals (as distinct from just summarily executing them - although you get to do that too) provide amusements and remedies from the sacred to the profane, and do the usual expand and conquer. But only if you want. Either way, there's none of the furious desperation of your typical RTS where you're frantically trying to beat the clock and utter destruction is but a single mouse click away.

Superficially, the game is very reminiscent of Bullfrog's Dungeon Keeper 2. This probably isn't all that surprising given that Mucky Foot has several ex-Bullfrog members in it, but unlike that older title Startopia is more detailed and cleaner to the eye, using a powerful and clever game engine. The use of rooms and furniture is similar between the other game's, except placed in a high tech environment. You get an army of Scuzzer Droids instead of dungeon Imps and build Space Ports to allow visitor access instead of attracting monsters from the netherworld via a hellish Gate.

You create the right rooms, equip them with the necessary equipment and then hire the appropriate aliens from your population who run them with very little direct interaction at all. To keep and maintain your workforce, essential services must be provided: sanitation, food, accommodation, medical facilities, recreation; even a bit of love and religion on the side. The main function of the Station is to accommodate the hordes of passing space travellers and keep them entertained so you can part them with their money. Add space rats, space plagues, errant meteorites, giant killer bugs and, of course, other Station Administrators and this becomes a cool little game. The more you beef up your station's facilities and extend its hospitality, the more customers you attract and money you make. The station itself requires resources and trading to function properly, constant maintenance and some law enforcement. Luckily for you, there's that expendable army of unpaid 'Scuzzer' Droids to scurry about to do all this for you. You allocate the tasks; your employees and Droids do the rest.

Graphically, structurally and entertainment wise, Startopia is nothing short of spectacular. There's a good camera to play with here, and you can flit up to the ceilings to take in the huge curving floor and the crowds or drop down to chat to one of the locals in close-up. There's a richness of clarity and detail that many contemporary 3D sims seem to lack. You'll need a good graphics card to see it all properly though, but since GeForce2's and their ilk are a dime a dozen these days that isn't so much of a drama as it was just a year or two ago. If you have less than 450Mhz and a not so crash hot graphics card you may find this game a bit clunky at higher resolutions. However, for all the sophistication of characters and activity on screen, there's surprisingly little lag.

HI! It's me, your humble editor! I'll put anything I'm responsible for in italics to differentiate it from the rest. Just FYI I'm not still actively working on this, but If you are reading this then that should mean the complete written content, if not links/layout is available.

Disclaimer
But first: a Disclaimer
The RTSC Startopia Guide has been making a big assumption with all the stats it presents. It assumes you're playing a networked multiplayer game or a Sandbox mode single player game with game difficulty set to Average. All the numbers and stats that I've presented in this Guide are those that assume these default settings.

But a Sandbox game gives you many different options to play. You can alter quite a few settings and set up to four victory conditions - assuming you even want any. Sandbox mode treats the game like an ant farm: it's for just fooling around with your toy Space Station, without the need to defeat foes or fight wars. The stats and numbers in this Guide change depending on what difficulty settings you set. If I tried to itemise every small change we'd be here forever - and I think there's more than enough numbers and notes in it already.

Many of the basic and simple effects on a Peep seem to be unchanged as a general rule, regardless of difficulty levels. The biggest changes occur to Mind and the themed effects (e.g. like the effects of Love in a Love Nest, or of Soul in a Temple) which as a general rule of thumb are halved or doubled depending on your settings.

If you set Peep Moods to Easy then incremental negative influences are lessened and big, negative character hits are halved. Positive incremental character influences are increased and big, positive hits are doubled. You can specify whether these changes affect Residents, or Visitors, or both. On Difficult, its the other way around: the effects of negative influences are increased or doubled, while the influence of positive things reduced or halved.

By switching Economics to Difficult, things become more expensive while profits are shrunk: buying Rooms and Furniture, the cost of running them, and any other e expenses in the game are usually doubled, while the money you make off Station facilities and the bonuses from Recycling are halved and your profits are lessened. On Easy its the other way around - bigger profits and cheaper costs.

On top of all that, the moment you play the single player campaign or a custom mission many of these numbers fly out the window - if not entire conditions and rules. A mission is a set of scripts that can completely redefine just about any statistical effect or condition in the game. You can alter the files to give yourself ridiculous advantages, make diseases more prevalent, increase the number of Peeps coming through your Ports, anything. Its all there, in the Missions folders - all the scripts and settings files have been installed in ASCII - in other words, in text format. You can read them with Notepad (or better still, Textpad if you want to work with more than one file at once) or change them as you see fit. Mucky Foot designed Startopia with modders in mind, you see.

Salvaged from the Footnotes
The Station
The first thing strategy gamers will notice is that Startopia doesn't have different maps. Startopia is played entirely within the same environment: your classic, ring shaped Space Station. Its a majestic spinning torus with three circular decks subdivided into sixteen equal sections. This donut motif is central to Startopia's concept and humour. The cute thing about the playing area is that it is truly circular - scrolling around the curve will get you back at where you started. Your strategies aren't going to be revolving (har har) around different terrain types or wondering where the opposition is.

The Station from outside. That's the the Bio-Deck visible through the panoramic windows.

Each player starts with their own segment in an otherwise empty and derelict station. As Station Administrators, you are all charged with its renovation and reconstruction, opening new sections and annexing unclaimed territory. Those who survive bankruptcy or the skulduggery of their peers gets to claim the whole station and with it victory.

The next thing control freaks and micromanagers will find is that while there's a considerable amount of detail lurking in Startopia, there's hardly a health bar or stats table anywhere in sight. You get a couple of vague looking overviews, and that's pretty much it. Like all good management sims, control of your characters is indirect. Actually, they're not even yours to control: all you do is hire or fire them and make sure you've employed enough to ensure all your facilities are fully manned. Whether they decide to hang around, leave, work or piss about is entirely up to them.

There's considerable overlap in Startopia, and usually about three ways to do or get anything. To attract more of one species, you generally deck out your Station with the stuff that it likes, often installing more than one version of a facility or a Bio-Deck environment if you need to attract lots for some reason. They each have their favourites, but this by no means they won't use anything else. Rich species will use low rent facilities sometimes and vice versa. If you miss anything, its not likely to kill you off in the game as it would in a typical RTS, or completely stall everything. About the only thing you have to watch out for is power failures - which will screw you monumentally. Oh, and Skrashers - big, black scary space monsters that can wreck a fledgling Station Administrator's career very quickly.

Keeping everyone happy and healthy boils down to making sure that everything they need is readily available and just leaving them to it. Your role is mostly hands off: the Peeps and droids do all the rest, automatically working and using the Station. Direct micromanagement only comes in trading, arranging rooms and decks, defusing the odd bomb or two and and directing the action in a fire fight. With competitive netgames, Startopia can be a violent affair of forcible take-overs or a friendly (but serious) economic war where the winner achieves an economic goal or merely avoids going bankrupt before everyone else. It all depends on what victory conditions are set. Since its possible to have up to four victory conditions from a pool of choices, you can determine what kind of game you want to play beforehand.
The Decks
The Station is subdivided into three major decks:

Engineering Deck

The Engineering Deck is the lowest, or rather, the outermost deck of the Station. It's the garage level or "body" of the station. Here, all your Station's mechanical, industrial, power and supply requirements are met, as are the bare bones essentials that cater for the physical needs of your Peeps. Lose all your Engineering segments and its Game Over for you. You can just run a station with only this deck, but it will be strictly utilitarian and most of the more interesting features of the game simply won't be available to you. Utility alone is never enough: most of the population will get restless and want to leave such drab surroundings, and rich clients won't stay for long, if at all.

This deck provides access to your station via docking elevators called Ports, and parks passing trading ships in the big Starports. You process and store cargo and energy, basic sleeping quarters, recycle waste and litter, manufacture goods, provide medical facilities, run security and hold criminals in custody. The Engineering Deck is the business level of the Station - this is where all your work is done, and without it you cannot function.

Entertainment Deck

The lower deck might be a haven for Morlocks, but the mid-deck is where it's at. It's also known as the Pleasure Deck, containing all the fun stuff of Station life: Love Nests, luxury accommodation, shops, casinos, discos, public bars and other tourist traps. This is the "mind" of the Station, catering to the population's mental and comfort needs, alleviating boredom and offering a nicer environment to socialise in. The Entertainment Deck, as its name implies, provides most of the pleasures of the Station and is the reason why most travellers stop off in the first place. Building the right buildings will attract the right types of customers. For example, Rough Bars, General Stores, and basic Star Motels will attract cheaper customers like the Salt Hogs; while the fussy Gem Slugs expect expensive accommodation and upmarket facilities like the Cocktail Bar and Slug Apartments. Building the same item several times over will pull in more of the species that's attracted to it.

What's cute about this deck is that you can adjust the Station's "flavour" by changing how you lay it out. By emphasising some types of entertainment over others, you can change the character of the Station and the sorts of people that inhabit it. Whether you go for sleazy, refined upmarket, cheap'n'nasty, quietly urbane or a mix of everything is entirely up to you.

While the Engineering Deck is essential to everyone and everything's good health, its the Entertainment Deck that actually attracts custom to your door and generates the most revenue for you. Building up this deck properly allows you to attract more lucrative visitors to your Station and enhance your reputation as a desirable tourist destination in outer space.

Bio-Deck

The uppermost deck is a giant glasshouse containing artificial soils and climate control to reproduce alien ecosystems. This is the "soul" of your Station, and caters to those non-material and spiritual things that money and the nasty old material world just cannot provide. Here, the homesick population's spiritual and aesthetic needs are met within a deck that mimics the natural conditions of their homeworlds. It is home to the Zedem Temple, a magnet for space pilgrims and Zedem Monks. You can see across the Station through the panoramic windows, and even truck outside in outer space to take in the whole Station. You can grow whole forests up here, either to cultivate for cargo or just for the sheer hell of it! Every plant yields most kinds of essential supplies for your Station's needs.

The Bio-Deck is free of the mad bustle of the rest of the Station: no rooms or structures can be built on the Bio-Deck, although you can place public art and deck furniture on another deck and them beam it into the Bio-Deck But in order for you to get the most out of it for your population, you need to reproduce the right conditions for each alien species. Bio-Decks are extremely popular for Peeps; a really good one can occasionally empty an Entertainment Deck. Building mountain ranges to climb, deep waterhole's to swim in and lush forests and wilderness to trek through can sometimes attract more patrons than lines of Love Nests and Hotels. Peep's Souls are placated in this lush environment. More Details.
Who's Who Part 1
Peeps are the people of Startopia. Startopia makes full use of easily recognisable stereotypes with a science fiction theme - more to let you know what's going on than anything else. There are nine different species, each with their own characteristic theme that roughly corresponds to a particular aspect of the game. Each Peep has nine character and three employment ratings, but more on that in a later section.

The Peeps

Groulien Salt Hogs
The Working class of Outer Space


Small, robust, hardworking and generally poorer than everyone else, Salt Hogs are the easiest characters to deal with. These working class stereotypes embody the industrial heart of the Station, working in gangs of up to four workers in Recyclers and Factories. Its wise to have a sizeable pool of Hogs, and employee ratings don't seem to be such an issue with these guys. They can fill out an armed force in short order, and, I hate to say it, are largely expendable and easily replaced. Salt Hog tastes are simple and cheap and they are perfectly content using bare minimum facilities like Sleeping Berths, Lavatrons and Dine-O-Mats. They tend to avoid any upper-crust establishments, and there's some class friction with the aristocratic Gem Slugs.

Grekka Targ
Communications Geeks


These "knee high to a grasshopper" insectile travelers handle Station communications. They man your Comsensors and connect you to the rest of the Universe, and facilitate intelligence gathering on the Station for your security services. They're as easy as Salt Hogs to deal with except they don't have problems with anyone and don't have any particularly weird attributes, other than they tend to lack personality. About the only negative thing about them is that they aren't the most exciting people on the Station to talk to. Targ exist at the mid to lower end of the Startopian class system. They are gadget freaks; geeky like Turrakken Researchers, but not complete nerds. Not being as obviously critical as Greys or Salt-Hogs to your Station's well being, they can safely fill out an army.

The Greys
Medical Services


These pop icons embody all things to do with medicine and run all your Sick Bays. Unlike Salt Hogs and the Targ, it IS critical to hire skilled Greys, otherwise your medical services can start losing patients! Their character is cold and distant and their culture drab and uninspired. They like cold, snowy Bio-Deck conditions and swimming. Once, they used to perform evil experiments on people and animals... and although they've supposedly renounced those old and evil ways, Greys still buy up big on research equipment. Oddly enough, Greys are Startopia's biggest tourists. Unlike the other races they enjoy every kind kind of shop and entertainment with little preference or prejudice. And everyone gets on with them, with conversations actually making aliens feel better. Hmm... maybe they have reformed their nefarious ways...

Dahanese Sirens
Hedonistic Lovers


Sirens are only aliens in Startopia that come in sexes, hailing from the same universe that produced Barbarella. These hedonistic, pleasure seeking creatures strut around in G-strings and codpieces, providing Love to the Station's lovelorn in Love Nests. But don't panic - its all family safe: Siren love is G rated Star Trek energy being sex with no messy stuff. While Sirens provide a vital service in keeping your population sexually fulfilled, too much of it can drive Peeps to distraction and play havoc with your productivity, especially with the nerdy Turrakken. The siren theme is hedonistic and decadent, and they frequent any sporty fun facilities on the Station. Love is like religion to the Sirens, and there's racial tension between them and the religious zealots of Startopia, the Zedem Monks. They also baulk at the Kasvagorians' violent ways.

Kasvagorians
Security & Breaking Heads


Kasvagorians, or Gors, are based on every Klingon and space warrior race in any Sci-Fi series you care to think of and provide all your security cover. These tough guys can withstand more physical abuse than the other species, and Gor employees are usually the first at the scene of any biffo. They exclusively man the Security Centre; skilled Gors improve the performance of your Security Scuzzers and Security Turrets. Their violent ways upset the peaceful races: Karmaramans and the Sirens. They aren't that bright, they like a challenge, tend to eat a lot, are averse to luxury and comfort, and they get violent and seem a little more susceptible to depression than other species.

Karmaramans
Sleepy Hippies


At the other end of the aggression scale are the Karmaramans. These four armed hippies work exclusively in the Bio-Deck as farmers and environmentalists, turning empty Bio-Decks into verdant forests. Peace-loving and laid back, (somehow they're labeled in the Startopia forums as lazy, ignoring the fact that they're the only aliens in the game that actually do any physical work!) they groove in time with the Sirens, and eat and sleep a lot more than other species. They're not that feral though: Karmaramans prefer bourgeois facilities and shy from the rougher parts of the Station. They have patchy race relations with the Kasvagorians. Stripping out too much vegetation in one hit in the Bio-Deck will upset any Karmaraman employees so much they'll promptly resign and leave.

Turrakken
Nerdy Scientists


The uber-nerds of outer space, these two headed, lab coated scientists run all your Laboratories and embody all things scientific, seeking to expand their knowledge and learn the secrets of the Universe. While they have double the brainpower of everyone else, they are susceptible to affairs of the heart. Keep some Sirens on hand to handle their emotional needs - but too many are likely to leave the labs empty. You'll frequently see them in the Love Nest or gazing wistfully up at the Siren's risque Mother statue. Turrakken bore easily and need Love like other Startopians need food. Turrakken sit in the middle to upper class range, preferring mid level station facilities. These secular beings have issues with the religious Zedem Monks.

Zedem Monks
Religious Fanatics


These fellows handle all your Station's spiritual needs and embody all things religious. They build the Zedem Temple in the Bio-Deck, where they attend to the troubled souls of your population. Religion to the Zedem is like Love to the Dahanese Sirens and the Monks don't get on with them or with the super-scientific Turrakken. The Zedem are definitely what you'd refer to as the gentry: upper crust, despite arriving on the Station with very little money. They avoid the rougher faculties, preferring quieter parts of the Station where they can meditate over the universe or indulge in a tipple.
Who's Who Part 2
Polvakian Gem Slugs
Efficient Idlers


Unproductive, fussy, useless - they're unable to be hired nor fired - and with a disturbing propensity to die from their own excesses (A terrible bug not game breaking but certainly immersion breaking. The solution for the uninformed is to never place cocktail table or slug bath. The room is fine, but slugs will die if you place either of those equipment items as once they sit at them they can never leave, leading to death from, well, whatever gets them first I guess?) Polvakian Gem Slugs embody Startopia's decadent aristocratic class. They are only encouraged to visit your Station so they can poo everywhere in it. These rich old bastards get their name by defecating jeweled Turdite - a highly prized and valuable resource. (Golly, there's a message in all this somewhere - I can smell it! :P) Gem Slugs are a bit of an armful to please, and its tricky to get the right combination of facilities to encourage them to start venting. As to their attitude to everyone else they're fine. These aristocratic idlers can be seen having lively conversations with the rest of the population. They can be put off by a messy Station with too many Salt Hog facilities in it.

Other Characters

Penitents
The Born Agains of Outer Space


Penitents are the result of the Zedem Monks successfully converting a Peep to their religion. Its actually someone inside some big, uncomfortable armoured suit; the Zedem equivalent of ashes and sackcloth. Penitents don't do anything, don't use any Station facilities, and basically go around annoying everyone they meet - except for the Zedem, who are thrilled to bits and inspired by the Penitent's religious example and commitment. Creating a Penitent can score you lots of dosh, but you're losing valuable customers and employees to Zedem fanaticism.

Scuzzer Droids
Unpaid Robot Dogs Bodies


These squat, yellow robots form the indispensable backbone of your Station. With the emphasis on comedy, of course! You often buy them, or if you can, make them in your Factories. They perform all the odd jobs around the Station: building, cleaning and repairing facilities, collecting litter, and carting cargo. All they need is a regular recharge and your Station will remain in tip-top shape. They come in three classes: Mk I's scurry around on short, stumpy legs; Mk II's barrel along on caterpillar treads, and Mk III's burn around on retro-rockets. Each model type runs and works three times faster, and is twice as expensive to buy and maintain than the previous models. Other than that, they all do exactly the same thing

Security Scuzzers
Unpaid Robocops


This the security version of the Mk I Scuzzer. They only come in one class, but are tougher than normal and pack a slow firing ray gun. Again, Security Scuzzers, or 'Fuzzers', are indispensable to your Station. You usually buy or manufacture them. They waddle around on patrol, automatically arresting any detected criminals and defusing terrorist bombs, and will attack any identified hostiles in the neighbourhood. They are absolutely essential when breaching neighbouring Segments held by other Administrators - without them you can't hack or re-lock the Segment Doors and they'll attack any threats such as enemy Agents, Skrashers and invading neighbours. To get the most out of Security Scuzzers, you need a properly manned Security Centre. More details.

Enemy Agents
Bomb-toting Terrorists


Occasionally you come across this nasty piece of work from the Guild of Assassins, specialising in ruining people's day with the odd bomb. (Unless you've hired him, in which he's busy ruining some other Administrator's day!) Bombs can be a real problem, unless you have blanket Security Scuzzer coverage, a network of Comsensors, and a highly skilled Security Centre to defuse them. Otherwise, you're desperately running around your Station trying to find the unexploded bomb. Agents come in two forms: the camp guys in black leather, and innocent looking Peeps. Agents that are exposed are shot dead on sight with no exceptions. You've found an uncover Agent if you can peg a Peep with a cross hair. Its about the only time Startopia gets bloody minded.

Space Vermin
Disease-ridden Filth


The ship rats of outer space. They only start appearing when litter levels start getting out of hand and manifest in really big numbers after a battle, where a Station segment has been destroyed and there's tons of debris everywhere. They thrive on litter and the debris of a demolished room, carry disease and offend richer customers. Strangely enough, most Peeps will treat them like any other alien species, and you will see the occasional conversation with a Vermin. Alas, every conversation winds up with the Peep catching something infectious and requiring medical treatment. The best solution of course to Vermin is, of course, a preventative one. Keep those litter levels to an absolute minimum and your Station clean and polished and Vermin simply won't appear. I've yet to see them appear on the Bio-Deck; although you could try beaming lots of litter up there and see what happens...

Memaus
Cute Furry Animals


These cute little strays occasionally appear through your Station Ports and wander around looking cute and fluffy. They rarely travel further than the Engineering Deck, though. Peeps find them irresistible and can't help but pet them, receiving all kinds of character bonuses that work well for you as a Station Administrator, and them as individuals. Alas, Memaus might look like space cats, but they don't chase space rats. Furthermore, any heavy petters are also in danger of being infected by these furry fellows. Memaus love to eat litter, and become lethally infectious if they've eaten more than five pieces of it. Keep your Station clean, and watch out for any stray life forms lurking amongst the Litter Bins.


Skrashers
Oh my Goaaaeeeeiiiii *scrunsh pop*


Skrashers are big, black, chitinous monstrosities; they're the It from "It: Terror from Outer Space". Its Startopia's A L I E N reference: a single Skrasher embryo will incubate inside a hapless victim before hatching explosively as a full adult and going on a wild rampage. You can easily lose entire Sick Bays and sometimes even an entire segment to these things, and in some scenarios it can be so prevalent you need to establish Security Turrets near your Sick Bays just in case. Single minded and extremely violent, Skrashers revel in absolute destruction and mayhem. Needless to say, you will be amazed at the unselfish bravery of your Residents who rally for the safety of others and fight them off. If a Skrasher runs out of things to demolish and calms down, it then mutates into its next stage. You'll be surprised.
What's in a Peep Part 1
The Station provides the venue, but the Peeps are where all the heart, soul and action is. Peeps lead their own simple lives. They all have a name, a simple history, a few hobbies for laughs, some spare e to spend, three performance ratings and nine character attributes that affect their behaviour, employee performance and whether or not they want to stay on board and make you rich.

Peeps have nine character attributes and several employment ratings. Interestingly enough, these are crudely paralleled in the Station itself. Each of the decks corresponds with Body, Mind and Soul, and many of the Station's essential services are expressly designed to service each of the Peep's character stats. Each of the alien species also has a theme that moreorless represents one of these attributes. The Grays represent all things medical and with health; the Sirens Love; Karmaramans Sleep; Turrakken Mind; Targ Fun; and so on.

Visitors and Residents

All aliens are Visitors until you hire them, whereupon they become permanent Residents. Everyone else just hangs around until they run out of money or find the Station so unappealing they leave in disgust. Residents from all players are marked by a symbol representing their employer floating above their heads. Your Residents need to be looked after with appropriate sleeping, eating, amusements, sanitary requirements and career promotions otherwise they'll resign and leave you, too.

While most peeps will jump for joy at the prospect of scoring a job, don't get too upset if a few turn you down. You may have insufficient finances, they may have personal problems or they simply think the Station's just not up to scratch. Employee ratings ultimately affect how efficiently your Station runs. The higher the number of stars, the better the employee - and the more expensive they become to hire. Apart from the initial payment up front and subsequent promotions, Peeps don't receive any wages. This was originally intended for the game, but never implemented. Once employed, they will slowly start to improve their skills and gain rating stars - but they will need to be promoted lest they get upset and resign. Promotions are easy: just click on the flashing stars next to their name in the Peep Menu.

Right clicking on a Peep brings up the Alien Interface (right). This allows you to converse (albeit primitively) with them one on one. By conversing with individuals you can find out their names, hobbies, or their criminal record; hire or fire them and ask them what their pressing needs are. Straight off the bat you'll see three obvious attributes that will decide whether you want to hire a Peep or not: Skill, Dedication and Loyalty. Each of these are shown as five star ratings.

Skill
Quite simply, this is how well your Peep performs at their job. A poorly skilled worker takes longer to execute tasks or may produce an inferior result to a skilled one. In the case of an unskilled Grey medic, you can actually kill off patients! In a firefight, this shows just how straight a Peep can shoot - or not.
Dedication
This how long they actually stay at their post, regardless of more pressing needs. A 5 star dedicated Peep will stay at their post longer than a no star undedicated Peep who'll disappear off the job at the drop of a hat.
Loyalty
This is how likely they are to respond to a firefight. I think it also determines how long they stick it out. Loyalty might also apply to Peeps using other Administrators' facilities when neighbouring territories are open to each other, but I'm not entirely sure. I think disloyal peeps might use the oppositions facilities - at your expense!
What's in a Peep Part 2
Peep Personality

Okay - now for a bit of an in-depth exposé of what makes a Peep tick: the character stats. Some of you will almost certainly find this next tedious and anal (and probably unnecessary, given Startopia's freewheeling approach) and want to jump on to the next page. Much of the following has been gleaned from the text data files found in the Mission sub-folder inside your Startopia install on your hard disk.

Peeps have nine character ratings much like an role played character, but they live in a live, simulated environment and not a dice rolled sheet of statistics made for turn based play. The game engine uses these stats to simulate a crude little personality, like nine different fuel gauges inside their heads, instead of static ratings to show how well they can smack goblins. Stats don't differentiate between characters or to show if one is superior or inferior to another: Startopian Peeps are all fundamentally identical on the "inside". All Peeps are born equals. These character stats are simply tracking how everything on the Station affects them. The nine "health" bars record everything from actual health through to how drunk they get down at the local. If a certain stat gets too low then it triggers a response in the Peep to try an restore those lost points. The only clues to a Peep's current state of well being come from the cute little animations they do, the floating "emoticons" that come and go above their heads, or... or you find a corpse.

Each Peep's character stat has a maximum capacity of 10,000 points. The actual behaviour of a Peep depends on how "full" a particular stat is. Any stat sitting between 6000 and 10,000 points is considered optimal, and the Peep is perfectly satisfied in this area. That is, it might be happily well fed, feeling loved, fit as a fiddle, enjoying the perks of a perfectly relaxed bladder, and so on.

At less than 6000 points, the Peep's mood changes; they start to feel the first pangs of hunger, feel a bit off colour, experience tiredness, etc. and the need to replenish those missing points starts to concern them. Whether or not they immediately act on these needs tends to be influenced by their employment ratings. They will head off to seek the nearest Station facility that can address this need, and you'll be informed by a small greenish-white "emoticon" materialising above their heads to let you know what's on their minds.

Below 3000 points, the attribute is considered minimal and the Peep's need becomes really pressing. Emoticons turn an urgent shade of red. The Peep will drop everything and try to get those points fulfilled as soon as it can. At this point in time, the depleted stat will start affecting other characters stats - invariably for the worse - so trying to keep Peeps out of the red, so to speak, is a smart move. At under 10 points, the attribute has effectively zeroed. This is usually when you see a Peep experience death, deep depression, psychosis or they decide there and then to resign and leave the Station.

A lot of things influence a Peep. Just by standing around doing nothing, a Peep slowly loses all their points; they get progressively bored, hungry, tired, and eventually need to got to the toilet. On top of that, if they've caught a disease, or they feel under-promoted, or the Station has too much litter, or they're standing in a patch of Bio-Deck they really like, or there's a queue at the Lavatron, or whatever - then all these effects will stack up on their little psyches too. Some species will lose more of one stat than another, e.g. Gem Slugs are "fussy" because they bore quicker than everyone else; Karmaramans are "lazier" because they lose Sleep points faster, Kasvagorians get hungrier faster, and so on. (Grekka Targ by comparison, don't have any specific racial bonuses - apart from being rather boring to the other species - they're sort of Startopia's Platonic ideal of a Peep).

If a Peep eats a Dine-O-Mat meal, receives a Sick Bay cure, gets smacked around the ears by an rampaging Skrasher or struck by a laser beam then their various stats change in a big lump sum. Again, racial types, the Peep's current situation or the state of the facility they are in will affect how these events change the final outcome. So, what are all these influences? And how does a good Station Administrator minimise the yucky ones and encourage good ones? As mentioned before, Startopia is fairly easy going. Its a sim management game, not StarCraft; its not a sudden death contest where split second decisions make or break you. Things are indirect and take a little time to show. Kick back and take it easy. Enjoy the view. Get yourself a nice big hot chocolate or something. Works wonders for me!


Energy Matters Part 1
To build a thriving and successful Station, you must attract ever increasing numbers of visitors to it and gently relieve them of their hard earned cash. Occasional bonuses can be scored from medical emergencies, reforming criminals, religious conversions, passing groups of tourists and pilgrims and trading with merchant vessels. At the same time, you must plug inefficiencies in your economy by minimising your costs and recycling any junk or unwanted material.

Energy

Startopia uses an energy economy. e is used to power, build and fund everything on the Station and is stored in an impressive contraption called an Energy Collector (right). Each one of these stores up to 100,000e and are the hearts of your Station - losing all of them results in a loss. If you opt for the violent solution against rival Administrators, either capture the segment with their last Collector in it or just blow the device away for that decisive victory. The size of the floating glob of mercury in the middle shows how full your Collectors are: when they're down to a pinprick you know you're in trouble. Increasing e storage means building or capturing more Collectors. However, regardless of the number of Collectors you have, you'll still only collect the same amount of energy during a Solar Flare event in the game.

Energy and matter are interchangeable. Startopia borrows heavily from Star Trek and gives you a Transporter to beam stuff to and from the deck. Running in the background is a Matter Replication system that uses e from your account to conjure up the necessary cargo, supplies and requested facilities to build if the right crates aren't available. The Transporter system has a Pattern Buffer that can hold up to ten items. Anything that is dead or inorganic can be plucked off the deck and stashed here. This system is indispensable for editing and rearranging your station, cleaning litter, potting plants, and especially good for neutralising bombs.

e is automatically used to replace anything you run out of: building materials, cargo crates, and electrical power for Station facilities. If you ever run out of something don't fret - the Station is now digging into your energy reserves to replicate the missing supplies - provided you actually have sufficient juice in the bank, of course. Using cargo is really all about Station efficiency and maximising your profit ratios, not a matter of life or death. Although if you do let you energy levels drop, you will certainly feel the pinch. Using straight e for everything will almost certainly keeps you poor early on. You're far better off using the right supply crates in the long run.

Power

Collectors only store energy; electrical power still has to be generated to actually run the Station. The amount of e in your account also doubles as an energy rating: if, for example, you have 50,000e, that counts as 50,000 power points being "generated" every second. If the collective power rating of all your Station infrastructure seriously exceeds what's currently in your account, blackouts will occur: various buildings and rooms will start to shut down. So, to increase your power rating you need to build Energy Boosters (right) everywhere, preferably near vital buildings if things get tight. During a power squeeze, buildings are allocated power according to how close they are to a Booster, so set up these small machines near important facilities on both lower decks.

So power isn't that literal. You won't see your e slowly dribble away when you build a few rooms and start using power. All a Booster does is up your "power rating" by 20 000e when it runs. Each Booster charges 25e per half minute when they're running (depending on how hard you've set the economy) so they will eventually start to get expensive when you install large numbers of them. You're better off in the long run investing in a few more Collectors.

Power Failures

Running low on cash is basically the same as having a power crisis. Every building - including the Boosters - will start to power down automatically, and the lighting literally goes into the red. Going deep into debt utterly, utterly paralyzes you - everything will shut down! There's nothing worse than desperately trying to get back on your feet - difficult when nothing runs, no one can be rehired and nothing can be recycled or restarted since you simply have "negative" e. Basically, you are f****d at this point until you can demonstrate some administrative true grit and claw your sorry arse out of trouble before your head is served up on a plate. Some hints: filling the Recycler with trees, corpses, or even buildings and furniture, can scrape you through.
Energy Matters Part 2
Power Disasters

Catastrophic power failures are usually the result of warfare gone horribly wrong - the actual power failure itself can make it almost impossible to field any enemy action. About the only way out of this situation is to pray that Arona will want to buy some of your goods (most likely a sacrificed building, cargo, entire Bio-Deck forests - anything!). Just bear that in mind when you sally forth to kick heads next door. A rich, powerful Station Administrator can become a drooling economic basket case in no time! Casualties in a fight (or any kind of fatality on your turf) results in a 1000e payout per death to the next of kin. Losing armies of Station staff in a fight not only rapidly drains your energy but takes out your best medics, Recycler workers, communications and security personnel right when you need them most. As you can imagine, striking successfully into enemy territory can be devastating, but fraught with risk.

This may irritate control freaks who like their numbers, but there's not a single visible rating or bar graph anywhere in the game, other than a few global ones found in a few menus. You sort out your power needs - like everything else in the game - by feel. There is one graph you need to keep an eye on, and that's the horizontal indicator under your numeric e display. This shows the "efficiency" of your part of the Station in energy terms. Full green means you have a large surplus; red means you are starting to get dangerously low and blackouts are looming. Building Boosters and Collectors will up your efficiency rating. 100,000e may seem a lot to start with, but its easy to blow your budget and stall. If you're used to complete and total control over your gaming you'll find the indirect management nature of Startopia frustrating during a crisis. Like any real time strategy game, you still have to develop your economy and infrastructure in stages, and keep some spare fat in the system, just in case.

Unchangeable or rigid Buildings, such as Space Inns or Lavatrons, consume a pre-set amount of power. Resizable or adjustable Rooms like Berths, Sick Bays or Discos are charged per square of floor space. On top of that each piece of furniture also eats up a little power, so making a huge room and stuffing it to the gunnels with furniture will eat into your power rating more than a sparsely furnished small one.

Recycling

One way you can get a little back from what you've foolishly spent is to recycle any old junk, litter, crates, buildings and even corpses. The Recycler converts any matter dropped into its hopper back into e and shoots the result back to your Energy Collector via a cute little ray gun affair sitting on top. The process isn't perfect and only 25% of the building cost of the recycled item, but a little is a lot better than nothing.

Each Recycler is manned by a crew of up to four Salt Hogs. Its wise to have extra workers per building so you can run constant shifts without wearing out your workforce. These machines are completely automatic - or rather, their productivity depends on the performance of your workforce. With a gang of Scuzzers prowling the Station collecting litter and emptying bins, or by beaming it directly into the Recycler's tray yourself if you're really desperate, you can just hang in there by your fingernails if e is perilously low and you're struggling to acquire any Boosters. If worse really comes to worse, you can sacrifice a whole building and all its furniture to the Recycler to gain some urgent cash. Or some trees from the Bio-Deck. However, the e won't become available to you until the Salt Hogs have processed it. And watch out - criminal Hogs pocket the recycled e for themselves!
Cargo Cult
Everything in Startopia - except Peeps - can come in a Supply Crate. Some buildings and rooms consume Supply Crates, such as Medical Supplies for Sick Bays and Food and Mineral Ores for the Dine-O-Mat. Each crate only holds one item, and if left out on the deck for too long, eventually spoils to become a useless Damaged Good. A few Cargo Holds are necessary to store crates safely in stasis and prevent spoilage. Your Scuzzer Droids will automatically pick up any stray boxes they find and deposit them to the nearest Hold, but this depends a lot on Scuzzer availability and numbers - more often you'll be packing Cargo Holds yourself in really big stations since it can sometimes take a long while for your droid packs to get around to clearing them up. Scuzzers completely ignore any Damaged Goods, and these crates have to be recycled by hand as you find them.

Right clicking on a Cargo Hold brings up its menu, where you can quickly grab a Pattern Buffer's worth of cargo from everything that's stored any of the Station Holds. This is useful for unpacking large numbers Scuzzers, Furniture and Hardplan Crates in one hit when you need to use them without having to hunt them down on foot. You can also beam goods directly to or from the Hold itself without the menu.

Just a small note: any cargo crates that are "in transit", that is, either being manipulated by the Cargo droid in the Hold or carried by a Scuzzer become temporarily unavailable to your right click menu and trading menus. You have to wait until the Cargo droid has finished with the crate before it becomes available again. With Scuzzers, you can at least beam the crate out of their claws - often grabbing the Scuzzer as well.

I've also noticed Scuzzers can get stuck in the cargo delivery doorway if you have a building, room, or a small Corridor Item parked right in front of it. I keep the doorway clear of any other facilities myself, and this helps prevent any "blocked" Scuzzers and stalled cargo. I've even seen cargo decay waiting in a stalled Scuzzer queue, so a little vigilance might be required on your larger stations.

Trade and Communications
Trade

There are several ways you can obtain crates and cargo, and each has its pros and cons. Basically, if it saves you time, then it's usually expensive. The fastest way is to simply buy them from the first trader you deal with, Arona Daal. He's the only character you can trade with when the game first gets underway. He's a dodgy bugger though, and routinely overcharges you until you can scrape together enough cash and find enough space to install a whopping great Star Dock.

Star Docks are pretty impressive contraptions, and allow passing trading ships to dock. The Star Dock opens your domain to merchant shipping and the rest of the galaxy - and to much better deals than Arona. Each of the nine Startopian races have their representative traders, and each species will offer you cheap commodities and great sales according to their racial theme. However, the downside of trading is availability. If you need certain types of supplies or hardware in a hurry then you're likely to find yourself having to wait for the right trader to pass by, and then suddenly find half a dozen all try to contact you at once. Other players will also vie for their business as well, so it can boil down to who's got the quickest draw when it comes to snaring the deals you want.

Communications

However, nothing will happen in your docking bay unless you have a Comsensor to communicate with the rest of the Universe. Comsensors allow you to receive increase your Station revenue by accepting Traders' offers, receiving Tourist group requests from passing tourists and pilgrims, and assisting in medical emergencies that frequently offer substantial bonuses. You have to be fast and alert though, because a message may be snapped up by other players. I think by stacking the number of Comsensors, and manning them with enough skilled Targ lets you beat other players to the messages.

Comsensors are manned exclusively by those short little insect guys, the Grekka Targ. At first glance, you may feel you only need one Comsensor to scan the sub ether bands for incoming ships and messages. But they also monitor the Station's interior for any intelligence, working in conjunction with the Kasvagorians manning the Security Center. I think increased numbers of Comsensors will assist your Station's ability to spot bombs, agents, criminal activity and other hazards more readily. I've spotted flashing segment alerts where there was no violence or Security Scuzzers but only a criminal with only a Comsensor nearby. I'm still unsure whether it matters whether you pack all your Comsensors into one spot or whether evildoings are detected within a certain radius - if they can be detected at all.

The only downside is that criminal Targ may try to use your Comsensors. Apart from possibly interfering with any warning messages, this doesn't seem to have an noticeable impact on your station.

DIY Supply (Manufacturing and Research)
Trading is nice if you can get the right bargains but you're at the mercy of trader availability. Not only that, each merchant's offerings change each visit and the item you're desperately after may not appear until late in the game. Some degree of self-sufficiency is usually required. Once you've established your own means of producing your own Hardplan, Tech, Furniture and Supply Crates at your whim, then trading becomes a serious money making exercise instead of urgent necessity. But making or growing your own requires a substantial investment in time, staff, facilities and cash.

Cultivation

The easiest way to obtain your vital supplies is to just grow them on the Bio-Deck. Apart from the cost of opening new segments, hiring Karmaramans and waiting for the first crops to grow, this is requires little or no effort from you. Resident Karmaramans wander the landscape, planting shrubs and trees. To get the supplies you want, you create the right environments that will produce the right trees. When the plants have matured, you can "harvest" them by right clicking on them, and they'll transform into the Supply crates you need. If the plant isn't mature yet, you'll see a clock symbol appear over it to show it will be marked for harvesting the moment it matures. Your Scuzzers will automatically pick up any crates and stash them in the nearest available Cargo Bay. More on this in the Bio-Deck page.

Manufacturing

Ultimately, Factories are the best way to build all your crates, if you don't mind some micromanagement. They can build anything that comes in crate form, and for the cheapest cost. However, at the beginning of a game you can only build a few Supply crates and a piece of furniture or two. However, when you first go to make anything in a Factory, you will quickly find the selection of crates is very, very limited. If you want to expand your build list both in the factory and on the deck, you will either have to pay through the nose buying those green Technology Crates, or invest in a working Laboratory filled with equipment and staffed by Turrakken scientists to reverse engineer all the techs you require in the game. More on research below.

Factories, like Recyclers, need a gang of four Salt Hogs to operate them and are built exclusively on the Engineering Deck. The speed at which factories can produce goods is directly related to the number of workers and their employee ratings inside them. You'll need to have a sufficient pool of Salt Hogs to get the most out of these buildings, and sufficient Cargo bays and Scuzzers to collect and store stuff. Otherwise it all tends to go putrid outside the Factory unless you can use it promptly.

Unfortunately, only nine items can be queued up at a Factory at a time. For expensive and slow to build big buildings, its definitely worth the effort, but for small items, nine slots gets far too fiddly. You may find its not worth your while manufacturing tons of small items just to get bargain basement prices (although cost savings can certainly stack up) simply due to the huge amount of micro management involved. Although I suppose you could build your own industrial district and mass produce stuff - the only problem here is that long queues of Scuzzers will build up outside your Cargo Bays. While being carted, crates seem to be taken out of circulation for trading or consumption.

Even with cheaper manufacturing costs, you will only get the benefit of the cheaper prices if you built them from the Factory - and then open the Hard Plan or Furniture Crate item that was built using the Build Menu. Building raw from the deck with the standard build menu will still cost you the full amount and just create another copy of the crate. With Furniture Items its a little different: editing a room or placing stuff on the deck will cost you, but thankfully the game will automatically use any pre-existing furniture crates at no cost if they happen to be around. You'll know when you've run out of a type of crate when the cash register starts ringing up those full prices again.

Research

Factories can only manufacture techs you've been granted, bought or already researched. When you first get one you won't be able to make much except some basic cargo supplies and maybe the odd furniture item. You'll need to establish a Laboratory and hire some Turrakken researchers to reverse engineer some techs so you can become a little more self sufficient and less dependant on the fickle whims of passing merchants. Factories and Labs make a good combination: Labs can work their way up the tech tree supplied by freshly researched items from your Factories.

There's a tech tree to negotiate, accessible by by right clicking on the Analyzer dais in one of your Labs. There are several streams of research, and each stream usually starts by analysing a Supply Crate. e.g. Researching Luxury Goods allows your Factory to manufacture it, and also opens up the next item to be researched. You work your way from left to right, using a crate of the previous tech to be analysed to unlock the next. The illuminated light globe shows you which item is about to be discovered. With the easy going style of this game, its unlikely you'll be hunting down specific items in a hurry.

If left to their own devices, Labs will "improve" existing techs, but all this means is that the items they study only become cheaper and faster to manufacture, and nothing else. You can't actually improve the stats or abilities of any item or room. Research is little more than just a money saving exercise that needs a substantial investment of time and e up front, but can pay off handsomely once its all established.

To research something, plonk the object or crate in question onto the Analyser in the lab. Labs are like Sick Bays: you fill them full of equipment and other odds and ends, hire some researchers and then sit back with your executive mug of cocoa and watch the lads buckle down and do everything for you automatically. Labs with more expensive equipment tend to attract more researchers and get things studied more quickly than labs without. Other than that, there's no real difference between the bits of equipment other than "higher" tech items like Microscopes and Replicators are "better" than plain of Workbenches and Workstations. Really, its just fun to arrange labs with lots of different stuff. Don't forget, your researchers will appreciate pot plants and other niceties.

A Laboratory in action. You can study just about anything in the game, from litter (it grants you the Litter Bin tech) to every kind of Crate imaginable; you can even perform postmortems on dead bodies! I got the boys to examine a dead Gem Slug to determine just what exactly was the cause of death...

Know your Techs

Medicine Part 1
It goes without saying that a Station without a Sick Bay is a disaster in the making: a working infirmary should be an early priority in your game. Sick Bays provide medicine for all walks of Peep and are the major source of Body (a.k.a. Health) point replenishment for your population. Properly equipped, you can cure and stop plagues, heal the injured and successfully treat medical emergencies for those lucrative bonuses. Sick Bays are built exclusively on the Engineering Deck and are manned only by the Greys.

The effectiveness of a Sick Bay boils down to the current staffing levels and employee ratings. Expert medics will earn for the Station lucrative tips while poorly qualified Greys can actually harm patients, in extreme cases causing death from malpractice. I've found it wise to only hire Greys with two star Skill levels or more. Criminal Greys can also be a problem, surreptitiously using your facilities if there are long queues of patients and not enough doctors on the job. Illegal medicine is expensive for your patients and generally harms them, plus the illegal doctors pocket any fees for themselves. Again, try to keep your Sick Bays manned around the clock, especially on bigger stations. The number of doctors that can work in a Sick Bay is determined by the number of Diagnosis Machines set up in it. Ideally, you want a nice balance between Diagnosis, waiting patients and medical equipment to administer cures to.

In essence: prevention is better than the cure. You may never ever see a plague victim in a game if your medical facilities are up to scratch, except from passing emergencies. If you start seeing funny textures beginning to appear in your general population then your Station's medical services are not keeping up and disease is starting to spread through the population.

The equipment in a Sick Bay can determine how well it performs. Early on you can get by with basic Diagnosis Machines and Dispensers, but eventually you may need a Medi-Bed for serious cases and Z-Ray Scanners to spot inbound travellers infected with deadly Skrasher eggs. There doesn't seem to be any direct correlation using a specific medical widget for any specific illness. Again, its all done by feel. Its just that if your Sick Bays lack expensive hardware then its more likely that patients with nasty diseases may have to return for repeat treatments - a bad situation all around both for the patients and their opinion of your Station. If an advanced medical item isn't available, a badly ill Peep may have to undergo several treatments with the basic equipment before they they can be cured.


Injuries

See Combat
Medicine Part 2 (Eeek! PLAGUE!)
Know your plagues! With a bit of luck you'll hardly ever see them, but if the Station's medical services isn't keeping up then things can spiral out of hand. Startopian diseases really aren't all the same you know; some are more severe than others. Naturally occurring diseases seem to be fairly rare in a game, unless you're playing a custom mission that makes a point of them. Infectious diseases tend to become noticeable with minimal medical facilities and huge Station populations that have little to do except hold conversations with each other. With the higher population rates those low infection rates and incubation times start to bear a bitter fruit...

There's something like ten different ailments in Startopia (outside of injuries, battle wounds and Skrasher induced cranial traumas), each with its own distinct way of affecting Peeps. Some species succumb more readily than others to specific diseases. Many of the diseases are the med, and affect a particular character attribute like hunger (Gutworm) or Love (Nymphitus). These aren't obvious until symptoms become really severe and the Peep starts to develop some curious texturing on their bodies. Disease degrades Peep health until the sufferer eventually dies. Timely intervention by a Sick Bay can avert this unhappy state of affairs, and you'll know you have proper medical coverage when the only diseases you see are coming from Medical Emergencies called in via your Comsensors. Naturally occurring diseases seem to be fairly rare, unless your population starts to rise sharply and you can't keep up with your medical services. Then those low infection rates and incubation times start to take their toll...

Notes
  • Every conversation with a Vermin always results in the Peep getting sick. The Vermin Ratio shows you the chances of what disease it will be out of all the possible illnesses in the game.
  • As a Sandbox default, 5% of all Peeps emerging through your Port will carry a disease of some kind. The game then randomly decides what disease it will be using a "Port ratio" which I've translated into a percentage. Some diseases are more prevalent than others, like the Common Cold. The Port Ratio shows the likelihood a particular disease that that 5% is going to carry.
  • Contagion shows the percentage chance of a disease being transmitted via a Conversation between two Peeps.

Radiation Sickness
Radiation Sickness is the result of injury, and isn't a transmittable disease. Sufferers don't irradiate others. Thus it isn't contagious and no funny texturing appears on the sufferer (what! they don't glow!?). Sufferers lose Toilet points (diarrhea and vomiting being nasty side effects of radiation poisoning) and endure ongoing damage to the body, more so in the fragile species.


Common Cold
The Common Cold is a simple sniffle. As far as I know, this has no textural effects although you'll see Peeps pantomiming severe little coughing fits. Very infectious, but not as severe for some Peeps as some diseases. Runny noses obviously don't faze the slimy Gem Slugs, whereas pretty Sirens just become a mess.


Solar Fever
Solar Fever is one of the the milder diseases, affecting Mind. Sufferers have been caught in a solar flare and have a "touch of the sun", so to speak. Its not that fatal to the sufferer, but its a problem for Station Administrators since the sufferers' opinion of the Station is falling faster than a stone. Severe symptoms manifest as this amazing red hot brick texture.

Brainy Turrakken scientists suffer its effects a little more than other characters.

Nymphitus
Nymphitus is a disease where your patients won't die on you, but will go a little crazy, becoming Love starved and needing more of it more frequently. Severe cases start manifesting rather cute little Valentines all over their (presumably) sweaty, trembling bodies.

As some of you might have guessed, this sickness affects the Dahanese Sirens more than other species.

Lunar Psychosis
Lunar Psychosis is another semi-mental illness, except Peeps suffer Soul degradation over time. Potentially, this can quickly lead to a need for religion and ultimately even a soul-starved psychotic reaction. White lunar crescents appear all over the sufferer's bodies in severe cases, although on some Peeps it just looks like they've been badly shat on from a great height.

Kasvagorians are particularly at risk, suffering double Soul loss over other Peeps.

Hyperactivus
Of concern to all Administrators, Hyperactivitus is a mental bug that seriously affects a Peep's Fun gland, causing them to bore faster than normal. Bad cases develop a weird plasma like texture.

Grekka Targ suffer double the trouble to their Fun glands compared to other Peeps.Fixed?

Gut Worm
Probably one of the more visceral diseases around. Gut Worm is a space tapeworm: Gut worms suck Nourishment out of their hosts, and victims have to eat more. Arona Daal makes mention of one in the first single player mission. Sufferers develop a organically rich, woody, fungal sort of texture.

The decadent Gem Slugs suffer double the intestinal trouble of the other species. This is the right texture but not a slug, yet! It's the original image though!

Droop Eye
Droop Eye is a sleeping disorder that much like chronic fatigue syndrome. Sufferers start losing Sleep points and need to sleep more often. This could work well to your advantage as sleep deprivation can play into the hands of the Zedem Monks and earn some big bucks creating some Penitents. Peeps develop a strange, Bananas-in-Pyjamas stripy jimjams texture!

Karmaramans get more sleepier than other species with this condition. Yeah?!? Guess again, again... i want to fix this so badly but that would mean playing Startopia, and if i do that this is never getting finished. I'll be back for it!
Medicine Part 3 (PLAGUE! Continued)
Volatile
I think Volatile is the "Explody Head" disease mentioned in the game's Mission text files. I've had many volatile patients in the past, but I've yet to see any exploded heads - only exploded bodies. Occasionally you'll come across a freshly dead skeleton surrounded by the shattered polygons of its former owner, but with no Skrasher in sight you can be sure this has been an unfortunate victim of Volatile. Volatile patients develop a vivid and angry red rash all over their bodies.
A truly egalitarian illness, this disease affects all Peeps equally without any exemptions or prejudice. Although it only affects Health points, the severity of its symptoms make it a formidable medical condition: twice as bad as most other diseases, but not quite as nasty as the Space Plague.

Blotchy Green
Blotchy Green is a nasty bug causing both heavy Body and some Mind and Soul injury. That is, this bug is as virulent as the dreaded Space Plague, and adds a double whammy where it depresses the sufferer on top of everything else. This disease tends to knock out the "softer" and more intellectual Peeps more quickly. Blotchy patients develop yucky, green pimples. Unless treated immediately, weaker Peeps will die on you, often while waiting for treatment. Fortunately, its not that common and not that contagious.
Physically hardy species like the Salt Hogs, Targ and Kasvagorians are more resistant to Blotchy Green, whilst Sirens are especially vulnerable.

Space Plague
This is a bad one: Space Plague is the second most contagious disease in Startopia after the Common Cold and its symptoms can be very severe in some species. Space Plague simply drains Peep Body points without affecting any other attributes. While not as lethal as some diseases, its combination of relatively high infection rate and health loss makes it a potential problem. Sufferers can die waiting in Sick Bays if you don't watch out and it can spread rapidly on Stations with large crowds with nothing to do except engage in lots of conversations. This is one of the few odd diseases: the normally tough-as-an-old-boots Salt Hogs drop like flies before it, while the soft and unhealthy Gem Slug is barely affected.

Sufferers develop some suitably impressive purple spots with this space germ.


Alien Impregnation
Skrashers are the ultimate medical nightmare. You've got less than 200 seconds to get that Peep to a cure, and that's assuming they started off with full health. Otherwise, the Peep explodes to reveal a huge Skrasher. Most of the time you'll simply fail to save them and you'll be dealing with a destroyed Sick Bay. Skrasher spawn infect their hosts after they've been petting a Memau that's eaten too much litter. Keep those litter levels down, and keep an eagle eye out for any Memaus. The effects of alien spawn are immediate and horrendous: the hapless host's Nourishment and Body are gobbled up by the Skrasher larva. Weirdly enough, their Mind and Soul points start to increase - perhaps its larval induced delirium; or an evolved measure to prevent hosts seeking help?
Food and Drink
Food


Strangely enough, food comes - and ONLY comes - in one form: the Dine-O-Mat. There are no restaurants or cafes in Startopia. This is a four sided, fully automated vending machine built on both lower decks, and all it does is restore Peep Nourishment. Sprinkle them liberally throughout your Station, and keep an eye on your Overview menu to see how your population's food needs are being met.

Right clicking on a Dine-O-Mat brings up an options menu: by default, they produce cheap (and nasty?) synthetic food by replicating e. Not terribly good for your profit margins, and only the cheaper characters like Salt Hogs will really appreciate it. However, you can set Dine-O-Mats to create more upmarket foods based on Mineral Ores or go for rich, organic food sources based on Food Supplies. Various races prefer different types, and while all versions will nourish your customers, some food stuffs will subtract Mind points on different alien species. However, I've found leaving all three buttons on seems to work fine. Its an avenue of finessing your Station and catering to specific species' needs. Experiment. Have fun!


Drink

Fortunately, there's tons of options when it comes to drinking a Startopian under the table. You get three types of bar, only available on the Entertainment Deck: the Rough Bar is for the less cashed classes and the violent; Recreation Bars are general purpose establishment for most peeps; and the snooty Cocktail Bar for the upper crust and the clergy. These fine establishments help foster good relations, although peeps can literally drink themselves into a stupor and Kasvagorians sometimes kill each other in drunken brawls. Early on in the game you'll have no difficulty attracting patrons; but later on when other delights come online you can find all your fine drinking establishments maddeningly empty. One way to get those Peeps back in and socialising again is to drop the prices on each type of bar.

Gem Slugs get their own specialised Slug Apartments, a cross between a five star Sleeping Berth and a Turkish styled Bar. Here the Slugs get to recline in their own special slime baths (which apparently reek to the other peeps) and help themselves to their own delicacies without any pesky plebs getting in the way.

Drinking has the effect of dramatically increasing a Peep's Fun and relieving boredom, but at the expense of everything else. There's wear and tear on their toiletry, sleep and general health and well being. Regardless of how expensive the venue, the effect of drinking is the same, although different species get drunk at different rates. Interestingly enough, the rate at which sozzled Peeps dry out is the same, regardless of species. Peeps sober up in Lavatrons, Sleeping Berths and other forms of Accommodation.


Socialising is a far better option health, sleep and lavvy wise for all concerned, but only half as interesting. When Peeps are at the bar they're drinking: when they are at a table, they're socialising. Unlike a good binge, the effects of socialising vary according entirely on the venue. Early on, bars are easily filled. But as more lucrative facilities come online, you may need to drop prices to keep the patrons interested. Don't forget, the effect of taking a swig (which Peeps do both at the Bar and at the Table) stacks up on top their activities at the table...

Rough Bar


Recreational Bar


Cocktail Bar


Slug Apartments
Cleanliness
There are two main avenues of preserving public health on the Station outside a Sick Bay: Lavatrons and Litter Bins. Lavatrons are the airport bathrooms of outer space. They're an all purpose lavatory, shower and change room. Peeps low on Toilet points come to these public facilities to replenish them: i.e. scrub up and do a quick ablute. With all the appropriate noises, of course. Keeping your population clean, and thus healthy and satisfied, is as important as having a tidy station. No space toilets is big trouble for any place - doesn't bear thinking about!

A Peep with minimal Toilet points suffers continuous degradations to Body and Soul, and extra to that all important Mind total. i.e. queuing up for the loo will drive Peeps mad and dramatically lower their opinion of your Station.
While peeps are turned off by the sight of litter, they have absolutely no qualms about producing huge drifts of it. Litter Bins help control this ugly tide, but on their own they're usually insufficient. You'll need roaming gangs of Scuzzers to tidy up, and a Recycler or two to really contain the problem on big stations. Scuzzers empty Litter bins before making the trip to the nearest Recycler to empty their hauls there. Like many other animations in Startopia, this is a mimed pantomime, so you'll never see any bin toting robots anywhere.

Dine-O-Mats and retail stores are hotspots for rubbish. A good rule of thumb is to have one Litter Bin for every retail store you put up, and to trip Peeps up with Litter Bins when they enter or leave a shop or Dine-O-Mat.

Tons of garbage progressively degrades your peep's mental well being, but most Peeps have a threshold level before this starts to bite. The easier to please races will be more tolerant, and more lucrative patrons will be more offended.

Lots of rubbish also attracts Space Vermin, small rodent like creatures that can transmit disease. Oddly enough, most Peeps seem to treat the Vermin as just another species and even have conversations with them - but remember, conversations with Space Vermin usually winds up with the Peep catching a disease. Overall Space Vermin are a poor indicator of your Station's health and will further repel the richer customers, especially the Gem Slugs. Also be wary of Memaus eating litter - some players keep their Dine-O-Mats off the Engineering Deck because of this.

Just be careful of Litter Bins "blocking" Peeps occasionally. I've found if you plonk one down in front of the doorway of a re-sizeable room (like a Sleeper Berth or Disco), Peeps get "stuck" in the doorway and the room won't be used. Keep Litter Bins (and probably any other Corridor Items) to the side of any re-sizeable room's doorway, and you shouldn't have any problems. But for your other facilities, put those bins where Peeps will trip over them!

When using a Lavatron, all patrons gain +100 +300 & -5 drunk per second. Not only do they relieve themselves, but the relief lifts a little weight from their minds and even sobers them up a little.

What if a Peep can't find a lavatory?

Eventually, things get so desperate they apparently pee themselves in public! I've yet to see this (unless there's an animated pantomime with no mess) but listed in the moods_in00.txt and moods_out00.txt data files are references to such an event. The hapless Peep humiliates themselves in a single burst: -2000 -500 -1000 & +5000.
Love and other Catastrophes

Love Nests

After trucking around the cold depths of postwar space, all Peeps need some love and attention and your Station will require several Love Nests to satisfy any cravings for romance. Love Nests restore a Peep's Love points; and these rooms are exclusively manned by the Dahanese Sirens. Sirens service all walks of Station life without complaint. The actual process of "Loving" has been sanitized into some kind of clean cut Trekkie energy sex thing so there's nothing too controversial to confront the kiddies with. Sirens are the only creatures that come in sexes: the female version is your standard issue scantily clad sci-fi space bimbo; the male is a blonde, barrel chested himbo clad only in a blue codpiece. Some of you may recall the blind angel from Barbarella. Both sport angelic wings - their sexual organs apparently - but apart from looks there's very little difference between the two as far as the game engine or your good self is is concerned.

Sirens are good to have wandering the Station as any Peep striking up a conversation with one scores a Love bonus.

Love to a Siren is a very spiritual experience, as significant to them as religion is to the Zedem Monks. Sirens score huge Soul bonuses conducting their duties, while the Monks score huge dollops of Love working at the Zedem Temple. The two groups are polarised to each other and don't get on. Sirens and Zedem "counter" each other. Sirens have problems with anything to do with the Monks and don't receive good bonuses from the Temple, while Monks have a hard time at the Love Nest and disapprove of all things Dahanese. While many Peeps will huddle around the Zedem Temple seeking divine redemption and blessings, you can always be sure that your Nests will be happily packed with Sirens who are more than content with their Lot.

You can never have too many Nests it seems. Certainly the computer AI's seem to fill their Station segments with so many Love Nests you wonder if you've missed something. More likely though, the AI's need lots of help! While massive doses of good Loving are gained, Peeps will still need to be entertained in other ways. Love Nests only marginally alleviate boredom.


Oroflexes

Sirens and Love Nests aren't the only way to gratify a Station's lovelorn population. One of the best Station attractions you can build on the Entertainment Deck is the weird and vaguely suggestive contraption called the Oroflex. Oroflexes are a giant half animal, half tree, half fairground ride and circus freak show all rolled into one. They can service up to eight Peeps at a pop, rewarding them with large dollops of Fun and Love as the Peeps presumably get a thrilling ride inside it's gullet. They're expensive to set up and take up large areas of deck space, but these strange fairground amusements are well worth it. They are a fantastic attraction in themselves, and excellent for curing boredom on your Station. Alas, the Zedem Monks have issues with them and derive no fun from them at all; if anything, a modest spiritual crisis occurs in the face of such rampant fun.

Unfortunately, their success as a venue can also create a few problems for you. Oroflexes will draw Peeps away from other Station entertainments, leaving them empty. You will almost certainly have to drop prices just to keep other facilities occupied. But there's a useful flip side: their sure fire success works in your favour by livening up dead spots on the Entertainment Deck. Peeps like to travel only so far to get anywhere, so I generally try to keep Oroflexes away from any thriving faculties. I'll replace unused entertainments in a depressed part of the deck with an Oroflex to quickly revitalise it.

Redemption
All Peeps have little Souls, and like every other character trait, Soul points erode away during the cut and thrust of a Peep's normal day. A Peep will feel and heed the need for some religious advice and seek out a blessing from a Zedem Monk. The Zedem embody all things spiritual and religious in the game. In keeping with their religious theme, all other races receive a small Soul bonus whenever they have a conversation with a Zedem. But the Zedem's main tool is their Temple, and Peeps will receive massive Soul bonuses when they are blessed by a Monk in this institution.

Zedem Temples

Temples are raised exclusively on the Bio-Deck. They cost you nothing, but once created, it can never be removed. Your first hired Zedem Monk conjures up the central obelisk made of crystal; the process of establishing this plinth drains all the water in the vicinity, levels the land and automatically weeds out any vegetation nearby. For each subsequent monk you employ, a stone slab rises out of the nanosoil. Twelve monks will produce a ring of twelve stones, or the Zedem Full Temple. You can only have one Temple, unless you happen to capture another Administrator's Bio-deck space, and sacking all your monks will remove the ring of stones, but not the original obelisk, which will continue to attract a swirl of Monks and visiting pilgrims. Apart from the hiring and promoting each Monk, Temples cost you nothing and don't require any maintenance. Once planted, a Temple will begin to attract passing pilgrims. You'll need to have a working Comsensor and a quick trigger finger to receive their docking request before other players beat you to the punch.


Startopia certainly recognises the lucrative side to religion: while rehabilitating crims or curing plague victims nets only a piddly 1000e per soul, transforming a perfectly functional (if not spiritually depleted) Startopian into a somewhat useless religious fanatic scores you a cool 5000e! Many online players try to get a Temple up quickly to earn that extra cash through conversions without having to spend lots on infrastructure. The only problem you may find is that you may lose skilled staff to a Temple conversion every now and then.


Criminal Monks can be dangerous, since their advice only makes things worse. There's a close relationship between spiritually depleted Peeps and criminality. I've often found that a Station with a hard working Temple that's creating many Penitents is also one with bulging jails. (This is especially true in the single player missions: Mission 8, the Zedem Conclave) Lockdown Brigs incarcerate and rehabilitate crims using secular means, while the Zedem use religion to "fix" Peeps by solving their spiritual issues. I've had some surprising games where beaming a gang of Security Scuzzers into a Temple resulted in most of its patrons being marched off to the Brig - including a number of Zedem employees! The corrupt Zedem had been driving their flock to deeper levels of corruption and it wasn't until they were rehabilitated that the lockup rate across the Station started to drop.

The Targ on the right has serious spiritual issues (as flagged by the red Yin-Yang symbol) but look closely at the guy on the left and you'll see a dark shadow looming over him... this poor fellow's Soul has zeroed and he's now depressed.

Penitents

A skilled Monk at the Temple can turn a soulfully depressed Peep into a Penitent. This is good news for your coffers, since you win that 5000e. Unfortunately, Penitents shut themselves away from the rest of the world in a big, bulky Penitent Suit, and then proceed to wander everywhere on the Station, neither buying or using anything and annoying everyone they meet. On top of that, a potential customer or worse, a hard working employee, is effectively lost to you. Depending on the size of your population and the effectiveness of your Monks - and the sort of scenario you may be playing - this can sometimes lead to manpower shortages.

All Peeps suffer a small negative soul hit when conversing with a Penitent, and the Turrakken and Sirens suffer additional losses to their minds and their sense of fun. Unsurprisingly, Zedem Monks enjoy bursts of Love, Soul, Mind and Fun with Penitents. Produce twelve Penitents with a Full Temple and interesting things happen...


But there are other, more subtle ways to improve the soulful well being of your Peeps. A Plaza Fountain gives them somewhere quieter to sit back, relax and meditate. The giant Viewing Gallery gives them a portal to the Universe outside, to contemplate the vastness of Creation (it also lets you see passing traders and other weird space phenomena.
Sleep and Accommodation
Sleep

All Peeps need to sleep, and there's a full range of accommodation catering for all walks of life. At its most spartan, Sleeper Berths (pictured right) provide bus station style facilities for your residents and less discriminating visitors, such as Salt Hogs, Greys and Targ. Berths are fun for Station Administrators: you can arrange them in all sorts of interesting ways - from straight pack-'em-in sardine tins to large, spacious rooms with lots of nice pot plants and lava lamps. They replenish about 50 Sleep points a second, as well as slowly dry out a drunken Peep. Even Nourishment tickles up a little as those tired Peeps get some rest after a long flight.

However, from many Peeps' perspectives Berths aren't that crash hot. Salt Hogs are the only species that actually gets a kick out of sleeping in one while everyone else finds the idea of being stuffed into a yellow coffin a little uncomfortable. This facility is really for the cheap end of town. Kasvagorians have trouble fitting inside them; Karmaramans would probably rather be outside; Sirens prefer more luxurious surrounds; Turrakken scientists get depressed; and Gem Slugs wouldn't be caught dead in one - or at least, I've yet to ever see one use a Sleeping Berth. Zedem Monks and Greys aren't fussed, but they're more likely to gravitate towards any hotels in the vicinity. You will almost certainly need to build proper accommodation at some point, and its not unusual to find Berths empty during the latter stages of a long game.

Nevertheless, Sleep Berths are like couches to crash on for your staff, especially hard working Salt Hogs and Targ. Keeping them near industrial facilities or next to a Port is a good move as they are magnets for weary travellers and hard working factory Hogs. They are, after all, the cheapest accommodation on the Station.


Accommodation

Sleeping Berths are useful but they pale by comparison to a proper hotel. Hotels can do all kinds of things, since they're actually proper rooms with bed, breakfast and washing up facilities. Hotels are a Sleeper Berth, Dine-O-Mat and Lavatron all rolled into one, offering a nicer view and less chance of upsetting or frustrating customers. Like the Berths, Peeps can sleep off the excesses of a drinking binge and dry out a bit.

Hotels come in three major classes, effectively catering for economic Lows, Middles and Uppers. Mind you, before we get carried away pigeon holing people, there's considerable overlap in Peep preferences. Most walks of Peep will be perfectly happy in most hotels. Elite Residents may want to use more expensive accommodation; but richer clients can sometimes be seen using basic facilities too.

Star Motel


Space Inn


Palace Galactica

Boredom
Boredom is one of the hardest things to resolve on your Station and is measured in a Peep's Fun points. Of all the character traits in the game, these erode the fastest and are the whole reason for the Entertainment Deck. Things like toiletry, love, food or health are just bare essentials for a Station to function; the Entertainment Deck is where you have to get creative and the number of options and approaches you have for developing it expands considerably.

Retail Therapy

Retail Stores are the consumer versions of trading with passing merchants. While Traders will exchange dozens of Crates with you wholesale, retail stores generate a fair bit of extra cash by making a single Supply Crate last many serves. Apart from earning revenue, a Retail Store also boosts a Peep's Mind and Fun points in a single hit. Make sure you have sufficient supplies in storage, otherwise your retail stores will burn precious e generating them instead, biting into your profit margins.

Different Peeps have their own shopping preferences, so you build the right kinds of shops to attract the right kinds of shoppers. Everyone enjoys shopping, and there's no such thing as a truly unhappy customer. A typical customer in a Store will has lots of fun and burn up a few calories along the way. Their opinion of the Station improves a little, too. But not every Peep is interested in the same stuff and so won't score as highly, although everyone still burns the same amount of food. "Good" and "bad" customers are determined by the species' stereotyping: the tough Kasvagorians like Combat Stores, while the hedonistic Dahanese Sirens like Leisure stores, and so on. One thing you will notice is that the Greys are Startopia's archetypal tourist. They have no real preferences or aversions to anything.

Customer Profiles

When visiting a Retail Store, Peeps are have one of three responses: either they like it, they like it a lot, or they like it only a little bit. Retail stores don't ever produce a negative result and you really won't lose anything by planting them everywhere. As far as I can tell, Peeps never browse: they always enter a Store to buy something. You can tell a Store is occupied when it starts playing its custom sound effects. And, regardless of preferences, everyone works up a little hit of an appetite - so keep a Dine-O-Mat nearby for that extra shopping experience!

'Worst' customers
'Typical' ustomers
'Best' customers
+50 +3000 -100
+100 +4000 -100
+200 +5000 -100

Notes
  • All Retail Stores use Supply Crates to produce their wares. They use one crate at a time and make it last several serves. The Sells box shows you which Supply Crate a particular Store uses, and how many serves you get from it.
  • If you run out of crates, the Station's replication system conjures the sold items out of your e supply. Cost shows you how much each serve will cost you in this situation.
  • Best and Worst shows you which are your most and least interested customers from the Peeps.

General Store


Computer Store


Combat store


Music Store


Leisure Store


Curiosity Store
Entertainment
Apart from shopping, there's a fairly diverse range of Station Facilities to pick from, and each of them have their own style and feel. But all of them combat boredom in a major way. You can alter the general tone and feel of your Entertainment Deck just by changing the numbers and combinations of these facilities on your floor plan.

Disco


Holodrome


Roulesse Wheel


Plaza Fountain


Viewing Gallery


Oroflex
States of Mind Part 1

At the end of the day, once you've addressed all the essential needs for your customers and employees, entertained them with your fabulous array of Station pleasures and turned the Bio-Deck into a second Eden, there's only one set of character points in a Peep that can make or break you: Mind Points.

Probably the best way to think of Mind is as an approval rating of your part of the Station. Everything that happens to a Peep during its stay affects its overall opinion of the Station. If it had a bad time and your Station was poorly managed the Peep winds up with a depleted Mind score. If things get too horrible for it and Mind becomes minimal, they'll promptly leave (or resign) and make for the nearest Port. Nothing at this point will convince them to stay on the Station. Peeps may get terribly bored terribly quickly, but losing all your Fun points is nowhere near as severe as losing all your Mind points.

There's no one facility that can replace Mind points; everything affects them and the process is perpetual and ongoing. Its happening every second of the game for every Peep; even when they idly stand around, or having a chat, or using facilities or apparently doing nothing taking in the sights of the Bio-Deck. There's several important things you need to keep in mind to encourage Mind, and lots of minor, minor details that can accumulate into big outcomes. Common sense tells you that when things go wrong, rooms fill up, queues are forming, facilities are dirty or damaged, there are dead bodies lying about, etc. etc. then you can be sure things are working against you.

Race Relations

Not all species of Peep get on with each other. Some species are easygoing and get along with everyone; others can be finicky. As mentioned earlier, each of the alien races in the game represents a general theme that illustrates their character and make the game readable. For example, the Sirens are sexy hedonists, and don't get on with the religious Zedem Monks, who find it harder to enjoy themselves. In building your Startopia, race relations is something you will have to deal with, although its not really life or death situation. Most of the time, race relations are expressed as a Peep's preferences: e.g. Salt Hogs don't use Palace Galacticas all that often, and Gem Slugs never, ever use Sleeper Berths. You'll never see a fight or a riot break out amongst your population. People simply leave if they don't like who's around, and even then they have to do a fair bit of interacting before that can happen. Racial differences only seem to come into play with conversations and admiring the racially specific statues that you can build. All other "racial" effects are hardwired into how each species reacts to various Station facilities and environments on the Bio-Deck. You can look them up in the moods_in.txt and moods_out.txt files found inside the \missions\00 subfolder inside your Startopia install. This is basically where most of this Guide's numbers originate.

So first up, the obvious stuff in Peep racial relations: conversations and statues.

Conversations

Conversations are one of the driving social forces of everyone on board. All over the Station there are pairs of Peeps stopping to chat with one another. Sometimes they'll talk if there's nothing better to do, and - unless I'm imaging things - they might perform a little pantomime to show their feelings, so you can get some idea of what they're thinking and talking about. Talking to one another does wonders for their little minds. Every time two Peeps stop and chat, they each stand and talk, performing occasional little pantomimes such as jumping for joy, laughing or perhaps revealing their pressing most need with an emoticon.

Peeps generally count most life-forms encountered on the Station as being intrinsically worthwhile. They'll completely ignore your Scuzzer force (unless being arrested, of course) and despite the racket some packs of Scuzzers make as they hurtle around the Station they don't appear to upset and annoy anyone. They pet Memaus and even talk to Space Vermin.


So. Who gets on with who?

States of Mind Part 2
Statues
Statues are a good way to improve the Station's attractiveness and reputation for Visitors. Apart from conversations, they're the major feature that epitomises race relations. Peeps will gravitate around a statue and "admire" it. Civic art gives them something to do and for the most part most Peeps like most artwork. Usually everyone appreciates art regardless of where it hails from. If the statue happens to represent their kind then they'll love it to bits. Some Peeps will really dig the works of others, while some may be curiously unaffected by them. When it comes to races who don't like each other in the first place, then they'll stand there "admiring" it in a rather hateful sort of way and Mind points will be lost.

You should think carefully where you put your statues, although for the most part you can stick them pretty much anywhere and things will work out well for you four times out of five. More specifically, you can use statues to fine tune certain areas of the Station, enhancing areas you've set up to attract certain species with. For example, placing one or two Furies statues near Palace Galacticas and Gem Slug Apartments always seems to work for me...

Not only should you think of strategically placing statues, but also buildings and facilities to create little zones for various species. But sticking the somewhat intrusive Kategukhat in the middle of a pleasant grove filled with Sirens and Karmaramans tends to undermine that's area's effectiveness as a Siren and hippy jaunt. Once again, its all pretty free-wheeling and no one is really going to get hurt or that upset, unless you bury the Station in statues and venues they really hate. Multiple statues tend to multiply the effect by virtue that there's more to do and see in the spot you've artsied up. Once you've worked out which aliens are which, strategic statue placement becomes fairly easy.


Endeavour
Ya gotta love the little fellas... inside the diminutive frame of your typical Groulien Salt Hog beats the heart of an adventurous idealist. The Endeavour represents the Salt Hog's aspirations to greater things and this bold statue of two Salt Hogs climbing a mountain top is a tableau often repeated in the Bio-Deck. Build any peak, regardless of climate, and you'll often a Salt Hog proudly scaling it. The Endeavour is liked by all Peeps, except for those snooty Gem Slugs. Bah humbug!


Legacy
This squat piece of artwork that looks like an engine block represents the Grekka Targ's industrious colony structure. Grekka Targ are into all kinds of manufacturing and a predilection for cargo, especially of the technical kind. Its appreciated by everyone, except the Karmaramans, who simply don't get it and are completely unaffected by the Targ's symbol of heavy industry. The dry, freezing landscape that the Targ prefer complement this blocky arrangement of giant cogs perfectly. The Karmaramans prefer more greener and growing things.


Gmnerich
Everyone likes the Grey's Gmnerich. Heavens knows why! Its two cubes and a tetrahedron, chopped out of stone, and as sparse and ugly as you can get in Startopia. Bizarre!
States of Mind Part 3
Mother
In keeping with their loving ways, the Dahanese Sirens get the Mother statue. In line with their preferences for water, it comes with a small pond, and reveals a Gaia style heathen spirituality. You can see how the Karmaramans share a close affinity with the Sirens, and they doubly like the Mother. The Mother clashes with the Zedem Monks both on moral and religious grounds, while the Kasvagorians dislike it for its peace-loving symbolism.

Kategukhat
This imposing monument to the Kasvagorians's proud and honourable - if not downright savage - past instantly dominates any part of the Station you happen to slap it down in. The Kategukhat, like the Kasvagorians themselves, is not shy nor retiring, and this aggressive declaration puts them at odds with the Station's peace loving peoples: the Dahanese Sirens and Karmaramans.

Peace Totem
Startopia's environmental Karmaramans get this rather cool totem pole. While its colourful and light, it doesn't seem to impose itself so insistently like the Gor's monstrous Kategukhat does and its small footprint lets you stick it anywhere you like, be it discretely in a corner or boldly on a hill. Karmaramans and Dahanese Sirens have a close bond, and the Peace Totem is doubly liked by the Sirens, but disliked by the warlike Kasvagorians. The Grekka Targ return the same indifference to Karmas as the Karmas show towards the Targ's blocky Legacy statue.

Matter Anti-Matter
This elegant white block epitomises the ordered and precise world the Turrakken researchers inhabit. Its what you might call efficient sculpture. It takes up little space, comes in a nice neutral shade of white so it fits everywhere and everyone on the Station likes it. Except the Karmaramans, who have no opinion about anything to do with industrialisation or urban living, it seems.

Father Zederous
The stern looking patron saint of the Zedem Monks glowers at all and sundry who gaze upon him. Like most statues on blocks found in any site, you can plonk the good Father anywhere you like without ruining the neighbourhood. Everyone seems to like ol' Zederous, except the Sirens who have issues with him. And no doubt him with them, if he were still alive.

The Furies
Polvakian Gem Slugs, idling aristocrats that they are, appreciate good art when they see it and often you'll find them hanging around your fine sculptures casting a critical eye that only those with too much money and time on their hands can. The Furies belies the Gem Slugs slovenly ways, but is disliked by the Groulien Salt Hogs.

The Planetscape
The Planetscape is one of three statues not specific to any species in the game. Its a rare item, and hard to obtain. It does attract a bit of a crowd and takes lots of station space with its Hills Hoist configuration. Fortunately, there's plenty of unobstructed walking space. This is an excellent complement to the Plaza Fountain, shopping mall or awkward space that you can't quite work out what to fill with. Everyone likes it, and its especially enjoyed by your local geekery: Grekka Targ and the Turrakken.

Uplanter
The Uplanter's an odd statue: it only takes up one square of deck space, so you can plonk them down anywhere. Uplanters look better when you can make a row of them, lining boulevards or value adding to more important Station infrastructure. Everyone admires and appreciates them, especially the Karmaramans.

Robot Heaven
Robot Heaven is the ultimate in statues. But it's gigantic and takes up a huge amount of floor space leaving little room. Its castle like configuration makes it awkward to place without losing a lot of pedestrian space, and it really needs a lot of decking or a small plain in the Bio-Deck to properly place. This is, I think, the monument to V.A.L., your wry sidekick! Being robotic, it has no effect on the Karmaramans (again!) and is especially liked by (surprise surprise) the Grekka Targ and the Turrakken.

Rooms and Buildings
This is a frequent source of happiness and angst for any Visitors or Residents on board, and you can make fairly direct adjustments about how Peeps might react and respond to your Station. Most of these suggestions would fit under the tweaks category: but tweaks are what can set an exceptional Station apart from an average one.

Like many sim management games, travel times can be an issue. If you want things to resolve themselves quickly an easily, placing the right buildings close together can do wonders for you. Weary space travellers need some basic sleeping, eating and toiletries close at hand - don't make them hike halfway around the Station to get to them. I usually cluster things together and try to keep a species' theme as consistent as possible so that Peeps usually have a short path to travel. That is, if I wanted to impress the Gem Slugs, I'd put their favourite Bio-Deck environment right above a mid deck segment with their favourite upmarket entertainments, below which might be some essential Engineering Deck facilities with the Salt Hog's Recyclers and Factories kept a little way away. Then its just a simple walk to and from a lift for them to get anywhere. You can sort of "zone" your Station to reasonably good effect. Sometimes, I've fluked the right combination of Bio-Deck environments and almost emptied the Entertainment segments near it...

Building placement can be a bit touch and go occasionally. I've positioned Rooms such as two Research Labs side by side, only to find one constantly empty and one constantly full, simply because one was closer to essential services and Turrakken haunts. Even equipping the empty one with better facilities did little to solve the problem. It became cheaper to simply demolish the empty Lab and re-position it a few segments away where it could become its own point of focus. Sometimes, you'll find a Lavatron with groups of waiting customers, while just a short distance away another Lavatron is completely empty. Peeps will prefer to queue at the nearest loo rather than walk the extra distance. Some struggling facilities simply need a few complementary attractions near them to get them going, achieving a sort of commercial "critical mass" by being in a group.


States of Mind Part 4
Death and Destruction
The the effects of combat and violence in general on the Station can be seriously harmful to everyone, even to those not directly involved. However, death is a fairly common event in a large population, and destruction and disasters sometimes strike. Attend to them promptly and ensure you have sufficient Scuzzers to quickly clean up and repair and damaged buildings.

When a Peep Encounters a Body


When a Peep Flees in Terror
Whenever there's a disturbance, be it an enemy Agent being shot dead, a starquake or a major firefight, you'll see innocent bystanders fleeing the scene. Rest assured that running Peeps are running scared, although its not that serious. There's a small Soul and a solid Mind hit, but Toilet is improved: Residents that can fill out a Security force will generally turn to engage in a fight, based on their performance ratings. Peeps are affected by terror in different ways, with the more peace-loving the most affected and the tougher species feeling it less.


Minor Details
Here's a short, quick list of all the minor details than can adversely or positively affect a Peep. Most are negative, since they are the results of mismanagement or disaster.


That's it! We're outta here!
Past the point of no return, when Mind finally zeroes, Peeps resign and/or leave in a huff. At this point there is nothing you can do to stop them: they're off and that's it. But there's one more thing you can do to really mess with them...

What the--? We can't leave!
Remove all the Ports in the Station. If a Peep can't leave, it suffers a continuous -20 loss. Enterprising Administrators may find a use for this situation - although its hard to change the mind(s) of someone who desperately wants to leave.

Incidentally, merely turning off a Port still lets Peeps out, but doesn't let any new visitors on board.
The Bio-deck
This is the uppermost deck of the Station, a giant glasshouse containing artificial "nanosoils" and climate control to build alien ecosystems. The Bio-Deck is the "soul" of the Station and offers a spiritual and natural environment for your Peeps to shelter in. Its where the Zedem Monks raise their Temple and the Karmaramans plant your forests. All of Startopia's homesick population find their spiritual and aesthetic needs met here as they relax and commune within a deck that mimics the conditions of their home-worlds. This is the game's most spectacular turf. You can see clear across the Station through the vast panoramic windows, and even truck outside in outer space to take in the whole Station. Whole forests can be grown up here, either to cultivate for cargo or just for the sheer hell of it!

You can see across the Station through the panoramic windows, and even truck outside in outer space to take in the whole Station.

You can grow whole forests up here, either to cultivate for cargo or just for the sheer hell of it! Every type of plant that grows here yields some type of Supply Crate. Small shrubs produce one; trees produce two. To grow vegetation, simply hire some Karmaramans and just leave them to it. They will stroll around planting trees and shrubs all through the sections of deck that you control.

The fantastic thing about the Bio-Deck is how you can sculpt and landscape it to your whims. You can raise and lower land, pour or drain lakes, build snowy hills or scorching deserts. You get four controls: raising and lowering land; adding or subtracting water; cooling or heating the soil, or saturating or drying out the soil. There are nine types of nanosoil, determined by the combinations of moisture and temperature and a tenth: water. Each type can only produce the one type of plant and shrub, but you can mix and blend nanosoils together to get some pretty nice organic effects. Any plant that finds itself outside its habitable soil and conditions will slowly wither and die.

The most effective Bio-Deck - i.e. the one that attracts the most paying customers - is the one that has the most interesting terrain. Raise lots of mountains, build some nice swimming holes and create different terrain to please different kinds of Peep. The more you mix and match environments, the more visitors they tend to attract. You can accessorise them further and beam Statues and other Deck items like Litter Bins and Street Lamps. But in order to do this you need to set them up on one of the lower decks and then beam them to the Bio-Deck via your Transporter Buffer.


Notes

  • Each nanosoil type will only grow one type of tree and one type of shrub, unless you mix to types of terrain together. Raising terrain tends to chill it, so you'll get snowy mountain tops if you pull it up high enough.
  • Right clicking on a shrub will yield a single Supply Crate, while a tree will produce two. These are represented by the Supply Crate icons to the right of each terrain description.


Cold / Dry


Cold / Medium


Cold / Wet


Moderate / Dry


Moderate / Medium


Moderate / Wet


Hot / Dry


Hot / Medium


Hot / Wet


Water


Cultivation
Without a doubt the best way to obtain your vital supplies is to grow them on the Bio-Deck. This is dirt cheap, apart from the cost of opening new segments and initially hiring the Karmaramans to tend them. You have to be a little patient waiting for the first crops to grow but once you have sufficient Bio-Deck with its own gang of planters, you'll never run out of supplies again. You determine what type of plants grow by adjusting the moisture and temperature levels in the nanosoil they sprout from.

Each nanosoil type can support one type of shrub and one type of tree. Each plant type yields a different Supply Crate. Shrubs produce one crate; trees produce two. To farm vegetation, right click on a plant and it will be transformed by the Station's transporter system into its cargo crates. If the plant is not yet mature, it will show a timer icon to let you know when its ready. Plants are automatically harvested the moment they are "ripe" and the resulting crates will be automatically collected and stashed in the nearest Cargo Bay by your Scuzzer Droids. Well, most of them anyway. Your robots are not always prompt, and a little forgetful if you turn over too many trees. Some will be left behind and rot away to become useless Damaged Goods, fit only for recycling. Only Supply Crates can be obtained from the Bio-Deck - nobody's genetically engineered a Lavatron tree just yet! You will still need to buy or manufacture Hardplan, Tech and Furniture crates on the Engineering Deck.

Each plant type yields a different cargo. Shrubs produce one crate; trees produce two. To farm vegetation, right click on it. It will be transformed by your transporter buffer into its cargo crates. If the plant is not yet mature, it will show a timer icon to let you know when its ready. Preset plants will be automatically harvested and the crates picked up by a Scuzzer droid to be deposited inside the nearest Cargo Bay.

You can also beam up plants and then transplant them into Plant Bio-Pots, which allow you to turn your drab lower decks into shimmering tree lined paradises. Trees can be planted outside on the decking in pots, but only potted shrubs can placed inside Rooms. There's something about lots of lush greenery that can turn a dingy deck or a stark set of Rooms and Buildings into a warm, fuzzy environment you'd want to raise your kids in... Peeps do notice the difference.

Do trees and shrubs actually do anything?


How badly are karmaramans affected by chopping down trees?
They suffer a -100 -10 -50 hit per cultivated plant. Don't get too carried away and strip mine everything. Its a mental and spiritual loss, compounded by a minor health hit. Go too far and they'll start resigning and leave.


Karmagasms
You'll know your ecosystem in the Bio-Deck is up to scratch when Karmaramans start emitting Karmagasms. A Karmagasm is a red shockwave of energy that pours out of a Karmaraman in an expression of pure bliss and Oneness with the Bio-Deck. These are good vibes for the betterment of others: Peeps caught in the karmagasm's wake enjoy Mind, Body and Soul bonuses. Even Scuzzers are affected by this phenomena. Conversely, criminal Karmaramans emanate "bad auras" - little shockwaves of negative psychic energy that actually harms Peeps and Scuzzers within range.

Security Part 1: Station Security
Security is an essential service to your Station, and failing to implement enough of it can lead to your downfall. Apart from your glorious opponents trying to wrestle ownership of the Station off you, there's an unending stream of criminals and Agents coming in through your Ports, and Peeps themselves can succumb to corruption and start committing crimes. There is also the risk of those big black bugs, the Skrashers, running rampant on the Station, causing devastation and loss of life. Unchecked, these horrors can destroy large areas and hurt the population.

Security and a lot of combat is handled by the Kasvagorians, who work best with a Security Centre (pictured left). This oval building monitors all activity on the Station and enhances your Station's ability to handle battles and police actions. While they enjoy a good fight and are the toughest Peeps on the Station, don't expect the Kasvagorians in the Centre to actually get outside and do anything. Much of the actual policing footwork of security is performed by your robot Security Scuzzer force, and it takes a violent disturbance that requires a big firefight to shift them.

Several alien species double as security operatives, mostly the smaller and "lower class" ones. Groulien Salt Hogs, Grekka Targ's, Greys and of course, Kasvagorians. The hulking Kasvagorians are obviously the toughest and most enthusiastic fighters on your payroll, and receive slightly less physical and mental harm when struck by lasers. While only the smaller species who happen to be passing by get involved in a fight (unless you specifically target the enemy), Gors will zero in from all over the Station onto a major disturbance. Even so, you'll frequently see diminutive Salt Hogs and Targ jumping in and bravely holding the fort on their own even against those big black bugs.

The effectiveness of the Security Centre is determined by the skill of all the Kasvagorians manning it. The Centre's function is to improve the sensor coverage and efficiency of your Security Scuzzer and increase the firing range of your Security Turrets. Station Segment Doors are hacked faster and Bombs are more quickly found and defused by your robot police. You'll also need (I think!) Comsensor coverage to go with it to properly extend your intelligence network. I'm not entirely sure of this, but with Comsensors not only do you receive outside messages from inbound traffic, but you may also find out more info about your rivals and detect nasty things like Bombs, enemy Agents and other criminal activity in the area more readily.

You can also beef up security and fortify your Station with Security Turrets. These rather malevolent towers suspiciously train their weapon on anything, even dutiful and clean-as-a-whistle employees. A single Turret will have difficulty downing a single perp fleeing the scene, despite its apparent firepower. But their usefulness against enemy incursions, Skrashers or Agents can not be overstated: they function as a support weapon for your guys, helping to tip the balance in your favour. They're especially effective if you build zones of crossfire. They are, however, vulnerable against massed attackers. They will take out anything that looks even remotely suspicious at the drop of a hat. Keep them near troubled boundaries, your Ports, Station segment door locks or anywhere else you think might be under threat. The presence of a Security Centre increases the operating range of Security Turrets, represented by the big green glowing circles on the floor.

Security Scuzzers
But the most important component of any on board security system is that humble robotic footpad: the Security Scuzzer (or Fuzzer). These short little robot policeman waddle around the Station, little blue light flashing and sensors alert for any trouble, automatically dealing with security issues that stray into sensor range. They home into disturbances, arrest criminals, hack Segment doors and defuse bombs. They're sluggish in the fighting department, but can stomach a fair bit of damage. They'll disengage from a fight and run off for repairs, and you can set the cut-off point to preserve these rather expensive bits of equipment. Sometimes Criminals will be let off the hook when a Security Scuzzer disengages for a recharge. Security Scuzzers tend to run out of juice fairly frequently, so to complement any large Scuzzer force build Rechargers everywhere so they can juice up and receive repairs with a minimum of fuss and travel time.

Security Scuzzers are absolutely essential to any Station regardless of its size, and there's no such thing as having too many of them. Improving the effectiveness of your Scuzzer force boils down to having sufficient skill levels back at the Security Centre. The Security Centre improves the sensor range of these robots and also improves their ability to defuse bombs and hack door locks. You'll know Station security has been effective when you start finding defused bombs all of the place instead of big craters. 'Course, you can have fun dropping live bombs out of Star Docks or use them like grenades from your Pattern Buffer...
Security Part 2: Criminals
Criminals are Peeps that are corrupt. Corruption sets into any Peep that loses sufficient Soul points. You'll see them occasionally sporting a little red unsmiley face floating above their heads. Criminals can also enter through the Station's Ports. Some scenarios have parties of convicts coming aboard that require rehabilitation in a Lockdown Brig.

Many criminals aren't violent, and most crimes are low level ones where Crims attempt to defraud the Station by surreptitiously using Station facilities and pocketing the profits for themselves. The quality of service and work they do is also reduced, and usually counter-productive. For example, Criminal medics and Sirens make clients feel worse rather than better; and corrupt Monks curse their flocks rather than bless them. Be wary when checking out a Peep's character: CV's can apparently be forged, and also take note that even your own staff can succumb to the temptations of corruption and will sometimes need incarceration and rehabilitation.

Serious crime, like murder, is much rarer unless the Peep's Soul is so far gone they've become psychotically depressed. Depending on how good your security is, these characters should be located by a nearby passing Security Scuzzer and arrested. Once apprehended, the villain is marched off to the nearest Lockdown Brig, or, if you lack a Brig (or sufficient lockup space), promptly put off the Station via the nearest Port. The technology in the special holding Cells inside a Brig soon rehabilitate the inmate, and via the magic of future fantasy, transform them back into happy, well adjusted citizens again. A red progress bar appears by the Cell door to let you know how much rehabilitation is required. Isn't that sweet? You are also awarded 1000e bonus for every rehabilitated crim. Fantastic!

For any outraged Texans reading this, you can adjust those bleeding heart pinko liberal Fuzzers to adopt more healthy conservative values and placate those cravings for closure. Just right click on a Fuzzer to access its options menu and set all of 'em to just blast on sight any perps that stray into sensor range. More forgiving Administrators may instruct their Fuzzers to just issue warnings or, even more radically, ignore all criminal activity entirely!

In the Lockup
All Peeps, regardless of who they are, are universally rehabilitated the same way inside the Cells of a Lockdown Brig. For every second of their incarceration, they score:

+10 +10 +10 +10 +30 +30 +10
It's actually better than most Station accommodation! Oddly enough, inmates don't get sobered up. The Lockdown Brig is not a Drunk Tank! Yikes! They are being brainwashed and being made to love it. Is it still wrong if no one is hurt? Sorry I'm tired I guess.

Public Enemies 1, 2 & 3
Really serious crime comes in three major forms. Undercover Spies, Agents from the Guild of Assassins and of course, those ferocious space monsters, the Skrashers.

Undercover Spies look exactly like regular Peeps. You simply can't tell the difference until your mouse pointer suddenly changes to a cross hair when you brush it over one. Only after you've clicked on the Spy and declared them a target will they be dealt with. Permanently. Spies give intelligence on your territory to rival Administrators and can also engage in murder ("One of your Visitors has been murdered!") and sabotage.

Secret Agents are camp little fellows in black leather that look like they've escaped from a pantomime. They sneak around planting big clumsy bombs everywhere. If you hear VAL alert you to one then its time for you to start frantically looking for that flashing green light from the timer - unless you're confident that your Fuzzer force will do it for you. Bombs are planted in strategic locations, at Lifts and Door controls (making them easier to find if they're on the Bio-Deck) or at the corners of facilities. For all intensive purposes that can mean anywhere on the Entertainment and Engineering Decks.

While they make a loud noise, often kill a few Peeps and can occasionally destroy a room, Bombs are not that earth-shattering. If you beam them up while they're live they are rendered harmless - until you beam them down again whereupon they'll probably explode if their timer has expired. You can drop them out of Stardocks (always fun) or teleport them into the middle of a fight (very nasty). They are completely neutralised and disposed of within a Recycler. Their cumulative effects on the general public can become problematic. During a netgame and/or Sandbox game you may be approached by the Guild of Assassins offering to do some dirty work on your behalf...
Agents, Spies and Skrashers are never given the benefit of the doubt like other Peeps. You might set your Security Scuzzers to ignore all criminal activity, but these three groups are summarily executed the moment they're spotted.
Combat
Warfare is optional in Startopia. You can engage in "friendly" competitive economic battles between two adjacent territories or opt for a violent military solution; breaking into rivals' territory and seizing segments by force. Directing a battle is the nearest you'll ever get to direct control over your Peeps and even then they will have appeared from around the Station to defend your turf. If you do want to rally the troops, drop down Mustering Points in strategic locations. And concentrate your fire on select targets rather than rely on the AI defaults. Each target earns a small green cross hair tagging them as incontrovertibly hostile, and the number inside shows how many available Peeps and Security Scuzzers are currently assigned to zap it. By left clicking Diablo style on a cross hair you increase the number of staff and droids on a target, or repeatedly right click to reduce the number.

Peep's Loyalty and Dedication ratings will decide whether your guys stick it out during a fight, and their Skill rating will show just how well they can shoot straight. Stray shots will hurt civilians (who are probably fleeing the scene anyway) and damage station facilities. If you're not careful, "low rent" employees with poor Loyalty ratings may bolt if a fight starts to go badly.

If things do go badly you can find yourself in a situation where all your medics have been killed just when you need them the most. Waging war requires considerable medical support, and you can shoot yourself in the foot if there's insufficient medical services and most of your employees are off the job getting patched up. Peeps can get carried away and rush in where Fools would fear to tread, getting themselves killed deep in enemy territory or trapped behind closing segment doors. Next of kin payout's can snowball rapidly and devastate even the most robust economy. While Kasvagorians revel in a good bit of biffo, you can still traumatise them, and the effects of battle are especially acute with the other species. Survivors can be seen crying and mourning their fallen comrades in the aftermath of a big fight, and you can be sure they've taken massive hits to their Minds, Bodies and Souls.

When attacking other Administrators outside your own territory your energy and power supplies start to be crucial: the further from your own turf you are, the weaker your guys' energy weapons will be. Your e supply is also used to power their weapons - the further away from your territory they stray, the more expensive it becomes for them to shoot. You may want to build the odd Power Booster near a potential fight.

Attacking and claiming sections just comes down to hacking the locks on each of the giant segment doors. To claim an opponent's segment, there's a two step process. First, you have to get a Security Scuzzer to break open the lock and open those giant doors. Second, you then have to cross the contested segment to hack the next lock to claim all the segment and all facilities and cargo within it. This takes a fair bit of time, hacking both the first lock and then the second, giving your opponent plenty of time to valiantly defend themselves and pick off any offending Scuzzers. Those Security Scuzzers are easily nailed and the Achilles Heel of any attack - so look after them. The door locks and the Scuzzers hacking them are easily the most strategically critical points in any border battle. If things start going wrong you might have to close those doors just to protect yourself from a defeat - and without any Security Scuzzers to do this for you you've almost certainly yielded control of your doors to your opponents. Any staff that get stuck behind them in hostile territory will still fight for you and cost you e, but you'll lose control and visual contact with them.

Getting Smacked by a Scrasher


Getting Shot by Laser Beams
Supplemental: Neurotic Details Part 1
Always a Work In Progress
Probably no longer a work in progress unless anyone has any great info they feel should be added. Oh and I moved the disclaimer about settings to the intro.

The Missions Folder
So in the meantime, finding out all the neurotic details that lurk behind the cheerful facade of Startopia involves exploring the installed game on your hard drive. Crack open the Missions folder inside and have a browse. (This is where all those downloadable custom missions go.) You'll see a lot of subfolders named as two digit numerals...


Inside these mission folders you will find various files that the game reads before running a mission. It reads all the "default" settings for everything before amending them when it reads the other files from other mission folders, depending on whether you've set some Sandbox settings, fired up a networked game or run a single player mission. You can find out what makes a Peep tick in the moods in.txt and moods out.txt files.

Unit Limits
There are population caps in Startopia. The number of Peeps in your Station usually depends on preset conditions, not an arbitrary number. This basically means that each and every mission you play uses different criteria to decide who and how many arrive through your Ports. In Sandbox mode the maximum number of any given species that can enter via your Station Ports is determined by the number of Station Segments under your control minus the number of Penitents on board. If you look inside the Mish files you can see some of the conditions for yourself. Naturally, you'll need to have some understanding of how computer code works, otherwise it will all look confusing. For example, in the single player mission called the Zedem Enclave, the maximum number of Peeps of any given species that can enter is determined by the number of Rooms on your Station plus how many "good" or "bad" Peeps (those needing redemption by the Monks) are already on board.

Other things that can be changed on a mission by mission basis are:
  • The amount of e each peep carries
  • The number of emotional points they arrive with - not everyone arrives on the Station in the same mental, physical or spiritual shape.

No one ever said anything about a table here. <.<

Power Usage and Rooms
Power usage in Startopia is represented by a power rating instead of simulating actual power usage. Your e account and your Energy Collectors and Energy Boosters contribute to your Station's power rating: other facilities, Statues and Furniture deduct from it. If it drops below 0 power failures start plaguing your grand domain.

Rooms and Building are bathed in red light when they have been powered down. If you ever find an inert building or room (or you've captured a new bit of deck) you may have to open up its menu and power it up by hand before you can do anything with it.

Station facilities are classified in two types: Buildings and Rooms. Buildings are rigid, prefabricated structures that can't change size. Rooms are adjustable areas that can be resized when you build them and can be completely rearranged later on. You can furnish and play around with layout to your heart's content. I'm including gadgets like Power Boosters, ComSensors, etc. as Buildings. All Buildings and Rooms have an energy rating that is worked out by charging per square of floor space. You count the coloured rings on the floor lining the facility to work out the area being used. For example, a Lavatron as a footprint of 2 by 3 rings, charged at 50e per floor square: in total it consumes 300e.

Build cost shows the default asking price for the Hardplan Crate that actually conjures up the holographic plan that your Scuzzers build to. If you manufacture your own Hardplans from your Factory, they'll be considerably cheaper. N.B. The same applies with trading - those green and red smiley faces used to show you how good or bad a deal is to you are worked out from the default price - not the cheaper price your Factory can make it at.


Why do Gem Slugs keep dying on me?
Once you've played the game for a while and worked out how to appease those fussy aristocrats, the Polvakian Gem Slugs, the next thing you'll start to notice is that they have this rather annoying habit of dying in your nicely appointed Slug Apartment or Cocktail Bar for no readily apparent reason. Often the deaths occur in a Slime Bath or at a Cocktail Bar table. Mucky Foot claims this was a bit of a bug that missed the last (and only) patch; apparently the Slugs get "jammed" into place and stop moving. Despite their paralysis, the game engine still processes their characters stats and they eventually croak from health loss brought on by starvation or lack of Lavatronning - or something. Some people recommend taking out the Slime Baths in a Slug Apartment so the Slugs can't sit down and accidentally get stuck.

But for any corpse on the Station, you can perform a postmortem on it in your Research Lab by plopping the body onto the Analyser and waiting for the Turrakken to examine it. In fact, there's a few little things like this you can do.

Can you work Salt Hogs to death?
Yes. It is possible to kill Salt Hogs within a Factory by working them to death. Unlike all the other professions in the game, once Salt Hogs start their work in a Factory, they never leave it until the build list is completely finished. It doesn't matter what their current mood or state of mind or health is. Constantly adding items to the list will guarantee they never leave, and before long the game engine will work its merry magic on them and cause them to start expiring. In practise, you'll be hard pressed killing anyone queuing up basic cargo crates: this situation only applies to really massive items, such as the Energy Collector that take forever to build. Queuing up several Collectors is guaranteed to kill a Salt Hog or two.
Supplemental: Neurotic Details Part 2
What on Earth is a Ping-O-Tron?
A Ping-O-Tron is, of course, a machine that goes ping. All good futuristic Sick Bays should have one. It's a piece of Station medical equipment that nearly made it into the final game. Mucky Foot got as far and modelling and texturing these mysterious contraptions before removing them from the final release. Well... not entirely! There's still a reference to them in Mission 7 (I think) of the single player campaign; the Grey Trader will actually sell them to you and you can install them into a Sick Bay. Unfortunately, they were never properly removed, so building one can lead to some ...interesting problems. Usually, it just means you have a Sickbay that has a piece of unused equipment taking up space, but occasionally it will attract a customer that gets locked into place by some half-there programming. And occasionally those results can be pretty bizarre, like a Salt Hog lava lamp.

There's a number of features that never made it into the final game, and this has been a bone of contention for some fans. Its a bit of a moot point now that Mucky Foot is gone. Things like a flying taxi service, some animals to go with the Bio-Beck, salaries for Station Residents, a Fighting Pit for the Kasvagorians in the Entertainment Deck and others. Arona Daal was originally to have a parrot-like(?) sidekick called Goma; and you can still find many references to it in the moodsin00.txt and moodsout00.txt files. There was also a fairground ride called the Gyro coded into the data files that was never modeled. You can still include these things in your custom missions, just so long as you never, ever let their Crates be opened during the Mission.

What happens when a Peep's character stat is zeroed?
Interesting (but mostly unpleasant) things happen if a Peep has less than 10 points in a character attribute.


"Cheats" and Easter Eggs
I received email from a chap called Overmind recently, who, gravely concerned with the "death" of Startopia as a game online, sent me all his stray notes and bits to include in the site. A sort of final resting place and archive, so to speak. So, I've added the "F11" game "cheats" and Easter Eggs in here. If it gets too big I'll split them off into a seperate page. One thing I do want to do is knock up some nice screenies to go with 'em.3 layers deeeeeep


Graphics Easter Eggs


Overmind's list of bugs and other features
I'll let the man speak in his own words:

You can auction Gem Slugs doings! Bung 'em in the Auction slot and when the auction is done a green, plain-texture crate with question marks will be loaded into the buyer's cargo bay. It will then disappear without trace. The doings will appear in the next (non-biodeck) segment you open. If you occupy the entire station, your... um... Doings_Count in the Scriptinfo screen will be kludged to one over the 'real' value, so beware.

You can auction bombs, too, but they just blow up in your Cargo Bay. Sell 'em to your foes, though this trick won't work twice.

You can select the right-click menu of the Zedem Temple if you beam some art into it. DO NOT turn the power off and then on - your Zedem Monks will never work again. DO NOT repack then unpack the temple - it has not been designed to be built by Scuzzers, you'll just tie up your droids and get to watch an eternal red fiery corona where the obelisk should be. The Temple has no recycle value and the next temple (which your monks will automatically build) will almost certainly be in a different location, ruining your Biodeck's plant life and the contours of your land. Not to mention spilling water everywhere - do this before you expand the Biodeck for the F1 entry or don't do it at all.

If you place a Viewing Gallery on the North side of the station (north being forwards) you get to see heavy space traffic. Place it on the South side for energy beings and dead peeps, a quieter, more reflective view.
댓글 8
SuwinTzi 2020년 11월 23일 오전 1시 11분 
The guide's footprint sizes are off. Add 2 to both L and W and you'll get the actual footprint.
Yazra  [작성자] 2020년 8월 27일 오후 2시 18분 
Thanks H0t_Air_Buff00n, you the MVP. Added that info to the start of the guide (and of course grabbed that archive faster than a MKIII Scuzzer picking up litter)
H0t_Air_Buff00n 2020년 8월 24일 오후 7시 34분 
Lindsay Fleay, the original author of this guide, has put up the old website on his new blog here:

https://rakrent.wordpress.com/the-real-time-strategic-carnage-archive/

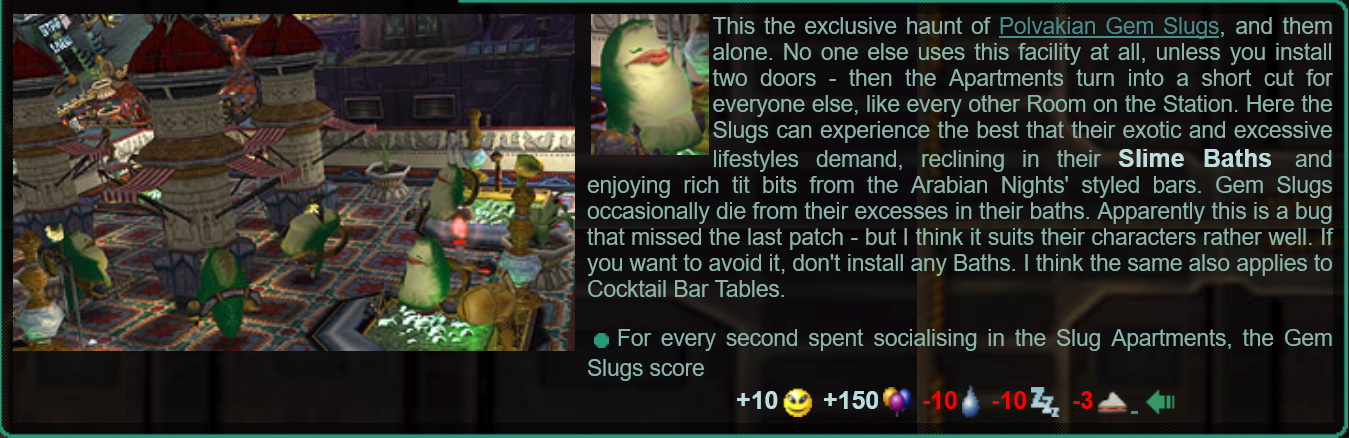
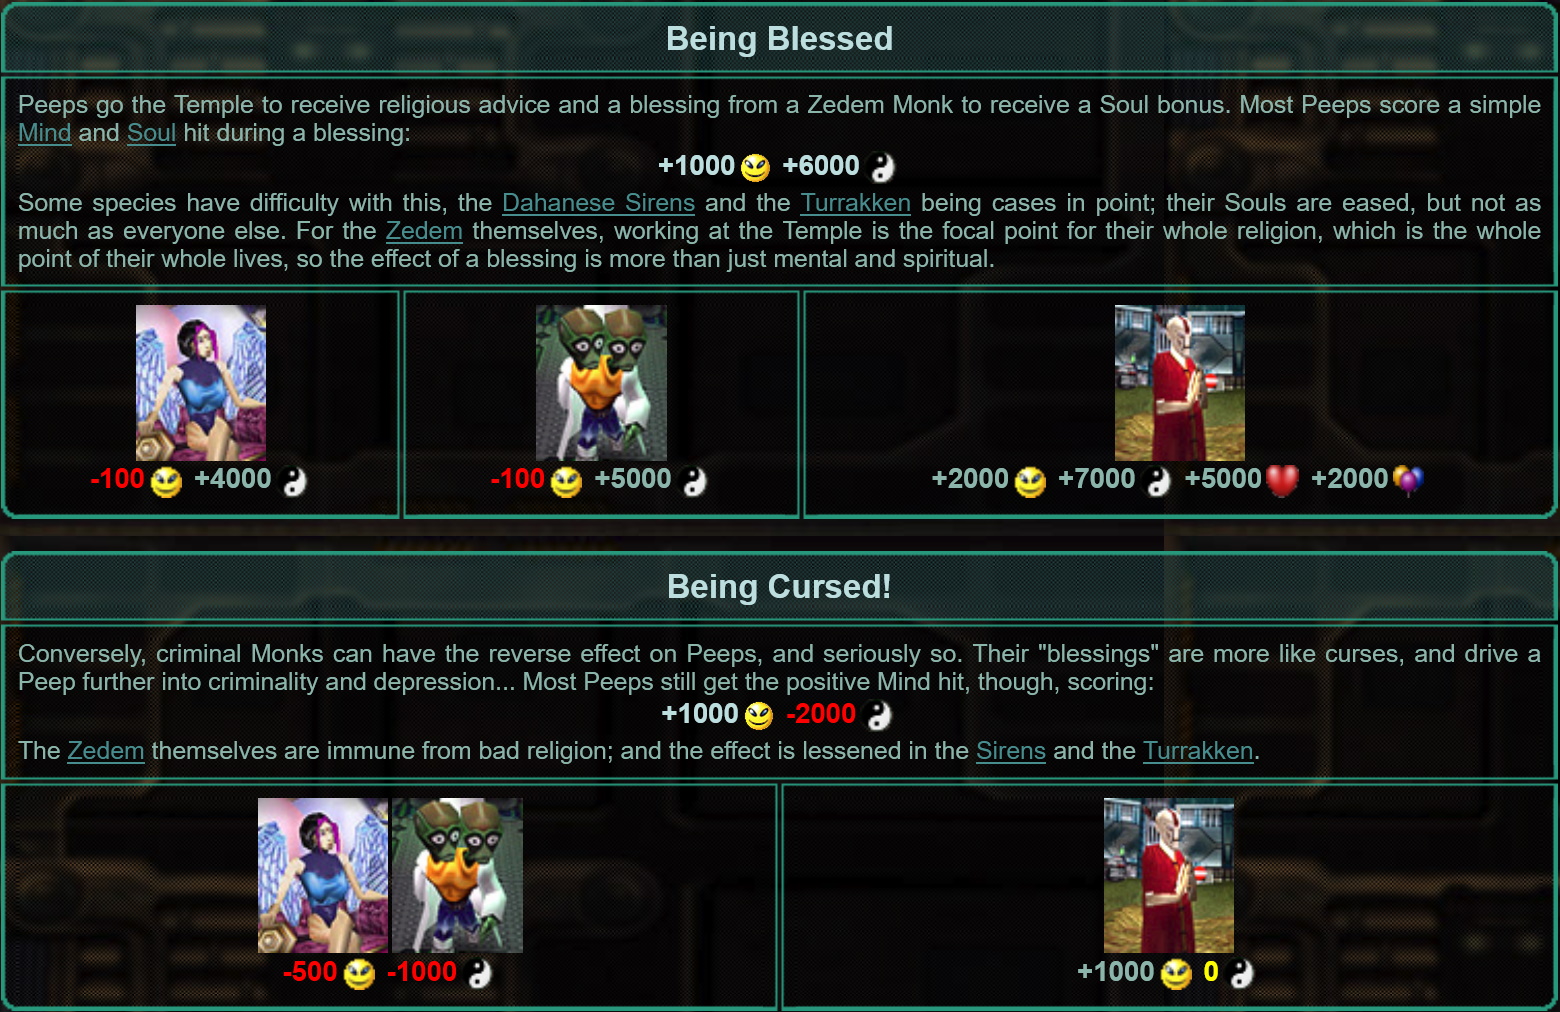
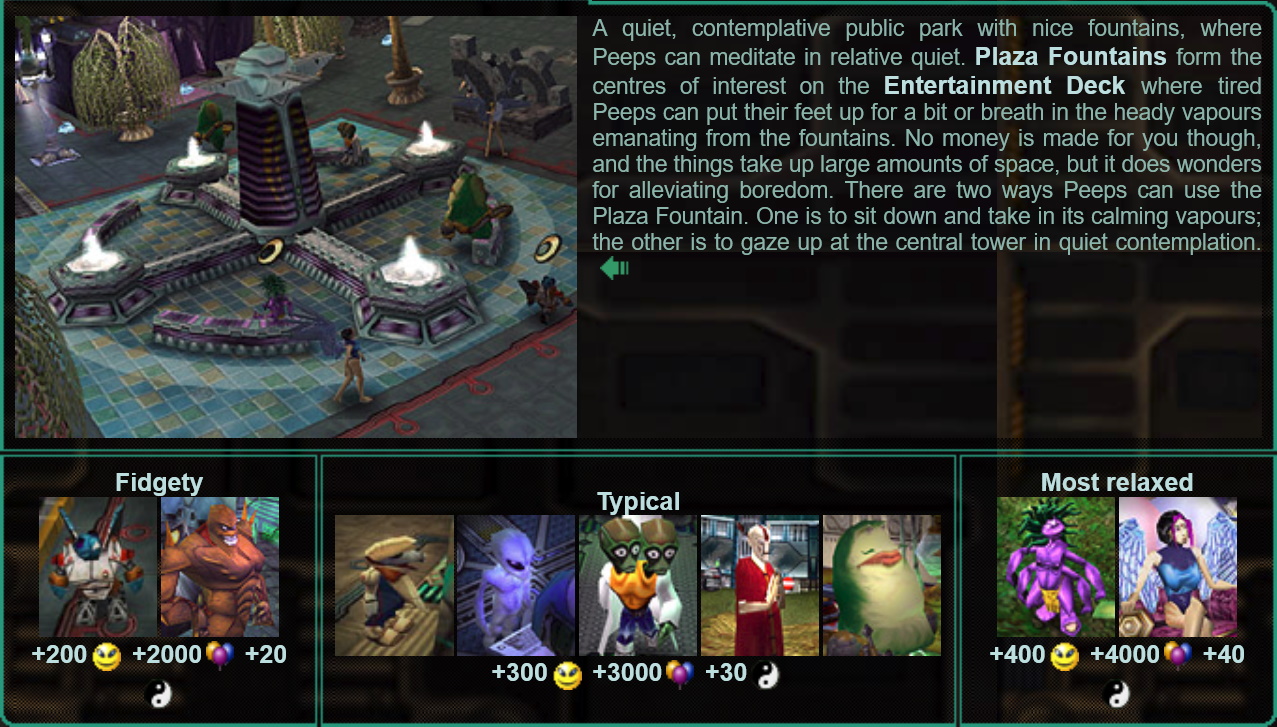
It's a nice little time warp back to the days of Web 1.0, plus he's a very interesting guy - he was the first person to make a LEGO stop-motion film and I think he also had a hand in making the code stream animation in "The Matrix".
Cadrin 2020년 7월 2일 오후 1시 28분 
Should you ever wish to see the original, it can still be accessed on the Web Archive:
https://web.archive.org/web/20180305120616/http://www.rakrent.com/rtsc/rtsc_startopia.htm
Mickmane 2020년 4월 20일 오후 5시 18분 
Wow, just found this while looking for the archive, for a friend who said the game looks interesting. Thanks for putting it here! :))
Joe 2020년 2월 18일 오후 2시 12분 
Wow, I've played Startopia since retail and I didn't know a lot of the stuff this guide covers. Thanks very much BlackYazra for posting this, and special thanks to the original author for this detailed and spirited guide.
Dallenson 2019년 10월 29일 오후 4시 38분 
Dude, you are an absolute saint for re-uploading this ever since the original RTSC site went down.
Lunafox 2019년 4월 22일 오전 12시 19분 
Dead Link