Terraria
Оцінок: 80
Soloing Pumpkin Moon as a Ranger, No Lifeleech.
Автор: whiskeychris
This guide will teach you how to solo the Pumpkin Moon as a Ranger, using Shroomite Armor, and with no Lifeleech.
   
Нагородити
До улюбленого
В улюблених
Прибрати
Introduction
The Pumpking and Mourning Wood Trophies. This is your goal. You will achieve this goal using the weakest of high end armors, Shroomite, and without lifeleech.

Beating the Pumpkin Moon and earning your Pumpking and Mourning Wood Trophies as a Ranger is incredibly challenging, and rewarding. This Guide will tell you everything you will need to know to defeat the Pumpkin Moon SOLO, legitimately, and without lifeleech.
Part 1: Understanding the Pumpkin Moon
To earn your trophies, all you have to do is kill a Pumpking or a Mourning Wood during Wave 15. If you have a Pumpking down to 3000 health when you see the Final Wave notice flash on screen, all you have to do is knock down that last 3000 health to get your trophy. You do NOT need to get to the final wave and then take down a full health Pumpking. The same goes for Mourning Wood.

The Pumpkin Moon should be thought of not as an invasion with many separate mobs, but as one entity. Each mob you kill should be thought of as a small part of larger boss. This boss has around 500,000 hit points. Your goal is to deal around 500,000 damage in 9 minutes.

Each mob killed has a points value that determines how quickly the next wave comes. The quicker you kill earlier waves, the more time you have to kill later waves. This will affect the enemies you need to target. Some enemies have priority over others, and some are utterly useless to target. See Part 4 for more details.

Points Value of the Mobs:
• Scarecrow: 1
• Splinterling: 2
• Hellhound: 4
• Poltergeist: 8
• Headless Horseman: 25
• Mourning Wood: 75
• Pumpking: 150

Waves and Points Needed to Advance:
• Wave 1: 0 Scarecrows
• Wave 2: 25 Points. Scarecrows and Splinterlings
• Wave 3: 40 Points. Scarecrows, Splinterlings and Hellhounds
• Wave 4: 50 Points. Scarecrows, Splinterlings, Hellhounds and Mourning Wood
• Wave 5: 80 Points. Scarecrows, Splinterlings, Hellhounds, Poltergeist and Mourning Wood
• Wave 6: 100 Points. Splinterlings, Hellhounds, Poltergeist and Mourning Wood
• Wave 7: 160 Points. Scarecrows, Hellhounds, Poltergeist and Pumpking
• Wave 8: 180 Points. Splinterlings, Hellhounds, Poltergeist and Pumpking
• Wave 9: 200 Points. Scarecrows, Headless Horseman, Poltergeist and Pumpking
• Wave 10: 250 Points. Splinterlings, Hellhounds, Poltergeist, Headless Horseman and Mourning Wood and Pumpking
• Wave 11: 300 Points. Scarecrows, Splinterlings, Hellhounds, Poltergeist, Headless Horseman, and Mourning Wood and Pumpking
• Wave 12: 375 Points. Splinterlings, Hellhounds, Poltergeist, Headless Horseman, and Mourning Wood and Pumpking
• Wave 13: 450 Points. Hellhounds, Poltergeist, Headless Horseman, and Mourning Wood and Pumpking
• Wave 14: 525 Points. Headless Horseman, and Mourning Wood and Pumpking
• Wave 15: 675 Points. Mourning Wood and Pumpking
Part 2: Terrain Preparation
You have two goals. Make it so that every single mob the spawns on the ground has nowhere safe to spawn without taking a spiky ball to the face and create a safe area to fly around in and kite the Pumpking.

What you will need:
162 Spiky Ball Traps
42 Super Dart Traps minimum. More is always better,
6 Flame Traps minimum. More is always better.
8-10 Heart Lanterns
8-10 Campfires
Lots of Wood Platforms
Note: You may have to create several worlds and enter the Lihzard Temple several times to get the required stuff.

First, the ground war. Find a nice spot, preferably on a hill and flatten the surface. You want your fighting arena to be 160 blocks long. Dig a large pit in the middle, 54 blocks across and 23 blocks tall.

Now, to set up your traps. Place your Spiky Ball Traps so that there is one block worth of space between the ground and the trap. Make sure you do this in the pit also. The spiky balls will bounce up through the Spiky Ball Traps, but not high enough to damage you as fly around the arena. On the walls of the pit place Super Dart Traps on the walls up to the top. Directly in front of the dart traps, place your Flame Traps, at least 3 on each side. The darts will actually pass through the Flame Traps. If you have extra Super Dart Traps you can double up the traps on the walls. 20 blocks above the last Super Dart Trap, build a row of wood platforms that should cover the pit completely. Now wire the ALL Spiky Ball Traps to a one second timer, The Super Dart Traps and Flame traps on one wall to another one second timer, and then the Dart Traps on the other wall to a third one second timer and place these timers on the wood platforms.

It should look kind of like this. Note that mine looks that way due to several experiments with arenas. The reason for the weird looking mud design under the traps is simply because I built and tested about 4 different designs for the ground arena. A simple flat surface with a pit is all you need


Next, the air war. Now what you need to do is to cover your arena in Heart Lanterns and Campfires. These both have about a 45 block range, each side. So you will need several of them. Count up 45 blocks and then build three wood platforms, place a Campfire, and hang a Heart Lantern from a block attached to the wood platforms. Only build the bare minimum of these to provide coverage as the block the Heart Lantern hangs from can get in your way when kiting. 2 rows of 4 on each side should do it.

Finally, build 4 to 6 rows of wood platforms no more the 30-35 blocks long. You want them long enough to get a speed boost from lightning boots and to catch candy apples that fall from Pumpking. You don't want them so long that smaller mobs won't fall off them into your death traps on the ground. These should be spaced in a zig zag pattern, and be a good 30 or 40 blocks apart. Messy is better when it comes to this.

Here is my air arena.

Next, place a grandfather clock next to the timers. Place a water candle at each end of the wood platform above the pit. And feel free to wire up some Heart statues if you choose. Heart statues are not necessary, but are nice early on. Later, so many candy apples/hearts will drop that the heart statue will stop functioning.

Finally, and this is critical, set up a bed over your arena so that if you die, you don't accidentally summon a bunch of Pumpkings and Mourning woods to your house, killing all your NPCs. It is a good idea to put a heart statue over the bed and turn it on before the battle begins.

Here is my arena.
Part 3. Item Loadout
Armor:
Shroomite armor. Some may argue that Cholorphyte Armor is better because it has a higher straight damage. Shroomite is still the better option though, because it has a much better critical chance, and 7 extra defense, both of which will be hugely important. However, the real reason we should use Shroomite is because it is our end game armor. If Mages and Melee can do it in their endgame Armors, then us Rangers can do it in ours, and show them up by not using life leech.
Obviously use the helmet that is most relevant to the gun you are using.

Weapon:
End game ranged weapon. Your choice for the most part, Megashark, Venus Magnum, Uzi, Stynger, Tactical Shotgun. If you have beaten the Pumpking, but not gotten a trophy, and have either a Candy Corn Rifle or a Jack'O Lantern Launcher, these should work also. Feel free to experiment with weapons.

Accessories:
EVERYTHING REFORGED TO MENACING.
Items in order of priority.
High End Flight Item (leaf wings or above)
Ranger emblem
Destroyer Emblem
Sniper Scope
Lightning or Sparkfrost boots

Optional replacements for the Boots:
Using any of these pretty much guarantees that you have to use the hoverboard as you will be too slow otherwise.
Celestial Stone
Avenger Emblem
Ankh Shield

The above is the list you get to choose from. Anything else will stop you getting your Trophy. You have 5 accessory slots. 3 of which MUST be emblems or the Sniper Scope, note that the Avenger emblem is the weakest of the 4 emblems. Another slot MUST be a high end flight item.

The final slot is up to you. Either Avenger Emblem, Celestial stone, Ankh Shield, or Lightning boots. I personally recommend Lightning Boots or Sparkfrost Boots because you need speed. There is, however, an argument for the other items. Late in the Pumpkin Moon, you can get stunlocked by multiple Pumpkings and bounced between them, the Ankh Shield prevents this. As for the Avenger Emblem, 12% extra damage over the course of 9 minutes is huge. If you have it, a Celestial Stone has slightly more DPS then an Avenger Emblem, and adds health regen. Using the Hoverboard without Lightning or Sparkfrost boots for speed has one problem. The Hoverboard you will only have speed laterally, and will slowly go down. Sometimes you need to go up, and go up fast.

Items I used the first time.
Unreal Stynger.
Ranger emblem
Avenger emblem
Destroyer Emblem
Lightning Boots
Hoverboard
AGAIN, EVERYTHING REFORGED TO MENACING.

Items I've used since.
Unreal Stynger.
Ranger emblem
Sniper Scope
Destroyer Emblem
Lightning Boots
Hoverboard
AGAIN, EVERYTHING REFORGED TO MENACING.

Potions:
Greater Healing Potions, Iron Skin, Swiftness, Regeneration, Battle, and Pumpkin Pie (or Bowl of Soup, or Marshmallow on a Stick). Hunter potions are useful also. You will have to re-up your potions halfway through the fight. Try to do it before multiple Pumpkings Spawn.
Part 4: Relevant Mobs. Pumpking, Mourning Wood, and Death Priority of Weaker Mobs
Relevant enemies:
Mourning Wood. Mourning Wood has two ranged attacks, one fires spikes straight at the player, these have unlimited range. These spikes do extreme amounts of damage, dodge them. The second is a flaming jet of sparks that are affected by gravity and bounce along the ground. If a Mourning Wood fires these from inside the death pit, they won't hit you. This flame jet can hit you though if fired from above the death pit, so watch out. These guys can phase through walls like a wraith. They are slow, so don't get close.

Pumpking: Note I took most of this from the official wiki and added a few notes because it was easier then typing myself.

The Pumpking has 3 phases, each are listed below in order of threat level.

During the first phase, its face will resemble a typical jack-o-lantern, with a sinister-looking grin and downward-facing eyes. In this phase, it will chase you more closely than the other phases, and attack with its scythe arms more aggressively. This phase is fast and is why lightning boots/sparkfrost boots are so useful. This phase will probably do the most damage to you.

During the second phase, the Pumpking's eyes will be half-closed, and its mouth will be fairly wide. In this phase, its scythe arms will fire projectiles at you. The projectiles will stay motionless for a few seconds, and then they will begin to spin, and fly towards you at increasingly fast speeds. The projectiles are very large, but can be dodged pretty easily. They are most dangerous at medium range. Either get far away from Pumpking during this phase to give you more room to dodge, or stay very close to Pumpking and dodge the projectiles when they moving slow.

During the third phase, its face will look angry, with its mouth wide open in the shape of an 'O'. It will follow you from a longer distance than the first phase, and it will spit out cursed flame projectiles. These projectiles are very easy to dodge, because they are fired with almost no force, so they will only fall down at an angle. However, they will stay on the ground for a short while and damage you if you walk over them. Stay above or to the side of the Pumpking during this phase and you will remain mostly unharmed. When getting above, be careful that you do not get too high above your traps. In this phase gliding down and at an angle can allow you to get a ton of shots off at the Pumpking.

Priority of enemy death:
The following list is the targets you should prioritize, due to various things like threat level, points needed to bring about the next wave, and ease of killing.
• 1. Pumpking: 150
• 2. Mourning Wood: 75
• 3. Splinterling: 2
• 4. Scarecrow: 1
• 5. Hellhound: 4
• 6. Headless Horseman: 25
• 7. Poltergeist: 8

This is simply a quick guide showing what to prioritize killing when Pumpking is not around. The list goes in order from highest priority to lowest. Poltergeists are the absolute bottom of the barrel in terms of effort to kill vs reward. The only reason to blast them is because they are in your way. Headless Horseman are actually worse to target because of their tactics, except that they have a drop and to get the drop you have to target them. Ignore Headless Horseman until you have gotten the trophies from Mourning Wood and Pumpking.

Part 5: The Battle
The Battle:
The battle divides itself into naturally into 5 parts. Everything up Mourning Wood, Mourning Wood to Pumpking, Pumpking alone, multiple Pumpkings, and the Final Wave.

First, Turn on any heart statues you have. So the hearts/candy apples are spawned at the start of the battle.

Priority 1 is to do over 500,000 damage in 9 minutes, to this end, never take your finger off the trigger, except to get the shroomite bonus early on and to re-up on potions. Priority 2 is to stay alive until you get your trophies.

Try to avoid flying up so far from your death traps that you despawn all the smaller enemies. Basically, if you can hear the death traps you are probably safe. Sometimes it can't be avoided though, later on you may need to fly really high when there are multiple Pumpkings.

Battle part 1: To Mourning Wood:
Turn on your traps and set yourself next to the Grandfather clock and check the time. At 7:20 use your potions. Remember potions are: swiftness, ironskin, regeneration, battle and pumpkin pie. Use the medallion as close to 7:30 as possible.

Stand still to get the Shroomite bonus and fire your weapon of choice towards the sides of your arena, and down into the pit as Mobs appear. Once Mourning Wood appears, do your best to stay still, but dodging it's attacks has priority. You will need health for Pumpking.

Battle part 2: From Mourning Wood To Pumpking
Continue to spend your time near the bottom of your arena, dodging flame spikes and flame jets from Mourning Wood. This is a good time to grab any hearts from heart statues you may have set up. Do your best to get the shroomite stealth bonus, but remember that staying alive is priority. Poltergeists are the most annoying enemy here, because they have a ton of health, yet aren't worth killing. Try to knock them off any platforms into the death traps.

Battle Part 3: From Pumpking To Multiple Pumpkings
When Pumpking appears take to the skies and kite like you have never kited before. Read the Pumpking Tactics list above, and focus on yourself and your characters position in the sky. It is much easier to dodge if you focus your character, not on Pumpking. NEVER stop moving. When you lose your flight and begin gliding, drop as fast you can onto a platform to recharge your flight. However, if Pumpking is in one of his two slower phases, gliding downward can give you an excellent platform to rain death on him.

Try to kill Pumpking in such a way that it's candy apple drops fall on platforms. Avoid these if you have more then 300 health. Save these for when you have potion sickness.

Try not to fly so far away that you can't hear the death traps on the ground.

Your potions will probably run out sometime around now. Quickly get them back up. You will need them for when multiple Pumpkings show up.

Battle Part 4: Multiple Pumpkings to the Final Wave.

Once a second Pumpking shows up, try to goad them into a position where the Pumpkings are stacked on top of each other, so that your weapon is able to damage both at the same time. This allows you to double the damage you are doing. Remember to think about this battle as a battle against one boss with 500,000 health, not as many separate mobs.

Continue to dodge like a mofo and try to get into a pattern where you kill one Pumpking, collect his drops to regain your health, and then kill the other one. Always focus on the Pumpking with the lowest health. If Pumpkings do not spawn for a several seconds, drop down and blast anything on the ground you possibly can.

At some point you will probably be forced to dodge so high up you despawn everything in your death traps. Don't worry about that anymore, just get lower when you can and stay alive.

If you die at this point, don't give up, you might be able to come back. Quickly get your potions back up and drop down from your bed. I put a heart statue over my bed and make sure it is on before the battle to get some extra health in case of death.

A very important trick: The spiky ball death trap ground will be littered with hearts/candy apples. If you get low on health it can be very worth it to drop down on your spiky ball traps and collect them. You will take damage from the spiky balls, but you should gain more health then you lose.

Battle Part 5: THE FINAL WAVE.
The moment you see the FINAL WAVE notice appear, your goal is to kill a Pumpking. Target whoever has the least amount of health. Remember, that all you have to do is kill a Pumpking after the notice flashes. If the notice flashes and there is a Pumpking with 1200 health left, all you have to do is reduce him by that 1200. Once you Kill a Pumpking, ignore all the rest and drop down low enough to try and kill a Mourning Wood. Fire as many shots as possible at a Mourning Wood, and remember that if you die your traps may finish the job.

You will most likely die during this wave. That is fine if you have killed a Pumpking or a Mourning Wood. At least you have your Trophy.

You may have to do this battle twice to get both trophies.

Good Luck.

Коментарів: 37
Nero 16 серп. 2015 о 0:11 
Hey, great guide! But I'm actually more interested in that last screenshot... Any chance I could get pics of the rest of that place please? :)

Thanks!
Quantum Particles 25 жовт. 2014 о 19:46 
I have a legitimate question: If you use bullets, which bullet do you think would be best?

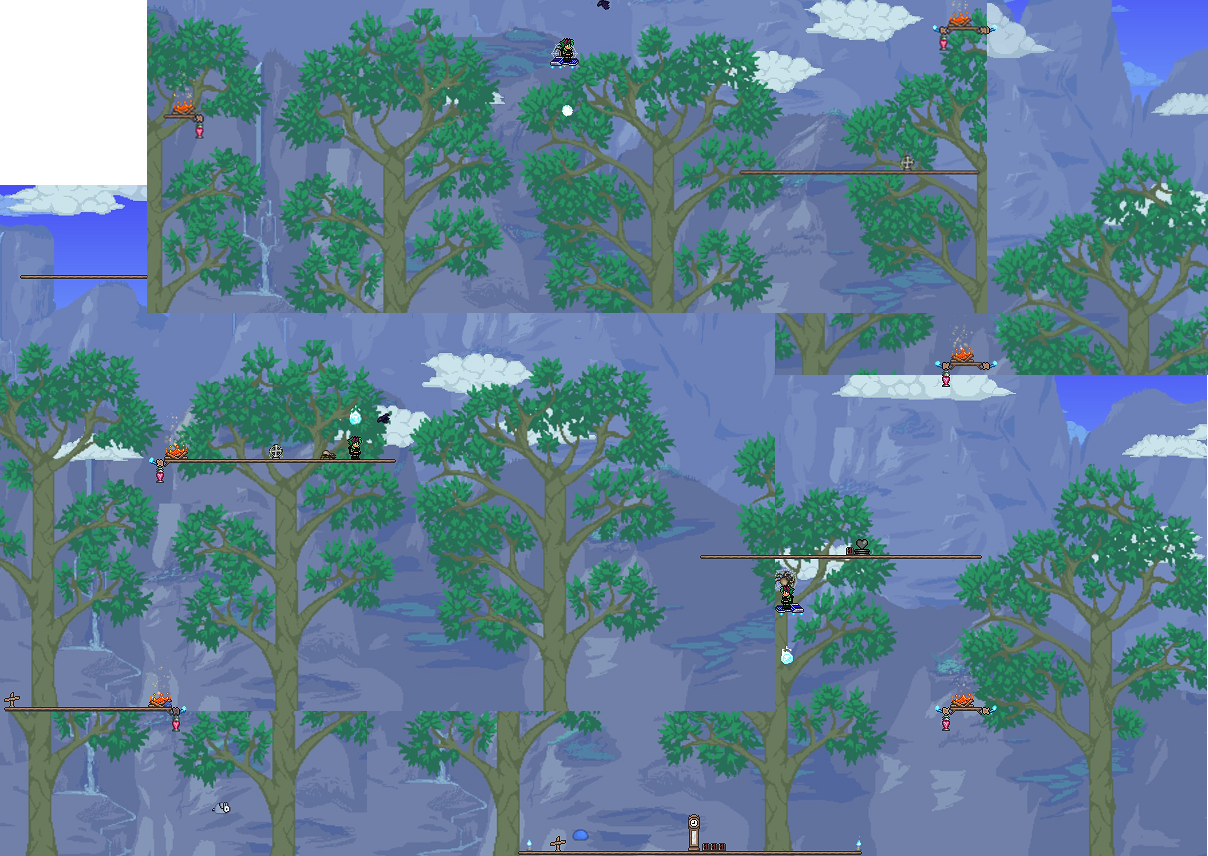
Venom for max base damage,
Ichor for armor reduction,
Or clorophyte efficiency?
toolshed 11 серп. 2014 о 20:16 
This arena caused some major fps lag for me.
Ali 27 трав. 2014 о 6:19 
Making the fight even easier: the Merfolk form can fly in any direction at high speeds without a cooldown. Flooding your arena and equipping the Neptune's Shell + Frostspark Boots can work better than wings. Theoretically..

Also, Heartreach potions negate the need to drop into the spiked balls, allowing you to get hearts without getting anywhere near them.
Dactyl 22 лют. 2014 о 16:49 
nice
AtlasGryph 19 лют. 2014 о 7:02 
Bravo. With this, I got to wave 15 first try, got all the drops, 4 mourning trophies and 3 pumpking trophies. And all this using my favourate charicter class.
Elli.The.Otter 18 листоп. 2013 о 5:00 
and i have the rainbow gun magnet spere pygamy staff nimbus rod and inferno fork
Elli.The.Otter 18 листоп. 2013 о 4:57 
plzz i love cat's...
Elli.The.Otter 18 листоп. 2013 о 4:56 
ummm can someone help me do this plzzz? i have turtle and spectre and spooky and chlorophyte but im one D;
Xyst0 16 листоп. 2013 о 7:50 
I'm going to stick with beasting it with pladind's hammer and turtle armour.
This is a great tutorial though people who post these thing are who give me hope for humanity.