Lethal League

Lethal League

102 次評價
Dead Man's Lessons - An In-depth Guide on Lethal League Tactics and Strategies
由 PeggleFrank 發表
They say the dead learn the most from their mistakes.
Top level Lethal League tactics that you will only find from interrogating Team Reptile. Not for the feint of heart.
   
獎勵
加入最愛
已加入最愛
移除最愛
Introduction
Before we begin, it should be noted that this guide is for top level players only. If you've already mastered the basics, this is where you'll learn the rest of the unspoken tricks.

These are tactics, strategies, and taunts that I've seen over the course of many games with high level players. Some of these strategies were taken from other players' feedback; you can learn more in the credits section.

Disclaimer

The views presented in this guide are purely subjective and are entirely of the author's own thoughts, opinions, and experiences. It is in no way representative of the Lethal League playerbase consensus at any level of play. All points presented in this guide are subject to criticism and denial; whether the guide is to be cleansed of these misconceptions is not promised, but said to be done if any are found. Survey of the Lethal League playerbase will likely yield different, if not opposing, opinions that may or may not be more accurate than the views presented in this guide.

Many opinions in this guide were formed from a survey of the Lethal League playerbase. It is suggested that it be read before this guide, in order to leave the reader less susceptible to any potential bias.

The results of the survey can be found here.[docs.google.com]

The survey itself can be found here.[docs.google.com]


Table of Contents


Revisions

REV1 – 11/13/14 – Published the guide in a WIP state.
REV2 – 11/14/14 – First major revision. Added Character Overview section and Indepth Character Analysis placeholder sections.
REV3 – 11/19/14 – Small additions. Added a table of contents and sectionalized informalities in the introductory section to make the guide appear more formal at first glance.
REV4 – 11/22/14 – Added in Dice's frame data, collected by the almighty Smellyhobo101. Also fixed the background gradient of the tables.
REL – 11/24/14 – Filled in the Indepth Character Analysis sections and added a Music section. I now consider this guide to be complete. Further section additions are not out of the question, however.
Fated Death
Fated Death is when you are absolutely destined to a percent chance of death, no matter what you do or what your opponent does. As skill level increases, other causes of death are suppressed, but you will still be (and will always be) susceptible to a fated death. This makes fated death one of the few things that can reliably kill a high-level player.

A common misconception is that a fated death is just the same as a regular death. A fated death is something like Switch's Switchflip, a move that makes the ball go in a very shallow and very deadly angle that can go to either the left or right with practically no frame delay, as well as a defensive version that can be activated mid-air with a small amount of frame delay; Latch's special, which allows the position to be adjusted via moving and gives the freedom of any angle upon the end of hitlag; Raptor's special, which allows the ball to be sent in any direction with a small or large amount of hitlag which may or may not be entirely covered by your opponent's swing; etc. All of these specials have little to no frame delay and two potential horizontal directions, which surpasses both the hit recovery time and the standard human reaction time.

It is wise to note that, while your chance of fated death is usually 50% or lower, it can be much higher if you consistently swing where you're looking and only aim to one side. Neither you nor your opponent are truly random; you will make a rational choice of where to swing, and your opponent will do the same with the ball direction. If you aim to the right every time but swing left, your opponent will eventually stop falling for it, and may send the ball to the right; this is impossible to reliaby predict, but you should still change things up as much as possible. It may be wise to set up a macro that can retrieve a number from random.org and display it for you outside of the game window; this is unfair in a tournament, however.

Ties to Ball Control

Fated Death is a direct result of Ball Control. At a high level of play, fated death is the only type of death you will feel; neither you nor your opponent will make any mistakes, so the only way to win is to control the ball as much as possible and force them into positions where they have a percent chance to live.
Stun Death
Stun Death is similar to Fated Death, except you will die 100% of the time. There is no randomness, for it is simply a matter of timing and positioning. The most common cause of stun death is a parry; your opponent gets you close to a bunted ball or their charge shot, and parries during the short period of hit lag. You're knocked out for a relatively long time, and, even though you could live by pressing literally any button, the stun prevents you from doing so until you die.

Stun deaths can be caused by parries, early hits, clashes, and auto-parries. All of these things require you to get into a position where you absolutely must be clashed, parried, or driven into premature recovery time; a good player will not get into these situations very often, however, so it's still your fault if you die to a parry, clash, or early hit.

Regular parries will stun you if you hit them. Similar to how you die if your character hitbox touches the ball before your attack hitbox does, you will be stunned by a parry if your attack hitbox touches the parry's hitbox; however, even if you don't attack, the parry will end the exact moment the ball comes out of hitlag. This means you either need frame-perfect reflexes, or you need to stand back in a position where your swing will hit the ball's hitbox once it starts moving but not the parry. You may need to start extremely far back if a character's neutral angles cover a wide area, and for characters like Switch, you may need to swing twice.

Early hits are what many new players do out of panic. Even if an angle creates a safe zone, they will jump and swing aimlessly in hopes of the ball running into their smash hitbox. This works sometimes, especially if you're at the edge of the map, but will usually kill you because of the small delay after hitting in which you cannot swing again. This also applies to bunts. If you charge a shot, and, knowing that it's going to be off-timed, you release it prematurely, you may not recover in time to swing at the ball again.

Clashes are rare, and usually accidental, but will kill almost every time at a decently high ball speed. Because it requires both players to hit eachother with a neutral attack or bunt, the only way to truly avoid clashing is to smash; smashing has many problems of its own, though, and bunt-smashes/charges are the only way to effectively return the ball in an offensive manner. If you're far from your opponent, or your opponent is a slow character like Candyman or Latch, you should try to charge or bunt-smash the ball instead.

Auto-parries are less common than regular parries, mainly because they're only enabled at the beginning of a match. However, if your opponent smashes the ball or does a downward neutral attack, you will almost certainly die. The auto-parry is enabled for quite a long time before the ball becomes untagged, so it may be wise to try to calm down your hyper-offensive opponent by simply waiting. If they strike the ball prematurely, the auto-parry will almost certainly kill them.

Ties to Ball Control

If you control the ball, you can give your opponent a small chance at grabbing it via a neutral or forward bunt. This will encourage them to take their chance at claiming the ball. Immediately jumping at the ball, doing a downward neutral attack or smash, and then parrying will guarantee a kill. This works best at high ball speeds, although sometimes your opponent will panic on a low ball speed and will swing too early or too late.
Imperfect Death
Unlike Fated Death or Stun Death, Imperfect Death is when you die to your own mistake. It is technically impossible for a human to be absolutely perfect, so imperfect death will always be a factor; it is also usually the first type of death to start decreasing in occurence once you become better at the game. Depending on your reflexes, quick decision making, vision, and any nearby distractions, most to all of your deaths will be due to imperfect death when you're just getting used to the game. However, as you play more and progress as a player, these imperfect deaths will begin to fade away, and you, being a higher level player that can play with higher level opponents, will need to begin focusing on small details in order to win games, such as fated death or stun death.

On a spectrum, fated death is the most predictable form of death. Any player can be killed by fated death due to how the game works, but a lower level player will be often killed by imperfect death or stun death more often than fated death. It is completely unavoidable, but happens less frequently than stun death or imperfect death.

Stun death is inbetween fated death and imperfect death. The situation itself is completely optional; if you lunge at your opponent after he bunt smashes your ball, you will be placed in an unwinnable situation once he begins a parry, but if you rush to a safe zone and calmly receive the ball, you will find your opponent putting in a lot of wasted effort. This leads to more mistakes, and more imperfect death. As you can see, it is not impossible to receive a charged or bunt smashed ball, but receiving a ball within an active parry is. In other words, stun deaths are set up by imperfection (not an imperfect death), and are finished off by fate. (not a fated death)

Imperfect death is something a perfect player will never die to, but again, humans are imperfect, so it will always be possible at all skill levels. However, the player with the lowest amount of imperfect death will generally be a better player; if they have a higher amount of stun death, they may be poor at making quick decisions, and if they have a higher amount of fated death, they likely don't exert much ball control. Combining all of these factors reveals that the best player would have complete ball control, make perfect decisions in short periods of time, and never make mistakes.

Ties to Ball Control

Controlling the ball can open up the opportunity for you and your opponent to succumb to imperfect death. Usually, if you're attempting a combo and your opponent steals the ball unexpectedly, this will lead to a short period of panic wherein you will have a higher probability of making a mistake.
Stress & Complexity
Complexity isn't always a good thing, yet it's not always a bad thing, either. A complex combo in the corner of the map won't threaten your opponent because the potential angle of the ball is going to be between 0 and 90 degrees; however, if you keep the ball away from your opponent while still dancing around the stage, you can make that potential angle between 0 and 360 degrees, which is much more threatening, albeit a bit less efficient at building your special meter.

The key to complexity is to do awkward movements and exert ball control to keep your opponent guessing where the ball will be the entire game. If they're guessing, it can't be long until they make a mistake and succumb to imperfect death. Additionally, if the ball is moving fast enough, your opponent has no leeway when it comes to missed shots. This, combined with the threat of being parried at close range, leads to a stressful situation for your opponent that forces them into a permanently defensive role.

Due note that your complex combos should not be unrelated to eachother. If your combos can't be merged with eachother, you may run into a situation where your only appropriate combo is being repeatedly interrupted. As such, it's important to make different "styles" of combos and practice different ways to execute them that can be linked together with ease. Even if your opponent disrupts your combo, you must be fluid in order to continue building your special meter.

It is also wise to note that a complex chain of potential combos may confuse you. If you're interrupted in the middle of a very long combo chain, you may not remember where you were in the combo, or know how to continue the combo in a way that cannot be easily interrupted. Additionally, your opponent may interrupt your combo and begin to use it to build their own special meter, while denying you any more of yours.

Combos with very little delay inbetween strikes (i.e. not hitting the ball against the wall repeatedly) can confuse the opponent, forcing them to guess where the ball is going to go every hit. If this is done repeatedly, it can stress out your opponent and make them extremely susceptible to a regular, un-combo'd attack.
Safezones
Safezones are, naturally, zones created by a certain angle that are safe to stand in. There are three main types: instant safezones, which are safe areas to stand in that will allow you to hit the ball one hundred percent of the time as soon as hitlag ends; static safezones, which are small places you can stand in that will never be intersected by the ball, either due to the map, the angle of the ball, or both; and moving safezones, which are areas that are safe to stand in, but move at a varying pace depending on the map and angle of the ball.

Instant Safezones

It's much easier to see an instant safezone than to explain one, so here's an example:


Instant safezones are safezones that will allow you to hit the ball, no matter what angle your opponent has chosen. Many of them only work on the ground, although a few work backwards, and even fewer work in the air. Most safezones are directly in front of the opponent if the ball is very close to the floor, although if the ball is higher up on the opponent's hitbox the safezone may be in a different location. Different maps have different safezones, because it takes less or more time for the ball to hit the ceiling and intersect with another angle. Certain maps may not allow any safezones at all; Dice's up angle is extremely steep, which prevents you from getting close enough without being parried on State Manufacturing Facility. Thus, his safezone is far in front of him, although you're forced to swing twice to get his up angle. This makes charge shots undesirable, as Dice can deny the charge by simply using his up angle, forcing you to use a regular neutral attack.

Static Safezones

Static safezones are created when a certain angle hits the walls in the exact same spot every time. Most angles only have one static safezone, which resides on a specific map, although some angles have static safezones on two maps. It's usually safe to assume that there'll be a moving safestone over a static safezone most of the time, as it's easier to die to a moving safezone that you thought was static than it is to die to a static safezone that you thought was moving.

Moving Safezones

Moving safezones are created when a certain angle hits the walls in a different spot every time, only repeating after hitting the wall multiple times. They're the most common form of safezone, occuring on just about every map with just about every angle. They're very deadly if you stand in their path unexpectedly, although it's possible to quickly calculate where the initial safezone will be and what direction it'll be moving in, as well as if it's going to be growing or shrinking.


You can find more information on angles and safezones here:
http://steamcommunity.com/sharedfiles/filedetails/?id=308796397
Time, Speed, and Preparation
As discussed in the sections on Fated Death and Stun Death, sometimes there's nothing you can do to save yourself once you've fallen into a situation, such as a baited parry, awkward charged attack,
or fakeout. These are more common at low to medium ball speeds (16-64) and less common at very low (4-8) or very high (128-1000000) ball speeds; at a very low speed, the ball may not be fast enough to actually hit your opponent before they're able to recover, and at a very high speed, there may be enough hitlag for your opponent to recover and swing at the ball again.

All of these elements are factors of either Fated Death or Stun Death.

Time

Time is the amount of time you have before your opponent strikes the ball, during hitlag, and after your opponent strikes the ball. Note that, out of these three sections of time, the first and last sections are usually very short, and only exist if you and/or your opponent don't hit the ball immediately after the end of hitlag.

Time is directly affected by speed. Depending on the speed of the ball, there may be more or less time between the beginning/end of hitlag and when the ball is hit.

Time is indirectly affected by preparation. Depending on where you are, and where you're planning to hit the ball from, there may be more or less time inbetween the beginning/end of hitlag and when the ball is hit.

Speed

Speed is how fast the ball travels. After a certain speed, the ball will move across the entire map in one frame, pause for 3 frames after hitting the wall, and continue along another angle, taking a total of 4 frames per bounce. This means extremely steep angles will take a long time to travel across the stage, no matter the ball speed, and extremely shallow angles will always speed across the stage, even on low to medium ball speeds.

Speed is directly affected by preparation. Depending on where you are and your method of striking the ball, the ball's speed may be increased by 1, doubled, or even quadrupled in Raptor's case.

Preparation

Preparation is where you are, what angle you're assuming your opponent will use, and what kind of attack you're planning to use to strike the ball. If the opponent charged their shot or struck a bunted ball, you will have less time to prepare. During this short moment of panic, you will be unable to use charge shots unless you know there will be enough hitlag for the ball to sail into your charged shot, in a bad position and/or outside the instant safezone, or in a position where any movement will make you susceptible to a parry.

Preparation is directly affected by time. Depending on how much hitlag is available, you may or may not be able to get into a position where you can strike the ball in an offensive way. Bunts are an effective method of "reserving" a short hitlag period for your next shot. Of course, if you were close to your opponent to begin with, they may steal your bunted ball and restart the cycle.
Offense and Defense
Offense and defense are two necessary components of a playstyle; offense is required to kill your opponent, and defense is required to protect yourself from your opponent. A completely offensive opponent will die almost immediately to well-timed parry or charge shot, while a completely defensive opponent will be very unlikely to kill you. Of course, you can still die to an overly defensive opponent, but it will likely be imperfect death rather than fated death or stun death.

Offense

Offense is usually done by applying pressure to your opponent or by stressing their reaction times. Despite most of a match being fast-paced, the obvious beginning of a large hitlag timer (i.e. jumping up to and getting ready to smash a ball at a very high speed) usually provides a small period of relief to your opponent. This relief, while short lived, gives them both figurative and literal breathing room. There are two methods of dealing with this breathing room.

Firstly, you can make sure that all of your attacks are either on bunted balls or charged shots: this will keep the hitlag timer low for your opponent and allow them little breathing room, increasing their chances of making a mistake. Additionally, they may make a simple attack like a smash out of panic, which gives you breathing room in return.

Secondly, you can pretend to give them breathing room, but cut it short. A good example of this is Raptor's special. Raptor can jump at the ball, initiate an obvious smash, but then immediately cut off the hitlag timer by using the short version of his special. This, while not eliminating the breathing room of your opponent, actually exploits it by cutting off the hitlag timer while they're still taking a moment to recalculate their potential options. While this is usually only possible via a special, if you manage to do it in another way that doesn't require use of a special, you'll end up with enough of your special meter left to parry. When your opponent is given fake breathing room like this, they are very likely to swing at the ball in panic. A parry will almost certainly finish them off; if they don't jump and swing at the ball, they will probably do a predictable attack like a smash, which gives you the opportunity to fake them out again. Even against the most experienced of players, repeatedly toying with their reaction times and relief periods can stress them out and cause them to do extremely predictable things, if not get killed outright.

Defense

Defense is necessary to keep yourself alive and to protect yourself against the many confusing tactics your opponent may employ. Common defensive strategies involve smashing, due to the large hitbox; bunting the ball repeatedly to give yourself breathing room, especially if your opponent can't jump very high (Raptor or Latch); and staying in areas where the ball is destined to visit at some point, such as a corner or wall.

It is important to note that certain defensive strategies can break when subjected to an equal amount of offense. Smashing wildly, for example, can lead to parries, and doing standard neutrals as a compromise between pure offense or defense can lead to clashes.
Character Overview
Each character in Lethal League is unique in just about every way. Whether it be the angles, the number of angles, top speed, acceleration, jump height, method of reaching the top of the stage, special, hitboxes, or hurtboxes, everyone is different and made to cater to a specific playstyle and/or method of killing.

Each character has 3 neutral angles and a smash angle, although some have a fourth aerial neutral angle and a few have modified special angles. You can find these angles on the guide sponsored below.

http://steamcommunity.com/sharedfiles/filedetails/?id=308796397

The top speed, acceleration, jump height, hitboxes, and hurtboxes are shown below. This data was taken from an indepth statistical character analysis by Smellyhobo101. You can see the results here.[docs.google.com]

TL;DR:
  1. Raptor has the smallest hurtbox, although Latch has the shortest crouched hurtbox.
  2. Raptor, Latch, and Dice have the fastest charge times. Candyman has the longest.
  3. Dice has the shortest jumps, Sonata has short jumps, and Candyman has the highest jumps.
  4. Raptor and Dice are fast. Latch is the slowest, and has the highest acceleration. Switch is the fastest, and has low acceleration.
  5. Candyman has the longest smashes, while Latch has the shortest.
  6. The switchflip has a massive hitbox, but doesn't help whatsoever if the ball is coming from above.


Hurtboxes
_______________________________________________________________________________


Neutral Hitboxes
_______________________________________________________________________________


Bunt Hitboxes
_______________________________________________________________________________


Smash Hitboxes
_______________________________________________________________________________


Special Attacks
_______________________________________________________________________________


Charged Attacks
_______________________________________________________________________________


Speed & Acceleration
_______________________________________________________________________________


Jumps
_______________________________________________________________________________


Each character has their own unique method of reaching the top of the stage. Some of these methods require being next to a wall, and some don't allow you to reach the top center part of the stage.

  • Raptor - Can wall-jump to glide across most of the stage. Cannot reach the top center of the stage.
  • Switch - Can wall-ride to move across the top of the stage, moving away from the wall and stopping at the other. Can drop down at any time.
  • Candyman - Can high-jump at the cost of short-hopping.
  • Sonata - Can double-jump.
  • Latch - Can somewhat slowly wall-climb to strike the ball with a modified down angle and two regular horizontal/up angles. Cannot reach anywhere inbetween the top sides of the stage.
  • Dice - Can crouch and jump to super-jump. Cannot immediately jump like Candyman due to half-crouch animation time. Can still short-hop.
Indepth Examination: Raptor


Background

Raptor is a rookie in the Lethal League scene, hailing from the south. Though young, he’s very determined and fiercely competitive. His weapon of choice is a metal baseball bat and his special ability allows him to twist around and quickly hit the ball two times in a row.

Relative Angles

Raptor's angles are generally inverted versions of the other character's angles. Instead of having a shallow neutral-up and a steep neutral-down, he has a steep neutral-up and a shallow neutral-down. His neutral-down angle becomes slightly more steep in the air, but not by much.

If the long version of his special is used on the ground without specifying a direction (holding down, left, right, up, etc.), his smash angle will be used. This does not work in the air, although special smash effects will play if the long version of his special is used on a corpse in the air.

Movement

Raptor is generally rather nimble compared to the other characters. He's short, his crouch isn't too tall, his acceleration and max speed are rather fast, and he has decent vertical acceleration.

Raptor can wall-jump by jumping on a wall and jumping off again. He can also wall-slide, allowing him to time his wall-jump more precisely or give himself extra time to strike a ball moving across the bottom of the stage.

Special

Raptor's special seems simple, but is actually one of the most complex specials in the game, aside from Dice.

By attacking again during hitlag, Raptor can initiate a whirlwind attack. After a short time, the ball will fly off again. Numerous things can be controlled here.

  • Hitlag. His special can be used at any time during hitlag; this could be at the very beginning of hitlag or at the very end to mess with his opponent's timing.
  • Timing. There are two versions of his special (minus the variable version) : a long version, and a short version. By simply tapping the attack button, the short version will be used, but by holding down the attack button, the long version of his special will be used. The long version of his special doubles the ball speed, as if it were a smash. None of this accounts for the fact that he can end his special at any time, explained later.
  • Angles. His neutral-down, neutral, and neutral-up angles are all available to select during his special. It is also possible to do these same angles behind him, giving him the opportunity to send the ball in 6 directions. If on the ground, Raptor will default to his smash angle if using the long version of his special and if no angle is specified.
  • Cancellation. Raptor can bunt out of both the short and long versions of his special. This can be used to reserve his special for later if it's not immediately useful in the given situation by immediately striking the bunted ball for 2 "free" meter, or it can be used offensively; for example, Raptor can actually downbunt out of his special in order to kill his opponent if they happen to jump over him by mistake. He can also release the ball prematurely; see below for details.

It is wise to note that, while Raptor has a short and long version of his special, the special can be ended at any time by simply letting go. This allows you to keep his special going until you notice a weak point; whether it be your opponent facing the wrong direction, beginning to charge, striking prematurely, etc. they'll most likely die if you send the ball at them without waiting for the timer to run out.
Indepth Examination: Switch


Background

Switch is a skateboarding ex-working class robot. He uses his skateboard and skateboard tricks to hit the ball. He sports cargo pants to stop filth getting into his leg joints when speeding across the city. Very unlike his old robot peers, he’s carefree, a daredevil, and he likes a challenge.

Relative Angles

Switch's angles are like Raptors, but with an inverted neutral-up angle. His neutral-down angle is also extremely shallow, and becomes steeper when in the air.

His neutral-up angle is actually behind him. This makes him more useful in the center of the stage, whereas another character would be better in a corner. If forced into a corner, the maximum hitlag generated from his neutral-up angle versus his horizontal angle is 8 frames, from the ball hitting two walls. This, combined with his rather shallow down angle, allows just about any character to stand directly in front of him and hit the ball 100% of the time. However, if in the middle of the stage, enough hitlag is generated that one swing won't be able to cover both his neutral and his neutral-up angles. This makes him extremely deadly when given the opportunity to move into position.

Movement

Switch is the fastest character in the game by far, but has the slowest acceleration. In most cases, his top speed won't come into play simply due to his abysmal acceleration, but when placed side-by-side with another character, he'll usually reach the ball first. His crouch hitbox isn't very tall, although his standing hitbox is.

Switch can ride the walls, starting at one corner and stopping at the next. This allows him to reach the top of the stage, albeit rather slowly compared to a character like Candyman or Dice. He has the option to drop down at any time; this, while making his raw switchflip more viable, reduces the chances of him getting an overhead smash and opening up the possiblity for an overhead switchflip.

Special

Switch's special is extremely simple, yet there are many ways in which to use it.

To start with, he can do a raw switchflip by simply jumping again mid-air. This will initiate a special attack which lasts until he touches the ground. If the ball touches his skateboard during this time, it'll be redirected either left or right, depending on what direction is inputted.

He can also do an overhead switchflip by doing an overhead smash and pressing the jump button. Despite having the same angles as a regular switchflip, this is usually more deadly, as the switchflip doesn't have to be used until the very last frame, making it a 50/50 chance to kill.

By crouching and jumping, his raw switchflip can be used. What separates this from his regular raw switchflip is that the switchflip will continue for a few frames even though he's touching the ground. He can also do a crouch slide in order to "sweep" a small area with his raw switchflip. This move is usually rather situational and has little over an overhead or raw switchflip, but when used correctly, can get Switch out of many deadly situations.

You can learn more about Switch's special here.

http://steamcommunity.com/sharedfiles/filedetails/?id=321855651
Indepth Examination: Candyman


Background

Candyman is a tap-dancing dandy with a big yellow head. He hits the ball with his cane and he has a special ability to change the chemical composition of certain objects to give them strange and odd properties due to his mutation. He’s jazzy, expressive and crazy. Always enjoying himself too.

Relative Angles

Candyman's angles are pretty extreme. His smash angle is almost directly downwards, while his neutral-up and aerial neutral-down angles aren't far from being completely horizontal. While grounded, his neutral-down angle is more shallow than his smash angle, yet still quite steep, making it one of the few "normal" angles in his arsenal.

Movement

Candyman has a low top speed with low acceleration. He can't short-hop, as his standard jump is extremely high, although he can reach the top of the stage rather quickly due to his quick vertical acceleration. He's extremely floaty after jumping, allowing him to linger at the top of the stage for extended periods of time, although his fastfall can prevent this if necessary.

Special

Candyman's special attack makes the ball into a candyball, allowing it to phase through two walls and bounce off a third before becoming a normal ball again. The candyball is not subjected to gravity if gravity ball is enabled. If he hits the candyball again, it'll have reduced hitlag and be able to travel through two more walls. This allows him to chain multiple candyballs together to confuse his opponent, as the candyballs can come from any direction and there is very little time inbetween strikes. The candyball also has a speed cap; it won't immediately be set to a certain speed like Sonata's special, but it won't go fast enough that he can't hit his own candyball again.
Indepth Examination: Sonata


Background

As a renowned b-girl, Sonata is all about pushing her body to its physical limits in the name of showmanship and impressing her audience. She joins the game to boost her recognition and fame. She wields a giant boombox hammer effortlessly, owing to her diligent training.

Relative Angles

Sonata's angles are beyond generic. Her smash is somewhat steep, but it's still extremely similar to all the other character's smash angles. Her special makes her up and down angles into the same angle, although they're actually even simpler and rather easy to get used to.

Movement

Sonata isn't the fastest character, but has decent acceleration. What puts her apart from all the other characters, however, is her double-jump; she can do massive aerial combos before even having to touch the ground, whereas a character like Raptor or Switch would need to hug the walls to be able to stay airborne.

Her double-jump also allows her to stay airborne for extended periods of time compared to characters like Candyman or Dice. This gives her the opportunity of doing charge shots at the very top of the stage.

Special

Sonata's special is quite complex, and not the most rewarding. It's activated by striking again during hitlag, like many other specials.

Once the special is activated, the ball will be set to a certain speed. This means that, at a high speed, the ball will begin to move slower, and, at a low speed, the ball will speed up tremendously. Pressing a directional input will move the ball in that direction, although these angles aren't relative; in other words, even if you just made the ball go backwards, pressing up will make it start going forwards again in an upwards angle. This makes a triangle shape just about the most complex combo with her special, which isn't amazingly threatening.

The speed of the ball during Sonata's special is generally faster than any character can run, although if the ball goes backwards it may run into your opponent's swing.
Indepth Examination: Latch


Background

Latch is a crocodile outfitted with a mechanical tail. Enhancements to his spine and brain allow him to function in human society. He is in possession of tremendous physical as well as mental strength. His personality is calculated, his movement is raw.

Relative Angles

Latch's angles are odd, perhaps even more odd than Switch's angles. His neutral-down is decently shallow, while his neutral-up is inbetween shallow and steep. His smash happens to be the exact same as his neutral-up, but going downwards instead of upwards. A quick review of the exact degrees of his angles shows that his angles are actually purposefully "off" compared to the other character's angles, which are usually going by intervals of 5 or 10.

Latch gains a new neutral-down angle when mounted on a wall. It's similar to Switch's neutral-up angle, but inverted; it goes down and behind him, allowing him to hit the ball multiple times on a wall if the ball is close enough to the ground.

Movement

Latch is the slowest character by far, but has extremely fast acceleration.

Latch is unable to quickly traverse the stage, for the most part. If he gets near a wall, he can climb the wall and attack from it, opening up new angles, but can be quickly killed if the ball is bunted into the wall. He can't move up and down the wall very quickly, and can be parried if his opponent manages to get the ball too close to him.

Special

Latch's special is similar to Raptor's special, except he can move around before releasing the ball, and the ball is set to come out at a specific time. This can be bypassed by bunting the ball out of his special, but the bunted ball can be stolen by an opponent, making it a risky move. He's also unable to climb walls while his special is active.
Indepth Examination: Dice


Background

Real name Hans Insel, Dice eschews the typical weapons of choice for a ping pong paddle that he wields with uncanny force. He appears distant at times, but can be intensely concentrated whenever he feels the need. As a Buddhist, Dice is known for his mental discipline and diligent physical training.

Relative Angles

Dice's angles are unique, yet not far from useless. His neutral-up angle is the steepest angle in the game by far, surpassing even Candyman's smash angle. The neutral-up angle rarely kills by hitting an opponent instantly; hitlag will be generated on even the highest of ball speeds due to the ball hitting the floor and the ceiling repeatedly, allowing it to hit an opponent that swung too early. His neutral-down angle is relatively normal, although it's a bit steep.

Dice's smash is also somewhat odd. It's not completely flat, but it's still more shallow than any other smash angle in the game, making it a threat when pushed up against a wall.

His special opens up the possibility of an extremely shallow angle, being the most shallow angle in the game. This doesn't happen every time his special is used, but in most cases, it will. While not technically being his angle, he can also send the ball directly upwards if the ball touches the floor during his special.

Movement

Dice isn't the fastest, but still has decent acceleration. His standard jump is extremely short, although he has a super-jump equivalent to Candyman that can be activated by crouching before jumping.

Special

Dice's special is at a complexity comparable to Sonata's special. By attacking during hitlag, the ball will immediately start curving until it touches a surface. The diameter of this circle can be controlled, as well as the direction of the circle and the direction of the ball if it happens to touch the ground.

If the ball touches the ceiling, it'll slide across until it touches a corner, and then travel along Dice's neutral-down angle. If the ball touches a wall, it'll slide down and travel at the standard shallow angle unique to his special. The direction of the ball after touching the floor can be controlled by pressing either left, right, or up; if left or right is inputted, the ball will use his shallow angle, but if up is inputted, the ball will go straight up.

You can learn more about Dice's special here.

http://steamcommunity.com/sharedfiles/filedetails/?id=339092773
Conclusion
This guide is absolutely massive. I know it's larger than the average Lethal League player's attention span, but I do believe it was worth it to make something more in-depth than the other "overview" guides out there. I must send my thanks to all those who submitted a form for the survey I put out some time ago. It's been helpful in giving me a slightly less biased point of view, which has hopefully made this guide all the better. [h1]Music[/h1] This is somewhat unrelated, but I thought I might as well put the music to Lethal League here for reference. [list] [*] [b]Main Menu:[/b] [u]Doktor Lazer - Turkish Mix[/u] [*] [b]Character Select:[/b] [u]Doktor Lazer - Warp[/u] [*] [b]Industrial Outskirts:[/b] [u]Doktor Lazer - Headbangeren[/u] [*] [b]Abandoned Pool:[/b] [u]Grillo - Urabon[/u] [*] [b]Underground Sewer System:[/b] [u]zeroSCAR - RE[/u] [*] [b]Room 21:[/b] [u]Klaus Veen - Ordinary Days[/u] [*] [b]City Streets:[/b] [u]Bignic - Scream[/u] [*] [b]Hammer Express:[/b] [u]zeroSCAR - Flat Attack[/u] [*] [b]State Manufacturing Facility:[/b] [u]Ishanna - Error[/u] [*] [b]Final Boss:[/b] [u]zeroSCAR - Doombox[/u] [/list] [h1]Power Rankings & Ladder[/h1] [strike]Something wise to be aware of is the [url=https://docs.google.com/spreadsheets/d/1cD5HGM1VrBWyHk7G8E7DejmngtJku6PNaIUf4p-aY6U/edit#gid=1089983546]unofficial power ranking system[/url] set up by NatureDown, as well as the [url=http://steamcommunity.com/groups/LethalLeagueLadder]unofficial Lethal League Ladder group[/url] run by YEH Dolphin. The power ranks are taken from the [url=http://llt.challonge.com/]Lethal League tournaments,[/url] driven by the [url=http://steamcommunity.com/groups/lethalleaguetourneys]unofficial Lethal League Tournament group.[/url] The ladder is run internally; you can play ranked matches at any time, and simply need to report the scores in the appropriate discussion on the group's forum.[/strike] The Lethal League Power Rankings and Ladder have been shut down. Tournaments are now seeded by time played, not power rankings. You should keep practicing to make your time represent your skill. Despite this, a new type of tournament has popped up. There are regular tournaments held by the Lethal League Tournaments group, though there are also two other specific tournaments being held. "Up-and-comer" tournaments are for players with less than 100 hours, while "around-the-block" tournaments are for players with less than 250 hours. In order to participate in these tournaments and win, you must train hard and fast and become as skilled as you can as fast as you can. If you aren't eligible for either of these tournament types, you can of course just participate in the regular tournaments. Tournaments are also being hosted by more individuals, as well as Team Reptile themselves. Jawbreakers was the first official tournament. The up-and-comer and around-the-block tournaments are typically hosted by ThatGuy, and many types of funky experimental tournaments tend to be hosted by aTastyT0ast. Python has also hosted some UAC tournaments. Badshot still maintains the main tournaments group, with occassional support from various Lethal League players such as YinYin. The two main regions supported by tournaments are the EU and NA regions. There have been a few tournaments in other regions, such as AUS, SEA, and SA, but there aren't an extraordinary amount of players in those regions. There are a few non-English speaking Lethal League groups that host tournaments as well, namely in Japan and in particular regions of the EU (Germany, France, Spain, etc.), though not much is known about them because the majority of the playerbase is English-speaking. [b][h1]Credits[/h1][/b] For those of you who don't know, I held a survey not too long ago. Here are the results: https://docs.google.com/spreadsheets/d/1kTfvDXXI43Uay3dP9K2eCUIksn49A-0Om3KqoZWQw9M/edit#gid=115330026 You can technically still submit a form, although it may not be read and your name may not be added to this list. If it's extremely insightful, however, I may consider it. [b]Special thanks to Ice Coldas for letting me kill him twenty times. It takes dedication.[/b] [strike][i][b][u]_______________________________________________________________________________[/u][/b][/i][/strike] [table] [tr] [th]Power Ranking[/th] [th]Name[/th] [th]Personal Ranking[/th] [th]Alternative Alias[/th] [/tr] [tr] [td]41 [td]XanPanMan345 [td]10 [td] [/tr] [tr] [td]45 [td]Monk/Honkey/Banana [td]7 [/tr] [td] [tr] [td]## [td]Anonymous [td]7 [td] [/tr] [tr] [td]49 [td]Roniyin [td]7 [td] [/tr] [tr] [td]## [td]Flagsofpie [td]7 [td] [/tr] [tr] [td]11 [td]Lumanos_Blue [td]6 [td] [/tr] [tr] [td]15 [td]PeggleFrank [td]8 [td] [/tr] [tr] [td]## [td]Anonymous [td]9 [td] [/tr] [tr] [td]## [td]Anonymous [td]5 [td] [/tr] [tr] [td]## [td]Anonymous [td]7 [td] [/tr] [tr] [td]06 [td]Smellyhobo101 [td]9 [td] [/tr] [tr] [td]42 [td]BadShot [td]8 [td] [/tr] [tr] [td]111 [td]Blarget2 [td]3 [td] [/tr] [tr] [td]149 [td]That_Latch [td]6 [td]Skillcap [/tr] [tr] [td]## [td]Anonymous [td]6 [td] [/tr] [tr] [td]## [td]Anonymous [td]9 [td] [/tr] [tr] [td]## [td]Anonymous [td]8 [td] [/tr] [tr] [td]30 [td]Nobody [td]9 [td]pgNobody [/tr] [tr] [td]## [td]HentaiMaster [td]2 [td] [/tr] [tr] [td]223 [td]montblanc [td]6 [td] [/tr] [tr] [td]## [td]Samoe [td]8 [td] [/tr] [tr] [td]## [td]Anonymous [td]3 [td] [/tr] [tr] [td]## [td]Katiopeia [td]7 [td] [/tr] [tr] [td]46 [td]Berk [td]7 [td]kirbyfreako [/tr] [tr] [td]204 [td]Halloweethan [td]4 [td] [/tr] [tr] [td]01 [td]Anonymous [td]6 [td] [/tr] [tr] [td]## [td]Mister The Wizard [td]6 [td] [/tr] [tr] [td]03 [td]Anonymous [td]5 [td] [/tr] [tr] [td]## [td]LMMN [td]8 [td] [/tr] [tr] [td]## [td]Anonymous [td]7 [td] [/tr] [tr] [td]## [td]Anonymous [td]5 [td] [/tr] [tr] [td]## [td]Eagleplane [td]8 [td] [/tr] [tr] [td]## [td]Anonymous [td]8 [td] [/tr] [/table]
6 則留言
Davidov 2019 年 1 月 1 日 上午 10:09 
Awesome guide, you probably put a lot of effort in it, helped a lot. Thanks!
aTastyT0ast 2015 年 11 月 25 日 上午 6:57 
Thanks for the Pre-introduction. Where is intermediate guide?
PeggleFrank  [作者] 2015 年 6 月 22 日 下午 2:42 
Probably not.

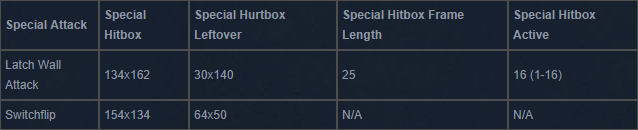
I don't actually know that much about him, other than the fact that he lacks a bunt, a taunt, and has an oversized hitbox.

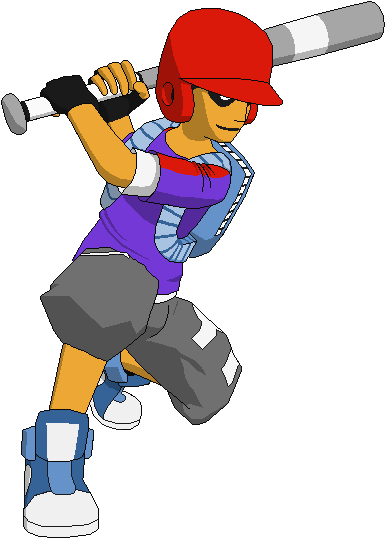
Also, I was originally avoiding him because he doesn't have a blown up portrait, like the main 6 characters do. It's all black, so it would look pretty out of place next to all the other indepth examination sections.

I'll certainly consider it, though. I'm getting back into the game, so it might be something I do later in my free time.
unendingEmpathy 2015 年 6 月 22 日 上午 4:50 
Out of curiosity, even if he's only useable in local play, will there be some in-depth look into Doombox, now that he's playable?
Pull 2014 年 11 月 24 日 上午 8:48 
thanks for teaching me how to spell Grillo
Arts van de plaag 2014 年 11 月 21 日 下午 2:43 
nice guide i am positive this will help many from Pros to newbies