Wargame: AirLand Battle

Wargame: AirLand Battle

1,627 evaluări
176-page Comprehensive Guide to All Things Wargame: ALB
De către SandyGunfox
I wanted to do something a little different with thise guide. I wanted to create a guide that taught a new player all they need to know to dive right in - a one-stop shop to teach all the basics, mindset, and units of the game instead of having to read a few dozen different tutorials - and hopefully shorten that period of learning the ropes tremendously...but I also wanted to write it in an informal, down-to-earth style that lacks the sterility and even the objectivity of most user guides.

So I wrote a guide with an informal tone and a lot of general rules-of-thumb and opinions to go along with the objective information. As a courtesy, I seperated out all the subjective details and made them easy to distinguish.

Though the whole guide is now written, it's still in its draft state, and I welcome comments to point out flaws, poor wording, overlooked things, or anything else!

Oh, there's also a live-updated version on Google Docs.[docs.google.com]

There is also now a sequel for Red Dragon.
5
4
4
   
Premiază
Adaugă la preferate
Preferat
Elimină din preferate
Introduction
I was begged to write this guide by the noobs of the /vg/ Wargame General Steam group chat. Many of those folks helped me out with staging screenshots or just general input, advice, and experience - so thanks goes out to all of them!

This guide is primarily formatted by in-game section. Objective information is presented first, with subjective and opinionated input in italics. This is intended to be a layman’s guide to hopefully shorten that period between being a total noob and beginning to master the game. Many of the claims and opinions expressed in this guide are not hard-and-fast rules, but rather general statements that may have some exceptions.

So, welcome to Wargame! Let’s start off by discussing the important questions - “What’s a Wargame? Is it like Starcraft or Command and Conquer? AirLand Battle is a stupid name, do the developers not speak English very well or something?”

Wargame: AirLand Battle is a real time strategy (RTS) game made by developers Eugen Systems. These guys (collectively and affectionately referred to by some as “Eugene”) are pretty damn good developers, all things considered. You can expect this game to be lovingly supported with balance patches and even free DLC, just like the game that came before it, Wargame: European Escalation.

It is absolutely nothing like Starcraft or C&C. If you play it like you play other RTS games, you will get your ass kicked. If you are new to Wargame, it is best to approach it like a new experience, and not to rely on the lessons learned in other games. Eugene takes the “Wargame” moniker quite seriously, and this game more closely resembles a fast-paced tabletop wargame than most video game RTSes.

The name “AirLand Battle” is taken from the {LINK ÎNLĂTURAT} when this game takes place. This is actually a very important point to note - many of the tactics in this game are taken from real-world tactical necessities, rather than video gamey tactics. If you talk to halfway-decent players, they are going to talk about real-world concepts like “combined arms” and “American armor is not invincible or even particularly good” rather than zerg rushes. You will learn more from the study of real-world tactical discipline than you will by improving APM or other silly video game concepts. If someone boasts of their APM in Wargame, ignore them, for they are idiots. Oh, and the developers are French, and sometimes their English can be a little idiosyncratic.

After you sign in (or, if this is your first time, making an account - and if you need help figuring this part out, please just turn around and close the game, because God himself couldn’t help you) you’ll notice two important things.

First, you’ll notice a chat room to the right side of the screen. Under it, you will see this panel:


Press the green button. The chat room will disappear. This is useful because the chat room is full of complete ♥♥♥♥♥♥♥ idiots. You will, however, likely need this chat display panel for communicating in multiplayer lobbies. Next to it, the “Add Friend” button, confusingly, is not how you add friends in most cases. More on that later. Finally, the red button clears the chat panel.

In the bottom center of the screen, you’ll see this:


But you’ll have zero XP and that QR code will instead be your Steam avatar. If you click it, you will go to your profile.

The real action is to the left. Here:


“Options” is for the game’s configuration, and “Profile” allows you to change your in-game nickname and view your stats and your friends list. If you need any further explanation of these features, know that Wargame isn’t exactly a video game for people new to video games. There’s a truly exciting, excellent series called “Call of Duty” that someone of your skill might find perfectly suited to your special needs.

One other thing to note is the last numbers at the very bottom left. When a patch is released, those numbers will change to the new patch version - pictured here is patch v1250. If you get a “failed to join game room” error while trying to join peoples’ rooms, make sure you have the latest patch.

Now click Solo. Now click Tutorial. Play those tutorials before you do anything else. Seriously, go on now. This guide will still be here when you get back. Really, go. Play those first.


Did you go play them? You just skipped ahead to read the next paragraph, didn’t you? Come on, it’s a freaking tutorial, what are you afraid of? Well, once you do play them, you should know that they don’t teach you ♥♥♥♥♥♥♥♥♥ about how to really play. In fact, some players consider the basics of the tutorials (with M1A1s killing large numbers of crappy Pact armor single-handedly) to be horribly misleading. But you should at least have a basic handle on how to select and move units, how to call in air forces, and so on and so forth, and that’s important.

Under Deck, you’ll see something like this:


“What’s a Battlegroup?” you ask, noobishly. These battlegroups are twelve pre-made decks, so that you can get right into the “real” game. Deck-building is an essential part of this game, but it’s honestly not the first thing you should do. So the developers have helpfully created twelve decks, one for each nation, so that you can get a feel for the basics before diving into advanced tweaking. If you click one, you can select View and see the units contained within. “Copy” will also be clickable - remember this, because once you get a feel for the game, copying and modifying a premade deck is an easy way to jump into deck-building.

These decks suck. There is no more polite way to say this. All of them are highly sub-optimal. The only ones even remotely useable for new players are the Soviet battlegroup and the French and British battlegroups. Play them first, and then move on to the others. I recommend playing every battlegroup at least once, so that you get a feel for each nation’s basic units and their capabilities. Know that Eugene did suggest they will re-configure all of the premade decks, so this may be subject to change, but for now...they suck.
Some Vocabulary
One thing you’re going to notice about this guide is that I don’t talk like a video game manual. I’m going to talk like the average Wargamer talks. I’m going to use the slang that the average Wargamer uses. This doesn’t help if you don’t know what I mean. So know these terms. You may recognise these terms from other video games. If so, good for you.

Common Wargamer Slang & Vocabulary
Becoming a Wargamer means talking like a Wargamer. If you don’t understand what the hell Wargamers are talking about, you’re never going to become one.

APM
Actions Per Minute. People bragging about having a high APM in Wargame are idiots. This is not that kind of game.

Best Germany/Worst Germany
Slang terms for East and West Germany, respectively.

Burrito
Nickname of the TOS-1 Buratino flame rocket launcher.

Card
Decks are built from these, they are a single slot item in a deck. Unit availability often expressed in deck-building as “units per card.”

Cheese
Refers to tactics that are generally not considered “legitimate” gameplay, and rely on “gamey” concepts rather than “real” gameplay to win. Related to, but not the same as, spam. For example, spamming cheap helicopters such as Dornier 205s with the knowledge that the average opposite player won’t have bought enough air defenses for such an unconventional tactic could be regarded as cheese. There is a very blurry line between unconventional strategies and cheese. Just because something is not conventional does not make it cheese. A general rule of thumb is that if the tactic would be ridiculously easy to beat if the enemy were expecting it, and works only because it’s not an expected mode of gameplay, it is cheese.

Cost-Effectiveness / Cost-Efficiency
Refers to the number of points a unit kills over the number of points a unit costs. If a 5-point unit can kill 50 points of enemy units on average, it is significantly more cost effective than a 120-point tank that kills 100 points of enemy units on average.

Deck
The arrangement of forces you bring to a match. You choose a deck before a match starts. The twelve pre-made “battlegroups” are example decks, but you’ll generally be using decks you custom-built.

Dying Like A ♥♥♥♥♥
Refers to an expensive, high-end unit getting killed by a cheap, low-cost counter, typically without having accomplished anything useful (see: Feeding).

Eugene
Collective fan nickname for Eugen Studios

Feeding
Feeding is something all noobs do. It’s when you make useless, wasteful, or counter-productive moves that end up just giving the enemy lots of points. Since most game modes rely on accumulating points for victory, this ends up helping the enemy and causes your teammates to hate you.

Micromanagement / Micro
Refers to focusing on individual units’ positioning, movements, or combat. Knowing when to micromanage and when not to micromanage is vital.

MPH
Miles Per Hour. Since all measurements in this game are in metric, anyone (see: Americans) who refers to a unit’s speed in miles per hour is actually meaning kilometers per hour.

NSWP / PACT Minors
Non-Soviet Warsaw Pact (nation). Refers collectively to Czechoslovakia, Poland, and East Germany.

OP
Overpowered. A unit, nation, technique, or deck that is too cost-effective or too powerful relative to its counters. 90% of the time, anyone whining about something being OP is usually just upset because they don’t know how to counter it.

Pub / Pubbie / Randoms
“Public” players, i.e. people you do not know who join a game. Collectively derided as being generally low-quality as a whole, though obviously individual pubs vary in skill level.

Push / Pushing
Attacking a specific part of the map, or attempting to move enemy lines back.

Ragequit
Refers to the depressingly common instance where a player quits a match because they’re upset something didn’t go their way. Never do this. In most modes of Wargame, it’s perfectly possible to lose the majority of the map but win the match regardless - and even then, it’s also very fun to play as a defensive, even when you lose.

Snipe / Sniping
Refers to using a single accurate targeted strike, usually by artillery or an aircraft, to eliminate a specific enemy unit. Typically done on high-value or important targets like CVs, SAMs, and artillery units.

Spam
Refers to using large numbers of a single unit type. Despite what some people claim, this is a legitimate playstyle and can be done “correctly,” however, it is actually harder to pull off than “conventional” gameplay. Not the same as cheese, but cheese frequently relies on this.

Stab
Stabilizer. Refers to a system that some tanks have that allow the gun to be fired accurately while moving.

Tactics vs. Strategies
Tactics are things individual units do, like “flank that enemy tank” or “hide in that forest.” Strategies are plans to achieve the goal of the match (the strategic objective) like “earn 4000 points as a team” or “kill all enemy CVs.” Operations are between the two, being things like “use an armored blitz to secure sector Alpha in order to move on sector Delta.”
More Vocabulary
Military Terminology & In-Game Terms
Because this game uses real-world units and techniques, many of the game’s aspects are discussed using real-world terms and acronyms.

Air Lane
The lanes in which airplanes spawn from.

AAA
Anti-Aircraft Artillery. Pronounced “triple-A.” Refers to non-missile-based anti-aircraft units. See SPAAG.

APC
Armored Personnel Carrier. A troop transport with light armor that is generally lightly armed and armored.

Arty
Artillery. Often used as a verb (i.e. artying).

ATGM
Anti-Tank Guided Missile. This is to distinguish it from (unguided) LAWs/RPGs, MANPADS and SAMs. These are guided missiles used to engage armor, generally at long range.

Beam Rider
Beam Riders are missiles that target enemy radar units. They’re called such because they “ride” the radar beam back to their target. These are used for SEAD purposes. It is important to know that they do not work on IR systems, only Radar systems.

CAP / Combat Air Patrol
Refers to using fighters or interceptors defensively, keeping one patrolling the air to intercept enemy aircraft quickly. Not to be confused with shorthand for “capture.”

CAS
Close Air Support. Refers to using attacker aircraft to counter enemy attacks in a close tactical situation.

Command Points
These are points used to “buy” new units from your deck. They accumulate over time based on how many command zones your team control in the game. Accumulation of command points is also the key to victory in the Economy game mode. Not to be confused with score points.

Command Vehicle / CV
Refers to a specific type of unit in the game. These are highly fragile and precious units that must be well-cared for and protected.

Flank / Flanking
Flanks are the sides of a military line. Flanking refers to moving along the side of an enemy unit or defensive line rather than attacking them head-on.

FOB
Forward Operating Base, the only building you can build in Wargame.

IADS
Integrated Air Defense Systems. Refers to using multiple different types of air defense units to create a formidable zone defense against aircraft.

IFV
Infantry Fighting Vehicle. Troop transports and lighter fighting vehicles that are heavier armed than APCs, generally with ATGMs and autocannons.

IR / Infrared
IR refers to weapons systems (guided missiles generally) that are guided by infrared energy (heat-seeking) as opposed to Radar. This is relevant in the game because IR missiles cannot be targeted by SEAD.

LAW / RPG
Refers collectively to short-range anti-tank rockets used by non-ATGM infantry. While they are used as a generic term, they also refer to specific weapon systems (the Soviet RPG series, and the American M72 LAW

MANPADS
Man-Portable Air Defense System. Refers to infantry-borne anti-air guided missiles, like the Stinger or Igla.

MLRS / Rocket Battery
Multiple Launch Rocket System. Refers both to the specific American unit called the MLRS, and as a general term for rocket artillery units.

NATO
North Atlantic Treaty Organization. One of the two factions in Wargame.

PACT
Warsaw Pact. One of the two factions in Wargame.

SACLOS and MCLOS
Semi-Automatic Command Line-Of Sight and Manual Command Line-Of-Sight. Types of missile guidance systems.

SAM
Surface to Air Missile. Refers to any surface-launched guided anti-aircraft missile, however, it is often used in-game to refer to non-MANPADS missiles in particular.

SAM Bubble
Refers to the half-sphere above the surface where a SAM can hit a target with a missile. Also used generically to refer to one side’s entire IADS zone; an aircraft flying behind enemy lines is said to be within their SAM bubble.

Score Points
These are awarded for killing enemy units. When you kill an enemy unit, you are awarded its cost in command points as a score. So if you kill a 90-point M1 Abrams tank, you receive 90 score points. Accumulation of score points is the primary means of winning in the Destruction mode.

SEAD
Suppression of Enemy Air Defenses. Pronounced “seed.” In real life it refers to the general practice of targeting air-defense units in preparation for effortless airstrikes. In game it is often used to refer specifically to SEAD aircraft (aircraft that fire anti-radar missiles).

SPAAG
Self-Propelled Anti-Air Gun. Refers to mobile anti-air gun systems, such as the Pact Shilka or the NATO PIVADS or Gepard.

Spawn / Spawn Zone
Spawn refers both to the act of bringing new units into the battlefield, and the zones in which these units can arrive.

Special Forces / Special Ops
Refers to a type of high-end infantry unit that generally specializes in unconventional tactics like raids and behind-enemy-lines operations.

Unit Group
Looks something like this:

This refers to a grouping of one to four units. You can only group identical units.
Factions: NATO
So, now that we’re here, let’s discuss the factions and nations of Wargame: AirLand Battle. There are twelve countries in two factions. These factions are not identical. The nations within are not interchangeable. And yes, some nations are outright better than other nations - this is because this is simply a historical fact. If someone whines that America has units that Polish decks have no good counter for, that’s because Poland was objectively militarily weaker than the United States. Deal with it.


As seen here, not every faction has an equal number of units either. Generally speaking, the Soviets on the PACT side and the USA on the NATO side are the easiest nationalities to get into for new players, since they have the largest selection and variety of units.

NATO


The first faction is NATO. NATO stands for the North Atlantic Treaty Organization. In the real world, NATO was an alliance founded in 1949 by the Western powers to form a united front against Soviet aggression. In-game, they are the blue team. Some players also refer to them as the “allies” because they’re idiots. Others call them the Western powers. NATO is host to eight countries: The USA, France, Britain, West Germany, Canada, Sweden, Norway, and Denmark.

As a rule of thumb, NATO forces generally have weaker tanks, better infantry, better air forces, and most importantly, much higher unit diversity. These are not universal hard-and-fast rules, but they are general rules of thumb that you can keep in mind. Really, only the US, France, Britain, and maybe West Germany and Sweden are viable as national decks - the rest (the “NATO minors”) are best used in multi-nation decks where you can take their most worthwhile units while not inheriting their shortcomings.


The first nation in the NATO faction is the United States of America. They are by far the largest faction in NATO and usually the one new players rush to first, especially if they are Americans. This is not necessarily a bad thing; they are also the easiest NATO nation to play.

They have the widest variety of units in NATO and so generally can fill any given role with a strictly national deck. They have the best-quality Air Force in NATO and are generally spoilt for choice when it comes to choosing aircraft. More on that later. However, they do not have the best armor in NATO, as many of their main-line options remain heavily overpriced. Their infantry as a whole is generally unexceptional, although American decks have decent options for transports.

Additionally, it’s a priority that you know most American equipment offhand, for two reasons - the first is that most NATO players play America, and the second is that many NATO forces use American equipment as well.


The next nation in NATO is France. French units are generally light, hard-hitting, and fast, but with poor armor. This is due to a not-widely-known historical fact that French armor developed after the Second World War was actually developed out of stale baguettes, and was thus generally inferior in the face of modern HEAT and kinetic penetrator tank shells.

Their specialties generally lie in light, fast units that punch above their weight and are generally cost-effective. They are best used in very mobile strategies and for ambushes. However, they are very poor in static slugging matches and in static defenses. Most of their tanks lack stabilizers (more on that later), making them also poor at fighting retreats.


The next nation is Great Britain, aka the United Kingdom.The UK has excellent armored vehicles with heavy frontal armor, but they are rather slow. Because Eugene is French, the British forces will always be slightly inferior to the French forces. Also, all British tanks have facilities for heating tea using the heat from their engines. True fact.

This makes them the tactical opposite of France - they are best in stand-up fights where their frontal armor can absorb blows, but are difficult to keep up with a highly mobile front. Their infantry are nearly the opposite - many come in highly mobile light armored transports.


After that comes West Germany. West German forces are a funny mix of older American equipment and newer, high-tech German equipment. Oh, by the way, this game has two German factions, and if you confuse the two of them, you’re an idiot.

They combine high tech, high-strength vehicles with heavily-armed infantry, but are generally lacking in some other areas. They have a low variety of units, an unexceptional air force, and generally you’ll have to pay a fair bit of money to see the best units West Germany has to offer.


The next NATO nation is Sweden. Despite their lack of unit variety, Swedes are actually surprisingly viable, with under-appreciated tanks and surprisingly quick and strong infantry. Swedish infantry will absolutely fight to the death, because death is preferable to living in Sweden.

Sweden has decent infantry and recon, very good tanks, but are hampered by an unexceptional air force and a lack of ground-based anti-air defenses.


The next NATO nation is Canada. If you want to play Canada, you’re wrong.Seriously, you’re just wrong. Nobody wants to play Canada. They’re too polite to be good at the cold war. Play with Americans or something instead.

But if you do insist on playing Canada, they do have some decent units. They have decent infantry with good transport options, a decent air force, but lack good AA options and generally have inferior tanks.


The next NATO nation is Norway. They have formidable infantry and a modernized air force. Since this is written by an American, I really don’t know enough about Norway to make a joke about them, so just...try them out or something.

They have a modern air force that will not steer you wrong. Unfortunately, they lack decent armor options, so you’ll have to rely on their very good infantry.


The last NATO nation is Denmark. Denmark’s forces are by and large light and fast, and they have very cost-effective infantry.

Danish forces are not the easiest to play for a new player. They also lack in effective heavy armor. However, they provide a good number of supporting units that can fill out mixed NATO decks, and should not be overlooked.
Factions: PACT


The other faction is the Warsaw Pact, referred to generally as “PACT”. The Warsaw Treaty Organization of Friendship, Cooperation, and Mutual Assistance was a mutual defense treaty organization formed in 1955 as a reaction to NATO’s formation and power in Europe. In-game, they are the red team. Some players refer to them as the “bad guys” because they’re idiots. Others call them the Eastern powers. Pact is home to four factions: The Soviet Union, Czechoslovakia, Poland, and East Germany.

In general, Pact forces have heavier armor, cheaper air forces, excellent gunship helicopters, and specialize more in lower-tech solutions. Importantly, they have much lower unit diversity. This is a historical reality - the majority of Pact forces were armed with Soviet equipment, so their forces are highly similar. The Soviet Union dominates the Pact forces, and Czechoslovakia, East Germany, and Poland are collectively referred to as “Pact Minors” or “NSWP” (Non-Soviet Warsaw Pact) countries.


The first nation in the Pact faction is the Soviet Union, aka the USSR (Union of Soviet Socialist Republics). They are by far the largest faction in the Warsaw Pact and the largest faction in the game, and usually the one new players rush to first. This is not necessarily a bad thing; they are also the easiest Pact nation to play.

They have the widest variety of units in Pact and so generally can fill any given role with a strictly national deck. They have the best Air Force in Pact and are generally spoilt for choice when it comes to choosing aircraft. They also have the best armored forces in the Warsaw Pact, and generally have some of the best heavy armor in the game. They have unexceptional line infantry, but decent specialized infantry forces and a good variety of transports.

Additionally, it’s a priority that you know most Soviet equipment offhand, for two reasons - the first is that most Pact players play the Soviets, and the second is that every other Pact faction heavily relies on Soviet equipment as well.


East Germany is the first Pact minor. They heavily rely on relatively outdated Soviet equipment, but they have decent recon capabilities and more than a good variety of decent infantry in fast transports. They are one of two German factions in the game, and if you confuse them, you probably got deja vu when you read this sentence.

Like Poland, they are generally best at using large numbers of lower-tech units than the USSR. They do have a decent lower-cost air force, good infantry, and it’s generally capable of fielding a large number of cheap MiGs.


Poland is the next Pact minor. Like Germany, they rely heavily on outdated Soviet equipment. However, they have strong infantry transports and sport very useful specialist infantry in good transports.

They have a low-cost air force that is mostly useful for spamming planes, but they have affordable helicopter support, good infantry, great artillery, and decent armor. Like East Germany, they are generally best at using large numbers of lower-tech units than the USSR.


Czechoslovakia is the last Pact nation, and generally the most unique NSWP nation. They are particularly notable for their powerful artillery, then their number of national variants of Soviet equipment. They have plenty of relatively unique vehicles and decent infantry.

Czechoslovakia is best as a Soviet national alternative, and have a decent air force, great artillery, good infantry transports, and decent armor. Oh, and prepare for lots of puns on the word “Czech”.
How to play Wargame: AirLand Battle
Okay, so now you know what the factions are, you’ve familiarized yourself with the menu, you might have even played the tutorial! So, you know how to play, right? I mean, you call in units, you select them, tell them to kill the other guy’s stuff, so on and so forth. Let’s go kick some ass, right?

Then you go and rush into your first multiplayer match, and you get your ass handed to you. “This game sucks!” you complain. “It’s so unrealistic! I sent in like twenty Abrams tanks and they got slaughtered by some stupid Soviet unit when everyone knows American armor would kick their asses!”

No, my made-up friend used for a rhetorical device, it is not Wargame that sucks, it is you that sucks. Yes, you. You suck.

But that’s quite alright, because I’m going to teach you to not suck. Not sucking at Wargame requires one thing, and that thing is some common ♥♥♥♥♥♥♥ sense. Unfortunately, I don’t know how to write a guide on the Internet to teach common sense, so instead, I’m going to teach you all the general knowledge, basic usage conditions, and advanced techniques you need to recognise, appreciate, utilize, and counter every unit in the game. Yes, all ~850 of them. I’ll also teach you all the basic mechanics and some of the crucial advanced techniques you’ll need to master.


Basics

First, though, let’s start with the general basics of how to play Wargame right. This will require a little knowledge and education, and if necessary, the un-learning of bad habits learned from more popular RTSes.

First off, this will require the teaching of some basic concepts. These are listed in no particular order. These concepts are not strategies you can choose to employ sometimes. They must be habits. They must be things you must do all the time. When you fail to employ these concepts, you will lose every time against an even remotely competent player.

“The general that hearkens to my counsel and acts upon it, will conquer: let such a one be retained in command! The general that hearkens not to my counsel nor acts upon it, will suffer defeat:--let such a one be dismissed!“ - Sun Tzu, The Art of War
Basics: Combined Arms
Combined Arms

First off, it is important to learn that Wargame is not about spamming two or three units in combination. Wargame does not have ~850 units so that you can use three of them. If you spam only a couple types of units, your opponent is going to bring in their counters, and your units are going to die like a ♥♥♥♥♥. Wargame absolutely requires the effective use of combined arms. I cannot stress enough that combined arms operations are not optional.

So, let’s consider this as an attacking force:


Looks good, right? That’s, like, almost 40 Abrams tanks! There’s no way we could possibly lose!

Ahahahaha. No. Do you know what I think when I see something like that coming at me? I think, “♥♥♥♥♥♥♥♥♥, how did you afford that many units, that must cost like 3,925 points!” I then think, “Oh, good, this will be easy.”

You know what happens after I see something like that? This!


See how it says “Stunned!” over all of those Abrams tanks? That’s actually a translation error Eugene hasn’t fixed yet. What it really should say is “Kill me now! I’m helpless!” You know what’s going to happen after that?


That.

Okay, you ask, but how does combined arms fit into this? Simple. Wargame is fundamentally a game of counters. There is not a single unit in the game that does not have another type of unit dedicated to killing it. This means that if you spam one type of unit, your opponent will simply spam its counter. If you spam two types of units, they will spam two types of counter (or better still, one unit that counters both). Any halfway competent player should know the units of the game by heart, and intuitively know what units in their deck will counter them. Thus, you have to build balanced forces that can flexibly adapt to a wide array of potential tactical scenarios. Don’t buy a ton of heavy tanks and only a token few escorts. It should be the other way around - a few heavy tanks should be well-escorted by support vehicles. Your basic general-purpose forces should look something more like this:


Notice how there’s really only a handful tanks? You can have more than that depending on what the force is actually going to be needed for, but the point is, the majority of these forces are supporting the heavy armor, not the other way around.

“But, player’s guide,” you protest, “I’m not stupid! Even Starcraft has units that counter other units!” I don’t think you quite understand. Okay, so you know not to spam a single type of unit. But Wargame is different. Wargame has a huge variety of units, all of which must be accounted for and prepared against. The force pictured above has heavy armor, medium armor, support guns, AAA, IR SAMs, ATGMs, infantry, recon, logistics, and a command element. It is capable of answering most types of enemy attacks that can be thrown at it.

Wargame is deeper than the tactical rock-paper-scissors approach of “heli beats armor beats infantry beats heli” that many other “strategic” games employ. And if this sounds overwhelming, trust me - it will become second-nature after a little experience. It honestly is not that hard. With a little knowledge of real-world weapon systems, you will find it very intuitive. The hard part for most new Wargame players is not learning Wargame’s units and how they interact, but “un-learning” other games’ habits. Use real-world logic, not video game logic.
Basics: Recon
Recon is another one of those things that is not optional. You must have sufficient reconnaissance to spot enemy forces. The vast majority of units do not provide their own vision to an appreciable degree. Wargame does not have a convenient “fog of war” that shows you where enemies might be. You can see the whole map at all times. There could be an enemy infantry squad right there, in your spawn zone, spotting all your precious high-value targets for artillery strikes and exposing every surprise you ever attempt, and you could go the whole freaking match without knowing it. Don’t believe me? I do this against other players all the time, so I certainly know the value of this fact.

Observe the importance of recon. Here is the command sector Golf:


Peaceful, right? So let’s capture it with a command vehicle, right? Here is the exact same scene, after moving a recon unit in:


♥♥♥♥♥♥♥♥♥! Aren’t you sorry you went waltzing your command vehicle into that peaceful little spawn zone like an idiot? Remember, recon is the difference between victory and defeat. You cannot possibly know what the enemy is doing or how to counter what the enemy is doing if you can’t see what they’re doing.

Next time you’re in a match, look at an empty forest or building in your spawn zone. Just look at it. See the empty forest? There’s an enemy recon infantry squad in there. Yes, in that empty zone you’re staring straight at. Right there. Don’t believe me? Send a cheap infantry squad over there. Every deck should have some cheap infantry. It costs you next to nothing to be a little cautious, but it can save you the game.

Consider an American military aphorism: “If you can see it, you can hit it. And if you can hit it, you can kill it.” Spotting a target is always going to be the first step in engaging it, so why would you ever skimp out on being able to spot your targets? Set up a few recon squads of your own on your flanks, and on the sides of the map, and on the tops of steep hills, where they can keep an eye on things. Without recon, you won’t know what the enemy has, where they’re oriented, and how to counter them until they’re right on top of you. Ever fought an opponent who just seemed to beat you at every possible turn? Like he just magically had on hand the worst possible units you could’ve run into? Guess what - he had hidden recon units scouting out your forces, and you failed to respond in kind and failed to hunt and kill their own recon.

Specific advice on the use of individual types of recon units will be in a later section. As a general rule, though, you must always have recon to be effective. Any experienced Wargamer will tell you without fail, “You cannot have too much recon.”
Basics: Concealment and Stealth
You’ve learned about the importance of recon - concealment is the other side of the coin. It is generally advisable to assume that any unit out in the open is seen by the enemy. If you want to achieve tactical surprise, you must learn to use cover and concealment. Cover is a factor of terrain and concealment. Any unit can hide in forests or swamps or in hedgerows. You can tell where terrain is considered concealment because the cursor turns light blue when you mouse over it.


Additionally, infantry and only infantry can hide on hills and mountainsides, and in buildings. Infantry and buildings will be covered in another section.

Forests are the thickest cover. Inside a forest, even recon units will not see other units until they are practically within knife-fighting range. This can be an asset or a liability. If your tanks get cornered in short range by concealed units, they are going to die like a ♥♥♥♥♥. Even against other tanks - more on how distance affects armored warfare later. Also note that vehicles are going to move through forests very slowly. Oh, and infantry in forests are really hard to spot.

Swamps will also hide your units, but not nearly as effectively as forests. Swamps are also rough terrain that will slow down your tanks. More on the effects of terrain later.

Hedgerows are the third major type of terrain cover. Unlike forests and swamps, hedgerows are not easy to see if you zoom out - but zoom in closer to the ground and you will be able to differentiate them. Hedgerows will conceal your units, but not as effectively as forests. Generally speaking, hedgerows provide concealment when other places of concealment are unavailable or too obvious.

This is an important point of note - it doesn’t matter that your units are concealed if it’s particularly obvious where units would be concealed. If there is one single small patch of forest in your command sector, don’t freaking put your CV there. That’s exactly where any Wargamer would expect it to be and that forest is going to get napalmed the second they decide it’s safe to attack. It is a common-enough technique to send bombers or artillery to blind-attack limited cover points hoping to get a lucky blind CV kill. Hedgerows are very good for this. In sectors with hedgerows but limited forest land, it’s generally a better idea to hide your CV and anti-aircraft pieces and whatnot out in the hedgerows where their location is less guessable. Hiding your CV in a dense forest is preferable, but only if you can secure the forest (it doesn’t have a wide open border that enemy forces can sneak through) and it’s too large to reasonably expect a blind barrage or airstrike to get lucky.

Finally, hills and mountainsides are accessible only to infantry, but should not be overlooked. The height advantage of hills gives recon infantry great lines of sight. MANPADS are always a good choice for hilltops as well, and ATGMs are situated above the forests surrounding hills and thus have clear lines of sight where they can launch at passing vehicles. Additionally, most players seem to mentally see these areas as physical barriers (because vehicles can’t go through them) and so dismiss the possibility of enemy attacks from that direction.

So, you know where to conceal units, but why? The first reason is generally obvious - units that are concealed are less likely to be seen by the enemy. However, even when your forces reveal themselves by firing or being spotted by enemy recon, the enemy still won’t know the extent of your forces. This will force them to be cautious or to take risks, which is good for you. Never give the enemy information you don’t have to give them. Why volunteer the information on your disposition of forces when you can at least make them work for it?

There are certain units you should always endeavor to keep concealed. Command vehicles out in the open can be spotted by any passing recon helicopter or even just passing jets. This means they’re going to be targeted and killed quickly. Ambushes on enemy movements should also be kept hidden - this allows them to get the first shot off when they engage, which is often decisive. You should keep the recon units that are not moving with your front concealed, as well, that way they are not interfered with at crucial times.

The second advantage to concealment is that they not only hide what units you have and where they are, but when and where they move as well. If there is a large forest near an enemy-held sector, and they are not fortifying that forests themselves, it’s like leaving an open door for you to waltz on in and take the sector from them. Forests are a great place to move recon units around and keep an eye on enemy positions. This is also highly important for lightly-armored ATGM carriers, such as TOW jeeps, which are best used in a shoot-and-scoot manner where they fire missiles, then retreat out of sight before the enemy can get close enough to engage.

The third advantage of concealment is you can tell when concealed units have been spotted. Don’t underestimate this crucial advantage - it’s often your first and only warning that enemy recon units are about before the pinpoint-accurate artillery fire starts falling. How do you know when a concealed unit has been spotted? Hidden units will pulse between transparent and opaque, while spotted units will be opaque. Observe:


See the difference? Always keep an eye out for when units that should be hidden suddenly aren’t. It’s very easy to spot, just look for the opaque bright dot in the midst of the terrain and the non-pulsing unit marker. That almost certainly means there’s enemy recon about. Bear in mind that this applies to your enemy, too. If you have recon sneaking about and spot a hidden unit, consider killing it quickly to avoid revealing your recon’s presence.
Basics: Static Defensive Positioning and Cover
Okay, so you’ve got some decently mixed forces, and you’ve got some recon scattered around the map and heading in front of your forces. You’re good to go, right? Now you can get to killing some bad guys?

So you run right into their defensive line, and get promptly slaughtered. What gives? You brought counters for things! You scouted them out! And then when you attacked, they destroyed you! This game is clearly broken and the other guy’s units are OP and need to be nerfed!

No, you’ve just discovered the power of appropriate positioning of your forces. Consider this defensive line:


This is a fair example of combined arms - you’ve got your recon units, heavy armor up front, infantry, AA guns, a SAM launcher, and support vehicles. But they’re all clustered together and given no positioning whatsoever! A single artillery strike is going to render that entire defensive line useless, which is going to promptly follow with them getting steamrolled.

Consider this basic defensive line, instead.


These are similar forces - they’ve got combined arms, SAMs, AA guns, with heavy armor up front, recon spread out, AA guns, and support. So what’s the big difference? The difference is that these units are spread out over a wide area and positioned in cover. There is a wide open field in front of them that will turn into a killing zone. Units in cover cannot be seen from as far away as units out in the open, and they take less damage from enemy attacks. Being spread out over a front makes it significantly harder for enemies to target them all at once, while making it easier for my units to engage enemies from multiple directions. Additionally, being spread out allows flanking recon troops to see around smoke, which allows your vehicles to fire through it.

Spread units are much more difficult to target with artillery, mortars, or airstrikes than concentrated targets are. Consider these four PIVADS air-defense vehicles (for the purposes of this example, we’re ignoring whether or not it’s wise to have four PIVADS in one grouping).


See that circle around them? That’s an artillery unit’s fire radius. Now, with these exact same PIVADS and the exact same artillery unit, let’s see how well this works with literally just one button press. The “Spread” command is extremely useful and underappreciated. The default keybinding is “X”. Just select a stationary unit and press “X”. That’s it! That’s all you have to do! Now, let’s see what happens when we issue the PIVADS a Spread command:


The exact same artillery unit went from being able to target all four of them to being able to target only one of them. When I see expensive, useful, or fragile units bunched up like that, I immediately reach for my artillery’s hotkeys and get ready to fire. Don’t let that happen to you because you were too lazy to press a single key.
Basics: Offensive Maneuvers and Flanking
Okay, you know the basics of creating a defensive line, but how does that help you when you’re attacking an enemy’s defensive line?

It doesn’t. Attacking the enemy’s defensive line head-on with zero preparation is stupid and suicidal unless you have an overwhelmingly superior force. Consider this: “Water shapes its course according to the nature of the ground over which it flows; the soldier works out his victory in relation to the foe whom he is facing. Therefore, just as water retains no constant shape, so in warfare there are no constant conditions.“ Do you know who said that? Sun Tzu! The guy who literally wrote the book on warfare. If you don’t listen to me, listen to him. Let your forces flow around obstacles like water, not barge through them while incurring heavy losses. Even if you win the battle you can lose the war by doing this. Don’t let your proud army’s advance turn into a Pyrrhic victory.

So, how does one accomplish this? Well, real-world commanders understood just as well as Wargamers the difficulties of assaulting a fortified position. And so, there are many types of units and weapon systems designed specifically for circumventing the defender’s advantage.

The first and most obvious technique is to avoid the defensive line altogether. Understand that assaulting a static defense is always going to give the defender the advantage, even if you can negate that advantage somewhat. I know this is not always possible. Sometimes, the enemy is just plain between you and where you need to be. But before you ever attack a fortified, prepared enemy, first ask yourself if you can simply go past them instead. Encircling enemies is vastly superior to allowing them to make a fighting retreat, incur friendly losses, and retreat to regroup and resupply.

Second, know that the Smoke Position command is the most underappreciated asset you have. What is Smoke Position, you ask? Artillery and mortar units have an oft-unnoticed feature that allows them to shoot smoke rounds instead of explosive ones. Let’s see what smoke looks like when it divides a town in half:


If the northern end of this town were occupied, they would be helpless to stop me from occupying the southern half of the town now. “But why use harmless smoke rounds when I could be hitting the enemy with HE shells instead?” you ask, noobishly, as you ignore one of the best features in the game. It’s simple. Smoke break lines of sight. All those prepared ATGM positions just waiting to turn your shiny Abrams tanks into scrap metal are going to fail to fire if they can’t see those shiny Abrams tanks.

The defense’s recon can’t see through smoke, either, so they won’t know what forces you’re sending until they’re already breaking through the lines. You should never, ever attack a static defense without using smoke to blind them first. Drop it right in front of them, practically on top of them even, then rush your advance forward and engage them when you’re right on top of them. This turns their strengths into weaknesses and gives you the advantage. Oh, and remember that smoke works both ways, your units are not magically able to see through it, either.

Third, know that infantry in buildings are nigh-invincible. If you attack infantry in buildings with your precious armored forces in close quarters, they are going to get ♥♥♥♥♥♥♥ destroyed within seconds. You must take measures to remove enemy infantry from the premises before rolling your vehicles through a town. More on urban warfare and the amazing capabilities of infantry in buildings later.

Fourth, understand and take advantage of morale and its effect on accuracy. Okay, so you’ve covered your advance with smoke, so the enemy can’t see you. Now you rush in and sweep them out, right? Well, not yet. First, you have to panic and stun the defenders, if you want the ability to actually get in the first shots when your forces arrive. Use heavy artillery bombardment and air power to suppress and shock defending forces before you assault them. This sets their morale state to panic (more on that later) and ruins their ability to fight effectively. This is also one of the few legitimate uses of rocket artillery (again, more on that later).

Finally, napalm never goes out of style. Even The Art of War has a whole chapter dedicated to the attack by fire. Napalm and incendiary weapons are great at forcing defenders to move out of their carefully-prepared positions and into the open where your units can cut them down. More on the use of fire later.

Attacking the enemy’s prepared defenses is never ideal, but it is frequently necessary. But these tactics are not freaking optional. These tactics are the difference between smashing your army and smashing theirs.
Basics: Economy of Force
“Okay,” you complain, noobishly, “fine, I’ll use recon and put my units in cover and mix them up and stuff. Now can I get to the explosions and stuff?”

Nope! There is another key difference that you must adjust to. In Wargame, your units are not generally disposable. Consider these numbers, from my personal Soviet armored deck.


So what does that mean? That means my deck, which specializes in armor, only has 52 tanks. And eight helicopters. And five whole airplanes. When you lose a unit in Wargame, that unit is gone for the rest of the match. You can not buy more of them. Dead men do not get do-overs. I already explained that using the right units for the right roles is vital, but this is why. If I recklessly get even just ten tanks killed, I have lost 20% of my armored forces with no means of recovering them, which puts me at a huge disadvantage. Remember, even if you have to occasionally retreat, it is generally better if your units live to fight another day than die stubbornly. Yes, sometimes you have to make a tactical sacrifice, but for the majority of purposes, your units’ lives are too important to waste.

Economy of force is also important. You’re generally not going to start a match being able to afford units for every contingency and do all the things you want to do. Of course, you have to bring in more units as the situation calls for it and as you get more income. This means that sometimes, less is more. Nobody ever measured a general’s worth by their army’s technological superiority. Yes, there is a time and a place for having superior units, but consider these two selections of American armor:


Both have 64 tanks total. But ♥♥♥♥♥♥♥♥♥! One is nothing but Abrams tanks! So having more of better units is better, right?

Nope! I would take the latter deck over the former every time. Your deck must include lower-cost workhorses. High-end high-tech high-price heavy armor is not this workhorse. They are the tip of your spear - your force must be filled out with cheaper, more practical solutions. So while M60A1 RISE Pattons are not particularly good tanks, they are half the price of an M1 Abrams. Many a noob rushes headfirst into a game, deck full of Abrams tanks, and then finds that they can’t afford a serious force because they lack cheap alternatives to their best units. Don’t be that guy. Be the guy who always has some affordable, practical units he can start out with and rely on. Your decks should always cover a range of expected uses.

This is also important for another reason. If you take a bunch of expensive units and they get killed, you just helped the enemy get closer to victory. All your expensive units did was feed them points. Every single Abrams you buy has to kill 90 to 135 points worth of stuff to have been cost-effective. A RISE Patton has to kill only 45 points worth of stuff to have been cost effective. Of course, this doesn’t mean that you should just bring large numbers of cheap, ♥♥♥♥♥♥ units either. Large numbers of cheap units just means it’ll take slightly more ammo for your enemy to win. You must find a balance between low-cost workhorses and high-cost powerhouses. Everyone’s ideal balance is a little different, and it depends on the units you have available, the enemy forces present, your tactical objectives, and the player’s personal style.

Knowing when to conserve and when to break out the big guns is a large part of mastering Wargame. While everyone’s strategy varies, a good rule of thumb to start out with is that you should comprise your general forces of medium-cost medium-strength workhorses, and break out the big guns when you need them to fill their primary role - so, don’t break out the heavy armor until you actually need an armored spearhead, don’t break out the expensive gunships until there’s an armored column to destroy, and so on and so forth.
Basics: Unit Organization and Grouping
As we already know, units come in groups of one to four. (Helicopters only come in groups of two. They otherwise work the same.) When ordering new units, you can order four at a time in one group by control + clicking them instead of just left-clicking them. However, it is not always better to have units in groups of four. Knowing what numbers to group your units in is the difference between your units being effective and dying like a ♥♥♥♥♥.

Groups of units move together and are ordered together as if they were one unit. This can make units easier to manage, but it also limits tactical flexibility. You can’t order one group to attack two different targets the same way you can order two groups. Groups of four also tend to bunch up together on their own, making it easier to hit all of them at once with artillery, rockets, or airstrikes. You can organize your units’ grouping with this panel:


And you can hide this panel with the Show/Hide Formations button. Split splits the grouping into individual units, while selecting multiple like units and clicking Regroup forms them into one grouping. Spread forces them to move away from each other as demonstrated earlier.

In general, your heavy armor should not usually be in groups of four. While armor is certainly effective in numbers, they draw fire way too quickly for that. I prefer to keep my tanks in groups of two for most purposes. It’s better if you have two groups of two instead of one group of four, because it allows you to order maneuvers, targets, and movements while still being relatively manageable. Artillery should also never be in groups of four. This creates redundancy and causes a waste of ammunition. Depending on the type of artillery, they should be used solo or in groups of two. More on the specific use of artillery later.

Units that require a lot of micromanagement, or “glass cannon” units like gunships, should usually be used individually. Anti-aircraft units should also be in groups of two or solo, so that you can spread them out and cover a wider area against a larger number of simultaneous aircraft. This also renders your air defenses less vulnerable to being sniped by artillery. Finally, having recon vehicles in groups is completely idiotic. Recon units are not meant to fight your battles, they’re meant to spot for the units that do. So if you have two or more recon units in one group together all but one of them are literally nothing but redundancy and waste. If you ever have cause to bring recon units in a group of two or more, immediately stop and ask what use they are in a group.

And for the love of all things sacred, never call in your units like this:


This violates so many basics of the game it’s not even funny. First off, it’s spamming a single unit, which always results in the other team just spamming its counter. Second, they’re clustered together, which means it’s going to result in this:


And finally, bunched units in groups of four are a wasteful redundancy. I know I can make it look stupid with a few timely screenshots, but noobs often panic and forget this in the face of a heli rush and call in as many single-unit counters as their deck can give them all at once. This may work against a dumb spammer, but that’s just what a smart spammer wants you to do. A smart spammer with a large heli rush damn well knows you’re going to spam your best anti-helicopter SAMs, and if you deliver them in the tightest grouping possible you’re doing half the work for them. This goes for any counter to any type of rush.

Be sensible. Call them in in pairs and spread them out. That way, they cover a much wider area, and you don’t have single groups flinging four missiles at a time at a single target. Remember that a group will only target one enemy group at a time, which is especially an issue for ATGM and SAM vehicles who generally have very limited ammunition but don’t need many shots to kill a target. If a Chaparral vehicle only has four missiles, but only needs one or two missiles to kill a helicopter on average, then telling four Chaparrals to fire at a single helicopter in unison is just wasting precious and limited ammo. Better if different vehicles engage different targets, especially in the target-rich environment of a rush!

However, line infantry is generally best in larger groups, especially in urban warfare. Grouped infantry can concentrate their fire on enemy infantry or light vehicles, which will quickly stun them and then gun them down. Additionally, one infantry group can fit in an urban sector at a time, regardless of how many squads are in that group, which favors group size rather than number of groups. Infantry in bulk generally has a morale advantage over individual squads, and with the exception of specialist infantry (MANPADS, ATGMs, recon squads etc.) they work best in larger numbers. Urban warfare will be covered in detail in the next section.
Basics: Urban Warfare and Buildings
As I said before, infantry in buildings are ♥♥♥♥♥♥♥ amazing. I have entire decks built around this simple, universal fact. If you take on my 5-point Danish reserves with your 170-point T80Us, I’m going to win every single time. Infantry in buildings are amazingly cost-effective. So, the answer to cheap infantry is better infantry, right? Ahahaha - not even sort of. Observe:


What you’re looking at is some of the cheapest infantry NATO has, costing only five to ten points, destroying entire Pact advances, including plenty of Spetsnaz and Morskaya Pehota infantry that are objectively superior. So what gives? This is nothing less than a demonstration of the sheer power of well-managed infantry in towns.

Generally speaking, infantry are at their best in urban zones. You can of course just bypass small urban zones, but this is a nuisance, crossroads are almost always at towns, and more importantly, this gives the enemy a prepared fighting position where he can place infantry-borne ATGMs and MANPADS to harass your forces and incur losses. Plus, urban zones teeming with infantry make great defensive positions, especially since infantry are incredibly cheap. Finally, infantry in buildings are in cover and stealthed, making it difficult to judge their forces from a distance.

The first rule of urban warfare is you never, ever, ever send your tanks into, through, near, or alongside an unsecure town. They will die like a ♥♥♥♥♥. Almost all non-specialized infantry units carry anti-tank rockets. In close quarters, they will cheerfully use them to waste your tanks. Tanks are at their best covering open territory. They are not instruments of urban warfare. The only possible use tanks have in this type of conflict is being parked outside of towns where they can fire into the side of town, at ranges beyond the reach of RPGs.

So, if not by heavy armor, how do you take a town held by enemy infantry? First off, know that fighting over an occupied town is going to be messy. When done right, much of warfare in Wargame involves your units hard-countering enemy units. The best battles in Wargame are when your forces completely rout the other through superior positioning, training, weapons, and counters, while incurring few losses. This is not the case for close-quarters infantry fighting. Forcing an enemy from a held town will be bloody, difficult, and you will lose infantry of your own. This is one major reason why cheap infantry in numbers are superior to expensive infantry.

There are three different weapon systems that are most effective. The first is 1000kg bombs, as delivered by American Nighthawks and Strike Eagles, the Norwegian F-16, or the Czech Su-22M4. These bombs are powerful enough to kill infantry squads outright while in cover; they also have an immense stun radius. If you can safely deliver them, do so, you will see little clouds of +10 +10 +10 +10 +5 +5 +5 +5 whenever they drop in enemy towns. However, be wary of MANPADS in the town, even if they’re not ideal vs. jets, it’s still embarrassing to lose a 200-point plane to a 15-point Igla squad.

The second is napalm. As previously mentioned, napalm never goes out of style. Napalm will instantly panic and stun troops, then burn them alive. Additionally, napalm is an instant smokescreen - if you burn certain sectors, you can move in right behind it and the enemy will get a nasty surprise once the smoke clears. Flame tanks, as previously mentioned, should not approach towns directly without support, but napalm aircraft or the Soviet TOS-1 “Buratino” napalm launcher are absolutely devastating against dug-in infantry. However, there is a “but” to this, and it requires knowing how urban sectors work. Napalm can be rendered ineffective if a sector is not properly covered.

This brings us to the second rule of urban warfare. The second rule of urban warfare is you do not talk about urb- nah, sorry, that’s just too easy. It’s that you must understand how urban sectors work if you want to succeed.

“What’s a sector?” you ask? This is:


See the little white outline over one part of the town? That’s a sector. Mouse over any town and the sectors will be individually highlighted. So, what’s the big deal about sectors? Sectors dictate what the infantry occupy, not individual buildings. A sector can be a very large building, a street corner, or even a whole block. Only one group of infantry (up to 4 squads) can occupy a sector at a time. If you try to move two groups of infantry into one sector, the second group of infantry will just stand out in the open. Infantry out in the open are vulnerable and can be killed easily.

To occupy a sector, you merely move your infantry into it - they will “snap” into the sector automatically. You can also unload a transport inside of a sector and the infantry will immediately occupy the sector as they unload. Occupied sectors will turn blue or red (depending on if you’re NATO or Pact) to show you that your infantry control that sector.


Infantry in a sector are stealthed, in heavy cover, and freaking difficult to kill through firepower alone. Also understand that infantry squads can move rapidly, as if teleporting, from one side of a sector to another. This means if your napalm weapon only covers half of a sector, the infantry squads will simply move to the other side of the sector. This is the cause of the “napalm doesn’t work on towns!” complaint people so often have. Napalm DOES work perfectly well, but not if you give the infantry a safe place to hide by missing part of a sector.

By the way, while only one group of your infantry can occupy any one sector, infantry from both sides can occupy a sector together, thus making a “contested” zone outlined in purple. Infantry with the [CQC] tag on their machine gun can use it in a “contested” zone against the enemy infantry, which gives them a huge advantage. Also, infantry from neighboring sectors can provide fire support on a contested sector. This means that if you are contesting one sector and the enemy holds all of the surrounding sectors, your infantry are going to be taking fire from every occupied sector there.

The third rule of urban combat is the use of the third effective weapon in urban combat. As many NATO troops will tell you, it always comes down to the infantryman and his rifle. There is no good substitute for having your own troops in the town. When napalm or 1000kg bombs are not enough to clear a town that you have decided you must take, do not make the common mistake of wasting thousands of points trying to clear out a couple hundred points’ worth of infantry. The best way to seize a town in a straight-up infantry battle is the ballsy technique of ramming a wave of infantry straight into them. This is a technique I use to great effect in my mixed-nation NATO infantry deck, but you must use the principles of urban combat and the advice of attacking defensive lines to make it worthwhile.
Basics: Sample Infantry Blitz
Let’s walk through a sample infantry blitz of an occupied town, shall we? For the purposes of clarity and simplicity, we’ll forgo the use of supporting fire from tanks or napalm, but know that these are never a bad idea.


This is our target. We are attacking from the left side of the screen into their front. (I know this violates the rules of flanking and maneuvering, but this is for the purposes of example only. In a real game, I would attempt to sneak in infantry from the right first, in response to this disposition of forces.) Morskaya Pehota are Russian Black Sea Marines, a high-end Soviet infantry unit. We are using Jägers, cheap West German line infantry with powerful MG3 machine guns.


Our first order of business is to smoke them and hit them with artillery or mortar fire (notice the Stunned! tag) at the same time. Using smoke is not optional. You will lose many infantry units if you fail to do this. Why? Because if infantry transports die while still loaded, the infantry within die as well. The more RPG rockets these Marines get off at the approaching transports, the more infantry they’ll be able to kill before the fight even starts. Be sure to definitively cover all the sight lines with smoke, if the smoke lands too far inside the town, they’ll be able to shoot regardless. The smoke comes BETWEEN your forces and theirs.


With the opposing infantry stunned and blinded (see here that the smoke cover did not go far enough to cover the infantry’s line of sight completely; the squad next to the lower group of M113A1Gs was not blinded), it’s time to assault. Issue the Move Fast command (this is among the only times it is acceptable to use Move Fast in a direct attack) and quickly move your transports through the smoke inside the city.


Once your transports are forcing their way into the city, zoom in. Smoke is going to make it impossible to see clearly, so rely on the HUD elements (unit tags, sector border colors, etc) if necessary. Some of your infantry transports will be destroyed, this is expected. This is one area where cheaper infantry shine over heavier infantry, because it’s okay if you lose some cheap infantry. Force the transports to drive right at the enemy-held sectors and then click the Unload command as soon as they arrive. Your infantry will unload, snap to the sector, and thus make the zone “contested”. By the way, if you have mortars, they should be firing as fast as they possibly can.


By the time the smoke clears, it should look something like this. Your infantry has contested or occupied the zones nearest the road, and if you’ve micromanaged well, you should only have some stragglers (odd survivors of transports being destroyed, mostly) not in a sector. This can be hard to micromanage rapidly, don’t fret if you’ve got a spare infantry group not in a sector, just order them to the nearest unoccupied or enemy-occupied sector. The important thing you want to see is this:


See that Rout! tag? Routing forces are totally useless in battle. That means your artillery and rapid infantry blitz have done their job. More on routing and panic later; for now, just know that it is a very good thing when enemy forces rout and a very bad thing when your forces rout. Investing in some veterancy (again, more on that later) is an essential way to make sure this goes in your favor. Oh, there is one more thing you’ll see:


That’s a line of dead transports. Your dead transports. This is perfectly normal. The important thing with your transports is that you unload them on target as fast as possible. I don’t care if the transports die after they’ve transported the infantry. This is why cheap transports are preferable to expensive ones for the purposes of this kind of offensive. If I’m using one-point trucks or even five-point APCs, it doesn’t feed the enemy many points if I lose them. You will lose many of the transports to RPG fire.

While they have other uses that will be discussed later, you do not use expensive IFVs, such as Bradleys, Marders, or BMPs, to assault towns in this manner. They will die just as fast at such close range to enemy rockets, but they’ll feed the enemy a ton of points before they do. Whether you prefer using the one-point unarmored trucks or five-point APCs with a machine gun on top and some bulletproofing is entirely up to your personal preference, as far as I’m concerned.

So, to recap infantry blitzes in urban zones:
  • Use fire and 1000kg bombs.
  • Tanks should only approach if there is no ATGM fire; aircraft should only approach if there is no MANPADS fire. Tanks should never get within 800m or so where they can be hit by RPGs.
  • Smoke Position and use artillery or mortars to stun the defenders.
  • Move Fast along the road into town.
  • Unload your troops right on top of them to contest the zone. Minimize the amount of time infantry spend in transports.
  • Expect losses.

If you must secure a town held by enemy infantry, this is the only reliably effective means of doing so.
Basics: Types of Move Orders
There are four types of move orders in Wargame. You have to know which one to use, when. Many noobs make the common mistake of not appreciating the differences between types of move orders, and this leads to inefficient or outright dangerous moves. The four types of move orders are Basic Move, Move Fast, Reverse Move, and Attack Move.

Basic Move is your basic right click. Select a unit, right click a destination, and the unit moves there as straight as possible. You can also right-click-and-drag to order units to move and form up in a line or snap to cover positions. Use this to set up defensive lines along the edges of cover. You also use Basic Move for general purpose movements where the other three movement types are not necessary or desirable. Note that any unit moving on non-road terrain will automatically use Basic Move unless you tell them otherwise. You should NOT use this as your only form of cross-map movement. Your units will never get anywhere.

Move Fast is the next type of movement. The default keybinding for Move Fast is ;, followed by left-clicking a destination. Move Fast tells units to use roads to get to a destination as fast as they can drive. Most units have a faster road speed than their off-road speed. You need to use Move Fast to get any significant distance quickly. You should use Move Fast to get across the map to your front lines quickly. Additionally, any unit called in will default to using Move Fast to drive to their destination. However, never, ever use Move Fast to press an attack except under very unusual circumstances (like the infantry assault in the previous section, where the units being ordered need to reach their destination rather than engage enemies). Why? Because of this:


Units with a Move Fast order generally travel in tight, easy-to-bomb groups who can be mass-stunned by rocket fire, flame weapons, or other such things. They also travel along predictable paths (roads) and don’t stop to engage targets, making them easy to ambush. Noobs often think that Move Fast is always the best way to move because it’s the fastest, and then send their entire armed forces careening into the enemy defenses at top speed like an idiot. Don’t be that idiot. Use Move Fast to get them close, then spread them out and use Attack Move to actually press the assault. Oh, and helicopters and infantry and aircraft all lack Move Fast for reasons that should be obvious.

The next type of move is called Reverse Move. This tells a unit to move to a destination driving in reverse. Its default keybinding is the G key. While it is slower than Basic Move, this is important because it allows your units to move away from enemy units while keeping their frontal armor pointed towards them. Why is this important? Consider the armor of an M1A1 Abrams tank:


Notice something? The frontal armor is a very good 17, but the rear armor drops down to 5. Rear armor is almost always thinner than frontal armor. Sometimes, you’ll need to move your units away from enemy units, but if you just use a basic move order to pull them back, they will turn and expose their weak rear armor to the enemy. Reverse Move allows them to pull back while keeping their heaviest armor directed at them. Your tanks’ frontal armor should generally always be oriented towards the enemy’s most powerful weapons. Reverse Move is what allows you to do this. Additionally, Reverse Move is absolutely essential to dynamic defense maneuvers (more on that later).

The last type of move order is called Attack Move. Attack Move tells your units to move to the indicated position as with a basic move, but to stop and engage any targets they come across as they move. This is essential for sending your forces on the attack. Unless they have Exceptional-tier stabilizers, moving units suffer a noticeable penalty to accuracy, which is a problem they’re facing static enemies in prepared defensive positions. Attack Move lets units move, but stop to engage (and thus have no penalty to accuracy), and then get moving again all on their own.

There is a time when you need your units to get from A to B first and worry about enemies second. Attack Move can cause your units to stop in the middle of prepared killing zones, which of course is not good. When managing an attack or defense, you must alternate basic move, reverse move, or attack move based on the specific tactical needs. Attack Move is also quite powerful when used in combination with Smoke Position - it’s basically an automated system for moving your units right up into the enemy faces, then stopping to engage them. at point blank range. Using Smoke Position and Attack Move in concert can be a very powerful asset.

If you use the wrong types of move orders, your units are going to be horrendously ineffective. This is not just a good habit to get into, it is essential to tactical mobility that you use the right orders at the right times.
Basics: Morale and Veterancy
Wargame takes another factor into consideration, and that is morale. Morale of units is individually tracked, and tends to go down when units take fire or are even near-missed by enemy fire. Exposure to flames, damage, or seeing friendly units die also reduces morale.

The five morale states are, in order from best to worst, Calm, Worried, Shaken, Panicked, and Rout. As morale drops, unit effectiveness goes down. Rate of fire drops and accuracy plummets. This means that units with low morale are less effective in combat. They will get off fewer shots and those shots they do get off will be unlikely to hit. This is especially crippling to guided missile units. Also, if a unit drops too low in morale, it will rout - this means it will stop responding to your orders and run off in a random direction all on its own, which is usually followed by it dying like a ♥♥♥♥♥.

Units also have veterancy levels. The levels of veterancy go from Rookie, Trained, Hardened, Veteran, and Elite. Veterancy levels are also individually tracked, and passively improve from exposure to enemy units, combat, fire, or other things. It’s important to know that veterancy is not magic. It will not magically make a tank withstand heavier impacts or shoot bigger bullets. However, it does affect all the realms of crew input. Veteran units shoot more accurately and stay cool under pressure. Very importantly, units with more experience will have higher morale in battle. They aim faster and engage targets faster. Veteran units get an accuracy bonus according to this table:
Rookie
x1 (no change)
Trained
x1.10
Hardened
1.26
Veteran
1.36
Elite/td]
1.60
[/tr][/table]

So that means an Elite unit gets a sixty percent bonus to their accuracy. That makes a unit with 10 accuracy (which is very meh) have instead 16 accuracy (which is very good). Oh, and this accuracy bonus is on top of their higher morale (which translates to lower penalties to accuracy) so you can consider it a double-bonus to accuracy. Let’s consider this tank force from earlier. For a moment, let’s forget what we’ve learned about unit balance and pretend a force of so many Abrams is acceptable.


What’s wrong with it? That’s 64 pieces of American steel right there! Isn’t it great? No. Why? Because they are all only rank-two veterancy! Those Abrams tanks are going to panic under pressure and get their asses kicked. When you’re choosing units for a deck, observe these options:


In every unit, you have the option of choosing veterancy levels. Higher levels of veterancy equals lower levels of availability. You can get eight veteran Abrams tanks per card, or sixteen trained Abrams tanks per card. Of course, if having eight tanks per card is too low for your needs, you just need to find a balance between availability and veterancy.

As in all things Wargame, you must also consider the tactical necessities involved when making this decision. Units that will certainly have to take on other units in close quarters should almost always be up-vetted at least one tier if you don’t want them to get trounced. But if unit availability is more important than unit quality in one unit’s case, take the lower veterancy. Generally, you should aim to cut it as close as possible to running out of units without actually running out of units in the normal course of things.

Some other notes on veterancy - veterancy is the hidden beauty of Category C decks. Category C decks give you an 80% bonus to unit availability, which could give you either great numbers, or superb veterancy ability while still maintaining sustainable units per card. This is why good Category C decks can mix it up with Category A decks despite having objectively inferior units. Secondly, don’t overlook a thematic deck’s XP bonus. Every deck “theme” (more on this later) gives a flat one-rank promotion to all units in a specific type. For example, the “Armored” theme gives a flat one-rank promotion to every card of tanks you get. One final thought, don’t take rookie units if you can help it. They just panic too damn easily to be of any use to you at all in a fight.
Basics: Terror Weapons and Fire
So, now you know how morale and veterancy improves how units fight. You’ve committed to maintaining your own troops’ morale by occasionally investing in their veterancy rank. How do you use this knowledge offensively? By the use of terror weapons, of course. Terror weapons are weapons that do low physical damage but high morale damage. Rockets, rocket artillery, mortars, fire, and machine guns and autocannons against light and heavy armor, are all examples of terror weapons.

Terror weapons are useful for stunning and panicking forces, generally so that your own forces will have an easy time of eliminating them. This is the sole purpose of rocket artillery, which almost never kills very much but can stun an entire advance dead in its tracks. More on the specific use of rocket artillery in another section, but for now, know that it’s an important example of a terror weapon. Artillery in general make good terror weapons - while they are capable of inflicting damage and casualties as well, don’t underestimate the value in their ability to panic everything they hit shortly before your troops attack.

Another useful feature of terror weapons and artillery is stunning. Remember this?


Counters are one reason, and terror weapons are the other reason why masses of tightly clustered expensive units are literally worse than useless. Units that are stunned will temporarily be unable to respond. While this doesn’t last more than a few seconds, it often means the difference between evading fire and being killed by it. Generally, you should try to hit enemy units with artillery or mortar fire or terror weapons immediately before engaging them with your conventional forces, in order to get off a shot or two before they’re even capable of moving.

Using autocannons against heavy armor, or machine guns against light armor, isn’t likely to do a lot of damage. But they will do very high morale damage, to the point of causing tanks to play yo-yo as they panic, rout, move backwards out of the line of fire, then recover and move forwards only to get stunned and routed again. This gives cheap autocannon vehicles like the M163CS or the ZSU-23-4 “Afghanskii” a great utility when mixed in with your forces. Additionally, units under fire also have a random chance to get in-battle malfunctions. Observe:


These malfunctions can hamper a unit in battle, rendering them immobile, causing damage, blinding them, making them run out of fuel or ammo, or any other number of things. Autocannons are great for causing these types of malfunctions.

Of course, the ultimate terror weapon is fire. Once again, napalm never goes out of style. Do you know what happens to commanders who think napalm has gone out of style?


That. This stuff is amazing. It can burn enemy infantry out of buildings and forests. It can instantly stun and panic any ground units. It can instantly stun and panic helicopters. It can force units out of defensive lines. It can grind an offensive to a halt. You can pre-emptively drop it on major roads to delay enemy movements. You can drop it right on top of the spawn lane in an enemy spawn zone to prevent them from bringing in troops to counter a push into that zone. Fire is a great terror weapon - and if napalm is dropped in forests, those forests will continue to burn for some time, which means any unit that passes through them takes morale damage.

Oh, as an aside, if you get the “repetitive unit voice” “glitch” that noobs complain about, nine times out of ten it’s because you have a unit who’s sitting next to or on top of a burning flame, and thus taking morale damage. Glance over your units and order the unit away and it’ll stop.
Basics: Supply and Logistics Management
Another factor separating Wargame from most of its kind is logistics. Units have three different type of logistical needs: Repair, Ammunition, and Fuel. Units without fuel will be unable to move. Units without ammunition will cease to fire. Know that while ammunition is tracked per-weapon (an Abrams tank that is out of ammunition for its main gun, for example, can still fire with its machine guns) ammunition is refilled as a whole.

Logistics vehicles, helicopters, or FOBs resupply forces within a radius around it. This radius is denoted by a wide yellow circle. The types of supply being taken on are shown by fuel, ammo, or repair icons next to the units. Any logistics unit also has a yellow-colored bar next to their name; this bar gradually empties to give you a quick at-a-glance estimation of its remaining supply capacity. You can also see its supply capacity by selecting it and looking where other units have their current fuel levels displayed.


Your logistics vehicles are really important. It is an absolute truth that an army fights on its stomach. In this game, its stomach is its supply line. Any extended operations will need supply to continue fighting in top shape. It is generally advisable that you bring logistics before you need them, not after. However, logistics vehicles are incredibly flimsy and fragile, and explode when killed (due to being filled with things like fuel and ammunition). This explosion can kill units that are clustered immediately next to it - this is mostly important for supply trucks kept in groups of 2 to 4, so it’s never a bad idea to use the Spread command on clusters of supply vehicles to prevent them from all being blown up when one is destroyed. Nonetheless, things like repairing damage and having ammunition are actually kind of important to an army, so try to always have some supply trucks handy.

Logistics capacity is abstracted as a generic “supply” value. Ammunition, fuel, and spare parts (repair) are all abstracted as being from the same pool of supplies. This means that you can (and sometimes must) choose whether it’s most important to refuel, rearm, or repair units. How do you do that? Like this.


When you select any logistics unit (logistics trucks, helicopters, or FOBs) you see this instead of a unit’s weapons. See how it says “On” there? Click it, and it will disable using the truck’s supply capacity for that particular category. By the way, this applies to ally units using your supply as well - if you have some idiot rocket and arty spammer for a teammate, tell your FOBs not to resupply ammunition to keep him from draining all the supplies your front needs.

Supply vehicles are unique in one other way, and that is that logistics units can be captured by the enemy. Any un-escorted supply vehicle or FOB will be captured if enemy units get within a few hundred meters of them without friendly units nearby. Be aware of this, and if you see enemy supply trucks out in the open, feel free to scoot a unit over there and nab them. Rations taste extra sweet when your enemy’s taxpayers paid for them. However, be aware that if your supply vehicles get caught unescorted, they can be captured as well. There’s nothing quite as bad as spending points to fix up your enemy’s vehicles so they can continue shooting at you with them. Oh, and because of this fact, your units will never shoot at enemy logistics vehicles without orders - this is fine if you’re going to capture them, but if not, and your units aren’t otherwise engaged, know that you’ll have to specifically tell them to shoot enemy supply vehicles.

“So, guide,” you ask noobishly, “what do I do with empty logistics vehicles?” Well, for starters, logistics vehicles can be refilled by FOBs. If you need your FOBs for artillery or they’re already empty, though, there’s not a whole lot you can do with them. Some people like to send them down roads and into unscouted towns to see if they get captured (thus betraying the presence of hidden enemy forces)...but you wouldn’t try to go through an area without scouting it out with recon first, would you?
Basics: Defense-In-Depth and Counter-Offensives
So we learned how to set up a static defense earlier, but we also learned that static defenses can be pushed through, even if it’s not ideal to do so. Static defenses do have the disadvantage of being, well, static - which means when the enemy knows where they are, they’re probably going to send airstrikes or artillery to attack it. So what do you do when the enemy is pushing against your static defenses?

The answer is the defense-in-depth, also referred to as dynamic defense. Unlike a static defense, where the objective is to “hold the line” and stop the enemy advance without moving back yourself, a dynamic defense moves along with the enemy’s advance, always hitting the enemy but never stopping long enough to get steamrolled. While I’ll talk in more detail about stabilizers later, for now know that stabilizers allow tanks and other such units to fire accurately on the move, and are absolutely necessary to a proper dynamic defense. Also necessary is the reverse move command. You must use this appropriately to pull off a dynamic defense, it is not optional.

In its most basic form, a dynamic defense involves reverse-moving your tanks across open ground, so that they can constantly be shooting at enemy targets without allowing the enemy to close the distance. This means the enemy cannot easily race past your defensive line and surround your forces. This prolongs the amount of time your units can shoot at their units, which means more enemy casualties. It slows down enemy offensives and allows you time to bring in reinforcements or call for allied assistance. It forces the fight to be on your terms, where you decide to lead them, and in your SAM bubble and not theirs.

However, dynamic defense is not as simple as “reverse-moving tanks”. We already covered reverse move. Lighter vehicles play a role in dynamic defense as well. Consider ATGM trucks - they are at their best when they can get off one or two missiles at enemy armor and then flee out of range to fire again. This is called shoot-and-scoot, and light vehicles excel at it. Additionally, gunships truly shine in dynamic defense, where they can rapidly move around the targets, firing rocket pods, autocannons, and ATGMs to turn an armored spearhead into a stunned, panicked, and burning mess. Infantry are not mobile enough for a dynamic defense, but they also have a role to play.

Defense-in-depth also suggests having defensive units spread out behind your front lines - this can bog down an armored breakthrough quite effectively. The problem most new players have is that if you manage to break through their defensive front, there’s pretty much nothing left standing between you and their entire side of the map. Even if all you do is scatter some cheap recon, MANPADS or other anti-air defenses, and infantry through your sectors, that can still keep your eyes on the target and prevent them from just lancing through all the way back to your starting zone unopposed. There is an obvious tradeoff between defense-in-depth and static defense - any unit sitting idle in a defensive zone is a unit not on your static defensive line. As with all things, you must find a balance between the two, and that balance depends heavily on your personal playstyles and the tactical necessities of the map and opponents.

So, you’ve kept your tanks alive and your front somewhat intact by reverse-moving, and the enemy forces are getting strung out as their heavy armor outruns their support to chase your own armor. But how do you really turn the tables? You do this by counterattacking. A counterattack is an offensive push you make to destroy or at least force a retreat of an enemy offensive. It is not the same as attacking into enemy territory, although a well-orchestrated counterattack can lead into an attack into enemy territory if the enemy is sufficiently off-balance. Consider this example:


Notice that the counterattacking force comes from a different area from the rest of your forces. You should aim to hook around behind them once they’re sufficiently strung out, and so engage them from the side or behind. Remember what we discussed about side and rear armor? That’s where you want to hit them. If they’ve outrun their air defenses, gunships are great for this task because of their high mobility; if they did bring too much air defense, then do this with armor instead.

Some people advocate always keeping a reserve force or quick-reaction force (QRF) of tanks and mobile vehicles behind your lines specifically so you can send them to intercept enemy attacks. Others advocate always keeping a few hundred points banked so you can quickly buy whatever reinforcements are needed in case of attack. Keeping a QRF behind your lines gives you the ability to react very quickly to an unexpected circumstance (hence the name), while banking the points instead gives you optimum flexibility to buy the best counters available to whatever pops up even if it takes longer for the reinforcements to arrive. While whichever technique you choose is up to your personal preference and style, I prefer to always have points banked and just buy whatever counters I need. Experiment and figure out what works most efficiently for you.

A properly-executed dynamic defense is very hard to counter, and if you find yourself facing one, it’s best to abandon the pursuit and try something else instead. Don’t ever let the enemy lead you where he wants you to go. Instead, attack elsewhere or with other forces and thus make him react to you, not the other way around. Remember, fight on your terms, not on theirs.
Basics: Tactical Mobility and Maneuver Warfare
At some point, your guys and their guys are going to come into contact with one another, attempt to have a civil discussion about the relative merits of communism and capitalism, and that civil discussion is going to turn into a shooting war. It is the nature of the 80s, I’m afraid. But this is not the first world war - if all you do is line up your guys against their line of guys and see who’s left standing when the shots stop coming, you’re doing it wrong. While there is a time and a place for your units to sit still and shoot, the majority of your time will be spent moving your forces around the map.

Even in a fight, staying in motion is important. Why? Because of this:


Every tank has weaker side armor and very flimsy rear armor compared to their frontal armor. If all you do is stand in a line and shoot at their line, you’re hitting them where they’re strongest. The basic concept of maneuver warfare is in bringing your units’ strengths around to where the enemy is weak. Remember, you always want to bring your strengths against their weaknesses, not against their own strengths and never the other way around. And how important is maneuver warfare?


Zelasko could probably tell you, couldn’t he? While those results are pretty drastic, don’t think that superior units will always beat inferior units. I would rather have a weak unit in the right place than a strong unit in the wrong place. Many of the techniques already discussed, like dynamic defense, the direction of a proper counter-offensive, and flanking offensives, are examples of maneuver warfare. Observe this diagram:


In this diagram, the blue force is performing a basic flanking maneuver against the red line. Note that a single vehicle on this red line cannot orient its frontal armor at both forces simultaneously. This means that they must either retreat, or get hits in their weaker armor and die. That is exactly what you want to have happen. Let’s observe what a flanking maneuver actually looks like in the game:


As you can see, an attack from the north was supported by a flanking maneuver from the west, which rapidly emptied the sector of enemy forces, as they were forced to expose their flanks to one side or the other.

Helicopters are excellent at maneuver warfare. They can fly over rough terrain with no loss in speed and are significantly faster than even the fastest ground vehicles. However, they do require significant micromanagement and will die like a ♥♥♥♥♥ to even cheap SPAAGs that get within range. Generally, IFVs and other fast, lighter vehicles should be used as your instruments of maneuver warfare while heavy frontal armor draws all the enemy fire. You should seriously consider using tanks with good stabilizers as your flanking force as well, but tanks without good stabilizers should always be used as your static force. Again, stabilizers allow a tank to fire accurately while on the move, which isn’t necessary for a static defending force and vital for a flanking force.

Thwarting enemy attempts to outmaneuver your forces is the key reason why you should always bring some flank security. Put some cheaper tanks and SAMs or SPAAGs along the outer fringes of your front, and they’ll at least forestall an enemy flanking maneuver long enough for you to hit them with artillery, airstrikes, or your heavy armor.
Basics: Defense vs. Offense and Strategic Objectives
So how do you know when to attack, and when to hunker down and defend? Sometimes it’s obvious - if the enemy is choosing to attack in force, it’s better to defend and let them throw units into your defensive lines, while if you know the enemy defense to be insufficient, it’s better to attack. But between relatively even forces, when it is necessary to attack and when is it necessary to defend?

First off, know that in Wargame as in real life, the defender usually has the advantage. Between two forces of equal strength and equal skill, the defender will usually win. So if you try to press an attack just for your teammates to scramble and tell you to stop, it may not be that they’re cowardly, but that the move is too risky. Even if your attack succeeds in its operational objective it can fail its strategic objective. Every move you make should be in the service of achieving the strategic objective of the match. Nobody’s going to care that you managed to take Alpha sector if the other team managed to win because of it.

Now, what is our strategic objective? It would be a specific match’s victory condition. Knowing when to attack and when to defend demands consideration of the game’s victory conditions. You can see these in the lobby.


There, see? In this case, the game’s victory conditions are set at Total Destruction (no point limit) and a time limit. Let’s go through the game’s various modes and what they mean for offense and defense.

In Destruction mode, points are gained by killing the other side’s units. Your main strategic objective is to accumulate the most points while feeding the enemy as few points as possible. An alternative way to win is by killing every command vehicle on the map - however, you’re generally going to hit the point limit before you pull that off except in very unusual circumstances. This means that it is generally better to defend, because defenders usually get more points than attackers. Victory is judged not by how much of the map you control at the end of the match, but by who first reaches the point limit. The exception is Total Destruction mode, where there is no point limit. In Total Destruction mode, you win by having more points at the end of the time limit (unless that is disabled, too) or, more commonly, by destroying every enemy command vehicle. In Total Destruction mode, it is generally better to attack. Obviously, this is subject to the specific circumstances of an individual game - if you’ve only got ten minutes on the timer left and your team is massively ahead in points, then you might as well just wait out the timer rather than risk letting the defenders close the points gap. However, you will usually be aiming to kill every enemy command vehicle in Total Destruction.

In Economy mode, you win by your team reaching the required command points, not score points. This means that cost-efficiency is the order of the day. If you buy a bunch of expensive units, your team is going to hate you because that sets back the entire team. In Economy, it is essential that you find the right balance between buying enough forces to seize and defend command sectors (which give your team income) without buying so much that the other team pulls ahead. In Economy it is generally better to grab territory quickly, then defend, because, again, defense is much more cost-effective than offense. It is doubly better to defend instead of attack in Economy because your enemies will be banking more points, which means it will be significantly easier for them to call in reinforcements in an emergency. However, if a command sector can be seized on the cheap, don’t hesitate to do so - sometimes you have to spend points to earn points, especially if your team is at a significant economic disadvantage, in which case it is better to attack. Know that particularly cost-effective tactics, such as infantry in urban zones or using deep-insertion of special forces behind enemy lines to spot and kill enemy command vehicles, is a very good idea in Economy.

In Siege mode, leave this stupid mode and go play something fun instead. But if you insist, in Siege mode, there is a team that is on the attack and a team that is on the defense, so you don’t need to choose. Eugene has confirmed that they will also be adding a fourth mode, Conquest, but it isn’t here yet.
Basics: Know the Map, Terrain, and Fronts
Before the game starts, in the Deployment phase, you have to buy your starting points’ worth of forces and place them in your starting zone and so on, you probably already figured that part out. But, especially while you’re still learning the maps, take the time to scan the map and the terrain. Take note of important features.

Where are the midpoints of the map, and from them, where are the fronts likely to fall? What are the major roads where your forces or enemy forces will likely Move Fast through? Are there crossroads you might preemptively napalm to block enemy movements? Where are the spawn zones and air lanes, and based on the direction of those air lanes, where should you place air defenses? Are there wide sides on the edges of the map where you or your enemies might try to sneak helicopter-borne troops or other forces? Are there large forests that infantry can roam through? Large plains for armor to roll over? Are there mountains or ledges where your recon troops would have good sight lines? Do the enemy rear zones have “back doors” or blind spots, like mountains, that you could sneak special forces through?

Before the match begins, you should be coming up with ideas for movement and unit placement. You also need to familiarize yourself with terrain. Terrain affects movement speed and line of sight for all ground units. A unit’s line of sight can be seen as a white line when you select them and order them to fire at something. That white line can have three parts:


The white solid line is the unit’s effective weapon range. The transparent white line is their line of sight. A dotted white line shows that their line of sight is either at its limit, or blocked by a terrain feature. Features like dense forests, mountains, and buildings block line of sight completely, while features like shrubs and hedges can be seen through, but degrade the LOS range beyond it.

We already discussed cover features like swamps and forests and hedgerows, but know that the type of ground affects unit movement speed. Units will move faster on roads and flat land than they will in cropland and tall grasses. Over rougher terrain, like swamps or clumps of hedges, movement can cause units to slow down with Rough Ground debuffs.

The other important terrain feature is height. Units situated on a ledge or otherwise with a height advantage have an improved line of sight and can potentially see over obstacles as well. Defending a ledge gives you a clear line of fire at the ground it overlooks, which is a particular advantage for defenders.

However, it is difficult to target units directly at the bottom of a ledge. This leads to a technique called the reverse-slope defense. Observe:


In this instance, units on the bottom of a hill can usually get the first shot off at units coming over the top of the hill, since it’s hard for forces at the top of a slope to target units directly below them because of the limited camera angle. Additionally, static forces at the bottom of a hill can hit targets breaching the crest of the hill one at a time as they emerge into their LOS.

Finally, maintain situational awareness of the game’s other fronts. By habit, you should always keep abreast of the changing tactical situation that your allies’ fronts are facing. If one of them gets their own front pushed back, you could be exposed on a flank you had assumed was secure, or rush ahead unsupported and get surrounded. Additionally, knowing what forces your enemies are facing could give you forewarning of what your own units might face - if I see an ally getting hit by a plane-heavy enemy player (an air spammer) I’ll buy extra SAMs for my own forces in anticipation of having to face the same thing later. As a bonus, it never hurts to give your allies some useful supporting fire when you’re able to, even if they don’t ask for it. Don’t spend so much time gawking at your allies’ movements that you neglect your own, but always keep an eye open to them - zoom out from time to time and scroll around, just to make sure everything is where you thought it was.
Basics: Control Groups
As with most RTS games, Wargame lets you map specific units to control groups using the 0-9 keys. This is an important feature that you should be using. To map a unit to a control group, select that unit and press Ctrl + [number]. To select that unit, press that number. This has several really good uses.

First is obvious - it allows you to quickly select an off-screen unit without having to go look for it. As such, your artillery batteries should always be individually mapped to a control group. This means you can select all of your artillery pieces without moving the screen away from the front. It’s trivially easy to just press a number key, then Fire Position or Smoke Position, and thus be always able to provide supporting fire to your front (or anywhere else on the map) without leaving it. Some people advocate doing the same with aircraft, but I prefer to just leave the Air Comm panel open at all times.

The other major use is less obvious - Double tapping a number key will bring you directly to that unit. If you have to manage multiple fronts, map an important unit to a control key so you can instantly switch between fronts. This is also useful for moving your artillery units around to avoid counterbattery fire (more on this later).

Finally, use control groups to speed micromanagement. Certain units, such as ATGM carriers, Radar SAMs, and most helicopters, must be micromanaged frequently to be most effective.
Basics: Aircraft Maneuvering, Handling, and Response Times I
“Every time I call in aircraft, they get killed by the enemy,” you complain, noobishly, “but their aircraft always seem to kill my guys and get away clean!” Why is that? Because using aircraft is not as simple as clicking on them and clicking on a target. This is not World in Conflict where aircraft constituted off-map support and were generally invulnerable. Although they are based off-map, your aircraft are your units exactly like all your other forces. This means their kills count as much as other units’ kills, and being killed feeds the enemy points - and typically a lot of points - just like any other unit. In this section, I’ll teach you how to use aircraft in general; in the next, I’ll teach you how to defend against them. I will provide specific advice about the different types of aircraft and their different weapon systems later.

First off, know that aircraft handling is a little idiosyncratic. There are several particularities that aircraft have, and understanding how aircraft handle is crucial to using them successfully.

Aircraft, as previously stated, are based off-map. They enter the map through air corridors, which are like spawn corridors but for aircraft. They can leave the map from any position, via the evac command (default keybinding: V). They only have, at max, a couple minutes’ worth of fuel before they must leave to refuel. If they run out of fuel, they will auto-evac, this is called Evac Bingo. ‘Bingo’ is NATO code term for having only enough fuel to return to base (and thus necessitating leaving immediately). If they expend their ordinance, they will also auto-evac, this is called Evac Winchester. ‘Winchester’ is NATO code for being out of ordinance or ammunition. When aircraft evac, they immediately turn away, climb, and will disappear from the map in a few seconds. When aircraft are near enemy forces, you must be ready to evac them at a moment’s notice in case they run into unexpected SAMs or get stunned by AAA. If your aircraft are in danger of getting destroyed, evac immediately. Don’t suicide a 160-point plane to take out a 55-point tank. Remember, with few exceptions aircraft are glass cannons that should shy away from SAMs.

Once aircraft evac, they will have a cool-down period before they can be called on again. The length of this period depends on the resupply that the aircraft needs. The status of your aircraft can be seen in the Airport Panel.


You can use this panel to quickly select aircraft currently in the field (“In Mission”). Aircraft with colored icons are ready to be used. Aircraft that are being resupplied have between one and five icons, and will display their resupply status (the EF-111A Raven is further along in its cooldown period than the F-16C Fighting Falcon). Because aircraft that took damage will take longer to resupply than aircraft that don’t, it’s always preferable to keep your aircraft out of the line of fire when possible.

Aircraft have to fly straight at their target in order to drop their bombs, and this is the source of the “aircraft flying over without dropping weapons” problem. If the aircraft is still turning to align with their attack vector, they won’t drop their weapons. This sends them careening into enemy air defenses. They also have to be several kilometers away from the air corridor to release weapons, which means there is a radius under the spawn point of aircraft where the distance is too short to release weapons. Aircraft will also fail to release and will fly straight and level if they have been stunned by AAA. Oh, and sometimes aircraft just inexplicably fail to fire their weapons for no apparent ♥♥♥♥♥♥♥ reason. I’m sure there is a reason, but very rarely, even though they’re flying over flat terrain and not turning, they just fail to drop. If this happens to you, it is usually best to evac immediately and try again. Generally speaking, you won’t get more than one pass before taking anti-aircraft fire unless you’re 100% sure you’ve destroyed enemy air defenses.

Aircraft also have turning radiuses, some of which can be quite wide. in general, faster aircraft have wider turning radiuses, though of course there are variations. This is less important in bomber aircraft who will generally drop all their weapons in one go and then automatically Evac Winchester, but it is essential that you understand how aircraft turn. Consider this shamelessly stolen chart - the colored circles are move orders in front of the aircraft, with the lines displaying where the aircraft will turn. The black circle is enemy AA that you should avoid. The objective is to get the aircraft to move away from enemy AAA as quickly as possible.


Green: Maximum turn rate.
Red: This is how the plane paths if the point is inside its turn rate, as it is the shortest path to the point
Blue: This is undesirable, as its deeper in assumably enemy territory.
Yellow: This works on the same principle as red, but mirrored. However, it also requires another click back to make sure it doesn't end up near the AA anyway.
Purple: This is the path to the point that is behind and to the left. Make sure it's far behind.

Yes, I realize it looks confusing at first, but this is the answer to the “aircraft turning in random directions” complaint that noobs often have. It takes some practice and getting used to, but for the tightest turning possible to ensure aircraft evac away from enemy AAA, yellow or purple are best. Blue is workable, but risky.
Basics: Aircraft Maneuvering, Handling, and Response Times II
Aircraft turning radiuses are important for one other reason - aircraft with tighter turn radiuses will generally out-fly aircraft with wider turn radiuses in a dogfight. This is why that cheap MiG-21 just killed your Tomcat in a dogfight. In a dogfight, aircraft will generally close by launching short-range IR missiles (such as the Sidewinder) and then try to finish each other off with guns. The aircraft that gets behind the other will generally win, because aircraft can only attack targets directly in front of them. If your aircraft is in a dogfight and the other aircraft gets behind it, evac immediately. It’ll overshoot when your aircraft turns and pulls away, and by the time it turns around to engage again, your aircraft will be gone.

Of course, it’s impossible to use aircraft well if they’re taking mass missile fire. SEAD is an important part of air operations. SEAD, or the Suppression of Enemy Air Defenses, refers to any strikes performed to neutralize enemy AA in preparation for a large or important air attack. This can be done with SEAD aircraft like Wild Weasels or Ravens - these aircraft have anti-radar missiles that can automatically target radar SAMs like Buks, Osas, or Hawks. They also target radar AAA like Shilkas or Tunguskas. A more generic SEAD activity is using artillery to kill, or at least panic and stun, enemy AA. You should always try to kill anti-air units when it’s convenient to do so, since every one you kill makes air operations a little easier. You should especially go to lengths to target AA units if you’re preparing for a mass air attack.

Now, on to attack vectors. An aircraft’s attack vector is the direction from which they launch their attack. Consider this simple defensive line. Note that the heavy armor is in front of multiple AAA and SAMs. Should your aircraft come in from vector 1, or vector 2?


You should always choose an attack vector that does not send your aircraft flying directly over enemy AA. In this example, Vector 2 is most wise (although, of course, you should always attempt to suppress enemy AA first). The reason for this is that after dropping its weapons, the aircraft on attack vector 2 can turn into friendly territory in order to evac, while the aircraft in attack vector 1 will go careening straight over enemy AA. Additionally, if the enemy sent interceptors of his own when he saw your aircraft, the plane on vector 1 is now heading straight for them! The last reason to use a side-vector is that bombers drop their bombs in a line along their attack vector. In the above picture, a line of bombs across vector 1 will damage/stun the center Rise Pattons and the M163CSes only - both vectors 2 and 3 will damage and stun all the tanks in the line, but vector 2 will send the aircraft closer to enemy AAA that will stun it and SAMs that will then finish it off. If you want maximum effectiveness, angle your bomber aircraft so that all of their bombs fall across the line, rather than perpendicular to their line.
Basics: Integrated Air Defense Systems
Okay, that’s how you use aircraft, but how do you defend against them? Obviously, with anti-aircraft units! While I’ll go over the specific types of anti-aircraft units and their uses later, for now, know that:

  • Self-propelled anti-aircraft guns, or SPAAGs, are vehicles with AAA weapons. Some have Radar capabilities, and some do not. Those that do are generally more accurate and have longer range. They can kill helicopters in range, but they can generally only stun and panic jets.
  • Radar SAMs are SAM vehicles that use radar. They are generally longer-ranged and more effective when fighting jets. However, they are also good against mass helicopter rushes because their missiles have a wide splash damage radius. They tend to be your best and most expensive SAMs.
  • Infrared SAMs are SAM vehicles and MANPADS that do not use Radar. They are generally longer-ranged against helicopters than against jets, but they are an important backup to ensure that SEAD aircraft cannot eliminate your entire defense.
  • Fighter aircraft are jets that specialize in taking on other jets in short range. They are generally armed with short-range missiles and guns and are capable dogfighters.
  • Interceptors are jets that specialize in taking on other jets at long range. They carry long-ranged missiles and are terrible dogfighters.

While I’ll discuss in greater detail the specific uses of each type, know that proper air defense involves using multiple types of air defense in concert. It is not enough to lazily bring along a SAM vehicle or two - if the enemy sees that that’s all you have, they will simply target it first and then send in as many bombers as they can afford. This is referred to as an integrated air defense system.

So, why do we need to have such a complicated setup? The first and most important reason is that each type of system works in different ways and against different types of enemy air. Thus, to achieve maximum tactical effectiveness against aircraft, different systems must work in concert.

The first thing you must do is consider where enemy air attacks are most likely to come from and in what forms. Look at where enemy airlanes are, and where their forces are in relation to yours. Watch how they use planes as well - do they send in a SEAD aircraft first? Do they send in a bunch of planes at once, or one at a time? Do they use them before a ground attack or during one? Do they use transport helicopters at the front? Do they use gunships offensively or defensively? Independently or with other forces? Once you know the most likely patterns of air attack, and so your IADS should be spread out to absorb and defeat air attacks in those patterns.

So, how does IADS help with this? Each type of AA complements another type’s weaknesses. Radar SAMs are the best at denying airspace to the enemy, but they’re counterable by SEAD aircraft. So, you couple them with SPAAGs and IR SAMs. Some types of anti-helicopter weapons can actually be outranged by heli-borne ATGMs, thus making it essential that you have other anti-helicopter weapons that can maneuver in or jets that you can call. Point is, every type of anti-air counter has its own set of strengths and weaknesses, and IADS allows you to create a well-rounded system with no obvious flaws.

The other important reason to use an IADS concept is redundancy. Just like any unit you field, sometimes, the enemy is just going to get lucky or just plain outmaneuver you and manage to kill a part of your AA network. When I play, I consider all SAMs to be high-value targets and attempt to eliminate them as often and as fast as possible. I know that most decks have a relatively limited number of SAM systems, and so killing off even a few pays dividends in the long run. Having redundant, overlapping systems makes it significantly harder for the other team to use aircraft safely, which means your men will get bombed less.

The last important reason is to counter SEAD. As a defender against air power, fear SEAD, hate SEAD, and be ready for SEAD. Pretty much all players are going to want to bring out their aircraft as fast as possible, as they tend to be hard-counters to almost every expensive unit in the game. The problem with SEAD aircraft is that the best ground units for shooting them down are also the units these aircraft are built to destroy. This means that you need to disrupt the SEAD aircraft action’s first by using other parts of your integrated air defense network. This can be very simply laid out if you know their probable attack vector - observe:


The general gist is that you stun them with AAA first, or at least waste their munitions on lower-value targets, and then use the expensive Radar SAM to finish them off while they’re stunned. Aside from that, IR SAMs and interceptors make a great way to get some extra missiles off against SEAD aircraft, which can be very difficult to kill due to their usually exceptional ECM.

Additionally, radar units require micromanagement to maximize safety against SEAD aircraft. Radar weapons are helpfully labeled in the HUD. Let’s see this on a Tunguska anti-air unit:


As you can see, the Tunguska has a 30mm Radar-guided anti-air gun and a SACLOS (non-radar-guided) anti-air missile. This means that the Tunguska can be targeted by SEAD aircraft. However, you can do this:


Petrovich’s Tunguska is now immune to SEAD aircraft. Any Radar unit can have its Radar weapon turned on or off to disable it in exchange for being invisible to SEAD aircraft. The general strategy with them is to have them turned off until the SEAD aircraft passes overhead, then turn them on and fire a missile up their tailpipe (remember, aircraft can only fire at targets in a cone to their front). Some people prefer to leave their Radar weapons off at all times and only turn them on when they spot a SEAD aircraft operating overhead, while others prefer to leave their Radar weapons on and hurry to disable them when SEAD aircraft are spotted. Both approaches have their merits, and whichever you decide to do is dependent on your attention span, skill at micromanagement, and personal preference.

Finally, there is one other thing to note. Consider the British expression, the bomber will always get through. This phrase came about before the Second World War, and was an influential part of strategic thinking in that war and in the Cold War. And it lives on in Wargame, too - know that near your front lines, a sufficiently determined bombing force will manage to drop their ordinance, whether they survive or not. It’s simply not practical to set up a firm AA screen in front of your forces, for obvious reasons. However, even a dedicated air spam deck will run out of aircraft long before you should run out of missiles to fire at them.

Understand this and be prepared for this - this is why having air defenses is no substitute for being properly spread out and on your guard. While obviously the ideal is to prevent the use of enemy air power, you will sometimes have to settle for merely killing those aircraft when the enemy does decide to use them. Often, players will see sacrificing a 50-point aircraft to bomb several hundred points of targets to be a worthwhile trade. Or they’ll just get frustrated and throw so many aircraft, your defenses can be overwhelmed. Point is, know that this will still happen and be ready and have your forces oriented to ensure that this tactic will not be a repeat performance. If you manage to shoot down enough aircraft, eventually you will stop seeing them.
Basics: Placement of Command Vehicles
While I will go into further detail about the different types of command vehicles and their varying uses later, by now you should know that command zones are captured by having a command vehicle placed inside them and not moving.

For starters, you should never ever do this at the start of a match:


See how that flare says “Sandy’s CV”? As will be discussed in the next section, this is a standard way of informing your team of who will be leaving a command vehicle in that zone to prevent wasteful redundancy. That means the other player who left a command vehicle here is an idiot.

Controlled command zones split their income across the whole team equally - there is ZERO bonus to having your command vehicle in a zone instead of someone else’s. Additionally, command vehicles do not stack their income, meaning having two CVs in the same zone is a completely useless waste of an expensive and vulnerable unit. Additionally, there is no good reason whatsoever to ever have two expensive, vulnerable, and important units right next to each other where they can both be bombed at the same time. If your command vehicle is immediately next to someone else’s, one of you has done something seriously stupid and one of those vehicles needs to move ASAP. Too many commanders spoil the regiment - there is absolutely no reason for command vehicles to ever work together. Even keeping a “spare” is a waste of points except in highly unusual circumstances.

Now that that’s out of the way, where should you place your command vehicles? As discussed in a previous section, it’s always preferable that they be hidden in cover, of course - but in situations where cover is unavailable or too obvious, it’s better to hide them behind buildings or at least in distant corners where they’re less likely to be blind-guessed. Additionally, never put your command vehicles next to artillery, SAMs, or other units that might get shot at by artillery. It’s embarrassing as hell to lose a command vehicle to the other team by accident, is it not?

Additionally, even though you can get command vehicles with armor, guns, or even outright tanks, you should never attack with your command vehicle, ever. Why? Because of this:


Attacking enemies with your command vehicle is the worst thing you can possibly do. Command vehicles are ALREADY precious and important units that your enemies will go to great lengths to target and destroy. Putting them on your front lines is doing the hard part of their work for them. Even the dumbest player is able to figure out that even if they have to sacrifice a plane to kill an exposed CV, it’s generally worth the cost. Remember what I said about the bomber always getting through?

At best, a command vehicle’s weapon is useful only in emergencies where it’s that or nothing - but you should never voluntarily enter such a situation! Remember, command vehicles should always be behind your front and within your IADS zone.
Basics: In-Game Etiquette, Flares, and Team Communications
Okay, so you know how to talk like a Wargamer and how to fight like one. But how do you talk to them? Wargame is a team-based game, and this means that proper communication with your team is essential. There is no excuse for you not knowing what your team is doing or for your team not knowing what you are doing at all times.

There are two major methods of team communications: flares and in-game chat. You can press Enter to bring up the in-game team chat, or Shift-Enter to bring up the all chat. Don’t be that idiot that announces your plans in all-chat instead of team-chat.

The fastest way to direct your ally’s attention to specific points on the map are flares. These four buttons underneath the minimap allow you to place flares:


You can place these flares anywhere on the map, at any time, and your allies will see them and hear a ringing sound effect. Flares don’t go away in the deployment phase, and in the battle itself, they’ll fade away after sixty seconds or so. There are three types of “standard” flares.


You will hardly ever need to use them. Why? Because you can also make a custom flare. The fourth button allows you to type a short message to go along with the flare, and it is almost always preferable that you use a custom flare instead of a standard one. Why? Simple! Let’s say you’re in a game, and your ally leaves this flare:


Attack? What does he mean? Is there a unit under that flare that he wants you to attack? Does he want you to launch an attack on that entire sector? Is he going to attack in that general location? Does he want you to hit that specific spot with artillery? Noobs use the same flare to mean all of these things. This means that the stock flares are not specific enough to be useful. Instead, do this:


It wouldn’t even take you two whole seconds to type that up, but given that it says “CV here” and is over an enemy sector, I know all I need to know. The enemy command vehicle is there. I should send artillery or air power to eliminate it. Simple! Do the same for any other time you need to draw your ally’s attention to something.

It’s generally expected that you use flares at the start of a match, in the deployment phase. I always leave at least two types of flares in the deployment zone. The first type says “Sandy’s CV”, and denotes the sectors I intend to leave or move a command vehicle to, and the second type says “Sandy attacking/Sandy defending/Sandy supporting” so my allies know what sector I intend to move my initial forces to. I might also send other helpful notes before the fight starts, like “Sending fighters here” or whatever else it is I happen to be doing. You should always do this. Why? So the team can very quickly see if there are obvious gaps in the team’s deployment, such as a sector that went “unclaimed” or a starting zone with nobody volunteering to leave a CV in it. It’s a sure sign of a disorganized team when none of them leave a CV in their own spawn zone because they each expected someone else to do it.

Oh, and unless your name also happens to be Sandy, obviously you should use your name and not mine. Be sure to add your name when you’re identifying your forces - if you just say “me” or something, we have to mouse over the flare to see who left it, which is an annoying waste of time. You don’t have to name every flare you drop, just the ones where it’s important that your allies quickly identify who sent it. And if your name does happen to be Sandy, hi Sandy!

Oh, and there is no reason to ever, ever do this:


Don’t be a hyperactive idiot. We can see one flare just as well as a dozen. All spamming flares does is make a constant annoying ringing sound. It will piss off your teammates and not communicate anything important. Worse, see that wide cloud of opaque teal smoke and those overlapping banners? They make it harder to see and click on units under them. Why would you ever want to do that?

Use flares to call attention to anything your allies might need to know about. When you hear a flare ring, you can quickly zoom to where it was left by pressing spacebar (which brings you to the site of important events, like flares, spawned units, and destroyed units). Be specific when using flares. The most common things you’ll need to leave flares over in mid-game are enemy high-value targets you passingly spotted, like command vehicles, artillery, or air defenses. Also point out where there are hidden units, like SAMs or ATGMs, which pose a threat to your allies, or when you spot units sneaking past your recon screen, like heli-borne infantry or troops hiding in forests. Try to put these flares directly on top of the units when possible, so that you or your allies can use them to blind-bomb them with some precision.

As for the in-game chat, use it for discussions and long messages that aren’t tied to an in-map location or are too long for flares, such as discussing team strategy. Clear tactical communications are vital. Try to always communicate when you’re pressing an attack or defending from a major enemy attack, so that allies know how and when to support you. Don’t assume your allies know what you know. They have their own fronts and forces to manage, and while every good Wargamer tries to maintain situational awareness, you’re always going to know the situation on your front better than they will. And especially when you need allied support, be specific as to what kind of support you need and what the relevant threats are. I’ve lost countless aircraft trying to give my allies some close air support because they failed to inform me of enemy air defense capabilities.
Basics: In-Game Etiquette, Flares, and Team Communications II
I’m not going to nanny you and tell you to say please and thank you, but there are some general etiquette tips you should be aware of. First, you don’t have to be a grammar nazi, but do at least try to use something resembling proper English. When I see someone chat in ♥♥♥♥♥♥♥♥♥ text-speak or illegibly bad grammar, I instantly think that this person is an idiot and adjust my plans accordingly.

Secondly, and this is important enough for bold text, do try to exercise some sportsmanship. Don’t harass and insult players on either side. It’s no fun to watch some jerk spamming up the chat with “LOL ♥♥♥ U GET GUD SCRUB” even when they’re on your team. If I wanted to get cussed out by someone who sounds like he’s twelve years old, I’d go back to Xbox Live.

Don’t use tactics to delay or draw the game out just for the sake of getting back at someone else for beating you. What I mean is tactics like sending your CVs off into a far corner of the map in a Total Destruction match just to force the other team to waste time trying to find it. Stalling tactics, such as doing this to wait for reinforcements or as a temporary retreat, are perfectly fine. But when you know that all is lost, do the honorable thing and let it end.

Oh, and never, ever ♥♥♥♥♥♥♥ ragequit, ever. Rampant ragequitting is one of the biggest problems Wargame has. I have won more games by getting the other team to mass-ragequit than I have by actually defeating the other team. It is always frustrating to have a victory cheaply handed to you because your opponent couldn’t be assed to actually play the game. At its worst, it gets like this:


If you have ever ragequit because a plane got shot down or something equally inane in the first minute of the game (or just as bad, because another teammate ragequit and left you alone, thus creating a cascade where the entire team quits one by one, which is what happened here), please take a vow of silence or something to atone for your sins. ♥♥♥♥ like this is a serious buzzkill, and it’s always disappointing.

If someone on your team is doing something stupid, ask them what they’re doing (they may know something you don’t, after all) and then gently explain what you think they should do instead and why. If they don’t listen, don’t take it personally - in my experience many people are happier in their ignorance and don’t like being corrected, even when they’re making wildly stupid moves. Don’t get mad and start calling them names or harassing them, either. Again, that’s no fun. If they argue with you and get hostile, just drop it, it’s really not worth it. If they get really hostile and teamkill you or something, there is a thread on the official forums[www.wargame-ee.com] for reporting that, but there’s really nothing else you can do other than try to work around them and try to remember their names and avoid them in the future. Arguing with these people just makes the game worse for you and your sane teammates, so don’t bother. Zero ♥♥♥♥♥ given. Move on and have fun.

As a final thought, being nice to your team, or the other team for that matter, is never a bad idea. If a teammate sent his own units to support your front instead of his, it really can’t hurt to thank him. Maybe they’ll be more apt to support you later. It also never hurts to ask instead of demand when you need support. Your allies will usually have their own engagements to worry about and it’s never fun having some jerk demanding you give his front your attention instead of your own. And nothing feels quite as good as being complimented by your own team or by the other guy when you pull off an impressive maneuver.
Units: Overview
“That’s great and all,” you say, noobishly, “but get to the shooty part already! I only opened this guide to scroll down to this section and see the descriptions of the killy stuff”

Well, since you’re apparently an Ork, congratulations on learning how to read. Fine, then - let’s go through all the 828 units of Wargame section by section. Yes, all of them. Recognising the units of Wargame by sight, and knowing what they do, is one of the best advantages experience will get you.

“What’s a Strv 103B?” the inexperienced Soviet commander asks as his tanks approach a treeline. “Oh, well, I’ll just shoot it.” This is followed by the great frontal armor of that Swedish tank absorbing the Soviet fire with relative ease.

“That’s a Strv 103B, a Swedish second-generation tank with good frontal armor, decent range, and a high rate of fire. I should attack it in close range from the rear to take advantage of its lack of a rotating turret and inability to fire accurately on the move.” says the experienced Soviet commander. This is followed by a crew of dead Swedes.

Follow along in the Armory as you read this section. Really, load up Wargame, open this in the Steam overlay, and shift-tab through this section while eyeing the various vehicles available. I cannot overstate how important it is that you recognise units on sight. There is no true substitute for experience in this matter, but the more you see them, the more you’ll get to know them. Knowing thyself and knowing thy enemy is absolutely basic and essential. It’s The Art of War kind of basic. It’s important. Oh, and by the way, you can change the unit type icons between fake “RTS style” icons, and the real-world standardized symbols used by NATO to show unit types at a glance. It’s under Interface options.


See? There it is. This feature was great in European Escalation, and I highly recommend switching to them while you’re still learning. Why? Because they’re easier to tell apart once you learn them - observe:


These are just better, they’re easy to differentiate, they look cooler and more professional, and you’ll learn some of the actual NATO standard symbology, not just fake icons made up by Eugene. Don’t worry, they’ll look like squares and Xes and circles and other useless ♥♥♥♥ at first, but there is a method to their madness and you can find a guide to reading them anywhere.

Units: Unit Information Panel I
So, how do you learn how the units perform? Well, the most immediately useful information is collated in a unit’s unit information card. First off, you can use the T key to bring up a unit’s information card in mid-game. This is a very vital feature while you’re still learning the game, use it frequently. I bound an extra key on my mouse to T just so I could click on any unit and see its information card in mid-game. You don’t need to memorize specific numbers, but it’s very, very helpful to memorize basic facts.

So, how do you read unit information cards? Here’s the unit information card of the M1 Abrams tank:


Across the top are the unit’s nationality, command point cost, name, and unit symbol. Already, just from the top panel, we know that the Abrams is a medium-high end American tank.

Below the title bar is between one and three weapons of that unit. Every weapon has an icon and its name, and then its tags and caliber.

In the above picture, you can see the [KE] and [AoE] tags on the M68A1 cannon. Tags denote special weapon effects, restrictions, or uses. Not all weapons have tags, and you can mouse-over them to display what they do. Let’s go over the tags in the game:

[AoE]
Area of Effect - This weapon fires anti-personnel explosive rounds. Its HE value applies over an area of effect.

[CQC]
Denotes an infantry machine gun that can be used in close-quarters combat and on the move, unlike most infantry machine guns, which have the [STAT] tag.

[CORR]
Corrected Shot - This weapon may provide indirect fire above obstacles. It may improve accuracy if a friendly unit has a direct line of sight on the target. Only artillery units have this tag.

[F&F]
Fire & Forget - Once fired, this missile doesn’t require any more action from the operator. Note that all guns and unguided shells are fire-and-forget, so this tag only applies to missiles. This is as opposed to [GUID].

[GUID]
Guided - This missile is guided. Its operator needs to stand still and aim at the target until the impact. This is as opposed to [F&F].

[HEAT]
High Explosive Anti-Tank - This weapon fires anti-armor chemical rounds. Its AP value will remain the same whatever the range to the target. This is as opposed to [KE].

[NPLM]
Napalm - This weapon uses napalm. It is likely to start fires in woods or buildings, but is also a terror weapon affecting the target’s morale within an area of effect. Note that this tag is generic to all incendiary weapons even if they are not technically napalm-based in reality.

[KE]
Kinetic - This weapon fires anti-armor kinetic rounds. The closer it will get from its target, the higher its AP value will rise. This is very important to know - weapons with the [KE] tag, including most autocannons and tank cannons, will do significantly higher damage close to the target. This means that even very weak guns will do good damage in tight quarters.

[RAD]
Radar - This weapon uses radar guidance, making it vulnerable to anti-radar missiles. Turning the weapon off will avoid this threat.

[SA]
Semi-Active - This missile is guided but can be fired on the move. Its operator needs to aim at the target until the impact. This is sort of a halfway between the [GUID] and [F&F] tags.

[SEAD]
Suppression of Enemy Air Defenses - This anti-radiation missile will lock on enemy radar and be guided on them as long as they remain active. These weapons tend to fire automatically at the first radar they see.

[SMK]
Smoke - This weapon fires smoke rounds. Smoke screens don’t deal any damage, but block any ground unit’s line of sight. Only artillery units have this ability.

[STAT]
Stationary - This weapon can’t be fired on the move.
Units: Unit Information Panel II
All weapons also have a caliber. This is good to know because in general, higher caliber equals longer range and higher damage. Caliber also shows you Radar weapons.

Underneath that are each individual weapon’s performance ratings in eight categories. Let’s consider the M1 Abrams tank’s main gun:


Quality is color-coded for your convenience; the colors range from red, orange, green, to blue. While I find it helpful to consider the actual numbers instead of just looking at the pretty colors, this can do in a pinch.

The first three categories are the weapon’s range against ground targets, helicopters, and airplanes. Only anti-air guns and the Canadian ADATS can target all three categories at once. Range affects your weapon’s hit chance and, in weapons with the [KE] tag, damage as well. Close range applies a damage bonus to [KE] weapons that increases exponentially in closer quarters, which means even a relatively weak gun can do major damage at very close range.

Below that is base accuracy. Accuracy translates to 5% hit chance per point of accuracy - so an Abrams tank with its accuracy value of 8 has a base hit chance of 40%. This base accuracy is multiplied by the unit’s veterancy multiplier to figure its useable accuracy. Remember this?


Doing a little math, this gives a Trained Abrams tank a 44% base hit chance, and a Veteran Abrams tank a 54.4% hit chance - meaning the veteran tank starts with a 10% better base hit rate!

Accuracy increases at short distance. A high-veterancy unit in close quarters can occasionally get a greater than 100% chance to hit - when this happens, the extra hit chance is added to critical hit chance. You probably won’t need to worry about that in battle, but just so you know.

Accuracy decreases when firing; this decrease is a function of the unit’s stabilizer - more on that later. Accuracy also decreases with unit morale, to the point where a panicked unit will be hard pressed to hit anything at all.

A weapon’s power is given in two values - AP and HE, or Armor Piercing and High Explosive. A weapon need not have both AP and HE characteristics. AP damage is the base damage applied to enemy armor - if you have a 12 AP gun and hit an armor rating of 10, you will do 2 damage. The formula appears to be (it does not seem to be officially confirmed)
damage = (attack value - armor value)/2 + 1

If the target’s Armor value exceeds the AP value of a shot, the unit will not fire on that target and attempting to do so will see an Inefficient! error. The unit will have to move close enough for the proximity bonus to AP value to exceed the target’s Armor value.

HE power is like AP power, but HE does not damage armor like AP does. However, HE shells deal splash damage and are significantly more effective against infantry and unarmored targets.

Suppression is morale damage per shot. Higher values are more likely to stun targets, and will reduce enemy targets’ morale state faster. Of course, all of this is multiplied by the rate of fire. The rate of fire is, obviously, the rate at which the weapon fires when engaging. Higher ROF means the damage and suppression values are applied faster. In artillery units, rate of fire shows you how many rounds per salvo are fired.

Below the weapons are the unit’s armor values.


As you can see, every unit has four different types of armor: Front, Side, Back, and Top. The frontal armor is always the heaviest, while Top and Rear armor are always the lightest. Armor value decides the damage caused by hits. We already discussed how side and rear armor necessitate maneuver warfare, but know that top armor is hit by direct hits from artillery pieces and from bombs, and maybe from helicopter autocannons (this doesn’t seem to have been officially confirmed or denied, to my knowledge).

The bottom of the unit information card gives other assorted important information.Some of these stats have a range that goes None, Bad, Poor, Normal/Medium, Good, Very Good, Exceptional.


The strength figure denotes how many hit points a unit has. In infantry squads, it denotes how many men comprise a squad.

The size figure affects enemy hit chance - large targets are easier to hit than smaller targets. A Big target gives a slight bonus to enemy chance to hit, while a Small target gives a slight debuff to enemy chance to hit. This appears to be five to ten percent either way, but the exact figures are apparently not publically known. Size does not affect range or chance to spot a target, despite popular belief. Oh, and in aircraft, this stat is called ECM, but it appears to function similarly - better ECM equals smaller hit chance.

Optics dictate at what range a unit can spot other units. Recon units, obviously, usually have Very Good or Exceptional optics, while non-recon units generally have Poor or Bad optics. There is one important thing to know here, and that is that all units actually have two recon values, of which only one is shown - those are optics for ground units and optics for air units. Anti-air units show you their optics value for air units, while all other units show you their optics value for ground units. This is why Radar AAA and SAMs frequently have Exceptional optics on their unit card. Recon units will generally be able to see both air and ground units well.

Speed and Road Speed are two different things - Road Speed is your speed during Move Fast orders, while Speed is the base speed for basic move. It is Speed that can be affected by things such as terrain, morale, and so on. The fastest road speed vehicles are 150km/h.

Stealth does what many people think Size does - they affect enemy chance to see the target; stealthy units can get closer to recon units before they are spotted. Few vehicles have decent stealth, while most small infantry squads have good stealth.

Fuel Capacity, measured in liters, measures how much fuel the vehicle can hold. Autonomy, a related figure, shows you how far a unit can travel before running out of fuel completely. Autonomy divided by fuel capacity gives you fuel efficiency (gas mileage), if you’re curious.
Units: Unit Information Panel III
Stabilizers are extremely important information. Stabilizers allow units to fire accurately on the move. Stabilizers demonstrate a vehicle’s accuracy on the move according to this table:


Again, units without stabilizers should not fight on the move. Use the Attack Move command to get them to move, but stop to fire at targets. Units with stabilizers put up an exceptional fighting retreat with the Reverse Move command. As you can see, movement applies a steep penalty to accuracy, even with bad or decent stabilizers. This is why attacking involves so much more than merely running at the enemy, and why defenders have such an advantage.

Oh, and be aware that aircraft have stabilizers too, but since all aircraft move at a fixed speed, it’s not entirely clear what they actually do.

Year and Type are irrelevant to gameplay, but important to deck building. Category B restricted decks may not use units with a Year later than 1980, and Category C decks may not use units with a Year later than 1975. While we will go into more detail about deck types later, for now know that Type shows all of the thematic decks that a unit is available for.

Finally, know that most units come in series, with several variants. For example, the M1 Abrams tank series has three variants: The M1 Abrams, the M1IP (“Improved Performance”), and the M1A1. In general, more expensive variants will have improved capabilities or better weapons than cheaper variants; it is up to you to decide on the variant you want based on your needs.

Now that you know how to read unit information, what are the units of Wargame: AirLand Battle? Well, Wargame has a fantastic armory viewer that allows you to view every unit in the game. The units are divided into eight different categories:

  • LOG - Logistics
  • INF - Infantry
  • SUP - Support
  • TNK - Tank
  • REC - Recon
  • VHC - Vehicle
  • HEL - Helicopter
  • PLA - Plane

The distinctions between these categories are very important for deck construction, but for now, we’ll just go through them one category at a time. In each category of unit there are multiple different types, and here I’ll offer examples, advice, exceptions, and my personal experience and opinions on how to best take advantage of each units’ capabilities or weaknesses. I’ll also add my suggestions on units I find noteworthy, at least so you people will stop asking me what the best unit in a category is. My opinions will always be in italics so that it can be easily separated from objective information.
Units: Logistics: Command Vehicles
Ah, logistics - so boring, yet so vital. Our first category includes command vehicles and supply vehicles and the game’s only buildable structure, the Forward Operating Base (FOB).

Command Vehicles

Our first Logistics unit is the humble command vehicle. You should already know how command vehicles control sectors and the importance of keeping them safe and protected, but now we’ll go into the four different types of command vehicles and how they are used. The four types of command vehicles are command jeeps, command APCs and command IFVs, command helicopters, and command tanks. All command vehicles are highly expensive, and all serve the same general purpose of capturing command sectors. Oh, and command vehicles are the only mandatory unit in deck building - all decks MUST have at least one card of command vehicle.

Command jeeps are the cheapest command units, ranging between 100 points and 110 points. Every nation has one. They are all unarmed, save the American Humvee CP. They all have relatively identical stats, except the more expensive ones are slightly faster. They are all unarmored, and will die if enemy forces so much as poke at them. They are:


Command APCs and Command IFVs are armored command vehicles that are lighter than tanks. Every nation has at least one. While there are differences between APCs and IFVs, the differences are a little arbitrary and blurry for the purposes of command vehicles. In general, IFVs are better armed and armored than APCs but are more expensive. They generally have lighter armor, 1 to 2 points, and range in cost between 120 and 160 points. While they have light armor, they will still die to any serious effort to kill them. An unusual example in this category is the Soviet BRM-1K, which is the only command vehicle with Exceptional optics. They are:


Command helicopters are helicopter command vehicles. They have the advantage of being significantly faster than any ground-based command vehicle, but they are very squishy and will likely die if they pass a lucky anti-air unit. They can be used to quickly seize a forward point, especially a forward spawn zone, but be careful not to outrun their guards! They are:


Sandy's Choice: T-80UK
Command tanks are the final category of command vehicles. These are fully-functional tanks that also operate as a command vehicle. They are expensive, very limited, and while they are as armored as their non-command counterparts, they will likely draw all the fire an enemy can put on it. They are best used behind a combined-arms force in assaulting enemy spawn zones, where they can park and thus “neutralize” the contested zone. This is essential for stopping enemy reinforcements. It’s important to remember that even though they are tanks, they are also expensive command vehicles, and you should not use them to do your fighting for you. Think of them as any other command vehicle, but limited and with the ability to survive artillery strikes and fight their way out of minor situations. This category also contains the game’s single most expensive unit, the T-80UK. They are:


Now that you know the different types of command units, let’s discuss their differences and how they are individually used. First off, it bears repeating that ideally, command vehicles should never get into a fight, ever. If one does get into a fight, you have already done something wrong. That said, you should prepare for the possibility - in your relatively secure rear zones, this means flank security, recon, and an effective IADS zone. In your front, it means you should retreat and regroup if a threatening force manages to break through your lines and guns for your command vehicles.

Command tanks should only be used for seizing zones at the front. Leaving them in rear zones is a totally useless waste of points and limited units - you’d better serve them by investing those points in a recon unit and some MANPADS to scatter around instead. A good general rule of thumb you can use is that the closer your CVs get to the front, the more likely they are to have to evade enemy fire, and thus the more armor they should ideally have.

Some people prefer to use the unarmored command jeeps as their general-purpose CV, while others prefer to use cheaper command APCs and forgo the use of command jeeps ever. I prefer to use command jeeps, and see the points spent to get an APC as being an unnecessary waste, but it depends on your personal tastes. As with all of my opinions, experiment for yourself and see if you agree, I am certainly not the final word on that debate. As for command tanks, I only take them in my decks designed to make armored breakthroughs. Oh, and command helicopters just suck; they’re no more durable than command jeeps but they lack the ability to hide in forests.
Units: Logistics: Supply Vehicles
The other section of the Logistics tab is supply vehicles. We’ve already learned about the importance of logistics and supply management - these are the vehicles that make that happen. Supply vehicles come in two flavors, supply trucks and supply helicopters. Aside from the obvious difference, these units act the same. This section also includes the Forward Operating Base. One other interesting point of note is that supply vehicles have unlimited range, as they do not consume fuel when moving.

Supply trucks are your staple logistics vehicle. Though they vary in speed, capacity, and availability, all of them are trucks that ferry supply to your front line. They are all very squishy, and explode when killed. This means you should try to avoid bunching them up, where one death will kill the rest in chain reactions.


Supply helicopters are just like supply trucks, except airborne. They have a speed advantage over trucks, in that they fly over obstacles instead of following roads and move significantly faster. However, they can be spotted from a great distance when they’re airborne, so you should never use them for resupplying hidden forces the enemy doesn’t know about - when I see an enemy supply helicopter landing somewhere I thought was empty, I immediately reach for my artillery and a recon chopper to check it out. Don’t betray your hidden troops!


Finally, there is the Forward Operating Base. All nations have an identical FOB, each one costing 100 points, coming at 1 per card (2 per card in Cat C decks) and supplying 10,000L of supply. They are the most cost-efficient supply sources, but not the most card-efficient supply source, supplying only 10,000L per deck card. You can calculate card-efficiency by multiplying how many vehicles per card you get times the amount of supply capacity of a single vehicle. FOBs are peculiar in that they must be placed in the deployment phase of a match and cannot be brought in later. So, any FOB in your deck that you do NOT place with your starting forces is wasted. Like your first command vehicle, your first FOB is automatically placed and deducted from your starting pool of points. FOBs can be used to refill supply vehicles, but generally, they’re best used to resupply artillery. They are also notably durable, taking quite a bit of directed fire to actually kill.

I prefer to take one card of FOBs for my artillery and two cards of the most card-efficient supply trucks available. Some forgo FOBs entirely and get only trucks, preferring the card-efficiency to the cost-efficiency. I do not like supply helicopters, they’re expensive, fragile, and tend to betray the location of hidden units.
Units: Infantry: Overview
As some troops will tell you, it always comes down to the infantryman and his rifle. Though they are uselessly slow on-foot and vulnerable to many types of attacks, infantrymen are highly cost-effective, cover a variety of roles, are as previously discussed great in buildings, are very stealthy, and suffer no loss of speed in forests. They are capable of gunning down anything without armor and almost all carry some form of anti-tank rocket or missile as well. They are best used to seize and hold territory and operating in forests, and come with a variety of great mobility options. Ergo, they are indispensable when used correctly. However, they do require some knowledge to differentiate the various roles.

Infantry

First, let’s discuss infantry weapons. Different types of infantry firearms behave differently. All infantry come with a primary firearm and a secondary weapon. Some also carry a squad machine gun as a third weapon. Understanding how these weapons work is important - they showcase how these units are best utilized and why cheaper infantry sometimes outclass heavier infantry. First, know that infantry rifles have different types of accuracy, and these are accuracy when stationary at range, accuracy when moving at range, accuracy when stationary in CQC (in contested urban zones), and accuracy when moving in CQC. The accuracy value given in the unit information panel is the stationary ranged accuracy value. This is why some troops with crappy inaccurate submachine guns suddenly kick ass in urban warfare.

These are different types of firearms modeled in Wargame:
  • Assault rifles are what arm the majority of infantry. These are guns like the AK-74, M-16, Vz.58, etc. and are usually in 5.56mm or 5.45mm. They are jack-of-all-trades firearms just like in real life, they do not excel in any one category but are also not lacking in any category. They have decent accuracy both static and mobile, are reliable in CQC, and have decent suppressive power.
  • Battle Rifles such as the FAL, G3, etc. are semi-automatic 7.62mm rifles. They tend to have high power, long range, and good static accuracy, but less ammo than assault rifles and they don’t perform as well in CQC. While they are very accurate when stationary, they are very inaccurate when on the move.
  • Carbines and submachine guns such as the CAR-15, AK-74SU, or SMGs like the MAT-49 have low base accuracy, but don’t lose much in movement. They tend to come in assault rifle calibers for carbines, or 9mm PB for SMGs. They are best in CQC, but lack suppressive power and hitting power relative to other firearms.
  • Bolt-action rifles such as the MAS 49/56 and the Mauser rifle, are mostly older WW2 surplus rifles used to arm cheaper infantry. They have surprisingly great static ranged accuracy, but suck on the move or in CQC.

The above are all primary firearms, but there are three different third-weapon-slot firearms that infantry squads carry as well:
  • Static machine guns like the PKM, SAW, M60, MG3 etc. provide powerful suppressive fire to most squads, but cannot be fired on the move. These will suppress and kill infantry out in the open very well, and are a threat to unarmored vehicles too.
  • Close-quarters machine guns like the l.MG3, RPK, etc. are lighter variants of static machine guns and can be fired on the move and in CQC. This makes them really, really good for urban warfare.
  • Sniper rifles are long ranged, highly accurate single-shot weapons that will instantly kill an infantryman and instantly panic an entire squad.

Second, know that infantry come with transports. When selecting infantry for your deck, you must also choose which transport they come in, and the cost of the transport vehicle is added to the cost of the infantry squad. The choice of transport is very important, and hinges on how you intend to use the infantry you’re transporting. Infantry transports will be discussed in their own section.

Finally,, there are different types of infantry to consider. These types are line infantry, ATGM infantry, MANPADS, Sappers, heavy infantry, Special Forces, and Reserves. Additionally, there is also recon infantry, but they will be covered in the Recon section as they are under the Recon tab. But know that they follow the same combat rules as other infantry.
Units: Infantry: Infantry I
Sandy’s choice: Jager, Mot.-Schutzen, Piechota Zmech.
Line Infantry are your basic, all-purpose infantry forces. They are generally unspecialized, and usually come with an assault rifle, an RPG of some kind, and a static machine gun. They are generally useful in all infantry roles, but are not specialized. They are usually 10 to 15 points, and come in squads of 10. Let’s consider the line infantry in this game:


These are your bread-and-butter infantry, and are quite useful in assaulting towns and on the defensive. They can bog down enemy forces in urban zones and annihilate tanks in close quarters, and are cheap enough to afford in sufficient numbers. I consider no deck to be complete if it lacks line infantry in cheap transports (15 points total) - they are that important. By the way, Jagers are my current favorite NATO line infantry. Dat MG3, and they come in cheap 5-point Dornier 205 helicopters.


Sandy’s choice: RBS 56, PTUR Konkurs, Milan F2
ATGM infantry are small squads that carry ATGMs with them. They are mostly small (with strengths of 2 or 5) squads and their price varies with the quality of their missile. They are not for taking on armor in close quarters - they are for sniping armor at long range. Because they are relatively cheap but a hard-counter to tanks, they are quite good on the defensive and very cost-effective. They remain one of the reasons why securing towns at crossroads is so important, for they are able to harass passing enemy forces and damage or destroy even heavy tanks.


These are pretty great on the defensive, and are a great way to kill tanks on the cheap. Higher-end ATGMs can knock out even heavy armor. Put them on the outer edges of towns so they have clear lines of sight. Alternatively, put them on the sides of hills so they have LOS over the surrounding forests and they can snipe at passing armor. Oh, and for the record, Dragon ATGMs are laughably ♥♥♥♥♥♥. Seriously, spare yourself this fate. Remember - dragons: Not even once.


Sandy’s choice: LAAD Stinger, PZRK Igla
Man Portable Air Defense Systems, or MANPADS, are infantry units with small SAM launchers. They are generally the cheapest SAMs available, and are the other major reason to take towns at strategic location. Because of their low price, you can afford to scatter them around in numerous locations. They are not SEAD counterable. Because of these facts, they can make up a crucial part of your IADS zone, allowing you to keep cheap SAMs in less pressing areas so you can keep your high-performance expensive units near the front where they’re needed most. They also deny the enemy the ability to cheaply bomb your troops in a town.


I consider these to be absolutely essential not-optional must-haves. Lacking MANPADS is one of France and West Germany’s biggest weaknesses. I LOVE leaving these all around the map, especially in loose buildings and on mountaintops, just to make sure no place behind my lines is relatively safe for enemy air to operate. They’re also good at denying helicopter rushes and for placing on the edges of the map to deny attempts to sneak helicopters past your lines. Oh, and I try to always keep one near my CVs, as well. They’re cheap insurance and a great way to fill out an IADS zone on the cheap.


Sappers, or flamethrower infantry, are infantry bearing either flamethrowers or incendiary rocket launchers. They excel in removing enemy infantry from cover, and as such have a unique and useful role to play, especially in urban combat. Know that their rockets or flames will not harm armored vehicles, but they have an unmatched capability to send enemy troops running.


I don’t like sappers all that much, and rarely use them. While their abilities are interesting, I don’t find that they do much that I can’t just do with line infantry or reserves. There’s nothing totally wrong with them, and if they fit your style go for it - but I find them redundant when I already have infantry good at fighting other infantry. Just...meh, why waste a card slot?

Units: Infantry: Infantry II
Sandy’s choice: VDV, Stormer, Vandoos
Heavy infantry, also called veteran infantry, are higher-end infantry usually that come in larger squads of 15 and generally have better weapons than line infantry. They include Marines and Paratroops - these two types of infantry are generally used for similar purposes, but in different thematic decks. They can do everything line infantry can do, but are tougher fighters and more durable. They also have a 50% ROF buff over regular infantry, meaning they can generally outgun equal numbers of line infantry. However, they are also more expensive.


I find myself lacking a use for these guys. While they are cool, they occupy that space between special forces badasses and line infantry, and their added toughness is not usually worth doubling the cost of line infantry in my opinion. While I never look forward to having to dig these bastards out of towns by force, I’m usually able to do it with line infantry and reservists. In my opinion, quantity is superior to quality in urban warfare. However, there’s nothing wrong with them, and I occasionally do have uses for them.


Sandy’s choice: Kustjagare, Kustjagare, Kustjagare!
Special Forces are the true kings of infantry. These badasses have carbines that are like SMGs but better in every way, they have CQC machine guns, and typically have very good anti-tank weapons as well. They are great, well-rounded, powerful troops who should not be underestimated. They are also very fast, running at 28km/h or 33km/h, which means they’re surprisingly mobile even through hills or other places their transports can’t go. They’re generally multipurpose and great as ambush troops or for operating behind enemy lines. They have a staggering 100% ROF bonus over line infantry, meaning they’ll cut down regular troops without breaking a sweat. However, they are also the most expensive infantry in the game, and they will die to anti-infantry counters pretty much just as fast as any other troops. Finally, note that many countries have special ops troops in the Recon tab; they are not listed here.


I LOVE these guys. You will not be sorry taking an up-vetted force of special ops troops in helicopters. Sneak them behind enemy lines and they will absolutely wreak havoc. They’re great for assassinating HVTs, and are agile enough to flee into forests or hills and thus remain out of the enemy eye. Additionally, they’re great for force-landing in enemy towns by surprise, and can generally hold their own until relieved by line infantry in numbers. They’re very, very good when working in concert with recon infantry, as well. If you’re considering using heavy infantry, consider investing the extra 5-10 points and going for specops instead. You will not be disappointed.


Sandy’s choice: Haer Hjemmvaernet
Reservists, also called conscripts, are the last category of infantry. These guys are 5 to 10 points and are generally cheap, providing a low-cost-high-availability alternative to line infantry. They can generally do whatever line infantry can do, but not as well, with less effective firearms and hand-me-down antitank weapons. Don’t underestimate them, though - they still have working firearms and antitank rockets, and while they may need several shots to kill a decent tank, they’ll still get shots off rapidly in tight quarters. Additionally, many of them come with SMGs, which are surprisingly effective in CQC. SMG-armed reservists in large groups are perfectly capable of driving off heavy infantry all on their own.


NATO has some reserve infantry, especially the Danish Haer Hjemmsvaernet, that don’t sacrifice much in quality, but I’m not impressed with Soviet reserves. If you passed reserves over, give them a second look. I find their true value comes from the fact that they’re cheap, spammable, and you don’t have to fret too much over losing some, since they’re only a few points. They’re great for leading infantry charges, while heavier and more valuable troops come up behind them to mop up. They’re also great for filling out relatively “safe” urban zones just to make sure enemy infantry can’t sneak past you, or for combing nearby towns or forests if you suspect enemy troops are about.
Units: Infantry: Transports
Of course, infantry are going nowhere fast without their transports. There are four classes of infantry transports: Trucks, APCs, IFVs, and Helicopters. The choice of what transport your infantry come in can be just as important as what infantry you take. These transports are not interchangeable and should not be chosen arbitrarily - instead, they are a reflection of your tactical doctrine. When selecting infantry in a deck, you also select their transport at the same time. As with infantry, expensive transports are not always superior to cheap ones. If you shell out the cash for more expensive transports but never use them to their potential, that’s money you needlessly wasted. Oh, and note that transports are visible in the armory under the Vehicle and Helicopter tabs, but for the most part can only be purchased with infantry.


Sandy’s choice: M998 Humvee, M6 Mosegris
Trucks are the first type of transport. These are all unarmored, unarmed vehicles that cost 1 point and all have identical stats - 110km/h road speed, 50km/h off-road speed, 3 strength (meaning they will die if the enemy so much as sneezes in their presence). These are tricky to use - don’t ever send them with your front lines into a fight, they will die even to splash damage and get your infantry killed. However, they’re great for transporting units that generally travel around behind the front, like MANPADS and ATGMs.


My advice is not to underestimate these things. I love using them in infantry blitzes, because I don’t really care if they die. Empty trucks seem useless, but they have their uses as well - charge them at ATGMs to waste enemy missile ammo, or use them ahead of your forces to draw fire and thus scout out enemy locations. Again, they only cost one point.


Sandy’s choice: BTR-60 series, BTR-ZD Skrezhet
Armored Personnel Carriers, or APCs, are lightly armored troop carriers that are generally armed with medium or heavy machine guns. They generally have one point of armor all around, and some variants may have additional capabilities, like ATGMs, and cost between 5 and 15 points. They are a halfway point between unarmored trucks and IFVs. Don’t expect them to survive any serious fire, but a little bulletproofing can go a long way. They’re best when you want the cheapest possible option to survive a little gunfire, and some provide some interesting capabilities. Also note that wheeled APCs are faster than tracked ones on roads.


I generally use APCs when I want the cheapest possible transport that is not a truck. Don’t expect very much out of them for the most part, but don’t pass them over too quickly either - they’re an affordable solution to trucks’ lack of survivability and a good way to keep costs down. Some models provide autocannons, AA guns, or ATGMs that can provide a significant source of extra firepower.


Sandy's Choice: M2 Bradley IFV, Marder 1, Strf 9040 BMP-1D, BMP-2, Strf 9040
Infantry Fighting Vehicles, or IFVs, are transports that are also armored fighting vehicles. They usually come with decent armor and potent autocannons or other weapon systems that provide your troops some serious fire support. Their downside is being expensive, with more expensive variants being the sort of thing you buy for the vehicle while also getting an infantry squad for free. However, infantry when backed up by autocannons and higher-end ATGMs can be a serious force even in relatively few numbers; don’t underestimate what a handful of survivable autocannons can do. These are also very good for accompanying your front-line forces, where they often can contribute even to outright tank fights.


I like these things, but with the caveat that they’re no replacement for cheap infantry. If you’re looking for some variety in your infantry, consider bringing some of these as well as some cheaper transports for the same type of infantry, so you cover a wider range of options. With some high-end vehicles, like the Bradley, you might as well just consider yourself as paying for the vehicle and getting a free rifle squad with it. Drop off the infantry, then use the vehicle as part of your forces, or as fire support for the infantry.


Sandy’s choice: UH-60A Blackhawk, Dornier 205, HKP 3C, Mi-24/25/35 series
Transport helicopters are, with a notable exception, usually lightly armed helicopters used to transport infantry. They are very fast, but they’ll die pretty quickly if engaged. Use them as a light, rapid assault or response force, just like they’re used for in real life. It’s best to send them to rapidly seize urban zones before the enemy forces get there, or to encircle enemies and occupy towns behind them. Note that in general, PACT has heavier-armed and more expensive helicopter transports than NATO, who have smaller, lighter-armed, and much cheaper options.

The Mi-24/25/35 series are full Hind heavy gunships which are also transports, and NATO has no direct equivalent. These can make infantry incredibly expensive to bring in if you don’t also have cheaper options. Consider using Hind gunships with recon infantry in a hunter-killer team, or for providing deep-insertion infantry with heavy anti-armor support.


At the same time, I find these indispensable but also warn not to overestimate them. They will die too quickly, with the exception of the Mi-24 series, to be of any real use in a fight. However, they have other uses. I try to always have heli-borne special forces and/or recon infantry in my general-purpose decks. An advanced technique is to sneak these helicopters along the fringes of the map around their recon screen and get them behind enemy lines, where infantry can do all sorts of damage before they’re spotted. This is much harder to pull off against experienced players who watch for this sort of mischief, though.

Also note that a few of these helicopters are quite cheap, like the Dornier 205 or HKP 3C, and don’t significantly add to infantry unit cost. This can be a powerful advantage. Because these helicopters are only five points, you can use them as a rapid scout hoping to spot high-value targets like CVs or probe enemy air defenses, and not worry too much if they’re shot down. Alternatively, if you manage to slip some behind the front lines and your enemy doesn’t have an adequate IADS zone, they can kill unarmored CVs or artillery pieces with their machine gun before the enemy will likely notice and respond.
Units: Support: Artillery I
Support

The Support tab is one of the most valuable areas of your deck. This tab covers two critical categories: Fire Support and Air Defense. Considering both of these are indispensable and have a variety of tactical options necessary for maximum utilization, your Support cards are going to be one of the harder choices you’ll make in your deck. The true problem is almost that you’re too spoilt for choice!


Artillery
The first category of support units is artillery. Artillery pieces actually come in four flavors - mortars, barrage artillery, tube artillery, and rocket artillery. These types of artillery are each used differently and in different roles, and it’s essential to your understanding of the game that you are able to differentiate them at a glance. There are, however, some concepts that apply to all artillery pieces.

First off, you must understand the importance of counterbattery fire. Even if you don’t have recon eyes on enemy artillery pieces, the shots they fire can be seen, which means you can pinpoint where a shot came from if you can glimpse where the shots originated from. This is not a gameplay flaw; it is an abstraction of real-world counterbattery techniques. If you do glimpse where shots came from, either send your own artillery at that point or at least flare it with “enemy arty” or something along those lines. Don’t just say “arty”, because your allies don’t know if you’re pinpointing enemy arty or calling targets for your own arty.

You should also get in the habit of moving your own artillery pieces after every salvo. Why? Because smart enemies will send shots back at where your artillery came from, too! Against smart enemies, you’ll frequently see shells hit shortly after your own shells fire. You don’t have to move them clear across the map - just do slow circles around your FOB. The important thing is to get in the habit of moving after every shot. It’s just a small precaution but it can save your artillery from destruction.

Second, understand differing time-to-target. Time-to-target refers to the amount of time it takes for an artillery piece to go from receiving a fire order to the shells landing on target. This can vary based on range, aiming speed, and type of artillery. This is particularly vital when trying to hit moving targets or when you need shells to land ASAP. Honestly, time to target is just something you will have to have practice with - you will develop a sense for how much time it takes for shells to reach distances from different artillery systems.


Sandy’s choice: 2S9 Nona, ShM-120 PRAM-S, PzMrs M113
Mortars are very short ranged in comparison to the others (typically between 3000 and 5000m, the Russian Nona is considered long-ranged at 7700m). These are best kept a short distance behind your front lines. Their advantages include fast aming time, fast reload time, short time-to-target, and most of them are relatively accurate with a small impact radius. They are nigh-indispensable in urban warfare for their ability to hammer one sector without touching another. They also carry a lot of ammunition, which means they won’t run out without constant resupply.

Their downsides are their relatively weak HE power - you're not going to kill tanks with these things. They're also micro-heavy, since you have to keep them at a safe distance behind what should be a moving front AND keep them moving to avoid counterbattery fire.

On the defensive, they are excellent for stunning/panicking advancing enemies with their short time to target. On the offensive, their short time-to-target allows them to hit enemy ATGM infantry with good effect, deliver smoke and support assaults on towns. They can also deal good morale damage to armor.


While mortars are very good at their role, I generally only use these in my armored front-line decks where they’ll get the most use. They can often replace barrage artillery in concert with a card of heavy artillery. However, if you’re playing NSWP, you really should just take Danas instead. They can do everything mortars can, but better.


Sandy’s choice: BKan 1A, 2S19 Msta, Dana/wz.77 Dana
Barrage artillery, also called medium artillery, is your basic artillery piece. They have moderate range (between 10,000m and 30,000m typically) and moderate spread. On medium maps they can generally stay with your FOBs; only on the largest maps should you bother moving them. They are moderately supply-heavy. Their advantages include being able to pound enemy armored advances and provide a wider array of smoke than mortars. They can cause a fair amount of damage and even casualties in clustered enemies. They aren't as micro-heavy as mortars, though it's still a good idea to keep them moving back and forth because they will attract the most counterbattery fire - this is because they have more distinctive firing sequences.

Their disadvantages come mostly from lack of specialization; they aren't accurate enough to "snipe" nor are they fast enough to provide the same degree of supporting fire as mortars. They have longer time-to-target than mortars, so they're best used against non-moving enemies or for pounding areas of forest or so on where you know there to be enemies.


These are best used as jack-of-all-trades artillery; they're capable of causing damage and killing lighter armor in enemies, provide a good amount of morale and stun damage to targets, and aren't too supply-heavy. They really shine in providing smoke, since they can hit a wider area than the others. By the way, faster medium artillery pieces like the Czech Dana are also really good at accompanying front lines; they can be kept further back than mortar pieces, and can provide more heavy fire than mortars. This can make them effective mortar-replacements in a deck.
Units: Support: Artillery II
Sandy’s choice: 2S7M Malka
Heavy tube artillery are the other category of tube artillery. Noobs often confuse them with your basic artillery because of a similar visual appearance and lack of general distinguishing in the unit stat sheets. They are devastating when used right, but lackluster when used wrong. They have extreme range (30,000m+, the Malkas have over 40,000m) and can hit clear across the map even on large maps. The other thing you'll discover, though, is that they are highly accurate at extreme range without shot correction. This suits their preferred role perfectly - use them for sniping high value targets and for counterbattery fire. Additionally, they have the best HE damage of any artillery piece, which means they can kill most units on impact, even tanks.

Their downsides are their extremely long time-to-target, which makes them nigh-useless for attacking a moving front, and their low shot count. Don't use this as tactical artillery to back up your front lines - leave that for the others. Additionally, they're usually more expensive than other artillery. They also take much longer to reload than mortars or barrage artillery. Their low shot count and low spread also makes them relatively less useful for smoke, too, but they’re better than nothing in a pinch.


I advocate always having at least one pair of these on hand in any deck in which they are available. Keep them hotkeyed so that you can quickly select them without scrolling away from your field of view. Use them as your personal sniper rifle. They're excellent for taking out static CVs, SAMs, or for counterbattery.


Rocket artillery is the last type of artillery. Noobs LOVE rocket artillery because of its visually impressive firing sequence, but don't understand how to use it at all. Rocket artillery has very long range, but low accuracy, and shot correction does not help. This actually makes it more suitable for its primary purpose, but leads to a lot of misuse. Their advantage is their ability to morale-damage a wide area. Used correctly, rocket artillery can stun an entire front line, leaving them vulnerable to an assault or turning a relentless enemy advance into a panicked mess. A more nebulous bonus is that human players (well, noobs) often panic at the sight of a huge wave of rockets hitting their precious forces, which causes them to recklessly overreact.

Their disadvantages are numerous. They are EXTREMELY supply-heavy. They will eat FOBs in a couple of salvos at most. If you use allied FOBs to resupply your rockets, your team will get pissed at you. This is, in fact, a common form of griefing, or just plain retardation. They are also highly expensive. They are almost guaranteed to draw counterbattery fire and must be well-defended with AA systems and micromanagement. They have extremely long reload times - don't bother trying to hit the same situation twice with one battery. Oh, and they have very low damage - you'd get lucky to kill anything with it at all. They also have long minimum ranges. You can't move them in to make them more accurate.


Using them is tricky, but can be rewarding. When used wrong, they'll empty your entire supply and accomplish little, while pissing off your allies and wasting your command points. But when used correctly, they'll stun entire advances single-handedly and turn entire battles in your favor. Use them on large, wide concentrations of enemies just before attacking with conventional forces, to make the most of their high morale damage. Be sure to keep them mobile and defended, because they WILL be targeted. Personally, I usually forgo the use of rocket artillery - while they’re great in a highly specific role, the honest truth is you’ll be just fine with more medium artillery instead.


The TOS-1 Buratino is technically a rocket artillery piece, but it's easier to consider its Russian designation as a "heavy flamethrower." It is not really used like other rocket pieces. Instead, it fires napalm rockets. Its advantage is probably obvious - it can set a wide area aflame. If you're fighting a NATO player stupid enough to cluster an entire assault force in a small group, you will wreck that entire force with one blow. Its disadvantages are lack of availability and high cost (150 points, you only get get one per deck card) and very long reload time (it takes several minutes to reload a Buratino). It also takes a long time to for the Buratino to aim its salvo once the order has been given, meaning that it must be protected while it gets ready to fire. Additionally, they are one of the most supply-hungry units in the game, a single salvo will eat a good portion of an FOB alone. You will only need to use your Buratino a few times in a match, in pivotal moments.

They are tricky to use. You must keep them mobile, bringing them up to the front quickly and then scooting back to safe zones for resupply once their rockets are fired. They are high-value, high-damage targets, and so NATO players WILL try to kill them on sight with as much vigor as they'd give a command vehicle. But they can break a determined defense in a town (by burning the entire town to the ground) and can stunlock an entire NATO offensive single-handedly when used correctly, and so they are very useful to PACT players.

An advanced technique is to intentionally near-miss your Buratinos with tank shells to bump it up to Worried status, which increases its impact radius but doesn't seriously diminish its capability to stun things inside its impact radius. I recommend practicing this in an empty skirmish match where you won't be pestered for a while, so you can learn the distances needed.
Units: Support: Air Defense
Air defense systems are the other half of the Support tab. However, there are some non-radar SPAAGs which instead fall under the Vehicle tab. This will be important later, as it allows you to accept some downgrades in exchange for freeing up a precious Support slot in your deck. We already went over the different types of air defenses under the Integrated Air Defense Systems section, but these are the ones that fall under the Support tab: Radar SPAAGs, non-radar SPAAGs, Radar SAMs, and non-radar SAMs. In general, radar-guided units are superior to non-radar-guided units, but are also SEAD counterable.

The problem you face when deck building is that it’s almost impossible to have a perfect IADS and a perfect artillery complement at the same time. The Support tab is a perfect example of why deck building is so variable and so fun - you’ll never have everything you need. So you’ll have to make decisions about what parts of your IADS are most lacking or most vital.


Sandy’s choice: M48 Chaparral series, MT-LB Strela-10M, 2K22 Tunguska series
Non-radar SAMs are generally more useful against helicopters than against jets. They generally have lower range and less capabilities than Radar SAMs, but they also are not counterable by SEAD aircraft and are generally cheaper and more plentiful - which means they’re an essential part of building a thorough, robust IADS zone.


I consider these to be an indispensable, non-optional part of a deck. If you can’t get non-radar SAM vehicles, get good MANPADS infantry in the hopes of covering for this lack. They’re not just good at killing SEAD aircraft, they’re a great way to make sure enemy aircraft have nowhere to hide if they shoot past your lines. And because many of these options are cheap, you can afford to bring extra early in the game where points are precious. Oh, and several of these lack the [STAT] tag, which means they can fire on the move - this is essential for escorting mobile tank forces!


Sandy’s choice: 9K33 Osa series, any Roland 2, 9K37 Buk series
Radar SAMs are SAM vehicles that use radar. They are generally longer-ranged and more effective when fighting jets. However, they are also good against mass helicopter rushes because their missiles have a wide splash damage radius. They tend to be your best but most expensive SAMs. These are your heavy-hitters, and these are definitely the star jet-killers.


Another essential part of your IADS. If you lack IR SAMs, definitely stock up on these. However, know that they’re expensive and limited, so protect them and micromanage them well.


Sandy’s choice: M163 PIVADS, Flakpanzer Gepard, ZSU-34-4 series
Self-propelled anti-aircraft guns, or SPAAGs, are vehicles with AAA weapons. SPAAGs with Radar guidance are superior in performance to those without. They’re generally more likely to kill helicopters than jets, but they can also engage jets and at the least stun or panic them, which makes them sitting ducks for SAMs. As such, it’s best if you place them at your front, with SAM launchers further back so they’ll have the easiest time of engaging targets.


Don’t underestimate SPAAGs. They’re affordable, mobile, lethal against helicopters, capable of stunning jets, and they can stun tanks and kill light vehicles, too! I really like them and consider them an essential part of my IADS zones.


Sandy’s choice: FV434 Falcon
Unguided SPAAGs are just like Radar-guided SPAAGs, but cheaper, less capable, and they lack the [RAD] tag and thus the ability to be targeted by SEAD aircraft. Some unguided SPAAGs are in the Support tab, and some are in the Vehicle tab. However, they are generally used in the same manner as guided SPAAGs.


I don’t like taking these if there are better options available. The reason is, Support slots are highly valuable and limited, while Vehicle slots are generally underutilized. If I’m going to take unguided guns, I’m going to do so in the other category. However, they can do in a pinch, and they can still kill helicopters and stun ground units if you use them correctly.
Units: Tanks: Overview
Ah, tanks. Truly the fun part of any deck. Knowing how to use tanks is a huge part of knowing how to play Wargame. As previously discussed, movement, cover, and distance are critically important; it’s nowhere near enough to simply shove your armor at their armor and hope for the best. They are the heaviest, heaviest-armored, and some of the most expensive units in the game. Their cannons can destroy anything on the ground with enough shots. However, just like every other unit, you need to understand the basics of tank warfare to be effective.

Because they’re so useful, just like in real life there are many units in the game whose sole purpose is to destroy tanks. Sending tanks against these units unsupported is asking for them to die like a ♥♥♥♥♥. Don’t do that. When using heavy armor, you must guard against anti-tank units. I know it sounds obvious, but people forget to do this all the time. Then their tank rushes get slaughtered, and they get frustrated, because an expensive fighting force was just effortlessly ruined. Remember, the key to using tanks to their full effect is to liberally surround them with support so they can do their best work without worrying about hard counters.

So, if they get countered so easily, why are tanks useful? They’re useful because tanks are your heavy armor. They’re the units that take hits and keep on moving. They should be absorbing enemy rounds into their heavy frontal armor so that your fragile support units don’t get killed. They are the wall between you and all those squishy specialized units you have set up. They’re what keeps enemy armor from steamrolling your IADS and your artillery and your logistics. They also provide a significant portion of your firepower - while they are not as efficient as ATGMs at killing enemy tanks, they’ll still comprise much of your fighting capability.

One of the important things you need to understand about individual tanks are their stabilizers. As previously discussed, stabilizers allow a unit to fire accurately on the move, and this is absolutely critical to using tanks correctly. Tanks without stabilizers will not hit ♥♥♥♥♥♥♥♥♥ on the move; they should be used in static defense, ambush, or with the Attack Move command. Tanks with good stabilizers are absolutely at their best when on the move. Tanks with good stabilizers should not be standing still. If you use your stabilized tanks as static units, you’re throwing away what is usually their biggest advantage! Use them as part of a dynamic defense, or as instruments of maneuver warfare, but for your mens’ sake don’t throw your advantage away when you have it. When your tanks move, it forces the other guy to move his forces in response - and this is crucial in seizing and holding the initiative in a fight.

Next, you need to understand how range affects tank warfare. Tank guns come in one of three ranges:
  • 1925m
  • 2100m
  • 2275m

While this seems insignificant, the range advantage dictates how tanks are best used. If you send your cheaper 1925m-ranged tanks up against longer-ranged tanks, they’ll generally get a shot or two off before your tanks could even possibly shoot back - and this means they’ll take damage and take morale damage, which ruins their accuracy, which means the enemy will get more shots off...and your tanks will die like a ♥♥♥♥♥. Additionally, longer-ranged tanks apply the [KE] damage bonus at a longer range, too.

Generally, always use the range advantage when you have it. If your tanks have the range advantage, keep the enemy tanks at range! If enemy shorter-ranged tanks rush towards your longer ranged tanks, why would you sacrifice your advantage when you could just Reverse Move and keep them unable to return fire? Conversely, if you have cheaper tanks that lack the range advantage, use maneuver warfare tactics or the Smoke Position command to get your tanks right up close, where their disadvantage is negated by the close distance and shooting first is most important.

Finally, understand how a tank’s various stats relate to one another, and try to intuit how their various stats dictate their role. The three general categories that armor are judged on are mobility, firepower, and armor. Just because a tank sucks in one category doesn’t mean the tank sucks, if it makes up for it in another category. Generally, you will not get exceptional stats in all categories without a seriously high price to go along with it. You don’t need to spend 120+ points per tank to get a good vehicle - you just need to know your units’ capabilities and limitations.

Mobility refers to tactical mobility - the ability to move around the battlefield quickly. This is a function of autonomy, off-road speed, and stabilizers. Units with good stats in these areas are said to have good mobility, and so are best at maneuver warfare and dynamic defense.

Firepower is pretty obvious, and is a function of the quality of a unit’s main cannon. Range, AP value, and rate of fire determine a tank’s firepower rating. Better firepower makes a tank better at destroying other heavy armor.

Armor is even more obvious - it refers to a tank’s survivability. Heavy armor is usually the antithesis of high mobility, but not always. The heavier your tank’s armor is, the more effective they are on the defense and for absorbing fire so that lighter units can engage safely.

Again, you can only get all three in the most expensive tanks. It’s far better to have just one or two strengths and to use them most effectively.

  • Mixing Firepower and Armor, but lacking mobility? You’re best in a static defense, but be sure to guard your flanks so you don’t get surrounded.
  • Mixing Mobility and Firepower, but lacking in armor? You’re best in maneuver warfare, ambush, and quick shoot-and-scoot raids. The point is to keep moving and keep the enemy shooting at something else.
  • Mixing mobility and armor? Stay ahead of your front lines and absorb enemy tank fire while friendly ATGMs or aircraft deal the real damage - alternatively, rush in close to take advantage of the accuracy and AP bonuses that [KE] weapons get in close quarters to negate your lack of firepower.

Any combination of these features will tell you what to do with any single unit, if only you apply a little logic and your knowledge of the game’s mechanics.

Because of the arbitrary and difficult classification of units in the Tank category, for this category I’ll instead discuss every series of tank individually. Yes, that’s right - all of them, individually. Know that most tanks in Wargame fall into the category of main battle tank, meaning they are “line tanks” that, like line infantry, aim to cover general-purpose tank roles. However, there are exceptions.
Units: Tanks: NATO I
NATO Armor
NATO armor is more diverse than their Pact cousins - most NATO nations have their own unique line of tanks, although some use imports. It’s important to know that NATO armor is generally inferior to PACT armor. Additionally, NATO armor works best in mixed-nation decks, where you can use mixes of forces that cover different specialties.


AMX-13 Harpon: This French-only tank, at first glance, seems pretty useless as a tank. It has a frontal armor rating of two, and it only gets worse from there. On top of that, it has a nearly useless gun with only a 1575m range and an underwhelming machine gun. However, it comes with four useable ATGMs and has great mobility - save for lacking a stabilizer. Additionally, it has a Small size, one of the few units in the category to have such. Use this tank for ambush, or for rushing behind enemy units and shooting into rear armor at point blank range. For 20 points, it really isn’t that bad, especially for being an ATGM carrier.


AMX-10 RC SB: This French light tank has exceptional mobility (save for lacking stabilizers - an annoyingly common trait in French vehicles!) at 85km/h offroad and a 150km/h road speed. Like the AMX-13 Harpon, it has relatively weak armor, and will die in one shot to any serious tank. With its great mobility and decent firepower, it should be used in ambush roles or for a maneuver force; in a French-only deck it’s also useable as a flank-screening force for your AMX-30s. At 30 points, they’re actually pretty useful, and perfectly capable of taking on cheaper PACT tanks if you keep them shooting and scooting.


The AMX-30 series is France’s main battle tank. They cover the AMX-30, the AMX-30B, AMX-30B2, AMX-30B2 Brennus, AMX-32, and AMX-40. Generally speaking, all of them have great firepower and mobility for their price range. Even the 45-point AMX-30B has a 2100m gun, which gives them a range advantage against most tanks of their price range. Additionally, all of them above the base AMX-30 have a 20mm autocannon in addition to their main gun, which makes them surprisingly survivable against helicopters if they can get in close enough to shoot them. However, all of them have very flimsy armor for their prices - even the 95-point AMX-40 has only 12 points of frontal armor, while the M1 Abrams has 15 for five points cheaper! Finally, all French tanks have an irritating lack of stabilizers, which means they have to stop moving to use their excellent guns.

Because of this critical lack of armor, the secret to French armor is to use AMX-30s like light tanks. If you know how to use light tanks to maximum effectiveness, these can be a seriously great force. I also love mixing AMX-30B2s with Chieftain Mk.10s, using the Chieftain’s heavy armor to absorb blows while the AMX-30’s great gun dishes out the damage. Don’t let the terrible frontal armor scare you off - if you’re a little ballsy and good at dodging bullets, these are a really good investment! Oh, and as a bit of trivia, the AMX-30B2 Brennus wasn’t developed until the early 90s, making it one of the game’s few outright anachronisms.


The Cougar is a Canadian light tank. The first thing you’ll notice is that it uses HEAT shells, which means it does NOT get the AP bonus in close quarters of [KE] guns. But it does have a 2100m gun for only 25 points, even if it’s seriously wanting for accuracy and power. It does, however, have excellent mobility despite the lack of a stabilizer, with an exceptional 100km/h off-road speed!


The British Centurion AVRE and the American M728 CEV are both unique tank options with the same gun and a similar purpose. The first thing you’ll notice with these two is they do not have an anti-tank weapon; instead they lob HE shells at 2450m. Use these like extreme short-range direct-fire mortars. They hit with high accuracy and an area of effect - which means they should accompany your other tanks and destroy unarmored and infantry targets.


The Centurion series is a tank series shared by multiple countries. They include the Canadian Centurion Mk.5, Mk.6, and Mk.11, the Danish Centurion 84mm and Centurion 105mm, and the Swedish Strv 102, 102R, and 104. These are generally low-end and unexceptional NATO tanks without much to commend them, and don’t shine in mobility or armor or firepower. However, they’re a staple NATO tank in Cat C decks.


The Chieftain series is the British main battle tank. They cover the Chieftain Mk.2, the Mk.5, and the Mk.10. They typify the British armored doctrine - heavy armor and decent firepower but with low mobility. The Mk.2 has very decent frontal armor for only 40 points, while the Mk.10 is one of the better NATO medium-price tanks with a very nice 14 frontal armor and a 2100m gun for only 65 points. The Mk.5 sits somewhat in between them, but is one of the best Cat C-capable choices available to NATO decks.

I love the Chieftain series on the defensive, and the Mk. 10 rarely lets me down as a Cat B line tank option. Take some with some veterancy upgrades and they’ll make a great static defense, or keep them in front of AMX-30s for a great combination of heavy armor and heavy firepower.


The British Challenger 1 is the first of NATO’s three major heavies. It’s also the third-most expensive NATO tank available. It’s easiest to see this as being the Chieftain’s big brother - it has a good gun with superb frontal armor, but still lacks in mobility. If you need a tank to absorb enemy fire, there are few better options than the Chally.


The Scorpion Light Tank is a lot like the Canadian Cougar - right down to having the same gun! While it is slower than the Cougar, it also has a Small size and so is a little hard to hit at range. Unfortunately, it has only HEAT weapons, and so can’t really defeat heavy armor except with a rear or side shot. Like the Cougar, it has low accuracy as well.


The MBT-70 family is a strange beast from America and West Germany. The American MBT-70 mixes the unexceptional Shillelagh-C ATGM with an equally unexceptional HEAT-only gun and a decent autocannon. The German KPz-70 Keiler, however, nixes the ATGM in favor of a decent 2275m gun taken from the Leo 2 and a good stabilizer, while retaining the autocannon. This is one of the best Cat C tanks NATO gets, and the American version is one of very few NATO tanks with ATGMs. They both have decent frontal armor and good mobility, but the German version is much better at a mobile fight with the long-ranged gun and good stabilizer.

I am unimpressed with the American MBT-70, but the KPz 70 is one of NATO’s best units. Only the fact that it’s a Prototype to the otherwise mediocre West German deck stops me from using it all the time.


The M48 Patton series is an outdated series of NATO tanks. They include the West German KPz M48A2G and KPz M48A2G2, the Norwegian M48A1 and M48A5, and the American M48A5 USMC. While they were good in the late 40s and early 50s, by Wargame’s time they’ve long since been outclassed. Cheaper M48s even fail to have a 1925m gun, having only a 1575m range! However, they are one of NATO’s light, spammable tanks, starting at only 15 points. They’re also Cat C available and, in the USA’s case, available to Marine decks.

If I hadn’t made this obvious, I don’t really like M48s. In general, I don’t like 15-point spam tanks. However, like all cheap tanks, they’re perfectly capable of killing things in close quarters or for filling out the lines in between better options. But I still prefer to shell out the cash for something better.
Units: Tanks: NATO II
The Leopard 1 series is a NATO staple. They’re also much like PACT tank series in that they cover a range, from old, low-end, and spammable to decent mid-range tanks. They cover the West German Leopard A1-A5 series, the Canadian Leopard C1, the Danish Leopard 1A3-DK, and the Norwegian Leopard 1NO and Leopard 1A1NO. All of them have surprisingly decent mobility with 65km/h off-road speed and Medium to Good stabilizers. At around the 50-point mark you’ll get 2100m guns, too, and units above that mark make perfectly serviceable medium-cost line tanks. Most of them have good frontal armor for their cost. At whatever price point you need them, the Leo 1 variants are always a choice worth evaluating when you’re building a NATO armored deck.


The Leopard 2 series is the West German successor to the venerable, but dated Leopard 1. It covers the West German Leopard 2, 2A1, and 2A4. This is the second of NATO’s three series of heavy tanks, and generally the best in terms of stats. With high speed, good stabilizers, and heavy armor, these will not steer you wrong, even if the Leo 2 and Leo 2A1 don’t have great guns for their prices. The Leopard 2A4 is the most expensive and the best NATO tank in the game.

The Leopard 2A4 is the really noteworthy one here...the Leo 2 and 2A1 are comparable to Soviet tanks that are much cheaper. Then again, that seems to be the story of NATO armor in general.


The M1 Abrams tank series is the third and final series of NATO heavies, and generally the most beloved by noobs and/or Americans. This consists of the M1 Abrams, the M1IP (“Improved Protection”), and the M1A1 Abrams. The -A1 variant is the second-most-expensive NATO tank in the game. The original M1 Abrams has a surprisingly mediocre gun, with only 13AP. It and the IP both have Medium stabilizers, but the M1A1 has a Very Good stabilizer. They also have both a .50 caliber machine gun and a 7.62mm machine gun, and so can put out some good fire against close helicopters or infantry in a pinch. They have heavy frontal armor, but good mobility (except for the -A1, which drops down to a middlish 60km/h).

In general, I find the M1 Abrams to be a highly overrated tank, but I consider the M1A1 to be the best all-rounder NATO heavy. I usually give the M1 and IP a pass, but if I need an all-purpose NATO heavy, I generally reach for the A1. Since A1s are good general-purpose armor, I find they make a good spearhead while filled out with other medium tanks.


The M551A1 Sheridan light tank. One of the game’s few Para tanks. The first thing you’ll notice is that, for a tank, it has practically no armor at all. The other thing you’ll notice is that it’s one of the few ATGM tanks in NATO, but also has a relatively inaccurate, HEAT-only main gun. Since it derives no advantage from proximity, use this thing not as a tank, but as an ATGM carrier.

I consider this thing to be absolutely worthless. It’s decently fast, but its HEAT gun makes it much less useful in maneuver warfare. If you want an ATGM carrier, NATO is certainly not lacking in things with the superior TOW or Milan series of ATGMs, head over to the Vehicle tab. Additionally, its armor is like paper - 12.7mm or 14.5mm machine guns can pierce it! This might have had some value in the Vehicle slot, but don’t take this where you can take an actual tank.


The M8 AGS is an American prototype mobile gun system. Let’s discuss that - it is a mobile gun, not a tank. If you get it into a slugging match with tanks, it will die like a ♥♥♥♥♥. It has armor that even the French would scoff at, but it has great mobility and excellent firepower - for 50 points it has the same gun as the M1 Abrams tank, with a Very Good stabilizer, and a 50% ROF buff over the Abrams.

Don’t underestimate this thing - even though it’s not a tank, it’s a very, very good instrument of maneuver warfare for Cat A American decks. They mix amazingly well with M1A1 Abrams tanks; use the expensive tanks to reverse-move while putting out effective fire, then circle around with these and wreak havoc on their AA systems, ATGM carriers, or the rear armor of their own tanks. Oh, and yes, the Year for this model is 1992. Yes, this game takes place in 1986. So...yeah.


The M60 Patton series is the American series of main battle tanks. It covers the M60A1 Patton, the M60A1 RISE Patton, the M60A3, and the Super M60, as well as the M60A1 USMC. The USMC and the M60A1 variants are pretty cheap and underwhelming, but the rest have decent mobility and medium stabilizers for their price. The M60A3 has the same gun as the M1 Abrams for a third less, while the Super M60 improves upon the A3 with much better armor and two more AP for its gun.

These aren’t my favorite line tanks, but the RISE Patton is a decent 45-point tank that I use in my American decks as an affordable line tank, and many people I know swear by the A3 as being an “Abrams Light”, making up for the M1 Abrams’ relatively low quality for its 90-point price tag.


The American M60A2 Starship series covers two models, the E1 and E2. They’re one of the few NATO tanks to carry an ATGM, the Shillelagh, with only 6 accuracy and 16AP. They couple that with a 152mm HEAT-only gun. The E1 model has a .50 caliber Browning, while the E2 trades up to a 20mm autocannon. They both have the same armor as the RISE Patton, and are both pretty slow, with no stabilizers.

I consider Starships to be absolute garbage. They have lackluster armor and ♥♥♥♥ mobility, a HEAT gun instead of [KE], and the Shillelagh sucks as an ATGM. Why would you ever rely on it when NATO gets Milans and TOWs instead?


The Swedish Strv 103 series, including the 103B and the prototype 103C, are an oddball amongst NATO. The first thing you’ll notice is the S-tank’s lack of a rotating turret - they more closely resemble Nazi StuGs than NATO tanks in that regard. With their 50km/h speed and total lack of stabilizers, they really suffer in a lack of mobility. But they have great frontal armor for the 60-75 point range and a high-ROF 15rpm, 2100m-ranged gun. Additionally, note its Small size, which gives enemies a decreased chance to hit.

I really love the 103B, and would love the 103C if I ever used Swedish-only decks. It’s truly amazing in static defense, or in ambush roles. Don’t expect its 12AP gun to kill heavy Soviet armor at max range, but it can destroy anything in its own price range in a slugging match and in a short-range ambush at side armor it can one-shot a T-80. These go in almost all of my NATO mixed nation decks.
Units: Tanks: PACT I
PACT Armor
PACT armor, unlike their NATO opposition, are highly homogenous. For the most part, all NSWP nations use variations of Soviet equipment. It’s important to know that Pact tanks are generally superior to NATO tanks. Also know that Soviet armor is generally the best - this is a historical fact; the Soviet Union preferred to arm its Warsaw Pact allies with slightly out of date weapons so it would always be militarily superior. Also, the Soviets inversted a lot more in tanks with ATGMs than the Americans did, and so most higher-end variants have ATGMs. Finally, most Pact tank series act like the NATO Leopard 1 or M60 series - thanks to modernizations programs, most series cover a range between low-end and high-end, which means that lower-end variants of newer tanks compete with higher-end variants of older tanks. We’ll start with the special tanks, and then move on to the five main series of Pact armor: the T-55, the T-62, the T-64, the T-72, and the T-80.


The Russian PT-90 is one of the few Pact light tanks. It mixes a pitifully weak gun with the Malyutka-P ATGM. It isn’t very maneuverable and has very weak armor. Essentially, it is a vehicle for delivering more ATGMs to the battlefield.

I don’t like the PT-90 at all; PACT is never short on choices for ATGMs and the Malyutka only has 13 AP. The only time you might need this is if a Cat C Armored deck needs ATGM carriers.


The Russian BMP-685 is the other Russian light tank. For its price, it has an accurate but not very powerful gun. But it does have a Medium stabilizer and a 70km/h offroad speed - this gives it some use as a maneuver warfare vehicle or for rushing right up close to the enemy to engage.

I don’t like this either, but only because it has to compete with some very good T-55 variants at the 40-point range. It’s not that it’s bad, just that you can get a real tank with real armor for the same price.


The Polish PT-76B Desant is another Pact light tank. This is one of the cheapest tanks in the game, but it shows - it has a whopping 2 frontal armor and a 76mm HEAT-only gun with 4 accuracy and 10 AP power. It’s critically slow at 45km/h offroad, and its only real advantage seems to be a medium stabilizer and a small size, and only 10 points.

I consider this to be absolutely awful, worthy only of distracting players or filling out a spam deck - and even then, why not take the same-priced T-34 instead with a [KE] gun and better armor?


The East German KPz T-34/85M and Polish T-34/85MI are two identical units, the T-34. Yes, that T-34. The one from World War Two. Yes, they seriously were still in service in the 1980s. Their gun only reaches out to 1575m, and has only 3 accuracy and 8 AP power - but for ten points, what do you expect? They’re pretty slow, have no stabilizer, and only 3 frontal armor. The only serious use these things are going to have is if you can sneak them around behind enemies - remember, [KE] guns do much more damage at point-blank range.

I still consider these pretty worthless. Yes, you CAN use them up close if you maneuver, but why the hell would you? Even the base T-55 is only 5 points more and that at least has frontal armor to show for it. These were a good tank in 1943, but warfare has come a long way since then.


Warsaw Pact all have flame tanks, as well - all four nations have an identical TO-55 and the Soviets also have a TO-62. The TO-55s are essentially base T-55s with flamethrowers attached to them. The TO-62 is, you guessed it, a T-62 with a flamethrower attached to it. Unlike NATO flame vehicles, these are fully functional (if low-end) tanks that are also flamethrower vehicles, rather than trading their gun for a flamethrower. Like all flamethrowers, it’s generally best to use these close to their maximum range of 1050m, against infantry - it will burn infantry alive and create a wall of flame, and also stun or panic armor.

These have some limited use in burning the outskirts of town for urban warfare, but honestly, I don’t really care for these. This is mostly due to there being too many good choices for Soviet armor - I find it hard to justify giving up a good tank to get a low-end tank just to have a fire weapon. These were great in Wargame: EE, but generally less so in ALB.


The T-55 is the first of our series of Pact main battle tanks. They were also the most produced tank in history! Their variants are:


The base T-55 is a 15-point low-end tank. The T-55A (called the L variant in Poland, otherwise identical) is a five-point improvement that adds a machine gun and improves the main gun into something useable. Like all low-end tanks, they really need numbers or close range to be seriously useful. All of them above the base model have Medium stabilizers and most are generally slow off-road at 50km/h. Most models have decent, but unexceptional frontal armor for their prices. Higher-end T-55 variants compete with cheaper T-72s and T-64s, but many have Bastion ATGMs and surprisingly good guns.

Low-end T-55s are spam tanks, especially in Cat C decks. However, don’t dismiss high-end T-55s, I actually prefer the T-55AMV over the same-priced T-64A as my Soviet medium-cost line tank. While high-end T-55s have relatively lackluster 11AP guns, they’re a cheap way to get decent ATGMs onto the field. While Bastions aren’t going to one-shot NATO heavies, they’re decent in numbers, and are a good way to deal some damage to NATO armor before they even get in range to respond.


The T-62 is the next series of Pact main battle tanks. It did a brief stint as the Soviet Union’s main battle tank, but wasn’t well-received and was replaced in that role by the T-72 less than a decade later. It also wasn’t widely exported. Its variants are:


The base T-62 is the same price as the T-55A, and has one point more of frontal armor in exchange for a worse main gun, no stabilizer, no machine gun, and lower mobility. The 1972 revision added a machine gun, but it isn’t until the 1975 revision that you’ll see a Medium stabilizer and better armor. The Czech T-62cz is a significantly improved 1975 revision for only five points more. The M-1 and M-V models adda Sheksna ATGM, with a great 2800m range, but only 8 accuracy, with 19 AP. All T-62 variants have low mobility and only the Czech variant has good armor at its price point. All of them have a very low ROF on their gun, at only 6rpm.

I don’t like T-62s at all. The Czech variant is an okay addition to Czech-only decks, but in Soviet or mixed decks, I find none of the variants to be as good as other tanks I can get in their price range. Some people do find the M-1 model useful, so do take a look at it. I don’t see why you would bother with any other variant; the earlier three T-62 variants are outclassed by competing T-55 models and the T-62M-V costs as much as the superior T-64B!
Units: Tanks: PACT II
The T-64 series are Soviet-only main battle tanks. Unlike the T-62, this was never exported for being too good, not for being too bad. The four variants are the T-64A, T-64B, T-64BM, and T-64BV.

Though most of the time later tanks are better than earlier tanks, the T-64 was actually superior to the later T-72, but was more complex to manufacture. The T-64A starts at 55 points, but jumps up to 80 points for the B variant, going on to 95 and then 135 points from there. The T-64A is an option as a main line tank, while the more expensive variants are better used as more expensive high-end tanks.

All of them have bad or absent stabilizers, which is actually historically incorrect. They have decent armor in their price ranges, and aside from their lack of stabilizers are decently mobile off-road. The Kobra ATGM has a 2625m range, having only 8 accuracy but a considerable 20 AP power. Interestingly enough, these tanks are all surprisingly cost-effective. Compare the 95-point T-64BM with the 130-point T-80BV. In fact, the T-64BM is nearly a straight upgrade over the T-80B, while costing five points less.

Because of this cost-effectiveness, I always bring T-64 variants in my Pact armored decks. The base tank is comparable to the T-55AMV as a line tank, while the B and BM variants are very cost-effective. The BV variant is one of Pact’s best heavy, high-cost tanks.


The T-72 series is the most the second-most numerous and varied series of Pact main battle tanks. It replaced the short-lived T-62 and the more venerable T-55 as the main battle tank of the Soviet Union, and was widely exported. Its variants are:


As with the T-55, the base T-72 models are identical, and the T-72A/M model are also almost identical. Low-end models have very poor main guns and no stabilizers, but very good frontal armor for their price. This is a common feature to T-72s - they have good armor and decent mobility, but relatively lackluster main guns. High-end models have better guns and very good frontal armor, but almost all still have a low 7rpm rate of fire, and only the top-end Soviet variant gets an ATGM - the exceptional Svir ATGM, which is surpassed only by the T-80 lines Refleks ATGM. Because these tanks combine armor with mobility while sacrificing firepower, they’re generally best used as a front line tank where they can absorb enemy fire while T-64s or T-80s provide the firepower with their faster-firing and more accurate guns.

I don’t like T-72s for Soviet decks, but they’re slightly more useful in NSWP decks where they comprise the best tanks available for those countries. In general, I prefer T-55s for low and medium-tier tanks, T-64s for medium and high tier tanks, and T80s for the high-end heavies, leaving no real room for T-72s in my eyes. The Polish Wilk is more than decent, but is a Polish prototype.


The T-80 series comprises Warsaw Pact’s heavies in this game, and like the T-64, only the Soviet Union has them. This line includes the T-80, T-80B, T-80A (yes, confusingly, the A variant is better than the B variant, unlike everywhere else), the T-80BV, and the T-80U.

These are not line tanks - even the cheapest tank is 85 points, and the T-80U is the best and the most expensive tank in the game at 170 points. The entire line has medium stabilizers, and all but the base model have either Kobra or the exceptional Refleks ATGM.

Like all expensive high-end tanks, use these as the tip of an armored spearhead, or keep them behind cheaper armor like T-72s so they can fling their high-end ATGMs with impunity. Strangely, the T-80A and the T-80BV are the same price, 130 points each, so look at them both and decide what you think is more worthwhile.

The T-80U is the single best tank in the game, resting at the apex of the triad of mobility, armor, and firepower. Its side armor is heavier than most T-55’s frontal armor, and it has a perfect 20 frontal armor. On top of that, it has an incredible 20 AP value for its main gun! It’s for this reason that the T-80U is considered incredibly hard to kill. NATO players generally panic and overreact when they see one.

I like the later T-80 tanks, but I generally take T-64s over the earlier ones. The T-80A and the T-80U won’t fail you as your heaviest firepower, if you can get over their insane price. Just to put it into perspective, you can get four T-72s for the price of a single T-80U and still have ten points left over. But when you absolutely, positively have to kill every last capitalist on the front - T-80U, accept no substitutes.
Units: Recon: Overview
Ah, recon. We’ve already discussed the importance of recon - but it bears repeating that you can never have enough recon. Nobody has ever lost a match of Wargame because they were able to see the enemy too well. Recon units are what allow you to see the enemy at range and what allow your units to fight at their maximum range.

Of course, just like every other category, recon units come in different groups. They are recon jeeps, scout cars, scout tanks, recon IFVs/APCs, recon infantry, recon special-ops, and recon helicopters. As with all units, these categories are not interchangeable, and must be understood if they’re to be used most effectively.

All recon units have one role in common, though - they spot targets for your forces. This means that their primary job is being in the right place, not fighting. While some recon units can fight - and indeed some are quite powerful - if you’re sending your recon unit into a fight, stop and ask why you’re sending it and not a dedicated fighter that doesn’t have a more important job. In addition, since your recon forces’ job is to spot targets, having recon vehicles in groups of two to four is usually a bad idea. They don’t provide any additional sight to your forces, and that’s the job of every single unit in the Recon tab!

Instead, spread your recon out, so that they provide overlapping lines of sight and thus protection from being blinded should one unit perish. Scatter the rest of your recon forces wherever they can lay low and watch, and thus be able to see enemy forces moving around. Secondly, consider disabling your recon units’ weapons if they are meant to be hidden and not moving. Recon units often reveal themselves inadvertently as they open fire on passing units, which gets them killed. Unless they’ve already been spotted and need to fight to get away, or are quickly ducking in to assassinate high-value targets that can’t be killed by other means, they won’t often need their weapons unless they’re built for specialized roles.

By the way, to emphasize the importance of optics, I’ll color-code every unit in this category by their optics rating:
  • Red: Medium or worse
  • Yellow: Good
  • Green: Very Good
  • Blue: Exceptional

You should always prefer better optics to worse optics, all else being equal - optics are what makes a recon unit recon!

An advanced and real-world technique is called the hunter-killer team. A hunter-killer team comprises of a recon vehicle (the hunter) and a vehicle with a powerful weapon (the killer). An example would be mixing the AH-64 Apache with a recon helicopter, using the recon helicopter to spot high value targets for the Apache’s Hellfire missiles. The same thing can be done using a recon vehicle and a heavy tank or ATGM carrier, or even a recon infantry squad and a special forces team.

Finally, I advocate having three different types of recon in any deck: Recon infantry, recon helicopters, and recon vehicles for accompanying the front line. Your style may vary, of course, but I find this to be an ideal mix of forces. I also don’t typically up-vet my recon units, since having more means covering more of the map.
Units: Recon
Sandy’s choice: M151A2 FAV, Rover Pinky, UAZ-469 AGS-17
Recon jeeps are our first category of recon units. They are inexpensive, but unarmored light trucks; some are unarmed and some have machine guns. But since they’re pretty likely to get killed if engaged, don’t use these as part of your front lines where they may take fire. Instead, hide them in swamps, hedges, or forests along the map, taking advantage of their low price and high availability.


I don’t really like recon jeeps, but others swear by them. They have their uses, but they don’t do anything that the rest of them don’t do and I prefer to have some armored protection in my vehicle-based recon.


Sandy’s choice: OT-65RL, some V-150 series
Scout cars are a lot like recon jeeps, but have light armor. Like jeeps, they’re generally light and mobile, but lightly armed, most only having a heavy machine gun. They’re not going to do much fighting for you, but as long as you take care of them, they can do in a pinch in accompanying your front line if they have to.


I occasionally take scout cars as a general purpose recon vehicle, but I never try to use them in a fight. Neither should you - they can snipe a helicopter in close range perhaps, but they’re not going to contribute much to your firepower.


Sandy’s choice: M3A1 Bradley, AMX-10RC, ERC-90 Sagaie, BRM-1, BPzV Svatava
Recon APCs and Recon IFVs are recon variants of armored personnel carriers and infantry fighting vehicles. They have heavier armor and usually better weapons than scout cars, and are best suited to accompanying your front line. Some of them have ATGMs and/or autocannons that can contribute to your front lines’ firepower, or provide some additional capabilities to your forces. However, IFVs can be significantly more expensive.


I like recon IFVs for accompanying my front lines in my armored decks, even though they’re costly. Their autocannons provide a decent force for stunning armor or destroying lighter vehicles, and they’re pretty survivable.


Scout tanks are light tanks that double as scout units. Not all nations have them, and they’re generally used like recon IFVs are - as a recon escort for your front line, where their armor might survive a hit or two if they have to. Unfortunately, most of them lack in optics, which is sort of a problem for recon units.


I don’t like these scout tanks at all - I find them very lackluster and lacking in a use. They’re not “real” tanks that will provide much to your armored thrust, and I find that having recon tanks encourages recklessness that gets them killed.


Sandy’s choice: Fallskarmsjagare
Recon squads are one of two categories of recon infantry. These are lighter-armed infantry with only basic weapons, that are best used as sneaky recon troops that hide in forests or on mountains. They’re also great for sneaking around behind enemy lines, since they’re hard to spot. They’re not very tough, though, so don’t get them into fights if you can help it!


I love sneaking recon infantry behind enemy lines. I consider them indispensable, especially when in transport helicopters where they can rush across the map before landing and hiding.

Sandy’s Choice: Commandos Para, Marinejegeer, Spetsnaz VMF, Specialni Jednotky
Recon Special Forces are the other class of recon infantry. Unlike basic recon infantry, these guys are special ops teams - they generally have much higher grade weapons, like high-end anti-tank weapons and CQC machine guns, meaning they can mix it up well with enemy infantry or tanks. Unlike recon infantry, these guys are just as good at being a self-contained hunter-killer team, able to sneak around, spot targets, then eliminate them. They’re also excellent as ambush troops, just like other special forces.


I like these guys just as much as recon infantry - if I don’t have special forces in the Infantry tab, then I’ll have them here. They have all the benefits of normal special forces, and the sight of recon troops. What could be better?


Sandy’s choice: OH-58D Kiowa Warrior, Gazelle AH.1, Mi-9, Mi-2Ro
Recon helicopters are the last category. These are, obviously, helicopters with recon optics. They aren’t very sturdy, but they’re highly mobile, allowing you to patrol large areas quickly, or fly over water or the fringes of the maps relatively unbothered. Pair them with gunships or ATGM helicopters for an excellent hunter-killer pair. Some helicopters are armed, but since they’re fragile, only use them for hunting enemy recon helicopters or unarmed command vehicles.


I consider these an essential. Their mobility and optics are highly useful, just remember to keep them away from enemy AA or even machine guns or autocannons. Oh, and I love using the Kiowa Warrior as a self-contained hunter-killer, unlike other units in this class it comes equipped with four Hellfire ATGMs that can kill most units in one shot. It’s also the only heli-borne F&F ATGM! Great for sniping command vehicles, artillery, or heavy PACT armor at a distance.
Units: Vehicle
Ah, the Vehicle tab - this is the closest Wargame has to a “miscellaneous” category. In general, the Vehicle tab consists of any vehicle that is not a logistics, support, tank, or recon vehicle. In the armory, this tab includes infantry transports; however, infantry transports cannot be bought on their own.

The categories in the Vehicle tab include tank destroyers and mobile guns, infantry fighting vehicles, ATGM carriers, and a handful of miscellaneous vehicles. Because Vehicle is such a varied category, it can be difficult to give generic advice on how to use it. It’s generally one of the lesser-used categories in deck-building, but don’t overlook it; some of the vehicles here are fantastic, while others are a decent way to fill in some lacking capabilities.


Tank destroyers and mobile guns are tank destroyers that are not tanks. Some of these are highly mobile and useful in maneuver warfare, but the majority are slow, weak, and lacking in impressive stats. These are mostly best used in ambush roles, or for providing extra firepower to your forces on the cheap. Don’t expect them to take out NATO heavies, but they can kill infantry perfectly fine and can kill lighter tanks, especially from behind or against side armor. Oh, and pay attention - some of these have the [KE] tag, and some have the [HEAT] tag.


I don’t like virtually any of these. They have some use in heavily restricted decks, but unless your restrictions have left you desperate for firepower, use an ATGM carrier or just save the deck slot entirely if you need to kill things. ATGMs kill tanks much better, and IFVs kill troops much better. All in all...meh!


Sandy’s choice: BMPT
Infantry Fighting Vehicles, or IFVs, are just like their infantry transport counterparts - armored fighting vehicles that can provide autocannons to a fight on the front lines. They’re great for stunning vehicles, killing troops, or even gunning down helicopters if they stray within range.


Sandy’s choice: Any I-TOW, TOW 2, or Milan F2, MT-LB Shturm-S
ATGM carriers are units whose sole job it is to ferry ATGMs into the battlefield and launch them against enemy armor. These are a hard-counter to tanks, but are relatively fragile; try not to get them shot at, as low morale will make their missiles miss uselessly. Set them up for long-range ambushes, shoot-and-scoot in a dynamic defense, or keep them behind your front line so your heavy armor can absorb fire while they fling ATGMs with impunity. Just remember to keep supply trucks close at hand; they generally have low ammunition and they’re pretty much useless without missiles. Oh, and be sure to micromanage them, else you’ll be wasting valuable ATGMs against one-point trucks.


These are relatively indispensable. They often come with high-end ATGMs, like the I-Tow or Milan, and can shred heavy armor while being very cost-effective. If you’re lacking in ATGM carriers, stop and ask what you have to make up for them!

The last two categories are particularly limited in number - the first are unguided SPAAGs that are not in the Support tab. The only two examples of this are the Soviet ZSU-23-4 Afghanskii and the American M163CS. Both of these make mediocre anti-air guns, but great anti-surface guns. They’re both relatively cheap, at 20 and 30 points respectively, and are generally best fielded as light autocannon units. Use them to ambush, or to provide a stunning force for your main forces, or as backup anti-air guns that can at least fight helicopters.

I love both of these, but especially the Afghanskii. They’re cheap enough to bring them with you everywhere, and autocannons are generally pretty damn awesome and useful. And since they’re in the underutilized Vehicle tab instead of the crowded Support tab, why pass them up?


The final category of vehicle is the American Zippo series. These two vehicles are armored flamethrower vehicles - unlike the Pact flame tanks, though, they are in the vehicle tab and do not also carry a cannon. Otherwise, they’re used like Pact flame tanks - get them in close enough and they’ll spray a stream of napalm at targets, which is useful for dealing morale damage, removing infantry from buildings, or even providing a wall of smoke and fire to conceal your forces.

Like flame tanks, some people really like these, but I generally don’t find them very useful. In the decks I’ve tried them, I’ve generally found that other units can do all of their jobs, but better.
Units: Helicopters: Overview
The helicopter section covers all of the game’s helicopters. In the Armory, transport helicopters are shown too, but they can’t be brought on their own. This section will cover three types of helicopters; ATGM carriers, anti-air helicopters, and gunships. There are a few special-purpose helicopters that I’ll cover seperately as well.

Back in European Escalation, helicopters were the sole reason to bring anti-air defenses with your forces, since there were no jets. Even then, air defenses were absolutely essential. Considering air defenses are even more vital in AirLand Battle, many people see helicopters as having become significantly less essential than they were before. But they’re wrong - helicopters, when managed correctly, are great. They can scoot around the map like aircraft, but they have the staying power of regular forces. They’re the kings of maneuver warfare. They’re also some of the best ATGM carriers in the game!

In general, helicopters are some of the most mobile forces in the game - they’re able to quickly move around to wherever they’re needed while ignoring terrain. This makes them ideal for anything involving maneuver warfare. However, they do have some handling idiosyncrasies, and in general helicopters will die quickly to their counters. If you fly a helicopter over an enemy autocannon, expect it to get stunned and killed off before you can safely get it away. Most tanks, some vehicles, even some command vehicles, are equipped with machine guns that can hit helicopters, too. Since they usually lack armor, this means that helicopters need a high degree of micromanagement to be used effectively, else they’ll get stunned and then gunned down.

First off, helicopters have altitude that must be managed. There are three altitudes: High, Low, and Land. Observe this helicopter at high and low altitudes:


At high altitude, helicopters are easier to spot and engage, but can see and shoot over cover. At low altitude, they can be protected from return fire, but can be hit by artillery and explosives. When landed, they can be targeted by tanks and other ground forces, like ground units. Altitude can be managed by the Advanced Orders panel:


In general, helicopters will fight at high altitude, where they can shoot their ATGMs or rockets without obstruction. They’ll duck to low altitude to hide behind terrain. Oh, and helicopters sometimes default to low altitude when they don’t have a target, which is a feature I find really ♥♥♥♥♥♥♥ annoying. They’ll move back up to high altitude to move around, then duck back low. So be sure your helicopters are at the altitude you actually want them at! Also, know that the Land order tells helicopters to land at the ground they were flying over at the time the order was given - so if you tell a helicopter to land while in motion, they’ll overshoot and turn around before landing, which could be a fatal waste of time if they’re getting shot at.

Secondly, helicopters do not respond instantly. If you tell a tank to stop driving forward, it brakes to a stop nearly instantly. However, helicopters have inertia and must slow to a stop, which causes them to rear back like this:


They can turn on a dime when stationary, but have a turning radius while in motion. This is realistic, if a little annoying to deal with. When zoomed out, it isn’t very clear that helicopters have this problem, which is the cause of that “slow to respond to orders” problem that people often complain about with helicopters. This is a weakness when fighting along a mobile front, so be aware of it!

Finally, some notes about the weapons of helicopters. There are six types of weapons helicopters have:
  • Rocket pods, which deal good damage to unarmored targets and, more importantly, stun clustered armored forces, which can bring a tank rush to a screeching halt
  • ATGMs. We already know what ATGMs are, but they’re particularly noteworthy when paired with helicopters’ high mobility.
  • This includes Hellfire missiles, which unlike all other ATGMs, are fire-and-forget. This has a big implication for micromanagement - in order to not waste missiles, be sure to disable the weapon immediately after firing and then re-enable it and select a new target, else Hellfire carriers will fire a second missile after the first, wasting it.
  • Air-to-air missiles. There are several advantages to having an airborne anti-air platform, which will be discussed later.
  • Machine guns, which arm lighter helicopters.
  • Automatic Grenade Launchers, or AGLs. Only available on the UC-1C Heavy Hog, these are great for stunning pretty much anything.
  • Autocannons, which are great on helicopters. Why? Because of the [KE] tag and the ability to hit top armor! While they have to get fairly close to kill tanks, autocannons on helicopters can kill tanks with surprising efficiency.

Be aware that helicopters are not simply offensive weapons - because of their mobility and firepower and ability to stun armored columns, they are great at dynamic defense. Since they arrive quickly, call them in as reinforcements.
Units: Helicopters
Sandy’s choice: SH-60B Sea Hawk, AH-64 Apache, Mi-28, Lynx AH.7
ATGM carriers are our first breed of helicopter. These are helicopters which specialize in getting in, firing their ATGMs, and fleeing back before the enemy can respond. Because the majority of them are rather cheap but carry decent-to-great anti-tank weapons, they’re very cost-efficient. Notably, the longest-range missiles can outrange their counters!

Because of their fragility, keep them the hell away from enemy air defenses. These are generally best used at their maximum range, inside of your own air-defense screen where enemy aircraft can’t charge at them without getting themselves killed in the process. However, they usually have very limited ammo.


These are pretty damn good, in my opinion. They’re like ATGM carriers in the Vehicle tab, except even faster. Like their vehicle cousins, they’re lightly armored and won’t survive gunfire, but these are even faster and more capable of the shoot-and-scoot maneuver. They also make great hunter-killer teams when paired with a recon helicopter. Oh, and I generally use the Mi-28 like an ATGM carrier even though it’s a gunship, because those 16 Ataka-V missiles are just too good to pass up.


Sandy’s choice: W-3W Sokol
Anti-air helicopters are helicopters that carry anti-air missiles. These make great anti-helicopter counters, because they can chase down enemy helicopters much faster than ground-based SAMs can. They’re also frustrating counters to SEAD, since they aren’t targetable by SEAD aircraft or artillery, meaning they’re a good mobile backup to an IADS zone, able to scoot in quickly and make up for a sudden gap in the air-defense network.


Sandy’s choice: AH-64 Apache, Mi-28
Gunships are the last category of helicopters. These are usually expensive, but have the benefit of being multirole - most of them mix an autocannon, rocket pods, and ATGMs. All of them have multiple different weapons that cover different uses. They’re devastatingly effective if you can keep them away from enemy AA fire, and a lot of them have higher strength ratings and better yet, a point of front and side armor, that allows them a little survivability.


Gunships are great once you learn how to manage helicopters. They’re exceptional on the defensive, and some come with great ATGMs. Their rockets are great for stunning enemy armor in their tracks, which allows their ATGMs or your other forces several free shots at them. Just be sure to keep them moving in between engagements, and know that it takes a lot of supply capacity to resupply them.


The American UH-1C Hog series and the Soviet and Czech Mi-4A are two helicopters which don’t fit into the categories above - they are rocket-carriers. the UH-1C Hog has 48 FFAR rockets, while the Heavy Hog variant adds an AGL as well. Use these like all other heli-borne rockets - for stunning clustered forces.

These are pretty great in Category C decks, but otherwise I give them a pass - they’re not bad, but even an America-only or Soviet-only deck has no real shortage of great helicopters to choose from, and their use is just too situational for my tastes.


The French Gazelle 341F Canon and Puma 330H Cassiopee, and the Polish Mi-2 US, are two other unusual helicopters - they are autocannon carriers. While autocannon-equipped gunships can do everything they can do, they’re often too valuable to risk in close-range fighting, which does give the non-prototype Gazelle Canon and Mi-2 US an interesting role.

I really like the Gazelle Canon, and I liked it in EE too. Noobs often underestimate them, but they’re exceptional tank-killers if you can catch tanks without AA escort. Because of the [KE] tag, once it flies in close, it’ll drain a tank’s armor really fast.
Units: Planes: Overview
Ah, the Air part of AirLand Battle. Airplanes are one of ALB’s most prominent features, and cover a significant variety of roles. They’re also generally fragile; almost no planes have any armor and rely totally on their ECM rating to survive enemy missiles. Low ECM values mean an aircraft will get shot down very easily by enemy missiles.

We already discussed the general handling and micromanagement of aircraft, but this section will discuss the specific types of aircraft and their best uses. Aircraft cover a very wide variety of roles - and some cover more than one role - so this tab has numerous categories. They are short-range dogfighters, medium-range interceptors, long-range interceptors, ATGM/CAS aircraft, rocket attackers, cluster bombers, HE bombers, napalm bombers, SEAD aircraft, and multiroles.

First, though, we’ll discuss two weapon types common to almost all aircraft:
  • Guns - Most aircraft have a gun, which can be used against aircraft and helicopters in close range, and can also be used against ground forces in strafing runs. While they’re deadly to infantry and can kill unarmored vehicles, don’t expect most guns to do much to tanks unless they have [HEAT] or [KE] tags and an AP value.
  • Short-range AAMs - Many aircraft carry short-ranged AAMs, like Sidewinders, in addition to other ordinance. While this is a neat secondary capability, don’t think an aircraft is a capable dogfighter just because it has some self-defense capability.

Also know that aircraft can fly off the sides of the map, which is surprisingly useful for sneaky flank attacks. Also, you can roughly judge the value of bombs and rockets by looking at their caliber - a 500kg bomb is going to do much more damage than a 250kg bomb, after all.

Now, on to our different types of aircraft...
Fighters
We’ll start by discussing fighters - aircraft that specialize in fighting enemy aircraft. They come in three flavors - short, medium, and long range - and are generally divided by how they’re used best.

Short-range Dogfighters are our first category of air-to-air aircraft. These aircraft are intended to get right up close to enemy aircraft and shoot them down inside of gun range. They lack the medium- or long-range missiles of the others, and generally rely on guns and short-range missiles to get in close and shoot down enemy planes. They also rely on small turning radiuses and high maneuverability to get on their enemies’ six.


They’re best used when they can get into knife-fighting range against enemy attacker aircraft, or if you can manage to overwhelm long-range interceptors with them.

I don’t care for any of these, mostly because multiroles can take care of this job as well while also bringing other capabilities to the field. However, they have some worth in limited Cat C decks.


Sandy’s choice: MiG-29M
Medium-range interceptors are our next type. These aircraft are generally not as good in a dogfight as short-range dogfighters, though there are exceptions and that varies per-aircraft. They’re generally armed with medium-ranged, mostly semi-active missiles.

They’re best used to intercept enemy aircraft, hitting them with their medium-ranged missiles and then closing in to finish them off with short-range missiles, guns, or friendly IADS.


I don’t really care for these. If I want a dedicated air superiority platform I’ll generally bring a long-range interceptor, but that’s a matter of style to be honest. The exception is the MiG-29M, a multirole cluster bomber that brings medium-ranged F&F AAMs!


Long-range interceptors are our last type of air-to-air aircraft, and there are only two of them. They are the Soviet MiG-31 series and the American F-14 Tomcat. They carry extreme long-range F&F missiles, but make very poor dogfighters.

They are best used by keeping them circling around behind your lines, safe within your IADS zone, so that they can fling their long-ranged AAMs at enemy aircraft while being relatively safe from dogfighters. They’ll be quickly out-flown by tight-turning fighters, but they’re a very good long-ranged AAM truck.

These used to be truly great, but now they’ve been demoted to merely useful after a patch. As long as you can keep them circling behind your lines, though, they’re great at flinging AAMs at enemies and several of my decks have these.
Units: Planes: Attackers
Attackers
Attacker aircraft, also called bombers, are our other category of aircraft. These aircraft are used to destroy enemy ground forces. They are generally divided by what weapons they use - ATGMs, rocket batteries, cluster bombs, HE bombs, and napalm bombs.


Sandy’s choice: A-10, Super Etendard, MiG-27 series
ATGM attackers are our first class of attacker aircraft. They rely on ATGMs to destroy armored advances. Some of these attackers also have very powerful guns and armor, allowing them to destroy armored vehicles in strafing runs and survive some AAA fire. These are very good for providing CAS (close air support) to your front line, destroying enemy armored advances, or sniping high-value vehicles.

These are best used against armored columns that have outrun their air support, or in conjunction with SEAD aircraft so that they can do their work unmolested. Some of them have small numbers of high-end or long-ranged ATGMs; these are best used to snipe high-value or high-armor targets in a single pass. Others have powerful guns, armor, and plenty of missiles, and provide excellent close-air support.


These are pretty great at killing armor. Of course, the A-10 is famous for this purpose, and don’t overlook its unique gun. I also love the Super Etendard, it only carries a single missile but it can one-shot almost everything in the game. I use them to snipe T-80Us!


Sandy’s choice: Su-25
Rocket attackers use rocket batteries to provide close air support. These aren’t going to kill heavy armor, but will stun and panic tightly-clustered forces, damage things, and destroy lighter vehicles like APCs. This category also includes aircraft with smoke rockets, which are cheaper aircraft that can provide an instant smokescreen along its attack vector using the Smoke Position command.

These are best used against lighter forces than ATGM attackers, or for stunning and panicking tightly-clustered forces instead of artillery. Think of them like pinpoint-accurate rocket artillery. As for smoke rockets, their use should be obvious - they’re a quick smoke provider!


I don’t like these at all. While they have a use, they’re just not a really great attacker, especially not if you can get better. Oh, and smoke rockets are useful, but not really worth a deck slot.


Sandy’s choice: MiG-29M, F-111F Aardvark, Danish Starfighter
Cluster bombers are our first category of bombers. These fly in and drop their bombs in one pass, then Evac Winchester, which is good for avoiding enemy air defenses. This category drops HEAT cluster bombs, which are anti-armor weapons that deal damage to armored targets in a wide radius. Note that cluster bomb are unlikely to kill armor in one shot unless they’re already heavily damaged, but they can damage and panic armor in a decent radius at least, and they’ll kill lighter vehicles reliably.

Use these against clustered armor to damage things, or blind-bomb forests when you know there are enemy vehicles in them. Bombers with smaller-but-more-numerous bombs, like the Aardvark, are best used to bomb columns in a line where all of the bombs can hit. Oh, and cluster bombs can hit helicopters with a little timing.


A lot of people don’t like cluster bombers, but I do. They won’t kill fresh tanks on a first pass, but they’re great when particularly stupid enemies cluster their forces tightly and I have great luck blind-bombing forests where I see AAA or SAM fire coming out of, since they have good dispersion.


Sandy’s choice: Any 1000kg bomber
HE bombers are attackers that drop high-explosive bombs. Don’t expect high explosive bombs to kill armor except with a lucky strike, but they’re significantly more effective against infantry and unarmored targets. This category includes 1000kg bombers, whose 1000kg bombs destroy everything short of the heaviest armor and have an immense stun radius.

These bombers are best used against clustered enemy, or for bombing in lines through un-scouted terrain like forests. They’ll stun and damage enemy armored columns, but they really shine against unarmored targets. You can sub-categorize these bombers based on the size of their bombs; only 1000kg and 500kg bombs have very significant power, while smaller bombs are usually carried in large numbers and dropped in a long line.

This category also includes the F-117 Nighthawk, a relatively unique aircraft with an oft-misunderstood role. The Nighthawk has exceptional stealth but bad ECM, meaning they’re great for sneaking past IADS zones but not very good at surviving if engaged. Don’t run these things at air-defense units with good anti-air optics like a ♥♥♥♥♥♥ and assume that because it’s a stealth fighter, it’ll never be seen. That will promptly be followed by it dying like a ♥♥♥♥♥. Instead, sneak around like a stealth fighter should do and bomb HVTs with that fantastic guided 1000kg bomb.


These are your typical bomb attacker. I love 1000kg bombs, though - bring them as much as you can, they will not fail you. 500kg bombs work fine too, but be wary of anything smaller than that, I find they just don’t have the punch I want.


Sandy’s choice: Su-7 series
Napalm bombers are our last category of bombers. These are aircraft that can deliver napalm across a surprisingly wide area, turning whatever it hits into an instant firestorm.

As we’ve previously discussed, napalm never goes out of style. Napalm is great for blocking off roads, burning spawn points during an assault on a spawn zone, burning infantry out of buildings, burning units out of terrain cover, forcing enemy assaults to back off, or denying areas to the enemy. Napalm bombers can be used in all of these roles - so while napalm won’t kill much on its own, don’t dismiss them!


Napalm is great. I love it. Bring the Su-7 series along in any deck you can get them in, since they’re really cheap but drop a lot of napalm.
Units: Plane: Other
Other
These last two categories don’t fit the above roles.

Sandy’s choice: EF-111A Raven
SEAD aircraft, more properly called electronic-warfare aircraft (hence the E/W in their NATO symbol), are aircraft that specialize in hitting enemy Radar units. We’ve already discussed SEAD and Radar previously, and these are the aircraft that carry those out.

Don’t think that just because they have good ECM and anti-radar missiles that they are immune to IADS zones. They will still take fire from enemy ground and air forces, and if some SPAAGs manage to stun them, their ECM isn’t going to do ♥♥♥♥♥♥♥♥♥ to save them. They’re best when they fire one missile at max range and then turn away - it takes a little practice, but instead of sending them straight into enemy IADS zones and trusting them to evac, practice ordering them 2000m or so in front of their frontmost Radar units so they turn away just as they’re firing, and circle over neutral or friendly territory. This allows you to safely open up a hole in enemy air-defense zones that your bombers can exploit.


If you can get ‘em, I highly recommend bringing a SEAD aircraft. It’ll make your use of air power much easier if you can suppress some of the enemy’s best SAMs first. Note that having more missiles isn’t necessarily better, since they’ll be flying at enemy air defenses and so will probably need to evac fast anyway. Why bring more missiles if you won’t use them?


Multirole aircraft are, as their name suggests, capable of performing two or more roles. Generally, these are aircraft that can dogfight and also carry anti-ground weapons. These aircraft are also listed in the above categories, but are collated here for your convenience.


Because of their ability to fulfill multiple roles, I often use these instead of dedicated short-range dogfighters or even medium-range interceptors. I find I generally have so many choices to make for planes, it’s essential to use multiroles to offload some tasks.
Deck Building: Overview
“That’s a lot of units,” you whine, noobishly. “But I think I have a handle of them all now! Now can I go kick some ass?”

Haha - almost! Now that you understand the basics of the game and have a working knowledge of its units, it’s time to bring those units together into a deck. Remember this?


Yeah, unless you want to use these forever, you’ll need to build your own decks. Deck-building is, in all honesty, one of the most entertaining and well-made features in the game. It’s where you get to experiment with new styles and strategies and fine-tune your armies into whatever you deem fit.

Of course, there is no such thing as a perfect deck. The first thing you’ll have to come to accept is that no deck is going to have everything you’ll want. If you bring all the tanks you want, good luck affording aircraft. If you bring all the tanks and aircraft you want, good luck affording artillery. If you bring all the tanks, aircraft, and artillery you want, good luck affording anything else. And so on and so forth.

Deck-building is essentially a series of trade-off choices. Do you want more tanks, or more aircraft? More artillery, or more air defenses? What infantry do you want, in what transports? Do you need an FOB or not? Before you dive into building a deck, you need to ask yourself some essential questions, such as:

  • What general strategies will this deck employ?
  • For example, will this be an armored breakthrough deck, or a fierce defensive deck, or a rapid heli-borne infantry and gunship force?
  • What tactical advantages does that strategy need?
  • For example, a defensive game will emphasize infantry in towns and tanks with good stabilizers and heavy armor, while a rapid offense may prefer heli-borne infantry and tanks that mix mobility and survivability.
  • What are the most prominent counters of my planned strategy, and what counters those?
  • For example, if you have an infantry-heavy deck, bring lots of air defenses to counter 1000kg bombs and napalm bombers, and lots of artillery for hitting targets out of your infantry’s reach.
  • What kind of match will I primarily be playing, and on what maps?
  • For example, 10v10 games have significantly higher point income than most other modes, so bringing a more expensive high-tech deck is much more viable, while if you’re playing no-time-limit Total Destruction, you’ll want numbers and a lot more supply.

For now, you may want to consider just creating some “general purpose” jack-of-all-trades decks that cover a wide variety of roles. But once you have enough experience in the basics, start experimenting with some different playstyles until you find some that you enjoy.

Once you have some of the basics down as to what you expect your deck to do, you can launch into creating a deck of your own. When you do, you’ll see this:


Name your deck, choose NATO or PACT, and then click Create. Ignore the Select Bonus button for the moment.
Deck Building: Making a Custom Deck
Once you do, you’ll be confronted with a big, empty deck, like this:


If starting from scratch seems too intimidating to start off with, you can always copy one of the premade battlegroups and then edit them - you’ll come to the same screen but with a pre-made deck for you to edit.

Now look at the upper right corner. It shows your activation point counter. You didn’t think you had nine choices in every category, did you? Hahaha. No. Only the cheesiest decks will actually use all nine slots in a category. You have thirty-three activation points, with which you “buy” cards to add to your deck. You can see the cost of adding a card in the boxes - the more cards you have in one category, the more the cost of adding a new card rises. Some categories, like Support and Plane, are more valuable and expensive than others, like Tank and Infantry.

Click the highlighted box in any category, and you’ll wind up at a screen much like the armory, in which it will list all available units in that category. Click on a unit, and the veterancy buttons will be highlighted.


Remember those? Use those buttons to add units to your deck at that veterancy level. Double-click a unit in the list to add it at the lowest veterancy level. But you wouldn’t rely on a force of low-vet units in a fight...would you?

Unit availability has two relevant factors - availability per card, and number of cards available. Let’s look at the Swedish 103B’s unit card after adding one card to my deck:


See that “1/2" in the lower left corner? That’s the number of cards available over the total number of cards available. That’s right, you can’t just make a deck of nothing but your favorite unit, unless that deck is hilariously tiny.

As you build your deck, remember the basics. A balanced force with good recon options and tactical alternatives and wise veterancy options is always going to be better than a random assortment of units that looked cool. On the other hand, don’t be afraid to experiment. I discovered most of my favorite units in the field after trying out some units that caught my eye.

Once you’re done, your deck should look something like this:


Once you’re satisfied that your deck looks acceptable, go ahead and play a few matches with it just for play-testing. Take note of what units you end up relying on, what units you run out of, what units underperform or outperform your expectations, and so on. A deck is never truly complete until it’s battle-tested and tweaked to perfection. And it’ll never reach perfection. My best decks are always being slightly updated as I try slightly different approaches or decide to swap out less-utilized units or encounter new enemy strategies, or even as patches re-balance the game.
Deck Building: Bonuses
Okay, now you’ve gotten a handle on building a basic, general-purpose factionwide deck. Now what?

Decks can have three different types of bonuses, which modify how the deck is used by adding restrictions in exchange for higher activation points, XP, lower costs, or higher availability. Thse bonuses are used to specialize decks, locking out alternatives but giving bonuses to specialization. There are three different types of specializations: Nationality, Type, and Category.

Decks are limited by their activation points, which can be increased by selecting a nationality. Activation points for all decks are determined by this table:


What does this mean? It means that decks that are nation-restricted can have more cards in them than mixed-nationality decks. It also means that playing minor nations lets you have more cards than playing USA and USSR, in a balance for their general lack of choices to choose from. This doesn’t mean that single-nationality decks are inherently superior, however; it merely means that you’ll have an easier time of deck-building with them due to fewer options and higher activation points to take them with.

You can also choose one of six Types as well. Selecting a type (or theme) of deck gives you better XP (amounting to a flat one-rank veterancy upgrade to an entire unit category) and lower availability point costs for certain types of units, while locking out units not of that type and restricting the card slots available in other categories. The six types are as follows:


Don’t overlook that one-rank veterancy promotion. They can be a great way to increase the effectiveness of your fighting forces if you’re willing to put up with the type restriction. Unfortunately, said restriction can get rather hard to deal with; most of these are simply not viable for nation-restricted decks except for the larger nations. Fortunately, this can somewhat be overcome with mixed-nation decks. Experiment for yourself.

Unfortunately, I find most of these to be not worth giving up the versatility and selection of other units. I do have several national Armored decks, and Marine and Mechanized are well-liked by some people. Para, however, seems absolutely worthless; it appears to mostly be useful in the campaign mode.

The last category of bonuses are year restrictions, which are referred to as category restrictions. Category A is the default, and allows any unit in the game. There are also Category B and Category C decks. Category B restricts any unit built after 1980, but gives you a 40% bonus to availability per card. Category C takes that one step further, restricting units with a year after 1975 but giving you a whopping 80% bonus to per-card availability!

Obviously, this necessitates a change in tactics and strategy. Category-restricted decks, especially Cat C, don’t allow modern, high-tech units. But boy, do you get a lot of lower-end units with which to compensate! For this reason, they’re popular with spam decks, but that isn’t really the only viable strategy with these decks.

Category B still gives you plenty of good middle-of-the-road units, and even some base models of heavier units, like the base M1 Abrams and the AMX-32. However, the 40% availability bonus is usually enough to up-vet everything at least once with no loss in numbers.

Cat C takes it one step further, restricting you to only older units but giving you a massive boost in availability. Even units that are usually one-per-card, like some aircraft and FOBs, are two-per-card in Cat C. Cat C allows you to choose both high-veterancy and high-availability; don’t overlook this option in deck-building!

In reality, you’ll almost need to up-vet everything at least one rank just to keep a useable number of units; it’s entirely possible to get upwards of 300 tank or infantry units in a Cat C deck at bottom rank, but of course they’d get killed in a fight if they panic. But that’s the truly great thing about Cat B/C - you can have high-ranked troops in enough numbers to truly matter, and usually cheap enough to overwhelm the opposition. The only thing to keep in mind is that Cat C decks almost never have prototype units in them anyway, so mixing them with nation-restricted bonuses is rarely worthwhile.

Of course, these bonuses could be mixed and matched to have stacking effects, too. You could have a Soviet-only Category C Armored deck, if you so choose, and overwhelm the opposition in mid-tier T-55s and waves of T-72s. Picture it!
Deck Building: Do's and Don'ts
Just because you can make a deck any way you want, of course, doesn’t mean there aren’t wrong ways to go about it. I’m not going to rehash too much of the basics, but if you’re considering any general-purpose deck, ask yourself some of the following questions:

  • Does this deck have enough numbers for the type of game it will be playing?
  • Does this deck have enough logistics to last the entire length of a game?
  • Does this deck need an FOB or would I be better served by logistics trucks that give more supply per card?
  • Do I have a sufficient variety of forces?
  • Will I actually be able to afford my forces in the game mode I’ll be playing in?
  • Do I have enough recon?
  • The above is a trick question. If you don’t get it, shame on you.
  • What are the units my deck absolutely cannot afford to lose? What do I do if those units get killed? (“Panic” is not an acceptable answer.)

I’d also like to discuss so-called “support decks.” Support decks are when you get the brilliant, totally original, never-been-thought-of-before idea to make a deck that specializes exclusively in airpower and artillery, to provide the other team with dedicated fire support. These are usually a really bad idea. It never fails that in every 10v10 match I play in, some genius noob with a “support deck” gets their airplanes shot down in ten minutes when their targets start spamming IADS techniques, and then ragequits because they’ve got nothing left to do, letting their team down. The reason this is so common is simple - airstrikes are some of the most instant-gratification parts of Wargame; airpower flies in quickly, blows stuff up, then leaves. What could be better? Sorry to burst this bubble, but every new Wargamer pretty quickly thinks up this idea, and they all end up just not doing anything to help their teams.

However, they’re also controversial, because the truth is there is a good way to play support decks. But done properly, a support deck is harder to play than a conventional one. Yes, I just insist on sucking the fun out of everything. I will discuss how to use support decks properly for the sake of comprehensiveness, but I really recommend just playing the game “right” and not dragging your team along as you try this for yourself.

First off, I’ll note that this is really only possible in the 10v10 mode. Even in a 4v4, your team is just going to get pissed at you if you leave an entire front unmanned. With that said, you have to have more than just artillery and aircraft. My 10v10 support decks (yes, I have them too, and I’m not afraid to admit it) include:
● A huge overcapacity of supply trucks for resupplying friendly forces (which noobs love to overlook since it gives them no points)
● High-end heavy tanks (10v10’s high income plus not buying in regular forces means a lot of points) for supporting allied offensives or defensives
● Heavy gunships as a quick-response force
● Infantry forces for garrisoning towns
● Heli-borne recon infantry
● An overcapacity of air defense systems to create a wide IADS zone and accompany allied fronts
● Only two cards of artillery
● Only a few cards of airpower

That’s right, my artillery-and-airpower deck only has a few cards of artillery and airpower! What gives? Well, the truth is that as I said, it’s harder to play than a conventional force. To actually be effective with this sort of deck, you have to keep situational awareness of every front and what every ally is doing, and keep abreast of air defenses across the entire map! I don’t rely on spamming aircraft in response to getting them shot down - that just leaves you with nothing to do once your airpower is spent. I rely on applying the principles of aircraft micromanagement and maintaining awareness of enemy air defenses to not get my aircraft shot down.

And even then, it’s usually more of a hassle than it’s worth. Yeah, if done right you’ll get a great kill-to-losses ratio, but that’s just cheap, isn’t it? So, again, try it once you’ve gotten used to such things if you must, but it’s not really worth bothering. Oh, and don’t try it if someone else on your team has an obvious “support deck” as well, or you’ll start to really cripple your team.

Additionally, for your general convenience, I’ll attach a basic guide for building a general-purpose deck. Please note that this is just a basic guide to get you started, not gospel by which all decks must adhere to. Not even all of my decks adhere to this. But it’s a handy basic guide to get you started on your first, non-themed non-year-restricted deck. I will use a color code for recommendations:


Again, before all the experienced players reading this out of curiosity start leaving angry comments, this is just a basic guide for general-purpose decks to get you started. You absolutely don’t have to follow my guidelines - again, not even all of my own decks do. As you figure out a style that works for you and start gaining some experience and developing techniques of your own, you can easily modify your decks at any time. The best deck is the one you kick ass with, not the one that best fills out a checklist.

As a final thought, remember that there is no such thing as a perfect deck. Every deck will have compromises and make sacrifices. You are never going to have all of the things you’d like - and that’s why deck-building is fun. It’s honestly not possible to answer a question like “Should I take the F-14 Tomcat or a second card of F-16Cs?” It really depends on what else is in your deck and how well you like using them.
Conclusions
Conclusions

“Oh thank God,” you mutter to yourself, sick of being called noobish and vaguely starting to wonder if this guide is actually going to end or if you got sucked into a weird, infinite time loop thing and are doomed to read the neverending Wargame guide. “I think Conclusions means it’s over.”

Well, it is, but I feel compelled to leave off with a few thoughts. Sorry about that. You can honestly stop reading now and go play the game if you really want.

Wargame is a tremendously complex game, as the length of this basics guide can attest. But at the same time, it has a very fast pace - its games last no longer than that of, say, Starcraft or Command and Conquer. What does this mean in gameplay terms? It means that, in my opinion, Wargame is an ideal mix of the depth of tactical tabletop games and the pace and fluidity of video games. You don’t have all the time in the world to ponder your next “turn” - you have no turns. You don’t have the relaxed time of a tabletop game to perfectly micromanage your forces.

You are going to ♥♥♥♥ up. You will forget units. You will suddenly lose units and not really know where they were. You will forget some of the basics. You will forget to smoke a position before sending a column of infantry careening straight into enemy troops. You will fearlessly charge your tanks at that lone enemy shadow, only to hurriedly haul ass away when it turns out to be a T-80U. You will call in an aircraft for an airstrike, move on to quickly micromanage something else, and notice half the game later that the aircraft you called in just vanished and you have no idea where or how. You will suddenly realize you haven’t had a recon vehicle along your entire front for at least 20 minutes. You will watch replays and realize you spent the whole game preparing to defend against an enemy sector that had gone totally forgotten by them, held only by a pitiful skeleton force that you were convinced was a massive army. You will order an artillery barrage ahead of your moving front to stun the enemy, misjudge the time to target, and end up blowing your own forces apart. You will get aircraft shot down because you stupidly decided that they could probably survive a few Buks and Osas if you evac’d them fast enough. You will see enemy tank forces show up in your spawn and silently wonder how the hell those things snuck across your entire half of the map. You will realize you sent your men to their deaths because of a risk that, in hindsight, was blatantly obviously never going to pay off.

Now, how do I know you’ll do that? Because I’ve done all of those things. Hell, I’ve done all of those things in the time it took to write this guide, not just in my newbie adjustment phase! And I’m certainly not about to cede that you might be better at it than me, and that means you’ll do them, too.

Don’t get frustrated. Those sort of things are half of the fun of Wargame. There is never a minute in the game in which you are not doing something, and that means you will screw up, make mistakes, and overlook things. Relax. Understand that that is a part of the game, and a big part at that.

It’s realistic. This sort of ♥♥♥♥ happens in the real world too, and any student of history can tell you that. Wars are not glamorous affairs where gentlemen officers meet on the field of honor. Neither is Wargame. War is more akin to a bunch of shockingly incompetent individuals trying to sort through dizzying amounts of information while taking fire in the hopes of killing the other guys slightly faster than the other guys can do the same. It’s confusing, messy, and merciless; and it punishes every single mistake, every single time a commander fails to observe the basics, in the most natural and obvious way possible.

And that struggle to constantly stay one step ahead of the chaos is exactly why we love Wargame.

Enjoy!
248 comentarii
tc1961 4 mart. la 13:03 
Thank you!
sterkam5 29 nov. 2020 la 9:18 
thank you for this guide
peterg73 4 mai 2020 la 16:18 
"Superb", I say, noobishly....
flyingfish505 12 mart. 2019 la 18:47 
Daryl I think it is SEE-ADD
pops951 30 dec. 2018 la 19:45 
Wow. Just wow. Thanks.
panzerthings 21 oct. 2018 la 17:02 
My Wargame ALB Bible.
crafty 4 aug. 2018 la 15:38 
thank you, a true masterpiece. i take off my hat for you. hard work and time
Tanksaawk 15 iun. 2018 la 5:35 
Now that´s what I call a proper Guide. Good Job and thank you, it helped me a LOT!
powerf7ip 18 mart. 2018 la 18:22 
A masterpiece. An absolutely masterpiece.

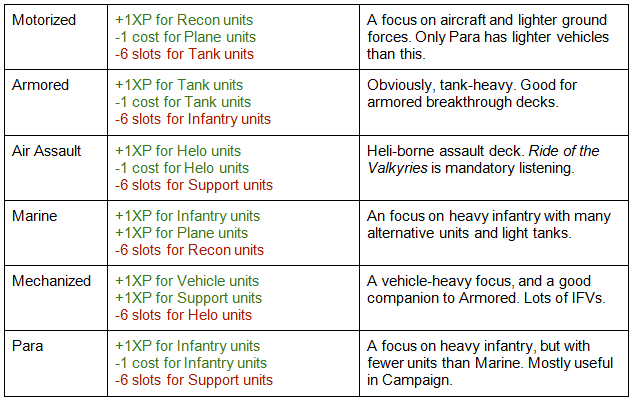
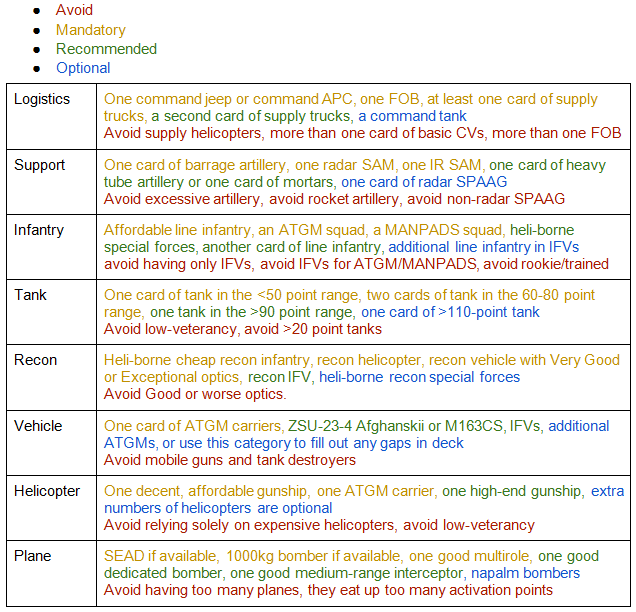
This guide is mandatory.

This game is 2 completely different things pre/post reading through this guide.

This will be my 3rd or 4th time returning to this game; and, with the new found concentration to take interest in this guide, I can't wait to pick up the controls again.

Amazing. Way amazing. Maybe I'll survive more than 3 or 4 maps in campaign now.

I'll see some of you in the Red Dragon multiplayer expansion.

As for the author of this guide...holy crap man.

I know that this was mostly written so that the author could sort out everything himself from A-Z...but damn man...this guide is some savage-art. A fricken masterpiece.

Wow.

11/10.
Daryl 31 ian. 2018 la 13:19 
Only comment I have so far is SEAD is pronounced SEE-ADD in the US military (have shot quite a few of them with both Artillery and 91mm Mortars), great write up so far