rFactor 2

rFactor 2

41 beoordelingen
rFactor 2 Quick Guide: Hosting a Multiplayer Dedicated Server Using "RaceEvents"
Door Chris
This is a quick set-up guide for hosting a multi-player server using the preconfigured RaceEvents included in rFactor 2 .


Prijs
Toevoegen aan favorieten
Toegevoegd aan favorieten
Verwijderen uit favorieten
Getting Started
This rFactor 2 Quick Guide is also available to watch on YouTube.


First, you will need to open the following ports on your router:

(These are the default ports, assuming you have not reassigned ports in your player.JSON file)

  54297 TCP + UDP
  64297 TCP
  64298 UDP
  64299 UDP


Please check your router's manual or manufacturer's website for further instructions.

Now, open rFactor 2 from your Steam library.

In the Launcher, click on the Globe/World icon.


This opens the Dedicated Server setup.
Selecting a RaceEvent
In this first window
  1. Select the RaceEvent you want to run.
  2. Assign an Administrator Password (recommended).
    NOTE: this is NOT the password needed to join your server. You can set the server password later.

IMAGE

Click on Vehicles>> to advance to the next window.
Vehicle Setup
The middle column shows the vehicles available in this RaceEvent.

To exclude a car or filter it out highlight the car name and click the <<Remove button.

To add a filtered car back in highlight the car name in the left column and click Add>>.

Use the Forced Driving View dropdown menu if you want to restrict the driving view available on your server.

IMAGE

Click Config>> to advance to the next window.
Configuring Track Layouts
Here you can filter track layouts and change the track layout order of rotation.

To exclude a layout highlight its name and click <<Remove.

To add a filtered layout back in highlight its name on the left and click Add>>.

If you want to change the order of rotation, highlight the layout you want to move and click the Rotate To Top button to move it to the beginning

or

use the plus (+) and minus (-) buttons to move a layout's position up and down the list

Leaving everything at default in the Connection Type dropdown menu allows a maximum of 31 drivers to join your server.

Leaving the Allow Custom Skin Transfers option checked makes custom skins visible to everybody on the server.

Skip the Weather button to leave the (advanced) weather options at default.


Click on Options>> to advance to the next window.
Additional Server Options
Type in the name of your server in the Race Name box.

Note that the name you choose here will appear in the Steam Matchmaker server list as well as in the rFactor2 Matchmaker list.

Fill in a Password if you want to restrict access to your server (this server password will be required to join).

You may want to experiment with the settings for the following options:
  1. Flag Rules to Black Only (no full course yellow)
  2. Mech Failures to Normal (corresponding to use instead of time)
  3. Adjust the number of Race Laps according to you needs (default is 5).
  4. Driving Aids Allowed options:
    In most cases, you'll want to leave the two deselected options – Invulnerability and AI Control – as is.
    - Invulnerability disables all damage.
    - AI Toggle gives drivers the option to let the AI control their car.

Leave the Damage Multiplier and AI Strength sliders at default (recommended).

If you always want AI on the server set a minimum here. (You can add AI during the session but they will not stay on the server once the session advances to next layout.)

The Weather Type dropdown menu allows you to select basic weather conditions.

Default will set a mix of clear and lightly cloudy skies throughout the session.

IMAGE

To get the server up and running click Load Track>>.

IMPORTANT! A few seconds after you click Load Track>> your server will be online.
Dedicated Server Monitor
Next, in the Dedicated Server Monitor window you can administer your server:
  1. Game Name will show the name of your server at the top left.
  2. AI and real driver names (people who have joined your server) will appear in the list on the right.

To remove an AI or real driver highlight the name and click Boot.

Click Add AI to add more AI drivers one by one.

This window also lets you control the following key actions:
  1. Next Session> advances from Practice to Race (for example)
  2. <<Restart Weekend will restart the session in Practice
  3. Go To Next Race>> will load the next track layout in the list
  4. <Restart Race will restart the race in progress


NOTE: If you want to change some previously set options without closing and restarting the server
click on Options to access the Track Selection window again, allowing you to add or remove layouts. (See the section titled Configuring Track Layouts in this Quick Guide for details.)

In the Track Selection window, click on Options>> again to access and edit any of your previously set Event Options.

Then click Load Track>> again.

IMPORTANT! If you want to edit the cars you will have to shut down and restart the dedicated server.
Joining Your Server
There are two ways to join your server:
  1. To join your server via the ISI Matchmaker, go to the Launcher and click on the Double Helmet icon.

    Scroll to find your server in the list.

    Highlight the server name and click on the big orange RACE button to join.

    IMAGE

  2. Another way to join your server is through the Steam Matchmaker.

    First, exit rFactor 2 Matchmaker and close the Launcher.

    In Steam, open the View menu and select Servers.

    To join highlight the server name in the list and click the CONNECT button.


And that's how to quickly set up a multiplayer RaceEvent in rFactor 2.

Have fun and good luck all!
39 opmerkingen
Adolfo Bisi 8 jun 2022 om 20:18 
I did a tutorial for the new UI

Youtube
HarleyDavidsonfx 1 okt 2021 om 19:24 
I hope you can update the guide for the new user interface.The Globe on the spreadsheet is no more. Thank you.
Todor Vasilev 5 mrt 2021 om 1:52 
I changed to a static IP address with my internet provider and after setting all ports for rf2 everything was working fine, people seeing and logging in to my server ok. But I had issues with my internet because of the GRE tunnel or the Hitron router that Virgin Media Bussiness (in the UK) is using for static IPs, so I changed back to a dynamic IP. Then I hosted a DDNS with DynDNS.org to try to host the server via DDNS and made all the steps, settings, port forwarding for the Dyn Updater software but unfortunately, I can't see my server online. Has anyone any idea if this is possible to be done with dynamic IP and DDNS hosting and if yes how? Thanks.
Bob_Morane57 28 nov 2020 om 3:43 
I don't see my server in the launcher list? while I see all the others. Yet it seems to be running correctly, the session timeout is working, the ports are open on the router and rFactor declared in the firewall. Thanks for your help
Motmox 18 nov 2020 om 1:35 
I can't open the dedicated server window. Any help?
trichens 14 nov 2020 om 15:24 
I think the ports that Aldo had were configured incorrectly?
I have
54297 tcp + udp
64297 tcp
64298 udp
64299 udp

and also
54298 tcp + udp
64300 tcp
64301 udp
64302 udp

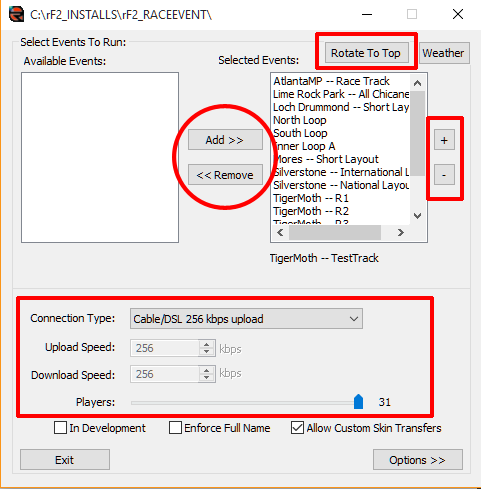
All set to forward to my "box" which is running two servers.
Both show up the the rFactor2 servers list and I can connect to both OK
uJinsCAE 8 nov 2020 om 2:08 
@Aldo Martinello How?
The_Fiddler 3 jun 2020 om 5:06 
If you can't port forward, it's probably because your ISP uses CGNAT. Request to opt-out and you should be able to forward ports without needing a static IP
Aldo Martinello 5 mei 2020 om 14:08 
Solved :-)
Aldo Martinello 4 mei 2020 om 7:07 
I've opened port correctly :
54297 tcp+udp
64297 - 64298 - 64299 - udp

Selected mod & track
Server UP

But not show at all
Any idea ??

Tks