Meadow
33 ratings
Dualshock 4 / PlayStation 4 controller configuration
By h4k3
EDIT 2024-03-27: This guide is for now obsolete, as M&D has added official gamepad support, and currently there is no method to override that. While the official gamepad support is good enough, it lacks some key features that made the setup from this guide very fluid. In any case, even if M&D add things to make a setup like this possible again, I'll need to rewrite lots of contents. So for now this guide is put on hold until I can be bothered again to mess with it. Have a good day!

Configure your Dualshock 4 controller to fully replace the keyboard&mouse-focused controls in Meadow. Control the mouse cursor with the touch pad and bind up to 10 emotes to the directional buttons.
   
Award
Favorite
Favorited
Unfavorite
Introduction
Meadow utilizes keyboard and mouse by default. However many people prefer to play with a game controller. Thankfully, most controls in Meadow can be rebound to controller input - but there's a catch! Meadow uses the mouse extensively for the on screen HUD emoticon actions. There is no official way to select emotes with game controllers as for now. Additionally, the emote assignments to the number keys (1,2,3...) would take too many button slots on a controller.

The solution: A Dualshock 4 controller and a bit of configuration with some additional tools. If you follow all the instructions from this guide, you'll be able to fully control Meadow with your Dualshock 4 controller and throw your keyboard and mouse in a fire emote. ;)
Download Tools and Preparation
Two tools deliver all the additional functions we want. The first one is DS4Windows which handles the controller connectivity and button assignments, and the second one is JoyToKey, which adds some neat double assignment functions that we will exploit to assign up to 10 emotes to 5 buttons the controller.

Download the tools from here:
DS4Windows Configuration
Preparations

First, we need to setup and configure DS4Windows. Make sure your Dualshock 4 controller is connected to your PC. If you start DS4Windows for the first time, it should automatically install the drivers.

Before we fiddle around, let's first copy the standard settings to a new profile for Meadow. Enter the Profiles tab, select the "Default" profile from the list, and click on the Duplicate button at the top. Enter a name, "Meadow" sounds perfect I'd say. Click the Save button and now we have a nice profile that we can configure for our means - and if something goes wrong, the Default profile is our backup.

Editing the main profile

Highlight the "Meadow" profile and click the Edit button at the top. A new menu with many entries opens, don't be scared, I'll guide you through.
You can change button behavior by either clicking the button on the controller picture in the top left corner, or by choosing the button name from the list below the picture. A new window opens that basically let's you assign anything involving the keyboard, mouse or XBOX 360 controller you could think of.
  • First make sure that at the bottom left part of the profile window the Touchpad is set to Use as Mouse
  • The touchpad click function has some disadvantages for Meadow, so let's set Left Touch, Right Touch, Multitouch and Upper Touch to "Unbound" each. (You find "Unbound" in the lower left corner of the pop up menu)
  • Click the L2 trigger and set it to Left Mouse Button (the "L" on the mouse picture of the pop up menu).
  • Click the Left Stick Up (LS Up) and set it to the keyboard key W, and afterwards click the Left Stick Down (LS Down) and set it to the keyboard key S.
  • For taking screenshots, set the PS button to the "F12" key on the keyboard.
  • In the Gyro category set Tilt Left to "Mouse Wheel Up" and Tilt Right to "Mouse Wheel Down" - they are the little arrows above and below the middle mouse button.
  • In the Sensitivity category set Six Axis X to "0.60".
  • And if you're fancy, change the Lightbar using the RGB sliders (not pictured) into your favorite color, like the meadow-green I use in my profile
  • Most importantly, click the Save Profile button at the top after you've entered all the changes. You'll return to the Profiles list.

Creating a secondary Profile for Auto Forward mode

We now have a theoretically fully functional Meadow profile. However, to support full Auto Forward functionality, we need to create a second profile with some minor alterations. When you play with the keyboard, it makes sense that the W and S keys cancel Auto Forward when you play with the keyboard. However when you play with gamepad, the Left Stick is way too sensitive for movements in any direction, including Up and Down. This secondary profile will ignore any Forward / Backward (Left Stick Up/Down) inputs when Auto Forward is active.

Since the last step you should still be in the Profiles list. Highlight the "Meadow" profile from the list and click the Duplicate button at the top. Enter "MeadowAutoFwd" as the new name and click the Save button.
Highlight the "MeadowAutoFwd" profile and click the Edit button at the top. There are only two buttons we need to edit here, the rest should stay exactly the same as in the original "Meadow" profile:
  • Click the Left Stick Up (LS Up) and Left Stick Down (LS Down) and set them both to "Unbound".
  • Don't forget to click the Save Profile button at the top again after you've entered all the changes. You'll return back to the Profiles list.

Switching between the two profiles

The last thing we need to tell DS4Windows is to switch between the normal "Meadow" profile and the "MeadowAutoFwd" profile when we press the Auto Forward button. For that we need to add a Special Action to the original "Meadow" profile.

From the Profiles tab highlight the "Meadow" profile in the list and click the Edit button at the top. You're once again the the profile editing window where you need to [/previewimg]perform some final steps:
  • Activate the Special Actions tab in the top left
  • Click the New Action button.
  • Enter the Name for the action: "AutoForward"
  • From the drop down menu -Select an Action- choose "Load a profile".
  • A new drop down menu will appear below. It must be set to "MeadowAutoFwd".
  • From the list on the left side activate the "Triangle" entry.
  • Click the button Set Unload Trigger and also activate the "Triangle" entry in the list.
  • Click the Save button at the bottom (not to be confused with the Save Profile button at the top!)
  • The new action should now appear the list. If everything looks fine, click the Save Profile button and you'll return back to the Profiles tab.

Selecting the play profile

Finally, go the the Controllers tab and choose the "Meadow" profile from the Selected Profile drop down list. The Dualshock 4 will now use all the settings we just prepared, and glow in your favorite color ;)
JoyToKey Configuration
We will use JoyToKey to squeeze all emote assignments to the directional buttons and the Share buttons on the Dualshock 4. There's a nice function that lets you double assign keyboard keys to controller button. Here's how:


Open JoyToKey. Click the Create button at the lower left corner. Once again, let's enter "Meadow" as the profile name and click OK. On the right side of the window is a list of all buttons on the controller. If multiple controllers are listed, select the tab for your Dualshock 4. You can easiely find out if it's the right one by pressing buttons on your controller - if list entries become marked yellow, you're in the correct Joystick tab.


We'll now perform almost the same procedure for each of the four Directional and the Share buttons. This example is for the Up directional button.
  • Highlight POV: 🡡 and click Edit button assignment
  • A new menu will pop up, similar as in DS4Windows. Select the Keyboard 2 category at the top
  • At the top, there are four sections titled 1, 2, 3 and 4 with four input fields each. Only the top row of these input fields interests us. Enter the number "1" in the section 1 and number "6" in section 2. The remaining input fields should be left blank (Disabled).
  • Activate Switch depending on how long the button is pressed and enter 300 msec threshold.
  • Click OK to confirm the entries for this button.
Do the same for the POV: 🡢, POV: 🡣, POV: 🡠 buttons and Button 7 (the Share button), and enter the following numbers as the first entries in the lists:

Button
Section 1 key
Section 2 key
POV: 🡡
1
6
POV: 🡢
4
9
POV: 🡣
2
7
POV: 🡠
3
8
Button 7
5
0

All other controller buttons should be left Disabled. Once you've entered everything, the main menu of JoyToKey should look like the first screenshot of this chapter.

If you want, you can test your results right now. Open an empty Notepad or Word document, and press the Up-Down-Left-Right-Share buttons. They should enter numbers in your document. Depending on how long you press the buttons, the numbers should vary for each button.
Meadow Ingame Configuration
We're almost there! Leave DS4Windows and JoyToKey with the selected Meadow profiles open and start Meadow. In the Settings, enter the Controls tab. We will reassign almost all keys, here's what buttons you have to press at each corresponding entry:

forward
W
camera up
Right Stick Up
auto forward
Triangle button
left
Left Stick Left
camera left
Right Stick Left
auto run
Circle button
back
S
camera down
Right Stick Down
peek names
R1 button
right
Left Stick Right
camera right
Right Stick Right
snap camera
None
run
R2 Trigger
move cam hold
L2 Trigger
toggle emotes
None
jump
Cross button
rise
Cross button
toggle hide
Click Touchpad
sense
R3 button
fall
Circle button
talk
Square button
puzzle view
L1 button
radar
L3 button
(Notes: The L3 and R3 buttons activate when you press/click the Left and Right Sticks down. The Cross and Circle buttons are indeed used twice. "None" can be entered by pressing the Escape key)

If you've set up everything correctly, your Controls menu should look like this:


Finally, make sure that expand emotes is activated in the Gameplay menu.

It's time to play!
Playing
You've set up everything to play the game with the Dualshock 4 controller! Yay! :)

Always make sure that you open DS4Windows and Joy2Key before you start Meadow. The game camera and possibly other things behave strangely when you forget to do it and you'll have to restart (which is always a long process in Meadow...).

I've put all the functions on the following controller layout sheet for you to check while playing. So you could either print it out or put it on your phone or a second monitor if you have either.


Some more details/explanations:
  • Use the touchpad to move the mouse cursor around and press the L2 trigger to "click" an emoticon. I find the L2-click much more comfortable and reliable than clicking the touchpad. Also, you can leave the mouse cursor on a certain emoticon and just spam the L2 key if you want to, like, set off unlimited fire emoticons.
  • The Emote binding keys 1-2-3-4-5 and 6-7-8-9-0 are assigned ascending to the Up-Down-Left-Right-Share buttons. Pressing the controller buttons briefly activates the lower numbers 1 to 5, holding them long will activate the higher numbers 6 to 0. Assign emote bindings as you would with the keyboard. E.g. when emote HUD is activated (Click the Touchpad), hold the Down button on the controller long on the ruin-emote to assign it to the 7 number. Deactivate the HUD (Click the Touchpad again) and hold the Down button long and you'll post the freshly assigned ruin-emote. :)
  • When Auto Forward is active (Triangle button) the Left Stick Up/Down inputs become ignored, as they would cancel Auto Forward, which we don't want at all. There is a small catch, though: When you are in Auto Forward mode and the animal stops movement by itself (e.g. after falling down from great height), you will have to manually revise back to the correct mode. Just press the Triangle button a couple times until movement is back to normal.
  • Toggle Auto Run on and off (Circle button) when you are in Auto Forward mode for slick movement pleasure.
  • Zoom the camera by tilting the controller to the left and right (Sixaxis controls). It's also possible to use up/down tilting, but is more likely to result in happy accidents. You may adjust to your own personal likings.
  • Eagle controls are fully implemented. Because Eagle cannot jump and auto run I set rise and fall to these unused buttons - and it works great! Rise with Cross and fall with Circle! :)
  • I've switched off snap camera and toggle emotes, I don't see a good use for those and there was no space left on the controller, after all. If you need them, you can swap them out for another button, or assign keyboard keys and use those.
  • The PS button takes a screenshot with Steam's integrated screenshot function (F12 key).
  • Perform Nodding/Shaking your head by holding the L2 trigger and wiggling the Right Stick vertically (nod) or horizontally (shake head). It's not very easy at first and might require some learning, but so it is with the mouse ;)
Final Words
Hopefully this guide is helpful for some of you who own a Dualshock 4 controller! I can only recommend it to anyone who plays a lot of Meadow, it's a great relief for the hands and wrists and so much more relaxing - at least for me.

Thanks a lot for reading! If you have suggestions, experience errors or have some other issues with this guide, please comment below. If it works for you, I'd be happy to hear that as well. If you like this guide, please click the Rate Up and/or Favorite button. Thank you!

Enjoy the game and see you in the Meadow! :)
-Klaimen
Updates
v1.1 (25. May 2017):
- Made Auto Forward mode work properly by switching to a second DS4Windows profile that ignores Up/Down input - the now twice as long DS4Windows chapter is worth it though, promise!
- Switched sense and peek names button positions as it's easier to turn peek names on/off with the shoulder button.
- Eagle is now fully controllable with the standard profile.
- Added Zoom functions for Sixaxis controls
- Ditched Eagle Sixaxis chapter for now, the guide has got complicated enough. If someone wants it back, shoot :)

v1.0 (19. March 2017):
- Initial release
7 Comments
Goblin King Sep 10, 2018 @ 11:11am 
Thanks for the guide! It would be nice if someone could share their configuration files, so we don't have to manually set every key.
❂ Narquelion ❂ Jun 29, 2018 @ 11:20am 
Can you make one of these guides for xBox Controller users? :>
Labracadabrador Dec 13, 2017 @ 10:23am 
Thanks, got it to work :3 Now all I need to do is get used to this so I don't stumble around all the time xD
h4k3  [author] Dec 13, 2017 @ 10:11am 
Hey, glad you got it to work! About your question: One of the most recent game updates changed the cam hold behavior. I fixed it by this:
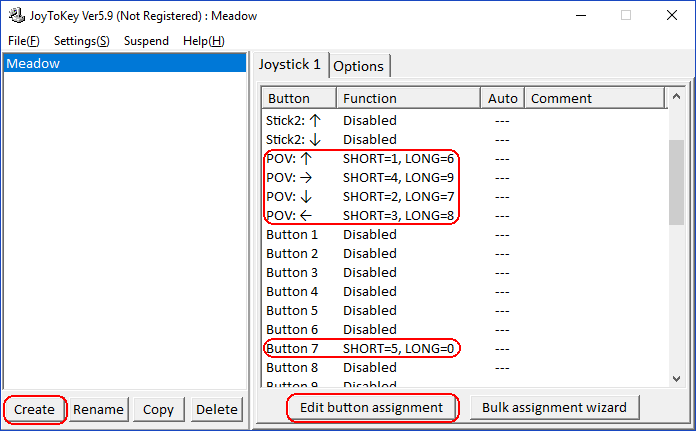
- in the game menu, change "move cam hold" to the keyboard letter "H"
- in JoyToKey, add keyboard letter "H" to all directions of Stick 2.
This way, "move cam hold" will always be pressed down when you move the stick. Not pretty but it works until I've found a better solution...
Good luck! :meadowrabbit:
Labracadabrador Dec 13, 2017 @ 9:56am 
Hey, I got it working and everything is fine! Is there any way to set it so that the camera can be moved when I am not holding cam hold?
Labracadabrador Dec 13, 2017 @ 8:57am 
Trying to get this to work on my computer at the moment :D thanks for making this!
prettyprincess127 Mar 20, 2017 @ 9:13am 
hi