Guns of Icarus Online

Guns of Icarus Online

359 ratings
Muse in Arms (Gunnery guide for 1.3.9)
By Wundsalz and 3 collaborators
Specific guns are discussed in detail, including loadout suggestions. General discussion of gun mechanics, with some practical tips mixed in. A guide for crew members and captains alike.
   
Award
Favorite
Favorited
Unfavorite
Introduction
This guide discusses the "Guns" of Icarus themselves, with all their many facets. It addresses both new players and those who have already played a few hundred matches. Just read along if you're interested in a better general understanding of GoI's arsenal! Alternatively, if you're just interested in using a single gun more efficiently, you can skip the basics and jump straight to the gun-specific tips and loadout discussions or take a look at the summary (TL;DR) section.
If you're playing as pilot, you might be interested in the ship loadout section. It has some useful tips to help your ship's weapons complement each other.
Glossary
Arming distance: The distance projectiles need to travel before arming (see weapon mechanics in the basics-section of this guide).

Field of operation: The area in which the weapon is able to hit. This is restricted by maximal horizontal and vertical arcs, as well as by its effective minimal and maximal range.

DPS: Damage per second. "Dude, this spreadsheet says lochnagar gives you mucho DPS!" Note: lochnagar does not always give you mucho DPS.

Hit markers: Indicators that appear when you hit an enemy with a weapon. Bigger hitmarkers mean more total damage dealt (after modifiers have been applied).

Kill feed: All component destructions, rebuilds, and ship deaths are logged in the upper-left corner of the screen.

Hull strip: Break an enemy's armor to expose their hull and make them vulnerable to permanent damage. The closer a ship is to a hull strip, the more smoke emits from its hull. The Hull strip itself is indicated by a sound effect and a small explosion of black shards. If a ship's hull is hit by gunfire while the armor is destroyed, the hitmarkers are red instead of white.

Blender: The carronade got this name because getting killed with one is painful, frustrating, and takes a while compared to some other weapons.

Bifecta: A group of 2 guns on a ship that can all be focus-fired on one target. Present on all ships.

Trifecta: A group of 3 guns on a ship that can all be focus-fired on one target. Fairly common.

Quadfecta: A group of 4 guns on a ship that can all be focus-fired on one target. Quite rare because it requires the pilot to leave the helm.

Buff engineer: An engineer equipped with the DynaBuff Industries Kit (aka buff-hammer).
Basics
Ship Components
Your weapons are used to destroy various components on your enemies' ship and, ultimately, the ship itself. Let's have a look at what we can destroy:

Weapons: Weapons are used to damage components on a ship. As a weapon gets damaged it is slower to shoot, turn, and reload. Muzzle speed and damage per shot are unaffected. If a weapon gains 8 fire stacks, the gunner is kicked off the weapon until the fire is extinguished or the gun burns down.

Engines: These distinguish the noble dirigible from the lowly aerostat and are used to maneuver the ship horizontally. The main engine has the most significant influence on the ship's movement along the longitudinal axis. The side engines are required to turn the ship, but can also provide some longitudinal speed. Damaged and/or destroyed engines make for a slow and clumsy ship.

Balloon: The balloon keeps the ship flying and lets it maneuver vertically. A ship with a damaged balloon ascends and descends more slowly. If the balloon is fully destroyed, the ship falls and may take damage from hitting terrain if the balloon is not rebuilt in time.

Armor: The armor protects the ship's main hull. Only after the armor is destroyed can the hull be damaged. A ship with damaged armor suffers no other ill effects, but when the armor is destroyed, anything that would otherwise damage armor goes straight to the hull.
Note: the moment armor breaks is highlighted with a sound effect and a small explosion of black shards. Ships without armor emit small trails of black smoke until the armor is rebuilt.

Hull: The ship's most vital component. Damage to the hull is permanent cannot be repaired. The hull can only be damaged if the armor is down. A ship with a damaged hull becomes visibly bent and broken, but its performance is otherwise unaffected. If the hull is destroyed, the ship dies. Note: whenever you deal damage to an enemy's hull, the hit marker is red instead of the usual white.

Weapon Mechanics
Most weapons have two different damage sources: a primary and a secondary. The primary damage is applied to the component hit directly by the projectile. The secondary damage is applied in an area of effect (AoE) around the point of impact and affects all nearby components. The component hit directly suffers both primary and full secondary damage. Components further away than 50% of the AoE radius receive less secondary damage. (source[gunsoficarus.com])
Arming time: Some of the more powerful weapons (namely the lumberjack, light flak, heavy flak, hades, and mine launcher) only deal their secondary damage after the projectile has been in the air for a certain time. It's easy to tell when a projectile is armed because it visibly ignites. The secondary damage constitutes a large part of these weapons' total output, so ships equipped with them should try and keep a sufficient distance to make best use of their guns. Special ammunition can alter the arming time and/or distance. They are elaborated under "range optimization" in the Crew Loadouts-section of this guide.

Note on hull strip: primary and secondary damage is applied sequentially. This is relevant when a projectile's primary/direct damage alone is enough to destroy the armor, and the secondary/aoe gets dealt to permahull. Thus a heavy flak or mine can occasionally both break the armor and deal significant damage to hull in one shot.

Damage Types
A weapon's final damage is determined by its damage types and the target component.
There are six different damage types in Guns of Icarus, and each is effective against different components.
1. Piercing damage is most efficient at stripping the enemy's hull.
2. Flechette damage is most efficient at shredding the balloon. Guns and engines are immune to flechette damage.
3. Explosive damage is best at demolishing a ship's hull once the armor is down.
4. Shatter damage is excellent for disabling enemy guns and engines.
5. Fire damage is passable against everything except disabling engines, but it's hard-countered by certain repair tools.
6. Impact damage kills everything. However, there are only three sources of impact damage- the mine launcher, collisions with terrain, and collisions with enemy ships.

Here are the exact damage modifiers based on type and target component (engines are treated same as guns when determining damage):


Weapon Range
In theory every weapon can hit anything in between its muzzle and its maximum range (which is determined by muzzle speed and a shell-life timer, which detonates the projectile after a few seconds of flight).
However, there are weapon characteristics which further restrict the field of operation in which a gun is effective. Some weapons suffer from an arming time and are next to useless if your enemy is too close for your weapons to arm. Other weapons are hampered at close range by narrow gun arcs or slow rotation speeds, which make it hard to keep your guns pointed at the enemy during a close-range brawl.
There are also factors which restrict a weapon to be used efficiently close to its maximum nominal range. Some weapons, for example the Gatling or the hwacha, have lots of recoil and fire in a spread, which causes a lot of your shots to go off target. Recoil can be negated with heavy clip. Other weapons like the Lumberjack or the Hades have large projectile drop: the projectile accelerates downwards, requiring the gunner to arc their shots. Projectile drop can be mitigated with lesmok rounds.
Ship Loadouts - Gunnery for Captains (other classes may take a peek as well)
One of the most interesting aspects of Guns of Icarus is the rich variety of ship builds. There are a lot of viable weapon combinations that can be used and need to be played entirely differently. However, randomly mixing guns will barely ever yield an acceptable build. Hence I'd like to provide some guidelines how to find good ship-loadouts.

Know your guns!
Guns are usually specialized at taking out a specific set of components. Experience is probably the best way to find out which gun can be used for what properly. Use a gun and toy around with it! Try different ammo types, pair it with different weapons and see how it handles various tasks. However, this process takes time and it's really not necessary to find out that some builds can't work out by dying over and over again. This chart rates the efficiency of guns at destroying different components. It can't really substitute in-game experience, but it can help getting you started by weeding out poor options:

(+++) excellent - in the right hands this gun can do the job on its own within a few seconds
(++) good- gets the job done alone in a short time
(+) decent - can do the job alone but needs a long time to do so. Better pair it up with an additional damage-source of this type if you want to do the job properly
(o) poor - the damage can be out-repaired by an engineer. Still it might make sense to point the gun into the general direction of this component if you can still hit your main target while doing so
(-) very poor - if you've got anything better to do, don't shoot your gun at this target. Reloading your gun or just waiting for a better target are better things to do in most situations.
(--) useless - the gun either can't inflict any damage on this component or it can be ignored. Point it at something else or leave it alone!

Use guns with a similar field of operation!
What's better than guns? Right, more guns! Most ships in GoIO have a layout which allows a relatively easy establishment of a bifecta or even trifecta (that's the GoIO terminology for bringing two or three weapons into an overlapping field of operation, which allows them to shoot at the same target). Make sure that your guns can actually shoot at the same target at the same time. In order to do so, your weapons need to have a similar effective range which can be looked up in the table below:
(++) Ideal range for the weapon, (+) The weapon can be used efficiently but is somehow restricted to operate like it should (e.g., special ammunition may be needed, or it's hard to aim with the weapon), (-) the weapon can operate in this range, but it's clearly not at home. It's recommended to avoid this range with this weapon (special ammunition might be required, dps might be reduced, aiming might be very hard, etc), (--) The weapon can't operate (efficiently) at this range. If there are hard-caps for a guns effective range, they are given in brackets.

Another aspect one need to consider are the arcs of the guns. The horizontal arcs are interesting in particular if you plan to establish bi- or trifectas with guns that don't point into the same direction. As a rule of thumb, the guns you want to shoot at the same time at the same target should have an overlapping horizontal-arc of at least 10°. Unfitting gun arcs in vertical direction can imply restrictions as well. E.g., the Mercury and the Artemis pair up very well - both with regards to their effective range and the damage source they deal. However, while the Artemis can barely aim upwards, the mercury can barely aim downwards. This forces you to maintain the same altitude as your enemy if you want to attack them with your full damage-output. That being said, the vertical gun arcs generally have a smaller influence on the viability of gun-pairings than the horizontal ones. Here's a chart with all weapons' gun-arcs:


Think of a Strategy!
The game starts in the match lobby. Take a look at your enemies' build and discuss with your co-captain how to counter it. On death match your goal is to destroy the enemy ships more often than they do. To kill ships you need to get rid of their hull and then inflict damage on their permanent hull. Whether you do so straight forward with a piercing damage + explosive damage weapon-pair or if you want to pop your enemies' balloons to crash them into ground is up to you. You could also choose a painful and prolonged disabler-death for your foes if you're a meanie. Just make sure to discuss your strategy and build with your ally. Your builds need to fit together and should synergyze well together.
As a rule of thumb: if you and your team mate can point and shoot weapons at your enemy at the same time which sum up a total of 3-5 plus-signs against the Armor and 3-4 plus-signs against the hull if looked up in the Gun-Performance table, your setup is likely viable. Remember the arcs of the guns and their effective range!
In addition to keeping an eye on a sufficient total team-killing power, you might also want to be able to kill an enemy on your own in a 1vs1 situation, as allies have the bad habit to die occasionally. In order to do so you need roughly 2 plus-signs in armor and hull damage each. Alternatively, if you fly a relatively quick ship (Squid, Goldfish, Pyramidion), you could likely just run away from your enemies as well and rejoin your ally once he respawns.
Remarks regarding the weapon "Terrain (crash)": Your enemies will likely crash into the ground or collide with terrain if your team uses a balloon-popper-heavy loadout (3 or more plus-signs against balloons in the performance chart). Crashes with terrain help to get rid of your enemy's hull-armor and to finish the permanent hull as well. Feel free to add this "weapon" to your calculation if you fly a balloon-popper build!
Remarks regarding the weapon "Ship (rams)": if you fly a close range Pyramidion or a close range Goldfish you can harass your enemies by poking them around during your engagements, inflicting damage to the component you hit. If this fits your play style, feel free to add this "weapon" to your calculation. Piloting tip: use moonshine or kerosene to ram your enemies! Not only do these increase the velocity of your ship (and hence the impact damage of your rams), but it also prevents your ship from bouncing out of your gun-arcs during the rams due to the reduced angular drag perk of these steering tools.
Crew Loadouts I
A major aspect of gunnery is the choice of ammunition. Some ammunition types are chosen to make it easier, or even possible, to hit with. For example, a couple of weapons have a lot of spread which makes precise hits impossible unless heavy clip is used. Other weapons' projectiles decay quite early, making long range hits impossible. In these cases lesmok rounds can be used to extend the field of operation of the weapon. Other weapons, like the Lumberjack or Hades, suffer from an arming time, which makes the weapon next to useless if the enemy is too close. This can be addressed by ammunitions which reduce the projectile speed or the weapon's arming time. Last but not least ammo can be chosen for the purpose of maximizing the dps of a weapon.

Engineers are the better gunners
Yes, you read that right. In many cases it's most efficient to play as an engineer if you want to focus on gunning. The reason for this is the buff hammer; a buffed weapon deals an additional 20% damage without any drawbacks besides a 14-second prep time. If you compare this to the numbers in the charts below, you'll quickly realize that this is a huge boost that often can not be outperformed by the gunner's ammo types. The exceptions are 3 weapons where a gunner can be better- Lumberjack, mine launchers, and Hades.

Ammunition types
Let's have a look at what ammunition choices we've got:


Normal: The basic ammunition every players have, regardless of what other ammunition they pick. As the name suggests, there is nothing special about it. Normal rounds are commonly used when a shooter's special ammunition doesn't work as well in the current situation. For example the accuracy-increasing heavy clip is not needed at close range, so a gungineer will switch to normal rounds and get increased ammo compared to heavy.

Burst: Burst rounds increase the area of effect (in which the gun's secondary damage is applied). They also increase the clip-size and reduce the rate of fire. As a result the weapon's damage/clip is increased and the dps decreased. The clip-dps reduction is insignificant or in some cases even negated if reload times are included to the calculation. This ammo is best used on guns with already high AoE radiuses.

Charged: Charged rounds increase the damage of each individual shot, but they also decreases the clip size and the rate of fire. Charged rounds can be used to optimize the damage output of weapons with a low clip-size such as the Mercury.

Greased: Greased rounds greatly increase the weapon's rate of fire while slightly reducing damage and increasing clip size. Projectile speed is also slightly reduced. This is the go-to ammunition for high-clip slow-firing weapons such as the Gatling, mortar, flamer, light carronade, and others. However, the damage penalty makes it a poor choice for low-clip weapons. Often used in conjunction with a buff hammer to maximize dps.

Heatsink: Heatsink ammunition increases the weapons clip-size and rotation speed and reduces the damage per projectile and projectile speed. In most cases heatsink clips are a situational weapon choice against flamer builds. This ammo essentially acts as chemspray when loaded, and can also be used to increase damage per clip in weapons with only two shots.

Heavy: Heavy clip reduces the clip size and removes projectile spread, making weapons pin-point accurate. Heavy clip is excellent for weapons that suffer from a projectile spread, especially the carronades and hwacha, but is largely useless elsewhere.

Incendiary: Incendiary rounds reduce the weapon's clip-size, rate of fire and projectile speed. They grant a chance of 20% to add a fire stack to a component that is hit directly. This chance is added to the weapons base-chance to set fires. Best used on weapons with high rate of fire or large AoE radius.

Lesmok: Lesmok rounds increase a weapon's muzzle speed and slow down the falling speed of arcing projectiles such as Hades shots. This comes at the cost of a largely decreased clip-size and a reduced rotation speed. Lesmok rounds are used to extend a weapon's maximum range and to make it easier to hit with weapons that have a low muzzle speed or unwieldy ballistics. This ammo type is best for long-range pressure as opposed to raw dps.

Lochnagar: Lochnagar rounds make the gun pin-point accurate, increase the damage by a factor of 2.25 and reduce the arming time to 40%. Sounds good doesn't it? Unfortunately, the drawbacks are similarly severe: The clip-size is reduced to 1, the AoE is reduced by 50% and rotation speed is reduced to 10% of the original. After the single shot is fired, a gun receives 250 damage. The latter drawback makes lochnagar impractical for light weapons, as light weapons only have 200 hit-points, forcing you to rebuild the gun after every shot. Thus the usage of lochnagar is limited to heavy weapons (except hwacha).

Here's a table summarizing the qualities of the ammo-types:
Crew Loadouts II
Range Optimization
In order for your weapon to deal damage you must be able to actually hit the target. Some weapons are difficult to hit with and/or apply the weapon's full damage at certain ranges. Ammunition can be picked to address these difficulties:

Maximum range: Lesmok rounds can be used to increase the weapon's maximum range, as every projectile has a certain life time and as lesmok increases the projectile velocity it can travel further before it decays.

Ballistic Drop: Some weapons have a strong projectile drop which makes it hard to hit distant targets. In these cases lesmok rounds can be used to extend the weapon's effective range. Both the projectile velocity boost and the projectile lift boost lesmok grants reduce the projectile drop per unit of distance.

Projectile Spread: Heavy Clip can be used to make guns pin-point accurate. They can be used to let guns with heavy spread (e.g. carronades, Gatling, hwachas or Banshees) operate efficiently, even if they're at maximum range. This ammunition is largely useless on guns with no inherent spread.

Arming time: Some weapons suffer from an arming time which causes the major damage source (their secondary, AoE damage) not to be dealt if the target is too close. Hence bringing special ammunition is a good idea if you expect your enemies to get close to you. Here's a reference table of influence of ammunition on the arming distances:


Damage Optimization
As a gunner or gungineer, optimizing the damage output of your weapons is very important. What this means in practice depends on the weapon you use and sometimes on the situation you're in. You either want to optimize the dps of your weapon within a clip to deal the most damage possible in a short time frame, or you want to maintain high continuous pressure. For the latter case you want to maximize the dps of your weapons over several clips, so reloads must be accounted for. Charts that illustrate the dps difference compared to normal rounds for each round in % can be seen below.


There are some guns which can almost but not quite do their job in a single clip (e.g., destroying a fully intact balloon or destroying a hull of a specific ship with a single volley). In these cases bringing ammunition to increase the damage output per clip is best, even if it means reduced dps. Most situations of this type will be elaborated in the gun-specific sections of the guide. However, if you want to dive into the numbers yourself, I suggest to take a look at this spreadsheet[www.dropbox.com], which should cover the information you need.
The Barking Dog Light Carronade


Play style
A carronade shot consists of 16 pellets fired within a 5-degree cone, one of the widest spreads of all weapons. Carronades are powerful balloon poppers, decent disablers and can help out with stripping hulls by dealing roughly 45% of a Gatling's dps to the armor. Due to the projectile spread the gun is inefficient at the edge of its stated range unless heavy clip is used.
Carronades are often used on very fast ships like the Squid. This makes communication with your pilot very essential if you want to take out components with heavy clip, as a sudden sway can easily ruin your shot. Announce that you want to take out specific components just before you're ready to fire. This way your captain can try to avoid sudden steering for the brief moment you need to aim and shoot.

In my opinion the heavy carronade is best played as a gunineer with buff kit and heavy clip, as buffed normal rounds outperform the dps bonus of ammunition choices like charged rounds. With this loadout heavy clip can be used for long range shots and to take out specific components. Once you're really close to an enemy and you're sure that all projectiles of the carronade hit anyway, you can switch to normal rounds to maximize the damage output. Keep in mind though, even when buffed one heavy clip is barely enough to destroy an enemy balloon from full health, so you can't afford to miss. Thankfully the balloons are huge targets.

Viable Ammo Types

Heavy clip focuses all 16 projectiles into a single ray, making the weapon deadly accurate. Not only does this allow the carronade to be used efficiently at longer distances, but it also unlocks the disable power of this weapon. While heavy clips reduce the dps, they allow to target specific guns or engines rather than spreading the projectiles over the enemy ship. To be more specific a carronade loaded with heavy clip can:
1-shot light weapons,
1-shot light engines when buffed (unbuffed they deal 288/300 damage to engines which might still be sufficient to take them down if the enemy pilot used steering tools recently)
2-shot heavy weapons
2-shot heavy engines
and they can take down an enemy balloon with an entire clip if the weapon is buffed and the balloon isn't maintained while the clip is shot. Unbuffed the carronade deals roughly 80% damage to the balloon with heavy clip.

Incendiary rounds can be used to start fires on the enemy ship. Due to the large amount of projectiles, each shot will add slightly more than 3 fire charges on average. Setting fires on hull and balloon while still dealing good direct damage is the best way to make enemy engineers sweat - especially if they've just rebuilt the component.

Greased rounds maximize the dps of the carronade if reload times are not taken into consideration (+27%). This can be useful for quickly popping a balloon before the enemy has a chance to react, but it's quite hard to pull off.
Javelin Light Harpoon Gun


The Harpoon is a utility weapon. While the damage inflicted by this weapons damage is neglectable, it can be used to pull yourself and your enemy closer together. When shot at an enemies ship hull, a rope gets attached from the harpoon to the hit location for 5 seconds. Along the rope a force of 270 kN is applied to the attached ships. That is roughly the equivalent of most ships engine output when moving backwards with full thrust.

Play Style
Harpoon shots have not only got a significant impact on your enemies movement, but also on your own. Hence Harpoon shots should always be communicated with the captain. Often times it's advantageous to leave the gun alone if your ship is in a superior position.
If your captain requests an enemy to be harpooned try to aim for the enemies hull or broken (red) components, as those are the only places a harpoon-rope can be attached to.

Viable Ammo Types

Normal Rounds are sufficient to shoot the harpoon most of the time. As the harpoon is usually not a primary weapon, try to optimize your ammunition loadout for other guns you might use on the ship!

Lesmok Rounds can make hitting with the harpoon easier, as its projectiles drop relatively quickly.
The Beacon Flare Gun


The flare gun is a utility weapon. Flares travel until they either reach their maximum range of 750m or get stuck in a cloud or a ship. Regardless of what causes the flare to stop, it starts to emit light, revealing any ship within a certain radius that would otherwise be hidden in a cloud. If a flare hits an enemy ship it sets 10 fire stacks on the hit component. This can be useful for instantly disabling guns or generally spreading havoc, but keep in mind that the flares have a spread and are not pin-point accurate without heavy clip.

Play Style
The main purpose of flare guns is to give you the upper hand when it comes to spotting enemies. Note though that the flare works in both directions - if the flare gets stuck too close to you, your position will very likely be compromised. Nothing points your enemy's attention more into your direction than green party light which spoils your cloud cover. Hence the best thing you can do with a flare gun is actually very often not to touch it.
Here's a rule of thumb to decide when to shoot the beacon: If you've got an idea where your enemies are likely located AND you're sure that your shot will not get stuck close to your or your allies' position, shoot the beacon. Otherwise leave the gun alone!
Of course there is no rule without exceptions. Sometimes it's worth to shoot a beacon even if you're in the middle of a cloud. One common situation like this is an enemy trying to use cloud cover to shake his spot. However you should make sure to communicate flare shots like this with your captain, as he might want to use the cloud-cover himself for other purposes like tactical relocation.
The secondary, often a bit underestimated purpose of flares is to use it as an actual weapon. Each beacon projectile has a 100% chance to set 10 fire stack on the component hit by it. 10-20 fire stacks on the hull or the balloon of a ship can make engineers sweat on their ships and more than 8 fire stacks on a weapon causes their gunner to be kicked off it and blocks its usage until the gun burns down or is extinguished.

Viable Ammo Types

Usually the beacon gun doesn't need to be reloaded with any fancy ammo. Normal rounds reveal enemies just as as any other ammo type does and the precision of the gun is still sufficient to reliably hit hulls and balloons.

Lesmok Rounds increase the range of the beacon gun, which comes in handy if you're flying a sniper ship and need to spot your foes from afar.

Heavy Clips make the beacon gun pin-point accurate and hence increases the chance you actually hit the component you aim for.

Heatsink ammunition increases the number of flares from 2 to 3. It increases the turn rate of the beacon gun, which can come in handy as a beacon is a gun you quickly want to hop into, place your shots and leave it again. The drawbacks of this ammo type is the reduced projectile speed, which decreased the maximum range of the beacon and makes aiming harder as you need to compensate the longer projectile travel time with an increased lead. Nonetheless, heatsink is usually a good choice if you plan to use the flare gun aggressively, such as on the side of a Pyramidion.
The Whirlwind Light Gatling Gun

Play style:
The main purpose of the Gatling gun is to break the enemy's armor. It's often a good idea to reload the Gatling gun once the hit markers turn red - even if the clip isn't empty yet to ensure a fresh clip is ready when the enemy has rebuild their hull. This does not apply to Squids (and also isn't always a good idea when fighting Goldfishes) as their hull is very weak and can be broken again with the same clip. When fighting Squids, hold your fire for roughly 2-4 seconds once the hull breaks (that's roughly the time the enemy team needs to rebuild it when camping it) and start shooting again just before they finish the rebuild so you can take it out again instantly afterwards.
Piercing armor aside, the Gatling gun is also a decent disabler. Occasionally it is a good idea to take out weapons or engines rather than going straight for a hull strip.

Viable ammo types:

Greased rounds provide the highest dps of all ammo types at the cost of a reduced range. They are currently the most optimal pick for the Gatling gun.

Heavy clip is a viable pick against Junkers if you plan to keep barely in Gatling range for whatever reason. The spread reduction allows you to take out their slim hulls precisely even at the maximum range. Heavy clips are also useful to take out critical components (e.g., Goldfish's frontal gun) quicker and more reliably.

Incendiary rounds are a utility ammunition choice. While severely reducing the dps they provide a chance to ignite components. They also grant the Gatling gun the ability to burn down the enemy's balloon if the enemy has no firefighting tools.
Dragon Tongue Light Flamethrower


The flamethrower has the unique characteristic of shooting particles rather than projectiles. Unlike projectiles, particles can travel through components, which allows a single particle to hit multiple components in a row.
Each flamer particle has an 18% ignite chance on each component it hits.

Play Style
The main purpose of the flamethrower is to add fire stacks to components. Fire stacks are most threatening to the balloon, followed by the hull armor, but they only do minimal damage to guns and engines. That being said, when shooting the flamer, you should still try to aim for guns and engines rather than the enemy's hull. This is because of the flamer's particles ability to hit multiple components in a row. You'll almost certainly hit the hull and/or balloon of the enemy as well if you target their guns and engines. Furthermore, if a gun catches 8 fire stacks the player is kicked of the gun if he mans it and no one can use it again until the fire on the gun has been reduced to less than 8 stacks again. This can come in very handy to disable guns.

The flamer is not time-sensitive and should always be shot regardless of the enemy's hull status. It is capable of dealing noticeable hull damage and setting stuff on fire while the enemy engineers try to patch the hull and/or balloon, adding to the general chaos.
One last note regarding setting fire charges: chem spray and heatsink rounds prevent setting fire stacks. If you see a component covered in a white, spiderweb-like texture you will not be able to ignite it. While the flamer still deals noticeable damage to chemsprayed armor and balloons, your damage output will be significantly reduced if components are chemsprayed.

Viable Ammo Types

Burst rounds are a good ammunition choice for the flamer. While flamer particles don't have an AoE to increase, burst rounds increase the size of the particles themselves, allowing easier hits on multiple components.

Lesmok rounds almost double the range of the flamer at the cost of both reduced firestacks and direct dps.

Greased rounds maximize both the fire charges/time and direct dps at the cost of a slightly reduced range.

Heavy clip is a rather uncommon choice for the flamethrower. Still, heavy clip can come in handy if you want to use it to disable guns. Remember that 8+ fire-stacks kick a player off their gun. Hence, in case you want enemy gunner(s) to permanently cry for their engineers to fix their toy you've ruined, heavy clips can be a viable ammo choice. However, choosing this ammo comes along with a dps drop and a reduced fire stack chance over time.
Artemis Light Rocket Launcher


Play Style

The Artemis combines a wide field of operation (wide horizontal arcs, a wide arc downward, long maximal range, no arming time) with good disabling power and decent explosive damage. Furthermore, if they are grouped up, e.g., in a Junker bifecta (or trifecta), they are also capable of breaking hulls. 3 Artemises deal roughly as much damage to the hull armor as a heavy carronade (or half a Gatling gun). It's an all-rounder weapon which does a lot of jobs decently.

When shooting the Artemis you've got two jobs:
1. Take down enemy guns and engines. Which ones to target depends on the situation, but generally you want to take out their own long-range disabling guns, then get to work on other stuff.
2. Kill enemies once their hull is down.

Usually the Artemis can be fired without regards to timing to accomplish these tasks, but sometimes it's a good idea to delay shots a little bit. For example, if you expect a heavy gun to be rebuilt within the next couple seconds, it is often a good idea to hold your fire for a brief moment and take it out again right away. Artemises are also frequently the only source for explosive damage in sniper matches. Hence it sometimes makes sense to delay your shots a bit if another weapon, like a Mercury or Hades, is about to take out the enemy's hull, letting you get in some permanent damage.

Unbuffed and with loaded with normal/burst rounds the Artemis can:
1-shot light weapons
2-shot light engines (1 shot with charged rounds or buffed normal rounds)
2-shot heavy weapons
3-shot heavy engines (2 shot with charged rounds or buffed normal rounds)

Viable Ammo Types

Burst rounds increase the AoE of your shots, which allows you to take out components with less precise hits or multiple components with the same hit if they're nearby. Burst is the best universal ammo because good dps coupled with easy disabling.

Normal rounds are good for slightly increasing the rate of fire over burst. Occasionally this will let you get an extra rocket into their hull while the armor is down.

Lesmok rounds increase the velocity of the rockets and hence the maximum range. It's a good choice for ultra-long-range sniper builds like Mercury+Artemis Mobulas.

Greased can be used if your enemy is rather close and you want to kill him with the Artemis rather than keeping it disabled. Note that greased rounds decrease the projectile velocity quite a bit, so you have to lead your shots more. Hence you need to adjust your lead in order to still hit your target. The total dps increase over burst rounds is very slight (less than 5%), making greased a situational ammo for killing only.
The Scylla Double-Barreled Mortar


Play Style:
Mortars are usually used in combination with a hull stripper, most commonly a Gatling gun. As a mortar gunner your job is to kill the enemy once the enemy's hull has been broken (red hitmarkers). For some ships, however, it's best to hold your fire and let the Gatling gunner do his job until you can see smoke particles being emitted from the hull. E.g., when you're fighting a Pyramidion and you've got a decent Gatling gunner with a clear line of fire that should happen briefly before the Gatling runs out of ammo. That's your sign to open fire with the mortar. Ideally you'll help to break the hull with your first shots and kill right away without granting your enemy time to rebuild the armor.

Currently there's a clear favorite loadout for players dedicated to a mortar. It's the same as for the Gatling gunner: engineer with greased rounds and buff hammer. With that setup you should load greased rounds, prebuff your gun, give your mortar the final buff hammer whack a couple seconds before the armor breaks and open fire. If executed properly, this almost guarantees a kill on enemies with a low permanent hull, like Junkers, Pyramidions and Spires.

A more advanced technique is to help the Gatling gunner break the hull armor more quickly (also called pre-firing). The mortar does about 20% of the Gatling's dps to armor, and that 20% can make the difference between victory and defeat, between a good gunner and a great gunner. However, it's critical to remember to leave enough shots for the actual kill!

Viable Ammo Types
Greased rounds are by far the most commonly used ammo type for the mortar. It reduces the maximum range of the weapon and maximizes weapons dps per clip -- and that's what should count, as any ship, including the Galleon, can be destroyed with a single mortar volley.

Lesmok rounds are an uncommon ammo choice for the mortar. It's useful as it allows the mortar to shoot further away which makes it an viable option to be combined with mid-range weapons like the Hades. Also the increased projectile velocity allows an easier lead of your shots which might come in handy when fighting fast moving targets or if you need to compensate for your own ships movement, e.g., swaying on a Junker. However, lesmok rounds reduce damage per clip significantly, and being forced to reload in the middle of an engagement can prove fatal. The low ammo also means you can't pre-fire.

Burst rounds significantly reduce the dps, but the damage per clip is increased, which allows you to start pre-firing earlier. If you use burst rounds, try to aim for the enemy's guns. Damaging the enemy's guns, and hence reducing their dps however slightly, can grant you the upper hand.
The Echidna Light Flak Cannon


The light flak cannon deals a decent amount of explosive damage within brief bursts. Its projectiles have got an almost neglectable drop and spread. Compared to the mortar, the flak cannon has a quite high precision. This, combined with the relatively high projectile velocity which makes hitting moving targets easier, makes the flak cannon a good choice for a mid-range encounter finisher.
The gun has got an arming distance of 150m which means that the major fraction of this weapon is not dealt if your target is very close to you.

Play Style
The main purpose of the flak cannon is to take out the enemy's permanent hull once their armor is down. If you notice the hull breaking sound, see the log notification of a hull break in the upper left corner or see hit markers turning red on your target, your flak shots should start to hit your target. When shooting try to avoid hitting any other components but the hull! The damage/clip of the clip is sufficient to kill certain ships like pyramideon, spires and mobulas with a single clip if the gun is buffed and the correct ammo is used. However it barely reaches the Threshold to one-clip kill these targets. Hence you should try to make each shot count and hit the correct target: the hull.
Usually light flak cannons are shot by engineers. If that's the case for you, make sure that you don't get sucked into gunning - the light flak really isn't needed in your engagements until the enemy's hull break. Feel free to focus on other stuff at the beginning of your engagements like repairing stuff or buffing equipment (like the weapon which is stripping the hull for you). While you focus on helping out on other places than your gun, keep a close eye on your engagement with the enemy, as you definitely want to be ready to fire the flak instantly after the enemy's hull breaks. If you see your Hades/Gatling gunner nailing his volley or your ally joining you on the same target, head to the direction of your flak cannon already! Once smoke emits from your foe's hull, which is an indicator of their armor almost being broken, you already want to stand next to the flak.
When shooting the flak as an engineer with buff equipment, make sure to keep your flak pre-buffed and finish the buff right before you start shooting! An flak cannon on its own can usually not inflict sufficient damage to kill any ship but the Junker with a single volley if it's not buffed. If the gun is buffed, the Pyramidion, Mobula and Spire can be shot down with a single clip quite reliable.
If no immediate

Viable Ammunition Types

Burst rounds are the only ammo type which lets you deal more than 750 damage with a single clip (784 to be more precise) if your gun is not buffed. With this ammunition you can kill a Spire (750HP) with a single volley and you can still finish a Mobula or a Pyramidion with a single volley, even if you miss one shot.

Heatsink ammunition increases the clips total damage to 743 which is sufficient to kill a Mobula or a Pyramidion. Heatsink also reduces the arming time of the weapon and the dps. It might be a good ammunition choice if you don't play as a buffengineer.

Greased rounds maximize the dps of a single flak volley. They also reduce the arming distance of the flak cannon. Only if the weapon is buffed a single volley can kill a Spire, Pyramidion and Mobula if you don't miss a shot.

Charged rounds increase the dps of the weapon as well as increasing the damage per clip to 728. With charged rounds a flak can kill a Junker, Mobula and a Pyramidion (700HP each) with a single volley if you hit every shot.

Lesmok rounds increase the maximum range of the flak. It's a good choice if you plan to snipe your enemies and will likely get rid of their armor before they reach the 1000m mark. On the downside your dps will be lowered and your arming distance increases.
The Banshee Rocket Carousel


The Banshee rocket carousel deals decent damage to the permanent hulls, but with only roughly 500 hull-damage per clip it is not able to kill any ship but the Junker on its own with a single volley, even if all projectiles hit the hull directly which is unlikely due to the Banshee's strong projectile spread.
In addition to the hull damage the rocket carousel has got a high to set fire charges on your enemy's components. There is a 35% chance the component the Banshee hits directly is set on fire with one stack. In addition to this, any component within 3m of the projectile impact has got a chance of 26.4% to be set on fire with two fire-stacks.

Play style:
Banshees are usually paired up with Gatlings or Hades guns which are excellent hull-strippers. Hence, your primary job is to destroy the enemy ship once their hull armor is down. However, due to the high ignition chance of the Banshee it can help out with the hull stripping as well. Fires, especially on hull and the balloon, put additional pressure on the engineer who tries to keep up their hull under your Gatling or Hades fire. In general it's a good idea to just point and shoot the Banshee at your enemy. If you see smoke emitting from your enemy's hull and you think your Hades or Gatling gun will get rid of the hull-armor within the next few seconds it's a good idea to delay your shots a little so you can hit your target once their hull is unprotected.
Due to the high ignition chance the Banshee can be used to attack balloons, as fires pose a major threat to it If your enemy's balloon is not chem sprayed (which prevents fire stacks and is indicated by a white glow around the balloon component). It's often a good idea to place a couple of shots at their balloon. Note though that balloon destruction is not a primary objective of the Banshee, but a situational side-usage.


Viable ammo types:

Greased rounds optimize the dps and ignition chance of the carousel at the cost of reducing its maximum range.

Heavy clips make the carousel pin-point accurate and hence allow you to use it efficiently close to its maximum range despite the gun's strong projectile spread. A single heavy clip Banshee volley deals roughly 340 damage to the hull and hence is not able to kill any ship, including the Junker, on its own.

Burst rounds increase the AoE of your shots and hence enlarge the area in which you can set fires. It also increases the hull-damage per clip to 630, which is enough to reliably kill a Junker with a single volley even if a couple of shots miss.
The Mercury Field Gun


The Mercury is a slow firing weapon which does an excellent job at disabling weapons and steerings. It also does a good job at getting rid our your enemy's hull-armor. It's long maximum range and its fast projectile velocity combined with a relatively low (yet noticeable) projectile drop make the Mercury field gun one of the best sniping weapons in Guns of Icarus.

Play Style
Point and shoot at the enemy's armor and components.
Currently a buff engineer with charged rounds is probably the best load-out choice if you want to focus on shooting the Mercury.
Mercuries can 1-shot all guns and engines.

Viable Ammo Types

Charged rounds maximize the damage output of the Mercury.

Heatsink increases the number of bullets for the Mercury from 2 to 3. Even with the reduced damage the Mercury deals enough damage to snipe out all guns and light engines with a single shot, which makes heatsink useful for disabling. However, the reduced projectile velocity alters the trajectory of the shots.

Lesmok rounds are only mentioned here because I occasionally see people picking it to shoot the Mercury. Lesmok rounds increase the projectile velocity, allowing easier hits in the distance. However, due to reduced clip size from 2 rounds to 1 round the dps drops to less than 50% of the dps with charged rounds. Frankly I recommend not to use it. With some practice even the slim Junker hull can be hit reliably at a distance of 2000m with charged rounds, and fights beyond that mark are pointless anyway.
Phobos Light Mine Launcher
The Hades Light Cannon


The Hades is the second most powerful weapon when it comes to breaking the hull armor. And unlike the Gatling gun, which is the only weapon which outperforms the Hades at this particular task, the Hades can shoot over an enormous range of up to 1400m and even beyond 2500m with lesmok rounds.
The Hades has got an one-stack ignition chance of 25% on the component it hits directly and in addition to this a one-stack 40% AoE ignition chance. The gun suffers from an arming distance of 150m, which causes the major fraction of its damage not to be dealt if an enemy is very close to your ship.

Play Style

In general you should try to hit the hull with the Hades, as damaging its armor is its main purpose. Unlike the Gatling gun, the hades deals decent permanent hull damage as well. Hence it's usually the best option to continue firing once the enemy's hull armor has been broken.
Every shot has a relatively high chance to set a fire stack on the component it hits, which puts additional pressure on the engineers when it comes to repairing. Due to the chance of setting fires, targeting the enemy's balloon can be a viable option as well. While the Hades only deals roughly a quarter of a light-carronades dps to the balloon, the firestacks it induces can burn it down rather quickly. Note though that shooting at the enemy's balloon with the Hades is almost useless if the balloon is chemsprayed. That's because chem spray prevents firestacks from being applicable to the sprayed component, which is the Hades' main damage source vs. the balloon.
Hitting anything with the Hades in the first place can be a bit tricky, due to the strong ballistic characteristic of its projectile. As getting used to the ballistic visor definitely helps here, I'd like to link you to this guide which is dedicated to the Hades and includes a detailed illustration of how to put said visor to good use.[gunsoficarus.com]

Viable Ammo Types

Lesmok rounds increase the projectile velocity and hence increase the maximum range of the weapon. Furthermore the increased velocity decreases the difficulty to hit with the Hades. This makes lesmok a viable option even in mid-range combats, e.g., if you're up against a strafing Junker or a fast moving Squid. Note though that lesmok increases the arming distance of the hades to 270m!

Greased rounds maximize the dps of the Hades and reduces the arming distance. Use greased rounds when you're confident to hit your enemy even with the slowed down projectile velocity, which makes aiming with the Hades a bit harder!

Burst rounds increase the fairly large AoE of the Hades. Use this ammunition if you want to hit your enemy's balloon and its hull at the same time while dealing some damage to components along the way. Keep in mind that the Hades has got a 40% AoE ignition chance! Fires on guns are annoying.

Heatsink and incendiary decrease the arming distance and the weapon's damage output. They are a viable situational pick, if the enemy is close and you don't have greased rounds with you.
Typhon Heavy Flak Cannon
Hellhound Heavy Twin Carronade
Manticore Heavy Hwacha
Lumberjack Heavy Mortar


There is a lot to say about this gun. After all it's probably the gun with the most viable ammunition types. Still I won't discuss them here because other did so already. Let me just link you to Levi Manns Lumberjack guide here![gunsoficarus.com] It discusses the gun (and everything that revolves around it) in great detail.
Minotaur Heavy Cannon
Summary (TL;DR)
In this section you can find two tables which can be used as a quick reference for ammunition choices. The first one sums up the recommendations given in the gun-specific sections. In the second one the recommended loadouts for the gunner and engineer class are presented. In the latter only the performance on a gun is rated. In many cases it's beneficial to play as an engineer rather than as a gunner to be able to maintain nearby components properly - even if this implies a worse performance on a gun.


Rating:
++ (dark green) - primary choice
+ (light green) - secondary, often situational choice
o (yellow) - provides a minor advantage but is outperformed by other ammunition types.
- (light red) - no significant advantage compared to normal rounds
-- (dark red) - worse than normal rounds
Reason:
captial letters: major reason; lower case: minor reason
HC - increases the hit chance of a weapon
DC - increaes the DPS of a single clip
DR - increases the DPS including the reaload time
DMG - increaes the damage per clip
IGN - increases the ingition chance of a weapon
LR - allows the gun to perform better in long range
SR - allows the gun to perform better in short range


brackets (AMMO) - secondary, often situational pick
Rating:
dark green: best performance
light green: good performance with minor drawback compared to the other class
yellow: inferior to the other class, but viable
red: severe drawbacks compared to the other class
20 Comments
amYGDala Nov 29, 2022 @ 7:48am 
I have just returned to playing GOI after several years of absence. What a relief to find this guide because any experienced player knows that a familiarity with these statistics is ESSENTIAL in differentiating a basic crewman from a valuable crewman. Further, I worked and disseminated these types of tables when I was a more active player and am very aware of the difficulty in creating the table and modifying them when various guns or ammunition types were changed by the developers. My sincere compliments to the author of this guide for his hard work and dedication.
◄KING ✠ JO► Jun 27, 2017 @ 5:35am 
Great guide!
Allons! Sep 15, 2016 @ 11:18pm 
Still an excellent guide, thx to Wundsalz and the Co-Authors :fire::fire:
ZenithZX May 19, 2015 @ 8:52pm 
Despite the fact you have updated this guide, I still appreicate all the info inside. It helped me relearn the game.
Wundsalz  [author] Apr 4, 2015 @ 3:20am 
I currently do not actively maintain this guide anymore. That being said the information provided here is still up to date for 1.4.0.

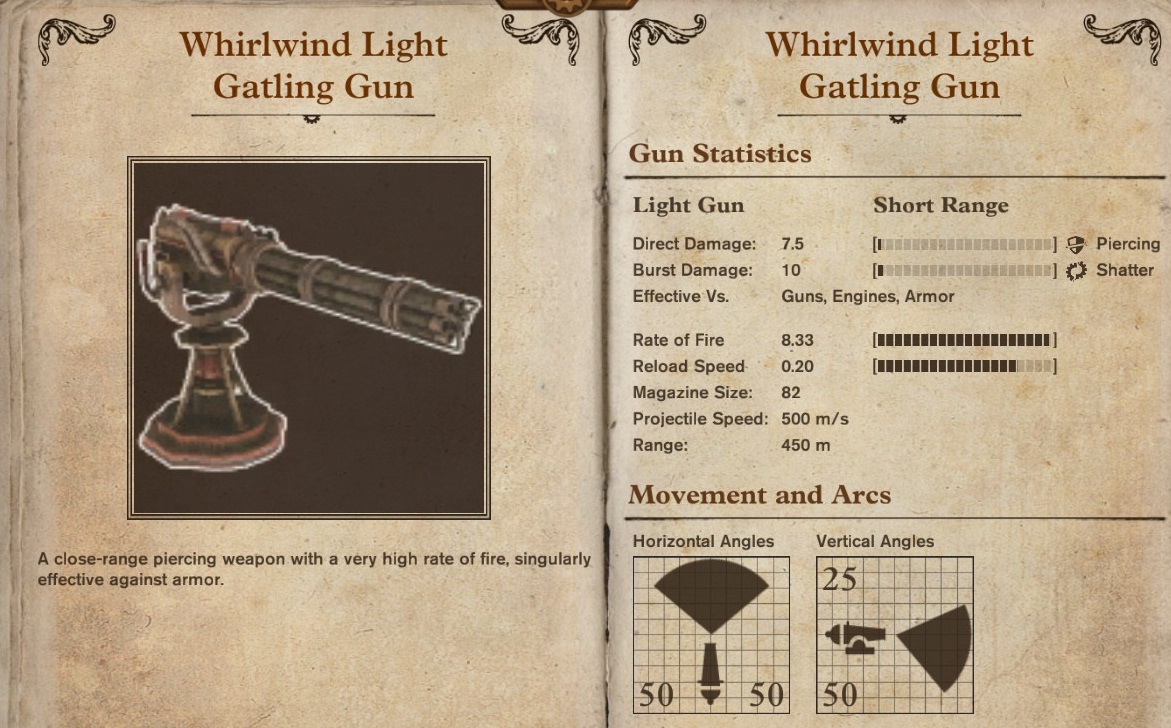
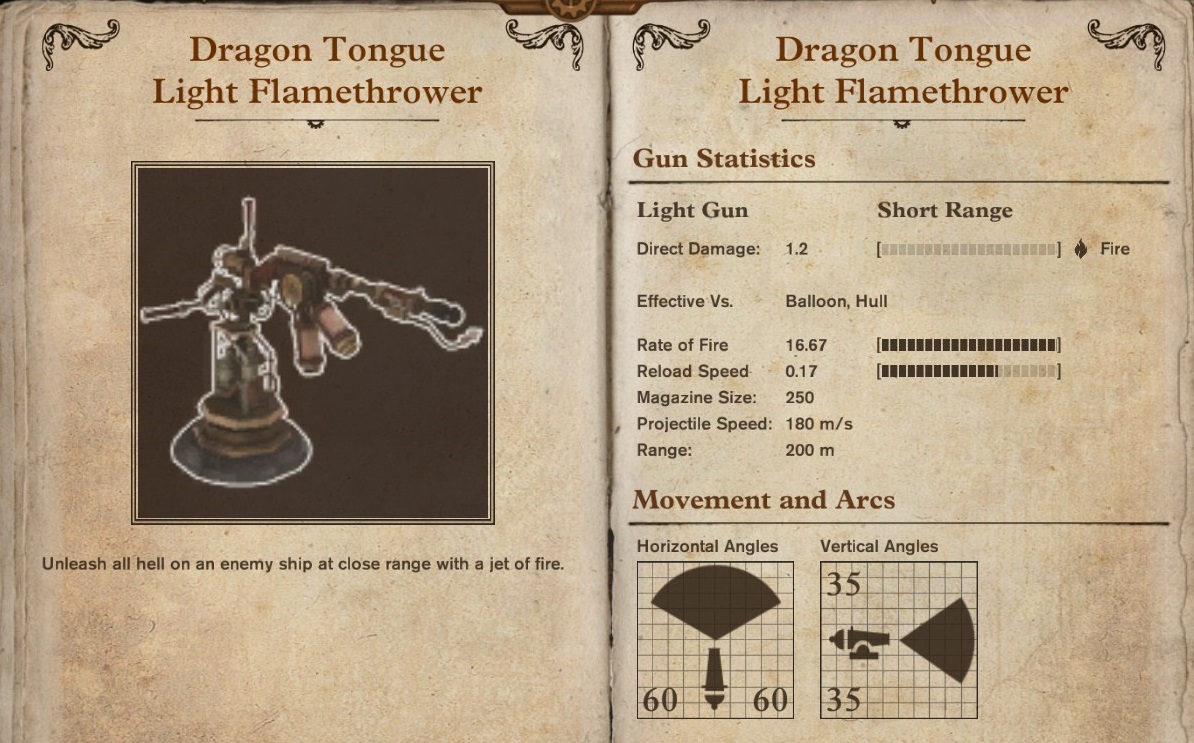
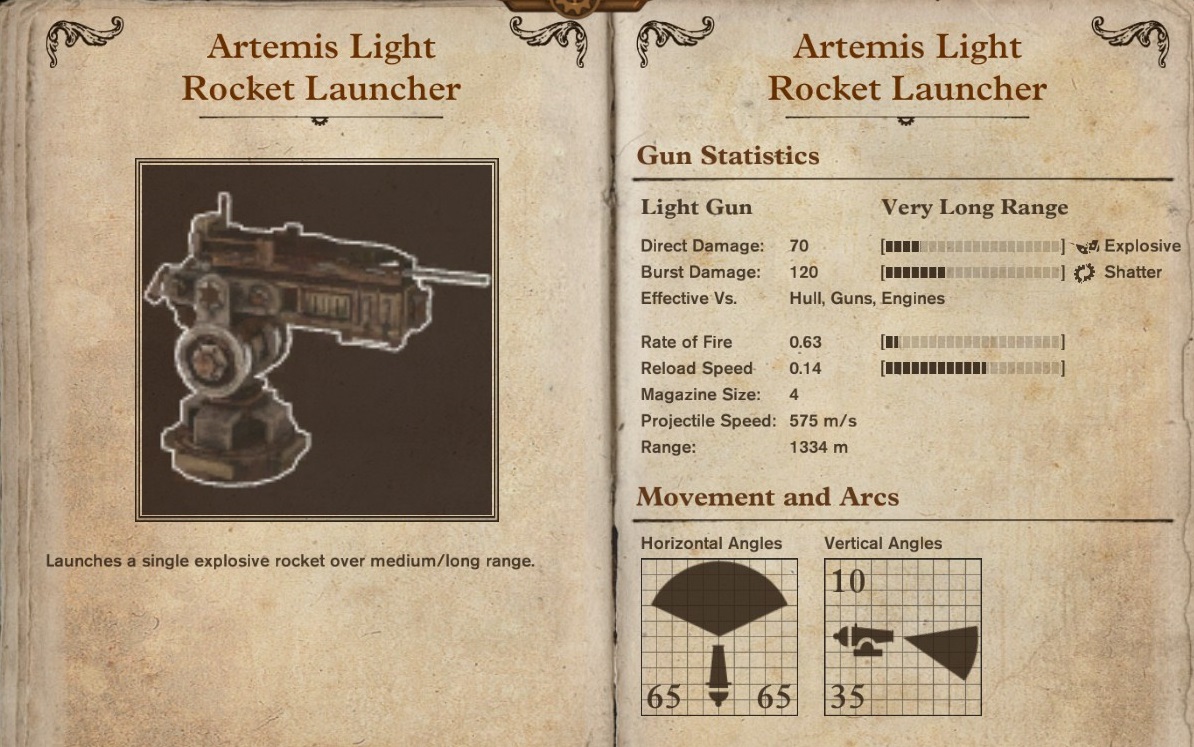
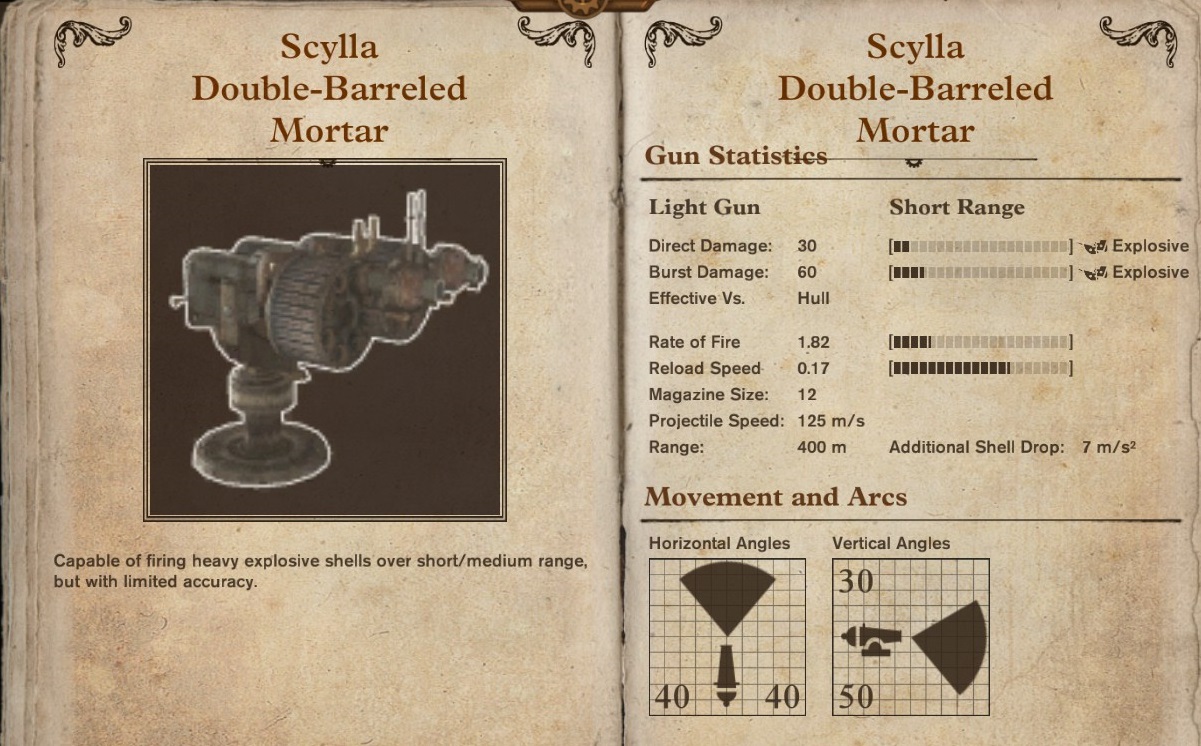
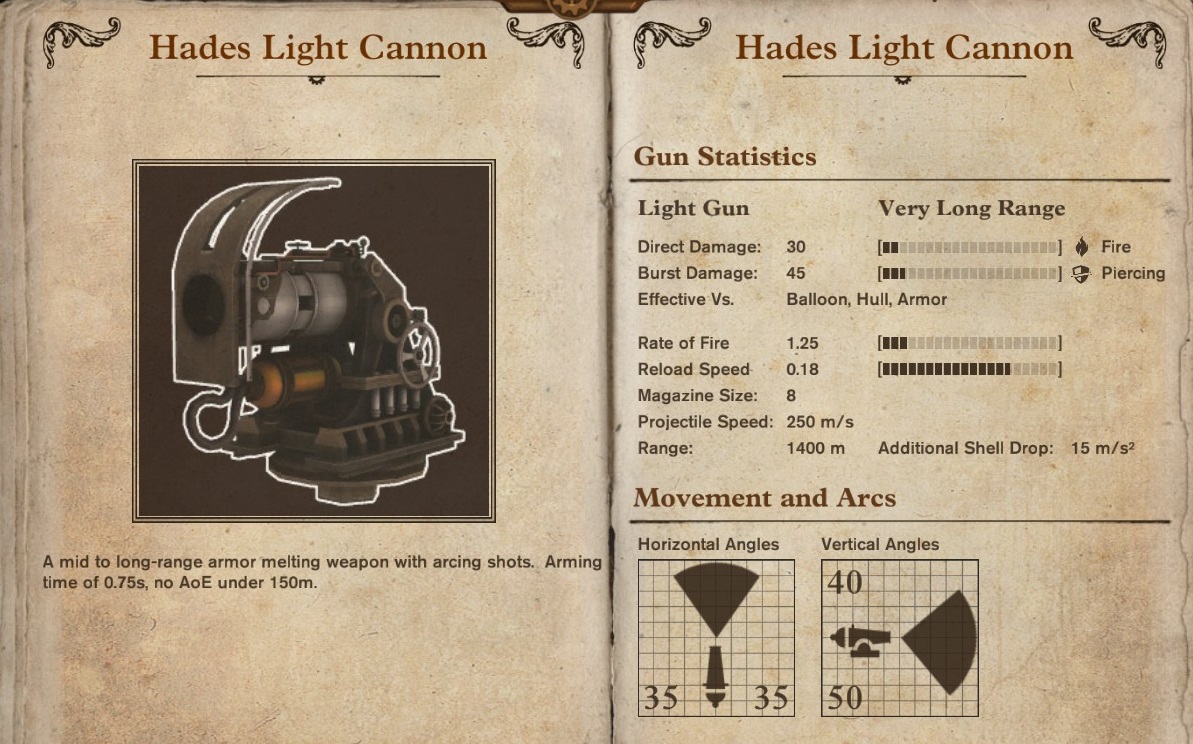
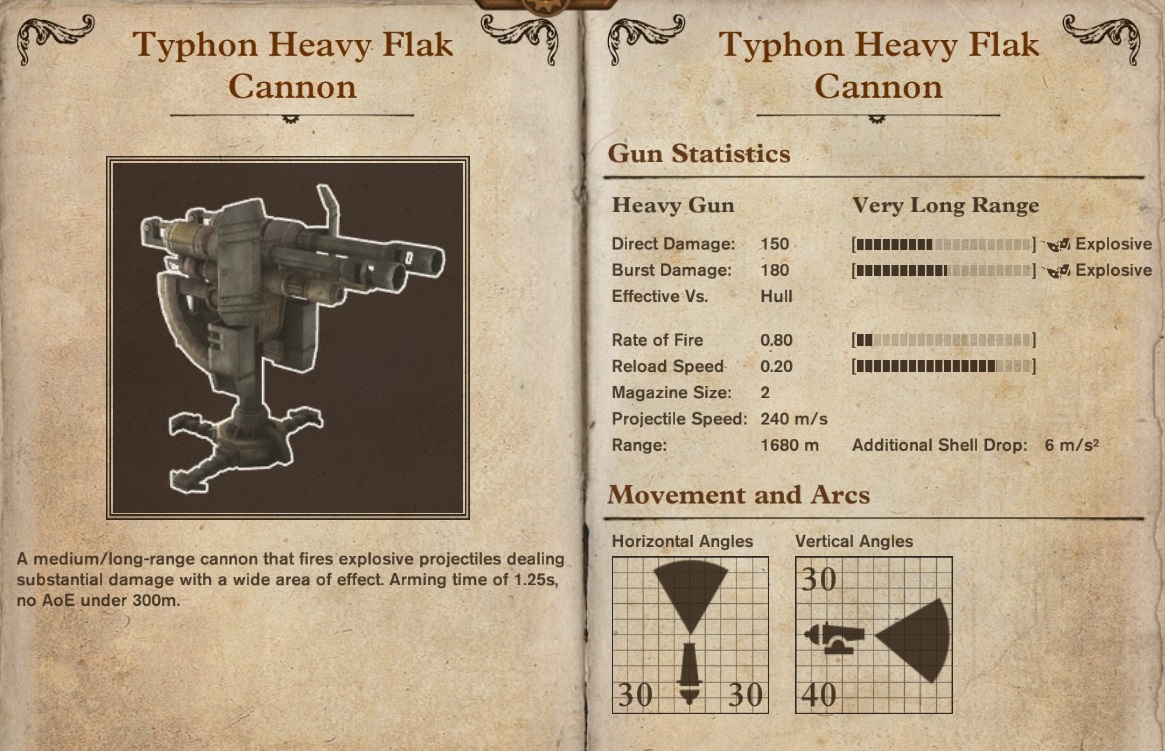
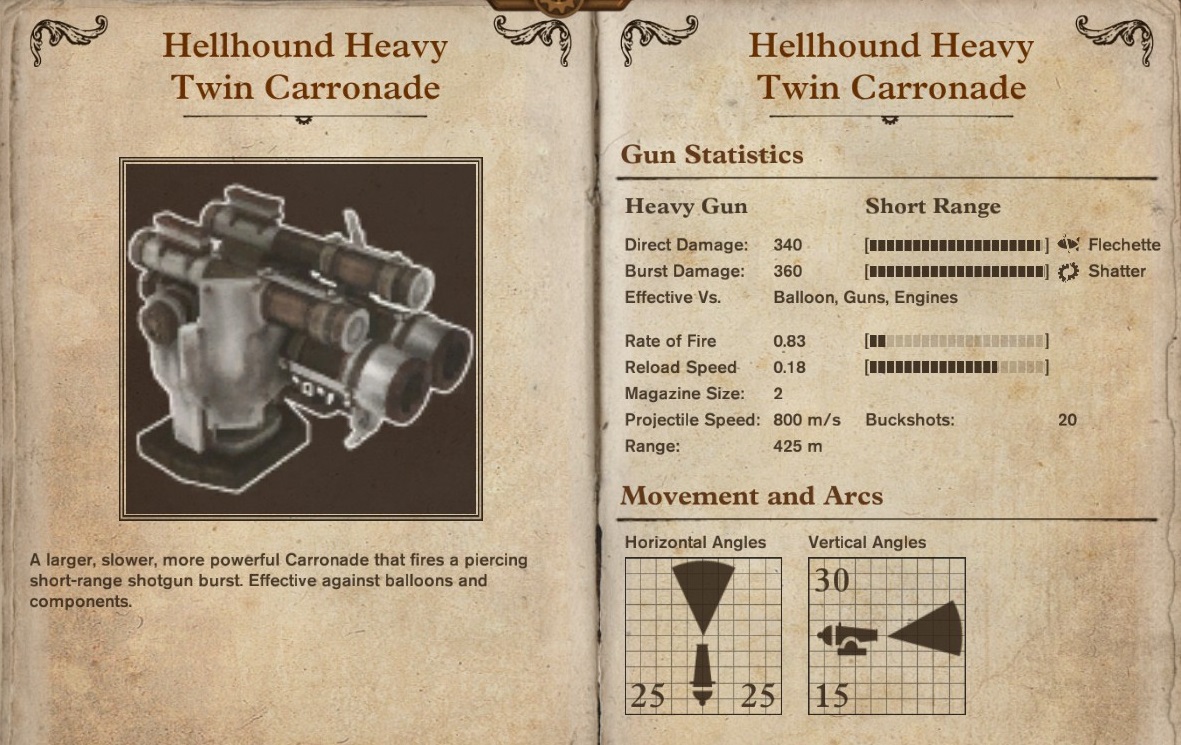
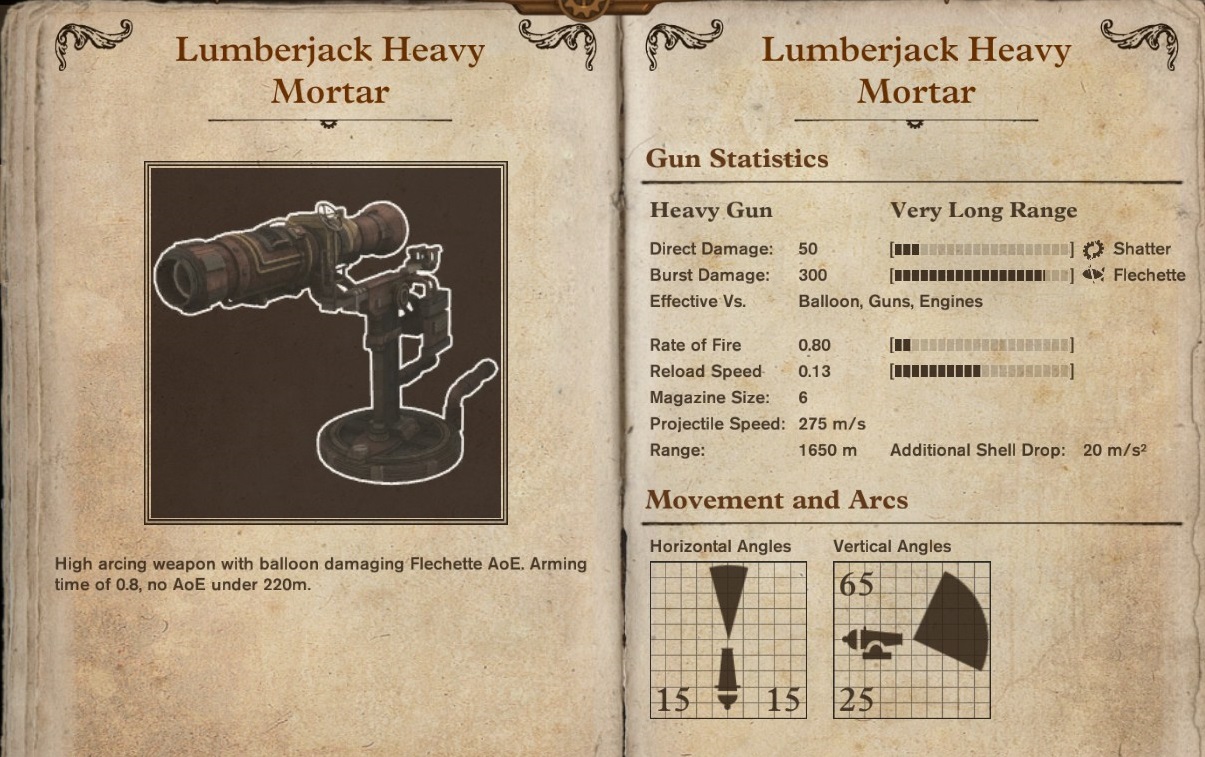
I'd like to link you to the Guns of Icarus wiki which is probably maintained better than this guide: http://gunsoficarusonline.wikia.com/wiki/Category:Weapons
It was a horrible source with a lot of outdated information in the past, but there has been an initiative by a bunch of very experienced players who cleaned it up, updated it and added a lot of content. I've been asked by multiple people if they could use my guide for this purpose as well. Hence I assume you can find a lot of information provided in this guide over there as well.
SlicedAndDiced Nov 17, 2014 @ 10:15am 
In My oppinion it's better to get Loch instead of burst on a lumberjack. Why? it make the lumber more useful at closer ranges. Plus If you hit a gold fish at the right spot (in between pilot wheel and balloon) you kill both the hull armor and the balloon
Swcatt Nov 8, 2014 @ 8:54pm 
very extremly helpful
Magnarr Aug 3, 2014 @ 6:18pm 
Awe you linked my hades guide? Thanks
Harvey Dent Jul 13, 2014 @ 4:05pm 
WOW great guide
Wundsalz  [author] Jul 6, 2014 @ 3:06pm 
Regarding the Hwacha: Heavy clips for long distance and burst rounds for close range is all this gun needs. There is no situation where the approximately 4 firecharges incendiary rounds add to a hwacha volley outperform the damage and AoE bonus burst rounds provide.

Regarding the recent lack of updates: there is a major update around the corner which will significantly alter the excisting ammo types and introduce new ones requireing large sections of the guide to be rewritten and a lot of tables to be adjusted.
Hence my motivation to add new contend to this guide right now is a bit low. I'll probably extend the guide once it's adjusted to the upcoming patch.