PAYDAY 2

PAYDAY 2

1,637 ratings
Ultimate Death Sentence Stealthing Guide (All Loot Possible, No Dead Civilians)
By CommanderCH and 15 collaborators
This guide was made by members of TM$ for every PD2 stealther to enjoy.

We gathered all information about stealth mechanics in PAYDAY 2 in one place, so you can easily complete any heist on Death Sentence solo and with friends.
6
2
   
Award
Favorite
Favorited
Unfavorite
Introduction and acronyms.
This guide contains every bit of technical and practical info you need to know to make your DS stealthing more comfortable. This guide also contains walkthroughs and detailed descriptions of every stealthable heist. Note, that all information is original (except some small amount of numbers from The Long Guide), and was made by TM$ guys. Enjoy.

Let’s start with some Acronyms and Terms we use around here:

DS = Death Sentence
OD = One Down
SS = Solo Stealth
ALP = All Loot Possible (including all small loot, such as Money Bundles)
NA = No Assets (complete a heist in stealth without purchasing any assets on every day)
NDC = No Dead Civilians
75 = 75 Detection Risk (completing a heist in stealth with maximum detection risk)
NE = No ECMs. (complete a heist in stealth without using an ECM jammer)
NBBC = No Body Bag Cases
Pacifist = Complete a heist in stealth without any kills.
PCM = Hacker's Pocket ECM.

P.S. Heists are listed in FBI Files order.
Skills
Probably one of the most important things for comfortable steatlhing is your Skillset.

Master mind tree:


Enforcer tree:


Technician tree:


Ghost tree:


Fugitive tree:


Ofc its just an optimal tree and you can change it and tweak it for stuff you prefer

I will elaborate on some Skills and tell why I do prefer them
  • Stockholm syndrome basic: On stealth heists like Go Bank especially in solo you won't have enough cable ties to tie all civillians. This skill enable you to control the untied civillians with loud gun shots or loud saw.
  • Jack of all trades: This skill is very usefull on stealth since you can equipe 2 equipment, that gives you the ability to have ECM jammers and Body Bag cases.
  • Beserker: that skill will let you saw deposite boxes in one tap when low on hp (for more info check the ove9000 saw section).
Perk Decks

It comes with Clover Character Pack.

We recommend using Burglar only on heists where there are no cameras (The Yacht Heist for example) or heists where you are going to kill a security guard on cameras, otherwise use Copycat with a Hacker card.

Pros:
  • Bag corpses 20% faster
  • Pick locks 20% faster
  • Answer pagers 10% faster
  • Crouch 10% faster

Cons:
  • Lacks of pager delay
  • You can't disable cameras in critical situations.
  • Useless for ECM rush


Allows you to use pocket ECM. Like usual ECM jammer, this one may disable cams, delay pager answer etc. Compared to ECM this one has some pros and cons.

Pros:
  • Instant installation (right after pressing "Use throwable weapon" button).
  • May be installed while interaction (pick-locking, answering the pager, using equipment).
  • Probably, it's most important thing, Pocket ECM can be stored after cooldown (if you haven't Pocket ECM left, first one would be reached after 100 seconds, second one would be reached after another 100 seconds; you can have 2 Pocket ECMs simultaneously).
  • You can watch on Pocket ECM timer which appears right on your health bar.

Cons:
  • Only 6 seconds of action (instead of 30 on usual ECM).
  • You can't open the doors by this ECM.
  • Pocket ECM replaces any of your throwable weapon, including Molotov that may help you to activate Berserker skill (see OVE9000 Saw section below).

Simple situation where Pocket ECM helps you:


There is alternative perk you can use - Yakuza. With that perk you can increase your movement speed by 20%. All you need to do is a damage yourselves by Molotov and reduce your health under 25%. This perk may be useful on some large-distance heists like Shadow Raid, The Bomb: Dockyard, The Diamond, Midland Ranch, Lost in Transit.

Since Update 232 you can use Copycat perk deck which is very customizable and has a great cards. With Copycat you get: 40% movement speed while crouching and carrying heavy bags. But the most important thing is that you can choose the last card for yourself, you can pick Hacker card for PCM (21/22) or Yakuza card (12/22) for movement speed.

Recommended cards for Copycat deck:


We recommend using Yakuza only if you are experienced player or when you are a lobby host, otherwise use Copycat with a Hacker card.
Domination and Ragdoll
For this you going need any silenced shotgun.

How does this work?
As soon as you get alerted by an enemy (detection meter hits 100% and DETECTED! Message appears), press “F” (depened on your keybind) while looking directly at him. He will immediately cuff himself.

Why do you need this?
There are many reasons, but important ones are
  • Guard will become completely harmless – he can’t move, cuff you, shoot you or raise the alarm.
  • You can move his body in any direction with your shotgun (see the .GIF below). This might be EXTREMELY helpful in cases when you want to save a body bag or move the body from camera/other guards’ field of view.
  • Some enemies (Murkys) are hard to kill when alerted and it’s safer to Dominate them first.

Double jump
This is a very little, but useful feature.

How does it work?
It’s pretty simple: you jump, and AS SOON AS you land on your feet, you jump again. As the result, you jump a little higher the second time.

Why do you need this?
This is basic jump (Jewelry Store):

This is Double Jump:
Crouch jump
Most important of all stealth mechanics, this thing saved me thousand times.

How does it work?
  • Press and hold "W" (walk)
  • Tap “Shift” + “Space” (long jump)
  • Immidiately after the jump tap "Ctrl" (crouch)


Why do you need this?
The trick is that while you doing this, you move quite fast, but your detection remains on the level if you were crouching. It may take some time to get used to, but you will master this move quite soon, it proved to be very helpful.

For complete tutorial, watch Commander’s video:
Useful stealth shortcuts
There are some little tweaks that can save you time.

Here they are:
  • Jewelry Store (left side) - jumping over the fence to get inside. Use double jump to get on the electric box.
  • Jewelry Store (right side) - jumping over the fence and back.
  • Firestarter, Day 1 (left hangars) - jumping on the hangars. Use double jump at the beginning.
  • Election Day, Day 2 - jump right to the cameraman on the left side. Use double jump in the end.
  • Big Bank - a quick way down from the 2nd floor.
  • Framing Frame, Day 1 - jumping down from the ceiling, throwing paintings, jumping straight to the parking lot.

With Shacklethorne Auction heist appeared, there are a few more shortcuts found.

Down to ground floor from balcony:

The same one on other side:

Down to ground floor near the storage room:

Bypassing the guard in lobby:

(Thanks to PAYDAY 2: Useful shortcuts for the idea)
Stockholm syndrome
This is a skill which will allow you to control civilians over the distance.

How does it work?
You're gonna need any loud weapon for this. When you shoot, civilians in specific radius they will lay on the ground and stay there for a minute or so.
It's recommended to use either automatic weapon, a Loud Saw for better effect.


Here's the range table for different weapons:

Weapon
Radius
Silent Saw (not using the blade)
2m
Silent Saw (using the blade)
8.5m
Loud Saw (not using the blade)
35m
Thanatos
35m
Brenner, KSP, KSP58, MG42, R93, Chicago Typewriter SMG,
Queen's Wrath, Lion's Roar, Vulcan Minigun, Lebensauger
40m
All other guns
45m
Loud Saw (using the blade)
75m

Why do you need this?
On some heists this skill saves a lot of time, GO Bank being the one where you're gonna need it the most.
It's an easy solution to control civilians and finish the level without any casualties.

(Thanks to The Long Guide for exact nubers)
Noises and alerts
Noise
Alert radius
Enemy/civ dies/gets badly hurt (with Hidden Blade Aced/Shinobi Aced)
0.25m
Civilian screams
2m
Silent Saw (not using the blade)
2m
You take fall damage
2.5m
Enemy/civ dies/gets badly hurt (WITHOUT Hidden Blade Aced/Shinobi Aced)
6m
Silent Saw (using the blade)
8.5m
Glass breaks
12m
Molotov explosion
15m
Enemy gunshots
25m
Loud Saw (not using the blade)
35m
Player unsilenced gunshots with most weapons
45m
Tripmine explosion
50m
Loud Saw (using the blade)
75m
Grenade or HE round explosions
100m
ECM Feedback
100m

(Thanks to The Long Guide for info and exact nubers)
Enemies
All PD2’ stealth enemies can be divided in two groups:
  • Carrying pager guards.
  • Non pager guards.
Those two groups are divided to 3 subgroups:
  • Security guards
  • Private security
  • Gangsters & thugs

Carrying pager guards:

They appear on most of the heists and are:

Security guards – most of the heists.


Government AgentsFraming Frame (Day 3), Firestarter (Day 2), Big Oil (Day 2), Train Heist, Hoxton Revenge, Shacklethorne Auction.


GGC Guards - Golden Grin Casino only.


Alesso Nightclub GuardsAlesso Heist only.


GenSec Guards - GO Bank only.


SWAT FBI units - Hoxton Revenge only. They look like a Murkywater merceneries, but they have a bit different armor color and have a FBI stripes.


Scarface's bandits (inside the house) - appears in Scarface Mansion only.

All of those guards have 40 HP on the DS difficulity except SWAT FBI units and Scarface's bandits inside the house - they have 480HP.
Additional note: Scarface's bandits inside the house MAY NOT BE DOMINATED.

Private security

Murkywater merceneries- Only appear in Shadow Raid, Murky Station, White House.

Have 480HP on the DS difficulity.

Also, there is another type of Murkys:

They appear only at White House and have 40 HP on the DS difficulity.

Non pagers guards:

Security guards
cops-appear in Jewelry Store, Ukrainian Job, Election Day (Day 2 and Plan C), GO Bank, Mallcrasher, Big Bank, Counterfeit and Breakin' Feds.


Have 40HP on the DS difficulity


FBI Units
They appear only on Breakin' Feds.


Have 480HP on the DS difficulity


Gangsters & thugs
They appear on specific heists and are:

Mendozas - Firestarter (Day 1) – if moving Mendoza is alerted, alarm is raised.


Cobras - Rats (Day 2) – if alerted, alarm is raised.


Russian ThugsNightclub


Bikers - Big Oil (Day 1)

Scarface's bandits (outside the house) - appears on Scarface Mansion only.

They all have 480HP on the DS difficulity and MAY NOT BE DOMINATED.
Weapons
Weapons
We strongly recommend to take a shotgun with you to send guards flying (see the Domination and Ragdoll section above).
Most popular choices are:

Locomotive 12G (Secondary, Vanilla), 30 max concealment.


Raven (Primary, Gage Shotgun Pack DLC), 30 max concealment.


Judge (Secondary, Community item), 31 max concealment.

Here is additional remark for all of Shotguns: when an enemy has been uncool for a 3 seconds, he has a 10% chance to fire his gun upon taking heavy hurt or being killed. You can avoid it by killing an enemy with shotgun from less then 5m. Keep it in mind while trying to kill an enemy with hight HP. (Thanks to The Long Guide for exact numbers)

Another gun is completely you choice, although I recommend taking some high-damage pistol (Deagle, Baby Deagle, 5/7) against Bikers and Murkys, so you can one-shot kill them if they get alerted. Or you can use a gun with great rate of fire, such as Clarion or any concealable SMG, but be careful and don’t hit the glass.

Here are some popular choices (max concealment includes the Concealment Boost):
CAR-4, 32 max concealment.


Cavity 9mm, 32 max concealment.


Compact-5 SMG, 32 max concealment.


Deagle, 31 max concealment.


Baby Deagle, 32 max concealment.


Gruber Kurz, 34 max concealment.


Bernetti-9, 34 max concealment.


5/7 AP Pistol, 31 max concealment.


Example of using a Five-Seven:


Melee weapon – you can take anything you like, but leave Buzzer at home, because an enemy can shoot when tased, thus alerting the whole map. And don’t forget to take basic inner pockets skill.
Deployables
Body Bag Case

This one is quite useful in solo runs and an almost must-have deployable while steathing Firestarter, Day 1.
For every other heist you can take only one BBC, since in contains 3 body bags, and you already have 2.

Here's a list of heists, where BBC can prove itself useful
  • Firestarter, Day 1 - strongly recommended.
  • Nightclub - there are always more than 4 Thugs present on the map.
  • Framing Frame Day 1, Day 3 - if you're doing a No Assets run.
  • Scarface Mansion - if you want to kill everyone outside.
  • Border Crossing - on Mexican side you can bag a lot of non-pager guards.

Trip mines

Trip mines are awesome in sensor mode. They will spot every enemy and civilian and make a sound every time their sensor is triggered.

Trip mines can be useful on most of heists.
OVE9000 Saw
With addition of Silent Motor mod for the Saw, it became a powerful stealth gear.
But it's important to understand that it still isn't completely silent.
Alert radius with blade usage is 8.5m, without - 2m.
Note that point of noise spread is a place where player stands, not a place where player saws.
Basically what you need to do, if you have basic Sixth Sense skill - stand still for 3.5 seconds, and if there are no highlighted enemies/civs around - you can use the Saw freely.

Here's some stuff you will need for a basic Saw build:


How to improve your Saw efficiency
  • Easiest way - silent motor ofc. with a sharp blade to save on ammo when using saw (more info in the table down below).

  • Take Basic Berserker skill and damage yourself (i.e. throw a molotov and stand in the fire) to the point when your character will demand a medic bag. This will increase your saw efficiency greatly as well. Also, you can activate Berserk skill by picking Frenzy Basic skill. It takes you only 30% HP so you can open every deposit boxes by one-tap. That means you don't need to take Molotov and you can take any of the throwable including Pocket ECM. This way to activate skill may be very useful on Big Bank heist.

Note that every safe deposit box in the game has 37.5 HP (max damage you can achieve for Saw without any skills is 30.4). It takes a double-tap to open the box. With basic Berserker it almost always takes one tap.

Also, with some Saw config you can open boxes with one tap, if you have Besserker basic.

Saw config
One-tap deposit
box opening (under 25% HP)
One-tap deposit box opening (under 50% HP)
Silent Motor + Durable Blade
Silent Motor + Sharp Blade
Fast Motor + Durable Blade
Fast Motor + Sharp Blade
Four Stores


Main loot: None.
Additional Loot: Money bundles, Small Jewelry, Gold Bars, Money Rolls, etc. Sometimes there is a bag of Jewelry in a safe.
Guards\Civs: 2 Normal Guards, 20 Civs.
ECM Rush: Partially possible.
Recommended assets/weapons: None assets recommended/Bring a loud gun to control civs.
Preferred strategy: Dispose of 2 guards (at “The Pear Store”and “Kung Bo”), break all cams, keep the civilians down with Control Freak.

Jewelry Store


Main loot: 9 Jewelry bags – 7 in the store, 2 in the Titan Safe in the back.
Additional Loot: Various small Jewelry.
Guards\Civs: 1-4 Normal Guards, sometimes 2 blue Metro Cops with no pagers at the hot dog stand; 17-18 Civs.
Recommended assets/weapons: NONE/NONE (or bring some loud gun to control civs)
ECM Rush: Impossible due to the Titan Safe. (Possible with 4-man crew, but seriously, what’s the point?)
Preferred strategy: Eliminate the Guards, drill the safe, keep the people under control.

Ukrainian Job


Main loot: Tiara
Additional Loot: 3 bags of Jewelry + various small Jewelry
Guards\Civs: 1-6 Normal Guards, sometimes 2 blue Metro Cops with no pagers at the hot dog stand; 16-18 Civs.
Recommended assets/weapons: Code for shutters/NONE (or bring a loud gun to control civs)
ECM Rush: Impossible due to Titan Safes. (Possible with 4-man crew, but seriously, what’s the point?)
Preferred strategy: Eliminate the camera guard, set up the drills, use the shutters on main window, keep the people in check. If more than 4 guards with pagers have been spawned, try to avoid killing them outside, but be aware – they can see your drill through the window.

Mallcrasher


Main loot: NONE.
Additional Loot: 3 bags of Jewelry, 1 bag of Money from 1 random safe, various small loot. Tricky one – cashier on the left of main entrance has lootable cash register.
Guards\Civs: 5 Normal Guards, 3 blue Metro Cops, 25-26 Civs.
Recommended assets/weapons: NONE/Bring Saw for the ATMs.
ECM Rush: Possible with 4-man crew, after getting the 50k objective.
Preferred strategy: Scout for safes on the 1st floor beforehand. Smash some ♥♥♥♥, here are some good examples:
  • Destroy all bottles in wine store.
  • Puncture all bags in… bags store, I guess?
  • Smoke that sport car.
  • Headphones, laptops, etc. in The Pear Store.
  • Top window ceiling. Don’t worry, nobody will hear this.
  • Black glass boxes with stores’ names on them and cashiers’ monitors are good choices as well.
There are 2-3 Guards on the 2nd floor, you can kill them, if you want, but try to avoid chain civ reaction. After that, open up all the safes and ATMs, and you’re good to go. You can open ATMs first, and then go to 2nd floor – your choice.

Harvest & Trustee Bank


Main loot: Depends on the Bank Heist type, but always 1 bag of any loot needed to trigger the escape.
Additional Loot: Various small loot, 2 ATMs.
Guards\Civs: 4 Normal Guards, 15-17 Civs (additional Civ may enter the map after 04:00)
Recommended assets/weapons: Keycard, couple of Spycams/Saw.
ECM Rush: Possible.
Preferred strategy: Eliminate the camera guy (a Keycard might help you here – it’s either lying on the Manager’s table, or the Manager himself has it), then all other guards, keep the tellers and back office workers from the panic buttons, control the crowd, secure the loot. This is as easy as it gets.

Nightclub


Main loot: 2-4 Money bags.
Additional Loot: 0-4 Coke bags, a whole bunch of Money Bundles all over the map.
Guards\Civs: 5-12 of Russian Thugs, 15-17 Civs with Bad Music Asset purchased, 24-27 otherwise.
Recommended assets/weapons: Bad Music, Loot Drop Off Truck/NONE (or bring a loud gun to control civs)
ECM Rush: Possible.
Preferred strategy: As you approach the main entrance, look to your right – if you see a GenSec logo, there are cameras inside. Work your way to either of locked doors – use ECMs to open them. Find the safe(s), secure main and additional loot if needed. Beware the drill in manager’s office – it can be spotted by Thugs all the way across the map on the 2nd floor. Also, there is always 1 Keycard on a random Thug (or on Dmitry, he could be smoking out back), should you run out of ECMs.

Firestarter: Day 1


Despite everything game tells you, this day is actually stealthable.
It requires a lot of experience, skill and sometimes luck.
So I strongly recommend watching a couple of videos below, before trying.

Main loot: 6-8 Weapon cases.
Additional Loot: 4-5 more Weapon cases (12 total max) +1 money bag.
Guards\Civs: 23-31 Mendozas.
Recommended assets/weapons: Vantage Point, to spot which hangars are open/A Shotgun, a Silent Saw, Body Bag cases, Laser Trip Mines, Silent Drill - take your pick.
ECM Rush: Not possible.
Preferred strategy:
If any moving Mendoza is alerted, the alarm WILL go off, no matter what.
Use a silenced Shotgun to launch Mendozas in safe spots, thus saving some body bags.
When all walking Mendozas are killed, you can clear the hangars. Watch out, there can randomly be from 3 to 5 of them inside of each hangars. Kill them carefully, so no one sees the death of another, if someone does - act quickly, before he gets alerted.
Be advised of cameras. Use silent Saw or a silent Drill to open the trucks.

Here are all possible combinations of open hangars:

Close Left, Close Right:


Far Left, Close Right:


Far Left, Close Left:


Close Left, Far Right:


Far Left, Far Right:


Far Right, Close Right:

Firestarter: Days 2 and 3
DAY 2


Main loot: 2 Servers.
Additional Loot: 0-12 additional loot bags in the evidence room, spawning randomly (Coke, Money bags, Weapons, Gold) and a Goat.
Guards\Civs: 8-9 Goverment agents, sometimes 2-3 FBI agents with no pagers. After 4 pagers are answered, another Goverment agent will spawn.
Recommended assets/weapons: Camera Feed, Body Bags, Spotter/A Silent Saw/ECM to open the server room.
ECM Rush: Possible.
Preferred strategy: Find the server room door, hack the PC, cut 2 cables, saw the door/use an ECM on it, secure the Servers. You can use either a Silent Saw, or a Silent Drill on the evidence room cage.


DAY 3


Just a basic H&T Bank, but with electricity switch on the roof.
Look at "Harvest & Trustee Bank" section of this guide.

Fully stealthed Firestarter:
Framing Frame
DAY 1


Main loot: 4 paintings.
Additional Loot: 5 more paintings (9 total)
Guards\Civs: 8 normal guards (6 patrolling, 1 cam guy, 1 lobby guy), additional Guard will spawn after 4 kills. There are no Civs on the map.
Recommended assets/weapons: Entry point – Hall D, Roof Access, Couple of Spycams (I recommend Halls B and C)
ECM Rush: Possible.
Preferred strategy: Scout the area from the roof, detect where the lasers are, spot the paintings, if you want as well. Descend and throw Paintings into the small windows up on the ceiling. There is a lot of cover in each room, use it to avoid detection.
Additional note: You can throw paintings through lasers. Here is a little space over them:

DAY 2


Main loot: NONE.
Additional Loot: 4-9 Money bags.
Guards\Civs: 3 Civs, no Guards.
Recommended assets/weapons: NONE.
ECM Rush: Not needed.
Preferred strategy: Make the trade, bring bags to the van, control the civs.
Additional note: There is a 1% chance of ambush, even you have completed Day 1 in full stealth. Only happened to me once in my 2000 hours experience. If that happens, just leave all the bags and rush through the window on the 2nd floor.

DAY 3


Main loot: NONE.
Additional Loot: 8 bags of Gold and 1 Old Wine.
Guards\Civs: 6 Normal Guards, the Inspector comes after 4 kills.
Recommended assets/weapons: Bag Shortcut, 3xSpycams – Central Corridor, South main Room, Kitchen.
ECM Rush: Possible with 4-man crew.
Preferred strategy: Scroll through camera feed, examine the tech’s locations. Collect it, find the vault. If vault is on 2nd floor, beware the camera on the opposite wall – it WILL raise the alarm when the vault is opened, use Camera Loop or ECM to shut it down. If vault is on 1st floor, use the server room behind it as transshipment base for the loot – get it open with a Keycard. Remember – as soon as you deactivate the lasers, you will have 50 seconds before they will come back on. Also, Inspector leaves the map if no signs of break-in were found.
There are all of the device locations (note that different devices may spawn on same locations):

Full walkthrough:
Rats: Day 2


Day 2 of Rats is actually still stealthable.
You just need to be careful and have a silenced Shotgun.

Main loot: NONE.
Additional Loot: 1-4 Money bags, depending on how Day 1 went.
Guards\Civs: 30 Cobra thugs.
Recommended assets/weapons: NONE/Silenced shoutgun.
ECM Rush: Not possible.
Preferred strategy: If you don't have any Meth to trade, the only way you can get the intel without cops coming is by having aced Lockpick. There are also usually 2-3 apartment rooms that are fully populated with gangsters (3 - 5 each). One of the rooms is always a decoy that has no safe (and likely the one where the doublecross will happen), 1-2 of them have safes (of which 1 has the intel). There are always Cobras at every entrance into the buildings and there can be additional gangsters in the hallways too.

Big Oil
DAY 1


Main loot: NONE.
Additional Loot: 0-4 Weapons, 0-3 Money bags (1 spawns with 100% chance if there is a Coke trade going on, 2 have a very small chance to spawn in each safe every time), 4 Coke bags if Coke trade is happening. 8 ATMs in the basement.
Guards\Civs: 15 Bikers or 15 Bikers + 7 Cobra Thugs if the coke trade is happening.
Recommended assets/weapons: NONE/One-shot kill silent weapon is strongly recommended (anything with 68DMG and higher – Deagle, Baby Deagle, etc.), or something with really high RoF, - Clarion for example. Also, Saw, doesn’t matter Silent or not.
ECM Rush: Possible, sadly.
Preferred strategy: Start from the basement and work your way up. Act quickly, if the whole map is alerted, put the ECM down. Eliminate all Bikers, secure the loot, don’t forget about ATMs. Your main goal is try and secure all Assets, the most useful are: Keys to the airplane, Keycard, Shutter Codes and Cold Fusion Research.

DAY 2


Main loot: An Engine.
Additional Loot: A piece of small Jewelry in the bedroom on 2nd floor.
Guards\Civs: 6 Normal Guards, an Inspector comes after 4 kills, 1 Civ.
Recommended assets/weapons: Alex Ammo Drop, Extra Helicopter Fuel, Camera Feed, Body Bags/If you’re going solo\duo, try to balance your weapons and deploys to be both stealthly as well as combat ready. ECM Feedback is a really good choice here. Crit build is viable too.
ECM Rush: Impossible due to hack timer and random Bile ETA.
Preferred strategy:Try to determine which Server Room is needed from the outside, use Shutter Codes if you have them. You can also spot servers on the 2nd floor even with shutters closed:


Use a Keycard or ECM to open the correct room, start the hack. About guards spotting the PC: on the 1st floor – only time pC can be spotted if a Guard walks straight from the gym; PC on the 2nd floor near the office cannot be spotted at all, and the other PC on the 2nd floor can be spotted pretty easily from different angles. Remember – guard will get alerted even if the hack is done. While the process is running, search the house for clues.
Here are the spots (excluding the ones in the basement):

1st floor:


2nd floor:


Get down to the lab, figure out the correct Engine, pick it up, try to light a flare before carrying it out. Guards will get alerted by open lab door, so act quickly. Be advised, the alarm will go off approximately 15 seconds after Bile says "30 seconds left". After the engine is dropped off, you can camp under the house (the place in the back) and wait for chopper\plane.
Additional notes: If you got a Cold Fusion Research asset from Day 1, your engine will always be Deuterium-filled, with 3H. It takes 75 seconds for Bile to deliver your engine and 30 seconds to verify it, in case you decide to defend yourself on the airfield the whole time, which is not a very good idea.

Full walkthrough:
Diamond Store


Main loot: 14 Jewelry bags.
Additional Loot: 2-4 Jewelry bags, 0-2 Moeney bags can spawn in the safes, a lot of small Jewelry, Money Bundles from cash registers, 2 ATMs outside.
Guards\Civs: 4 Normal Guards (3 patrolling, 1 on cam duty), 25 Civs.
Recommended assets/weapons: NONE/NONE (or bring a loud gun to control civs)
ECM Rush: Possible.
Preferred strategy: Eliminate the cam guard, catch female manager on 2nd floor, get a Keycard from her. Locate the keypad, deactivate the alarm. Kill other guards, secure the loot, keep the people in check.

Train Heist


Main loot: 3 Turret Parts, 20 Shells Bags.
Additional Loot: NONE.
Guards\Civs: 11 Normal Guards, 4 Civs (one of them holds a Keycard).
Recommended assets/weapons: Body Bags if going solo/Silent Saw if going solo.
ECM Rush: Possible.
Preferred strategy: Short version – secure the area around Lumber Mill, and work from there. Find the loot, secure it. Develop your strategy depending on which escape was triggered and which cart contains what. For long version you can read this guide. http://steamcommunity.com/sharedfiles/filedetails/?id=408146853

GO Bank


Main loot: 1 Money bag.
Additional Loot: Various amount of Money Bags (10+), small loot, Money Bundles from cash registers and around the tellers, 2 ATMs.
Guards\Civs: Basic setup: 2 Normal Guards, 18-20 Civs. Sometimes there are 2 blue Metro Cops hanging around the gas station. Sometimes the GenSec truck spawns near the entrance, guarded by additional 2 Normal Guards (truck’s deposit boxes contain only small loot, also no more guards with pagers will spawn), sometimes (rather often) 2 GenSec guards will spawn with their car, and Captain Rogers will send 3 blue Metro Cops to “check things out” eventually, so don't hang out too long. There is 1% chance that vault will be open for manager’s inspection and will have no lasers – this is the easiest setup, but beware, there are 3 Normal Guards present, instead of 2.
Recommended assets/weapons: NONE/Bring a good weapon to control civs – a loud Saw are a top-notch choice, also sometimes it is wise to bring a sniper rifle, so yo can kill Metro Cops through the wall.
ECM Rush: Partially possible (depends on the duration of timer over the vault).
Preferred strategy: Find 2 keycards, launch the timelock, control civs with loud weapon. React to random events (code searching, etc.) Don’t forget about the phone – you can only fail answering it once. After you get into the vault, try to act as quickly as possible to avoid Captain Rogers’ cops.


With 2 GenSec guards:
Election Day
DAY 1


Main loot: NONE.
Additional Loot: NONE.
Guards\Civs: 7 Normal Guards, 4 Civs (two of them with Keycards).
Recommended assets/weapons: Security Access, Spotter/Silent Saw is pretty useful here, also brind door-opening ECMs.
ECM Rush: Possible.
Preferred strategy: Pinpoint the truck you need either using the PC, or searching the containers, set up the GPS, get out.

DAY 2


Main loot: NONE.
Additional Loot: 7 bags of Gold (it the truck at the end of the heist), 6 Money bags randomly spawn in the steel cages.
Guards\Civs: 7 Normal Guards, 2 blue Metro Cops outside, 1 Civ on cam duty.
Recommended assets/weapons: Warehouse Ladder, Additional Keycard, Spotter/Silent Saw will be a great assist in dealing with those cages.
ECM Rush: Possible with at least 3-man crew.
Preferred strategy: Get in, neutralize the camera guy, find a crowbar, spot the insides of the cages through their ceilings, remember which ones you will need to get open. Collect the Keycards (there are 3 of them on the map, 4 with the Asset bought), activate the devices (there are always 8 crates with devices inside, you will ned only 6), secure the Money, don’t forget to grab the Gold.
There are some crowbar locations:

Full walkthrough:
Election Day: Plan C


This is NOT a stealthable heist, it WILL go loud eventually.

When you mark the wrong truck on Day 1, this heist will take place. You can stealth it right until the C4 will blow.

Here are some tips (courtesy of revnant)

So the needed setup is (very luck/RNG based):

  • Get into the bank without being spotted (depends on police placement outside)
  • Get in the side area (depends on not having stationary guards in 2 different places along the way)
  • Killing the guard near the camera (need to melee him to death without him cuffing you, without myself getting caught by the camera, without the guard's body being detected by the camera after he dies)
  • Lockpick the door and get inside the server area - RNG luck needed to not have a stationary guard right beside that door and not have a civ watching the door through the low cubicle glass
  • Hack the server - there are only 3 out of 5(?) spawns where you can hack the server successfully I believe and it depends on stationary guard and civilian placement
  • Bonus headstart on getting as many C4 planted without getting cuffed
  • Autorestart thermal drill for the vault (If I don't get it, I usually restart)
  • Hiding / camping spot and hope I don't die due to aggressive enemies or enemies clipping / shooting through a wall
  • Dodge luck
  • Autorestart drill on the 2nd drill (not as important as it's much shorter but I was lucky to get it). Would have been even better luck if there was no money and I could just make a run for it.
  • Luck to get back to camp / hiding spot before getting killed
  • Luck on getting money out and not die to snipers (I was lucky to just get 2 after my original bags were stolen)
Shadow Raid


Main loot: 12 bags of any loot.
Additional Loot: 9-13 bags of various loot (Nobunaga’s Armor included)
Guards\Civs: 5 Murkywater Mercenaries inside the warehouse, 9 Normal Guards outside, 4 Civs (Orange ona always has a Keycard on him)
Recommended assets/weapons: Thermite Paste – Sidewalk outside compound, Loot Drop Off Point – West ompound wall garbage, Zip-Line to river tug/Something with high damage – Deagle, Baby Deagle, Judge (with 000 ammo) to quickly pacify alerted Murkys. Also, Silent Saw helps with the cages.
ECM Rush: Possible with 3-4-man crew.
Preferred strategy: Start from the top of the warehouse, eliminate the cam guy, get a Keycard from him, find a Crowbar, store all loot down the manhole on 1st floor. There are 9 wooden crates on a map originally, and only 6 of them will contain any kind of loot. So if you have found 6 bags in the crates downstairs, you don’t need to open the cage upstairs. Bring the loot through sewer to the garbage bin or zip-line, whichever you prefer. About 5 minutes in, the chopper will fly in, either with another wooden crate with an Artifact, or with more Murkys on board. You can ensure it brings a crate by sitting at this spot on a roof around this time. Also remember that vault door has a 10 seconds lockdown after first Keycard was swapped and will lock forever if second Keycard wasn’t inserted in time. There are a total maximum of 25 bags can be secured and 4 bags of Money are always stored in outside containers.
Additional note: You can stand in this zone on the roof when Bain announces the arrival of the chopper, and the helo will drop a container with artifact, instead of bringing in more Murkys:

The Big Bank


Main loot: 4 bags of any loot.
Additional Loot: 16-21 bags of Money or Gold, 1 money counting machine.
Guards\Civs: 8 Normal guards (6 inside, one of them is a camera guy), 24 civs. Either 2 civs or 1 civ + 1 Normal guard could spawn out of the elevators. Also 3 Metro Cops might enter the bank after answering the call from GenSec, but it's a rare occasion.
Recommended assets/weapons: Escape plan: The Elevator Trick, Keycard, Poisoned Cake: Canteen/A Silent Saw.
ECM Rush: Not possible.
Preferred strategy: Kill one patrolling guard, tie down all 4 patrolling civs: the Manager, an old white woman, a woman wearing a blue skirt and a black woman. Find the server room, activate the PC, find out which computer you need to activate - either randomly, or with help from another player. Wait for the timelock to finish, enter the inside area. Activate 2 buttons, the manager's PC, get into the vault, clear it out, move the bags to the garage, escape. You can find keys for doors inside the vault:


Additional notes: 1. The PC in the server room has a small chance to be a correct one. 2. Use Aced Sixth Sense skill here - find a keycard before putting on the mask.

Art Gallery


Main loot: 6 paintings.
Additional Loot: 3 more paintings (9 total)
Guards\Civs: 8 normal guards (6 patrolling, 1 cam guy, 1 lobby guy), additional Guard will spawn after 4 kills. There are no Civs on the map.
Recommended assets/weapons: Entry point – any that you prefer, Roof Access, Couple of Spycams (I recommend Halls B and C)
ECM Rush: Possible.
Preferred strategy: Scout the area from the roof, detect where the lasers are, spot the paintings, if you want as well. Descend and throw Paintings into the small windows up on the ceiling. There is a lot of cover in each room, use it to avoid detection.

The Diamond


Main loot: The Diamond.
Additional Loot: 2 paintings, 0-2 Papyruses, 10-12 Artifacts.
Guards\Civs: 16 normal guards (2-3 outside, 1 cam guy, 2 in the basement, 7-8 patrolling inside, 3 in the Pre-Diamond room), 4 civs (all of them have a Keycard)
Recommended assets/weapons: Spycams: North Hall, Southwest Corridor, Bag Man: East Staircase Window, Glass Cutter, Thermite Pate: Forecourt.
ECM Rush: Possible.
Preferred strategy: Enter the museum either through main doors, or the basement. Search and hack for 4 electric boxes, and extract a Keycard from any civ. Insert it, wait for timelock to finish, meanwhile get another Keycard. Get to the Pre-Diamond area, insert it there, wait another 1.5 minutes. Launch the tile riddle, note that more time you relaunch it, more easier it would get. Grab the Diamond, escape. During all this secure additional loot.
There are all of the circuit locations:

The Bomb: Dockyard


Main loot: 4 Bomb parts.
Additional Loot: 0-2 Weapons in the truck, 10 wooden crates with randomly spawning loot: Money, Coke or Gold, sets of ingridients to cook 0-3 Meth bags.
Guards\Civs: 22 Normal guards (2 of them are camera guys), 16-17 Civs.
Recommended assets/weapons: Loot Drop Off Point: Main Street Garbage, Crowbar. Optional: Manifest, Zip-Line, various Spycams/NONE.
ECM Rush: Possible.
Preferred strategy: Find 2 Keycards, open the bridge, find the Phone and PC with GPS coordinates, then a PC to enter them. Wait for Moretta to move, get on the ship, find correct container, secure the Bomb, escape.

All Crowbar locations:


Car Shop


Main loot: A car.
Additional Loot: 3 another cars, not obtainable solo.
Guards\Civs: 9 Normal guards (3-4 of them outside), 17-19 Civs.
Recommended assets/weapons: Body Bags, Dumpsters (optional)/A Shotgun.
ECM Rush: Not possible.
Preferred strategy: Remember, that you can't break any of the main windows, or alarm will go off! Get in from the roof, locate the manager, secure a keycard from him, open his office, look for a name on the whiteboard. Now search both office spaces (check 2nd floor and director's door first) and find the correct PC. Activate it and lanch entering alerted guards with a shotgun across the booths to safely answer the pager. Set up C4s, grab the keys, escape.

Hoxton Revenge


Main loot: 6 Evidence bags
Additional Loot: Another 2 Evidence bags, 8 in total.
Guards\Civs: 7-8 Murkys outside, 6 Goverment agents inside, 1 Civs - FBI agent.
Recommended assets/weapons: Body Bags/A Shotgun.
ECM Rush: Not possible.
Preferred strategy: Find your way over the fence, locate an alarm box through the windows. Get in, deactivate it, find the panic room, avoid killing anyone for now. After the Panic rom is found, you can secure the area around it if you want, and get to objectives, which can be:
  • Find and insert 2 Keycards.
  • Find and force the FBI agent to complete the retina scan.
  • Find and hach the laptop.
  • Locate the telephone pole outside, climb it, hack the phone, talk to the FBI agent.
Wait for the timelock to finish, kill the traitor, secure all Evidence bags, escape.

Alesso Heist


Main loot: 12 money bags.
Additional Loot: Another 6 Money bags, 18 in total. 8 money bundles in cash registers, 3 ATMs.
Guards\Civs: 16 Alesso nightclub guards, 20 Civs.
Recommended assets/weapons: Body Bags, Extra Cutter/A Shotgun and a Saw.
ECM Rush: Not possible.
Preferred strategy: Locate all 5 C4 stashes, set up C4 at the basement, get into the control booth upstairs. Complete the pyro sequence, don't alert the guard near the booth. Get down, secure the money, escape. You can open ATMs with ECMs, or with SIlent Saw.

Golden Grin Casino


Main loot: The Dentist's Loot
Additional Loot: 28-29 Money Bags, a Painting, Poker chips and Money bundles. Also there is a small Jewelry in the room where you install the sleeping gas, in the bathroom.
Guards\Civs: 16-17 GGC guards, 39-40 Civs.
Recommended assets/weapons:
Also, take a Shotgun.
ECM Rush: Possible.
Preferred strategy: Look for the bottles on the Pool, on the Pool sided slots, inside the VIP room, on the VIP room-sided slots, remeber the colors. Grab your gear, sleeping gas and Poker chips from the guitar case, get to the back area. Eliminate all 3 (sometimes, really rare, 4) patrolling guards. Search the Manager's safe, Locker Room, and VIP room for the digits, search The Archives for the blueprint. Grab the flash drive, get to the reception, download the data. Figure out which civ you need, spike his drink (the civ wearing white shirt always spawns on the left from back area, the civ wearing the red shirt - on the right side), tie him down, get the Keycard. Install the sleeping gas upstairs, get to the basement vault. Enter the digits, clear the vault, escape.

First World Bank


Main loot: 8 money bags.
Additional Loot: 6 more Money Bags, 7 ATMs and Money bundles, an AU Ticket.
Guards\Civs: 14 Normal guards, 22-32 Civs, sometimes 2 Metro Cops spawn near the elevator in the staircase area in the end.
Recommended assets/weapons: Body Bags/A SIlent Saw.
ECM Rush: Possible.
Preferred strategy: Open up the ATMs if you want, find the manager, get his Keycard. Open the server room, rewire all 3 electric boxes, find the correct PC for the password. Meet the insider, get into the inner area, tie down the camera civ, activate the vault door opening mechanism. While evading 3 vault area guards, secure all the loot via the vent. Meet the insider again, go through the office area, drill the safe, collect all Money bundles, keep civs in check. Go downstairs and either secure all bags with ECMs being put down in a minute, or each 45 seconds return upstairs to yell on civs.

Counterfeit


This is NOT a stealthable heist, it WILL go loud eventually.

There are two ways to stealth first several minutes of this heist:
  • Solo, quick, easy, but not for long.
  • With 4-man crew and ECM rush.
Solo
Talk to Mitchell, descend into his basement, tie him down, start the hack. Get to the Wilson's basement, start the hack there. Now just wait until the first cop comes to you into the Wilson's basement. Kill him. This will give you some additional time, but alarm will go off when second patrol of cops gets alerted.


ECM Rush
The beginning is the same, only now you must not kill the first cop, but instead chain all 8 ECMs as soon as he becomes alerted. You also should have a good hose spawn location.
For more info watch the video below, or read this guide:
http://steamcommunity.com/sharedfiles/filedetails/?id=622149836

Murky Station


Main loot: 2 EMP parts.
Additional Loot: 14 weapon cases: 6x2 upstairs in two separate train carts, 1xPistols and 1xBattle Rifle in the basement.
Guards\Civs: 12 Murkys (3 of them in the basement: 2 patrolling and 1 in the boiler room), 2 Civs.
Recommended assets/weapons: Body Bags/Maybe a high conceal sniper rifle with a THEIA scope to scout the trainyard from above.
ECM Rush: Possible with a 4-man crew, after opening all train carts.
Preferred strategy: There are 4 types of equipment you need to find in order to open the train carts. Here they are:
  • Keycards (4 total)
  • Hard drives (2 total)
  • Blowtorch (4 total)
  • Thermite Paste (4 total)
If you want to know the exact location of these, take a look at this board, it looks loke this (note, that locations are ALWAYS randomly generated!):


After that, open the carts (look for a yellow hack panel on each of them), secure the EMP and additional loot. Escape zone is random, it's either the van at the spawn point, or the boat, across the map.

Scarface Mansion


Main loot: 6 bags of any kind (Yayo, Money).
Additional Loot: 10 bags of any kind (16 in total), and 2 stacks of 3 money bundles.
Guards/Civs: 30 guards in total: 18 patrol around the mansion and the 19th is Ernesto Sosa (not carrying pager), 11 inside the mansion and carrying pagers.
Recommended assets and weapons: Body bag case/Shotgun.
ECM Rush: Possible.
Preferred strategy: Kill the guards that patrolling around the mansion (you don't have to kill all of them, you can kill the ones around the docks and the ones in the yard where escape van spawns, although preferred to kill all).
After hacking the security system you can go inside the house and search for the coke package, after you use the phone go to Ernesto Sosa preroom hall if you have pagers left for the guards there you can kill them (there might be 3 of them). And then go to Ernesto Sosa and kill him (the door in the right to Ernesto Sosa room might be open sometimes so be careful to not being detected). Loot the vault and finish the heist.

Video for an example:
The Yacht Heist


Main loot: 8 Money bags (and a special hard drive).
Additional Loot: 7 artifacts.
Guards/Civs: 17 guards and 18-20 civs around the map.
Recommended assets and weapons: A shotgun... like always.
ECM Rush: Possible.
Preferred strategy: There is not a specific one cause its a very simple heist, go for money and artifacts when you have the chance to snatch and grab them.

Diamond heist


Main loot: 8 Diamonds.
Addonatinal loot: 28 Showcases that contains gems, and blood gem.
Guards/Civs: 14 Guards and 13 civs. One roaming in the map and the rest are on the top floor (party).
Recommended assets and weapons: No assets recommended. For weapons, i suggest you'll take pistol or assault rifle on semi auto to avoid hitting glass, and shotgun for ragdolls in emergency cases.
ECM Rush: Not possible.
Preferred strategy: Try to avoid guards and not being detected cause when you do you'll get spoted fast and kill camera guy to have less trouble with the cameras.

Breakin' Feds


Main loot: 1 Box.
Addonatinal loot: 0-8 Coke, 0-6 Money.
Guards/Civs: 12-16 Normal guards (1 cam guy), FBI Units 0-14, 5-6 Civs.
Recommended assets and weapons: Body Bags\Trip mine, Shotgun.
ECM Rush: Possible.
Preferred strategy: Kill camera guard. Place as many trip mines as possible on the side where the Garrett is located. Listen to the Locke's hints to find the correct code for the safe.

Locke's hints:
- Payday Gang (2015)
- History (1776)
- Wife (1212)
- No Hint... (1234)

Shacklethorne Auction


Main loot: Black Tablet.
Addonatinal loot: 35-38 artifacts, 12-15 small jewelry.
Guards/Civs: 10 guards, 21 civs.
Recommended assets and weapons: Ladder, glass cutter/Shotgun.
ECM Rush: Possible.
Preferred strategy: Get inside as shown in the video or use the ladder. Find and hack control boxes to gain access to the storage room. If possible, kill three guards on the 2nd floor (those that walk in rooms with artifacts), just in case save one pager or kill the camera guy. Find the blowtorch. Turn off electricity to lure out the auctioneer. Take away his keycard, find his office and hack the computer. Remember the code that appears on the screen after hacking the computer. Go down to the vault, enter the code, take the loot and escape.

All loot possible:

Main objective:
No Mercy


This is NOT a stealthable heist, it WILL go loud eventually.

Preferred strategy: Right after appearance PRESS THE RIGHT FLOOR! examine the lobby and corridors that lead to lobby, find all of the cameras. The number of cameras depends on number of players:
  • 1 player - 3 cams
  • 2 players - 6 cams
  • 3 players - 9 cams
  • 4 players - 12 cams
You'll get only 7 seconds to destroy all of them right after mask up. Countdown will be started and continued by Bain himself. After cams distruction you need to keep the people on the ground. Besides you need to keep people away from the alarm button in the corridor. There it is:
Also, you MUST to get down people on the kitchen and in the rooms near the kitchen, because one of them may to run and press the alarm button, even if he's not alerted. Hack the computer in lobby, answer the phone when that needs. Find the correct document and place the fake turrents. Go unmask and walk through door opened right to the patients. Listen to doctor carefully and indicate what patient you need. See what wire you need to cut (by the color) and do it.
Additional note: Alarm raises after killing any of civillians.

The White House


Main loot: 24 pardons.
Addonatinal loot: None.
Guards/Civs: 22 guards total on the map, 10 Murkywater Mercenaries outside the White House, No Civs.
Recommended assets and weapons: Body Bag case/A shotgun, Laser Trip Mines.
ECM Rush: Partially (Until entering the PEOC bunker).
Preferred strategy: Get into the White House carefully, there might be guards right by the entrance inside, so you might not see them. Make your way through the second floor and go down to the first floor, turn right towards the West Wing entrance. It's always spawning there. Interact with the panel, it will reveal a combination of colored wires that must be cut in order to gain access.

Find the electric cable boxes (4 in a total). Each box has one cable with red, green, blue or yellow color. You need to cut the right wires according to panel color combination. Cutting the wrong wire will raise an alarm.

Go throungh the door you opened to the West Wing. There will be 1 guard patrolling the corridor, don't kill him, you can avoid him pretty easy. Now you need to infiltrate to the president's office. There are 3 guards patrolling this place, you can kill them. Take off the paintings and find the safe. Look for the laptops (4 in a total) and hack them (the right one contains email message that has one of the those phrases: "Subject: Code Safe?", "Subject: Code Safe (again)?", "Subject: The Safe Code problem", "Subject: USB stick thing", "Subject: Safe code...", "Subject: Code to your safe"). There is interconnection between each of the phrases and location of the USB stick, you can read it in the email message.
Subject
Location
The safe code
fireplace in the Cabinet Room
The safe code (again)
large desk in the Roosevelt Room
Safe code...
fireplace in the Roosevelt Room
The safe code problem
large desk in the corridor leads to Roosevelt Room
USB stick thing?
small desk in the corridor by Cabinet Room
Code to your safe
small desk in the Roosevelt Room
Location: fireplace in the Cabinet Room
Location: large desk in the Roosevelt Room
Location: fireplace in the Roosevelt Room
Location: large desk in the corridor leads to Roosevelt Room
Location: small desk in the corridor by Cabinet Room
Location: small desk in the Roosevelt Room

Use USB stick on one of the laptops. Open the safe with a code you've seen on the laptop, grab the keycard. Go back to the central part of the building and head to the Library. Find the button. Enter the basement.

There are 3 patrolling guards. If you kill one of them, another guard will spawn in this area (after killing the rest of the guards there will not be more reinforcements). If you dominate them carefully, there will not be reinforcements at all. Start the hack, complete some little objectives (restart the computer, answer the phone call, hack another pc to take firewall off). Hack the computer thrice. You need to avoid guards carefully while hacking is in progress because there is almost no places to hide. Enter the vault, grab all of the Pardons. Go back to the Library and unmask.

Right after that, there will be Point of no return. You need to escape in 60 second. In this phase there won't be any guards inside the White House, but murkys outside the house still can detect you if you get too close, so keep your distance and escape.
Additional notes: there a few locations where you can find the laptops, you'll remember them soon, but don't forget about this one. That laptop is in corridor you passed before:

Border Crossing


Main loot: 12 money bags/12 weapons/12 coke bags.
Additional loot: depends on the main loot:
if 12 coke bags - 1 coke bag, 10 money bags, 9 weapons.
if 12 money bags - 1 money bag, 8 coke bags, 9 weapons.
if 12 weapons - 3 weapons, 8 coke bags, 10 money bags.
There are always 4 bags of meth and 4 pieces of Roman armor regardless of the main loot type.
Guards/Civs: Clubhouse - 17 bikers, 3 civs/16 bikers, 4 civs. Somewhere in Mexico - 8 murky, 11 gangsters, 5 civs.
Recommended assets and weapons: Upper floor access, Roof access, briefing room keys, crowbar - lunch room/Judge (with 000 ammo) to quickly pacify alerted guards. Also, Silent Saw helps with the cages.
ECM Rush: Possible.
Preferred strategy:

Club house

Enter the club. Take the key chain. If you placed recommended asset, It will be in the middle hallway, between main hall and workshop. Otherwise, it will be in one of the 7 possible spots.

You can enter the club from the right or from the left side. However, it's much easier to get upstairs if you choose the entrance on the right. On the second floor, there are 2 small rooms and one of them has a camera guy. No need in lockpicking, just shoot a door lock and the cam guy.

After that you can clear the whole location, but it's not necessarily. Now you can open briefing room with keys. The briefing room door is on the 2nd floor and it's red. As you enter the room, there is a chance that it has been filled with C4 (1-2 charges if you're playing solo). Try to defuse C4 before it explodes, otherwise, the whole map will be alerted, 4 meth bags in briefing room will be destroyed and probably if you stay in the room, you will be downed.

Take a look at the map of the clubhouse in the center of the room with a knife stabbed through it. The location of the knife points to the correct tunnel entrance. Also, there will be red text in the left bottom corner of the map, explaining where the code is.

There are 4 possible code locations depending on the text:
  • hey Joy since you don't seem to remember the code I changed it to you first arrest. Guess you can remember that! - the code is the date written on the bottom right of the WARRANT OF ARREST. It can be found in small rooms on the 2nd floor (see the picture below)
  • Blecket guarded the door again and has reset the system to factory settings - the code is the factory code written on the right page of the User Manual. It can be found in the hallway on the right side of the club (right side entrance).
  • same year when clubhouse was founded you idiot - the code is the year written on the banner over the entrance in the main hall
  • it's in the shіtter - the code is in the toilets written on a door on the left

Grab a crowbar and a keycard from the table. At the end of the table, there are 4 meth bags. Also, there is a safe in the room. Open this safe any way you want and pick up blueprints inside. They are necessary to spawn the vault in the second part of the heist.

After that, open both storage shacks outside on either side of the house. There is a 2nd keycard and a crowbar. Take it if you're playing with someone else. Each shack may contain keycard, crowbar or both of them. So once you have opened a shack and picked up both things, there is no need to open another. If you're playing solo, just leave those shacks, there are no loot inside.

Afterward, find the tunnel entrance and enter the code. Be careful, if you enter the wrong code - alarm goes off, so enter the right code, secure meth and escape.

Somewhere in Mexico...

Get into the hangars. Open hangar doors and cages with a saw. Find the plane and then go to the large warehouse (Warehouse North "Culebras" on the preplanning map). Get up to the 2nd floor and take out the cam guy, avoid 2 guards patrolling the 2nd floor. There are 2 spots where he may be. After killing the cam guy, start looting the warehouse. Gangsters have no pagers so take them out first and hide their bodies. Guards on the 2nd floor won't be a problem, try to not alert them.

Open cages by interacting with PCs in the Storage Control Room on the 2nd floor:
Each cage has a number written above it, and the PC that also reads that number must be interacted with to unlock that cage. By interacting with one of these PCs, the relevant cage can be unlocked without the keycard for 30 seconds, you can see flashing green light above the unlocked cage. After that time, the cage will re-lock, and you'll need to use computers again. Once unlocked, a cage will stay open.

Alternatively, you can open it with a saw, but if you don't have an ammo bag, better save some blades for 3 cages in the small warehouse.

If you have picked up the blueprints from the America side before heading to Mexico, a vault will spawn underground in the North warehouse. This vault requires 2 keycards to open.
You have a keycard from the club house, your crew member must have another one. But if you started the "Somewhere in Mexico..." part alone, there will be an additional keycard. It can be found in the North warehouse on the 2nd floor on the table in the lunch room or on the table in the corridor nearby. The vault door doesn't have simultaneous use lock, so take your time and pick up the 2nd one.
Inside the vault you will find the Roman armor. Bag all 4 pieces of armor and move on.

After that, go to the small warehouse (Warehouse South "Santatico" on the preplanning map). There is one guard with pager and no gangsters. There is no need to kill him, you can avoid him easily. Open cages with a saw. Also, don't forget about wooden crates with loot, located throughout both warehouses.

Take out some gangsters outside carefully, keep an eye for your spare body bags amount. Secure the loot, connect the hose and search for gas cans, use as needed. Open the gates, escape.

American side - code hints and keychains locations

Mexican side - crowbar locations (in progress)

San Martin Bank


Main loot: 10 Romanov Treasures, Fabergé egg.
Additional loot: Various small loot, 3 ATMs.
Guards/Civs: 9 Security Guards, 2 Police officers outside with no pagers, 35 Civs.
Recommended assets and weapons: Garbage truck for loot drop and ammo bags to replenish saw blades near the auto repair shop, Drunk Mariachi Band. Silent saw and gruber/judge.
ECM Rush: Possible.
Preferred strategy:
Get inside the bank. There are several ways:
  • in casing mode, through the front entrance or through the side entrance on the right, near ATMs. Go upstairs, put on mask, shoot a lock on the white door.

  • on the left, the gateway between the auto repair shop and the bank, pick the lock, there is a staircase opposite the gate door, go one floor up.

  • on the right, get past two guards, a bus stop and bank’s side entrance. Pay attention to the scaffolding, it has a foldable ladder with a red clip. Break the clip and climb up to the roof. There is one patrolling guard. You can see 2 closed rooms there, one of them has an electric panel, use it to turn off the lasers inside the vault beforehand. Go to the opposite side of the roof, lockpick the door and go down to the first floor.

Locate the manager’s office on the first floor. 2 guard patrol this area.
Find the safe behind bookshelves. Find and grab some tape, it spawns in one of 8 places (see the image below).

Next, you will need to obtain fingerprints from the manager's coffee cup. It will always be next to the manager himself in 1 of 3 places: in the kitchen, in the conference room or in the room with a gate door, which is right next to the manager’s office.

Open the safe, pick up keys and open the gate to the ground
floor. It doesn’t matter which gate door you unlock first - after opening any one of them, all the others will open automatically.

On the ground floor, there are 2 patrolling guards, 1 civilian and a guard in the camera room. Despite the large number of cameras, it isn’t necessary to kill the camera guy. By using pocket ECM generators and camera looping you can easily eliminate other guards and tie the civilian. But cameras on this map can be pretty annoying and camera guy might spawn in a room where he can hear a saw noise, so it’s your choice.

Find door to the vault and interact with RFID reader, it will display two colors lighted up.
Locate a blueprint manual in one of the ground floor back rooms. The manual tells which number corresponds to which color, numbers are written inside power boxes. So, find 2 power boxes with those numbers and cut the wire. After that, enter the vault room.

There is a note under the vault code panel. Find the the office seat with relevant nameplate on the first floor and hack a computer. After ~ 20 seconds, a code will appear on the monitor.
Enter it in the panel, open the vault. There will be lasers inside the vault if you haven’t turned them off before. Grab the loot.

Be careful, after opening the gate doors with the manager’s keys, some security guards from other areas will be able to move to the ground floor.
Guards from the second floor can go down through the staircase. Guards from the lobby can go there too. This does not always happen, but keep it in mind.
Perhaps you should place more trip mines to make it easier to track guards routes and keep a distance so that they don’t hear you if you want to open deposit boxes with a saw.

Also, be aware that civilians on the first floor and a camera guy can still hear a saw noise in some places.

Circuit and tape locations:


Video for an example:

Alternative strategy:
Climb to the roof through the scaffolding and go down to the ground floor to the gate door. Place a drill on it.

There is another way to this gate - through the aforementioned gateway between auto repair shop and the bank, but in this case there is a chance that a security guard from the lobby will come this way and spot a drill. So you need to open this door at the end of heist, when you carry loot, at that time, this guard will most likely be “stuck” and not move in the bank.
You can place mines on the first floor while the drill is working.
After drilling this door, all other gates will not open automatically, unlike the option with keys.

This method allows you to completely skip an objective with the safe and fingerprint. Also, sawing deposit boxes will be much easier. Therefore, it’s important not to open other doors until you finish with the vault, because guards will go to the ground floor and get in your way.
Breakfast in Tijuana


Main loot: Almir?
Additional loot: 3 bags of pure cocaine, 3 weapon cases, 7 medals, small jewelry in the locker room.
Guards/Civs: 11 Security Guards, 14-19 Civs.
Recommended assets and weapons: Spiked Churro, Illegaly parked car, Open window/A Shotgun, Laser Trip Mines.
ECM Rush: Possible.
Preferred strategy:
Get inside the police station:
  • Incorrectly parked car asset: climb the car and jump over the fence. Then go along the wall to the door and open it, or move further and climb through the window, which is can be opened by purchasing an appropriate asset in preplanning menu.

  • Through the gate or a hole in the fence on the right behind the corner.

On the right side of the main entrance, there is grill door and an circuit box next to it. In total, there are 3 circuit boxes on the map. Hacking one of them will disable an alarm on windows. Hack it and open the gate, then you can get inside through window.

There are 2 guards on the ground floor and 2 more on the first floor. One guard from the ground floor can go up to the first floor by stairs.
There are two cameras on the first floor, and there are also a few civilians leaning pillars and 2 walking civilians. Carefully eliminate two guards on the first floor, tie civilians and move them out of cameras sight, loop cameras or use an ECM Generator to keep it in safe.

Now you need to find and hack police chief’s computer. It's always in one of two offices located opposite each other on the first floor.

Next, destroy the physical evidence. You can find it in the evidence room, which is located on the first floor, either on the left or right wing of the building. Also, there is a safe with 3 bags of cocaine.
To get into it, you need the RFID tag. It appears in one of 4 places (see image below).

Search the shelves, then you will need to destroy the evidence in 1 of 3 ways:
  • flush them down in the toilet
  • use a shredder in the server room
  • or destroy them in a blender.

The server room is on the first floor.
Toilets are always behind the main lobby. One of two staircases from the first floor leads directly to them.
The blender is always in the dining room on the ground floor.


After that, you need to find the entrance to the cell block. You need a door breaker to open this door. It’s in the Armory, which may be in 1 of 3 places:
  • next to the dining room
  • opposite the first one
  • opposite the dining room

At these three locations a storeroom and a locker room may appear too, you’ll need them later.
In addition, there are cases with weapons in the Armory.
Open the cell block with a door breaker, find Khairudin.

There is a cam guy, so you can disable cameras if you want. However, it won’t cause you much trouble.
Go to the storage room and get the bolt cutter. There is one civilian, tie him up and move him to a safe corner.

Cut the prisoner's chains. Then go to the locker room and grab a police uniform.
While Khairudin is changing clothes, hack an electrical panel with alarm, if you haven’t done it yet.

There are always one civilian and one security guard in the corridor on the way to the parking lot and another security guard at the parking lot. Get to the room with keys, from there you can easily get to the parking lot, don’t forget to open the door for Khairudin.

Notice the number of a parking lot where Khairudin's car is parked, grab the keys. Finally, you can slowly take out all the loot through the corridor or through the street parking lot of the police station, first opening the door to the underground parking by the button on the wall.

Additional notes:
  • The shredder and the blender appear only after the evidence has been found. The toilet cubicle is open from the beginning of the heist, but only when you need to flush the evidence into the toilet.

  • If you decide to ECM rush, bring a saw, so you can get into the evidence room without the RFID tag. However, you still need the RFID tag to open the armory.
    You can saw cell doors when searching for Khairudin, as well as chains on the hands of the prisoner, so you don’t need a bolt cutter.

  • Although it’s not obvious, this door can be opened from the parking lot.

Video for an example:
Buluc's Mansion


Main loot: None.
Additional loot: 13 Coke (5 of them in safes), 4 weapon cases, 4 money bags.
Guards/Civs: 10 Security Guards, 28-30 Civs.
Recommended assets and weapons: Boat entry, 2 spycams/Any silent weapon, Laser trip mines, Body bag cases.
ECM Rush: Possible.
Preferred strategy:
Choose a boat as your entry point in the preplanning menu and you’ll spawn in the wine cellar. Take the thermite and go upstairs.

There are 2 guards, one patrols the corridor, and the other always sits at the table. Burn the vault grate and find the code on the wall inside. Open another door on the opposite side of the vault by pressing the button next to it.
Climb up the stairs further. Enter the code.

Now we need to find a way to get inside the secret part of the mansion. There are two ways to get there.
The first is the black door with a key card panel.
Another is the wall with a statue that requires two missing items: a scythe and a globe.

Entrance locations are always the same, but the door type (black door or statue) is random.
The black door can be opened with a keycard, which is held by one of the 4 masked guards.
The name of this guard is written on a piece of paper that is located in the right wing of the building near two possible cameraman locations.
After identifying the name, you need to find out what mask the guard is wearing. You can do it by using the computer in one of the 3 rooms.

1) 2 such rooms can spawn in the right wing near the toilet.
2) Another one in the left wing opposite the exit from the wine cellar

All 3 rooms have 2 doors and are indicated as shading squares in the preplanning menu.
Now you know what mask the guard is wearing. Look for him and kill. The guard with a key card doesn’t have a pager.

However, there is a 2nd way.
All you need to do is to carefully search for a scythe and a globe for the statue.

It’s difficult to say which of these two methods is easier - just try to do everything at the same time.

It is recommended to move two civilians out of the fireplace room near the wine cellar exit.
Also, eliminate two guards patrolling the area. One of them usually wears a mask and there is a chance he’ll drop a keycard, so you can take it and open the black door. If there is no keycard, search for the scythe and the globe.

Scythe spawns in 7 possible places on the first floor only. The globe spawns in 6 locations, 2 of which are on the second floor.
All possible places:


After going through one of the entrances, you will find a hall connected by a corridor with another hall.
Next, you need to find the Buluc’s secret waiting room: use the hidden lever that opens 2 passes.
Search bookshelves in one room and scroll through the candelabra in the other room.
In parallel with this, look for folders on the tables in the halls.
Some of them contain hints: on the right page there is a number at the top and a word at the bottom. The word means a button with a symbol that you need to press on the panel of the door to Buluc's office, and the number represents the sequence. The words are written in Spanish.

Original
Translated
Peek'
Dog
T'u'ul
Rabbit
Ch'i'ibalil
Frog
Kitam
Boar
Buho
Owl
Book'
Bat
Báalam
Jaguar
Batso'
Spider
Cangrejo
Crab
Ba'ats
Monkey
Kaan
Snake
Áak
Turtle
Péepen
Butterfly
Úuricho'
Snail
Kaaye'
Fish
Áayin
Lizard
Cocodrilo
Crocodile
Síinik
Ant
Ku'uk
Squirrel
Milpiés
Millipede

There is a board inside Buluc's waiting room that shows the word's meaning. Also there are folders with clues near the board.
Finally, after identifying the sequence, you can safely go up to the top floor. There is always 1 guard and you don’t need to eliminate him.

Enter the office and throw Buluc down. Open his safe, take the hard drive. Now you can just collect all the loot. There are 5 safes on the map, which are always located from the same places. The first is located not far from you, in a room adjacent to Buluc's office. Another safe is in the book room. There is a similar safe in the secret waiting room, next to it on the table are several bags of cocaine. And two more are located on the first floor of the mansion: in the cafeteria and in the bedroom (cafeteria and guest bedroom on the planning map). Each of them will contain a bag of cocaine. Take everything into the room with the fireplace, where you removed the two civilians, and further through the cellar. If there are pagers left, then you can remove the patrolling guard here. There is some more loot in the vault in the cellar. And don't forget that there is always 1 more weapon case in the garage.

Video for an example:
Dragon Heist


Main loot: Dragon Statue.
Additional loot: 4 artifacts, 4 bags of gold, 3 coke, 2 paintings, 3 ATMs, tea set, various small loot.
Guards/Civs: 10 Security Guards, 5 Triads, 16 Civs.
Recommended assets and weapons: Bag zip-line, garbage truck, 2 spycams.
ECM Rush: Possible.
Preferred strategy:
Disable the alarm by opening and breaking the correct alarm box.
Two boxes are located in the alley on the right side of the store, and the other two - between the warehouse and the store on the left side.
There are either 2 pager guards, or 1 pager guard and 2 bandits without pager in back alley. The camera there may bother you, so it’s better to eliminate everyone.

After that, open the window to the store from the right alley.
There may be an artifact in a glass case, next to that window.
Open the office door and secure the key card and some small loot.

Next, open the door to the back alley and the entrance to the downstairs.
There are 2 guards with pagers. Kill the one near the warehouse gate.

There is a room next to auction with 2 artifacts and 2 paintings, grab them and turn on the light.
Enter the auction hall and wait for the participants to leave. There are almost no hiding spots here, so just wait for the right moment to sneak past 2 guards.

Go into the auction office and find the vault code.
The hint on the whiteboard says that the dial of the office clock on the wall must be divided into 4 15-minutes intervals. These intervals are numbered clockwise, from 1 to 4. For example, if the minute hand is in 30-45 minutes interval, then the code will be 3
Find a notebook with the correct code.
There are always 2 notepads in the office and 2 more in the hall. Tie up the boss, he’ll drop a keychain, also there is a crowbar in the office.

You need a keycard and the code to open the vault door. You can always get the keycard in the warehouse office or from a bandit standing next to that office.
Wait for the temporary lock and look at the colors in RFID box, find and cut wires with the matching colors. Loot the vault.

There are 3-4 pager guards in the warehouse, depending on how many are outside.
Two pagerless bandits can spawn next to the gate to the warehouse, kill them.
Place sensor mines and move all bags to the zip line. Don’t forget to open wooden crates with cocaine. There are 2 crates in the warehouse and one more in the room with zip-line.

Don't forget the artifacts from the shop. Exit the basement and open the adjacent door. From there you can see the 2 possible spawn spots:
1st is right next to a cupboard and the 2nd is to the left of cash register stand (the last spot is near the office with the first keycard). There are always 2 artifacts in the shop.
Move all the bags to the garbage truck and saw 3 ATMs outside.

Video for an example:
The Ukrainian Prisoner


Main loot: Vlad?
Additional loot: 5 bags of gold, 5 coke, tea set, various small loot in wooden crates.
Guards/Civs: 32 security guards in total, 17 Civs.
Recommended assets and weapons: Less drones, Ladder bridge, Broken wall, 2 Spycams/Any shotgun, Body Bag Cases, Trip Mines.
ECM Rush: It makes no sense.
Preferred strategy:
First, we need to connect to the camera and see which container Vlad is in. Go to the second floor. There are usually 4 guards patrolling here. They can sometimes move between floors, and a civilian walks around the office, corridors and cafeteria. If you're a bit lucky, it can be tied. You need an IT room. It’s located in a place above the warehouse not far from where we appear or in the corridor between the dining room and offices. Remember the name of the company written in the container with Vlad. Go to the control room and hack the computer. There are 3 warehouses on heist. Figure out which one warehouse contains the containers of the correct company and head to it.
The warehouse can be opened by one of three ways. You have to use a code with numbers, a code with hieroglyphs or a keycard.
  • Code with numbers can be found on one of the computers in the office. Remember and quickly enter it on the panel. Note that it’s updated every minute from the start of the heist.
  • Code with hieroglyphs is written on a notepad. It appears in the office on printer or on table. Also, it appears on the ground floor on the wall (see the map below).
  • Keycard is in office. The office can appear in the same places as the IT room. You can open it by luring out the bandit. Find a detergent in the storage room on the ground or second floor. Add it to the cake in the dining room. Look at the office number through the window on the board next to the bandit. Make a call to it from the dining room. Keycard will be on the table.
Do not forget you can search for a notepad, detergent and a computer at the same time. It helps you to safe some time to open the correct warehouse.
Open the warehouse and find a gas cutter. Open containers. Find Vlad, inject him with adrenaline, go outside and head to the harbor.
Open the gate then go to the left to the next gate. There will be 2 bandits and 2 guards with pagers behind it. Sneak between the containers to the next gate.
Go to the harbor office, pick up the USB stick, scan the documents and get out of the warehouse. Open next one warehouse right to you, there is always 1 bandit in here. Distract 2 civilians and remove the jack. Now you are on the last area. There will be 3 civilians, 2 guards with pagers and 1 bandit. You can eliminate all the guards and tie up all the civilians carefully for your space, but watch out for 2 cameras and a drone that has a large field of view. Find and light up gasoline. If you wish to take absolutely all the loot, you need to take the bags from the secret container near the escape zone. To activate it, you need to press 3 buttons on entire heist (see map below).


Video for an example:
Black Cat Heist


Main loot: 12 bags of money.
Additional loot: 2 bags of coke, 2 weapon cases and 1 bag of money, tea set, various small loot in cabins.
Guards/Civs: 25 guards, 34 civilians.
Recommended assets and weapons: Entrance from the crew deck, Keycard, 2 spycams: cabin area right, cabin area left/Any shotgun, Body Bag Case.
ECM Rush: Possible.
Preferred strategy:
The heist starts on the lowest deck if you have taken entry point in the planning menu. You have a mask already. There is only one guard patrolling the entire deck. Hack computer in the room next to you to recognize Xun Kang's room. Find information from our insider and take the keycard purchased in the planning menu.
There is 1 guard with a pager and 2 without it patrolling in front of the main staircases. Go upstairs. There will be several civilians at the entrance to the upper deck. One of them always walks. Safe with a code is located in one of the symmetrically located saunas on both sides of the yacht liner. If you see a civilian inside a room, then safe is in another one. Drill the safe, take the money and remember the code.
Next, we need to find Xun Kang. After that, you will need to open storage room and put a listening device. If you already got phone number, you’ll skip this objective. You can find it in a cabin with a number which you’ve seen on computer at the beginning. Vlad will lure Xun Kang out of the casino. Kill the guard on the side where Xun Kang is, look around the casino. Both patrolling guards and civilians behind slot machines can see him. Take your time, wait for guards and civilians moving on routs and tie down Xun Kang. Hack the slot machines from the control room, which is located in one of the two symmetrically located rooms under the Xun Kang 's office. Cut the wire, take everything from the vault.
Search all cabins for some small loot. One of them will contain a shelf with two weapon cases and two bags of coke. You should do it while you’re looking for phone number. Third and last one bag of coke located in titan safe. You must bring Xun Kang to open it. Kill the guards in the corridor with the correct cabin, as well as one more in the corridor connecting the left and right sides of the yacht liner. You may have a bad luck so you’ll have to lead Xun Kang along stained glass window. Guards and civilians may see him through it. If you see you’re about detected, do it with ECM rush.

Video for an example:
Mountain Master


Main loot: 4 bags of gold.
Additional loot: 4 bags of gold, tea set, 2 ATMs in the lobby, small loot (lobby, reception, office, elevator hall, white van, poker table).
Guards/Civs: the amount of guards, non pager guards and civs depends on the current section of the map.
Recommended assets and weapons: hacking, bag zip-line terrace, body bag case - roof air duct, insider help mark the correct bookshelf; any shotgun, body bag case.
ECM Rush: Possible.
Important notes:
Do not drop any body bags off the building since this will trigger the alarm!
You can not insert a key card during ECM!
Guards will be alerted by open bookshelves!
Preferred strategy:
The two preferred options to get past the lobby are:
  • On the right side is a metal detector which has to be deactivated. This is done by cutting the wire of the electrical box. There are 3 possible spawns on the right side. When the green light is off you can enter via the metal detectors.
  • On the left side is a coffee machine. Once activated it will distract the guard blocking the open door to the small office.
Inside you have to lock pick 3 security boxes. Doing so will enable you to call the elevator. Ideally you don’t need a pager here. On the first level there is one patrolling guard and there are 4 possible spawn locations for the boxes. In the basement corridor there is one patrolling guard and 2 possible spawns of the boxes on either end of the corridor. In the garage there is one guard, 2 non pager guards and civilians. The possible spawn locations of the security boxes are on the left and right side of the garage. While in the garage check the 3 white vans in order to get the tools to open the elevator.
The order in which the switches have to be used is random, but a green light indicates which one can be used at the moment. Afterwards call the elevator and disable the power. Open the elevator and use the zip-line, preferably the one close to the next elevator. Turning right you will see a door through which you will get to the sofa area. If you took the other zip-lines, then be careful with the patrolling guard. You can turn right and make a U-turn to get to the same door.

Make your way to the two big windows close to the sofas. By activating the light close to the right window, you’ll call the window cleaning platform / elevator. Cut the glass and get outside onto the platform.

In the penthouse area you will encounter a mixture of guards, non pager guards and civilians. When leaving the platform you should take cover on the left side between the pool and the railing, preferably close to the pool. In order to make movement on the terrace and in the bar easier you can take out the guard patrolling there. Additionally you can take out the non pager guard at the zip-line (you can put the body bag on the zip-line). You can access the office and the bed room through a vent in the dining room. There will be a pager guard in the office / bed room which you can also take out. If you don’t open any doors here, then you don’t need a body bag. Additionally it is also recommended to not open any other doors, since this will change the movement patterns.

(Optional) The security room can spawn in three locations. One can be reached when you enter the penthouse through the main door of the bar. This security room can have two different spawns for the door. One is on the left wall once you enter the show room, the other is on the right wall in the lounge. The second spot is in the corridor near the kitchen. And the third is in the same corridor close to the office.

The correct bookshelf can spawn in 3 different locations:
  • when you enter the bar via the terrace it’s on the right side after the fire place
  • lounge
  • in the office close to the bedroom.
Find the correct bookshelf and close it again immediately. The code with which you can open the gate spawns in different locations: at the zip-line on one of the benches, in the corridor between bedroom and roof stairs as well as in the kitchen on the kitchen table. Use the code to open the gate, take the hard drive and close the bookshelf again. The laptop can spawn at these locations: small table close to the piano in the lounge, bedroom and on the table in the office. After decoding the drive it has to be placed inside the food elevator in the dining room.

Pick up a key card at one of these random locations:
  • on the small table in the bar close to the poker table
  • small table with a civilian in the lounge
  • table next to the bed
  • big table in the dining room.
There are 3 locations for the gold stashes to spawn (2 of them will always spawn):
  • lounge
  • in the showroom on the wall next to the bar and the elevator
  • bedroom.
Bring 4 gold bags to the closest drop off location (zip-line or food elevator) and secure them. Do not forget to close the bookshelf since this can alert guards.


Now find the red fire alarm which will spawn on the wall in different locations, including the bedroom, the hallway, the show room, the bar or in the kitchen. This will trigger a lot of movement. Some civilians will leave the penthouse and the movement patterns of the guards and non pager guards is changed. The best place to wait for the people to leave the meeting room is behind the right pillar closest to the door or (if you want to be extra safe) in the sleeping room/office area. After they left, make your way through the meeting room and up to the roof via the staircase. On this level there are non pager guards and the triad boss. Up here it is advised to move to the location of the body bag case at the air duct. Take out the non pager guard there and wait for the triad boss. You can drop the body bags into the air duct on the wall.

Pick up the key card and move down to the penthouse area via the ladder located at the terrace side.

The tea set is located in the meeting room.
Secure the remaining gold or leave via the window cleaning platform.

Video for an example:
Midland Ranch


Main loot: 8 bags of weapons.
Additional loot: 6 bags of weapons.
Guards/Civs: 12 guards with pagers, 1 non-pager guard (Esteban), 18-19 civillians.
Recommended assets and weapons: Countermeasures, mark weapon parts crates, extra weapon parts, crowbar / A saw, any shotgun, body bag case.
ECM Rush: Possible.
Preferred strategy:
The heist has two main objectives: find out the name of Gemma's customer and steal the weapons. At the beginning of the heist, you can choose in which order to complete these 2 objectives. It is recommended to proceed as the game initially suggests - first determine the name of the customer for Gemma (from here on it will be called first part of the heist), and then pick up the weapons. It is worth doing this for the reasons that the first part of the heist can be completed quickly enough and, most importantly, without the use of pagers. The more pagers you manage to save on the first part of the heist, the more comfortable it will be to collect all the loot at the end of the heist.

Take the thermite and the crowbar on the pier and use the thermite to open the right gate. Behind the gate there will be a small area with 1 patrolling guard and sometimes there might be 1 civilian as well. Sneak around them and open the next gate. There are 3 patrolling guards around the house, there are also several civilians to your left as well as Esteban. The safest way to enter the house is through the double door on its left side. Inside there are 2 moving guards, 2 moving civilians and some stationary civilians. One civi will always be in the dining room, hall and the living/TV room. Another civilian can appear in one of two places: in the kitchen and in the room with washing machines.

When you enter through the double door, move to the right room with the boxes. On the right side of it there may be an office with a computer, for which you will need a key card. If there is a key pad next to it, it is already the office you need to reach. But the office can also be located
at another spot. If it is not there, then you should head to the left and go through the shower room. When leaving the shower, go through the entire dressing room. In the corridor opposite there will be a right door (you will need a code for this door). Neither civilians nor guards enter the showers and locker rooms.

The easiest way to start searching for a code or key card is from the locker room. The key card can be in one of the lockers, and the notepad with the code can be on the bench in the center of the room. All places with key cards and notebooks in the scheme below.


Open the office and activate the laptop. Now you need to get a recording of Esteban's voice to access the laptop. Take the bugging device in the trunk of one of the cars in the backyard. 1 civilian walks here, and a guard occasionally looks in here. Place the bugging device in two places convenient for you. Choose a place not only depending on the location of civilians and guards, but also on the current position of Esteban, so that you do not have to wait long for him to arrive at one place or another. You don't have to pick up your device after you put it in second place, so get back to your laptop right away. During the hack, you may need to disable the firewall within 60 seconds. Make your way to the other room with metal doors. After disabling the firewall, resume hacking the laptop and head to the second part of the map. Find and cut the wire of the desired color. 3 electrical panels are located to the left of the gate when looking at them (1 panel very close to the gate and 2 more in small storages nearby) and 1 panel to the right of the gate.

Outside the gate there may be a civilian or a guard. Look around and enter the barn. Tie up as many walking civilians as possible. The most convenient way to do this is inside the barns, out of sight of the guards and cameras. There are a total of 4 guards and 4 civilians patrolling around the three barns. There is also always 1 civilian at the gate to the barn on the right. Also 1 civilian can be near the old car at the exit of the ranch. If there are pagers left, you can eliminate all four, and then there will be only a single guard at the exit of the ranch. Place the drills on the cages that have marked crates or weapons behind them. You always have the option to open the bars using/hacking the computer located in the central barn on a table not far from the truck. After hacking the computer, only 1 cage can be opened. Guards can see the computer being hacked, so be careful or just try to not use it at all. There is a chance that you have to restart the hack. If you manage to stealthily search the first barn, you can not waste your pager on the guard patrolling nearby, but use it for the guard in the camera room (behind the metal doors).

Open crates and build weapons as well as open the boxes in all barns and take weapons. You will find thermite in one of the cages or on one of the tables. After securing all weapons, set the workbenches on fire the workbenches. Go around the last guard at the exit of the ranch, open the gate with the button and head to the pier.

A saw can be a good help to you, but it is not necessary to take it at all. In addition, it will make it a little more difficult to sneak around the enclosed areas of the house in the first part of the heist.

Video for an example:
Lost in Transit


Main loot: 9 bags of printing plates.
Additional loot: 26 money bags.
Guards/Civs: 19 guards with pagers, 3 civs.
Recommended assets and weapons: Less drones, Spotter - Trainyard center, Ladder - Trainyard west / Any silenced weapon, body bag case.
ECM Rush: -
Preferred strategy:
The heist begins in the parking lot in front of the checkpoint. First of all, you need to get past it. You can jump over the fence on the right, open the gate with the button in the checkpoint booth or cut a hole in the fence on the left. Shoot the electrical box to cut the fence safely.

After that, you need to get to the terminal. Find a walkie-talkie in one of the 5 locations. Locke will help you open the gate. One civilian will always cross the road from left to right next to gates.

Make your way to the depot and find out which company transports the desired cargo. It will be in front of you. You will need to cross 2 tracks with wagons, 1 guard patrols between them. Another guard walks between the depot and the track closest to it. There will be 2 guards inside: 1 on the first floor and 1 on the second floor. Find a note with a code, remember it and use it to open the door to the office. There is 1 guard patrolling between the rooms. Take the blow-torch, hack the computer, determine the name of the company. You can complete this stage faster when you bring a saw. Just saw the door to the office.

Go to the wagons, but it's too early to open them. Find the motion sensor console. You need to enter the code to disable the alarm on the cars. Hack the keygen panel. It will be in a warehouse or outside. There are 2 guards, 1 of them patrolling in the warehouse and 1 is on the site. The keygen panel will contain a panel that simulates the panel on the motion sensor console. On this panel, the lights will turn on in a certain order. It is this order and arrangement of the lights that determines the code for the motion sensor console. For example, if the one on top left blinks, then the code contains the number 1, and so on. By the time intervals between turning on the lights, you will understand where the combination begins and where it ends. So now you will finally get a code with 4 numbers. Go back to the cars, enter the code.

Now you can open the wagons. First, you need to open the printing plates (the one that is owned by the company you've recognized). Then you can open all the others. Visually, the cars of different companies are easily different from each other: Avalon - always blue, Hefty - red, Omni - yellow. You can also find other wagons that stand above the viewing pits. They may be opened by cutting through the floor. Be careful, bags with loot will fall out of the car (2 bags from each car). It can be spotted by the guards. There are only 4 such cars on the heist.

All bags of loot must be thrown into the locomotive. 1 guard walks next to it and further along the cars. It is better to eliminate him. Also, 1 more guard walks between the two tracks, it is also better to kill him. Now you can clean the wagons without any problems. A drone flies over the cars from time to time.

Go to the control room when you're ready. 1 guard walks around it, he can also walk inside. Connect Locke to the microphone, he will notify the complex about the transportation of the locomotive. Come back. Refuel the locomotive. After the Locke's notification, 1 civilian will walk around it. It is best not to touch it, because he is in a fairly visible open space. Move the locomotive to the turntable. Further, in order to set the turntable in motion, you will need to use the keycard on the control panel. The keycard is always kept by the civilian inside the control room. There are several rooms with a corridor, there may be surveillance cameras inside. Tie up the civilian in a safe spot. Probably, you still have 2 extra pagers so you can also eliminate the guard inside for more safety. Turn the locomotive, repair 2 cables under it and escape.

Video for an example:
Contributors and useful links
Big thanks to:
CommanderCH - for creating an original guide and much much more!
Clyde - for totally reworked of the original guide, adding new information, design, GIF-animation and much more!
revnant - for some really great remarks, info + video about ED Plan C and tons of Firestarter Day 1 videos.
UnrealMe - for general help and tons of videos.
zartox - for general help and some videos.
Astartes - for general help and info about Threat stats.
Kadabra - for information and reworking.

Links:
M$ - main open group for stealthers. Join us!
TM$ - a group for Top Master Stealthers, who have proven yourself.
Discord[discordapp.com]
Russian localization

Happy stealthing guys!
229 Comments
RuntyFlame Jan 22, 2022 @ 3:48am 
its possible to ecm rush breakin feds if you launch bodies correctly
Readraid Aug 6, 2021 @ 12:57pm 
This is still being updated but a brief look through tells me that at least for ecm rushing you havent got a clue, im not gonna give a complete list but The Bomb: Dockyard, Transport: Train, and The Diamond are 100% Rushable and have popular videos documenting how to do them . Most heists can be ecm rushed but in this guide you say most cant ¯\_(ツ)_/¯
Readraid Aug 6, 2021 @ 12:48pm 
oo
Nobody Jun 27, 2021 @ 10:12am 
As for the Dragon Heist, it seems like Overkill liked my idea of making a time-based vault code. (The first ever heist to have that was Cargoship Raid (custom heist) that Miamicenter, me and a few other friends made together.)
Pels Mar 19, 2021 @ 7:01pm 
I've been following this guide and it's been really great, but you need to update some of the videos, Four Stores now have Titan Cameras, there is no way around them since the guards are patrolling more.
Takku Jan 30, 2021 @ 7:54pm 
idk if it was changed since you wrote this, but Buluc's Mansion on DSOD has 17 guards, not 10.
gameplayer3050  [author] Nov 11, 2020 @ 10:31am 
Just for the writers, the new Heists seems to have a total of 21 bags.
gameplayer3050  [author] Aug 16, 2020 @ 7:25am 
And since I forgot to mention it, just another note for the San martin Bank Heist.
I would recommend always using the ladder on the right side to enter the bank and drilling open the gate on the ground floor. Firstly, doing the regular objective will open the bank totally which in turn will lead to one more guard roaming the area. If one takes the entrance on the left side, it is possible to have a guard patrolling outside and spotting the drill you might place on the door on the ground floor. This happened twice in a row to me, I can not say if I was just unlucky or if this happens most of the times but is an additional pager wasted.
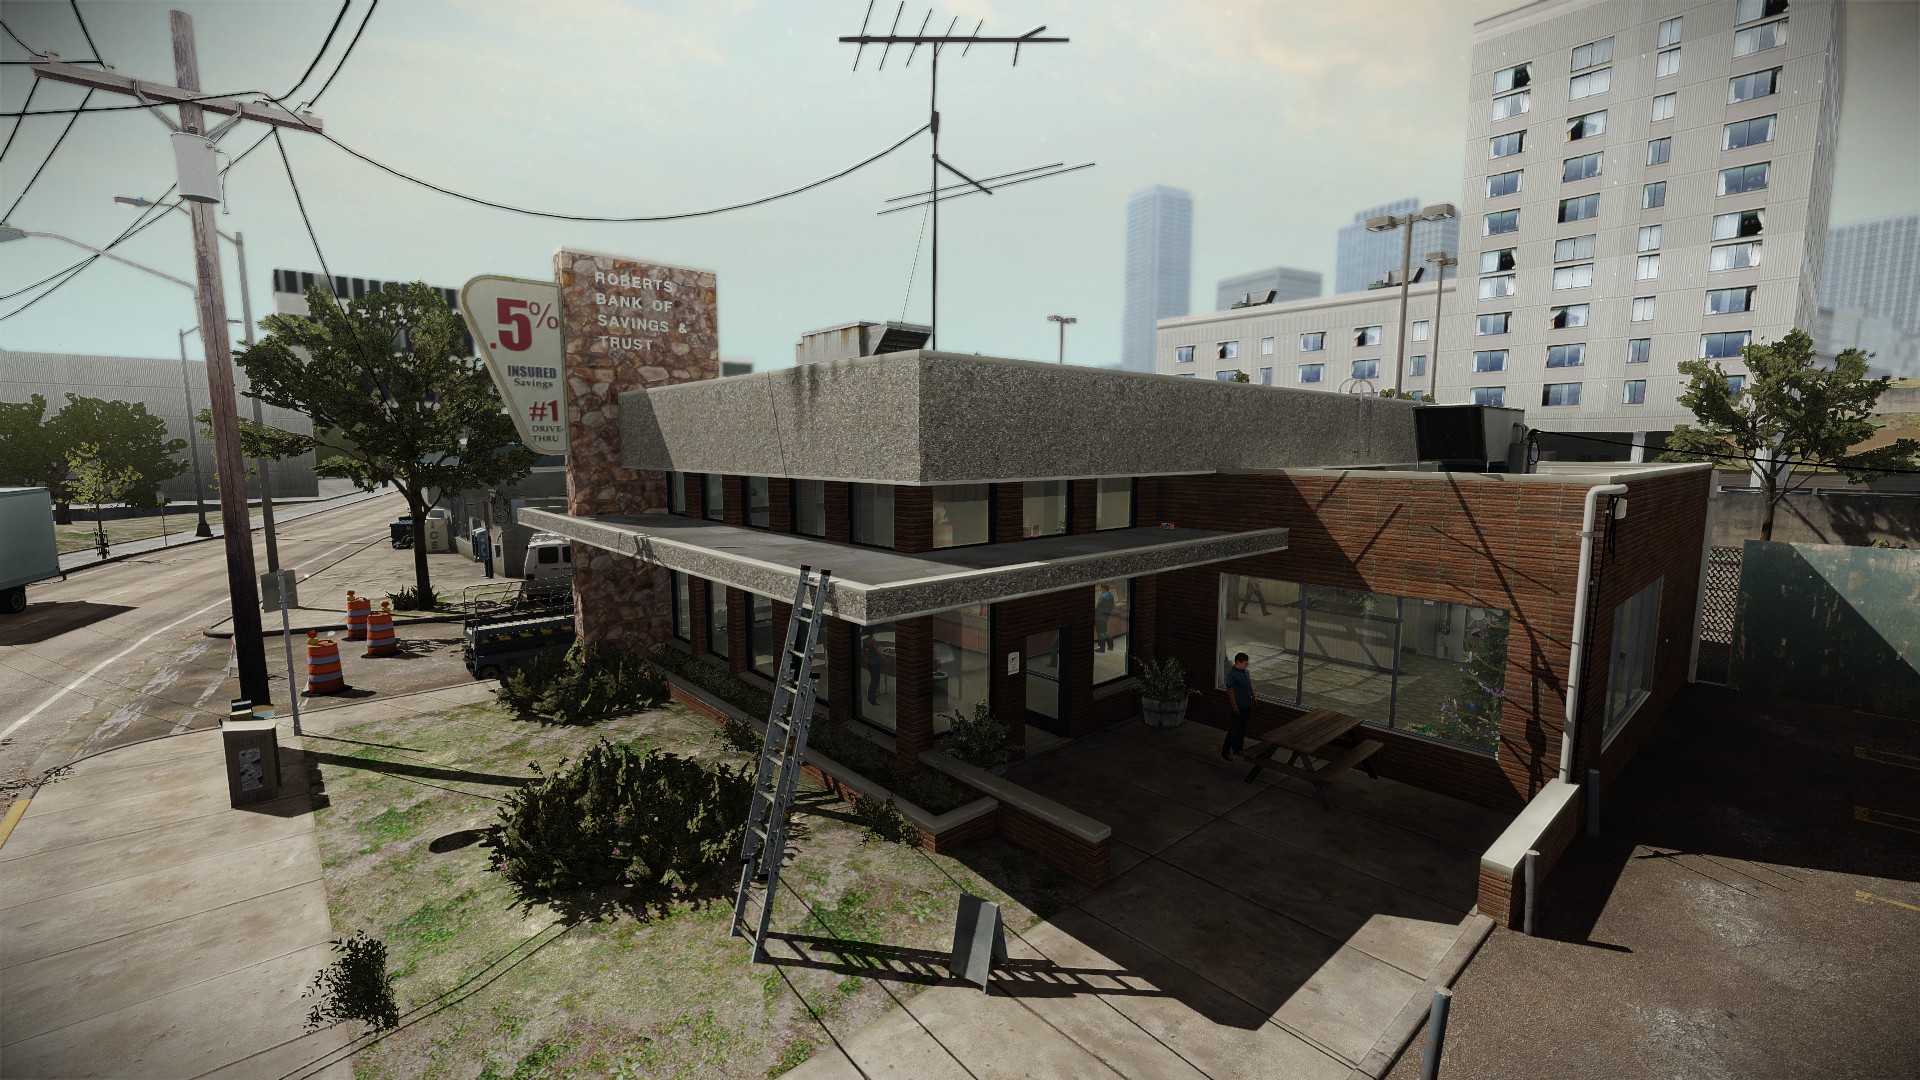
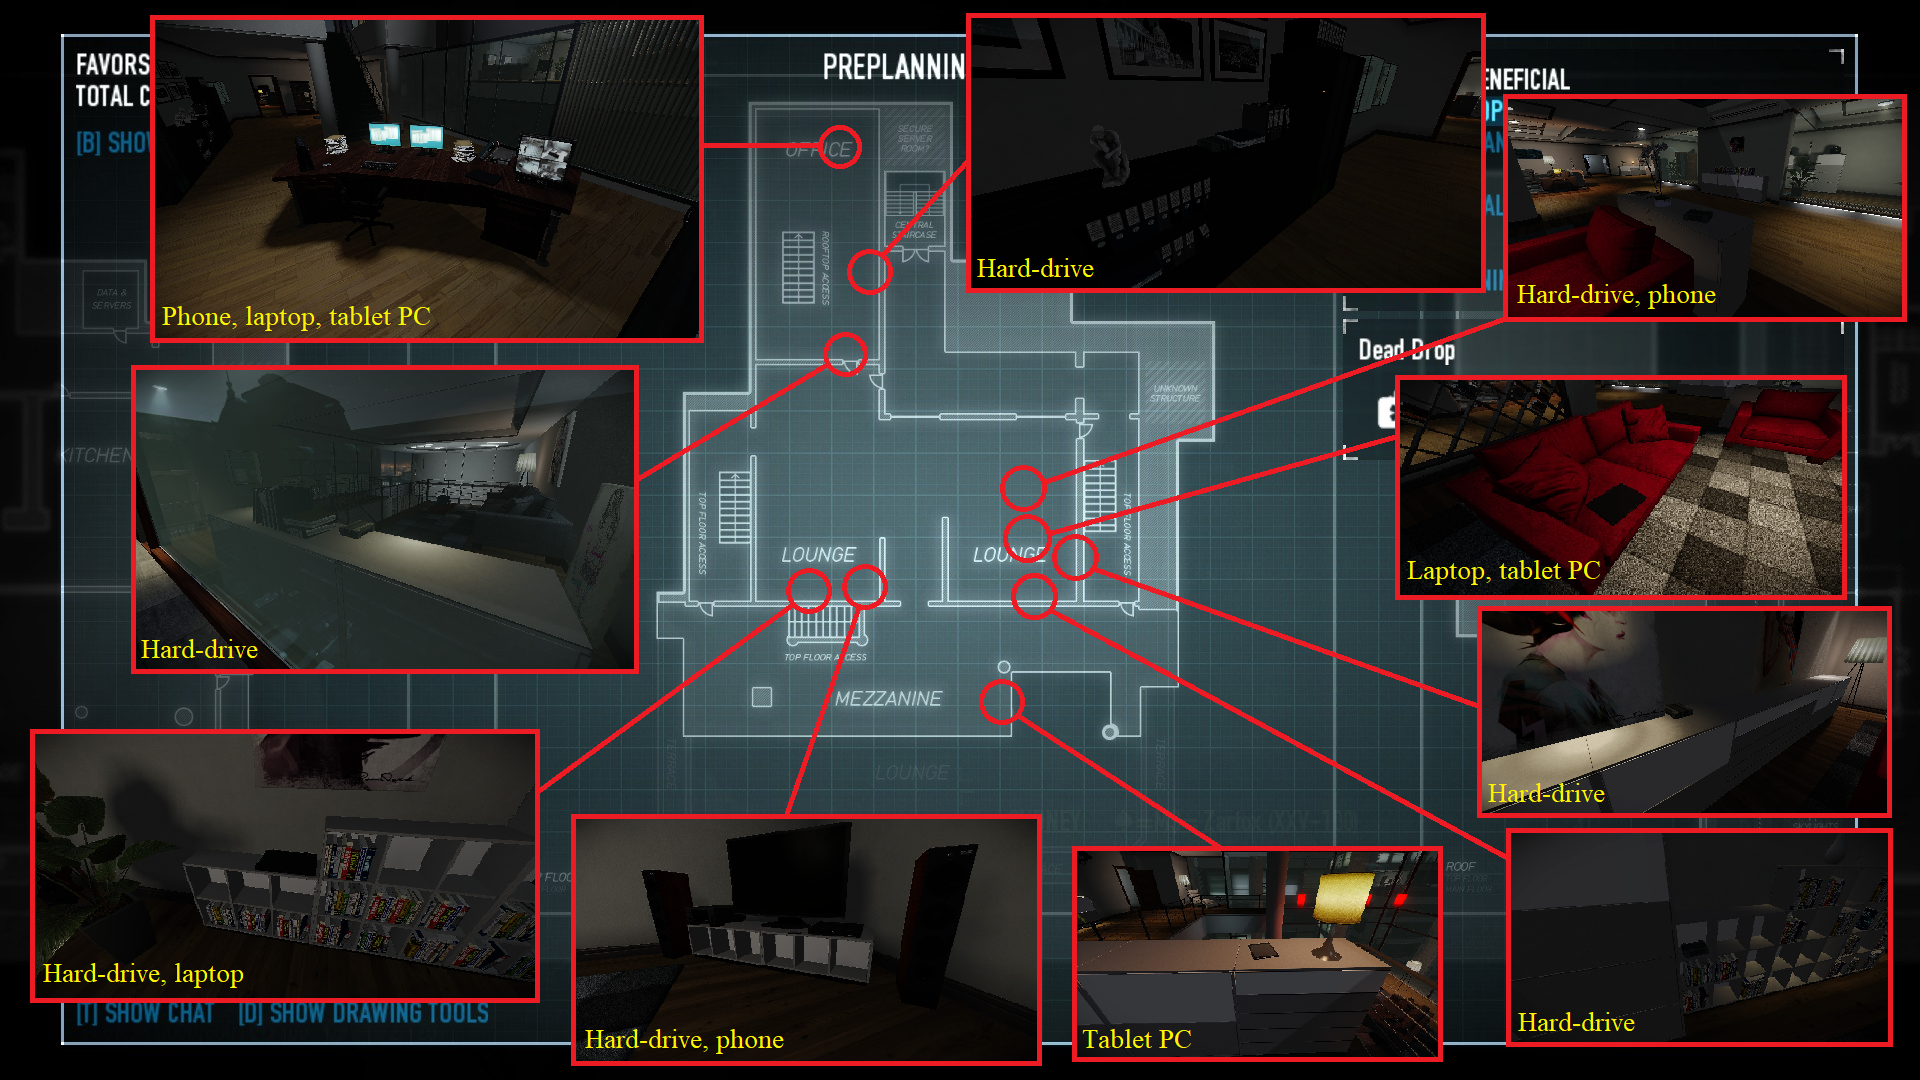
If one enters through the roof and gets inside the ground floor by drilling the metal door one can easily kill the two roamers + the cam guy, cable tie the civy and kill one final guard on the first floor. That leaves one roamer on the second floor, which makes sawing all the boxes open quite easy.
gameplayer3050  [author] Aug 16, 2020 @ 7:19am 
Just a suggestion for the Border Crossing Heist, it is something that I discovered by accident.
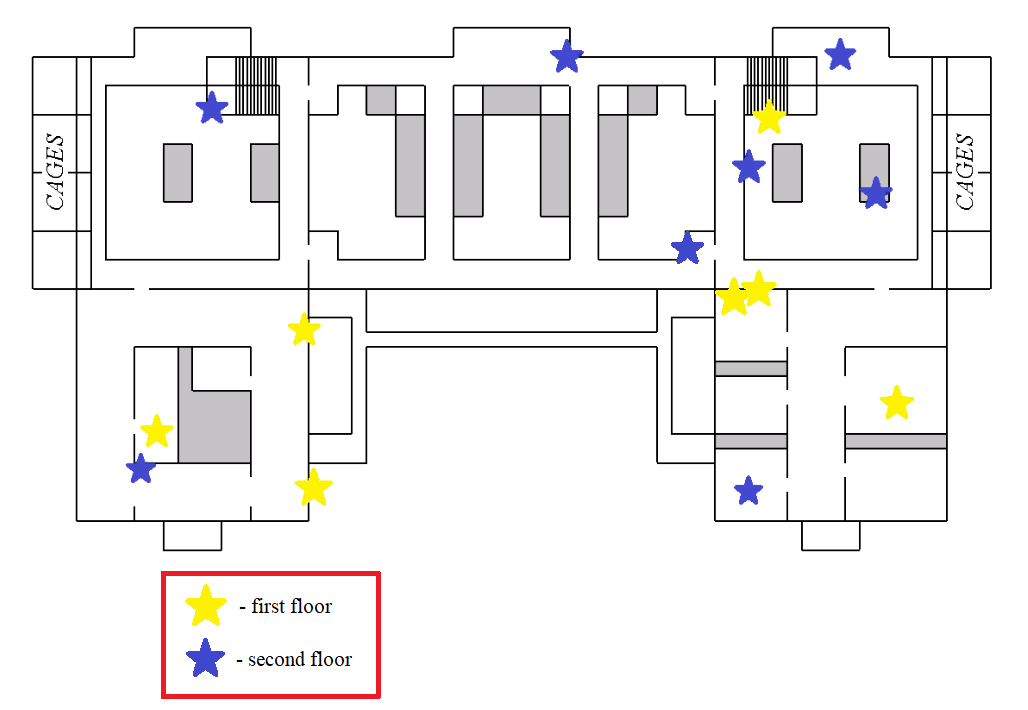
My usual tactic is to clear out the entire big warehouse. With four pagers out of the way, you can easily and without any problems secure everything there.
The small hangar is the trick here. There are several doors, and as far as I remember, one of them will always be open. If one goes to the back of the small hangar, you will see a garage door and a normal door. If the normal door is closed, as long as you pick the garage door and get inside the hangar once, the roaming guard inside the hangar will always eventually leave the small hangar and become stationary outside. The only draw back is that if the normal door I mentioned above is open then the guard will walk outside through the garage door and inside through the normal door again, therefore making a loop.
I do not know if other garage doors work as well but it is quite the easy strategy and makes this heist incredibly easy.
Bain's_GuideYT Aug 11, 2020 @ 5:43pm 
BRO gensec guards arent in GoBank only
if we talk about stealth maybe they so,
BUT in general they are in
Transport heists
Slaughterhouse