
382 ratings

Getting Started: Dota 2 Content in Source Filmmaker [SFM] - [Source 1]
By Wyk
This guide is now obsolete and not needed.
SFM is now directly available inside the Dota 2 Workshop Tools with native support to all things related to Dota 2.
1. Download & Install Dota 2 Workshop Tools from Steam.
2. Open the Tools.
3. Launch SFM from the toolbar at the top. All Dota 2 content will be readily available for use.
----
This is a detailed picture guide on how to get Dota 2 content working in Source Filmmaker.
NOTE: This is an updated version of the guide that was previously available on my blog. I have discontinued using that site and will continue to update this guide here from now on.
**Last Updated:** September 14, 2014

Favorite
Favorited
Unfavorite


| 25,765 | Unique Visitors |
| 292 | Current Favorites |
Guide Index

Overview
Introduction
What do I need?
Setting up SFM for Dota 2
Installing Dota 2 Resources
Fixing Dota 2 Material Files
Launching Source Filmmaker
Loading in the Heroes and Units
Some Handy Tools & Tutorials
Closing Notes
Comments
Introduction

This is a detailed picture guide that will help you setup Dota 2 content in Source Filmmaker for all your movie works.
The guide here is an updated version of the one previously hosted on my blog which you might be familiar with. I have discontinued using the blog and all updates to this guide in the future will be done here.
Last Updated: September 14, 2014
What do I need?
To get Dota 2 content working inside SFM, you will need a few tools and programs. They are all listed below.
1. Source Filmamker: You can get it on Steam for free.
2. Dota 2: You can get it on Steam for free.
3. GCFScape: You can find the latest version here[nemesis.thewavelength.net].
4. Notepad++: You can find the latest version here[notepad-plus-plus.org].
5. Dota 2 Map: You can get it here[www.dropbox.com] - Credits: Swordzzzz: Link
Downloaded them all? Okay. Let's get started.
Setting up SFM for Dota 2
By default SFM currently does not ship or scan for any Dota 2 content. So we will need to manually add them all to the program. It's quite simple to do. Follow the steps mentioned below.
1. Launch Source Filmmaker SDK. To do this, right click the SFM app in the Library and click 'Launch SDK'.
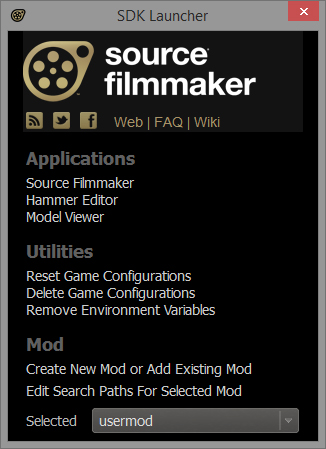
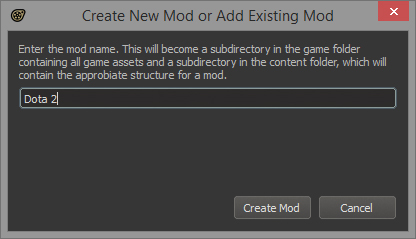
2. On this screen press "Create New Mod or Add Existing Mod". When the new dialog box opens up, type in 'Dota 2' and press enter.
3. On the nex dialog box, press "Open Game Directory in Explorer" to open to the folder where the mod has been created in your SFM directory.
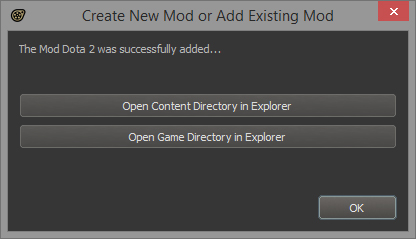
Once the folder opens up, open the 'gameinfo.txt' file that you can see there.
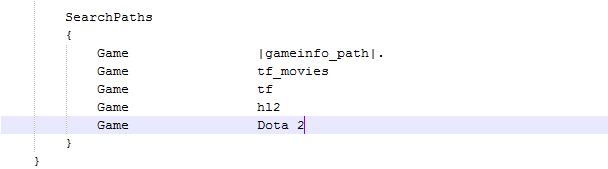
4. In the gameinfo.txt folder, you need to setup the paths so SFM can know where to look for the Dota 2 resources. We'll get to adding the resources shortly.
To setup the paths, add a new entry under search paths for Dota 2. Check the image below for reference.
5. After you've done that, go back to SFM and press OK. You will be presented with a new dialog box that asks you to override SFM's mod selection with what you just created. Press OK.
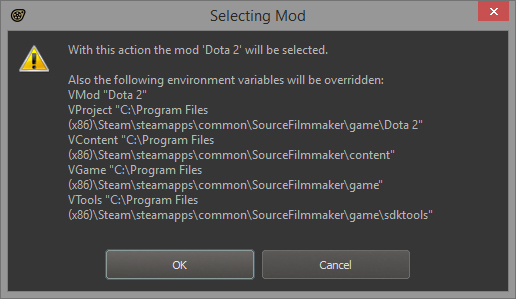
This will take you back to the SDK screen and to know that you've done everything right, just look at the bottom where the Selected section should be the new Dota 2 mod you just created.

6. Congrats. You've now setup your SFM to run a check for Dota 2 content. Now to move on to installing the resources.
1. Launch Source Filmmaker SDK. To do this, right click the SFM app in the Library and click 'Launch SDK'.
2. On this screen press "Create New Mod or Add Existing Mod". When the new dialog box opens up, type in 'Dota 2' and press enter.
3. On the nex dialog box, press "Open Game Directory in Explorer" to open to the folder where the mod has been created in your SFM directory.
Once the folder opens up, open the 'gameinfo.txt' file that you can see there.
4. In the gameinfo.txt folder, you need to setup the paths so SFM can know where to look for the Dota 2 resources. We'll get to adding the resources shortly.
To setup the paths, add a new entry under search paths for Dota 2. Check the image below for reference.
5. After you've done that, go back to SFM and press OK. You will be presented with a new dialog box that asks you to override SFM's mod selection with what you just created. Press OK.
This will take you back to the SDK screen and to know that you've done everything right, just look at the bottom where the Selected section should be the new Dota 2 mod you just created.
6. Congrats. You've now setup your SFM to run a check for Dota 2 content. Now to move on to installing the resources.
Installing Dota 2 Resources
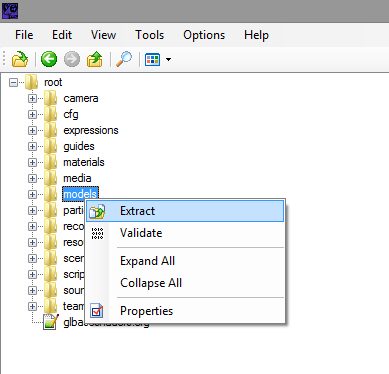
Now that we have SFM setup to look for Dota 2 content, it is time to add that very content to the folder where SFM is going to look for it. You can get your resources from the Dota 2 game installation using GCFScape that you downloaded earlier.
1. Open GCFScape. Go to File > Open and select the "pak01_dir.vpk" file that you can find in the ".../Steam/SteamApps/common/dota 2 beta/dota/" folder.

2. What you see now are all the resources that make Dota 2 run. We will need the 'models', 'materials', 'particles' and 'sounds' from these to get stuff running in SFM.
Right click on these folders and extract them to the Dota 2 folder that has been created in the SFM installation folder for you. Location of this folder should be ".../Steam/SteamApps/common/SourceFilmmaker/game/Dota 2/".
Once you finish extracting these, open the "sound_vo_english_dir.vpk" file in your Dota 2 folder and extract the sounds in the same way and to the same folder as above.
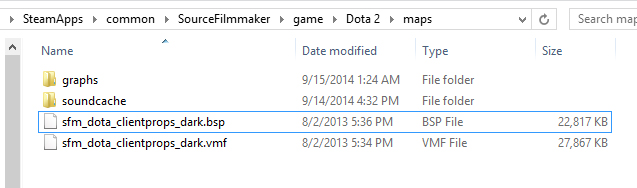
3. Now extract the map you downloaded earlier and copy the 'sfm_dota_clientprops_dark.bsp' and 'sfm_dota_clientprops_dark.vmf' to the "maps" folder in ".../Steam/SteamApps/common/SourceFilmmaker/game/Dota 2/".
Your maps folder should look something like this.
3. Done? Good. You now have your resources in place.
1. Open GCFScape. Go to File > Open and select the "pak01_dir.vpk" file that you can find in the ".../Steam/SteamApps/common/dota 2 beta/dota/" folder.
2. What you see now are all the resources that make Dota 2 run. We will need the 'models', 'materials', 'particles' and 'sounds' from these to get stuff running in SFM.
Right click on these folders and extract them to the Dota 2 folder that has been created in the SFM installation folder for you. Location of this folder should be ".../Steam/SteamApps/common/SourceFilmmaker/game/Dota 2/".
Once you finish extracting these, open the "sound_vo_english_dir.vpk" file in your Dota 2 folder and extract the sounds in the same way and to the same folder as above.
3. Now extract the map you downloaded earlier and copy the 'sfm_dota_clientprops_dark.bsp' and 'sfm_dota_clientprops_dark.vmf' to the "maps" folder in ".../Steam/SteamApps/common/SourceFilmmaker/game/Dota 2/".
Your maps folder should look something like this.
3. Done? Good. You now have your resources in place.
Fixing Dota 2 Material Files
The Dota 2 material files are not fully compatible with SFM as they use a different shader and light templates compared to what SFM supports and hence the models will have some issues if you load them up in the program as they are. This needs to be tweaked and all you need is Notepad++ for it.
Note: With Swordzz new edited map, you are no longer needed to tweak the models but the lighting still needs to be addressed.
1. Open up Notepad++ and go to Search in the top bar and 'Find in Files'. This option allows you to find a certain word in various files and replace it with what you want in one go. This is exactly what we need.
2. We need to change the GlobalLitSimple light templates used by the Dota 2 materials to VertexLitGeneric that is fully supported on SFM. So enter the following content as is it in to the dialog box you see.
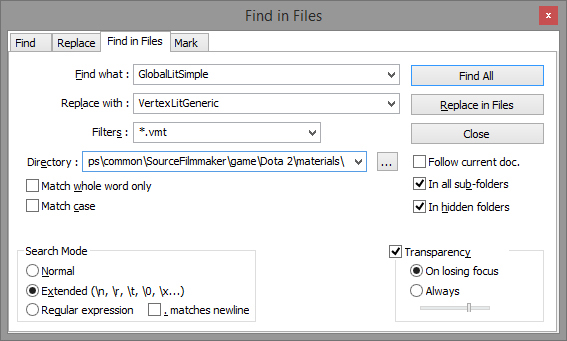
The location of the directory should be set to the 'materials' folder that you extracted earlier to the Dota 2 folder in the SFM directory.
Now press "Replace in Files" and press OK on the confirmation tab. The program will start searching. Give it sometime. When it completes, you will be prompted with a message that tells you how many occurences have been changed. This number varies from person to person. So don't worry if it does not match mine.
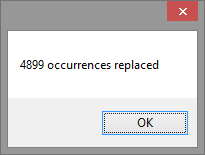
Press OK.
3. OPTIONAL: I will call this step as an optional one. There is no need for you to do this if invisible models in the Model Viewer (will work fine in-game) do not bother you. It's quite a complex fix with each file with an alpha setting interacting with the map in a different way. So skip it up and go to the next step if you want to.
If it does bother you, then here we go. The models will load up just fine in SFM but they will be invisible in the Model Viewer. This could be a tiny irritation that we could get rid of.
For those interested, the reason this happens is because of the $alphatest stipulation that the Dota 2 material files have which interacts incorrectly with the Model Viewer in SFM causing the entire texture surface to became transparent. So we just need to disable this particular entry in all the texture files.
We could have replaced it just like we did previously with the shader but there is a tiny issue. There is a naming inconsistency in the material files where sometimes this stipulation is tagged $alphatest and sometimes as "$alphatest" (with quotes) which makes it not viable to directly change them.
So we first change the "$alphatest" entries to $alphatest and then disable them all at once.
To do this, open up the Find In Files in Notepad++ and enter the following and press OK.
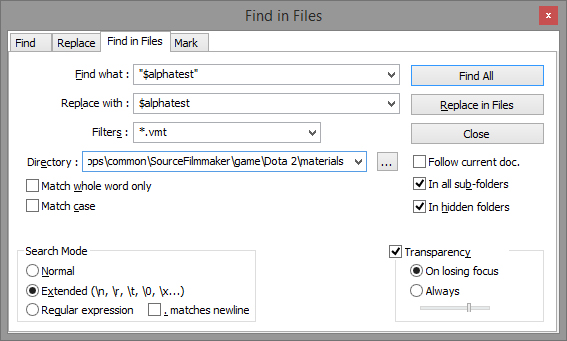
Once these occurences have been changed. Now we'll just disable the stipulation by adding two forward slashes in the front.
NOTE: We only want to disable alpha's for those that we are going to preview in the model viewer - mainly heroes, items, couriers, creeps and etc. We do not want them effecting map elements because then it would make the map ugly. So just manually change the values in those folders by changing directory every time.
Open up the Find in Files tab once again and enter the following and press OK.

The few folders that you want to tweak are - heroes, items, couriers and creeps. Do NOT disable alpha's in the rest.
4. That's it. We're done setting up. Time to jump in to the program and see if we set up everything correctly.
Note: With Swordzz new edited map, you are no longer needed to tweak the models but the lighting still needs to be addressed.
1. Open up Notepad++ and go to Search in the top bar and 'Find in Files'. This option allows you to find a certain word in various files and replace it with what you want in one go. This is exactly what we need.
2. We need to change the GlobalLitSimple light templates used by the Dota 2 materials to VertexLitGeneric that is fully supported on SFM. So enter the following content as is it in to the dialog box you see.
The location of the directory should be set to the 'materials' folder that you extracted earlier to the Dota 2 folder in the SFM directory.
Now press "Replace in Files" and press OK on the confirmation tab. The program will start searching. Give it sometime. When it completes, you will be prompted with a message that tells you how many occurences have been changed. This number varies from person to person. So don't worry if it does not match mine.
Press OK.
3. OPTIONAL: I will call this step as an optional one. There is no need for you to do this if invisible models in the Model Viewer (will work fine in-game) do not bother you. It's quite a complex fix with each file with an alpha setting interacting with the map in a different way. So skip it up and go to the next step if you want to.
If it does bother you, then here we go. The models will load up just fine in SFM but they will be invisible in the Model Viewer. This could be a tiny irritation that we could get rid of.
For those interested, the reason this happens is because of the $alphatest stipulation that the Dota 2 material files have which interacts incorrectly with the Model Viewer in SFM causing the entire texture surface to became transparent. So we just need to disable this particular entry in all the texture files.
We could have replaced it just like we did previously with the shader but there is a tiny issue. There is a naming inconsistency in the material files where sometimes this stipulation is tagged $alphatest and sometimes as "$alphatest" (with quotes) which makes it not viable to directly change them.
So we first change the "$alphatest" entries to $alphatest and then disable them all at once.
To do this, open up the Find In Files in Notepad++ and enter the following and press OK.
Once these occurences have been changed. Now we'll just disable the stipulation by adding two forward slashes in the front.
NOTE: We only want to disable alpha's for those that we are going to preview in the model viewer - mainly heroes, items, couriers, creeps and etc. We do not want them effecting map elements because then it would make the map ugly. So just manually change the values in those folders by changing directory every time.
Open up the Find in Files tab once again and enter the following and press OK.
The few folders that you want to tweak are - heroes, items, couriers and creeps. Do NOT disable alpha's in the rest.
4. That's it. We're done setting up. Time to jump in to the program and see if we set up everything correctly.
Launching Source Filmmaker
We're all set to go. Time to go to the Library and launch Source Filmmaker. Opened it up? Time to test.
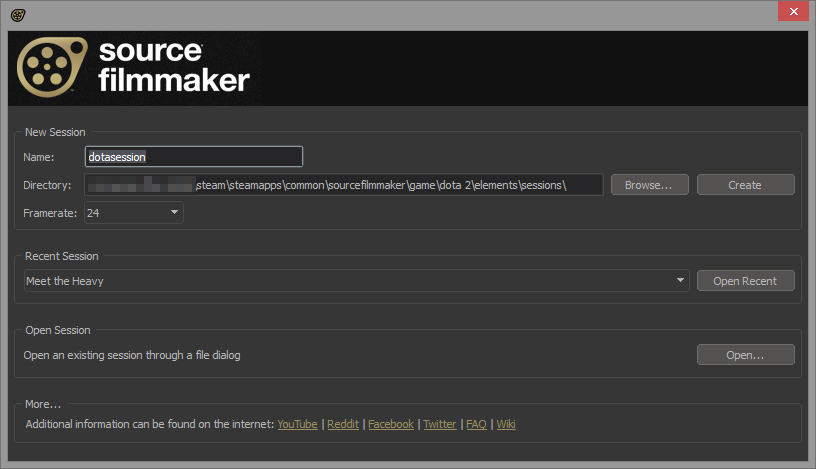
1. When you boot up Source Filmmaker, you are presented with a screen to start a new session. Enter any name for your session and press "Create". I entered the name dotasession.
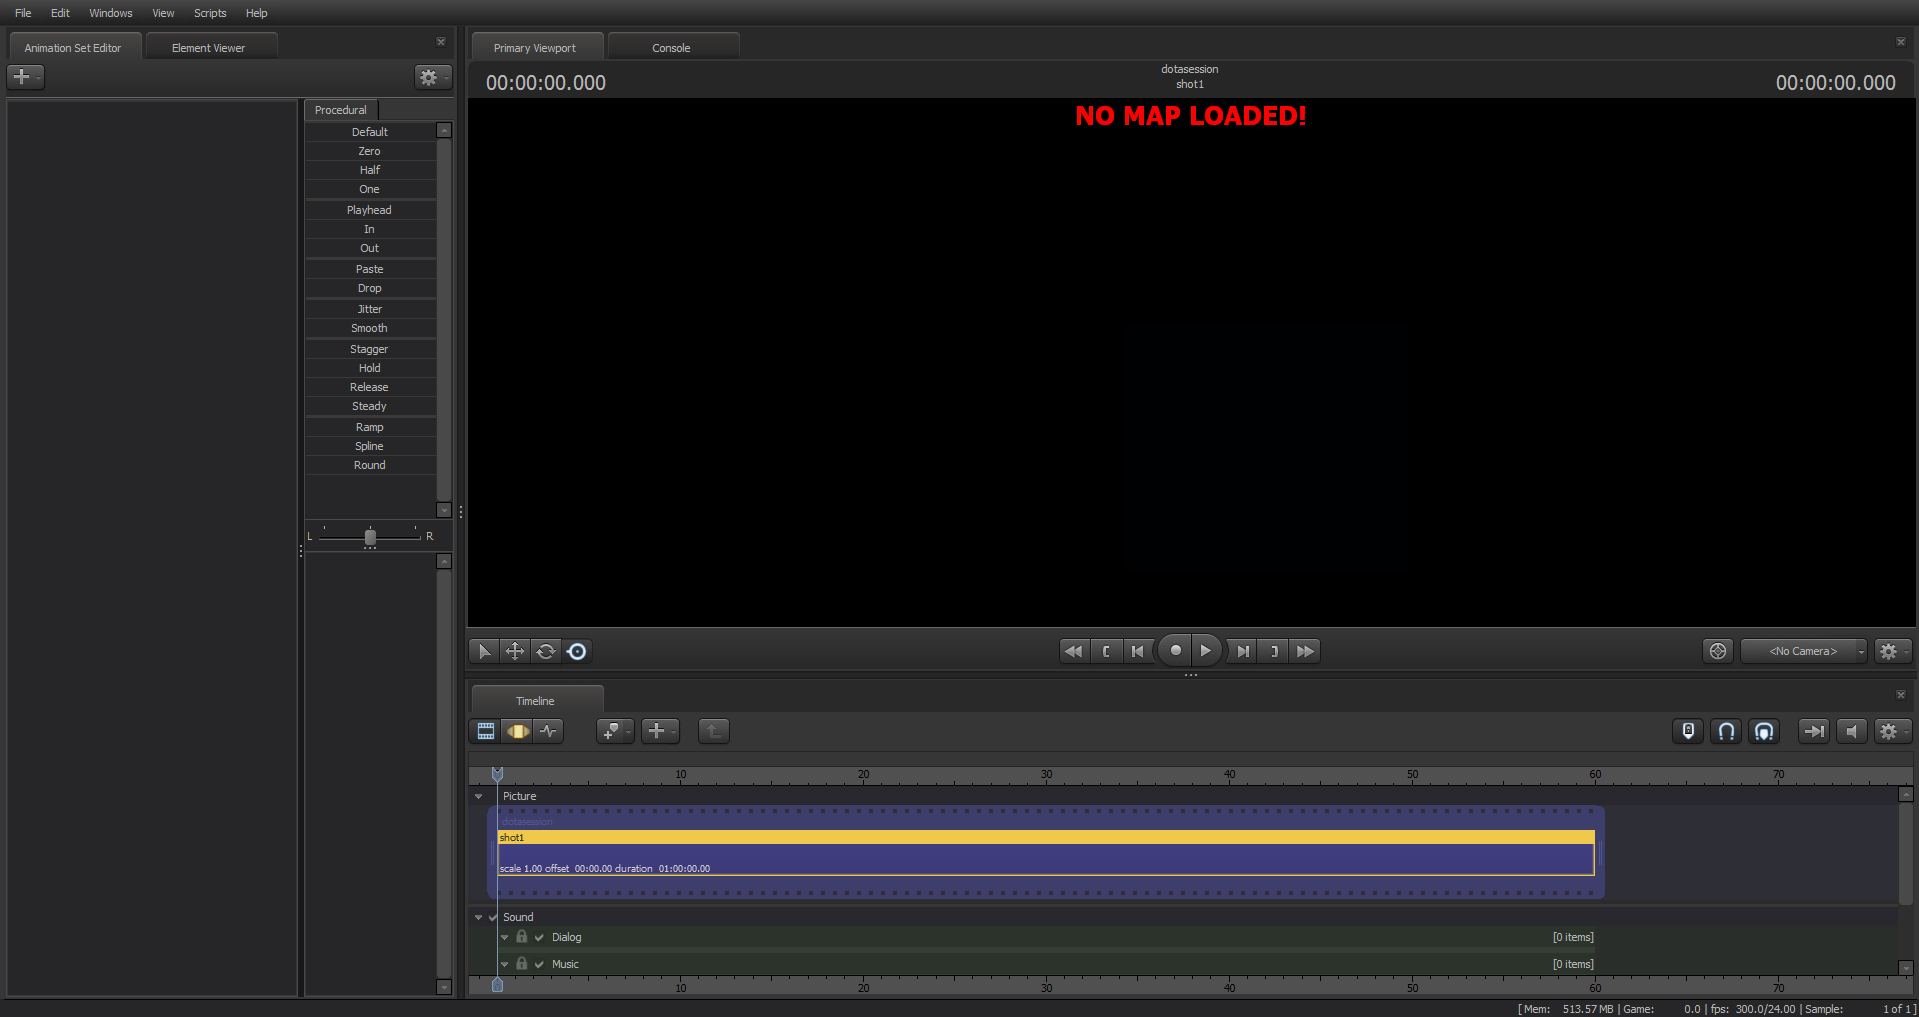
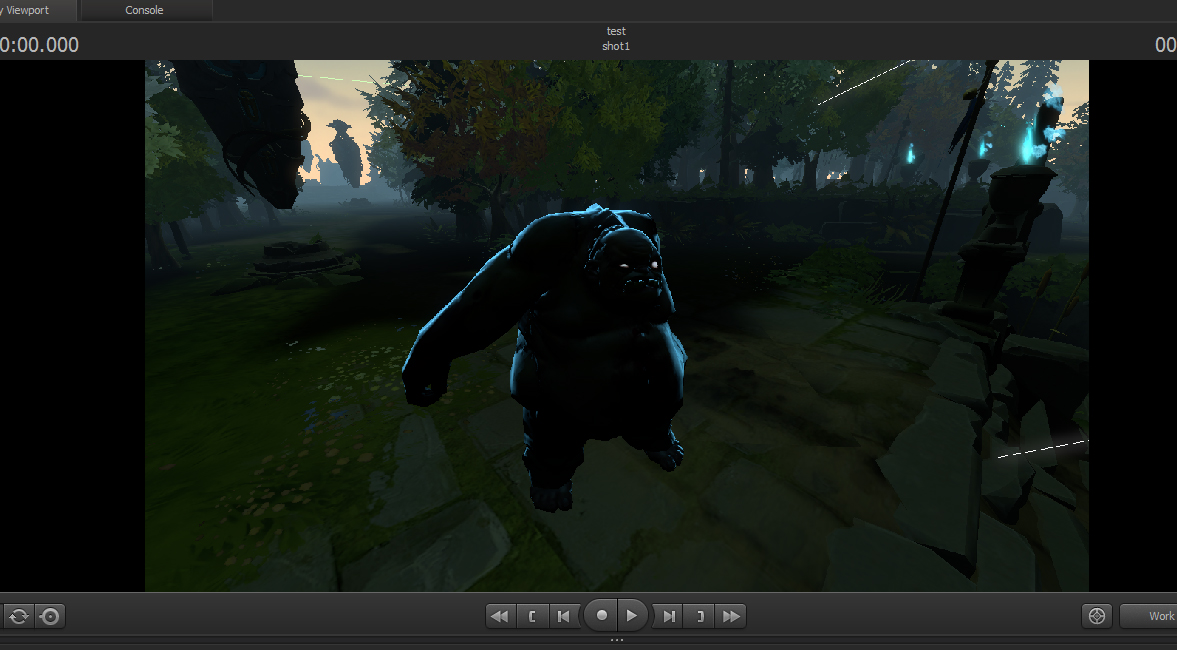
2. You now load in to Source Filmmaker. You should see something like this.
Now time to load the map. Right click on the blank space and press "Load Map".
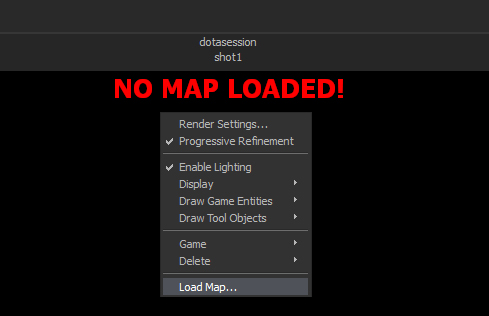
In the load map dialog box, open the zdrop down and choose 'dota 2' and select the 'sfm_dota_clientprops_dark.bsp" and load it in.
Note: If you do not see any maps, just press Rescan and it'll show up if you did everything correctly.
Viola! The map is loaded. Congrats!
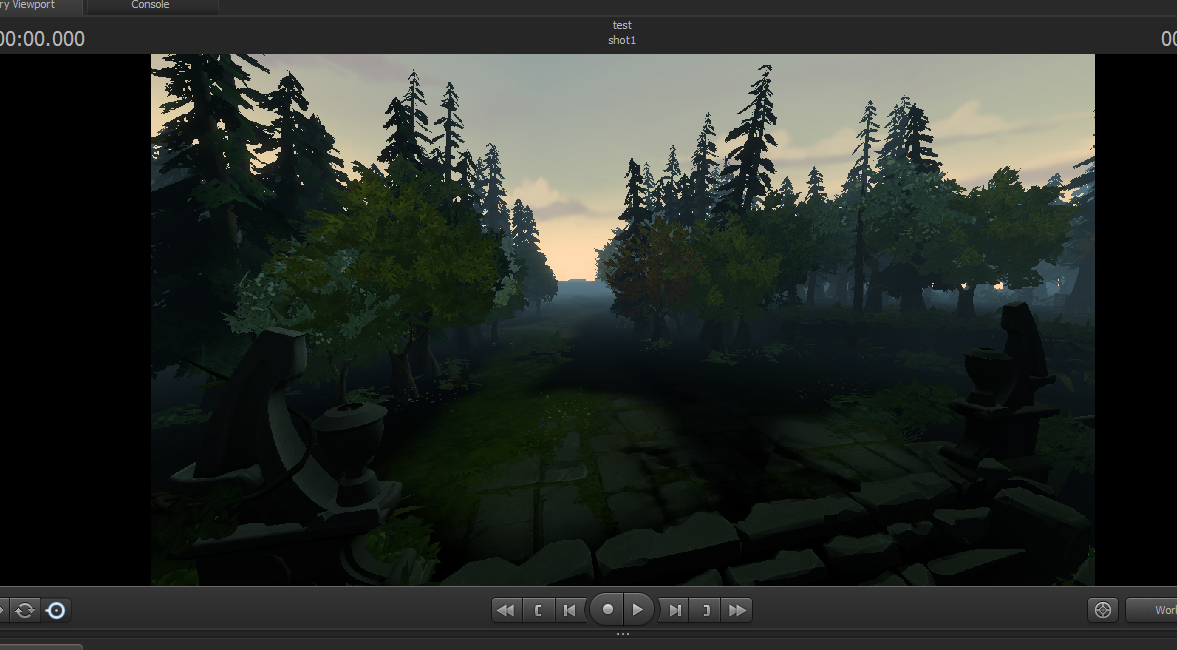
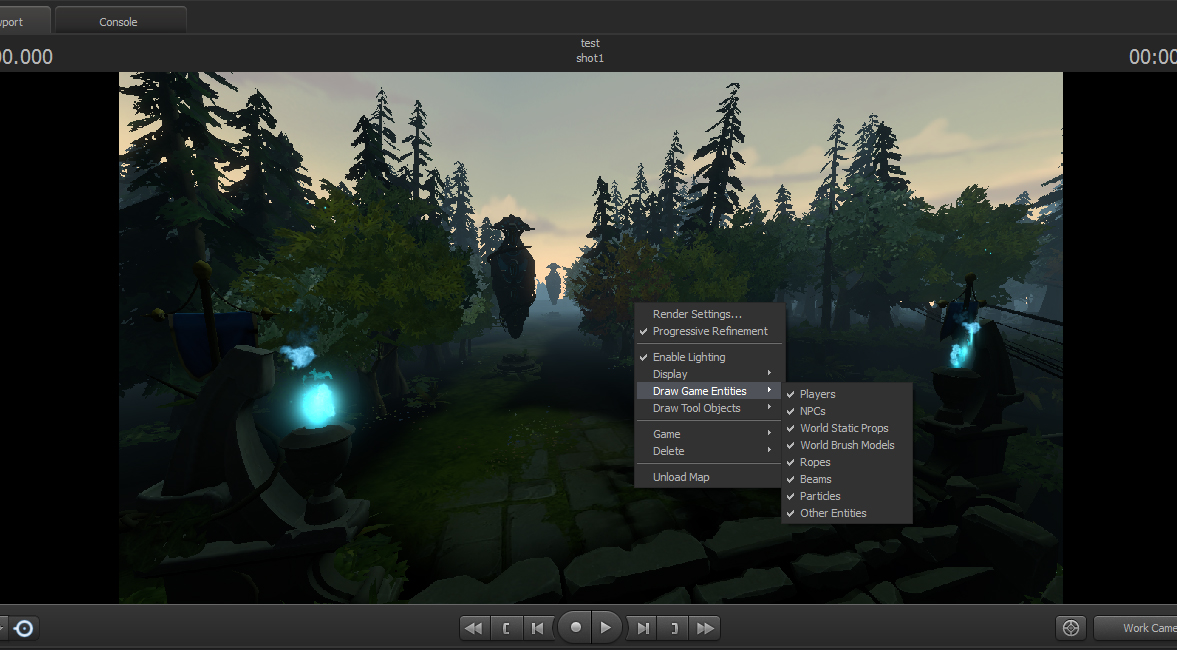
3. Right click on the map now and activate some entities that are turned off by default. Once you do this, towers, critters, particle effects and more get loaded in.
That's it. Now that we have the map in, time to port in some heroes and see if everything works on that end too.
1. When you boot up Source Filmmaker, you are presented with a screen to start a new session. Enter any name for your session and press "Create". I entered the name dotasession.
2. You now load in to Source Filmmaker. You should see something like this.
Now time to load the map. Right click on the blank space and press "Load Map".
In the load map dialog box, open the zdrop down and choose 'dota 2' and select the 'sfm_dota_clientprops_dark.bsp" and load it in.
Note: If you do not see any maps, just press Rescan and it'll show up if you did everything correctly.
Viola! The map is loaded. Congrats!
3. Right click on the map now and activate some entities that are turned off by default. Once you do this, towers, critters, particle effects and more get loaded in.
That's it. Now that we have the map in, time to port in some heroes and see if everything works on that end too.
Loading in the Heroes and Units
Now that we have the map loaded in, time to port in some of the heroes and check if it is all working fine. This is quite simple too.
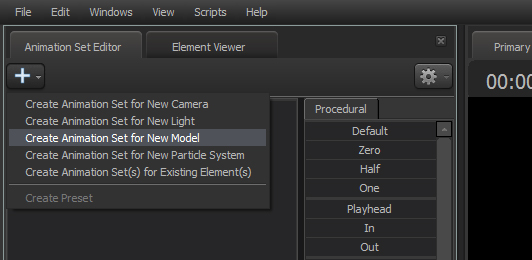
1. In the Animation Set Editor in the left hand side, press "Create Animation Set for New Model" to load up the Model Viewer.
In the model viewer, drop down and select 'dota 2' to display the content we added. Scroll through and select model you want to load in. If nothing shows up, just press Rescan and it will. You can press Rescan any time you add new content too without having to reboot the client.
**Note**: Do note the models in the viewer might be invisible if you did not manually fix them in the earlier step but nothing to worry. Just boot them in. They'll work fine in SFM.
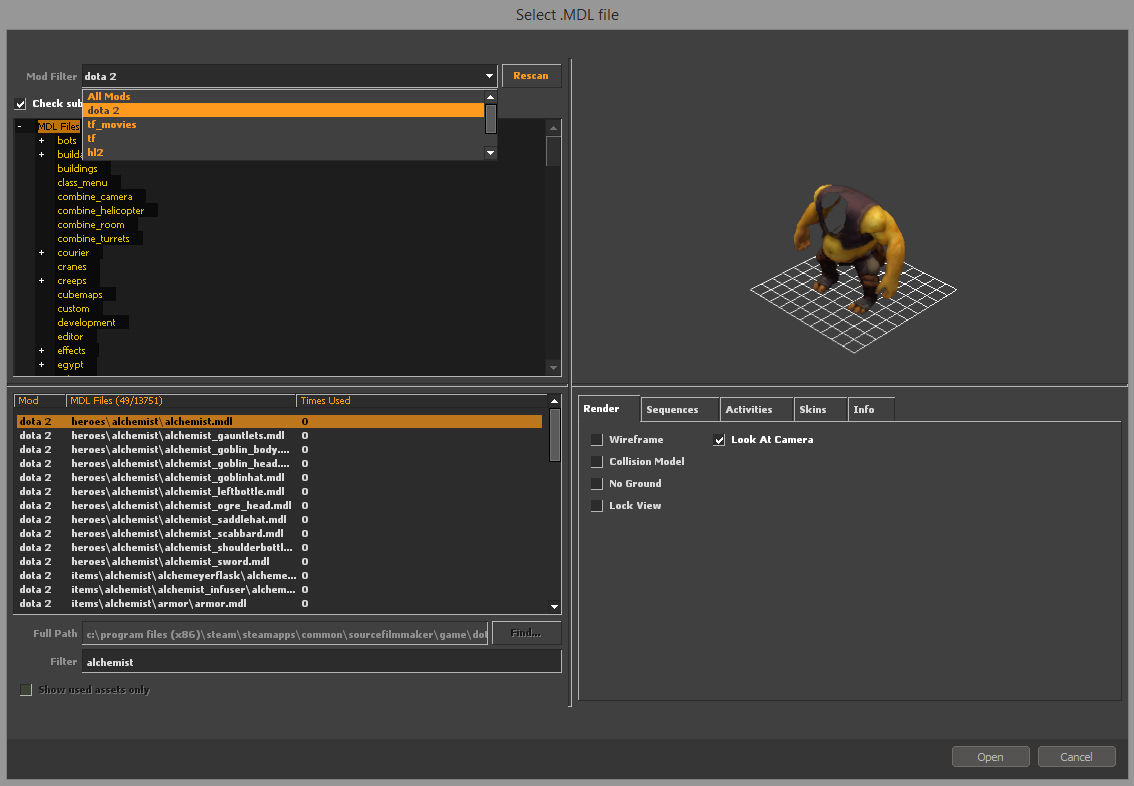
For my example, I'll boot up Pudge.
2. Pudge is split in to multiple parts that make up his cosmetics. So when I load in the Pudge model, it will only load in the base.
Don't worry about the darkness. It's just because there are no lights. And the stiffness is because he loads by default in to BindPose. We'll give him some animations soon. First, let us load up his cosmetics slots.
Pudge has 7 different cosmetic slots - back, belt, bracer, hair, leftarm, leftweapon and righthook. Load them all up like you did with the base model.
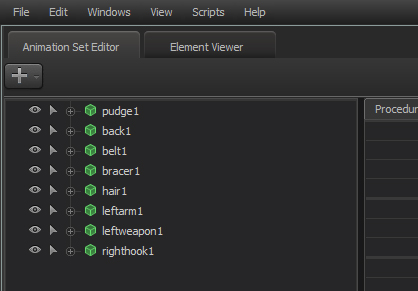
Once these parts are loaded, we need to parent it to the Pudge base model that we loaded first. Quite simple. Just drag and pudge1 on to the rest of them. They'll get locked to the base model. It should look like this when you're done.
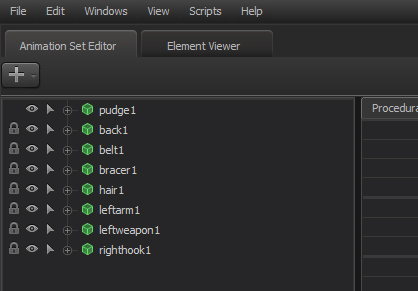
Now hold Shift + Click on all the parts (except main base model) to select all the parts. Once you have them selected, press 'Tab' to access the Motion Editor. If you did it right, the timeline would have turned green.
Now under the Procedural column, click on Zero and drag it all the way to the right. Once done, press Tab again to exit the Motion Editor.
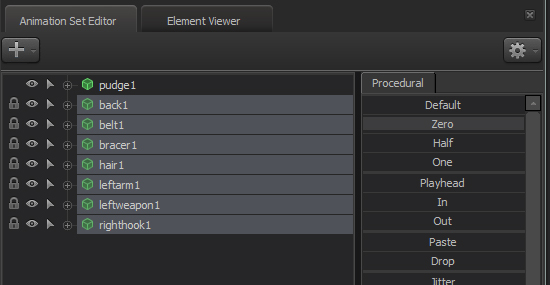
As you do this, you will notice in the viewport that the parts now get attached and placed on to Pudge correctly. You should see something like this.
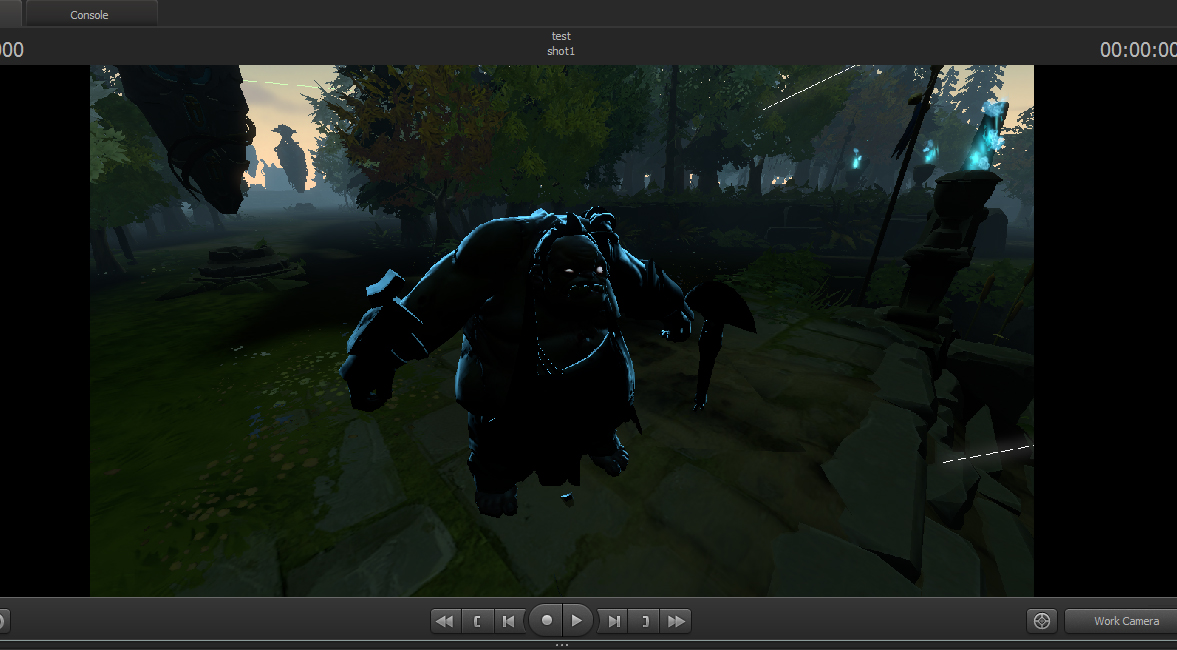
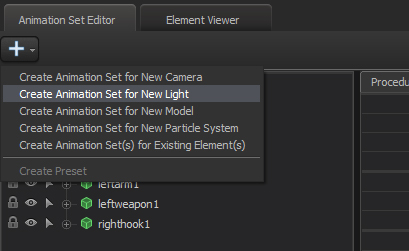
3. Now with Pudge loaded in, let's light him up. That we do using a Light. Like you loaded a model in, load up a light instead by clicking on "Create Animation Set for New Light".
Once you load it in, you can see Pudge lit up in the Viewport.
You can adjust the placement of the light by selecting it in the Animation Set Editor, then pressing Tab to open up the Motion Editor, and then use the Transform Tools available there to move the light.
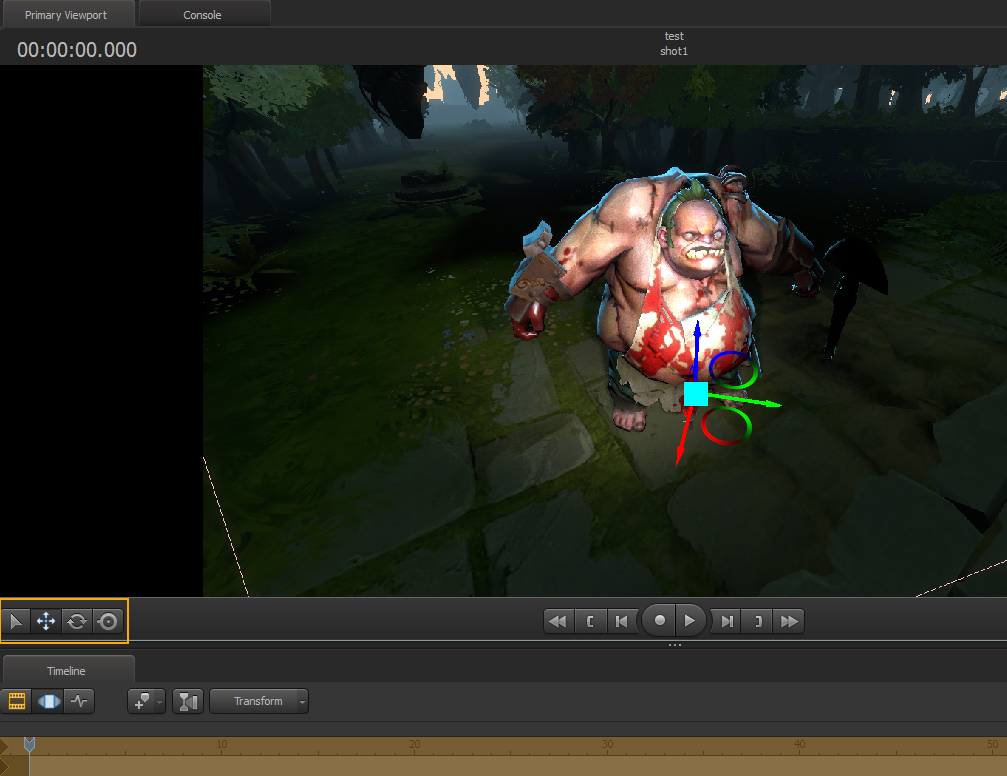
Once you're done you can Tab back to exit Motion Editor and save the changes.
You can also tweak the properties of the Light such as the Intensity, Color and loads more in the Animation Set editor. Feel free to experiment.
4. Now that we have Pudge loaded in, let's give him the relief from the stressful posture and give him one of his preloaded animations.
You can do this by selecting the base model in the Animation Set Editor, Right Click > Import > Sequence.
From the Sequence tab, you can go through and select a bunch of animations available for him. Let's pick pudge_idle_alt for this example.
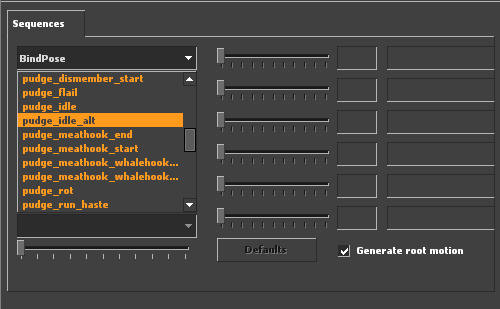
Once you open it up, the animation will get added to the Pudge model and you can see that it will loop continuously on him in the Viewport.
Congrats, you got models loaded in. Go wild!
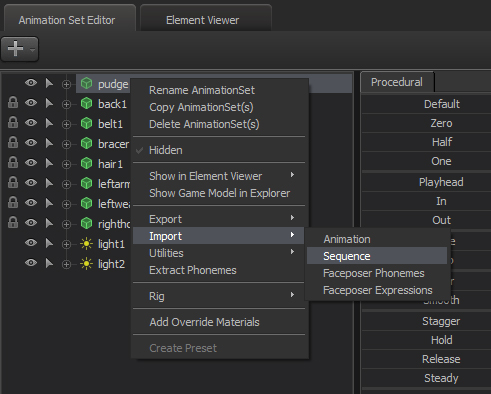
5. One more thing you might want to know is how to attach Particle Effects. Pretty much the same way you just attached the cosmetic slots to the base Pudge model.
Go to the Animation Set Editor and press "Create New Animation Set for Particle System".
This will open up a dialog box where you can set your Particle Properties. Find a PCF (particle file)
- in this case, I'll pick the hero_pudge.pcf - file that I copied earlier and load it up. There are a bunch of particle systems in this file so I'll load one up. Let's go for the dirty 'pudge_rot'.
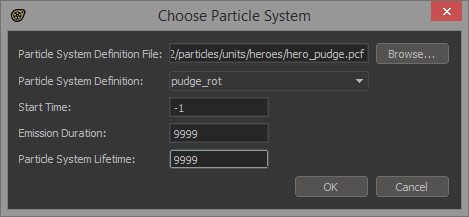
As for the rest of the properties -
- Start Time: Basically how many seconds you want it to wait before it fires up.
- Emission Duration: How many seconds do you want the particles to be emitted.
- Particle System Lifetime: How many seconds do you want the entire particle system to live before it dies out.
Quite self explanatory really. As for this example, I want the flies to load in right from the get go. So I'll set Start time to -1 because I don't like 0, Emission Duration to 9999 because it is a big number and it won't die out soon and the same for Particle System Lifetime.
When you load it in, you should see the Pudge Rot particle effects.
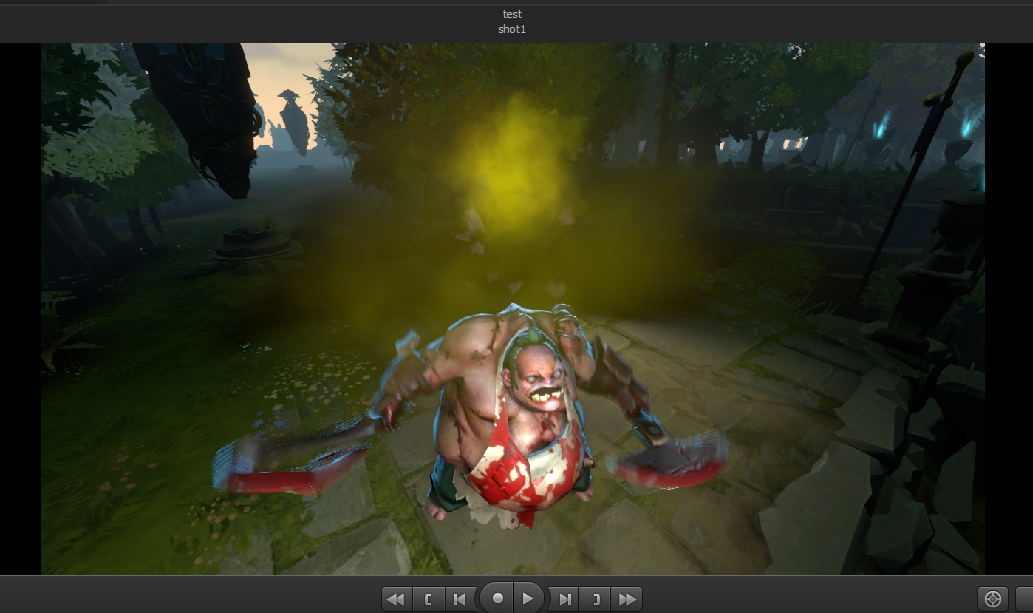
This rot effect is at that location where it is. You will need to parent Pudge base model to the particle effect like you did the cosmetic slots if you want it to follow Pudge around. You do it in the same way.
We want to attach the Pudge Rot particle transformation to the root of Pudge's body. So I open up the pudge1 base model and go to the Body sub category and find the root bone. Then I drag it and drop it on the box next to the transform option in pudge_rot1.
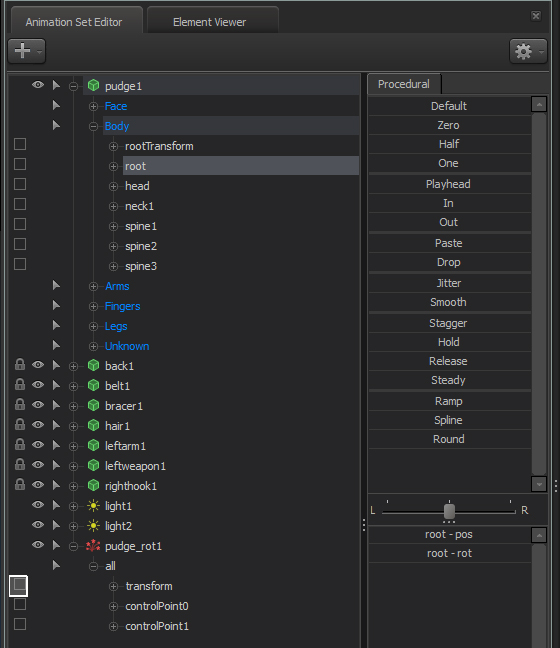
Job done! The particle is now parented to pudge and will move around with him at the center of his body at the root bone.
That is it for Dota 2 content in SFM. Now if you know SFM already, start off with making some good stuff. If you don't, learn the program and let your creativity flow. The possibilities are endless. I'll link you to some handy third party tools and tutorials for SFM in the next section.
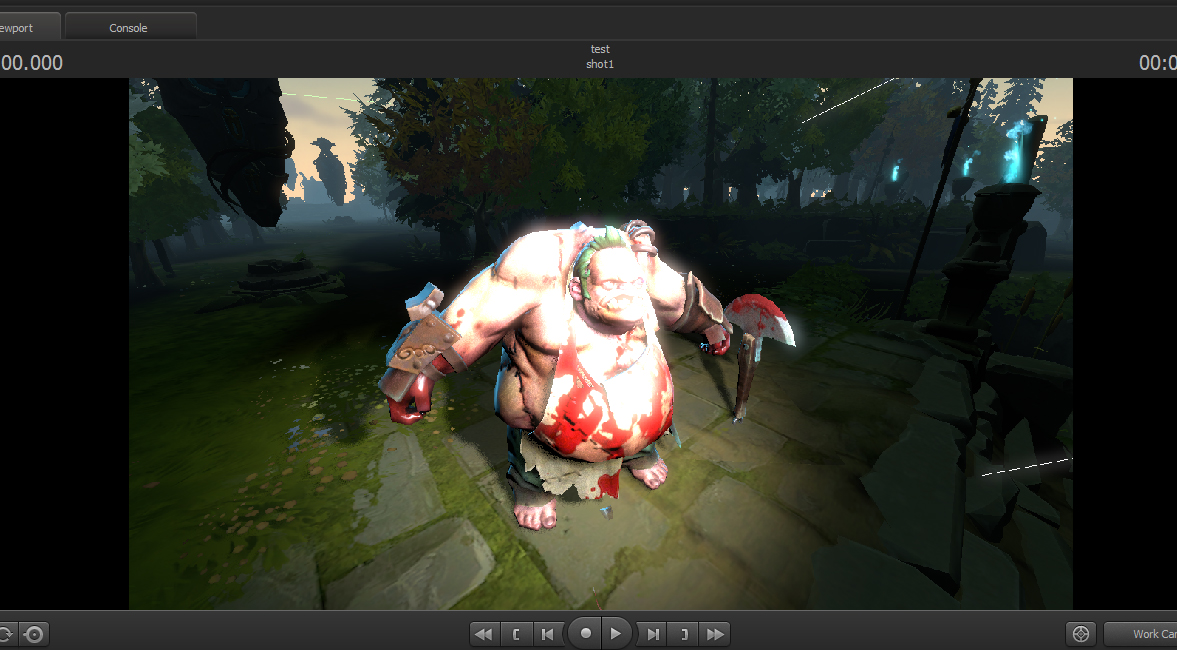
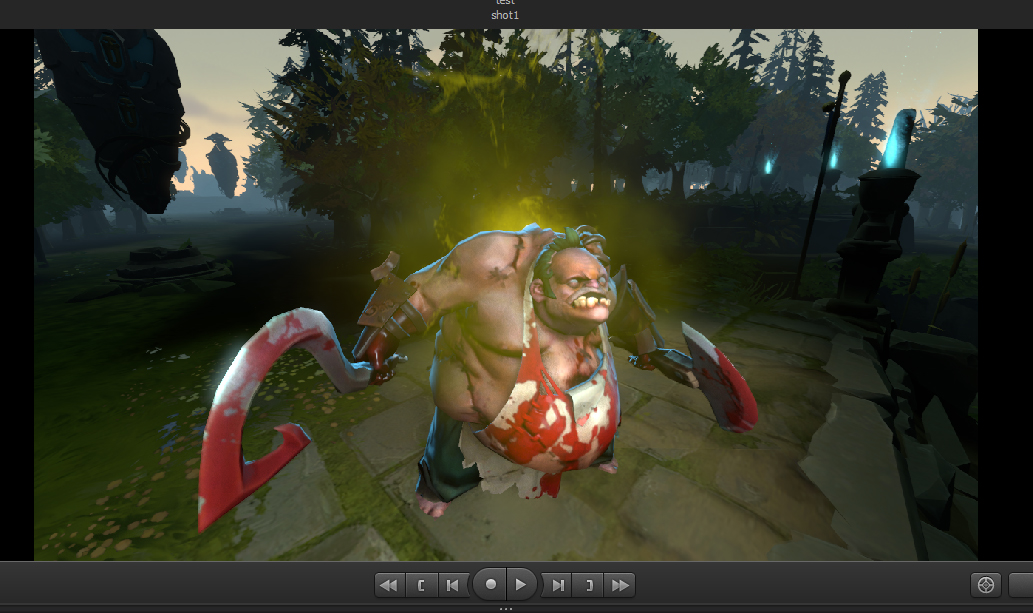
6. Here's the final version of the Pudge piece I just made for an example.
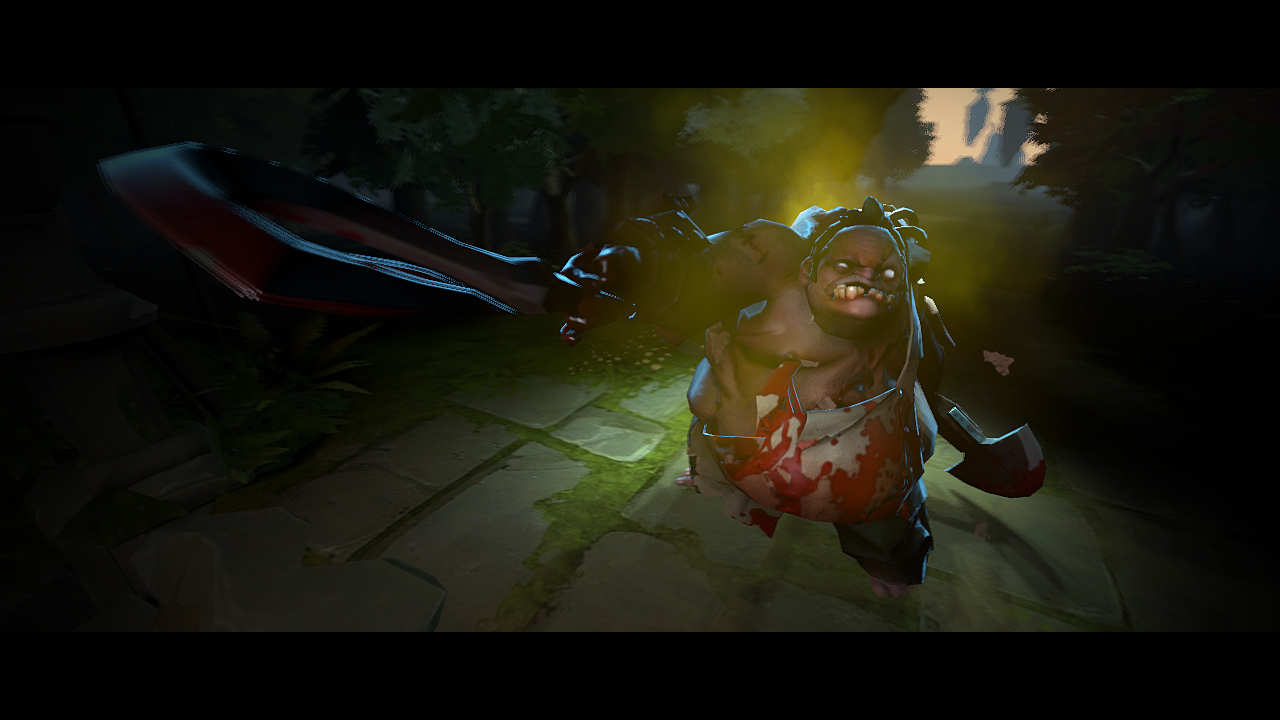
Also here is another quick 4 second clip I made to preview a bit more of what is possible.
1. In the Animation Set Editor in the left hand side, press "Create Animation Set for New Model" to load up the Model Viewer.
In the model viewer, drop down and select 'dota 2' to display the content we added. Scroll through and select model you want to load in. If nothing shows up, just press Rescan and it will. You can press Rescan any time you add new content too without having to reboot the client.
**Note**: Do note the models in the viewer might be invisible if you did not manually fix them in the earlier step but nothing to worry. Just boot them in. They'll work fine in SFM.
For my example, I'll boot up Pudge.
2. Pudge is split in to multiple parts that make up his cosmetics. So when I load in the Pudge model, it will only load in the base.
Don't worry about the darkness. It's just because there are no lights. And the stiffness is because he loads by default in to BindPose. We'll give him some animations soon. First, let us load up his cosmetics slots.
Pudge has 7 different cosmetic slots - back, belt, bracer, hair, leftarm, leftweapon and righthook. Load them all up like you did with the base model.
Once these parts are loaded, we need to parent it to the Pudge base model that we loaded first. Quite simple. Just drag and pudge1 on to the rest of them. They'll get locked to the base model. It should look like this when you're done.
Now hold Shift + Click on all the parts (except main base model) to select all the parts. Once you have them selected, press 'Tab' to access the Motion Editor. If you did it right, the timeline would have turned green.
Now under the Procedural column, click on Zero and drag it all the way to the right. Once done, press Tab again to exit the Motion Editor.
As you do this, you will notice in the viewport that the parts now get attached and placed on to Pudge correctly. You should see something like this.
3. Now with Pudge loaded in, let's light him up. That we do using a Light. Like you loaded a model in, load up a light instead by clicking on "Create Animation Set for New Light".
Once you load it in, you can see Pudge lit up in the Viewport.
You can adjust the placement of the light by selecting it in the Animation Set Editor, then pressing Tab to open up the Motion Editor, and then use the Transform Tools available there to move the light.
Once you're done you can Tab back to exit Motion Editor and save the changes.
You can also tweak the properties of the Light such as the Intensity, Color and loads more in the Animation Set editor. Feel free to experiment.
4. Now that we have Pudge loaded in, let's give him the relief from the stressful posture and give him one of his preloaded animations.
You can do this by selecting the base model in the Animation Set Editor, Right Click > Import > Sequence.
From the Sequence tab, you can go through and select a bunch of animations available for him. Let's pick pudge_idle_alt for this example.
Once you open it up, the animation will get added to the Pudge model and you can see that it will loop continuously on him in the Viewport.
Congrats, you got models loaded in. Go wild!
5. One more thing you might want to know is how to attach Particle Effects. Pretty much the same way you just attached the cosmetic slots to the base Pudge model.
Go to the Animation Set Editor and press "Create New Animation Set for Particle System".
This will open up a dialog box where you can set your Particle Properties. Find a PCF (particle file)
- in this case, I'll pick the hero_pudge.pcf - file that I copied earlier and load it up. There are a bunch of particle systems in this file so I'll load one up. Let's go for the dirty 'pudge_rot'.
As for the rest of the properties -
- Start Time: Basically how many seconds you want it to wait before it fires up.
- Emission Duration: How many seconds do you want the particles to be emitted.
- Particle System Lifetime: How many seconds do you want the entire particle system to live before it dies out.
Quite self explanatory really. As for this example, I want the flies to load in right from the get go. So I'll set Start time to -1 because I don't like 0, Emission Duration to 9999 because it is a big number and it won't die out soon and the same for Particle System Lifetime.
When you load it in, you should see the Pudge Rot particle effects.
This rot effect is at that location where it is. You will need to parent Pudge base model to the particle effect like you did the cosmetic slots if you want it to follow Pudge around. You do it in the same way.
We want to attach the Pudge Rot particle transformation to the root of Pudge's body. So I open up the pudge1 base model and go to the Body sub category and find the root bone. Then I drag it and drop it on the box next to the transform option in pudge_rot1.
Job done! The particle is now parented to pudge and will move around with him at the center of his body at the root bone.
That is it for Dota 2 content in SFM. Now if you know SFM already, start off with making some good stuff. If you don't, learn the program and let your creativity flow. The possibilities are endless. I'll link you to some handy third party tools and tutorials for SFM in the next section.
6. Here's the final version of the Pudge piece I just made for an example.
Also here is another quick 4 second clip I made to preview a bit more of what is possible.
Some Handy Tools & Tutorials
Here a few third-party tools that will help you in your run with the Source Filmmaker.
1. The Assembly Script by Rezvin[revzin.net]
Dota models are heavily broken down for cosmetics and attaching them all together inside SFM can prove to be a tedious process. Rezvin made a handy script that automates this process for you. You can download it here[revzin.net].
To install this script, just copy the extracted files to -
.... " ...\SourceFilmmaker\game\platform\scripts\sfm\animset\".
You can check out more tools from Revzin on his website linked to above.
2. Improved Dota 2 Resources by BlueFlyTrap
He put together a bunch of custom tweaked heroes and other resources for usage in SFM. You can check them out here[www.facepunch.com].
3. Video Tutorials on SFM by Valve
You can find the entire collection of SFM Tutorials here. They consist of everything right from the basics, to editing, to lip syncs to more. A good place to get started on learning how the program works.
4. Polycount SFM Thread - assorted by Helenek
A really nice thread that has a lot of helpful information dealing with Dota 2 content in SFM. The other users there deal with the same thing so it will be a good community to be a part of. You can check out the thread here[www.polycount.com].
---------------------------------------------------------------------------------------
If you have any other content that you found useful and feel that it might help others too, feel free to buzz me up so I can add it here. You can find my contact info in the next section.


i know how to load dota map
but how do you load costum models into dota 2 sfm content?
- follow steps in guide above skip the step "installing dota 2 resources" cause extracting them doesn't work after reborn so you have to get old dota models download them here https://www.deviantart.com/8yaron8/art/DotA-2-content-on-Source-1-559491931
-after downloading them extract them to the mod created and perform other steps
P.S -if you still see your models bright white(disable lighting and check model) now to use them with lighting perform an additional replacement in notepad++ replace CustomHero with VertexLitGeneric this should fix the issue.
Tried all the tutorials and guides about dota 2 SFM..
still have problems about:
- Can't find "sound_vo_english_dir.vpk".
- That notepad++ part search always said "0 occurances changed"
- Tried like what Maasai said, skip first 4 step. but when I load the map... the map turn to be a lot of purple colored with a lot of "Error" text..
- F11 thing... ughhh...
I smashed my head to the keyboard several times coz of these problems..
:<