Six Ages: Ride Like the Wind

Six Ages: Ride Like the Wind

86 valoraciones
Nearly Comprehensive Combat Guide
Por lyreofsheliak
This guide explains how battles work in Six Ages: Ride Like the Wind, how to win them, what's essential and what's not.
4
10
   
Premio
Favoritos
Favorito
Quitar
Introduction
This guide is meant to provide an overview of how combat works in Six Ages: Ride Like the Wind, including the essentials (having a strong warleader and the blessings of the war gods) as well as optional extras (performing combat-related ventures, bargaining with spirits, using battle treasures, and so on).
Your Warleader
Your warleader is the member of your Clan Circle who takes charge during battles. Their skill is the single most important factor in whether or not you win battles. Ideally you want Heroic Combat; Renowned is all right. High Leadership is good, but not as important as Combat.

So, when you choose your Clan Circle, make sure that your best warrior is on it.

For example, in the clan at left, Kimka is far and away the best warrior, so she gets to be on the circle.

Sorting by combat is the easiest way to find a potential warleader. Some nobles also offer a campaign pitch such as "The best warrior belongs on the circle. I am the finest warrior this clan has."

You do not get to assign the warleader role directly. Normally it's taken automatically by the best fighter on the circle (Kimka in this case), but I have occasionally had an Elmal worshipper usurp a better-skilled worshipper of a different god. If this happens, take the troublemaker off of the circle. (Or, I suppose, boost them with rituals until they actually are as good as they think they are.)

If you don’t have a great warrior (or if all of your great warriors are old—in Six Ages a sixty-year-old can still fight like a hero, but is vulnerable to dying of old age), you need to train someone up. Look at your noble pool, and try to find a youngster who’s fairly good at combat (Excellent, though Very Good might do in a pinch) and worships Elmal or Osara. For example, if Kimka in the example clan above dies, I could train up her cousin Balindrai to be her successor.

Send them on the Elmal Path Guardian ritual, then pick the option to strengthen them--this will boost their Leadership and Combat. For the best chance of success, put magic in War and Ritual at Sacred Time, get everyone you can to help, and sacrifice generously. Note that women can only do this ritual if they worship Osara.

Gamari Horse Mother can be used to boost the Combat and Leadership skills of female nobles (though unfortunately it seems to be one of the tougher ones to get through), and Dostal Elk Hunter can be used to boost male ones in Combat (unfortunately, it does nothing for Leadership). Although these rituals aren't quite as good for the purpose as Elmal Path Guardian, they can be useful as a supplement or emergency substitute.

For how to get through those rituals, see the following links:

Elmal Path Guardian[sixages.fandom.com] (available to men, and to women who worship Osara; worshippers of Elmal and Osara get a boost)
Gamari Horse Mother[sixages.fandom.com] (available to women; worshippers of Gamari get a boost)
Dostal Elk Hunter[sixages.fandom.com] (available to men; worshippers of Dostal get a boost)

You can start knowing the details of “Elmal Guards the Sunpath” (the myth that Elmal Path Guardian reenacts) if, during clan creation, your ancestors were the best fighters when the First Clan split. Otherwise, you’ll need to sacrifice to Elmal to learn it. Since Elmal has four blessings and two myths, this may take a while.

You do not always get a good warleader prospect early in the game. You will definitely get one eventually.

When you get the Fire Children event, try to send the children away to study with another clan. If this fails, tell people to be patient with them in the follow-up event, and do not pursue the matter further if that fails--you can be railroaded into exiling them or taking away their powers. Don’t marry Ayvtu off; that results in her leaving the clan, permanently. You want those kids to stay right where they are.

If you keep them in the clan and don’t depower them, they’ll show up as nobles when they turn 17 (first Yatakan, then Ayvtu the next year). Both start off reasonably strong in Combat and are good candidates for Elmal Path Guardian due to him granting them fire magic (even if Yatakan grows up to worship Zarlen, he won' t suffer a penalty for worshipping the wrong god), so you can increase their skills relatively easily. They aren’t guaranteed to succeed, but there are two of them, so even if one fails…

Ayvtu can also do Gamari Horse Mother, and Yatakan can also do Dostal Elk Hunter, though it’s better if you send them on Elmal’s ritual first since it will be easier for them. Either of them can be a great warleader. If you have no good prospects early on, you can still turn things around if you hold out until your fire children are of age.
Swords & Bows
Swords
Swords are professional warriors, who do not do any other work. They enjoy high status, since they risk their lives in defense of the clan--and often lose them. When your circle members say you need more warriors, they're talking about Swords.

One Sword fights as well as five Bows—or ten, if you have Elmal's Flaming Lance blessing. So promoting Bows to Swords can boost your effective numbers significantly.

Since Swords do die fairly often (especially if you're struggling in battle), you'll need to recruit more from time to time. Recruitment costs three or four cows' worth of goods per Sword (depending on whether you offer extra gifts to sweeten the deal).

Keep in mind that sick, wounded, or absent Swords cannot fight for you. If you have twenty Swords but half of them are incapacitated or away from the clan, you should probably recruit some more.

Bows
Bows are clan members who can fight, but spend most of their time doing other things, such as farming. (This is why you shouldn't raid in Sea or Earth: your Bows are busy farming, and taking them away from that work will impact your food supply.)

Hyaloring men are expected to fight as long as they're physically capable of doing so; women aren't required to fight, but many choose to. So many, but not all, of the adult members of your clan will be Bows.

Not all Bows are equally dedicated. The ones who respond quickly to emergencies and are on hand to defend missions are called the short-call. The short-call will start small, but grow as you build more shrines granting war blessings.

Choosing Raiders
It's tempting to take absolutely all of your fighters along when you raid someone. However, there are a couple of reasons why this isn't a great idea.

First, if you take all of your Bows away on a raid, your neighbors just might take advantage and raid your herds while you're gone! There's no point shedding blood to steal cows if you're just going to come home to find that an equal number of cows have been stolen from you.

Second, smaller armies are better at sneaking past defenses. If you send everyone, you're likelier to end up facing your foe's entire army; if you manage to sneak up on them, you'll be facing fewer warriors.

Personally, I tend to take all of my Swords—might as well take advantage of their strength of five-or-ten—and about half of my Bows. Thirty Bows left at home to guard the herds is usually too few, in my experience.

And if you're planning a herd raid, less is more. If you send a very small number of warriors on a herd raid—say, only nine Swords—you have much better odds of sneaking past the other clan's patrols and bringing home cows without fighting for them. (Of course, if your warriors are seen, you should probably just run away if you sent such a small force! This is what evasion is for.)
Magic — The Gods
As usual for this game, you very likely need the help of the gods to get what you want. You're a lot likelier to do well in battle if you seek divine aid.

Sacred Time
After the first two years (one year in Harsh) you should generally be putting as much magic as you can into War at Sacred Time.

By default you can put one point of magic into War. If you have a worshipper of Elmal or Osara on the circle it’s two, and if you have both, you can devote three points of magic to helping your warriors.

War magic will help you in battle throughout the year, and allows you to work rituals before battle (more on that later). It also helps you if you need to contact Elmal or Osara in an emergency.

I strongly recommend investing as much magic as you can in War, unless you desperately need that magic elsewhere.

Occasionally, you will be unable to put magic into War. This lasts only a year; you can weather it. Minimize raids for this one year, and consider putting magic into Diplomacy, as you may want to parley if you're raided.

You can also receive omens telling you not to raid in the coming year. In these circumstances, you should heed the omens, but you may want to put magic into War anyway, in order to defend against potential attacks.

Finally, if the gods want you to raid, do so. Failing to obey their demands can damage your war magic (or occasionally, your farming magic instead) for years.

Shrines
The gods can also help you in some more concrete ways. The battle blessings are as follows:
  • Flaming Lance (Elmal): This makes each of your Swords count as two, boosting your effective numbers. Swords already fight as well as five Bows; this makes them as good as ten.
  • Protection (Elmal): Reduces wounds in battle, helping keep your effective numbers up. You can start with this blessing if you choose Yelm as your first god in clan creation.
  • Steadfast (Elmal): Helps you when you defend your own lands. You can start with this blessing (including a shrine) if you choose the Battle of Akashar as your Famous Event in clan creation.
  • Morale (Elmal): Boosts the confidence of your warriors in battle, allowing you to take riskier options and reducing the risk of them running away. You don’t need this if things are going well, but if your mood is low and you’ve been losing a lot, you might want it active.
  • Firearrow (Osara): Makes skirmishing more effective. Also, it’s Osara’s only blessing, which makes it easy to get.
  • Sureshot (Dostal): Makes skirmishing more effective and brings in food.
As a special plus: As you learn more war-related blessings, your short-call will grow. The short-call is the group of warriors who respond in emergencies. The more war blessings you know, the more of your army will actually show up to fight.

Special mention:
  • Healing (Erissa): While Erissa is the pacifistic goddess of healing, your warriors have great cause to appreciate her. When you fight, your warriors end up wounded, and wounded people can’t fight. Healing will get those people up and active much faster than otherwise. You can start with this blessing if you choose the Bone Mending Ballad as your Famous Event in clan creation. Her other blessing, Curing, will do the same for your sick people.

I’d recommend having shrines to Osara (Firearrow), Dostal (Sureshot), and Erissa (Healing or Curing, depending on whether you have more sick or wounded). You should also have at least a shrine to Elmal, or perhaps a temple if you want to keep two of his blessings active.

Ritual Benefits
The gods' rituals offer a motley assortment of warfare-related benefits, of varying usefulness. I've already mentioned some of them in the Warleader section, and I do think that when you're starting out, the rituals that can be used to strengthen a warleader are the most useful. However, later on, you may want to consider other things.
  • Dostal Elk Hunter: Can either help you fight monsters (some enemies do take monsters to the battlefield) or strengthen a male quester's Combat.
  • Elmal Path Guardian: Can strengthen a male or Osaran quester in Combat and Leadership. Alternately, can make each Sword fight as two (stacks with Flaming Lance), aid leaders during battle, grant a random battle treasure, or reward victories in battle by increasing your magic.
  • Gamari Horse Mother: Can strengthen a female quester in Combat and Leadership. If you unlock it with certain choices outside of the ritual, you can also gain the Flying Horse, an effective battle treasure that helps you sneak up on your foes.
  • Hyalor Tablet Maker: Provided you defeat the ice giant (more or less requires Heroic Combat), you can win a treasure that increases your magic when you use a certain tactic to win a battle.
  • Inilla Forage Finder: Can make your foragers into keen-eyed scouts, making it harder for enemies to sneak up on you on your own land.
  • Nyalda Marriage Maker: Provided you make particular choices, can grant you a random battle treasure, or a war blessing against your ancestral enemy. If your enemy is the Ram People, this blessing lasts seven years. Otherwise it is permanent.

For more detail on how to succeed in rituals (and get the more esoteric rewards), see the Rituals[sixages.fandom.com] articles on the wiki.
Magic — Spirits
There are dozens of spirits you can have sworn to your clan; the only one you’re guaranteed to have is Raven. There’s no way to guarantee which spirits you get, so they’re not likely to be a cornerstone of your strategy--but some of them can be useful.

In order to get any benefit whatsoever from your sworn spirits, you have to go to your spirit screen and bargain with them.

To do this, you first go to the Magic screen. Click the ">Gods" text at the top of the gods list, and then choose "Spirits" from the menu. Finally, select a spirit to bargain with.

When bargaining, you have the following choices:
  • Persuade: This costs nothing but time. However, it can fail.
  • Offer Magic: This is guaranteed to work, but costs a point of your precious magic.
  • Release for larger effect: You will lose the spirit, but its effect will be magnified.
  • Release for longer effect: You will lose the spirit, but enjoy the effect for several years.

Note that not all options will appear for all spirits. For example Raven is a very powerful spirit, sworn to the god Hyalor rather than to your clan. Therefore, Raven cannot be released from his oath.

Bargaining with spirits goes better if you have a (non-Raven) shaman on the circle. (Raven shamans are especially good at bargaining with Raven herself, though.) The skill level of your best magician is also important. And it helps if you devoted magic to Rituals during Sacred Time.

Some of the most useful spirits are:
  • Raven: Raven is the only spirit you’re guaranteed to have. Unlike the vast majority of spirits, he has two blessings: Stealth and Theft. Stealth (helps your raiders avoid being detected, leading to having to fight smaller defending armies) is extremely useful once you start winning battles at home and are up to raiding others. Theft is not nearly as useful. Stick with Stealth.
  • Hawk: Helps you win battles. That’s it. Literally. Recommended. If you have this spirit, bargain with it and keep its ability active. If traveling shamans show up offering to sell you a Hawk spirit, buy it.

Other spirits that are likely useful (though I haven’t tested them as much):
  • Owl: Helps fighters respond more quickly. This should mean that when you’re attacked, more of your people show up to defend their land.
  • Winter Fox: Helps your raiders in snow, making Dark Season raiding viable.
  • Healing: Basically discount Erissa, with the same Curing and Healing abilities. Useful for getting your warriors back on your feet. (And your farmers. And leaders. And… but this is a battle guide.) It heals/cures ten people at a time.
  • Beaver: Makes building fortifications cheaper, which doesn’t really matter with a watchtower but is nice when you’re building a stone wall. It offers as 12% discount, and cannot be released for greater effect.
  • Bear: Helps leaders with single combat.
  • Wolf: Helps leaders with fights against groups of lesser foes.
  • Sakkar: Helps overcome your own fear. I think it helps you resist an enemy's intimidation tactics.
  • Antelope: I'm fairly sure that this one helps your nobles pull off risky stunts in battle, like leaping over an enemy chariot.

Spirits aren't essential, and you can't rely on getting any particular spirit (other than Raven) in a particular playthrough. However, they can be useful. Use what you have.
Treasures — Passive
Treasures that are useful in battle fall into two broad categories: those that act passively no matter what, and those that must be chosen at the start of battle to do anything. This section focuses on the first group; the other is covered later under Battle Tactics.

Passive Treasures that Help You Win
These are some of the best combat treasures in my opinion—but keep in mind that that's the opinion of someone who usually ignores combat treasures! The ones that do their job despite being ignored are, obviously, my favorites.
  • Agimori Fire Spirit: Helps with vs Skirmish test; bonus increases during Dark Season. Obtained via event.
  • Flying Horse: Helps your raiders sneak past patrols (you will face a smaller force). Also, should you win an offensive raid, causes the clan you attacked to fear/respect you more. Obtained via the Gamari Horse Mother ritual.
  • Master Sword: "Fights as an extra Sword."
  • Storm God Bone: Combat bonus when you fight Rams. Obtained via event.
  • Sword of Death: "Kills someone each round of combat" —at one point this killed fighters on both sides, making it dubiously useful; I think that it's been changed to only kill enemies, but I'm honestly not sure.

Fringe Cases
  • Helm of Elmal: Although this is a warlike treasure, I'm not sure it helps you win battles/raids—what it does is grant bonuses to Elmal worshippers on Combat (yes!) and Magic. (It helps your heroes Beren and Yatakan with all other tests as well.) However, it only acts when you choose them to be tested, which in battle you don't...
  • Singing Stone: Targets of offensive raid won't like you less because of it. (This works no matter what, but doesn't actually help you win—instead, it removes an unpleasant consequence of warfare.)

Passive Treasures that Only Act If You Win
These treasures reward you if you win, but don't help you to do so. Many have additional requirements.
  • Flying Horse: as mentioned above, increases your foe's fear of you (if you were the attacker).
  • Insistent Arrow: increases margin of victory if you win skirmishes. I think this means that it increases the favorability of the victory (i.e. grants you more loot if you're attacking).
  • Sly Dagger: increases margin of victory when your nobles win duels during the battle.

Magic-Granting Treasures from the Giant's Pouch

These treasures can be earned by completing the ritual Hyalor Tablet Maker and choosing a treasure from the giant's pouch as your reward, though you can also find them exploring or even start with them. The majority grant magic if you won a raid by using a particular battle tactic. (I'm pretty sure this means you have to use that tactic on your last turn to win, so there's a certain amount of chance involved—you don't get every option every turn.)
  • Blood Twig: Grants 1 magic if you win a raid in which you made a berserk attack.
  • Turtle Stone: Grants 1 magic if you win a raid by fighting cautiously (i.e., you chose to fight cautiously and won the battle on that turn).
  • Owl Egg Stone: Grants 1 magic if you win a raid by fighting cleverly. (I think of this as the best of the lot, since "fight cleverly" is a very good option once you have a Heroic Combat / competent leadership warleader.)
  • Skull of the Old Wolf: Grants 1 magic if you win a raid by conserving your strength.
  • Marten Skull: Grants 1 magic if you win a raid by fighting fiercely.
  • Squirrel Skull: Grants 1 magic if you "flee cleverly"—successful fleeing counts as a loss but hey, free magic!
  • Bull Stone: Grants 1 magic if you win a raid by holding your ground.
  • Terror Lizard Skull: Grants 1 magic if you win a raid by pressing the attack.
  • Darestone: Grants 1 magic if you win a raid by taking risks to win.
  • Sakkar Skull: Grants 1 magic if you win a raid by waiting for opportunities. (Note that waiting for opportunities makes you less likely to win that turn, & thus less likely to win on that turn—so this might not be the treasure to pick over the others...)
  • Cautionstone: Grants 1 magic for withdrawing cleverly. (Again, a successful withdrawal counts as a loss; I think "cleverly" here means pulling it off, basically.)
Fortifications
Fortifications can aid you when you're attacked.

A watch tower makes it less likely that you’ll be taken by surprise--in other words, it makes your people likelier to notice herd raids, and means that more people will show up to fight against full raids.

A stake perimeter will help you in fighting Wheels and Riders; it’s not really useful against other foes, though.

Everything else just reduces your material losses if you’re defeated. If you choose “Survival” as your goal, they’ll also help you by reducing the number of casualties your forces take.

Some fortifications are expensive to build; a stone wall requires 150 cows worth of goods. (The Beaver Spirit's blessing can help here.) Others are cheap, like the watch tower at a mere 10 cows worth of goods.

It is worth noting that fortifications stack: a ditch and a stone wall are more effective than a stone wall alone.

Fortifications can be destroyed in battle, or by other disasters. Make sure to build the ones you rely on up again as soon as you can.
Ventures
There are several combat-related ventures. They can be useful, but they’re not really essential, and I wouldn’t recommend doing any of them until you’ve got the Clan Hall built.

  • Combat Training: Useful but not essential for winning. Worth it after you have the Clan Hall and before your battle strategy is fully sorted out.
  • Defense: What it sounds like; helps you in defensive war. Like Combat Training, this one can be useful, but isn't essential if you're doing well already.
  • Fletchery: Makes it less likely that you’ll run out of arrows. In other words, you can skirmish more. If you end up with a very skirmishing-heavy strategy (e.g. if Strongbow turns out to be great for you) this is probably worth it; otherwise I’d go with another venture.
  • Guard the Herds: Helps against herd raids. I’m not sure if it gives you a bonus fighting them off or just makes it likelier that you’ll notice them before they get away with your cows.

With the exception of Fletchery, you need ten Swords available (that is, uninjured and present on your clan lands) to perform a combat-related venture.

It's worth nothing that Combat, Fletchery and Defense are all relatively easy ventures to succeed atl
Allies
If you can, ally with neighboring clans. Allied neighbors can warn you of some attacks, giving you time to raise your forces and meet the raiders with a larger army. They will also be far less likely to raid you themselves!

Also, you can ask allies to join you on raids, which will boost your numbers. Keep in mind that allies you owe favors to are likely to refuse to help, so repay any favors you owe to your allies ASAP. (Just send someone with 25 cows worth of gifts to them if you have to; that generally counts as repaying the favor even though they didn't ask you for it.) And you can only ask one other clan to come along per raid, so make sure you ask the right one!

You can also ask clans that owe you a favor to come along on raids, though personally I like to save my favors for other things.

Ironically, winning battles is a good way to get allies. As tough as it can be to persuade another clan to ally with you, once you start winning battles regularly, you may find that other clans come to you with talk of an alliance, rather than the other way around.
Timing
When you raid matters. Do not launch full raids in Earth or Sea, even in response to events. Either the Bows—who are after all also your farmers—refuse to go (leading to a mood penalty and your Swords probably refusing to go without them) or you’ll be taking farmers away from planting/harvest, which will reduce your food production for the year.

Herd raids are OK if you send out only Swords. So are honor raids, whooping runs, and “elite reprisal raids” as part of events.

Your human neighbors are bound by the same agricultural constraints as you are--they’re also clans in which most of the warriors do double duty as farmers, so they can't afford to raid during planting and harvesting seasons either. People like the Northern Wheels and Vestantes may not have those limits. Nonhumans definitely don't. So you're less likely to be raided in Sea and Earth, but it's not impossible.

Humans can’t raid during Dark Season. Dwarves can, and Trolls actively prefer to fight in Dark rather than in the warmer parts of the year. (You can raid in Dark if you bargain for the help of the Winter Fox Spirit.)

If you don’t raid for too long, people will start thinking you’re a wimp. “Too long” is about three years; raiding every other year will keep your rep up and stop people from thinking you’re a soft target. If you’re really struggling with battle, it’s better to accept that people are going to mock you and stay home, but once you’re mostly winning, you do want to get out there and fight periodically.

In the first year or so of the game, your neighbors are unlikely to raid you. And later on, you probably don't have to worry about raids for a year or two after the skyfall, as everyone else is suffering from that just as you are.
Picking Targets
Once you're successfully fighting off raids, you can consider going on raids of your own.

Pick your targets carefully. Your circle members know a bit about your neighbors. On the Raid screen, click their portraits and see which clan they think is the weakest. If two circle members offer different opinions, consider which one might be more reliable (I tend to trust the one with higher Combat, myself).

(Of course, you might have a good reason not to fight the weakest of your neighbors! For example, they might happen to be your ally. As raiding them could be the end of the alliance, you should probably choose a different target in that case.)

If you raid the same clan over and over again, they may seek the help of the gods. This will allow them to become a much greater thorn in your side, so picking a designated punching bag isn’t a safe strategy.

On the other hand, if you raid a bunch of clans, that’s a bunch of clans that now want to get back at you. A balanced approach is best: alternate between a couple of targets, and don’t make either one of them desperate enough to go for a nuclear option.

You also need to consider the map.

You can only raid clans that are fairly nearby--either your direct neighbors, or theirs. The latter present some issues: if you have to cross a third party's land to get to your target, they may well object! You may end up having to pay them to let you across, or wasting your time entirely if they refuse to budge.

And if you haven't yet tamed the Black Eel River, an attempt to raid someone on the other side can run into the same problems as your trade and diplomatic missions. Sometimes you can get by with a small offering to the river, but at other times you have to decide between spending clan magic and going home in disappointment. It's better to raid clans on the same side of the river as you until you've dealt with that issue.

(In the example map above, the highlighted Char-Orisa clan is a poor raid target for both reasons. Both the Black Eel River and the lands of the Zethmaring clan lie between them and the player clan, the Mints. The Nar-Onon clan up north might be a better choice of target.)
Battle Tactics — Overview
Now that we've covered warleaders, armies, magic, and which fights to pick, it's time to discuss how those fights work.

Combat is divided into rounds. Each round tests your warleader against their enemy counterpart, with magic, numbers, and other circumstances also influencing the outcome. The winner of the round gains advantage. Either or both sides may also take casualties (deaths, and injuries severe enough to remove warriors from the fight).

The battle ends either when one side gains an insurmountable advantage, or when one side runs out of uninjured warriors.

Numbers influence the number of casualties you take, with a large force taking fewer casualties.

Morale can also be important. At high morale, you can take risky options; at lower morale, you can’t. And if your morale is very bad, your soldiers may break and run away. This applies to both sides, by the way!

You can keep track of how things are going by looking at the symbols at the base of the screen.

Your clan's forces have a symbol (the same one associated with completing the clan hall) just behind them, to distinguish them from other Riders. Defenders stand in front of either a stronghold (in full raids) or a sheep figure (in herd raids).

The figures' position shows their relative advantage (for example, if close to the fort, the defenders are at a relative disadvantage), while the length of the line beneath each army shows how close they are to success. (It's possible for both sides to be on the edge of victory—which paradoxically means that they're also both close to defeat. In the example fight, both have significant advantage; the battle is likely to end soon.) When one army forces the other to the edge of the screen, the battle is over.
Battle Tactics — Preparation
At this stage, you can see your enemy but haven't yet started to fight. You'll be told how many of your Swords and Bows you have with you, and how many elite fighters and regulars your opponent brought to the fight. Keep in mind that Swords (and charioteers, and other elite warriors of different cultures) fight as well as five Bows or other regulars—sometimes more, if divine blessings are in play.

Pay attention to what your warleader says about their opponent. A cautious leader, or one who fears your might, is likely to make cautious choices. For example, they might choose to “conserve their strength”, making it harder to wear away at their numbers. A daring leader, or one who mocks you, will be bolder, perhaps making choices like “take risks to win”.

And if your warleader is worried about how many warriors you're facing, keep that in mind too.

If you have any free magic, you have the choice of spending some of it on the battle. Personally, I don't do this. It's better to spend magic at Sacred Time, which will help all your battles throughout the year.

You also have the choice of using a battle treasure, if you have one. More on that later.

At this stage, you have to choose your goal for the battle.
  • Plunder (attacking) and Drive them off (defending) are the standard choices. Your goal is either to steal your opponent's wealth, or prevent them from stealing yours.
  • Kill as many as possible is what it sounds like, prioritizing killing your enemy over wealth or protecting your own soldiers. Be aware that even if it succeeds, you'll have earned the ire of your enemy as well as hopefully making them weaker.
  • Survival is a choice for situations when you're vastly outnumbered or otherwise at a huge disadvantage, and just want to minimize deaths and injuries among your own forces.
Battle Tactics — Treasures (use in battle)
These treasures must be chosen at the start of battle to do anything for you. Keep in mind that you can only choose one treasure per battle. Choose carefully—a treasure that only takes effect if you win isn't a great choice if you think you're likely to lose the battle, and one that mitigates losses isn't terribly useful if you think you're extremely likely to win!

Also, many of them can break on use. So consider whether an effect is worth it, when it might break the first time you use it! Maybe you'd prefer to sell that treasure instead.

Unbreakable (use in battle)
These treasures must be chosen, but cannot break. Some help you win in various ways, some reduce your material losses (amount of goods and cows stolen, fortifications destroyed) if you are defeated, and some increase your loot if you win.

Unbreakable - Help You Win
I would personally recommend using treasures that give you a general Combat bonus over those that help with specific tests or increase your ferocity (number of casualties inflicted—this wears away at your enemy's numbers but doesn't help you win rounds).
  • Basikan’s Battle Standard: Helps your nobles fight monsters. If you have provoked a punching bag clan to summon a ram/lizard/chariot from the Gods War, you may want to use this to help fight that monster. Trolls and Alkothi also sometimes bring monsters to the battlefield, and there's also a dwarf combat event that might qualify.
  • Elmal’s Battle Standard: Helps your nobles when they choose to fight enemy leaders in duels. Stacks with Bear Spirit's ability.
  • Orlanth Slasher: Increases your ferocity (number of wounds/deaths inflicted) when you raid Rams.
  • Ostalar’s Battle Standard: Helps your nobles pull off daring stunts in battle, like leaping over an enemy chariot. Stacks with the Antelope Spirit's ability.
  • Raven Rock: Combat bonus when you raid clans that like you.
  • Samnal Slasher: Increases your ferocity when you raid Wheels.
  • Sawing Sword: Combat stat bonus when raided by elves.
  • Shargash Slasher: Combat stat bonus when raided by Alkothi.
  • Sparking Sword: Combat stat bonus when raided by dwarves.
  • Stelfor’s Battle Standard: Helps nobles when they choose to attack many lesser foes at once. Stacks with the Wolf Spirit's ability.
  • Tide-Turning Spear: Combat bonus when the enemy is closer to victory than you are (i.e. has a longer line under their little figure).

Unbreakable - Decrease Losses on Defeat
These treasures should be chosen only if you expect to lose the battle you are fighting. As far as I can tell, all of them decrease your material losses when you are defeated on a defensive raid.
  • Battling Brothers Banner: Decreases your losses when you are defeated by Rider attackers.
  • Branch Burning Banner: Decreases your losses when you are defeated by elf attackers.
  • Bucking Mare Banner: Reduces your losses when you are defeated by an attacker seeking to take captives.
  • Cloud Parting Banner: Decreases your losses when you are defeated by Ram attackers.
  • Demon Barrier Banner: Decreases your losses when you are defeated by attacking Alkothi.
  • Dwarf Hurler Banner: Decreases your losses when you are defeated by dwarf attackers.
  • Grasping Talon Banner: Reduces your losses when defeated by an attacker who seeks plunder.
  • Tusk Burning Banner: Decreases your losses when you are defeated by troll attackers.
  • Wide Ditch Banner: Decreases your losses when you are defeated by Wheel attackers.

Breakable (use in battle)
These are my least favorite battle treasures—the ones that can break on use. Very few of them actually help you win. Frankly, I prefer to trade these away rather than use them.

Breakable - Help You Win
  • Hollow Spear: Grants a bonus on any tactics used during the engaged/melee section of a battle.
  • Self-Firing Bow: Makes skirmishing more effective. (This is the only treasure I've noticed having multiple copies of at once.)

Breakable - Take Effect After Victory
These treasures can break if used, and take effect only if you win. I have not used them enough to say if there's a risk every time you use them, or only if you in fact win and benefit from their effect. I'm also not sure how they help when you're defending rather than attacking. In any case, I'd advise against using these unless you are confident that you will win. And keep in mind that several only take effect if you choose a particular goal!

Unless otherwise noted, these apply to full raids and not herd or honor raids.

Treasures that increase your margin of victory (loot earned):
  • Thunderstick: Increases margin of victory when you are attacking (i.e. aggressor in the raid) to kill (chose that as your goal).
  • Gold-Seeking Scope: Increases margin of victory when you are attacking to plunder.
  • Coffle Cutter: Increases when margin of victory when you attack a slavekeeping clan.
  • Shield of Tablets: Increases margin of victory when you are the attacker and choose survival as your goal.
  • Rampant Belt Plaque: Increase margin of victory on herd raid victory as attacker.
  • Rearing Belt Plaque: Increase margin of victory on herd raid victory as defender.
  • Shield of Thorns: Increase margin of victory when you are the defender and you choose to drive them off as your goal.

Treasures that have a relations effect after victory:
  • Wind-Shattering Bell: After raid victory against Rams, makes all Rams fear you a bit, especially the one you just defeated.
  • Spoke-Shattering Bell: After raid victory against Wheels, makes all Wheels fear you somewhat, especially the one you just defeated.
  • Chastening Bell: After raid victory against Riders, all Rider clans that don't dislike you fear/respect you a bit, and the clan you defeated fears you more regardless of whether they like you.
  • Joyful Bell: After defensive raid victory, all clans neighboring your attacker like you more (how much depends on your margin of victory).
  • Vengeful Bell: After you win an offensive raid against another clan, that clan's neighbors will all like you more (how much depends on your margin of victory).
Battle Tactics — Before Closing
This stage of battle is also called the skirmishing stage, or the disengaged stage.

At this point, the two forces are still some distance apart, and have not yet entered melee combat.

You'll generally have two or three rounds of combat at this stage--more or less, as either side can close whenever they like. You have different options at this point than you will during the melee.
  • Skirmishing involves shooting arrows at an enemy from a distance, aiming to decrease their numbers. It's far more effective with Firearrow and Sureshot. You generally have enough arrows for one or two rounds, though the Fletchery venture can provide more for a year or so.
  • Intimidating the enemy (whooping at them and so on) can disrupt their actions on that turn, for example preventing them from doing a ritual. It can also lower their morale, potentially preventing them from taking aggressive options later in the fight. And if you're very lucky, they'll be so terrified that they'll run away! (Obviously, this outcome is far likelier if their clan fears you.)
  • Reserving one in seven fighters will reduce your numbers as you enter melee. However, you will be able to commit the reserve later, which is a fairly powerful move.
  • Evading is an attempt to remove your people from the field of battle. If you succeed, you will lose the battle, but you'll also have minimized your own casualties. So this is a choice to consider if you don't believe you can win, or don't think victory would be worth the losses you would take. (For example, if your very small herd raid force ends up facing a large army after being detected, evasion is probably the best tactic to use.)

Other choices are Parley (only available at the start of battle) and Conduct a magical ritual. These choices have their own sections, as they are worth going into in more detail.

Parley
You can send out one of your circle to talk to your opponent. This works best with enemies that are culturally similar enough to recognize your offers, and don’t hate you enough to ignore it. I’ve never managed to get a troll army to agree to a parley, for example. But other humans may start a parley themselves. They can try any of the options that you can.

Your warleader can boast or taunt them. Success will increase your morale and decrease theirs; failure will do the opposite.

Your diplomat can attempt to concilliate them—basically, calm them down and cool their ire. Success will have the enemy turning around and going home without a fight. Of course, this tends to require a highly skilled diplomat, preferably Renowned or Heroic.

Finally, your trader can offer tribute (or demand it, if you're attacking). The standard amount seems to be about twenty cows worth. A very skilled trader can persuade the enemy to be satisfied with less—but keep in mind that if they reject your offer, you'll have to fight, rather than being able to offer more. (If an enemy offers tribute when you attack them, though, you have the option of demanding more.)

(It's worth noting here that the ritual Ekarna Four Trader can be used to increase a quester's skill in Bargaining and Diplomacy. If you lack a good warleader but do have a good diplomat or trader, it might be worth it to boost them up and rely on parleying for a while. There's also a spirit, the Crawfish, that aids in tribute situations.)

Combat Rituals
You can only perform combat rituals if you either invested magic in War at Sacred Time or choose to use your free magic at the start of battle. Personally, I don't recommend doing the latter--it's always seemed much more cost-effective to me to spend magic once at the beginning of the year than several times during it. And if you spend your magic in the heat of battle, you may not have any left to ride to the Gods War.

Regardless of how much magic you invest, or when you do it, you can't perform more than one ritual. So choose carefully!
  • Battle Glow: This boosts your chances of victory. It’s what I almost always use.
  • Firehoof: Increases your effective numbers, which is less tactically useful than it sounds like. It’s a good idea if you’re outnumbered by more than about two to one, though, or if your warleader is worried about the enemy's numbers.
  • Fight in Formation: This is only available against Rams, and only if they’re your ancestral enemies. I tend to use it when I can; this course of action has not proven disastrous so far.
  • Strongbow: Your skirmishers inflict more casualties. A bit risky, since it only helps your skirmishers, and you don’t always get a chance to skirmish after the first stage. Never use this against Rams; they have a ritual that creates enough wind to disable your archers, and that completely cancels out any advantage this ritual could give you. It’s an option against other foes, especially if you’ve got Firearrow and Sureshot active, but it’s still a bit risky--if they close early you’ll have wasted a turn. I personally wouldn’t recommend this if you’re struggling with battles.

Closing
Either you or your enemy can decide to end the skirmish phase of the battle. There are three ways to do this: Charge, Maneuver, and Advance.
  • Advance: Advancing towards the enemy at a normal pace.
  • Charge: Rushing towards the enemy is a more aggressive choice, and can disrupt their rituals.
  • Maneuver: Carefully maneuvering your forces into a favorable position. If successful, this can help you out in the melee stage.
Battle Tactics — After Closing
This is also called the melee phase of battle, or the engaged stage. At this point, your armies are locked together in combat, and you have a new set of options.
  • Fight Cleverly: Success at this will bring you closer to victory than other options, but it relies more than usual on your warleader being better (at combat and leadership) than their opponent. Probably not a great idea if your warleader thinks their opposite number is better than them, or even if they’re evenly matched. If you’ve got a Renowned/Heroic warleader, though, you should probably take this option every time it appears.
  • Take risks to win: Like Fight Cleverly, success at this can help your chance of overall victory a lot if you succeed. However, you will also be taking more casualties with this approach, so it’s not a great idea if you’re getting low on uninjured people.
  • Wait for Opportunities: This is an odd one. You’re less likely to win the round of combat with this choice, but (unless you lose right then) it boosts your odds of overall victory. So don't use this if you think you're at risk of losing the battle on this turn!
  • Fight Fiercely: This inflicts more casualties on your enemy, whittling away at their numbers.
  • Berserk Attack: Inflicts even more casualties, but you’ll suffer extra casualties as well. This is something to consider if you outnumber the enemy already and have a chance of winning through reducing their numbers.
  • Fight Cautiously: A clan that fights cautiously will take fewer casualties in that round. This is an option if you're outnumbered.
  • Conserve Your Strength: If you do this, you’ll take much fewer casualties, but inflict fewer as well. This is an option to consider if you're so low on people that you're at risk of a loss by attrition.
  • Press the Attack and Hold Your Ground are both neutral choices that don't have outsize impact on your numbers, casualties, or odds of victory. In other words, they're safe choices if other options seem unwise just now. You might want to stick with Hold Your Ground if you just maneuvered successfully, though.

Those are the standard choices. Others can show up, such as "decide the fate of disabled foes" and "Take advantage of an opportunity for slaughter". These generally lead to follow-up choices. Most of them influence morale; some also influence relations with the other clan (making them hate you more or less). I personally tend to ignore them, with one exception:
  • Let [Hero] have his/her day: This is letting your heroic combat nobles be awesome. If it appears as an option, take it. It’ll lead to a follow-up choice. "Try to take out their leader" has the greatest effect on the battle. If that's not available, I tend to go with either “attack where the enemy is strongest” or “take out as many of the enemy as possible”.
Sometimes you’ll get mini-events with your nobles. For example, one of them might notice a chance to steal a magical treasure from the enemy. Take their skills into account when you decide what they ought to do—and consider how important they are to your clan. Don’t risk your best trader fighting a berserker in single combat!

As the fight progresses, keep an eye on those symbols at the bottomof the screen! This section keeps track of both sides' numbers, as well as their relative advantage (position on the screen: if the icons are close to the fort, the attacker has the greater relative advantage) and how close they are to victory (the lines beneath them).

This is information that can be useful to you. For example, if your numbers are declining, a berserk attack may not be a great idea. And if you've been forced back almost to your fortifications, waiting for opportunities may not work out for you! On the other hand, if you seem to be on the verge of losing, perhaps it's worthwhile to take risks to win.

And if you're lucky enough to have a treasure that increases your magic if you win using a particular tactic, well, it's good to know if you're close to victory!
Conclusion
What's Essential
You need the best warleader possible. Unfortunately, this isn't negotiable. Grooming a Heroic warleader is the single best thing you can do when it comes to combat.

It's also important to invest in war magic, and vital to have shrines to Elmal, Osara, and Dostal. Do everything you can to retain the favor of the war gods.

You should build a watch tower and stake perimeter at the very least, although other fortifications are less vital.

Never raid during Sea or Earth, when your Bows are needed at home to help farm.

And you need to pick your targets carefully, preferably alternating between a couple of relatively weak neighboring clans.

What's Not (But May Still Be Useful)
There are a lot of things that aren't strictly speaking necessary, but can still help you a lot in war. Spirits and ventures can grant you an edge, as can battle treasures. Allies can help you fight.

A Work in Progress
This guide represents my experience and what I've learned from other people's guides. If it turns out some of it is incorrect, I'll try to fix it. At present, it's accurate to the best of my knowledge.
Other Sources
Of course, other sources of advice exist! You might want to check some of them out.

The Manual
War Section[sixages.com]
Combat Section[sixages.com]

The Wiki
Battle[sixages.fandom.com]
Raid[sixages.fandom.com]
War Screen[sixages.fandom.com] (Note that this article was written with the IOS version of the game in mind; while the Steam version conveys the same information, it does look different.)

Other Players' Advice
Cheetah7071's Battle Tutorial [forums.somethingawful.com] (This is the guide that first got me from losing fights to winning them!)
7 comentarios
Ironkeg 22 AGO 2021 a las 9:00 p. m. 
Good Guide!

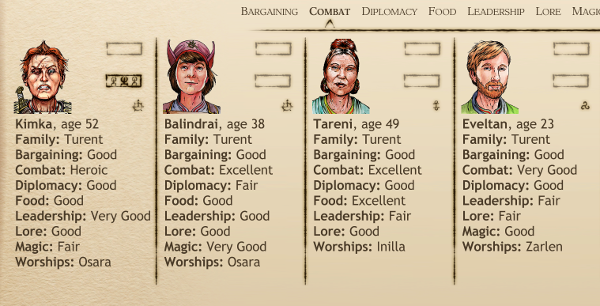
My recommendations is to get the Dostal Sureshot as your first blessing after Pela and either Yryarda's Milk or Busenari's milk blessing. Extra food AND super effective skirmishing is super dope.

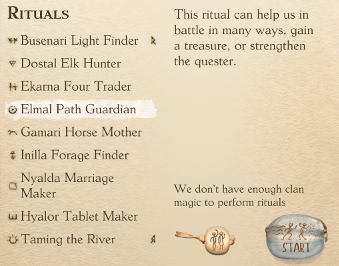
If your clan gets a young Dostalite at clan creation you are in for a treat. The Dostal ritual is way easier to succesfully complete than the Elmal one, and you can get your Dostalite to heroic combat and food easily from it by selecting to improve the ritualists skills after a succesful ritual. One guy handling your food and combat is just insane.
mojomonkey3 18 ABR 2021 a las 11:44 a. m. 
Thanks but I keep losing battles as much as I try to follow this guide; how do I raise more warriors while trying to balance the herd?

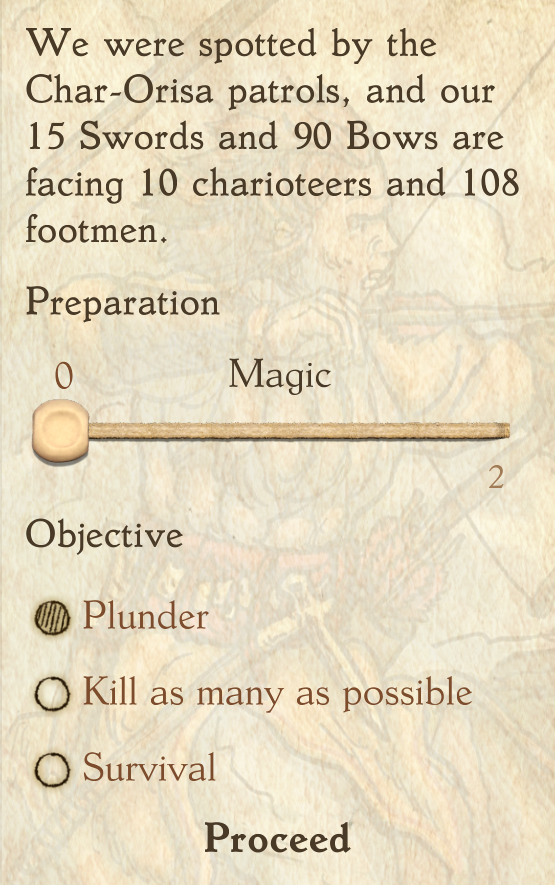
I feel like I have to constantly pour everything into defence and warriors, but I'm still outrageously outnumbered and punished each time. On top of that, almost every other event is debilitating on its own.
Sandame 26 JUN 2020 a las 5:57 a. m. 
awesome, really cleared some stuff up for me.
happytin 24 ENE 2020 a las 10:56 a. m. 
Thanks for this guide. It really enlightened me so I'm no longer randomly picking what feels "right".
Rinjii 1 NOV 2019 a las 6:58 p. m. 
Great guide. :)
david  [desarrollador] 31 OCT 2019 a las 9:30 a. m. 
“The display at the bottom shows both the relative advantage of each force (based on the position of the symbols), and how close they are to overall success (the line beneath).”

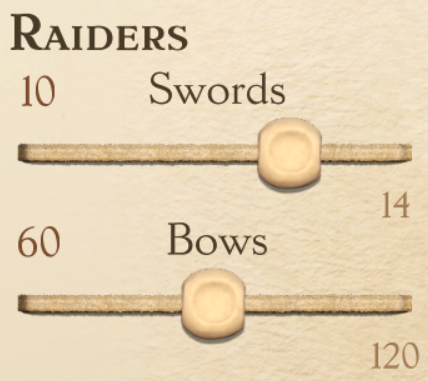
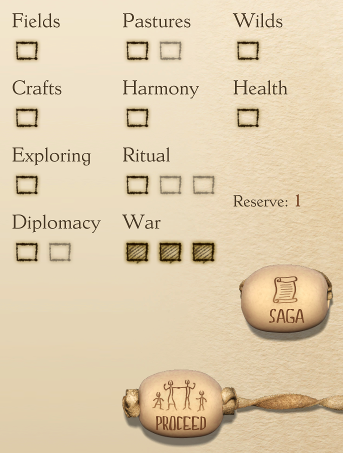
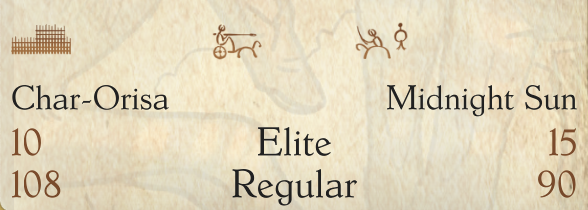
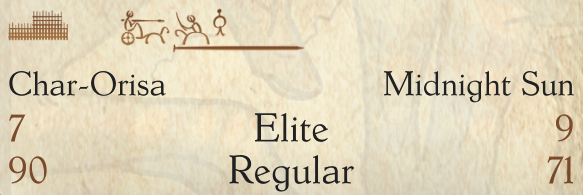
The longer your line is, the closer you are to getting the other side to lose. If both of the lines are the same length, neither side is closer, so neither has a relative advantage, and the symbols would be in the center since the battle can go either way.
Cerberus 27 OCT 2019 a las 5:53 p. m. 
Great guide! I have a question about the lines below the symbols. You say they indicate how close both parties are to victory. But how do the lines indicate this? Does it have to do with their length, their position, or both? And at what point can I tell that I am close to victory or defeat, exactly? What do I see?