Stronghold Crusader 2

Stronghold Crusader 2

455 értékelés
Stronghold Crusader 2 Official Map Editor Guide
Készítő: Firefly_Studios
This official guide is intended as an introduction to the basics of making maps with
the Stronghold Crusader 2 Map Editor.
2
4
   
Díjazás
Kedvenc
Kedvenc
Törlés
Getting Started


This guide is intended as an introduction to the basics of making maps with the Stronghold Crusader 2 Map Editor. It is worth looking through before you begin creating maps as it will help you avoid common pitfalls people encounter. In particular, the Landscape section contains information that will save a lot of trial and error when testing out your maps.

To open the Stronghold Crusader 2 Map Editor, open your Steam client, click on Library and then Tools from the dropdown list. The map editor will appear in the list there. When you open the editor, click File then New in the dropdown.

You will be prompted to pick a map size. Small is best to start with, as larger maps take exponentially longer to finish.


Before you begin, it’s a good idea to free the camera with the Free Camera button. This unlocks it from the boundaries of the in-game camera, letting you move it to any angle and position.


You can move the camera around by:
- left clicking and dragging, to “push” the map in different directions
- right clicking and dragging, to rotate the camera around the point it’s aiming at on the ground
- scrolling the mouse wheel, to zoom the camera in and out.

If you ever lose track of where the camera is you can reset its location by selecting Tools, then Reset Camera.


All the different tabs used to shape and edit the map that you see on the left (e.g. Buildings, Texture, Resources) are contained in the overarching Tools tab. Next to it in the bottom left corner of the window is the Objects tab. This is empty at the start, but once you begin to populate the map it will show a list of all the entities in it. This can be helpful when you want to select a particular object without searching through the whole map for it.

On the right edge of the main window there is a collapsed Object Properties tab. This can be ignored most of the time but for some particular objects, such as carter posts, you will need it.

Editing the map or placing any kind of entity in it is done with ctrl + left or right click. With the Units or Buildings tab opened, multiple entities can be selected by ctrl + left click (and hold) and dragging the mouse to create a selection box.

Once you’ve started editing a map, you will need to close the map editor and reopen it if you want to work on a different map.
Landscape
Roughly carving out the landscape is a good place to start when building Stronghold Crusader 2 maps. Under the Landscape tab you’ll find both Freestyle and Plateau sub-tabs.

The heights in SC2 are based around a “plateau” system of several fixed landscape heights. Walls will always snap to the closest plateau height below them, and range bonuses are calculated based on how many plateaus up a unit is compared to its target (rounded down to the nearest half plateau). Therefore, it’s best to keep terrain in playable areas generally at plateau heights, and also quite flat, because buildings require almost perfectly flat ground to be placed.


Leaving your map completely flat is absolutely an option, but if you plan to include any raised playable terrain at all then you should use the Plateau tab to mark out the different heights before adding more detail with the Freestyle tab. Plateau heights are painted with ctrl + left click, the same way as landscaping freestyle.

Avoid dipping the terrain below the plateau height inside player estates where possible, as this will prevent walls being placed in that area. In particular be careful with rivers: if your terrain slopes down into a river it may be impossible to completely wall it off. Walls do not snap to plateaus below sea level so do not dip the terrain below this level in a player estate.

If you do want to dip the landscape inside a player estate, (for example, for a path leading down to a lower plateau height) then keep the upper edge of the dip a straight line. This will allow players to build a straight wall along it.


Remember, if you raise the landscape walls will continue snapping down to the nearest plateau. As a general rule, keep it flat in playable areas or players will lose their walls below the terrain. In particular, the land below any kind of resource besides trees should always be flat, to ensure buildings can be easily placed atop it.

It’s worthwhile experimenting with the different brushes when it comes to finding a landscape style you like. The Circle brush is very useful with freestyle editing. It helps you get the sharper, more defined edges you’d expect to see on cliffs. Noise brushes help to roughen up rocky areas. Smooth brushes work well for sand dunes and slopes.
Factions
The Factions tab is for placing spawn points and drawing estate lines. To paint an estate area, select that estate in the list then ctrl + left click in the map over the areas belonging to that player. Select Create Spawn Point then ctrl + left click where you want the keep to appear for the currently selected player. If your map is being used for a mission rather than a skirmish or freebuild, you can place keeps using the Buildings tab, instead of spawn points.

How you draw the estate areas will have a big impact on how the game plays out. Simple shapes work best for player estates. Remember, players will try to build their walls right up the edge and a squiggly estate boundary will be a pain to build walls along. Ideally keep to 90 degree angles where possible.


Don’t end estate boundaries just before cliffs – players will get annoyed they can’t build walls up to the cliff!

Think about how much wall players will have to build to enclose their keep. If you give them a whole corner of the map, they’ll only need to build walls along two sides of it. If they’re connected to the other estates by just one or two small chokepoints, they’ll be able to build up thick layers of wall and it’ll be a very defensive map.

Also consider rectangular estates surrounded by neutral on all sides. This map style forces players to wall off their keep on all four sides (and build something that actually looks like a castle!). It makes defending more challenging but estates can still be large. If your map is balanced, estates should be the same size. Turning on grid lines makes it easier to measure them.


Spawn points are used to mark out the starting positions in skirmish and multiplayer games. The amount of flat, pathable space you leave around spawn points will dictate how large a castle the AI players can build there.

Select a spawn point and ctrl + mouse wheel to see how big a castle they can fit. A white square means a castle of that size will fit, a black square means it will not. Pathing tiles, changes in height, stone, iron, trees and pitch will all block off AI castles. Generally you want as much space around spawn points as possible, as this increases the variety of castles the AI can build there.


Texture
After making a basic outline of the plateau heights, it’s a good idea to broadly mark out where the different textures will go. Fine tuning the details is easiest once resources have been added. Use the Texture tab with the Texture Painting sub tab to select a texture.

How you use the different textures comes down a lot to personal style, but in general:

Sand (base): This is the default texture of the whole map and generally how most of the playable area should be.

Sand (dune): A more desert kind of brush. This sand works well on the edge of maps, suggesting the start of a large desert. You can raise the landscape under it to create dune shapes but be cautious of doing this inside player estates as it makes building harder.

Cliff: The standard texture for any rocky areas or sharp raises in terrain. It can also be used faintly on flat ground, but remember that players will expect any strongly cliff-textured areas to be unpathable.

Rock: An alternative to the cliff texture, which adds some variety.


Stones: Very useful for breaking up large areas of otherwise pure base sand texture. This texture also looks good at the edge and base of cliffs.

Oasis (grass): Obviously for players to build farms they will need grass! Make it plentiful or sparse, it’s up to you. Ponds in the center of grassy areas make them look a lot better.

Oasis (feather): This texture is a less rich looking grass, useful at the edge of green areas for fading the grass into base sand.

Oasis (leaves): Another way to add detail and variation to oases. Leaves look good scattered around ponds and trees.

While painting textures, you may notice faint sand-coloured lines dividing the map up into segments. These segments are important because you cannot have more than four textures in a single segment. Any more will not be visible in the final game. You’ll notice when too many textures are in a segment because the smallest type of texture will only appear while you’re painting.

Resources
The Resources tab lets you place trees, iron, stone and pitch.

Trees: Found under the Wood sub tab. You can select which tree to place or use the Mix button for a random tree each time. Trees work best in groups close together. Too many stray trees alone will confuse the path finding engine. It’s good style to generally place trees on grassy areas and around oases, although acacia trees also work well in desert areas.


Iron and Stone: Both of these can go just about anywhere besides grass. Surrounding them with stone or rock textures helps give them some context. Always keep the ground underneath them completely flat, otherwise it may be difficult to place mines and quarries on them.


Pitch: Can be placed both on grass and base sand. Avoid raising the landscape above them because this does not stop pitch ditches being placed on them in game.
Water
Water is an excellent way to bring colour and a hint of life into the desert. Under the Water tab there are sub tabs for Sea, Rivers and Ponds. Ponds and rivers are both painted on to the landscape, while seas cover the whole map at the height you specify.

Be careful when adding water inside player estates. You may make it impossible to enclose walls if the land sloping up from the water is left pathable, resulting in a frustrating experience for the player.
Decoration
Under the Vegetation tab, you can use sub tabs to add Flowers, Rocks and Shrubs to your maps. Shrubs are particularly good around oases and densely packed trees. They give a sense of concentrated life in the area. Flowers also increase the lushness of a green space.


Stones and boulders found under the Rocks tab. Like other decorations they work well in clumps. Beware that just placing them does not give them a pathing footprint. This means if don’t want buildings placed on them, or units walking through them, you’ll need to manually add pathing tiles underneath them.


Underneath the main Buildings tab there is an Editor-Only Objects sub tab with a Cliffs category listed. Here there are three different large rocks which can be used alongside the rock decorations.
Units and Buildings
Units and buildings both have dedicated tabs to select and place them. If you are building a mission you can use them to populate the map. By default all units and buildings will belong to the estate they are placed on, you can change this by moving the mouse over the Object Properties, click on the Estate dropdown and selecting the desired estate.

If you are designing a freebuild or skirmish map, you will also find occasional use for these tabs. The Outpost category under buildings contains both outposts and lion dens. Under their Object Properties there is an Entity Specific Settings section, where you can specify a spawn delay. This is the amount of time before the buildings start spawning troops or lions that move out to attack players. Decorative buildings such as ruins and signs are listed in the Editor-Only Objects sub tab. You can add camels and camel herds by going to the Units tab and the Animals sub tab.
Camera Grid
The camera automatically moves with the shape of the landscape but you can change its height, along with how much it clings to the ground in this tab. If your map has hills or dips but only a flat playing ground, tweaking these can make moving the camera around the map feel smoother.

You can also add a starting camera sequence if making a custom mission by adding several nodes for the camera to move between. To add each node click Add Node when the camera is in the desired position and setting a pan duration (from the previous node to that node) and a duration to hold the camera on that position. When the map is played the camera will move through each of the nodes you have added in order.
Scenario Editor
Click on Tools, then Edit Scenario to open the Scenario Editor. Here you can control map type, starting goods, availability of buildings and units, events and the mission briefing.


Map Type: Here you can select the kind of map you are building. This will affect where the map appears in the game.
Starting Goods: Specify the amount of resources for the player to start with. These will be overridden in skirmish and multiplayer games.
Availability: Select which units, buildings, tradable goods and tools are available in the map. These will not be overridden in any game mode.
Events: This is where you can add all of the various triggers and effects that make missions interesting. Click Create New Event to open the event editor. There are boxes both for Conditions and Actions. You can leave the condition box empty to make the action occur in all circumstances on the day specified.

Both sections have long dropdown lists to use in your missions. Some of these use map markers, which you can add separately from the main Markers tab. Note that the Game Event action contains all of the occurrences in the game. These have an effect on the popularity of the estate selected as well as other effects.

Closing the Scenario Editor and Event Editor with the x buttons in the corners will save your changes.
Pathing
The Pathing tab controls all of the pathing tiles that get painted on the map. Painted tiles cannot be walking on by units, nor can buildings be placed on them.

Use the auto generation to make a rough outline of the pathing area, but take a manual pass as well. The tiles generated by height and inclination may cover over slopes you want to be pathable.


As mentioned before, be careful with slopes and cliffs inside player estates. If pathing tiles do not sufficiently cover the edge of a cliff or hill, players may leave gaps at the edge of their wall, thinking they have completed it. Also be sure to cover any large rocks and boulders with pathing tiles.
Village Estates
Adding village estates to your maps is a straight forward process. First, go to the Factions tab and select one of the estates with a Village player. You can then paint the estate onto the map as you would any other.

Next the estate needs a Village Hall. This is found under Buildings > Editor-Only Objects > Non-player Buildings. You also need to place a Carter Post, located in the same list. In the Object Properties for each Carter Post there is a Goods Type section where you can specify the kind of resource the carter horse will deliver. Finally, add whatever economic buildings are needed to gather and store the relevant resource.

Sounds
Under the Sounds tab is a list of all the sound effects you can add to your maps. These can be selected and placed in the map like any other object. The volume of each sound emitter at a given distance is represented by the two green circles surrounding it when it is selected. The inner circle is the area inside which the sound is at full volume. The outer circle marks the point at which the sound is no longer audible. Different emitters fade away at different rates as you move the camera away.

By default each sound emitter you place will emit from a single point. To make it emit across a wider area, go to its Object Properties and set Emit from region to True. You will now see a white box around the emitter and the green circles will move as you move the camera. The sound effect will now be heard everywhere that can be covered by the green circles.


You can change the size of the emitter region by editing the x and y Scale values under Object Properties. You can also rotate it using the Rotate tool or with ctrl + mouse wheel.

The emitter radius is 3D, which means the height of the emitter will affect how loud it sounds in game. Generally, river and sea emitters should be placed at the water surface level while wind emitters should be about camera level. Most of the map should be covered with at least one emitter.
Balancing Skirmish Maps
In a balanced skirmish map, all players should have the same amount of space and resources inside their estates. Each time you save the map in the editor you will get a Save Log, which lists the amount of resources in each estate. This means you can make maps perfectly balanced regarding available resources. Turning on grid lines helps with giving all players the same amount of space.
Publishing to Steam Workshop


You can share your map with the other players using the Steam Workshop. Once you’re happy with your map, and have saved it (it will always publish the last saved version of the map), click on the Publish to Steam Workshop option in the File menu. This will open the publishing window. Before publishing for the first time, you should view and the Workshop terms of service. If these have not been accepted using your Steam account, your items will not be visible to other players.

The next step is to enter a name and description for the map. These will appear to any players looking at your item in the Workshop, and also the title will be used to identify the map in the game itself. Then you should select whichever tags (if any) you feel apply to your map. Players can use these tags when browsing the Workshop to filter the items shown to just those they are interested in. It’s a good idea to just stick to appropriate tags (rather than ticking them all). It should be noted that the size and type of your map (freebuild, mission or skirmish/multiplayer) will automatically be added as tags.

Finally you can set whether the items will be visible to everyone, or just to people on your Steam friends list.

Once you are happy with all of the details of your map, click the Publish button to start the publishing process. This will upload your map to the Steam cloud, and then publish it in the Workshop, which can be accessed either through the Steam client or an internet browser. Once the process is complete, the item’s page will open in a browser window and you can check whether you are happy with it. If you need to change any of the details you entered in the publishing window, you can do this here (or through the Steam client) at any time.

You will be able to use your map using the .shmap file like any other, but if you wish to access it via the Workshop, you can do so by subscribing to it. You can get more information on the Workshop by visiting http://steamcommunity.com/workshop/


©2014 FIREFLY STUDIOS LIMITED. All rights reserved. Stronghold Crusader 2 and FIREFLY STUDIOS LIMITED are trademarks or registered trademarks of FIREFLY HOLDINGS LIMITED.
64 megjegyzés
EdTheHun 2023. nov. 25., 9:22 
Could this please be updated? There is no tools in the Library dropdown anymore
Matej 2023. okt. 15., 4:57 
Where do i download map editor? :scribe:
mxrevolution 2023. júl. 28., 12:19 
i worked hours, even days on great crusader 2 maps and scenarios. but i never managed to upload my new maps to steam. wrote emails to firefly but never received an answer.
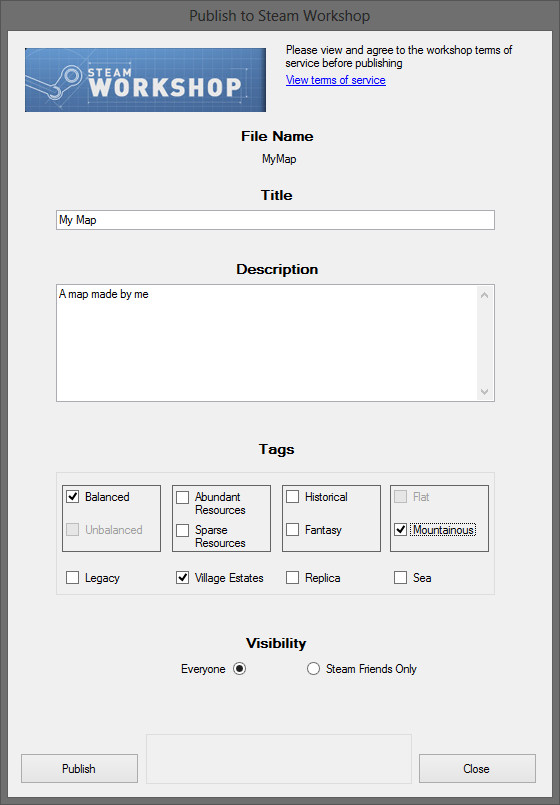
the game itsself and the editor works great. but uploding maps is impossible...
Karl_theConsumer 2022. dec. 30., 3:38 
my upload is always failed for some reason :(
cadreaming80 2022. júl. 29., 10:48 
It is possible to downloads any of the new maps that already been created by other players.
SadMan 2022. júl. 19., 6:22 
The king when spawned with the large arabic keeps are stuck within the building. What should I do?
Molly 2022. júl. 7., 14:37 
nice
mxrevolution 2022. febr. 27., 13:21 
i have the same problem like dazbigblue, the mapeditor does not show the publish button, so i cannot publish my well designed and tested maps/missions to the community
any idea?
Vvvvega 2022. jan. 16., 7:18 
根本无法找到如何安装地图编辑器
fysooly-2011 2021. dec. 18., 3:00 
How do I make my own map?