Factorio

Factorio

130 ratings
How To: Single-Line, Two-Way Rail Network
By Hoshi
Basic guide for those who want a single-line rail network that multiple trains can use in either direction.
   
Award
Favorite
Favorited
Unfavorite
Introduction


(Warning: this guide was made back when you could craft curved rails and had to place every single piece of rail manually, as opposed to the nifty green arrow function available today)

Train networking is one of the most aesthetically-pleasing parts of Factorio. This guide is meant for those who want to set up a rail system that uses single lines as two-way lanes for most of the network.

Pros:
  • Fewer resources required
  • Easy to set up, easy to expand
  • Simple intersections
Cons:
  • Slightly slower than having dedicated inbound/outbound lanes
I live in a highly-segmented water world with sparse deposites of resources. I use a spiderweb of train tracks and small, one-wagon trains to feed the beast.

And by the beast, I mean my factory.


Altogether, I'd say things are running smoothly. With just a few guidelines and sample blueprints, you too can make a rail network like this. This guide will assume the reader already knows the basics of rail systems, including what each type of signal does and how blocks work.
Managing Blocks
A simple way to categorize blocks in this type of network is into three different categories: unloading stations, loading stations, and the main line. Each of these categories have their own section.

While construction railways, keep the following in mind:

  • Do not put more trains in your network than blocks. If in doubt, make more blocks using pass-arounds.
  • Make all intersections three-way, so that any approach can leave in any direction, except those noted.
Unloading Stations


Unloading stations should be one-way segments that connect to the main line at two different spots.


In my own iron ore unloading station, trains come in from the upper left and leave to the upper right.

Note the rail signals along the left edge. This allows multiple trains to wait in line.

Also note that the example is only a basic method of unloading. There are many of other ways you can increase the throughput of unloading stations, but this guide focuses on railway logistics.


This is the upper half of my unloading station. As you can see, they don't connect to the main line at the same place. The rail signal on the left ensures that as soon as a train enters the unloading loop, the main line block is once again free.

In this example, the path out is as long as the path in, but this is not necessary. The path in should have enough space to handle the trains that need to wait in line, but the path out can be as short as you can make it.
Loading Stations


Loading stations are spurs off your main line. They are one-way loops that, for simplicity, should enter and leave the main line at the same spot. Only have one train go to each loading station, otherwise they could cause a traffic jam.


In this example, the train can enter and leave this iron outpost from the left or right, depending on traffic between it and the main base and how the internal AI decides which is the quickest path. Note the position of the signals on the left.

How much defense you need for your outposts will vary. I can get by with just a few lasers.
Intersections


Intersections don't have to be complicated. If your main line needs to branch off in a new direction, you don't have to bend over backwards laying down rail signals with surgical precision.


Seriously, that's it. There are no rail signals here at all. So where are they? That's covered in the next section.
Pass-Arounds
This here is the most critical part of your rail network, which will determine whether or not you will get a traffic jam!


Build a pass-around between every feature of your main line (Features: connecting points of loading stations, unloading stations, and intersections).

If any segment of your main line looks like it's too long, you can build a pass-around on it to reduce delays. If in doubt, build another. Too many pass-around will not hurt you, and will not slow down trains.


This, unlike other parts of your rail, DOES require placing signals and chain signals with surgical precision. Note that there are two straight rail segment in the middle, lengthening the pass-around horizontally. This makes the pass-around just the right size for a single diesel locomotive + cargo wagon. If you want longer trains on your network, you will need to extend the pass-around further horizontally.


Note that a diagonal pass-around cannot have a line straight through the middle. From what I could tell, this is because diagonal curved rails don't meet up exactly like horizontal curved rails would, causing the game's block detection to screw up.


Pictured: exactly 4 curved rails. the two on the right would require an additional straight rail segment to line up perfectly. In my experience, if you make a diagonal pass-around with a line through the middle, a train that waits in a lump on the side will prevent a train from going through the middle.
Blueprints
Finally, here are some blueprints which I find useful. The world I made required me to make many small outposts in hard-to-reach areas, so walking around with nine portable roboports on my back and having a small library of blueprints really sped things up.

Note: these blueprints can, obviously, be rotated and will work from any direction.

Handy trick: If you place a blueprint down while holding shift, your robots will remove any trees in the way. This makes cutting through the forest with minimal destruction very easy. Remember, trees absorb pollution, which wards off the biting menace!


Basic main line components.


Horizontal pass-around with the straight rail segments removed for clarity.


Diagonal pass-around with the straight rail segments removed for clarity.


Basic outpost, complete with defenses and radar.


Two outpost exits; one with an end going horizontally/vertically, and another going diagonally. Once you lay down the basic outpost plan, align one of these over either of the curves with the end pointing in the direction of the main line. Then, remove any extraneous parts and you have very quickly made yourself a loop!


Basic oil outpost. Most clusters of oil patches won't produce oil fast enough to justify having more than one assembling machine. the smart inserters are set to only take off empty barrels.

Handy trick: on trains going to oil outposts, X-out all of the spaces except for ten. Reserve five of the remaining spaces for crude oil barrels. Put an assembling machine at your oil unloading station generating all the empty barrels your trains will need.
Conclusion
This is the conclusion.

Have fun!
27 Comments
darrendarren5 Nov 15, 2020 @ 8:24am 
thankyou very much, im 950hrs in and still havnt found until now a good single train b/print book, this will change my game
luziferius May 27, 2020 @ 2:32pm 
It works for larger trains, too. You just have to stretch the blueprints yourself. I used them with 1-4 trains. Just note my proposed correction in the earlier comments, otherwise you’ll get deadlocks on more frequently used tracks.
blackknight24 May 25, 2020 @ 4:40am 
wow, these would all be great if i wanted to wast my time with tiny, 1 wagon trains.... ~sigh~
luziferius Mar 27, 2018 @ 1:11pm 
As i said, the only correction needed in the original blueprints is altering the pass-arounds by removing the outer regular signals. Then everything works.
Durabys Mar 26, 2018 @ 3:01am 
PS: Also I use Waiting Areas for trains.
Durabys Mar 26, 2018 @ 2:58am 
@luziferius
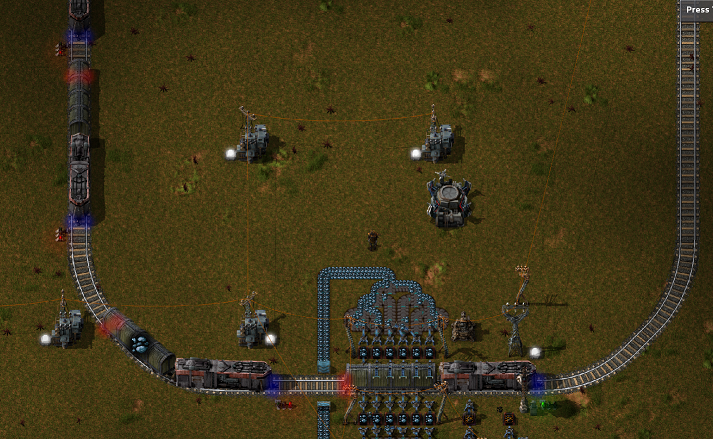
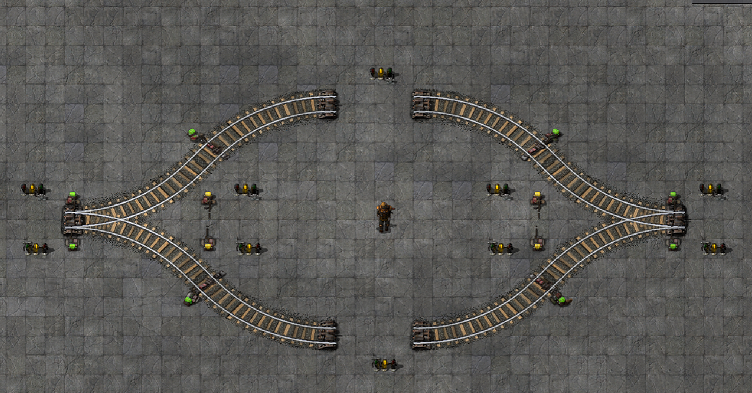
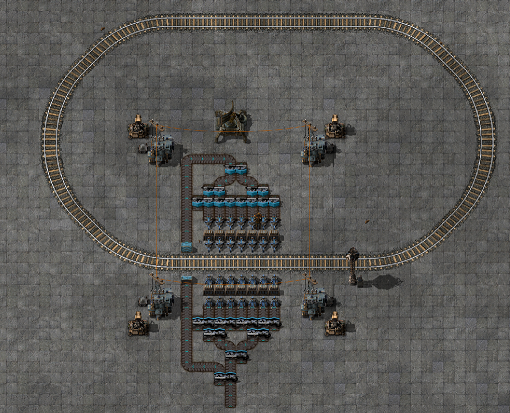
Yes. But there is a correction possible: Replace Regular singals at the entry and exit points for stations with Chain signals.
luziferius Mar 25, 2018 @ 3:15pm 
@Killcreek This won’t work either. Your approach deadlocks if you have 2 pass-arounds, and 6 trains approach, each 3 from both sides. I’ll assume horizontal layout: 3 trains approach from left, taking the 3 bays in the left pass-around and 3 trains approach from the right, doing the same in the right bays. -> Result is a deadlock.
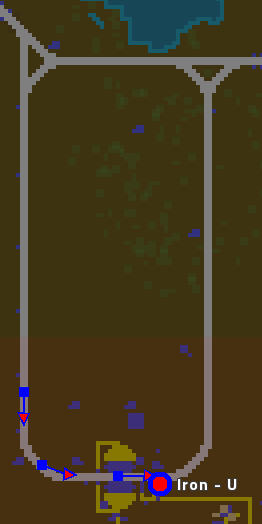
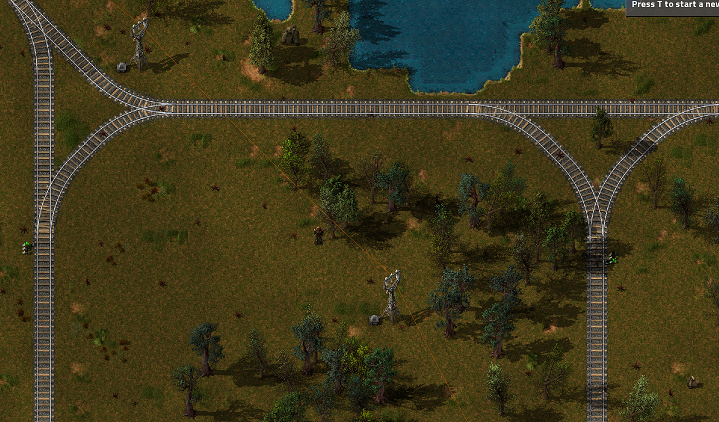
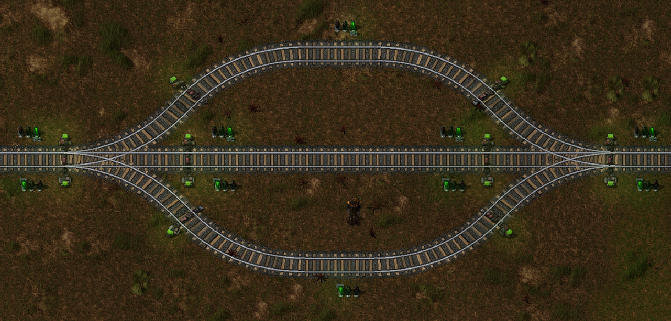
It is a crucial design point that the outer rails are single-directional. This causes a train driving west to reach west, regardless of the train count driving east.
Killcreek2 Mar 14, 2018 @ 4:02pm 
luziferius is correct. Your passing designs use too many signals.

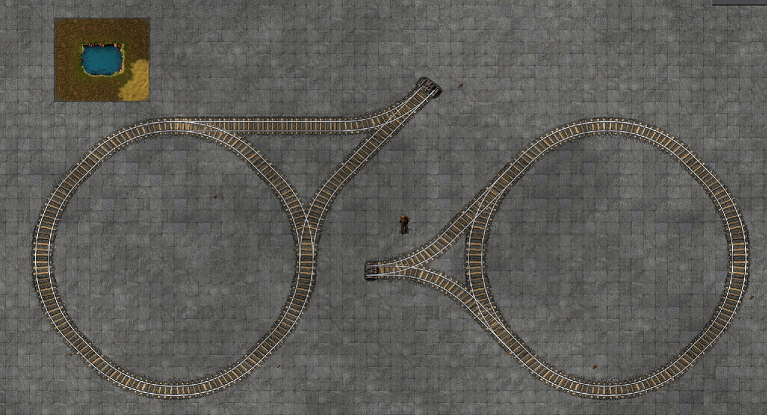
This is how the passing bays ought to be signalled: Rail in, chain out pairs at each end.
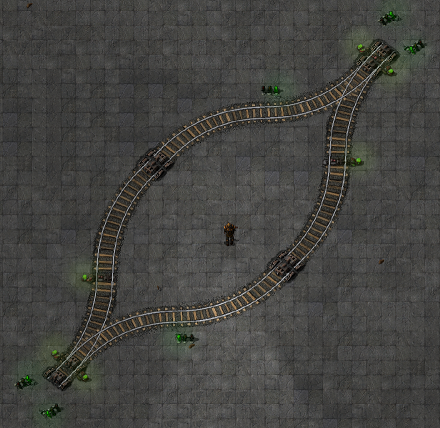
Two-direction bays ~ https://i.imgur.com/mF8tt0f.png
luziferius Jan 30, 2018 @ 11:19am 
The proposed pass-around blueprints deadlock. You have to remove the outer normal signals so that it ends with chain signals on both ends.
I used those blueprints in my world and got constant deadlocks when load increased. When, for some circumstances, 5 trains approach a pass-around (2 from left and 3 from right), the whole thing deadlocks. Building more pass-arounds does not solve this.
Removing the outer signals causes the 5th train to wait at the previous pass-around and therefore make it deadlock-free.
reaq Sep 11, 2017 @ 1:27pm 
Can you add the blueprint strings??