Resident Evil 5

Resident Evil 5

138 ratings
All BSAA Emblems + Treasures + Eggs + Weapons in each Chapter (with Screenshots)
By Eerie Goes D
A guide showcasing the locations of Resident Evil 5 collectibles with screenshots.
3
2
3
   
Award
Favorite
Favorited
Unfavorite
Introduction
Hi,

I'm Eerie Goes D[linktr.ee] and this is my second guide.
This one uses screenshots of every collectible in every chapter of Resident Evil 5. I like them better than videos.
Screenshots are chronological to the levels events.
Hope it's useful for you! Feel free to comment any feedback you deem necessary for this guide and I'll make sure to improve it.

Heavily inspired by this guide, but with screenshots instead.

This guide is not a walkthrough.
Chapter 1-1 | Civilian Checkpoint
1/3 - Treasure - Topaz (Marquise)
Right after defeating the first horde of zombies, it will be dropped right where the last guy was killed. Search this area once it's cleared and you should find it.
2/3 - Treasure - Gold Ring
Kill the Executioner Majini (big axe guy) and he will drop it. Sorry that I took this screenshot when he was already dead, but it's in this area :)
2/3 - Weapon - VZ61 (MG)
Right at the end of the level, before the last gate. Make sure to open it before the level ends or you won't be able to.
Chapter 1-2 | Public Assembly
1/7 BSAA Emblem
On the first balcony of the first building you may enter in this level (which has a stairway on the side leading to a locked door).
2/7 - Treasure - Antique Clock
Same building, adjacent balcony. You'll find it there.
3/7 - Weapon - Ithaca M37 (SG)
The building after this one, with a blue door (opens with the key).
4/7 - Treasure - Ivory Relief
Kill the mini-boss-woman-like or whatever it is. It will drop it. Once again, I'm sorry that the item isn't here, as she was already dead, but it's in this room.
5/7 BSAA Emblem
Aim at the barrel while climbing the square-like broken building.
6/7 - Treasure - Gold Ring
Drops only if you defeat the first boss of the game without using the furnace.
Use any grenades you have, ammo, and the 2 gas containers around the furnace area.
7/7 BSAA Emblem
Found just to the right, before the last elevator which ends the level.
Chapter 2-1 | Storage Facility
1/14 - Weapon - H&K MP5 (MG)
Right in the beginning of the chapter. Can't miss it.

2/14 - BSAA Emblem
On the wall of the first storehouse close to the weapon you just picked.

3/14 - Treasure - Jewel Bangle
Dropped by the big guy as soon as defeated.

4/14 - BSAA Emblem
After the bridge encounter, it's found underneath it, before entering the sewers.

5/14 - Treasure - Sapphire (Pear)
After the sewers, as soon as you step out, to the left, on the ground.

6/14 - Treasure - Topaz (Pear)
Soon as you reach the docks, walk to the shore and into the water. Found just before the ship.

7/14 - BSAA Emblem
By the docks area, on the first small green shed. Need to aim inside it to see it.

8/14 - Treasure - Ruby (Marquise)
To the right of the BSAA Emblem you just found there's a small market area. This treasure is in a chest surrounded by the stalls around it. Just throw a hand grenade on them to open way (If you need one, there's one right on the fruit stalls after slicing them).

9/14 - Treasure - Emerald (Square)
Climb the ladder and walk across the rooftops to find the treasure.

10/14 - Treasure - Jewel Bangle
After grabbing the Port Key, defeat the big guy who drops it.

11/14 - BSAA Emblem
When the helicopter scene begins, defeat the enemies and climb the ladder on the right. Aim at one of the indoor balconies and you'll find it there.

12/14 - Weapon - S75 (RIF)
In the small warehouse (with the red steel gate) before the helicopter section is completed.

13/14 - BSAA Emblem
Close to the end of the chapter, before you need to Assist Jump Sheva, look to the roof of the opposite side to find it.

14/14 - Loot Chest
Right by the end of the chapter, after defeating the chainsaw guy. Can't really miss it.


Chapter 2-2 | Train Station
1/15 - BSAA Emblem
As soon as you step out to the train section, aim up to one of the electrical antennas.

2/15 - Treasure - Jewel Beetle
In the end of the same train section, before climbing up the platform

3/15 - Treasure - Jewel Beetle
Climb the first platform before reaching the top of the train. Found on the right.

4/15 - Treasure - Ruby (Pear)
This one is invisible and unfortunately I can't help you precisely where it is. As soon as Sheva picks up the lantern in the mines, you will see a couple of sandbags laying on the ground, on the left side. Before the second one, aim up, until your cursor changes red. Shoot at it.

This Youtube guide helped me find it. Minute 7:00 of the video.

5/15 - Treasure - Ruby (Pear)
This one is easier to see. After coming out of the first set of water, in the mines, aim up around this area and you should be able to find it.

6/15 - BSAA Emblem
When you reach the bridge, look to the right side of it.

7/15 - Treasure - Ruby (Pear)
Right after you shoot at the previous BSAA Emblem, aim to the end of the bridge on the rocks above.

Extra: Egg Location
I was able to find an egg in the mines section by killing some snakes. They spawn after you slice the crates around.


8/15 - Treasure - Diamond (Oval)
While exploring the mines, stick to the left wall and you will eventually find an off-path leading to a barrel, a box and a chest. The treasure is in this chest. Note: A snake will be in the crate. Kill it to try your luck on some egg drop.

9/15 - Treasure - Ruby (Square)
In the area where Sheva opens the gate for you, there's a mechanical crane in the center. This ruby is in one of its top gears.

10/15 - Treasure - Ruby (Square)
Before using the elevator to go up and finish this section, there will be one last guy who will drop from above which will spawn a thingy on his head after you kill it. In this same area, aim up - this Ruby (Square) is there.

11/15 - Weapon - Dragunov SVD (RIF)
Soon as the next cutscene ends, you'll find yourself in a room. This weapon is in a locker to the left of you.

12/15 - Treasure - Diamond (Brilliant)
Go outside and you'll find a ladder on the left, close to a red container. This treasure is in a chest to the left of it.

13/15 - Treasure - Diamond (Pear)
Before climbing the big ladder, aim at the top of to find a Diamond (Pear) on the right of it.

14/15 - BSAA Emblem
Climb this ladder and go to the left - aim at the top of the building you just were.

15/15 - Treasure - Diamond (Square)
After the next cutscene, you'll have to defeat an horde of zombies and you'll start climbing around this hill. On the left, there will be a ladder. Drop down on it and the treasure will be to the right.


Chapter 3-1 | Marshlands
1/25 - Treasure - Ruby (Pear)
Right at the beginning of the chapter, on the skull to the left.

2/25 - Treasure - Beetle (Brown)
Opposite side of where you found the previous treasure.

3/25 - BSAA Emblem
As far as I know, you can only get this one in split-screen or multiplayer.
Simply get on the boat in split-screen and use one character to aim at the first electrical post as soon as you steer the boat to the lake.
Exiting split-screen mode will reset the chapter, but you will retain the BSAA emblem.

Edit: You can still do this solo by equipping a sniper rifle while on the docks and aiming at it from afar.

4/25 - Treasure - Beetle (Brown)
If you are playing solo, drive the boat to the location shown on the map of the screenshot. Sheva will catch it for you when you get close to it.

5/25 - Treasure - Idol (Silver)
Drop off the docks close to the previous treasure and look for the chest around it.

6/25 - Treasure - Beetle (Brown)
Drive to the location shown on the map of the screenshot and Sheva will grab it for you.

7/25 - Treasure - Beetle (Brown)
Drop off the docks on the right area of the swamp map to reach the alligator infested area. This treasure is located on the left side of it.

8/25 - Treasure - Ruby (Pear)
Located here, still in the alligator infested area.

Extra - Egg
Was able to find an egg in one the sheds of the swamp infested area (after climbing the ladder), check the screenshot below. Check if you can find it as well (I'm not sure if egg locations are random or not).

9/25 - Treasure - Emerald (Pear)
Leave the alligator area, get on the speedgoat and hop off the docks on the north. This treasure is located as soon as you enter. Walk a bit forward and aim at one of the skull heads.

10/25 - Treasure - Ruby (Pear)
To the right of the previous one, also in a skullhead.

Extra - Egg (Brown)
Was able to find a brown egg in the shed to the left of the previous treasure. Check it if you can find it there.

11/25 - Treasure - Idol (Silver)
Assist jump Sheva to the north of this area and she will grab it.

12/25 - BSAA Emblem
There are 3 ways to get this one. It's located outside of the center-shed of the minimap.

1. Stand in front of the beginning of the docks (after hopping off) and aim underneath the shed with your sniper rifle to find it. Alternatively, use a rocket launcher gun to shoot at itunderneath it, hopefully hitting the BSAA Emblem.

2. Use the speedboat and hop off the decks on the far left. With a sniper rifle,try to aim at it from afar. It may take a couple of shots until youv'e hit it.

3. In co-op/split-screen. Use a friend or another controller to drive to the back of the shed and shoot at it safely.


Extra - Egg
The center area docks have 2 eggs on the right side standing on some wooden shelves.

13/25 - Treasure - Beetle (Brown)
Standing on a post to the left of the center-shed area.

14/25 - Treasure - Chalice (Silver)
Enter said center shed and open the chest.

15/25 - Treasure - Beetle (Brown)
Drive the speedboat to the sunken ship area on the north-western part of the map. You'll find it lying on the ground by the left side.

16/25 - Weapon - Rocket Launcher
Same area as previous treasure. Find the weapon in a case, in the sunken ship.

17/25 - BSAA Emblem
Stop by the north-westernmost shed of the area and you'll find it below the roof.

18/25 - Treasure - Beetle (Brown)
After the previous one, you'll find a small area on the right you can climb out off to the water. This one is in there.

19/25 - Treasure - Chalice (Silver)
Climb the remaining ladder in this area and you'll find it in a chest.

20/25 - BSAA Emblem
After finishing this area and opening the gate to the new one, climb off the ladder and look underneath the scaffold.

21/25 - Weapon - S&W M29 (MAG)
Soon as you enter the new village, you'll find it lying on the ground on the first shed on the right (but prepare for a big ambushed fight)

22+23/25 - Treasure - Blue Enigma 1 & 2
Unfortunately I didn't get screenshots of these ones. The point is you need to kill the 2 big masked guys and each of them will drop one. I was too busy running around trying not to die and unfortunately didn't get to screenshot it, but you get the idea.

24/25 - Treasure - Jewel Beetle
You'll find it by the right side of the crane you need to turn around, close to the door.

Extra - Egg
After turning the crane and while on the way to opening the other on the other side, you'll come across this area with 2 pots you can slice. Each of them will have a snake. Killing them might drop you an egg.

25/25 - Treasure - Ceremonial Masl
Open the last treasure on this location to find it, after opening the door on the other side.
Chapter 3-2 | Execution Grounds
1/13 - Treasure - Ruby (Pear)
After the raft scenes, slice/shoot the hanging torch to drop the treasure.

2/13 - Treasure - Sapphire (Square)
Right at the second torch, after the previous one.

3/13 - Treasure - Jewel (Beetle)
At the Tricell camp. First barrel you'll see on the ground, on the center of the camp.

Extra - Egg
Kill some snakes by the Tricell camp to get a chance at dropping eggs.

4/13 - BSAA Emblem
Go to the back of one tent. Then, while at the back, check the space between them.

5/13 - Treasure - Ruby (Pear)
Soon as you arrive at the oil field, aim at the cliff before it.

6/13 - Treasure - Venom Fang
While navigating through the oil field, kill the first chainsaw guy and he'll drop it.

7/13 - Treasure - Venom Fang
Do the same for the second one.

8+9/13 - Treasure - Jewel Bangle
During the elevator ambush, kill the 2 big guys and each of them will drop one.

10/13 - Treasure - Gold Ring
During the second elevator ambush, kill the chainsaw guys and he'll drop it.

11/13 - Treasure - Gold
Soon as the timer scene starts, turn around to the dock and get the suitcase for 3k gold.

12/13 - BSAA Emblem

13/13 - Treasure - Gold Ring
The last big guy (with the dogs) drops one. Sorry for the blurry screenshot. It was a tense countdown :v

Chapter 3-3 | Oil Field - Drilling Facilities
1/4 - BSAA Emblem
When the boat stops the first time, turn around and aim upwards where the gate is, you'll find it.

2/4 - Weapon - M3 (SG)
Once the boat stops a second time, wander around until you find a small cabin. This weapon is just outside it.

3/4 - Treasure - Sapphire (Pear)
You'll find it across from the previous weapon after jumping to the other side, laying on the ground.

4/4 - Treasure - Emerald (Marquise)
Still in this area, climb the upper part of it (in front of the boat) and enter the cabin there. Found in the drawer.
Chapter 4-1 | Caves
1/32 - Treasure - Topaz (Trilliant)
While exploring the first caves, there's a small dead end in which you'll need to climb up. It's in a chest afterwards.

2/32 - Treasure - Sapphire (Pear)
After getting the previous one, turn around and aim upwards to find it, before climbing down.

3/32 - BSAA Emblem
In the same area, before climbing the ladder, aim at the open area to find it.

4/32 - Treasure - Emerald (Pear)
After climbing the ladder and crossing the bridge, shoot at the first torch on the right to drop it.

5/32 - Treasure - Sapphire (Square)
Shooting at the next (second) torch.

6/32 - Treasure - Ruby (Pear)
Before reaching the ancient door, aim at the skull laying on the ground, on the right.

7/32 - Treasure - Sapphire (Pear)
Do the same thing for the left skull.

8/32 - Treasure - Topaz (Pear)
Now shoot the nearby torch.

9/32 - BSAA Emblem
After entering the door, aim with your rifle to the open area to find it on the center-left side.

10/32 - Treasure - Topaz (Square)
After climbing down and going to the right, shoot at the square archway.

11/32 - Treasure - Emerald (Pear)
After opening the tomb filled with gold, enter the left doorway and shoot the torch.

12/32 - Treasure - Topaz (Pear)
After the cutscene, go down, kill the zombies, and shoot the torch-bucket on the stairs.

13/32 - Treasure - Sapphire (Pear)
Go behind one of the doorways Sheva was staying after the cutscene, on the other side, and shoot the bucket in there (sorry for the screenshot, I had already shot it).

14/32 - Treasure - Ruby (Pear)
After shooting the previous bucket, investigate the nearby corpse to get this one.

15 + 16/32 - Treasure - Sapphire (Square) + Sapphire (Pear)
After entering the remaining doorway, open the gold-filled tomb which will contain these 2 treasures as well.

17 + 18 + 19/32 - Treasure - Emerald (Trilliant) + Sapphire (Trilliant) + Ruby (Trilliant)
After falling down, there will be 3 chests. One to the left, the right and behind you. Each of them will have one of these treasures.

20/32 - BSAA Emblem
After entering the new area, aim with your rifle to the end of the newly open field.

21/32 - BSAA Emblem
After the QT event with running/escaping the falling boulders, you'll come to a new open area. Aim to the left.

22/32 - Weapon - Grenade Launcher
Go down the stairs and to the left. Left again.

23/32 - Treasure - Emerald (Square)
After getting the weapon, turn around and aim up. Found it here.

24/32 - Treasure - Sapphire (Square)
After pushing the ancient stone statue, it'll show there.

25/32 - Treasure - Idol (Gold)
After getting the previous treasure, go up the staircase and jump to the chest.

26/32 - Treasure - Emerald (Square)
After pushing the second large statue, it'll be underneath it as well.

27/32 - Treasure - Topaz (Square)
After dealing with the new horde of enemies, jump to the platform to progress the level and you'll find it shining on the ceiling.

28/32 - Treasure - Topaz (Square)
Found after pushing the third large statue.

29/32 - Treasure - Sapphire (Pear)
After pushing the fourth statue, it's found underneath it, on the upper level.

30/32 - Treasure - Ruby (Pear)
Same as the previous treasure, but on the lower level, under the statue.

31/32 - Treasure - Ruby (Oval)
After pushing the fifth statue, found underneath it.

32/32 - Treasure - Soul Gem
After defeating the last boss, it'll drop the Soul Gem.
Chapter 4-2 | Worship Area
1/15 - Treasure - Topaz (Pear)
As soon as the level begins, turn around and aim above the door.

2/15 - Treasure - Sapphire (Square)
When you go through the narrow open hallway which strikes the solar beam, stop by one of the small safe stops on the right. This one will be inside one one bucket.

3/15 - Treasure - Sapphire (Pear)
As soon as you pass the previous solar beam pathway on the right, defeat the horde of zombies and check the ruins on the right.

4/15 - Treasure - Emerald (Pear)
After the second solar beam, go to the right to find it in a bucket.

5/15 - Treasure - Ruby (Pear)
Find shelter in one of the ruins between the next beams and this one will be embebbed in it.

6/15 - Treasure - Blue Enigma
Once you assist jump Sheva and she grabs the Sky Emblem, defeat the big guy and he'll drop it.
7/15 - Treasure - Topaz (Square)
Backtrack to where the solar beam hits on the long corridor and take a right to find a new solar beam. Also found in a bucket on one of the safe spots on the right of this corridor.

8/15 - Treasure - Blue Enigma
After defeating the second big guy, after getting the Sea emblem, kill him to get the second Blue Enigma.

9/15 - Treasure - Diamond (Trilliant)
After inserting the 3 emblems, climb the long stairs and aim above the door to find it.

Extra - Egg
After opening the door, there's a snake nearby who might drop an egg.

10/15 - Treasure - Ruby (Pear)
After going down on the first sunbeam puzzle, get to the stairs on the left and you'll find it on the ground. If you can't find it, probably Sheva has picked it for you already.

Extra - Egg
After the third puzzle, a new door will open which has a treasure and several pots on the side. Breaking these pots will spawn some snakes which drop some eggs.

11/15 - Treasure - Idol (Gold)
After solving the third sunbeam puzzle, a new door will open which will have this treasure inside it, as well as some pots which will contain gold and snakes (which will drop some eggs).

12/15 - Treasure - Ruby (Pear)
In the same room of where the Iron (Gold) is, shoot the skull on the right.

13/15 - Treasure - Emerald (Pear)
In the same room of where the Iron (Gold) is, shoot the skull on the left.

14/15 - BSAA Emblem
In the room where the skull is hanging, turn around and you'll find it above.

15/15 - Treasure - Beetle (Gold)
In the remaining room of the last puzzle, you'll find this treasure there.
Chapter 5-1 | Underground Garden
1/8 - Treasure - Ruby (Square)
As soon as the chapter begins, climb the stairs and turn around. Aim at the crevice above.

2/8 - BSAA Emblem
Walk around the right side of the circular area until you can't anymore and you'll find it under the small bridge.

3/8 - Treasure - Jewel Beetle
Found on the floor on the left side.

4/8 - Treasure - Emerald (Pear)
Before leaving the circular area, aim upwards at the rocks to find it shining there.

5/8 - Treasure - Lion Heart
While navigating through the facility, two enemies will spawn. One of them will drop it.

6/8 - Weapon - AK 47
Found in the monitor room of the facility. Check the map in the screenshot below.

7/8 - Treasure - Gold
In the same room there's a safe. It's inside it.

8/8 - Treasure - Lion Heart
This one is optional. The last batch of enemies that spawn right at the end of the level while waiting for the elevator will drop one.
Chapter 5-2 | Experimental Facility
1/5 - Treasure - Lion Hearts
In the corridors where you need to fight the creatures, they will drop it. I managed to get 3 of them.

2/6 - BSAA Emblem
After walking through the rollways of explosive barrels, drop down the ladder on the left and you'll find the emblem inside a trash container.

3/5 - Weapon - SIG 556 (MG)
Right after getting the previous emblem, turn around and you'll find it.

4/5 - Treasure - Power Stone
After turning on the generators, the praying mantis type enemy will spawn. It'll drop it once killed.

5/5 - Treasure - Dead Bride's Necklace (2)
In the conveyor belts with the undead laying on the ground, there's a chance these bodies will have the necklaces on their hand. As far as I know you can get two of them here. If you aren't getting them, just stand in the middle and wait for these bodies to spawn until you grab them.
Chapter 5-3 | Uroboros Research Facility
1/18 - BSAA Emblem
Enter the door and shoot this BSAA emblem which appears intermittently behind the running fans.

2/18 - Treasure - Sapphire (Marquise)
Enter the room after the fans and open the safe.

3/18 - Treasure - Power Stone
The area where you need to defeat the praying mantis type enemy, it'll drop it, You can get more than one praying mantis type enemy to get up to 3 Power Stone, however, I only managed to get 2. If you know exactly how it works, pls leave a comment.

4/18 - Weapon - H&K PSG-1 (RIF)
The room ahead with a bunch of ammo has this weapon inside a steel case.

5/18 - Treasure - Jewel Bangle
After pulling the lever, the big guy will drop the Jewel Bangle once killed.

6/18 - Treasure - Royal Necklace
In the control room, before the next objective, you'll find it on the right.

7/18 - BSAA Emblem
In the big circular room with several body capsules, aim at the balcony upwards.

8/18 - Treasure - Ruby (Brilliant)
After the long circular platform scene, aim at rocks above before entering the new area.

9/18 - BSAA Emblem
In this new industrial/construction area, you'll find an elevator on the left, leading to hole on the left. This BSAA emblem is located in it.

10/18 - Treasure - Lion Heart
This is a good area to loot Lion Hearts, dropped by the amount of Lickers spawned here after the elevator part. (I got 3 out of this wave, I'm not sure if you're always gonna get 3)

11/18 - Treasure - Chalice (Gold)
Inside a locker room you'll unlock after pushing the container on the catwalk upstairs.

12/18 - Treasure - Topaz (Brilliant)
Before opening the door to the next area, aim upwards and it'll be shining there.

13/18 - Treasure - Emerald (Brilliant)
In this new area, climb the stairs on the right and go all the way back. Smash one of the pots to find it.

14/18 - Treasure - Sapphire (Oval)
Still in the first Phase of the boss fight, enter the open door on the right (bottom floor), up the stairs, and go all the way up until you find an open doorway. Check the pot on the right containing this one.

15/18 - Treasure - Sapphire (Brilliant)
Right after the previous one, continue on until you see a treasure (or a stone coffin (?)) on the the left. It's inside of it.

16/18 - Treasure - Emerald (Oval)
Also in the coffin of the previous chest.

17/18 - Weapon - L. Hawk
Also in the coffin.

18/18 - Treasure - Heart of Africa
Deal enough damage to Wesker in the first Phase of the boss fight and this treasure will be between the stairs on the next phase (grab it before you remove the device from her chest)
Chapter 6-1 | Ship Deck
1/15 - BSAA Emblem
This one can be a bit tricky. After climbing the first tower, aim with your rifle from afar and spot it in the antenna-like thing in the distant.

Note: Shoot 4 guys from afar (You need to leave a specific guy alive - please refer to the screenshots to know who - otherwise the Keycard scene will not proc later on) from this tower as well.

2/15 - Jewel Bangle
The big guy will drop it once killed. The dogs might drop it as well.

Extra - Egg
After getting the Jewel Bangle, a couple of dogs will spawn. There's a chance they will drop an egg.

3/15 - BSAA Emblem
Found inside of a container (seen in the screenshot). You need to throw a grenade, shoot with a Rocket Launcher or a Grenade Launcher to get this one.

4/15 - Treasure - Topaz (Oval)
After the ambush, grab the Keycard, lift the container and open the new card with it. Climb the stairs and on the right you'll find this treasure.

5/15 - Treasure - Topaz (Oval)
Rejoice with Sheva and find the treasure nearby.

6/15 - Treasure - Gold Bars
Walk straight, through the green container and jump the several containers afterwards. Open the safe to find it.

7+8/15 - Treasure - 2 Jewel Bangles
Turn around and backwards and go back from where you came and turn left. 2 big guys will ambush you. Each of them will drop a Jewel Bangle.

9/15 - Treasure - Topaz (Oval)
Right nearby the Jewel Bangles, you'll find the Topaz treasure laying in this area as well.

10/15 - Treasure - Gold Bars
Jump to the container on the left and let Sheva lift you up. Walk around this new area and drop down to a new area where you can lift a container. After doing so, open the safe on the left.

11/15 - Weapon - Jail Breaker
After entering the tanker, go all the way downstairs and find it there.

12/15 - BSAA Emblem
In the next room after the cutscene, aim to the cupboard/draw on the right and shoot the last BSAA emblem.

Note: This should trigger the achievement for getting all the BSAA emblems.

13 + 14 + 15/15 - Treasure - Dead Bride's Necklace
In the very last room of this level there will be 3 rocket launcher guys. Each of them will drop it once killed.
Chapter 6-2 | Main Deck
1/2 - Treasure - Chalice (Gold)
After the escaping cutscene, you'll be inside the deck. Continue walking until you find a room on your right. The treasure is inside a locker to the right.

2/2 - Treasure - Chalice (Gold)
Go upstairs and open the door on the left. Then, open the middle locker.
Chapter 6-3 | Bridge Deck
7 Comments
Eerie Goes D  [author] Apr 30 @ 11:21pm 
Hey @Dominatic!
Thanks for letting me know man. It looks like I already had the screenshots stored locally, but for some reason I forgot to upload them to the guide. Turns out there were a total of 4 items missing in 5-3. I've added all of them.

I'll finish 6-3 soon enough. Thank you once again!
Dana_Chaos Apr 10 @ 3:49pm 
sehr gut!:re0redherb:
Dominatic Apr 5 @ 10:46am 
Hey, thanks for the guide!
There are 3 non-mentioned Treasures, which you should add.

I am missing these after your guide and have still to Check for the Sapphire myself, but here are the missing infos:

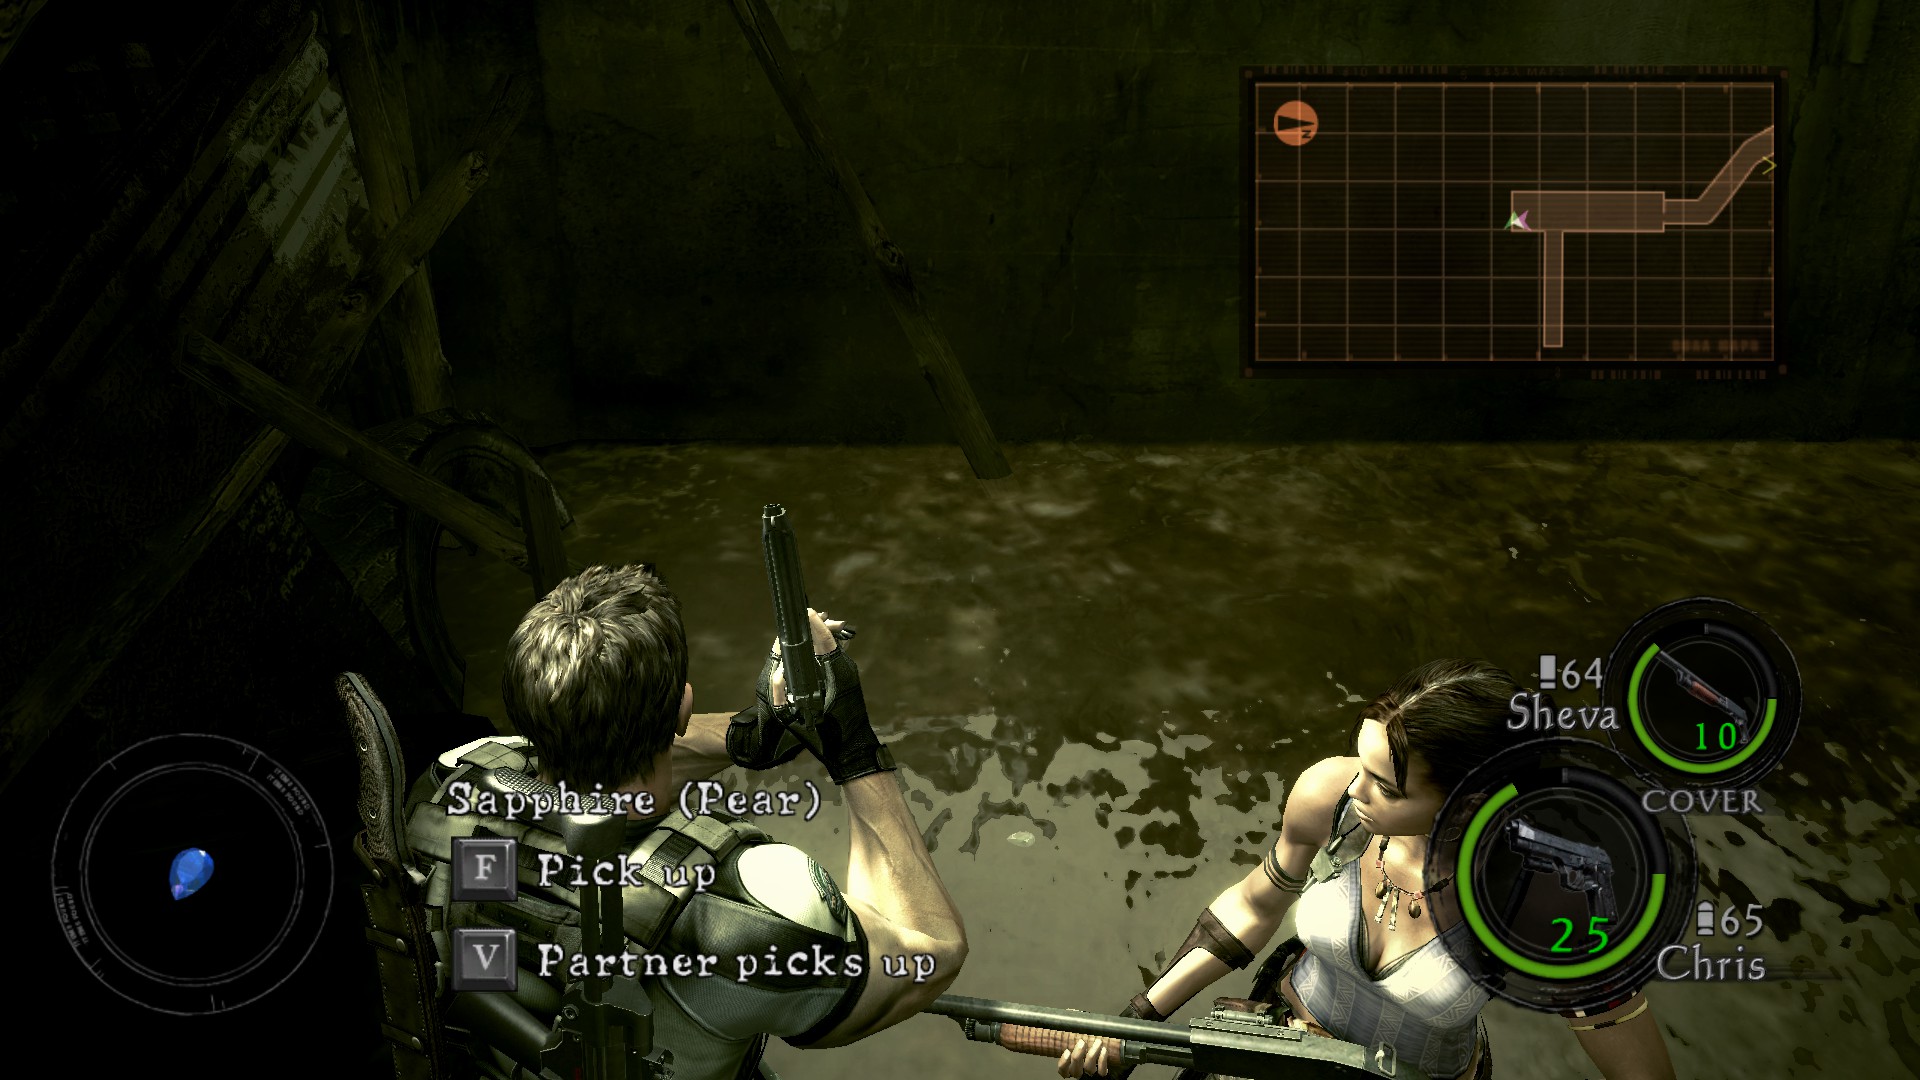
- Sapphire (Oval) in the First Phase of the Boss fight from 5-3, in a small jar on a shelf.
- Hearth of Africa / Diamond (Heart) also in the "Boss fight's" second phase in 5-3, between the stairs.
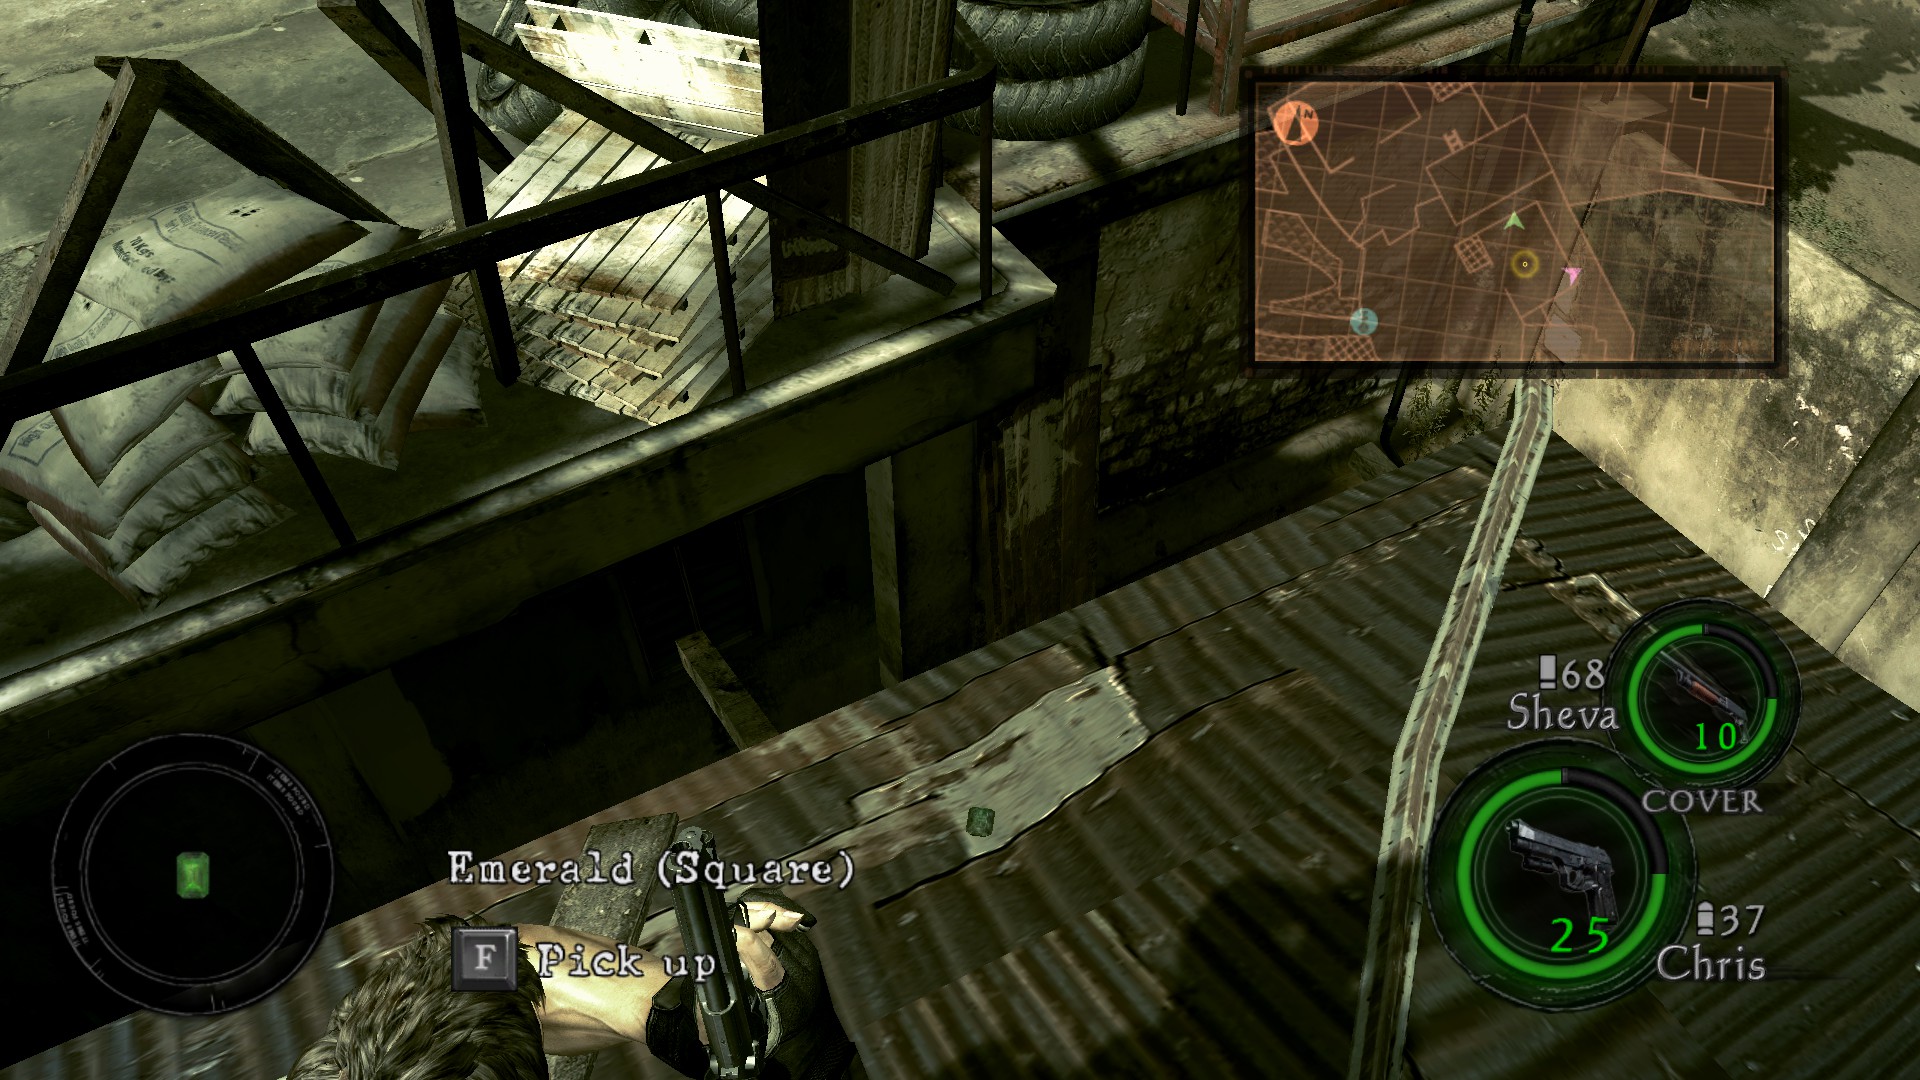
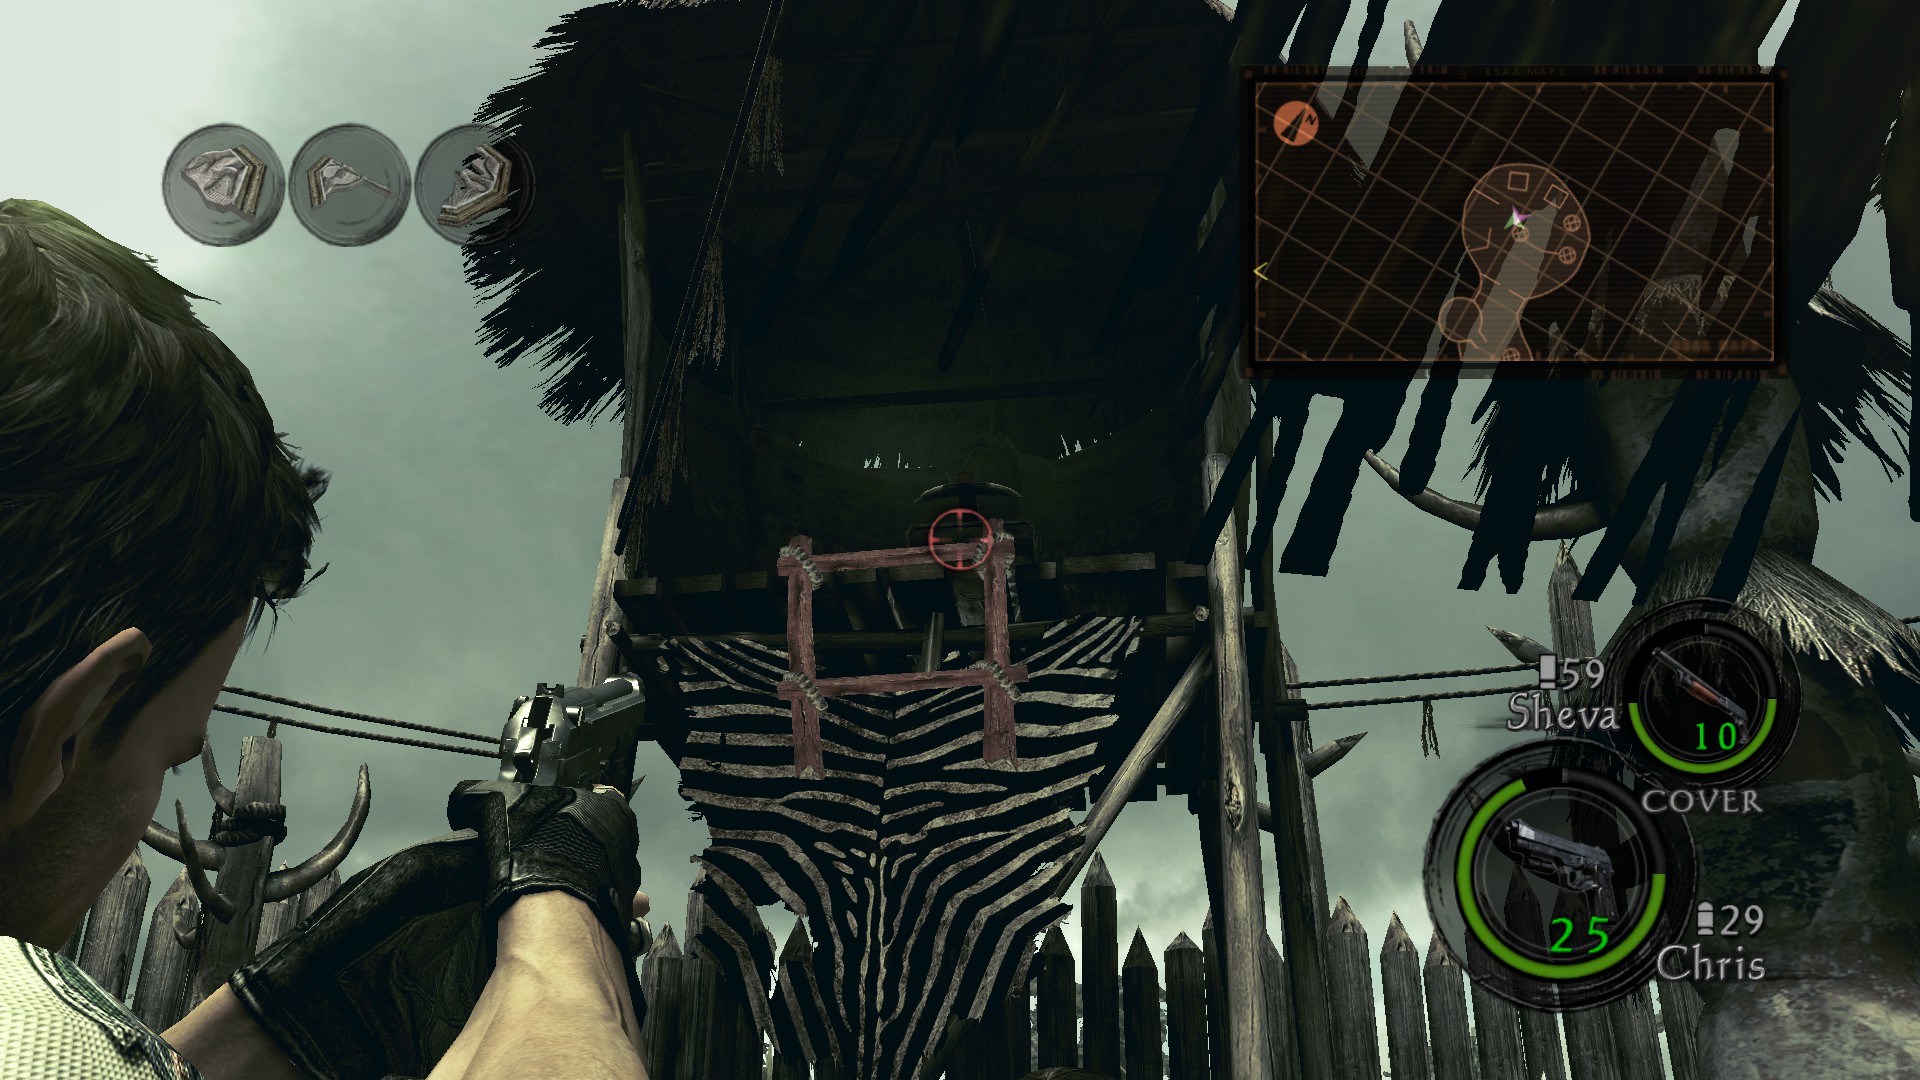
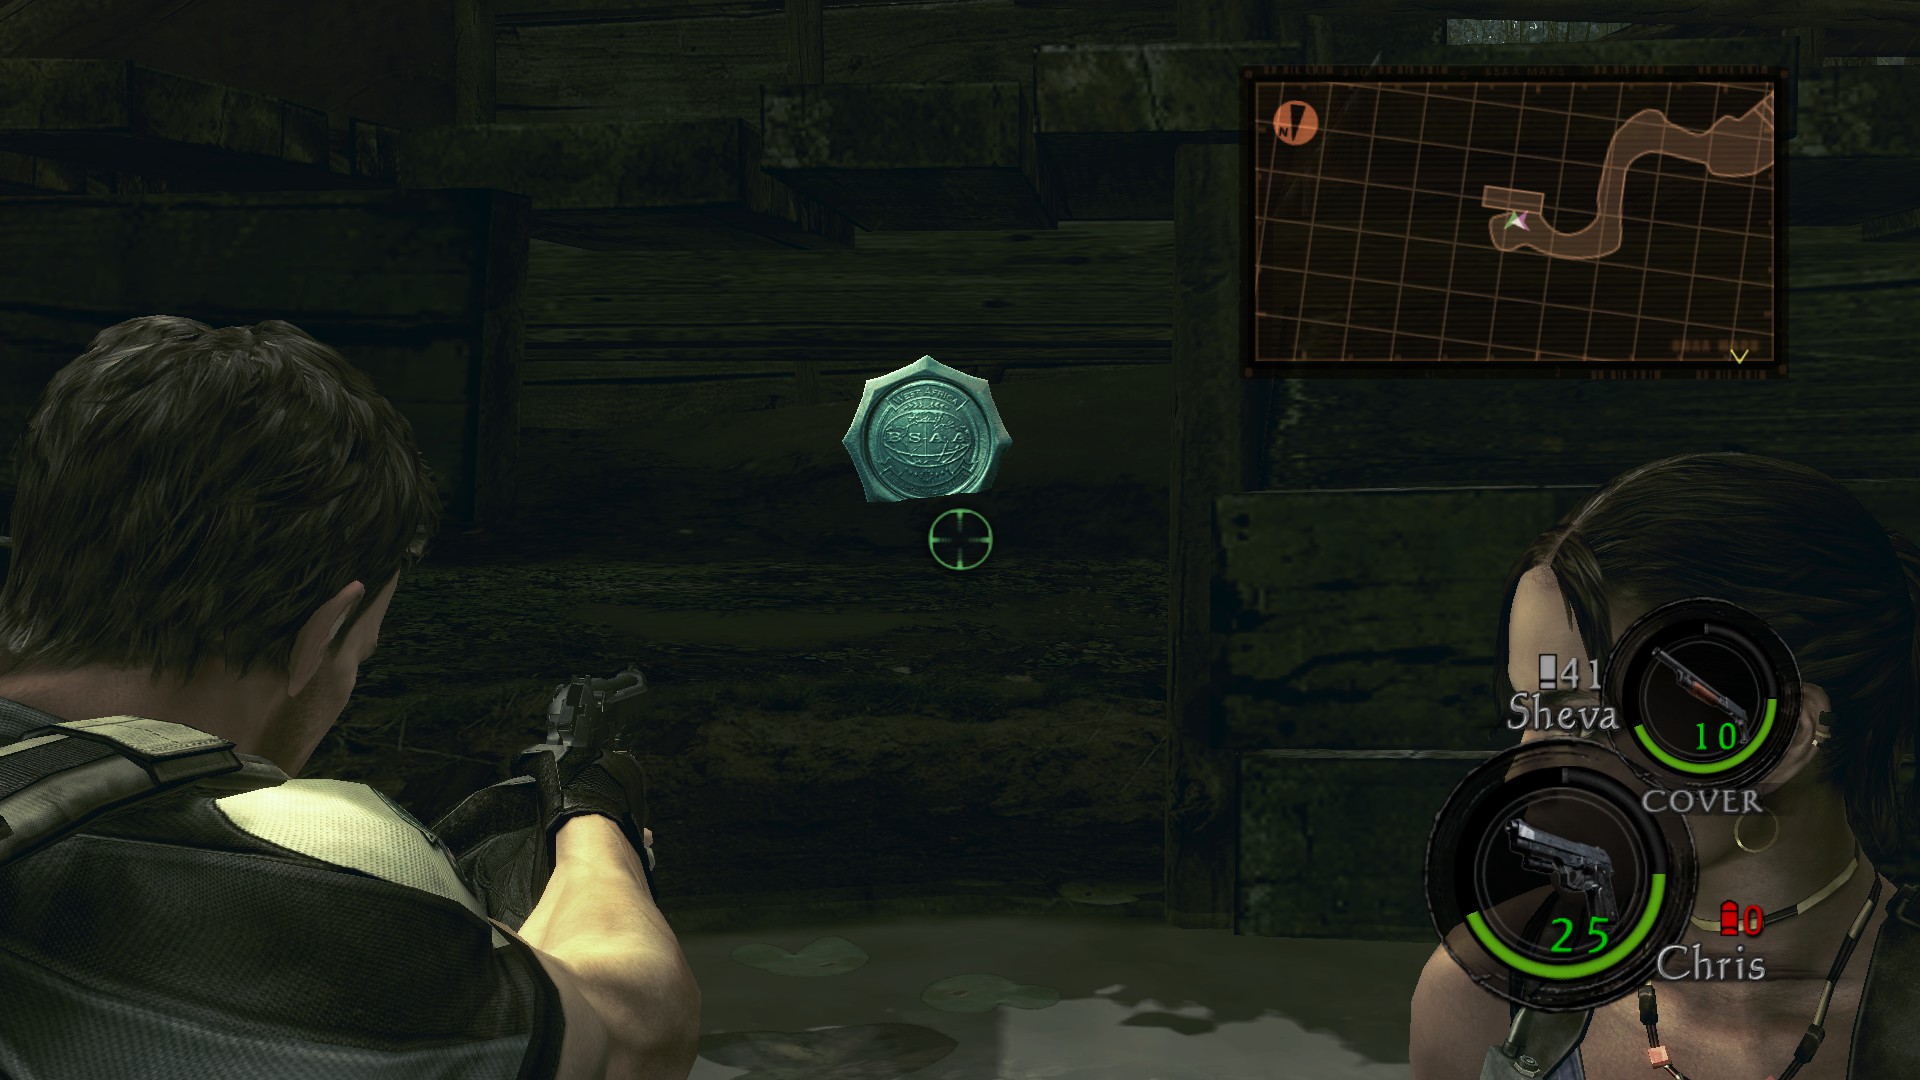
- Diamond (Marquise) in 6-3 in the last (hot) area at first contact with the boss, turning around and shoot it from the wall (only with Chris, if hes alone is capable of going down there)
Eerie Goes D  [author] Mar 25 @ 4:42pm 
Hey there, thanks for the feedback! I've noted it and fixed the typo.
Wolfguardiann Mar 17 @ 7:47am 
on 3.1 final part, theres 2 ''24/25'' little typo
Wolfguardiann Mar 17 @ 7:08am 
on 3.1 as well, right after 10/25 - i found a Golden egg instead a brown!

There was a chicken there, probably it laid that egg?

Just Fyi
Wolfguardiann Mar 17 @ 7:03am 
Great Guide, im at 3.1 so far!

at the 3.1 itself where you state that the egg drop might be radom, i've got it as well! does't seems to be random