Back 4 Blood
Оценок: 494
Back 4 Blood 100% Achievement Guide (+All DLC)
От Raptvre
Back 4 Blood achievements work similarly to its predecessor, Left 4 Dead. There are some natural campaign progression achievements, some hidden collectibles, and some grindy and specific ones that require a little bit more work. All in all this is a fun type of game to 100%! This guide includes information on the Tunnels of Terror and Children of the Worm DLCs.
12
6
3
11
5
3
3
3
2
2
2
   
Наградить
В избранное
В избранном
Удалить
Introduction
Welcome to this 100% Back 4 Blood Achievement Guide!

I was looking for more information while hunting, and was surprised that there were no complete achievement guides made for this game yet, so I decided to make my own. I have 100% the game, it took around 122 hours, but you could probably do it faster if you have a more consistent group for the struggle that is Nightmare difficulty (pre Tunnels of Terror DLC). I would also like to add more details, like screenshots for the secret locations and more specific and helpful information for some of the trickier ones. So, this guide will be a work in progress, and updated regularly for some time.

I hope you enjoy!
Fort Hope Achievements
These achievements can all be done in lobby.

Welcome to the Apocalypse
Good luck out there, you're gunna need it.
You'll get this one when you complete your first campaign mission. Unfortunately, solo runs do not award progress including achievements.

Squad Up
Form a party in Fort Hope.
Have someone join your lobby while still in Fort Hope.

Expanding the Arsenal
Spend your first Supply Point.
Supply points are earned by successfully completing a campaign mission, or winning or losing a game of Swarm. You can spend them on Supply Lines. Look for a woman in a red hijab and cowboy hat named Chenda, the Supply Line vendor, to check them out.
Unmissable Campaign Achievements
All of these achievements are obtained via natural progression through this games campaign. There are also achievements for completing each Act of the campaign on the three difficulties.
You must be alive when the team finishes the mission in the Safe Room. You can be incapped, controlling a bot, dead then revived or rescued, but not completely dead, otherwise you will have to redo that mission.
Edit: As of the November 2021 patch, this seems to no longer be the case. As long as someone makes it to the Safe Room to continue the game, it should count.

Paid the Toll
Complete the Devil's Return.


This Round's On Me
Complete Search & Rescue.


Breakfast Can Wait
Complete The Dark Before The Dawn.


Enemy of Mine
Complete Blue Dog Hollow.


Act 1 Recruit
Complete all Act 1 maps on Recruit difficulty or higher.


Act 1 Veteran
Complete all Act 1 maps on Veteran difficulty or higher.


Act 1 Cleaner
Complete all Act 1 maps on Nightmare difficulty.


Bob's Your Uncle
Complete The Armory.


Down the Drain
Complete Plan B.


Of Biblical Proportions
Complete Job 10:22.


Act 2 Recruit
Complete all Act 2 maps on Recruit difficulty or higher.


Act 2 Veteran
Complete all Act 2 maps on Veteran difficulty or higher.


Act 2 Cleaner
Complete all Act 2 maps on Nightmare difficulty.


Don't You Eat My Neighbor
Complete Dr. Roger's Neighborhood.


Paved With Good Intestines
Complete Remnants.


Act 3 Recruit
Complete all Act 3 maps on Recruit difficulty or higher.


Act 3 Veteran
Complete all Act 3 maps on Veteran difficulty or higher.


Act 3 Cleaner
Complete all Act 3 maps on Nightmare difficulty.


Act 4 Recruit
Complete Act 4 on Recruit difficulty or higher.


Act 4 Veteran
Complete Act 4 on Veteran difficulty or higher.


Act 4 Cleaner
Complete Act 4 on Nightmare difficulty.
Missable Campaign Achievements
Snitches Get Stitches
Kill a Snitch without it alerting the horde.
The easiest way to do this is to use a frag grenade. You can also flashbang them and quickly finish them off with a shotgun or a suppressed weapon. There is a Corruption Card that spawns mutated Snitches that alert the horde even on insta-death, so it's not possible in that scenario.

Breakfest
Kill a Monstrous Breaker after removing all of its armor.
Monstrous Breakers only spawn on Nightmare difficulty. On Act 1: A Clean Sweep, there is a guaranteed Breaker spawn as you fight off the horde in front of the gas station. Every single weakspot will have armor than needs to be removed before you can kill the Breaker. These include: upper left chest on the front, outer thigh on left leg, outer thigh on right leg, and on its right upper back. The armor makes a metal sound when shot in case you're having a hard time seeing it. You will have to be somewhat fast, as the survivors on top of the gas station are 'helping' in the fight.
The second and much easier way is to spam the Breaker with frags, which is how I got it. You can also get the Breaker stuck on the walls sometimes, but I can't seem to do it consistently.
Edit: Apparently there is a small chance for a Monstrous Breaker to spawn on Veteran difficulty as a random Boss Card.

Jugger-not
Make a Breaker hurt itself.
Basically you have to lure a Breaker to pounce into a explosive, this can be red barrels or gas and propane tanks. The same spot as the last Breaker achievement will work for this, Act 1: A Clean Sweep. When you come up to the garage door and fight off the horde a Breaker will spawn. There will be gas and propane tanks in the area, so you can either place them where the Breaker will pop out, or lure him towards where they spawn.

Brute Force
Kill an Ogre with the Howitzer.
Load Act 1: The Sound of Thunder on Veteran or Nightmare difficulty. The Ogre will not spawn on Recruit difficulty unfortunately. After you shoot 4/6 rounds of the Howitzer the Ogre will spawn. All you have to do is quickly load up another shell and fire as he's exiting the cave. It's not necessary to have use speed cards for this, but it will really help (Screwdriver, Multitool, Headband Magnifier). If you miss this window, have a teammate lure it in front of the Howitzer and fire; it only takes one round to kill him. This achievement will pop for everyone in the lobby.
My friend was kind enough to clip the end of us successfully getting this one:
https://www.youtube.com/watch?v=IpTHayIA3zk

Clean Up Crew
Complete a mission without any players being incapacitated or killed.
There are a lot of really short missions, play one of those on Recruit and this achievement shouldn't be too hard.

Grateful Eight
Complete a mission with each Cleaner.
Successfully finish one mission as Holly, Evangelo, Mom, Walker, Hoffman, Doc, Jim and Karlee. The latter 4 are unlocked after you make it through the first half of Act 1: Resurgence, Tunnel of Blood, Pain Train and The Crossing.

Apocalypse Pacifist
Complete a map without any players on the team killing a single Ridden.
You need at least 2 players for this, as solo runs don't currently award achievements.
Edit: This is now doable in offline mode if want to do it solo.
Bot kills apparently do not affect your ability to unlock this achievement, however. I suggest attempting this on a really short mission like Resurgence, on Recruit difficulty. Pick cards for health and speed/stamina, and make sure no one is running Combat Knife, so your bash doesn't kill. You'll need to be able to shove zombies back if surrounded without accidentally killing them. Run through as fast as possible, avoiding hazards like crows. As long as no real players kill a Ridden, the achievement should pop as long as 1 person makes it to the Safe Room.

Dead Quiet
Complete a map without ever triggering a horde from Reekers, Birds, Snitches, or alarms.
The Cleaner Karlee can sense nearby hazards which can be helpful for getting this achievement. A coordinated 4-man team in comms will make getting this achievement less of a pain, just take it slow, kill Reekers from far away, avoid the birds, and leave that damn money in the cop car.

Stacked Deck
Play 25 cards in a single match.
You need to have 25 Intel Cards active in one game. This should be an easy achievement with consecutive campaign play, but it seems to be bugged at the moment. If you aren't having any luck getting it, try queuing via Quickplay.

Jukebox Hero
Defend the jukebox in Bar Room Blitz without breaking it.
The jukebox is on Act 1: Bar Room Blitz. This will be easiest on Recruit difficulty. Try to start with a Team Offensive Item Upgrade and a Team Offensive Slot for more and better quality razor wire. Buy as much from the vendor as you and your team can. Place the razor wire around the jukebox to keep common Ridden off it. I also recommend having a person or two guarding close by with melee and another one or two people who can identify and take down the Special Ridden as they spawn.


Nemesis
Safely descend the ladder in the construction zone in Resurgence.
On Resurgence through the construction area there will be an area you need to drop down. Just go up to the ladder and press E, then hold W. I know this is one of the hardest achievements in the game, but avoid your impulses that tell you to just jump.

Brought a Knife to a Gunfight
Complete a level while getting at least 50 kills with melee weapons.
This one is pretty easy. Just pick a character that starts with a melee weapon like Holly or Evangelo, and practice your swings. It helps to bring a deck catered towards a melee build too, but on easier difficulties it's not necessary.

A Humerus Weapon
Kill 10 Ridden with Bob's Arm.
On Act 2: A Handy Man, you will destroy Nests to uncovered parts of Bob. On the third and final one, you will find Bob's arm which is necessary for accessing the Safe Room. This can be used as a melee weapon. Only one person can wield it at a time, so if you have multiple people in a group that want the achievement, save a cop car alarm to trigger a horde for more Ridden to kill.
Secrets in Campaign Achievements
These achievements involve finding a golden skull on certain maps, the you 'collect' by pressing E on. I will include screenshots and a brief description of the location, but if you prefer video guides, I highly recommend you check out this one:
https://steamcommunity.com/sharedfiles/filedetails/?id=2623432626

Port Man Toe?
Find the secret in The Devil's Return.
Just before the Ferry boat if you hop off the bridge to the right, there is a cargo container. It is crashed into the side of the boat, at the bit closest to the boat the golden skull trophy is there.

Bell Hop
Find the secret in Search & Rescue.
In the building that you first rescue survivors in, on the floor above where you enter, there is a desk in the back left corner. The golden skull is under that desk.

Pallet Cleanser
Find the secret in The Dark before the Dawn.
All the way right before the Safe Room, there is an area of stacked pallets. The golden skull is on the closest on to the door, and requires a bit of easy parkour to reach.

Easily Mist
Find the secret in Blue Dog Hollow.
Go past the 'creepy trail' that the Cleaners remark on where the trail forks. Once you reach the first cabin, back track to a hill of stone, and the golden skull will be on its peak, next to a tree.

Cooped Up
Find the secret in The Armory.
Fight your way through the garage. Follow the street to a construction area in the backyards of the houses. Behind the furthest house, the golden skull will be in the chicken coop.

Dangerous To Go Alone
Find the secret in Plan B.
Play as normal until the stream you're on turns into a waterfall. Drop down to the bottom, and at the base of it there will be the golden skull.

Cryptozoologist
Find the secret in Job 10:22.
When approaching the Church, take the road to the right. This will lead you to a graveyard. At the furthest back right corner, there will be a crypt you can enter, and in the left corner by the door there will be the golden skull.


Night of the Living Hedge
Find the secret in Dr. Rogers' Neighborhood.
Once you make your way through the hedge maze to the mansion, turn back around. From the front of the mansion, take the path just right of the stairs leading back down. It is at a dead end, not far from here.

Extra Credit
Find the secret in Remnants.
Once you have the generator pop the bleachers out, go up on the roof. In the midway point of the roof, there is a tent tucked behind some ducts, and the golden skull is inside. If you reach a drop down area with busses, you've gone too far.

Mind Your Step
Find the secret in The Abomination.
This golden skull can be found in the 3rd phase of the bossfight. The area where it can be found is where the Abomination will walk through at around 1:40 on the timer, however you can run ahead and get it before that. If you follow the direction of the caves, you'll come onto this chasm with a bunch of intersecting flesh-rope bridges. The closest one on the right will lead to a little divot in the wall where you can find the golden skull.
Miscellaneous Achievements
Aside from one, all of these achievements can be done in both of the game modes, Campaign and Swarm.

Swarmed
Win a game in Swarm Mode.
This one is easy, just win a game of swarm.

Good Riddence!
Kill 53,600 Ridden over your career.
This can be done in campaign or swarm mode, just kill a bunch of Ridden. It will probably be one of the last achievements you get. If you don't want to get it through playing the game normally there are a few ways to farm kills easier.
Method 1:
If you have a friend or second account, have them idle in the spawn room. Playing Holly or Evangelo speedrun to the Safe Room on the account you want the achievement on. Once the Safe Room door is closed all the spawns will be near you, and you can kill them through the wall with melee. Just watch out, it seems like acid can damage you so it's not 100% safe.
Method 2:
On Act 3, The Road to Hell, there will be infinite spawns of ridden to kill right before the Safe Room door at the end of the mission. A standard melee build would work well for this method but if you want to use a gun you'll need a custom deck so you don't run out of ammo. Make sure to put the most important cards first, as the first 6 will be automatically dealt.
Necessary cards: Confident Killer, Reload Drills, Widemouth Magwell, Ammo Stash, Ridden Slayer, Reckless Strategy, Patient Hunter
Also helpful: Combat Training, Large Caliber Rounds, Hydration Pack, Grenade Training, Demolitions Expert, Mag Carrier, Antibiotic Ointment, Avenge the Fallen.

No Time for a Nap
Revive a fallen teammate.
Go up to an incapacitated teammate and hold E. This is easier with certain cards that let you revive faster.

Hippocrates Would be Proud
Heal a teammate.
You can use any of your healing items, painkillers, bandages or a medkit, on an injured teammate. Doc can also apply field dressings to each teammate once per level, no healing item required.

Share the Load
Drop some ammo for a teammate.
Simply press tab and drag and drop any type of ammo off the side to drop it. I believe a teammate must actually pick it up for the achievement to pop though, so make sure it's a type they need.

Don't Ask...
Rescue a teammate from a cocoon.
One of the special Ridden, Hockers, spit a projectile that webs a teammate in place. To free them, just run up and melee them. Saving a teammate off the wall after they died and respawned also works.


Down, But Not Out
Kill 15 enemies while downed.
The easiest way to do this is to go down with a melee weapon out. Have a teammate who is not incapacitated stand near you to lure Ridden over you, and hack and slash like mad.

Smörgåsbord
Kill at least one of each non-boss Mutation.
Kill one of each of the following special Ridden: Snitchers, Sleepers, Bruisers, Tallboys, Crushers, Stingers, Stalkers, Hockers, Reekers, Exploders and Retches.
Tunnels of Terror DLC
These achievements are from the 'Tunnels of Terror' expansion that released on April 12th. You do not have to own the DLC to get the achievements as long as you're playing with someone who has it.

Master Spelunker
Complete All Ridden Hives.
One ridden hive will spawn per level, and all players must be near the entrance to enter. There are 7 different variations on the hives; you must complete each once to get this achievement. The types are Sunken Passages, The Cut, Brood Lair, 300 Below, Blood Stream, Caustic Cesspool, and The Nursery which is always the second level of a hive that you can do optionally for another 3 totems. To farm hives just load up a short level, and you'll have this achievement in no time.

Overwhelming Power
Get a kill with a Legendary Weapon.
Only obtainable in the ridden hives, legendary weapons have unique perks to add to your arsenal. There is a melee type, The Tenderizer, which is a giant hammer that deals explosive AOE damage and dismembers enemies on impact. Then there is the shotgun, Damnation, that has incendiary rounds. The pistol is called Embezzler, and nets you 10 copper per killing blow. The LMG is called Nemesis and draws aggro to the wielder within 30m. Pestilence, the assault rifle, has a damage stacking (3/s) and damage nullifying effect (1% on target) on successful hits. The sniper rifle, Witness, highlights targets and increses damage dealt by 20%. Finally is the SMG, Prototype 378, that charges lightening rounds to slow enemies. You only need 1 normal ridden kill to get this achievement, just be the person to open a warped cache and grab the legendary weapon fast.(There may be more but these are all I have seen for now).

Totem Toter
Earn some Skull Totems.
Simply exit a hive with one Cleaner holding at least 1 totem, combined or uncombined.

Using Your Noggin
Kill 10 Ridden with a Skull Totem.
When holding a Skull Totem it can be used as a melee weapon, and it's easy to get 10 kills in the hives. To drop the Totem so your teammates can get the achievement too swap to any weapon, healing, or utility item.

Unnatural Selection
Kill each of the Warped Ridden
The Warped Ridden spawn in the ridden hives. There are 3 types: Urchin; the stinger type variant, Shredder; the retch type variant, and Ripper; the tallboy type variant. It seems like only kills by your own hand count, so be vigilant and scout ahead from your team. With certain Corruption Cards they can spawn on normal stages as well.


Left Ventricle
Find the Secret in The Nursery.
The Nursery is always the secondary ridden hive you can enter while in another ridden hive. Upon sliding down, go the the flesh bridge in front, and slight to your left, and the golden skull trophy should be lodged in the highest part, again slightly on the left side.

Nook, Or Cranny?
Find the Secret in Sunken Passages.
You can get this one pretty early on. Follow the main cave, staying left. You'll pass through a narrowed area glowing red, then jump across a few ledges, pass through a small tunnel, then immediately on your left will be the ramp you need to jump off of to reach the golden skull trophy.

Unholy Grail
Find the Secret in The Cut.
Along the main path, just before the large cavern with your final totem and exit, there is a smaller endless pit. Slightly sunken into the rock edge on the left you will find your golden skull trophy.

Precarious Perch
Find the secret in Brood Lair.
You can see the totem when you first enter the large chamber with all the flesh bridges, it is up high on your left. To reach it, you need to find the doors that lead you up the main structure. From there, stay right and there will be two small platforms you can hop across, leading you to the golden skull trophy.

Backtrack
Find the Secret in 300 Below.
This one is all the way down on the bottom floor, same as the exit. To get to the exit you need to cross a railroad track across a chasm. From that track, turn back into the map and follow that path until you see a large wheel and coal filled minecarts on your left. Tucked next to the minecart is the golden skull trophy.

Round the Riverbend
Find the Secret in Blood Stream.
This one is a little tricky to find. At around the midpoint in this hive, you'll need to drop into a river slide that you can't go back up. A little ways past this you'll find a snapped ladder with a green flare next to a pit. Turn right to a dead end (don't drop down), and the golden skull trophy will be on a small ledge.

Pipe Dream
Find the Secret in Caustic Cesspool.
There will be a section in this hive where you slide down a waterslide. Immediately after turn left, and there will besom rocks to scale. You may have to remove several webbings to get to the top of the waterfall before the slide; that is where the golden skull trophy is.
Children of the Worm DLC
Like Tunnels of Terror, this will be a paid expansion that you can still access if someone in your lobby owns it; it doesn't have to be you. You will not need to do Act 5 on Nightmare for your ZWAT skins going forward, although there are difficulty based achievements still.

Act 5 Recruit
Complete all Act 5 maps on Recruit difficulty or higher.


Act 5 Veteran
Complete all Act 5 maps on Veteran difficulty or higher.


Act 5 Cleaner
Complete all Act 5 maps on Nightmare difficulty or higher.


Act 5 Ace
Complete all Act 5 maps on No Hope difficulty.


Balanced Meal
Have at least five different Food Buffs active at one time.
The Food Buffs are scattered around all maps including non-Act 5 maps. However, they spawn with more frequency in Act 5, especially In The Depths, often in little side rooms. So far I've found:
-Cereal
-Green Beans
-Peaches
-Peanut Butter
-Power Bars

Barely Made It
Jump over a Cultist Bear Trap without triggering it.
You can do this straight away in To The Den Of Evil, just hop over a bear trap a few times. They make a loud creaking sound so they're easy to find; alternatively, play Karlee for her hazard detection ability.

Duffel Brothers
Bring 11 Duffel Bags to Saferooms.
Duffel Bags spawn in every level in Act 5 and Act 6, just be more thorough when looting and you'll get 11 in no time.

Who Snipes The Snipers
Kill a Sniper with a Sniper Rifle.
You can get this almost immediately in To The Den of Evil, just start Act 5 with a sniper rifle, or found one of the numerous ones around the map.

Jar Jar Bonks
Hit a Pusflinger with a Bait Jar.
Hold on to a Bait Jar once you find one and save it until Where Me Flock's Chained and In The Depths where Pusflingers spawn most commonly. Try to hit them directly, as I'm not sure if throwing at their feet counts.

Smoke And Mirrors, But Without The Mirrors
Use a smoke grenade to become hidden while at Critical Health.
Use a smoke grenade at your feet at 40 health or below. I happened to get it after being rezzed by the Prophet, when his random card of smoke grenades went off.

Take A Bow
Kill a Crone with the Bow.
I found a bow in the Warped Chests in Ridden Hives. Bring it out of the Hive with you until you find a Crone and make sure you get the kill shot. I'm unsure if you can find bows anywhere else at the moment.

Force Majeure Claws
Kill a Slasher with Iron Claws.
The Slashers do a lot of damage on higher difficulties so it's easiest to do this on Recruit or Veteran. Iron Claws can randomly be found in weapons caches; hold on to them until Where Me Flock's Chained where they spawn abundantly, and make sure you get the final blow.

Left Fork Dead End
Find the Secret in Act 5.
This trophy is found in In The Depths, right before the safe room. After using the minecart to blow the wall up, pass through the hole and immediately turn right, and the trophy is nestled in a groove.
River of Blood DLC
Like other DLC, only one person in a party needs to have it to be able to play the new Act. You do not have to have played previous Acts to play Act 6 either.

Act 6 Recruit
Complete all Act 6 maps on Recruit difficulty or higher.


Act 6 Veteran
Complete all Act 6 maps on Veteran difficulty or higher.


Act 6 Cleaner
Complete all Act 6 maps on Nightmare difficulty or higher.


Act 6 Ace
Complete all Act 6 maps on No Hope difficulty.


TR's Secret Stash
Find the Secret in Act 6,
The golden skull trophy can be found at the end of Act 6 'Grim Discovery', at the T-Rex display you must activate to be able to get into the saferoom.

And The LAW Won
Land a final blow on a Boss Mutation with the LAW.
Hold as many LAWs in your inventory as you can (they take up an offensive slot), and wait until the Harbingers health is very low on the third and final stage of the fight. Once he reveals his weak spot, use a LAW as fast as you can. if you whittled away enough health, this should be a one-shot. You can do it with randoms if you time it well enough, but it's easier done with friends.

This Is Fine
Set an enemy on fire with the Flamethrower, while also being on fire.
Flamethrowers always spawn in the Saferoom in games with the corruption card 'Razor Worms'. Like the Skull Totems, you can hold it along with your primary and secondary weapon. Once you've gotten one, make sure you also have a molotov. Throw it down at your feet as some ridden approach, and quickly spray them before the flames subside. You'll also get if you have Charred Ridden and allow them to get close while firing the flamethrower.

A Can Of Worms
Play Trial of the Worm for the first time.
Hit tab and select the Trial of the Worm game mode. This achievement will pop once you get in a lobby.

Going For Broke
Earn a score of at least 100,000 in Trial of the Worm.
The more difficulty modifiers you apply the higher score you'll get for each individual match. You also have a choice between 3 different maps, and each will offer slightly varying scores. If you're with a good team you can ratchet up the difficulty modifiers and you'll probably get 100k easily in two maps. But for those of you who aren't as skilled, you have 4 maps to get 100k, so you need minimum 25k per map. This includes things that add to your score like teammates surviving, and collected momentos.

The Path To Glory
Complete a map in Trial of the Worm with a total modifier of at least x20.
You can do x20 on the first map in a Trial of the Worm run, so realistically you only need to successfully complete one map for this achievement. I personally added to the difficulty modifier until the total modifier was just over x20. I did it solo with bots, so it wasn't too hard.

Constant Vigilance
Kill all variants of the Sentinel.
The Sentinel is a new Mutation which consists of the Lobber, Swarmer, and Wailer. You only have to kill each once for this achievement, so just playing Act 6 enough times through will likely net you this achievement. One tip is, a flashbang opens up their weak spot, making them easy to kill.

Hard-Boiled
Defeat The Harbinger without using the LAW.
Your team needs to be on the same page for this one; if anyone shoots it with the LAW the achievement in nullified for this run. Other than that stipulation, this achievement is simple. There are 3 phases to the boss fight. Just focus the weak spot when it's revealed, and avoid its attacks. Running Jim and any weakspot cards will make this achievement go faster, since bullets don't do nearly as much damage as the LAW.

LAW and Hor's Doeuvres
Blow up a Food Item with the LAW.
The fortune card Food Scavenger (unlocked randomly via Duffel Bag) will make more food spawn, as well as making it easy to find. The character Heng also increases food spawns in a level. The LAW spawns on the boss fight portions in Act 6 'Behold the Harbinger'. Food can spawn in the lobby before the arena, so leave one or two there if you find them. The first phase of the boss fight will have LAWs and doesn't trap you in, so grab one and go back for the food. There are also more areas between the 3 phases of the boss fight that can spawn food, as well as in the arena itself, so keep at least one LAW on you until you find food. Playing with a friend and bots will make it easier, since you won't have to compete for these resources either.
Thank You!
This guide will be a work in progress as I add more detailed information and screenshots where appropriate. If you have any questions leave them for me and I'll help any way I can.

If it was helpful to you feel free to give it an upvote, award, or a favorite.


Check out my other Back 4 Blood guide here:
https://steamcommunity.com/sharedfiles/filedetails/?id=2858898010
Комментариев: 68
Raptvre  [создатель] 11 янв в 14:40 
@Sir JayTuutius I have one mentioned by name in the achievement description: Resurgence.
JayTuut 9 янв в 23:23 
Apocalypse Pacifist which map is the best?
Hellcat 9 янв в 11:26 
omega_black2999 можешь помочь с достижением выиграть рой
AceloraAmalera 2 янв в 12:39 
Add enxame PVP
omega_black2999 25 ноя. 2024 г. в 8:36 
hello, can someone help with swarm achivement and trial of worm ones? xD.
TheHunterForMilfs 5 ноя. 2024 г. в 5:52 
Add me to Complete ACT 5-6 No HOPE.
SGV.MOUSEHUNTER77n 2 ноя. 2024 г. в 17:43 
Always available to play or help others along the way
Zanndo 20 окт. 2024 г. в 23:13 
If anyone's up to tackle all of the chievos feel free to add me! :illbite:
purrrre 10 окт. 2024 г. в 0:39 
Hi. Can someone please help with the achievements in the game
Luko 8 окт. 2024 г. в 10:19 
Thx for this amazing guide ! :D
1. I did "Share the load" in this way: Tabbed out, drag/dropped some ammo and picked it up myself. Achievement obtained.
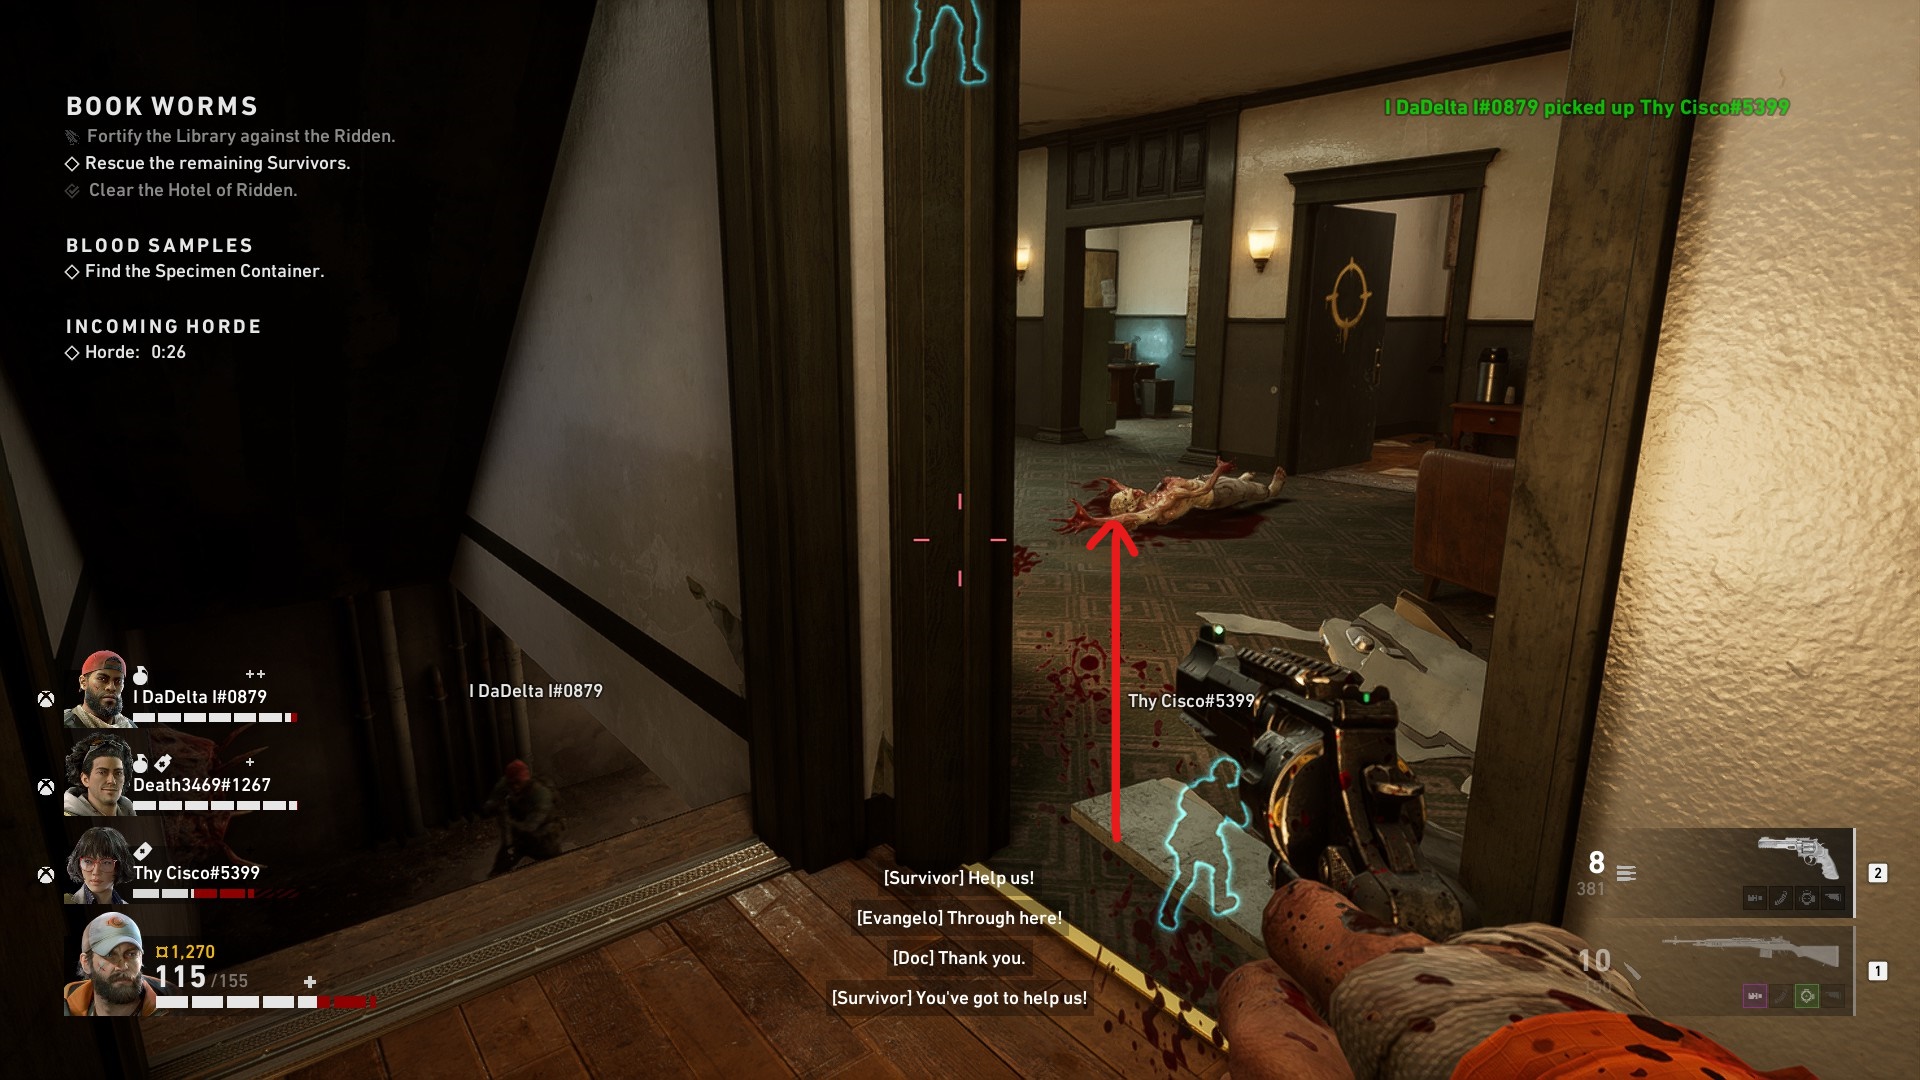
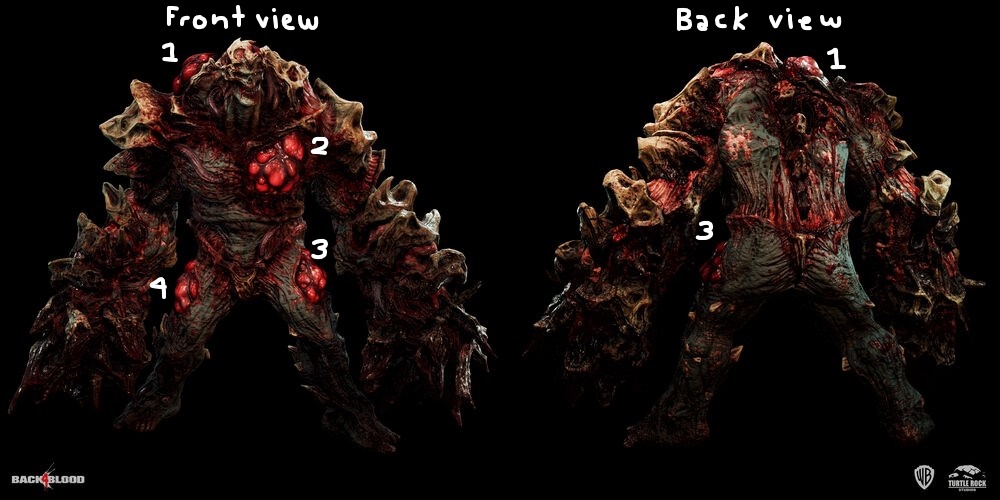
2. Brute Force - The Ogre appeared for me on Recruit level, maybe anything has changed, idk - I killed him with the Howitzer and obtained the achievements.