Still There

Still There

128 ratings
Walkthrough
By peevishdave
Walkthrough for Still There.
2
3
   
Award
Favorite
Favorited
Unfavorite
Day 1
1. Complete the Orb Dialogue
2. LMB click on the Alarm Clock button
3. LMB click on the Photo
4. (optionally) LMB click on the Large Photo
5. Use RMB to scroll the scene right
6. Use the chalk (LMB click → Gear button) on the wall (Move the cursor of the wall → LMB click) 7. Scroll right until you reach the mainframe
8. LMB click on the red blinking button on the keyboard
9. LMB click on “Daily Tasks”
10.LMB click on the first task
11.Scroll left until you reach the control panel (the panel with 3 monitors on top of it)
12.Click on the O2 check switch (CTRL_1, Switch 1)
13.Click on the CO2 check switch (CTRL_1, Switch 2)
14.Click on the H2O check switch (CTRL_1, Switch 3)
15.Scroll right until you reach the Jumpers Panel
16.Pick up the card with the blue label on it
17.Go back to the control panel, use the card with the socket in the bottom-right side of the control panel
18. In CTRL-9, turn down the following switches: B1, A2, B3 a. the other switches must be up 19.Scroll to the kitchen
20.Open the oven, pickup the bowl.
21.Pickup a meal (e.g. one with a green label on it - not the one with the leaf, that is Tuatara’s meal)
22.Scroll to the bathroom
23.Turn on the sink handle
24.Use the bowl with the flowing water
25.Use meal with bowl
26.Go back to the kitchen
27.Use bowl with oven
28.Close the oven
29.Open the oven, eat the meal (use action)
30.After some seconds, Gorky will call you automatically
31.Go to the control Panel. Use joystick, JOY-1, and CTRL-5 to grab the capsule. CTRL-5 is used to select the motion axis (one axis per monitor); Joystick is used to move the robotic arm; JOY-1 is used to control the robotic arm rotation; When arm position is aligned with the capsule and the rotation is synchronized (the two Xs on the first monitor should be one on top on the other), you can move the robotic arm towards the capsule. Otherwise the arm will be pushed back.
32.(optional) Open the capsule in the decompression room.
33.(optional) Take the coffee Take the moka.
34.(optional) Use coffee with moka
35.(optional) Use moka with the sink If there is not water in it, then: a. Go to the bathroom, open the WC b. LMB click on the WC c. LMB click on the button that’s on top of the WC d. LMB click on the recycle button on the left of the WC (under the recycle door) e. Open the recycle door, pick up the pee bag f. Go to the kitchen, open the recycler cap g. Put the pee bag inside the recycler, close the cap, turn on the recycler h. turn off the recycler (water will be back available)
36.(optional) Put coffee on the fist burner, in the kitchen
37.(optional) Turn on the main burners switch, and the first burner
38.(optional) Wait some seconds, then scroll left or right in order to make the moka be out of the camera view - then get back to the moka
39.(optional) Take the moka
40.(optional) Take the cup, which is closer to the control panel
41.(optional) Use the moka with the cup, Drink from the cup.
42.Go to the mainframe → Daily Tasks → Start the 2nd task (Constellation)
43.Read the Constellation name in the mainframe
44.Pull down the Periscope
45.Turn on the Periscope
46.LMB click on the Periscope’s Display
47.Use the joystick to move around and find the constellation with the same name you previously read from the mainframe. By hovering the cursor over a star, you’ll know its name, its constellation and the amount of radiation coming from that direction. You must find the star with higher radiation. Once found, click on it.
48.Press X to exit the Periscope UI.
49.Coordinates and radiation value will be written on the periscope’s display.
50.Go to the mainframe, open the Ray Mail page.
51.Click on “New Mail”
52.Select “Star Updates Service Mail” from the list.
53.Write down the star values in this format 0.30 0.50 5.15 (example values). If your text contains the correct values, Karl will automatically remove any other text from it (e.g. “werqe 0.30wefaw0.50fwe 5.15wefw” is still a valid text to complete the puzzle), complete the mail and send it automatically.
54.Select the last task in the tasks list.
55.Go to the Jumpers Panel, and select the following values: OUTPUT 6 - INPUT 7 OUTPUT 7 - INPUT 2
56.(optionally) play a chess match against gorky
57.Go to the bathroom, open the medical closet
58.Take the syringe and a vial
59.Use the syringe with the vial
60.Use the syringe
61.Wait for the cut-scene and complete the dialogue
Day 2
62.Complete the Flying Diamonds Dialogue
63.Click on “Refresh” in the Mainframe a. If it tells “No signal” then configure the Jumpers this way: OUTPUT 2 - INPUT 7 OUTPUT 7 - INPUT 6 (this connects Antenna to Modem, then Modem to Mainframe)
64.Pull down the Periscope (much down)
65.Pick up the Amplifier on the periscope
66.Use the Amplifier on the X1 socket (right of the radio, left of the manual)
67.Configure the Jumpers: OUTPUT 2 - INPUT 8 OUTPUT 8 - INPUT 7 OUTPUT 7 - INPUT 6 (this connects Antenna to X1, X1 to Modem, then Modem to Mainframe)
68.Go back to the mainframe, LMB click on “Refresh”
69.Go to the kitchen, pickup a fork
70.Go back to the control panel, there’s a metal panel on top of the manual (move the microphone or the periscope if they are covering it)
71.Use the fork with the panel
72.LMB click on the “thing” to stop it
73.Go back to the mainframe, click on “Refresh” again
74.Go to the Radio (left of the manual), Turn on the radio
75.Click on the Crown icon on the Radio
76.Complete the Dialogue with Elle
77.Click on the Emergency icon on the Radio
78.Complete the Dialogue with Grey
79.Go back to the mainframe, click on Discovery a. To setup a Full-Duplex link configure the jumpers: OUTPUT 2 - INPUT 7 OUTPUT 7 - INPUT 6 OUTPUT 6 - INPUT 7 OUTPUT 7 - INPUT 2 80.LMB click on satellite 1
81.LMB click on Dial Up
82.Select Grey
83.Go to Logs, read the number after “Distance” (158)
84.Do the same with satellite 2 (101) In a future release, the first satellite you’ll access will be in Serbian language.
85.Do the same with Bento (179)
86.LMB click on the Post-it near the mainframe monitor
87.Enter the distance data (158,101,179) inside the postit
88.Go back to the radio, click on Grey’s icon
89.Complete Grey’s dialogue
90.Call Elle, complete the dialogue
91.Go to the mainframe, select the Constellation Task - do the same as Day1
92.Select the Beacon Task
93.Configure the Jumpers: OUTPUT 4 - INPUT 1
94.Open the manual, go to the page with a sinusoidal icon
95.Look at the switches matrix image
96.Replicate the same image, by clicking on the switches in CTRL-12
97.Turn Switch 1 on Ctrl-10
98.Modulate CTRL-11 potentiometers in order to match the carrier wave
99.Scroll the scene so that both the keyboard and the three monitors on the control panel are visible
100. You must play the song “Arpeggio del Radiofaro” contained in the manual
101. To do that: hold 1st white button for 1 time slot hold 6th white button for 3 time slots hold 5th white button for 1 time slot hold 3rd white button for 1 time slot WARNING: the current version on Steam doesn’t warn you about wrong notes as soon as you play it (bug), it this happens just play a note many times until the sheet is reset
102. Start the last daily task
103. Configure the Jumpers panel OUTPUT 2 - INPUT 8 OUTPUT 8 - INPUT 7 OUTPUT 7 - INPUT 6
104. Go to the bathroom, open the WC
105. LMB click on the WC
106. LMB click on the button that’s on top of the WC
107. LMB click on the recycle button on the left of the WC (under the recycle door)
108. Open the recycle door, pick up the pee bag
109. Go to the kitchen, open the recycler cap
110. Put the pee bag inside the recycler, close the cap, turn on the recycler
111. turn off the recycler (water will be back available)
112. Take the bowl from the oven
113. Take a meal
114. Redo and eat your meal as in Day 1
115. Re-inject the syringe as in Day 1
116. Go to the bedroom, click on the bed
117. Complete the dialogue with Elle
Day 3
118. Complete the Reverse Dream
119. Go to the Mainframe
120. Daily Tasks → Find coordinates
121. Use the Periscope → try to select a star
122. The periscope is broken, read the message (hard disk is broken)
123. Pull down the periscope, remove the hard disk
124. Get the hard disk from the Tuatara Box
125. Use the hard disk with the periscope drive
126. Use the Periscope again, you’ll find constellations’ names are lost
127. You can find the shape of the target constellation, by searching through post-its in the Bento Station (Gorky tells you Salvatore has drawn them down somewhere)
128. Use the Periscope again, find the most radiating star
129. Write an email with such coordinates in the Mainframe (Ray_Mail → New Mail → select destination → send)
130. Complete the Grey dialogue
131. Cooling System is broken
  • a. You must close the coolant fluid cycle, fix the leakage and re-open the cycle
  • b. Coolant fluid cycle is described in the manual, there you can understand how to close such cycle.
132. Open the cooling system panel, nearby kitchen and decompression room
133. There are two combinations that makes the cycle stop
a. One is
134. Get the metal plate under the leakage
135. Open the fridge, take the sticky cube
136. Use the sticky cube with the metal plate
137. Turn on the three burners in the kitchen
138. Connect the three wires (under the burners) with the last wire plug
139. Put the metal plate (with the sticky cube) on the burner
140. Pick up the metal plate with the melt cube
141. Use the metal plate with the leakage’s hole
142. Click on any handle to restore the cooling cycle
143. Daily Task → Play Beacon
144. Repeat 94-96
145. Turn on CTRL-10 (switches 2 and 4)
146. Adjust the CTRL-11 to match the carrier wave
  • a. first lever in the upper half (~60%)
  • b. second lever in the lower half (~25%)
  • c. third lever in the upper half (~90%)
147. Connect keyboard to lo-fi antenna (first shortcut under the jumpers panel)
148. Play the 3rd musicsheet in the manual
149. Daily Task → Set up a two-way communication
150. Just click on the third shortcut under the Jumpers Panel
151. A Dialogue Puzzle will start
152. Ask Elle for Control Panel → Instructions → Symbols → Ok → Something Else → Crank → Try rotating it Clockwise and CounterClockwise
153. Complete the Dialogue
154. Talk with Gorky, complete the Dialogue
155. Move the Microphone nearby the Gorky’s speaker
156. Talk with Elle, complete the dialogue
157. You need to eat something, but the oven is broken
158. Use fork or knife or spoon with a fuse (under the oven)
159. Use fork or knife or spoon with the other fuse (under the oven)
160. Repeat 104-116

Day 4
161. Talk with Grey
162. Wear each piece of the space suit, leave the helmet as last piece
163. The O2 Puzzle is the most difficult puzzle in the game - it takes some time to be fully understood, but once the objective is clear takes some minutes of tries to reach the solution (that needs just to interact with CTRL-2 and CTRL-4 handles)
164. Open the Manual, to the O2 page a. The first page is useful to understand that a functional loop takes the CO2 (it’s depicted in green in the monitors) through to the top-right electrolyzer, and then ends up in the bottom-right pipe. b. The second page makes you understand how you can interact with some valves (1-6, A-F) and how some other valves react to pressure
165. Turn handle 4 in CTRL_4 in order to connect LEFT and TOP
166. Turn handle 1 in CTRL_4 in order to connect DOWN and RIGHT i. now the green fluid (CO2) goes into the electrolyzer, and ends up being transformed in O2 (blue fluid).
167. Turn handle 2 in CTRL_4 in order to connect DOWN and RIGHT
168. Turn handles B and E in CTRL_2 in order to reach High Pressure on both (look at the manometer)
169. Turn handle F in CTRL_2 in order to reach No Pressure (pipe closed)
170. Turn handle C in CTRL_2 in order to reach No Pressure (pipe closed)
171. Turn handle D in CTRL_2 in order to reach High Pressure
172. Turn handle 3 in CTRL_4 in order to connect RIGHT and TOP
173. Turn handle 5 in CTRL_4 in order to connect TOP and RIGHT
174. Turn handle 6 in CTRL_4 in order to connect DOWN and RIGHT
175. Complete Dialogues
176. Grey, Shoots at you. You need to find a way to hide the Bento. Ask Gorky.
177. To find the Bento’s system informations put the X0002 N1 Card into the control panel and then insert on CTRL-12 the code found in the last page of the manual a. You find Bento public key is ​BEAC02
178. To find Bento’s private key, insert the X0003 N2 card into the control panel
179. Set “​BEAC02​” under “Public Key”
180. How the hack tool works is found on the postit inside the last page of the Manual. a. By solving the puzzle you’ll get ​0471AF
181. Remove the card
182. In the mainframe, go to Discovery Routine a. If nothing is visible, just click on the 3rd shortcut under the Jumpers Panel
183. Click on the Bento
184. Go to the PING Menu
185. Hit “Disable Echo”
186. Go back to the Discovery Menu
187. Click on the Satellites, just one of them has the PING Menu
188. Enter the PING Menu
189. Configure the private key found in 171
190. Hit Overwrite
191. Complete the dialogue
192. (OPTIONAL) Salute the tuatara a. Tuatara is dead, Pick it up b. Go to the Decompression Room c. Use Tuatara with Capsule d. Use Capsule with the hole on the right of the door e. Click on the red button UNDER the hole
193. Call Elle a. Tell her you cannot do anything else
194. Radio Tube is Broken a. Replace it with the one found in the small side panel of the fridge
195. Call Elle
196. Talk with Gorky, ask for help on saving the stranded ship (the first choice)
197. Complete the Dialogue
198. Complete the Mail
199. Call Elle
Day 5
200. Complete Dream Dialogue
201. Wait 2 seconds, Elle will call you
202. Complete Elle Dialogue
--- (Optional) Make Milk
203. Bring the Microphone just on the Beacon Keyboard
204. Talk with Elle again
205. Watch the Song Cut-Scene
206. Open the Manual, open the last section
207. On the right page of the last section of the manual, there is written
  • a. when card must be used to access Accumulators Voltages
  • b. which CODE is connected to any accumulator
  • c. and the controls that must be used in order to configure the accumulator
208. Insert Card X0004 N3 into card slot
209. Select Accumulator 1
  • a. Select A column, set 0011
  • b. Select B column, set 1100
210. Pull up CTRL-3 until the accumulator is shut down
211. Repeat the same for all 5 the accumulators
  • a. On the last accumulator, CTRL-3 must be pulled up very slowly
212. The power must be restored, in order to do it you must study the manual section
2 (Energy Subsystem)
  • a. Click on elements for description.
  • b. You need to find 4 keys in the Bento in order to fix this.
i. If you found such keys during the other days, this puzzle will be a lot
easier. Otherwise, you must find the keys using the flashlight.
213. One key is under the soap.
214. One Key is under the pillow.
215. One Key is inside the cooling system panel (nearby the handles)
216. One key is in the kitchen.
217. Put the keys in the energy box in the control panel room, according to their color.
218. Configure the keys this way (S1 is useless), the energy switches (below) must be
all up, then press on the PQC-M main switch. The electricity should be operative
again.
219. The Bento enters Safe Mode (the red colour is a reference to the movie “Ex
Machina”)
220. Click on Supervisor Mail on the PC, then read some emails
  • a. for example, read the mail “Anomaly detected”
221. Go back in the menu, and click on Quit Safe Mode
222. Deirdre will call you, complete the dialogue
  • a. Pick Up Milk and Cereals in the kitchen
  • b. Use the bowl with Sink (with water)
  • c. Use cereals with bowl
  • d. Use Bowl
223. Call Elle
Day 6
225. Complete Dream Dialogue
226. Talk with Elle
227. Wear the Space-Suit
228. Complete the Dialogue, Choose a Song for Elle
  • a. Suggested: Goodnight Moon
229. Choose if you want to forgive Gorky or not
230. (Optional) Bring Gorky with you
  • a. Take the floppy hidden in the bedroom
  • b. Use floppy with Gorky
  • c.
231. Leave the Bento
  • a. Go to the Decompression Room
  • b. Press the Door Button
  • c. Choose “Abandon”
232. Complete the Dialogue.
233. Press the Door Button
Achievement
1. How are you, Karl?
Begin Chapter One

2. When am I, then?
Begin Chapter Two

3. Are you lost?
Begin Chapter Three

4. Empty Space
Begin Chapter Four

5. Who did you lose?
Begin Chapter Five

6. Open your eyes
Begin Final Chapter

7. Still There
Complete the game

8. Life ends where it begins
Watch all the end credits

9. In The Blind
Decode the mysterious signal (steps 63-68)

10. No Pressure
Fix the Cooling System (steps 131-142)

11. Breathe (steps 163-174)
Fix the oxygen leakage

12. Mockingbird
Hide the Bento (steps 176-190)

13. Let there be light
Restore the electricity supply (steps 212-218)

Optional Achievements

14. So long, my friend
Give a funeral to your little friend (step 192)

15. 1.44 MB
Take Gorky out with you (step 230)

16. Kasparov
Win a chess match with Gorky (step 56 or any other moment)

17. Henry V
Take care of the tuatara.
Give him food in order to fill the Food bar (Tuatara's food has a leaf on the box).
Make sure temperature is always at the same initial level,
that is, during the heat system fault, you must lower its temperature
and restore it when the heat in the cabin returned to normal.
Tuatara will die anyway in the oxygen incident
(it must live until that incident in order to get the achievement).

18. Can't extract milk from chocolate
Eat milk. You can eat milk in Day 5 before playing the song for Elle.

19. The correct way
Drink coffee (steps 32-41)

20. Tazza o Vetro? Secchio
Drink five coffees (loop making coffee and recycling pee 5 times)

21. Ah-ah!
Open the menu during fake credits (press ESC when the fake credits are running, after step 211)

22. Time Tracker
Draw a tally mark for each day on the Bento (use chalk each day on the wall,
except the 2nd day which is automatic)

23. Karlbrush Teethwood
Wash your teeth (take toothpaste and toothbrush, use paste on brush, use brush)
37 Comments
Error Code 864G Mar 3 @ 6:30pm 
I just finished playing this beautiful game, just amazing. Thank you to whoever made this guide, I had to refer to it occasionally.
peevishdave  [author] Apr 4, 2022 @ 3:06pm 
@Ronald nope :P
YoankaAvocado Jun 3, 2021 @ 3:15pm 
@Malorion Use the other satellite to see what the Serbian words in log outputs mean. You only need to locate the right number.
Malorion Apr 13, 2021 @ 11:55pm 
On Day 2, after connecting with the first satellite, everything is in Serbian. How can I see what I'm doing?
jd_ianonym Apr 8, 2021 @ 5:36am 
half-second mal , thx for Kasparov! ^^
All Thriller, No Philler Jan 30, 2021 @ 11:10am 
The vibrator part was....kind'a stupid. It's like, they reeeeally had to shoe-horn that in there, eh?
This is a well-made game, but with a terrible script writer.
half-second mal Jan 11, 2021 @ 10:50pm 
Kasparov: Starting from the incomplete game, use your queen to take the pawn, move the king to the left, king to the right, queen takes queen, rook to take the lower black pawn, then work on getting your pawns to the top to promote them to queens.
peevishdave  [author] Dec 31, 2020 @ 8:08pm 
@Leb sure!

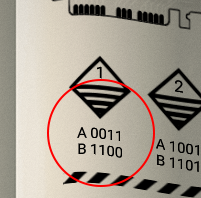
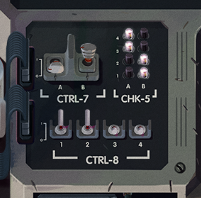
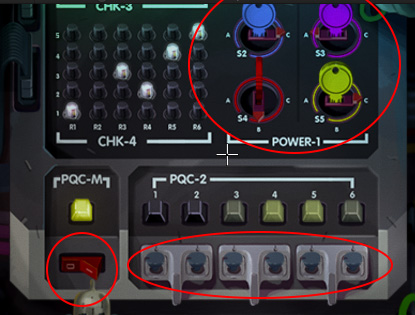
the box restores energy; on the manual, you get what the numbers are (1-6 on PQC-2 are room sections). A1-A5 are the accumulators that provide energy. A1 is broken (led is off), A3/A5 are flickering, A2/A4 are steady. S1-S6 are the selectors described in the manual. The objective is to restore energy, but when you try to turn the box on, it fails (it tells you that you must configure the box in order to turn on the control panel too). So you turn on all the switches in PQC-2 in order to include the control panel sections, before turning the box on. It fails anyway, but it says that it's because some unsteady power source is directed to the control panel. From the manual, you get that control panel is connected to sections 4 and 5, and that the keys can modify how each accumulator power can reach the sections.

Short:
Basically you rotate keys until 4 and 5 (the control panel sections) are on but not flickering (not unstable), and then, by turning on the puzzle is solved.
Leb Dec 31, 2020 @ 7:28pm 
Step 218, I don't understand what we're supposed to be doing? I mean it's cool you solved it for us and I got past it, but I'm not sure what the goal was. Any insight here? Thx
Adireael Dec 20, 2020 @ 4:38am 
I have a problem with the fifth accumulator, I put as it is said in the manual, but it does not select it. I don't know what to do!