Warhammer: End Times - Vermintide

Warhammer: End Times - Vermintide

110 ratings
Arrogance Lost - Achievement Guide
By Adelion
This guide shall provide some basic information regarding the 29 new achievements added with the Arrogance Lost Update. It will give a short description of the achievement goal as well as the way I have obtained them.
2
   
Award
Favorite
Favorited
Unfavorite
Introduction
Most of the achievements for Vermintide are straightforward: Reach level 100, complete map x with all tomes/grims/on cataclysm, etc. So most of them could just be obtained with heavy grinding, a bit of luck and just playing the game continously. This changed with the Arrogance Lost Update which added a total of 29 new achievements to the game. In contrast to the previously mentioned achievements they will most likely not be obtained if you do not go the extra mile to get them. In resonance to the original game idea they put an emphasis on teamwork and coordination while being diverse and challenging at the same time. The descriptions for the achievements are pretty straightforward telling you what the unlocking conditions are and most seasoned players should have no trouble to formulate an own strategy. So this guide will mostly be aimed at newer players which may look for some kind of ideas on how to tackle these achievements. While I say newer players you should absolutely restrain yourself from attempting the achievements unless you have completed the maps a few times on the difficulty of your choice (either Nightmare or Cataclysm). Also it is recommanded to at least ignore the Grims while attempting the achievements to not make it unnecessary hard and to remove the "need" to waste a trinket slot on the Lichbone pendant.

Therefore, I will describe in this guide what exactly has to be done for each of the corresponding achievements and I will explain how I obtained them. In addition, I will give some general pointers on what I think could be helpful on equipment and what the lowest number of human players to get them is. There are probably easier, more effective ways out there and you are welcome to post other methods in the comment section. All I can say is that the way I describe CAN work. Also, I would like to mention that I did most of the achievements in public lobbies, simply using written chat and not with premade teams. So you don't need one to do them. However, as it is already months after the Arrogance Lost Update it can be hard to find a group willingly agreeing on the spot in a public lobby to try one of the achievements as most of them need a coordinated approach. But normally, you should find help if you just make a post in the Looking for Group - Subforum in the Vermintide Hub.

As for the achievements, there are two per each main campaign map. One is for doing the specific action on Nightmare and another one for doing the same on Cataclysm. Doing it for Cataclysm will also unlock the achievement for Nightmare. Another three achievements are granted for completing a newly added map on the difficulties Hard to Cataclysm.
1 - Hornblower
Map: Horn of Magnus
Description: Alert the city by blowing the Horn of Magnus within 3 minutes of the gate exploding and then complete the Mission.
Minimum Amount of Human players: 1 (but at least two is recommanded)
Helpful Trinkets: Seal of the Swift Strider, Rack of Masterbrew Vials, Bottle of Bordeleaux Wine, Night Prowler's Cylindrical Box

First map and already one of the hardest achievements. Not because it is necessarily hard but because a lot can go wrong and the time limit is rather strict. Also you need Potions of Speed. The more the better. As written in the description you have to reach and blow the Horn of Magnus in less than 3 minutes after the gate at Barrel Event has been destroyed. While I think to have heard someone saying the achievement can be done without potions I find this hard to believe so you better prepare. So equip the mentioned trinkets (if you have them) as preparation. The Seal is obviously to increase your basic speed, the Rack of Masterbrew Vials and the Bottle of Bordeleaux Wine are there to maximize the benefit of every found Potion of Speed.

Play the map normally until the barrel event. Obviously ignore the Grims, you don't need them. There you complete the event until you have placed two of the three barrels and the last one is near the gate. Before you destroy the gate it is helpful to first kill of the last wave, to heal and to group together. Give the speed potions to the players with the Rack of Masterbrew Vials. Then, as soon as the gate explodes drink the speed potions. If you have more then one, trink both (always only the players with the Rack), if you duplicate it on the spot, drink again. The effect of the potions can stack and depending on your luck you can gain quite a bit of speed. With 5-6 potions stacked however, navigating can be quite interesting and challenging. Avoid fighting as much as possible. You may need to slash down some rats in the more narrow corridors but with your speed they won't be a hindrance. If someone of you gets trapped and gets downed, ignore it. He is dead. Depending on time you can revive him later in the tower. As long as you are under the effect of the potion only stop to pick up new speed potions. And as long as you have the speed effect do not bother to block as you will have passed most rats before they even notice you. Greatest problem you can encounter is a patrol depending on the location. After you reach the elevator you have a short breather and most likely no potions anymore so you have to do the last part normally. Special mention here that the elevator seems not to function if small rats are moving on it, so kill them if you see them on the elevator platform.
Stay close together and slash your way up as fast as you can to the Horn. Take notice that the Horn can only be blown if ALL living players are in the final area so if time is low think twice about reviving a fallen comrade. The final itself will then be played normally. After blowing the Horn try to gather as many supplies as fast as possible and go to your preferred defense position. While I had the feeling that every Skaven on the map followed me up there I think it was only the adrenaline and the final is the same as always. Just stay calm and do your job. Even with preparation Hornblower can take a lot of tries especially since you need a bit of luck for the positioning of the Skaven inside the houses and the usage of the speed potions.
2 - Thirst for Powder
Map: Smuggler's Run
Description: Bring 4 explosive barrels to the wagon on Smuggler's Run and then complete the Mission.
Minimum Amount of Human players: 1
Helpful Trinkets: Whatever you feel comfortable with. I'm not sure if the Gunnery School Guide trinket can trigger the barrels, so better do not bring it with you as it increases your effective radius.

This achievement is neither really hard nor is it easy. I think the most correct term would be annoying. You have to bring four explosive barrels to the end of the map. If you reach there you have to put them in a marked special slot after which they are indestructible.
The good news is that there are a total of 7 barrels spread over the map and also the map isnt that long. The bad news is that you are carrying explosive barrels. That means they will trigger if they got hit with a melee weapon (and some of the ranged weapons) and also trigger if you get hit while carrying them (curse you occasional wonder-rat out of nowhere somehow standing always behind me) even if it is friendly fire.
The first question you have to answer is how many human players you will take with you on this venture. If you go alone you have to carry all the barrels alone which will take quite a bit of time. Also the bots may tend to die depending on equipment. On the other hand they don't cause friendly fire so they don't trigger the barrels. On Cataclysm I would recommand at least 2 or 3 human players to have more safety and faster transport. You should look around all the time and probably first clear an area and then start transporting the barrels. Then put them down and clear a new area. If you hear a horde toss them to the side and fight the horde first (obviously). With this said you have four potential problems for the transport.
- The siege sections: As they are in an area below you have to throw all barrels down. Put them all in the same corner and then go to the other side of the area to defend there. Stay as far away from the barrels during those sections as possible.
- Chain reactions: If only one barrel gets lit and they are currently grouped together you have a problem. If you see it fast enough pick that barrel up and run away with it even at the cost of taking explosion damage. If it happens while transporting do the same. One mistake can cost you all barrels if you have bad luck. Also while putting them down to clear a new section in front of you you should space them out a bit so that a single explosion will not trigger all others.
- Gutter Runners: They appear out of nowhere. So if you hear one, all of you put the barrels down and make some distance to them. Only continue with the transport if you heard its death screech.
- Friendly Fire: Be aware that this will trigger the barrels. If possible try to avoid shooting as much as possible.
For the last transport section you can think about carrying the barrels one at a time. While it may take longer it is usually safer. The last area is predestined for rats out of nowhere or getting unfair hits at the top of the ladder. Also don't spread to far as hordes there can be deadly. The achievement isn't that hard but you will need some tries and a lot of patience.

If you get to the final section and one of your barrels explodes do not fret. Apparently, there is a bug in the game which allows you to use a single barrel to fill two slots if you throw it exactly between the two spaces. To be on the safe side, you should try transporting four barrels with you to the end of the level. For safety and the emotional pain, countless people before you experienced.
3 - Low Supply, High Demand
Map: Supply and Demand
Description: Complete Supply and Demand without any member of the team using Medical Supplies or Healing Draughts.
Minimum Amount of Human players: 1-4, there are different ways you can tackle this: either have a team full of living players or use mods to stop bots from automatic healing; it should also work alone without mods as long as you keep your healing slot unoccupied as bots don't pick up items then;
Helpful Trinkets: Whatever you feel comfortable with. Lichbone, Dove of Shallya and Charm of the Hedge Wizard are obviously wasted space.

This is one of the easier achievements double. All you have to do is complete the map without using any healing items (Healing Draughts or Medical Supplies) . Healing by Bloodlust or Regrowth, however, is allowed. Also, you are allowed to die. As often as you wish to. As long as you don't use healing items everything will be okay. With the given healing restriction however you need a team full of human players as you can't stop bots from using the items and failing the achievement for you. Technically you can do it with less than 4 players if you just kill the bots at the beginning of the map and you don't revive them. Just complete the map. This one is really easy.
4 - High as a Kite
Map: Black Powder
Description: Complete Black Powder without killing the Rat Ogre.
Minimum Amount of Human players: 4 or at least two living characters
Helpful Trinkets: Seal of the Swift Strider, Gunnery School Guide

This is a really fun and mostly easy achievement double. You have to bring all eight barrels to the ship while constantly evading the Rat Ogre. As you are not allowed to kill it you have to avoid bringing bots with you. If you don't have four players at hand just kill of the bots but be aware that you need at least two players - one kiting and one carrying the barrels. It is probably best to decide on a player kiting the ogre before the game starts. The designated kiter should have the Seal of the Swift Strider for speed purpose and to be able to keep dodging. It will help but is not absolutely necessary.
The Rat Ogre will most likely spawn after you brought back the first two barrels. If you are fast maybe after the first four barrels. After that the kiting player should get the attention of the Ogre. He can do this by attacking him. Some minor hits will not do signifikant damage unless they are superpowerful ranged weapon headshots like the Trueflight or charged attacks with Heroic Killing Blow. Don't do that! Seriously. Just get close, do some light attacks and then start running and dodging. Really large hordes don't appear on that map so the Skaven should not pose to much of a threat. Nonetheless you should find a weapon which compromises between mobility while blocking and defending for more than four hits. If things get problematic the usage of a bomb can help as it will clear surrounding Skaven and stun the Rat Ogre temporarily. The damage caused by the bomb can be neglected. You dont throw bombs at the Ogre to do damage anyways. Obviously - as you aim directly at the Ogre - only players with the no friendly fire Gunnery School Guide should throw. Either the kiting player himself or someone else. It doesn't matter. All in all this whole achievement can be done in five minutes. But take your time if necessary. Even dying and reviving can be done without much problems normally.

If you have trouble with the kiting, there seems to be an "Out-of-Bounds" spot in the map (check video around minute 6: https://www.youtube.com/watch?v=8su1n6RgnBE ). You can use this to "drop" the aggro of the Ogre which will then rush towards your other allies. However, be aware that the Ogre will then rush to the other players! You may need to shoot him to regain his attention. But if you encounter multiple Skaven while kiting the Ogre you can use the place to give yourself some time.
5 - Pierce The Veil
Map: The Wizard's Tower
Description: Find the Path to the Trials of the Foolhardy.
Minimum Amount of Human players: 2 - 4
Helpful Trinkets: Whatever you feel comfortable with. Lichbone is useless as you don't complete the map the normal way.

In order to obtain this achievement double you will have to reach an alternative end of the Wizard's Tower which will need several obscure steps. I will give a very short list of the necessary steps in order to open the portal. However, if you need more information you can check out this guide.
http://steamcommunity.com/sharedfiles/filedetails/?id=973128579
All relevant information can be found there although it is a bit messy at certain points. And what I'm presenting here is nothing more than a summarization of it:

  1. Play the map normally until you are close to the ledge leading to the illusionary room where you have to defend until the big door has opened. Split your team in two, one going down the other staying up. Start the event and go back to the ledge so the full party can help in the fight.
  2. After the fight has ended the team down has to trigger two switches (a lever and a button). The lever is still in the illusionary room right of the great door in the corner. The stone button can be found after going up the small stairs and before dropping down the next ledge. On the left side in the wall you will find it.
  3. The team up has now to go (if not done already) to the place where you can find the second tome (and also two healing items and an ammunition box). Open the door there and you will see a statue.
  4. Carry the statue all the way to the illusionary bridge near the end of the map. Before crossing the bridge on the right side you can place the statue. If you can't move it anymore it stands correctly. Do the small event and make the illusion go away again. Return to where you placed the statue and activate the picture lying on the ground (either by pressing "e" or just by getting near it, don't remember anymore). You will see a picture of the statue with a light blueish background.
  5. Complete the map normally.

  6. Restart the map and repeat steps 1 to 3.
  7. Now it gets a bit tricky. The place to put the statue is in the big library and you need your whole team there. So the team which dropped down has to get there as well. There are two possibilities: A. The team which dropped down (ideally just one player as all players need to die nearly simultaneous) will die after the rest retreated to the library, creating a ressurection in the stairway and as such before the drop down. B. The team which dropped down will leave the game and re-enter after the bots teleported back to the front. Second method could be problematic in public games, so yea .....
  8. Place the statue on the top level of the big library close to the windows. Particles will start swirling around in the room.
  9. Each of the four players has to stand on top of a magical book which only they can see (yea, seriously). The position's of them are tied to the player character. Check them on the mentioned guide. Not 100 % certified but it seems you have to activate them in order (Saltzpyre -> Sienna -> Bardin -> Kerillian -> Kruber). Since you need to keep standing on them for activation and the whole process take some time anyway, you should do it right after a horde. If they stop working get all away from them. I think they have some kind of cooldown. It may need some tries but it is not that hard. Just obscure.
  10. If have done everything right. A portal will open in the middle of the room. One of you has to jump into it. You can do this from the position near the statue. I may be mocking you and you will die a horrible death by jumping down in direction of the portal :P

And with this you have obtained the achievement. It is not that hard but you need to know what you are doing. It may be possible to skip the steps 4 to 6 if the host has done the first run already. Not 100 % sure on that one though.

Additional Note: Concerning player numbers, the achievement double seems to be doable with just two people. Although for the final step you have to jump loops. If a character dies on the book it corpse stays there and so does the activation. With this you can trigger all books by re-connecting as another character: https://www.youtube.com/watch?v=fAEOLBz_jRA
6 - Controlled Demolition
Map: Engines of War
Description: Destroy all 3 Doomwheels within 5 seconds on Engines of War and then complete the Mission.
Minimum Amount of Human players: 3
Helpful Trinkets: Whatever you feel comfortable with, maybe the Gunnery School Guide

This one is not to difficult but can easily be screwed over by bad luck or bad timing. Just play the level normally until you reach the area with the three doomwheels. In a first step you should visit each of the doomwheels as a group and clear the area to avoid unnecessary backstabs or hickups if you return with the barrels. Then you should wait for the next horde to appear so you have more safe time for carrying the explosives.
After that each player grabs himself a barrel, goes to a doomwheel, tells the other members that he is ready and waits if necessary. One of you should have command and give the signal to start. This can be done either with text chat or voice. If the coordination does not work as wished (can happen especially in public games) do not worry. Five seconds are actually a long time. If there was some misunderstanding on the starting command - which can happen if you do it by counting for example - listen closely. Inserting the barrels into their spot makes a specific sound. If you hear that one just do the same and everything should be fine. In case someone lost his barrel you have to destroy the remaining ones too so a new set of three barrels can spawn. If you have cleared out the areas before it shouldn't be to much of a problem. As you carry barrels be wary of gutter runners. Like always ..... Since you destroy three doomwheels at the same time you will also have to face one giant horde afterwards. So don't forget the post-destruction phase. Group up as soon as possible at an easily defendable area. From personal experience I think the area before reaching the doomwheel on a lower-level is suitable. No Skaven can drop from above and you have to defend mostly in just two directions. Also this is a moment for bombs to shine so don't waste them before. Gunnery School Guide can be helpful but is not necessary.
7 - Unchained
Map: Man the Ramparts
Description: Destroy all 4 chains holding up the Screaming Bell within 5 seconds on Man the Ramparts and then complete the Mission.
Minimum Amount of Human players: 2 - 4
Helpful Trinkets: Whatever you feel comfortable with.

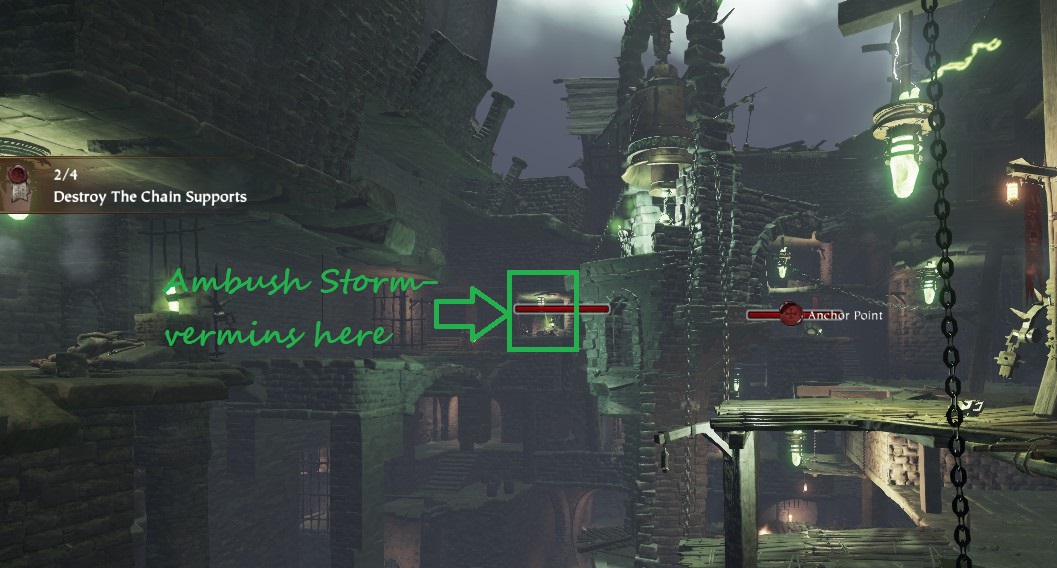
Here we have the second double of achievements which needs a total of four human players no matter what (see Additional Note). As in Engines of War just play the map normally until you reach the final area. In a first step you should clear the whole area again. Beside killing every visible rat on your way you should also use this oppurtunity to weaken the chains. In order to avoid "accidents" only ONE of you should do this at a time preferably the one with the weakest light attack. Damage the chain so much that only one or two more hits are necessary to destroy them.
After you have cleared the area and weakened the chains (and waited for next horde event) each of you will go back to one of the chains. Decide on some kind of signal and then go for the destruction of the chains. Like in Engines of War you can hear a sound if one of the chains break. So if some misunderstanding happens just attack the chain as soon as you hear it. With preparation the chain should be destroyed in less than a second. While it did not happen at my game, be prepared to run for your life. Four chains means four times Skaven fun. While it would be helpful to group up, remember that it is not necessary. Remember that you are in the final area. If things get ugly the players closest to the door should ditch the rest of the team and find their way down to the coach. It is enough if one of you reaches it alive.

Additional Note: Concerning player numbers, the achievement can be done with three or even two people: https://www.youtube.com/watch?v=hYcr_SzeO7s

However, needless to say that even with good coordination (and micro is most likely needed for this) this is close to impossible. The error gap is less than a second. So take every player you can get. Still showing it due to the very few player numbers in Vermintide .... and because technically it is possible.
8 - A Worthy Sacrifice
Map: Garden of Morr
Description: Bury all tomes and grimoires found within the Garden of Morr in the final resting place of the Cauldron and then complete the mission.
Minimum Amount of Human players: 2 - 3
Helpful Trinkets: Lichbone, Charm of the Hedge Wizard, Dove of Shallya, Bale Taurus Head Ornament, basically everything which eases your survival rate while carrying a grim

If you keep playing the game this will be more or less the way you do the map normally. Fight your way through the map, picking up the Tomes and Grims. At this point in time nearly every player should know where to find them. If you feel unsafe carrying the Grim you can use the Bale Taurus Head Ornament. It increases survival rate significantly. Other than that the only point of importance is at the end of the map.
After you destroyed the chains, the cauldron will fall down and create a hole in the ground. Your goal is that every player carrying a Tome or Grimoire has to jump in there and then complete the map. You can do this the hard way with three people jumping in it simultaneously and the last survivor fighting his way to the coach or ..... you take your time. There is absolutely no time limit for doing this. So take the safe route and jump one at a time and wait for respawn. Then the next person can jump. After you have destroyed every book the Cauldron Way, finish the map. That shouldn't be to hard afterwards.

Additional Note: Technically, you can do these achievements with just two people. Condition here is that one of the bots carries the remaining tome (which they pick up if the health slot is empty, otherwise mods can help) and you get in posession of the tome in the cauldron chamber again. In most cases this means gunning the bot down, picking the tome up yourself and jumping down the hole a second time with the new book. Not sure if health items spawn after the ledge drop. If so you can do a normal exchange.
9 - Special Delivery
Map: Wheat and Chaff
Description: Deliver all sacks to the wagon without dropping them once on Wheat and Chaff and then complete the Mission (Original Achievement description is missing a period, shame on you FatShark).
Minimum Amount of Human players: 1
Helpful Trinkets: Seal of the Swift Strider, Pouch of Relaxing Herbs

Technically, this achievement double can be done alone. On Nightmare I tried it and it worked on first try. On Cataclysm however, it could be really troublesome. So take as many human players with you as possible. Each one makes this significantly easier.
Before the game starts decide on a carrier. This is the player who will spent his time carrying the sacks while the rest is protecting him. The player carrying the sacks should at least equip the Seal of the Swift Strider as he has to be fast and dodge around a lot. Greatest danger are of course the special rats especially our dear friend the gutter runner. To reduce the danger of the remaining specials the carrier should be the host so he can dodge Packmaster more reliable and he should equip the Pouch of Relaxing Herbs so he won't get one shotted by globes.
Other then that just play the mission as always. It may be an idea to clear the map once in the beginning and drag the game a bit until the Rat Ogre has been killed. Normally, the amount of newly spawning rats later in the map is not that high making this a rather easy job. You can also assign an additional player to the carrier with a shield with improved pommel to reduce enemy contact even further. Normally, it is not necessary. The hardest part is on the carrier, so support him to the best. Also keep his health at max all the time to avoid dropping the sack because you get downed. A hit once or twice is not really a problem.
10 - Coordinated Assault
Map: Waterfront
Description: Escape the second warehouse within 45 seconds of escaping the first on Waterfront and then complete the mission.
Minimum Amount of Human players: 2-4
Helpful Trinkets: Seal of the Swift Strider, Rack of Masterbrew Vials, Bottle of Bordeleaux Wine, Night Prowler's Cylindrical Box, Gunnery School Guide

Coordinated Assault is an awfully well fitting name for this achievement double and one of the hardest. While it may be doable without potions you most likely need all the preparation you can get. 45 seconds is not a lot of time.
The good thing is that this is one of just two missions in the whole game where you can change trinkets in the mid. So if necessary do that. If available start with the Night Prowler's Cylindrical Box and search the map for potions. It would be great if you find at least one potion of speed and one potion of strength. Give these to the players with the Rack of Masterbrew Vials of which you need two. If not done so far you should now equip the Seal of the Swift Strider as you need all the speed you can get. Also, as a general measure, you can bring high damage weapons for the second warehouse as it reduces the numbers of strikes to cut down the chains. An example for this would be the glaive.
Now walk as group to the first warehouse. From experience I would say the one with the barrels is the better choice. But be aware, only one of you lucky people will enter it. The rest will keep standing in the door and provide support for the lone fighter inside. The player in the warehouse has to put four of the five barrels in position and prepare the fifth one. As soon as this is done the rest of the team will make its way to the second warehouse which is closed off for the moment.
After arriving there they will give a sign to the lone wolf who completes the fifth barrel. As soon as he leaves the first warehouse (or dies) your counter begins. The team of three sprints into the warehouse and uses the potions. You should split up early and not all smash together the first pillar. Two people should go down to the first pillar while one of you directly crosses over the bridge and up the stairs to smash that pillar while still under the influence of the potions. If you spot a halfway large group of rats just use a bomb (if available and with trinket) to not waste time on them. The other two players will go up the stairs in the front part of the building attacking the remaining pillar on the side. The faster/living ones will then continue to destroy the fourth and last pillar. If this is done, leave the warehouse as fast as possible. If someone gets downed, let him die. If someone is busy fighting, better die. If you are cut off on the other side off the building, jump into the sea. Every second counts so don't waste it with escaping. Only one of you needs to get out alive. After this you have a short breather where you can heal and stock up. Regroup with your fourth player (or revive him) and finish the mission. This will most likely take some tries and most likely some hours.

Additional Note: The description is meant for four a team of four players. And anything below that number will only make the headache stronger. However, it is possible to do with just two players. In that case though, you need a very specific weapon set-up and right potions. Also, you need to die in the second warehouse as not enough time is left to leave it: https://www.youtube.com/watch?v=aCrTvVJsoZk
11 - Not On Your Watch
Map: Well Watch
Description: Complete Well Watch without either of the wells being poisoned.
Minimum Amount of Human players: 1
Helpful Trinkets: Gunnery School Guide, Bomb Duplicate, Item Duplicate

Everyone's favorite: Well Watch. The map can already be a pain on Cataclysm while playing it normally. Most time players decide to just protect the well on the right side of the map as it is easier to defend. This time you have to save both wells from being poisoned which is easier said then done. There is no ultimate tactic to do this but it got easier with the 1.9 update as a lot of trinkets and weapons got a significant buff.
You can spend the time between the defense periods in the small shed near the coach. It is easy to defend as Skaven have to jump over the fence first. Globadiers can be a problem there. Just look out for them. The actual defense periods are a bit more problematic. While it makes sense to kill all Skaven as fast as possible you have in the first line to defend the wells. That said you should bring crowd control weapons (Conflag Stuff, Two Hand weapons, Shields with Improved Pommel) with you. As soon as the Skaven are engaged to one of the players they will stop poisoning the wells. So the players with shield should go close to the well and just pommel everything they encounter. The rest concentrates on killing the rats as fast as possible. You can decide on one player looking out for specials and have one player with a suitable weapon thinning out the horde before it arrives. Other than that stay close to the well. If you are starting to get overwhelmed, the player with the Gunnery School Guide can throw a bomb so you can get a breather.
12 - The Bell Tolls
Map: The Enemy Below
Description: Kill 20 Gutter Runners on The Enemy Below and then complete the Mission (sometimes mission is written with captial "M" and sometimes not, I miss a bit of consistency :P)
Minimum Amount of Human players: 1
Helpful Trinkets: Assassin's Skull, Charm of the Hedge Wizard, Bale Taurus Head Ornament, Dove of Shallya

This is one of the easiest achievement doubles and can be done alone without much troubles. If you have the time just play the map for hours and will get eventually 20 Gutter Runners to kill. Other then that you should take the achievement name literal.
Directly after the second Grimoire there is a slope downwards where you can find a bell on the left side.
You can ring this bell by pressing "e" and by doing so you can summon 4 Gutter Runners (although one will be missing occassionally). Do this a few times and you should have the 20 kills you need. Maybe kill some additionally as safety. With this said the most obvious choice for a trinket is the Assassin's Skull as you can't avoid to be pounced a few times. Also other trinkets for group healing are helpful as well as the Bale Taurus Head Ornament since this trial will slowly drain your health. Keep in mind that a horde or two will spawn in the mean-time. Still, even with all this it is a rather easy achievement double.
13 - Collateral Benefit
Map: The White Rat
Description: Kill 13 Stormvermin with Skaven technology on White Rat and then complete the mission.
Minimum Amount of Human players: 4 or at least all living ones
Helpful Trinkets: Whatever you feel comfortable with

For explanation. You have to kill 13 Stormvermins with the green lightning strikes coming out of the crystals. On Nightmare one of those strikes is enough on Cataclysm however you need two of them. Or you weaken the Stormvermins before shoving them into the strike zone. A body shot with any ranged weapon should be enough.
With this I also mentioned your "work" here. Shoving the Stormvermins into the strike zone. To do this I would recommand using weapons with a lot of Stamina and Improved Pommel. If you are not using a shield Devastating Blow is also recommanded to get the necessary pushing power. If you are using shields Devastating Blow is not necessary. So you can swap for a more useful trait like Second Wind which gives you the option to block the SV attacks to keep them in place. But for once shield work wonders as they give you six Stamina points and only half is consumed each time you shove with Improved Pommel. So bring a Dwarf and a Soldier with you. Technically, you can do the Stormvermin killing from the beginning. But as the Rat Ogre is always good for a wipe you shouldn't bother going for the achievement until you reach the third stage. Do not worry, the Skaven have an endless supply of Stormvermin although it takes a while before a new pair of them spawn. After you have killed the Rat Ogre and destroyed a number of chains less than four go to the back left corner and defend there.
All two to three minutes a new pair of Stormvermins spawns and starts running there. The Soldier and Dwarf keep pushing them into the strike zone (after weakening them) while the other two kill the clan and slave rats. Just keep doing this for a while you will gather your thirteen kills. Like for the Enemy Below achievement double take one or two as a safety with you. After this you just have to destroy the last chain and you have done another achievement double.

Bonus - Reckless, Heedless, Madcap
After you have jumped into the portal in the Wizard's Tower you will come to a new map: the so-called Trial of the Foolhardy. However, only by completing it you will have unlocked it for further playthroughs. So do yourself a favor and do not do this not on Cataclysm on your first tries. Because you know .... the map is really hard. I won't tell to much here as it is best to experience the map for yourself. Just know that it consists of four different areas and a central hub, a lot of portals and a lot of Skaven.
The achievements will be gained for completing the map on Hard, Nightmare and Cataclysm respectively. So for unlocking, just do it on Hard.
Final Remarks
With this the guide is finished. There is still work to do here like using the correct names for the Trinkets everywhere but I wanted to get it online. It isnt much but it should at least serve as pointer for people. If you have questions and some good tips just post them in the comment section. Maybe I will add a picture or one to make some descriptions more clear. If you find some kind of errors or mistakes - content- or languagewise - please tell me in the comments so I can update it.

With this said: Thanks for reading!
58 Comments
starttimartti Feb 6, 2021 @ 9:03am 
Did the Pierce the Veil twice with 3 players, single person activating all the books 1 by 1. Intentionally used two randomly chosen order to activate the books and both worked fine.
Scorpi80 Feb 2, 2021 @ 12:45am 
Great guide, most of them are really hard.
ScienceDiscoverer Dec 20, 2020 @ 9:27pm 
Yes, but there is some cooldown on that. Like 10 minutes or something, book deactivates.
VernonKun Dec 20, 2020 @ 8:30pm 
Anyway, summary of the Pierce the Veil duo run is that dying on the book doesn't reset its lit status.
VernonKun Dec 20, 2020 @ 8:22pm 
Trying any other order, the lights will turn red and go off. Standing on books at the same time sometimes work sometimes doesn't; I think it's just by luck the order is the same or there is a short time window. Anyway my order definitely works, so use it if any reader somehow can't figure the book part.

ScienceDiscoverer: I was just fast-forwarding in your video, but seems you also accidentally used that order.
VernonKun Dec 20, 2020 @ 12:12am 
Ah, the other link is this:
https://www.youtube.com/watch?v=aCrTvVJsoZk
ScienceDiscoverer Dec 18, 2020 @ 8:36pm 
I with my friend did that Pierce The Veil achive. I don't think order really matters. You can do it in whentever order you want and you don't have to be alive either.
VernonKun Dec 18, 2020 @ 2:05pm 
Someone shared videos of duo Pierce the Veil and Coordinated Assault:
https://www.youtube.com/watch?v=fAEOLBz_jRA

BTW I also posted comments under the Pierce the Veil guide that the players have to stand on the books in the order Saltzpyre -> Sienna -> Bardin -> Kerillian -> Kruber. No need to wait for the books to be lit, but the whole team should start with no one standing on books, then stand on the books one by one in that order. Since I don't think that guide will be updated, you can add this piece of info in your guide.
Adelion  [author] Dec 17, 2020 @ 2:07pm 
How reproduceable is that?