Total War: WARHAMMER

Total War: WARHAMMER

146 ratings
Total war : Warhammer - Some notes
By HexNibbler
The guide cover the stats of the units and some game mechanisms. It also cover the basics of strategy.
   
Award
Favorite
Favorited
Unfavorite
Stat : Unit size & Health pool
Unit size is the count of individual in the unit.

Healthpool is the sum of the healthpools of the individual in the unit.

The first one is affected by a graphical setting : unit size. I'll use the maximum in this guide.

An example : goblin spearmen are 160 in a unit for a total of 7680 hp.
Hence, each goblin has 48 hp (7680 / 160 ).

Another example : Chaos chosen are 80 in a unit for a total of 8640 hp.
Each chosen has 108hp.

It is important to note that the game engine apply damage to individuals.

Hence, the healthpool of individual tends to "cap" the damage received from blows.

The same chosen deal 42 damage per blow, let's assume for the sack of simplicity that every points is applied to the goblin : the goblin now has 6hp left. The next attack from the chosen will deal... 6 damage. Hence, the average is (42+6)/2 = 24...

Stat : Armor & Shields
The armor stat isn't that complicated to understand.

It is the maximum percentage of reduction of the total amount of damage received in one blow.

It is not a flat amount of damage substracted from the damage and so it shouldn't be compared to the damage stat.

Hence 40 armor is saying : it reduce the incoming damage at most by 40%.

The game engine also has a minimum percentage variable that may be modded. In vanilla, this value is 50%. It means that the armor percentage reduction will be between 50% of the armor value and 100% of it.

Hence, 40 armor is saying : it reduce the incoming damagee at most by 40% and at min by 20%.

The average is unknown because the distribution is unknown.

There are two potential cases : both suppose a uniform distribution.

the first one is that the random roll is between 50% and 100% of the armor value. The average will be (max-min)/2+min. (which is 3/4 of the armor value or 6/8)

Hence, an armor value of 40% does on average reduce the incoming damage by 30% (40-20)/2+20.

the second one is that the random roll is between 0% and 100% but the game engine increase any value below 50% to 50%. In this case, the average become (min+.75*max)/2 which is 5/8. (.625 or 62.5% of the max).

The armor value can be at most 200 (which reduce the damage by 100% all the time).

This reduction of damage only apply to non AP (armor piercing) damage.

-------------

Shields. As far as I know, there is no way to check how shield defend against missiles for one simple reason : If the shield has a X% chance to deny the missile entirely, the average will be the same as if the shield was reducing the damage of the missile by X%.

There are differents shields with different values : 35% and 55%.

They only works against missiles fired from an arc of 60° in front of the unit.

As a note,

a 35% shield is effectively the same as an armor of 47 (that seem to work against AP damage too) (or 56 if we use the 5/8 instead of 6/8 of the armor to compute the average)
a 55% shield is the same as an armor of 73 (or 88).
Stat : Leadership
Leadership is the ability of the unit to keep responding to orders.

Low leadership untis are easier to "panic" than strong leaderships ones.

There are many, many factors that can reduce the leadership. I am not covering the factors coming from campaign effects.

Casualties.

There is a penalty to the leadership that is related to the amount of casualties taken by the unit during this battle.

Those penalties varies depending on the proportion of the damage suffered and the amount of time during which this loss occured.

For casualties suffered during the whole battle, by increment of 10% (10% loss, 20%... 90%)
[ 10% / -2, 20% / -4, 30% / -7, 40% / -11, 50% / -16, 60% / -22, 70% / -32, 80% / -47, 90% / -68]

For casualties suffered during the last 60 seconds
[ 10% / -4, 15% / -6, 33%/ -14, 50% / -30, 80% / -56 ]

For casualties suffered during the last 4 seconds
[ 6% / -6, 10% / -12, 15% / - 18, 33% / -40, , 50% / -80]

Unit losing a combat -3
Unit Losing significatively -8

Attacked in the flank : -6
Attacked in the rear : -14

Flank uncovered ( A ennemy unit within a range of 100 can attack the unit flank. 100 is a little bit less than the goblin archer range. )
One flank is exposed : -3
Multiples flanks are exposed = -6

General death/fled.
-16 for a recent death / fleeing from the general.
-10 for the general death.
Fear : -10

Being shot by missiles : -5
Being shot by artillery : - 8
Fatigue
Tired : -2
Very tired : -4
Exhausted : -8
Magic spells (see spell description)
Loss of the army : -120.

There are also penalty for "ennemy stronger & faster close to the unit".

There also are positive leadership effects : charging (+15), flanks secured, general aura, winning fight.
Stat : Speed
Speed has many, many hidden variables.

The stat shown on the unit card is computed from those hidden variables and does not represent a value that can be compared to other units : some units have lower speed and yet will outrun units with higher speed.

There are 3 speeds, in order of magnitude from the slowest to the fastest : the walking speed, the running speed and the charging speed.

There is also a "flying speed" for flying units. Flying units have different speed when they are on the ground : some flying units are fast in the air and very slow on the ground which makes them unfit to chase down fleeing light cavalry (for those of you who tried to chase down pistoleers with fell bats ;) ).

There is also the "acceleration" variable. Units can have very different accelerations and the ratio of charging speed over acceleration can vary from less than one to 3 and more. (meaning : from standing still, some units can reach their charge speed in less than one seconds while others may need 3 or more.)

Knowing that the "charge" only trigger the charge bonus if the unit effectively reached its charge speed, it becomes clear that you should be cautious with the distance between a unit and its target before charging if you expect it to get its charge bonus.

Hence, this stat is there to give you an idea of the maneuverability of the unit.
Stat : Melee Attack & Attack nature
In vanilla, the default probability to hit a target with 0 defense in melee is 40%.

This probability is bounded to a minimum of 10% and a maximum of 90%.

It is increased by the melee attack stat.

Melee attack simply adds to this base chance : 1 points of melee attack increase the probability by 1.
Example : a melee attack of 10 gives a probability of 40% (base) + 10 (melee attack = 50%.

Attacks can be of different nature : magical, normal or fire and can apply effect : poison (+ special effect, often due to a magical weapon on characters).

Magical nature ignore the trait "ethereal" but are susceptible to "magical resistance" and possibly "physical resistance".
Normal nature ignore "magical resistance" but do not ignore "physical resistance".
Fire nature is used against some unit (mostly with regeneration). It increase the damage dealt to them.

It is very important to note that those chances are computed on an individual basis : the unit is made of many individual. Some of them have an opportunity to attack that is determined by the proximity of an individual of an ennemy unit,a cooldown (known as "the attack speed".) and the state in which the individual is (knocked back, knocked down, etc)
Stat : Melee defense
As explained in the melee attack section, the base chance are increased by the melee attack.

The melee defense decrease those chances to hit. In the same way "Melee attack" increase the probability by one point for each point, the melee defense decrease the chance of the opponent by one point for each point.

Melee Defense & Melee Attack are therefore comparable because they play a role in the exact same equation with the exact same influence : the chance to hit, 1 on 1 ratio.

As explained in the section about melee attack, the chances to hit are computed when an attack occurs. Those attacks comes from individual soldiers.

When an attack is made from an individual against another individual facing each other, melee defense is used at 100%. Example : two characters fight each other, facing each other, their melee defense will be used fully.

If an individual attacks another individual from its flank (example : a character is surrounded by a blob of goblins), the "melee defense" will be effective at 60% of its total.

Example : a character has 60 melee defense, he is attacked from its flank, the melee defense used to compute the chance to hit is 60 * 0.6 = 36.

Worse, if an individual attacks another one from its rear, the melee defense will be effective at 15% only.

Same example : 60 * 0.15 = 9.

This is the main reason why units trying to disengage from a fight tends to quickly lose morale : they are being attacked from their rear (leadership penalty) and they suffer rapid loss.

This is also the reason why there is a difference between "duelist" and "melee expert". Duelists tends to have a high defense, while melee expert tend to resist damage.

Disrupting ennemy formation can produce situation where the ennemy individual are thrown inside your own unit making them (the ennemy individual being surrounded inside your unit) very inefficient.

Note : When you attack a unit by its rear or its flank, the first attack will very likely to use this penalty, however, the individual of the unit being attacked will very soon face in the direction of the closest individual ennemy.
Stat : Weapon Damage & Damage types
Weapon damage is applied whenever a hit opportunity succeed its chance to hit test.

Damage is the amount of health point removed from the individual own health pool.
Damage is composed of different types : Normal type, Armor piercing type and Bonus type.

Normal type are reduced by the "Armor" stat of the ennemy individual. See "Armor" section for information.

Armor piercing type ignore the "armor" stat of the ennemy individual.

Bonus type are armor piercing type but they only apply to specific target : Anti infantry or Anti large.

"Large" is a hidden variable that may cause some questions (are dire wolves large ?).

Any unit that is mounted is considered large (hence Anti large bonus apply against them)
I "think" every unit that are "monstruous" in some way also suffer from it.

A minimum of 1 damage is always applied to the target own health pool when a hit chance succeed.

Things like Resistance (physical / magical) can reduce further more the damage being applied.

Weapon Damage are not comparable to each other : The attack speed can vary greatly between units. Hence damage of 15 every 6 seconds is the same as 10 damage every 4 seconds.

However, with the same DPS, higher damage tends to be for "shock" troops (troops that aims at triggering the "casualties in the last 4 secs" leadership penalty.)
Stat : Charge bonus
Charge bonus is a bonus that is applied to individuals who successfully completed a charge.

the value shown is the value added to melee attack (chance to hit) and normal damage (weapon damage).
It adds a 1:1 to both of those stats.

The Charge bonus fade out over 15 seconds ( = it doesn't last 15 seconds, it decrease over 15 seconds. The shape of the curve isn't known, but it is suspected that it is linear : losing 6.7% of the maximum value every seconds)

To complete a charge, a unit must reach its target at the charge speed.
A charge won't apply the charge bonus if the charge speed isn't reached when entering melee for the individual.

You can debuff the speed of an ennemy unit to prevent it from reaching its charge speed, effectively negating its charge bonus.

The charge bonus can also be negated by a bracing unit ( a unit that isn't moving and facing the unit charging it) if the bracing unit has an anti-charge perk.

This anti charge perk comes in two variant : an "overall" (anyone who charge) and an "anti large" (only negate the charge bonus of "large" units)


Stat : Ammunition
Ammunition is the amount of shots each individual of a unit can takes during a battle.

Example : a unit with 22 ammunition has 22 shots per individual.

The ammo stat also cover the "type" of damage (physical / fire / magical ). It is the same as "melee attack" in that regards. However, for some reason the "poison" effect is linked to the "missile damage" stat (while the poison in melee is linked to the melee attack stat as well).
Stat : Range
The maximum range of the range weapon.

In meters (in game), this is the range shown by the wide arc in front of missile unit when pressing the space bar.

Projectiles have many hidden variables that are not covered here (elevation, mass, etc).

Stat : Missile damage
Missile damage shows the damage per missile over 10 seconds, including the weapon rate of fire.

It works the same way as Weapon damage but it is modified by the rate of fire.

While the weapon damage shows the damage per successful blow, the missile damage shows the virtual damage over 10 seconds.

Missile damage are therefore comparable to each other : a value of 15 will always deal more damage than a value of 10.
Battle mechanism : Formation & Move orders
Formation is the shape of the unit on the battlefield.

You can add depth to a unit by decreasing the width and vice versa.

What are the effects of such changes ?

Reducing the width of the unit reduce the quantity of individual fighting. It both decrease the amount of damage it deals to the ennemy and the amount of damage it receive from the ennemy.

In a 1v1 fight, the widest formation will determine how many individuals are fighting at a given time : the widest will envelop the most tight unit.

But in a full scale battle, having multiple units with depth and low width only expose the two units at the flanks to this envelopment.

An opponent will either keep its front line wide or reduce it to match yours.

A "blob" frontline (many individuals involved but a reduced quantity of them actually fighting) tends to make missile units more useful because most target are far from your own troops. It also expose a longer "tail" to each unit engaged in melee when firing from the flanks.

The melee itself tend to last longer.

If the opponent keep its units "wide", he expose his frontline to monsters/chariots charge that can go through them to reach the back of his line (archer/crossbowmen) or to rear charge the frontline.

Move orders.

When you order one of your unit to move somewhere by dragging with the left mouse button, you can set the desired width and orientation of the unit.

The unit will always try to adopt the final formation as soon as possible.

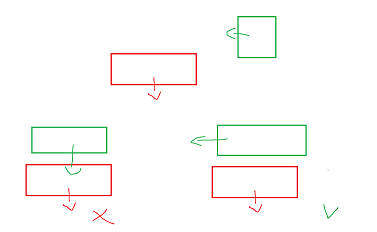
This mean that if you want your unit to smoothly go behind an ennemy unit while starting from one flank, you shouldn't order it be wide and looking at the ennemy unit.

Instead you should order it to be very tight very deep looking forwards : because this way the unit will form a column and will avoid contact.


This behavior of changing the formation as soon as possible only apply to walk & run orders. In other words, if you order a charge the unit will stay in its current formation until it reaches the charging distance and at this point it will stop maintaining the formation : each individual will charge toward the closest ennemy of the targeted unit.

You can play with this by ordering a unit into a marching column formation and then using the alt+right mouse button to "draw" a formation.
Battle mechanism : Charge
A charge in TW:W occurs when you order a unit to attack an ennemy unit that is in the distance.

A charge has two benefits : the collision damage and the charge bonus.

The collision damage is explained in a separated section because it apply to any moving entity on the battle field.

The charge bonus are dual : a leadership bonus of +15 (with a cool down of 60 seconds) and a specific bonus to melee attack & damage (known as the charge bonus)

A charge is successful (= apply the charge bonus) for each individual that collide with an individual of the targeted unit at its charge speed.

A charge isn't applied to unit but to individual in the unit.

As covered in the stat : speed section, each unit has a charge speed that is superior to the running speed.

There is another hidden variable, namely the "charge distance". This is a unit-specific distance at which individual will start to accelerate toward the charge speed when ordered to attack.

When you click "attack" on an ennemy unit, your order will be either a direct charge (you are within the charge distance and your individual soldiers will start their charge : if they reach the nominal speed they will receive their bonus) or a move then charge order (they will move in formation toward the target at the pace you ordered, either walking or running, and once they are in the charge distance they will accelerate toward the charge speed.)

In other words your individual soldiers will charge in the formation they are currently in : wheter it is a box or a completely disorganized blob.

Charging while being too close won't apply the charge bonus but will apply the fatigue penalty of the charge for the duration of it (charging is a sprint) .
Battle mechanism : Fatigue
Fatigue is a value that is accumulated and dismissed based on the activity of a unit.

Fatigue is unit wide and depend on the state of the unit itself rather than on individuals.

The state available to the user are thresholds namely : Fresh, Active, Winded, Tired, Very tired, Exhausted.

Behind the scene it is represented as range of integer values :
0 / 4400 / 8000 / 14200 / 20000 / 29000 / 36000.

Example : Active is having a fatigue count between 4400 and 8000.

Each fatigue state has its own set of penalties going from leadership to melee defense and even armor.

Standing still reduce fatigue by 14 per tick.
Walking reduce fatigue by 1 per tick.
Running increase fatigue by 3 (or 4 for cavalry) per tick.
Shooting increase by 21 per tick
Fighting in melee by 15 per tick
Charging by 30 per tick
Climbing ladders by 10000 per tick (hence troops are exhausted when reaching the wall)

Fresh & Active do not have any penalties.
Winded has a penalty to reload time (10%), Speed (5%) and Melee attack (5%)
Tired : reload time (15%), Speed (10%), Melee attack (10%), Charge bonus (10%), Leadership -2.
Very tired : Reload (25%), Speed (15%), Melee attack (20%), Charge bonus (20%), Leadership -4 and Armor (10%)
Exhausted : Reload (35%), Speed(15%), Melee attack (20%), Charge bonus (25%), Leadership -8, Armor (35%) and Melee defense (15%)

As explained in the section about the stat "speed", this percentage probably affect both the acceleration and the maximum speed or walking/running/charging.

It is worthwhile to note that those penalties are proportions of the overall stats of the unit : strong units with good stats suffer more from fatigue than their lower tiers counter parts. This is why you do not send Chaos Chosen fighting and wasting their fatigue on zombies.

Another thing worth noting is that the "defense" penalties (armor / melee defense) only occurs at the two last state of fatigue. It means that the DPS of the unit is the first of its attribute to suffer from fatigue. And that unit relying on quantity and defense are the least impacted by the fatigue (a goblin losing 10 points of armor compared to a chosen losing 40 points of armor...)

The only reason you might want to cycle your defensive low tiers units is to avoid the leadership penalty.

The tick length is suspected to be 1/10th of a second.
Battle mechanism : Knockback & Knockdown
Individual in melee can be interrupted.

This delay the ability of an individual to take his chance at hitting an ennemy in range.

It is the knockback & knockdown.

The chance to knockback is equal to 10% * a weight ratio.
The knockdown chance is equal to 5% * the weight ratio.

The weight ratio is simply the weight of the attacker over the weight of the defender.

There also is an additional parameters that disable completely knockback & knockdown based on this weight ratio.

If the ratio is below 50%, there is no knockdown possible for the attacker (example : big uns at 210 against empire swordsmen at 100. The ratio for the swordsmen is 100/210 = 0.47. 47% is below 50. Swordsmen won't ever knockdown big uns.)

if the ratio is below 35%, there will be no knockback possible.
In other words, heavier individuals have both a greater chance to interrupt ennemies in melee and a lower chance to be interrupted.

When charging, those probabilities are multiplied by 2.

The average infantry mass is usually 100. To give an example, a Bestigor has a weight of 160.

Hence the chance to knock back/down is, for the bestigor : 160/100 * 0.1 & 160/100 * 0.05 = 16% & 8% while the chances to do the same for the human is 100/160 * 0.1 & 100/160 * 0.05 = 6.25% & 3.125%

Weight of the individual is a hidden stat. The data is available in the table named "battle_entities".

The table is made of 294 entries, so I won't provide a list here.

Wraith is the lightest with 60(obviously !), then goblins and ghouls with 70, then free company militia & zombies with 80, Then all the usual "normal size" human, ungors, wood elves...etc at 100.

Exception for the wardancer with 120. Then comes the dwarves & Orcs at 130. Bestigors at 160. Then you have the bigger orcs (savage big uns at 180, black orcs at 190 & big uns are at 210 !)

Battle mechanism : Collision
Collision damage occurs when two individual get too close on the battle map.
3 parameters comes into play

The weight of each individual and a vector known as the relative speed vector.

The relative speed vector is simply the sum of the move vector of each individual. What matters is the magnitude of the vector. A bracing unit (speed = 0) and a charging unit (assuming a speed of 10) will have a relative speed vector of magnitude 10. (10 + 0)
A fleeing unit (speed = -5) and the same charging unit (+10) will have a relative speed vector of 5.
Both unit charging towards each other will have a relative speed vector of magnitude 20.

The amount of damage is computed by an unknown formula that probably has the form of (some relative speed factor value) * (some weight factor).

IRL, the kinetic energy is known to be relative to both the mass and the relative speed.

E = (1/2) *m * speed²

And the collision formula most certainly does compute it the same way. The "energy" is then modified to fit a scale of "damage" and is applied as such.

However, there are some ways to artificially increase the weight factor of a unit : bracing.

Bracing occurs when facing a charging opponent & not moving. This automatic action apply a weight bonus to the soldiers that is relative to the quantity of ranks of the unit (up to 7 ranks). In other words it decrease the collision damage received.

There also are some ways of decreasing the speed of a moving ennemy, mostly cavalry & chariots : holding the high grounds. it reduce the speed because the unit must move uphill and being in the woods : most large units do suffer from a speed penalty in the woods and trees can block individual. It is worthwhile to note that the beastmen have many "heavy charger" type units that do not suffer from the wood penalty. It also is worthwhile to note that undead "hexwraith" & goblins spider ignore the terrain penalties (spider can charge uphill, through the woods, etc).


There are two values to know about collision damage.

The first and most important is the fact that those damage are 70% Armor piercing.

The second one is the range of damage applied by the collision : it goes from 10 to 70. It might not looks like it's "that much", but it doesn't work the same way as normal "melee attack" : there is no delay. This mean that every individual being collided will suffer that amount of damage.

Those two values means that even the greenskins wolves chariot is effective against dwarfs infantry : it will collide with a lots of individual, in a very short time with a great speed and a heavy weight.

If you adds up context parameters such as slope (going down hill gives you greater speed), leadership penalty for massive casualties in a very short time (the 4secs leadership penalty), collision (chariots & heavy cav & monsters) can become a reliable source of pain.

Battle Concept : Initiative
Having the initiative is being in a situation where it's up to the opponent to change the flow of the battle in order to win.

In other words, you have the initiative if your moves are made according to your own plan rather than the opponent's plan.

This is the idea of "acting versus reacting".

This is where the strategy game becomes a "chess game".

Playing with action & reaction is at the core of strategy.


Strategy : Introduction
A strategy is a plan.

It abstracts the unit types and specifics. Instead it use "forces". Forces are relative. In the context of "rock paper scissor" the same armies can show different "forces" depending on the actual match ups on the field.

Example : the "forces" of an infantry unit that is anti large against anti large is higher than against anti infantry.

The abstractions of units and armies can sometimes take into account the "roles" of units : fast, range, defensive, offensive, etc.

Strategy are often explained through schema. Maneuvering is important, however, it is much more important to understand "why" a given situation works. A common mistake is to try to implement a strategy by its "look" rather than by its core principles.

Strategies try to provide answer to both balanced battles and unbalanced battles.
A balanced army isn't only an army with good proportions in terms of "roles", it also is an army that can pull out the needed strategies.

Some strategies requires the ability to concentrate a lots of damage in a very small area, other require the ability to move quickly, and others require the ability to "lock" areas of the battlefield.
Strategy : Envelopment
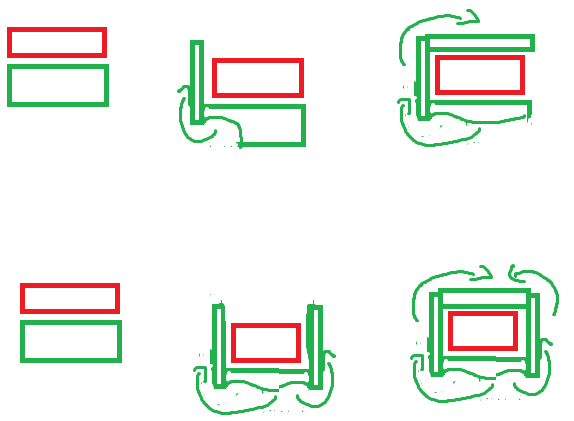
Envelopment is a strategy that aims at surrounding the opponent's army.

It requires the ability to

1) Hold the center with a limited amount of troops
2) either win one or both flanks or flank them

The main goal is to suppress the ability of the opponent to maneuver or retreat safely while in the meantime forcing him to actually need maneuvering and retreat.

It is often, and wrongly, simplified to "hammer & anvil". But this go way beyond this tactic.

When surrounding an army, you get many tactical advantages.

One of them is the ability to flank and rear charges some vulnerables units.
Another one is the ability to engage fast units or ranged units.
And yet another one is the ability to shoot in the back of ennemy troops to reduce friendly fire to a minimum.

One way to achieve envelopment is to break one flank of the opponent army. Flanks are easier to break than the center of the frontline because there are more ways to win them.

The center of the frontline cannot be outmaneuvered. It still can be overwhelmed or pierced through but the speed of units doesn't grant them any advantages.

No matter how you manage to break a flank. The envelopment takes places when you move units around the ennemy army, through the broken flank, beyond his line and all the way to the other flank. There you are surrounding the opponent's army.

Achieving such a long path cannot usually be done with slow troops such as infantry. Hence, the single flank envelopment usually need fast troops to go toward the other flank while slower troops surround the closest part of the army.

If you do not have fast troops, you still can envelop the opponent's army : by breaking both flanks.
The distance require to surround the army is divided by two (each flank only need to move half the width of the opponent's army.)


Note : the air can be considered the third flank of the army. Winning air supremacy can allow you to perform the envelopment through the airs. Hence there variants of envelopment with 1, 2 or 3 sides. The more air unit you have, the less each "ground" flanking forces need to traval to seal the rear of the surrounding.

An army can defend itself against envelopment with strong flanks. "Strong" here can mean many things. One way is to have superior cavalry and being able to prevent the opponent from flanking you. Anoter way is to position your missile units towards the threaten flanks to support and defeat the "blob" of ennemy. Another way is to have capable defensive troops, able to repel and/or hold most offensive units. Those unit do not have to deal damage, simply to tie the opponent's army units for a long period of time.

Countering such strategy is usually made with the strategy "piercing through the center" in the case of a 2 flanks envelopment and both piercing through the center and single flank envelopment of the opposite side if it is a 1 flank envelopment.

Piercing through the center can be effective because the envelopment needs to take place in a very short period of time to prevent a tactical retreat (example : moving back the missile units, forcing the envelopment to be too wide to be closed).

Hence, the attacker will usually position his troop on the flank(s) he want to exploit before actually overwhelming them. This leads to a weaker position in the center of his army. Which is a perfect situation for the "piercing" strategy.

Strategy : Piercing through the center
This strategy aims at cutting the opponent's front line in two or more pieces.

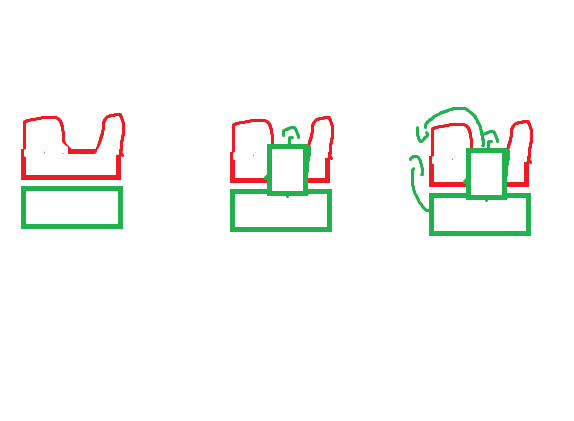
The idea is to find a weak spot in the frontline and overwhelm it with offensive units (chariots / monsters). Once you have a gap, you send reserve troops inside of it in column to separate both chunks of the opponent's army.

It is purely geometrical. I told in the "envelopment" strategy that the weakest spot of an army is usually its flanks. Hence, we tend to guards or reinforce the flanks. Piercing a hole in the middle of the army actually divide the army in two : and each chunk gain a brand new weak flank. Now the opponent's army has 4 flanks to guards instead of 2.

The situation works because each chunk cannot simply retreat backward : the gap in the middle filled with your own forces expose them during their retreat. To retreat, they need to go diagonally in opposite direction, making the gap even bigger and splitting the army even more.

It is important to note that the "piercing force" needs to go completely through. There should be nothing in front of it at the end of the maneuver, otherwise the gap will be hazardous to exploit.

Not retreating imply your own army can envelop one or both of the chunk easily while holding the other half out of helping range.

This strategy require the ability to pierce through the opponent's frontline : it both depend on your army to have such kind of roles and on the deployment/strategy of the opponent.


To defend against this strategy, you need to have a mobile reserve that close the gaps or prevent them. Those gaps are usually made thanks to large units which makes anti large a good reserve choice.

The strategy that naturally counter this strategy is the fake retreat. The idea is to lure the "piercing force" inside an inward arc inside your ranks and them blocking it there, exposing its flanks. See "fake retreat".
Strategy : Fake retreat
This strategy involve luring an offensive force inside your ranks by retreating units.

By trying to go beyond the frontline through your army, the opponent's force end up exposing its flanks. The unit(s) retreating then turn back and stop them while reserve force attack them from the flanks.

The opponent's force has no real choice : it must fight against 3 fronts or retreat and probably get routed and butchered on the way back.

It works because it mimic a situation in which your forces in both flank managed to push back the opponent's flank allowing for a partial flanking of its center. It is important to note that you mustn't lose your flanks in order to "peacefully" make it works.

It is very advised in situation where the opponent's center forces are stronger than yours. It works even better if the opponent was trying to pierce through the gap : blobbing his units in the middle and blocking them, making them extremely vulnerable to envelopment and missile fire.

It is a strategy fit for army with limited offensive melee capabilities. Instead, it turns the opponent maneuverability against him : he moves into a weak position instead of you moving into a strong position. You also needs strong defensive units to hold both flanks.


This strategy has 1 main weakness.

It require the opponent to actively try to exploit the gap. If he chose not to, you might need to retreat your two flanks, causing additional casualties.
In this case, having firepower to forcing him "in" or "out" of the gap can be a life saver. You do not risk friendly fire since your units have retreated and the opponent's units are more likely to be "offensive" than "defensive" (there is no reason to use this strategy if the opponent's units are empire spearmen with shields & no support.)

This strategy can be countered by flank envelopment : Since the army using the fake retreat is likely to have limited offensive power, and is positioning most of it in the rear-center of his army, flanking and enveloping this force is made easier because there are 3 sides exposed. A retreat from this offensive force would mean the destruction of its flanks.
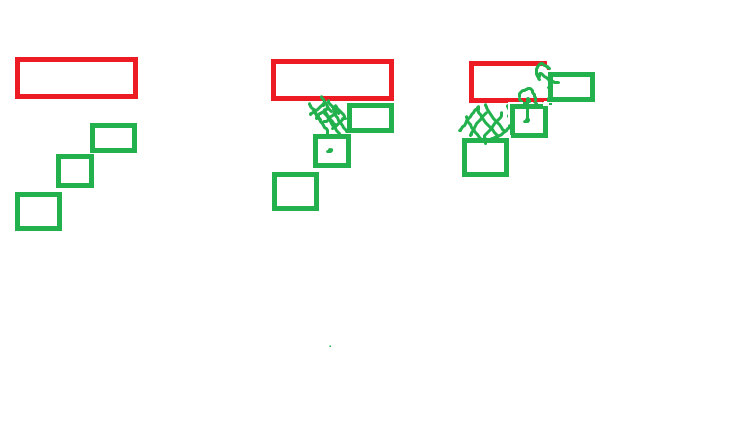
Strategy : Oblique Order
The idea behind oblique order is to delay the fight for most of your army to give enough time to a force to win its match ups.

The army takes the shape of a stair.

The step closest to the opponent's army is the one that will engage first. It usually is the "best offensive" one. The step next to it is the defensive step. Its role is to threaten any ennemy unit that would try to flank the first step. It doesn't engage the ennemy's army until either the ennemy army try to flank the first step, or the first step won his matchup and is now flanking the ennemy army.

It works because what matters isn't the result of fight that "may" take places but the result of fights that actually takes place : if you deny the fight for 80% of the opponent's army while engaging the 20% remaining with 50% of your power, you "chop off" the opponent's army bits by bits.

The distance between each "steps" of the stair and the ennemy army increases the distance needed to effectively flank them or engage them from the inside of the frontline. Hence, you must defeat chunks of the opponent's army before the rest of its army is able to reach the rest of your army.

Hence, having a bigger army to maneuver around becomes a problem rather than a strength.
The question of the size of the army is abstracted : it is not a matter of width but a matter of quantity and ratio between one army and the other.

This is linked to a broader topic : local superiority against global superiority.

3 keys points.
The ability of the first step to easily win its initial fight.
The control over the flank being attacked : the "stairs" might protect one flank, there is the other one to keep in mind.
Then the ability of the next steps to succeed at staying out of trouble while remaining in range to prevent flanking.

This strategy works in the situation where you need to turn the size of the opponent's army into a disadvantage. Having couple of units at each steps (one range and one guard) is advised because the steps naturally expose the opponent's units flank to missile fire.


Tactic : hammer & anvil
There isn't much to say about this. It exploit the damage dealt with collision & charge bonus against a ennemy unit that is currently busy fighting one of your unit.

The "hammer" is the unit charging back and forth.
The "anvil" is the unit that stays in melee.

You position your "hammer" behind the ennemy unit.
You charge in.
You order to move back after 5 seconds of melee.
You charge in again.
Until it breaks.

This can also be called "ringing the bells" : if you manage to position a charger between the ennemy infantry line and the ennemy "missile" line, you can "bounce" from one infantry unit to a missile unit diagonally alongside the "width" of those units.

This usually is used in envelopment strategy because it require to take control of the "back" of an ennemy line.

This tool is also known as "cycle charge"
Tactic : Chariot charge through your lines
Your chariots can charge through your own troops when they are fighting in melee.

Therefore you can position a defensive line that takes the ennemy charge, and then charge in those melee units through your own defensive units : you can break dwarf warriors with chariot through goblins spearmen this way without having to win any flanks.

It is a handy tool to apply the strategy "piercing through the center" because the chariots are fast and can quickly move in position and exploit any gap if their charge succeed.
Tactic : Layered counter charge
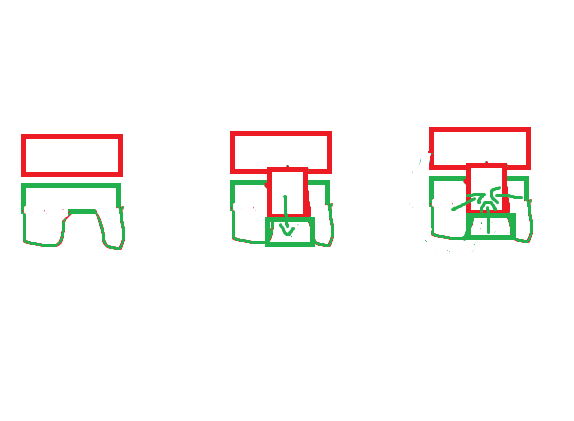
The idea is to "brace" your front line while setting them on "hold".

You need defensive infantry units with some space between each other (zombies rather than skeletons)

The ennemy units will charge in but your unit won't agglutinate on it, leaving some space between each soldiers for another unit to charge through them.

Not attacking = not agglutinate


Attacking = agglutinate


You can cycle charge dire wolves through zombies this way without having to control the back of the ennemy. You can also send a unit in wide formation to apply special effects to many units (ex : ghouls with poison, night goblins with swords & poison,) or specific units (anti large, anti infantry, etc).

The idea is to use the "meatshields" to soak up the charge and its charge bonus. And then send your valuable troops inside the meatshield : this way your valuable unit doesn't take the charge in its face and enter combat where many of the ennemy units will target meatshield individual instead of valuable individuals.

A) the ennemy attack your meatshield

B) You send in your valuable troops (grave guards here)

C) optionnaly you can retreat your meatshield. By doing so you increase the DPS your own valuable unit will take, but you also increase its DPS. (5 soldiers fighting and exposing themselves to being hit versus a full front of 20+ soldiers is the cause of this)


However, due to "natural selection", the frontline soon become full of valuable individuals.

It is important to note that It isn't a very reliable solution : units tends to "agglutinate" at one moment or another. They also always agglutinate against character charging them.

[update 1.01] While I named this "counter-charge", it is very unlikely that your troops will benefit from their charge bonus. This tactic is more about using meatshields in the least destructive way. Letting a meatshield alone is wasting it (unless you are counting on it to rout to persuade the opponent in the context of a fake retreat.
Tactic : Layered counter-charge (2)
Now we can also use meatshields while preserving the charge bonus of our own offensive troops.

The idea is simple : having a defensive unit or a meatshield bracing for impact and staying in fight for 15 seconds. This way, the extra damage coming from the charge is dealt against unit whose value is spent towards lowering the DPS of the ennemy (high defense/armor) or by lowering the cost of HP loss (zombies, goblins, peasants, etc).


Then, the maneuver is simple : attack the unit with the valuable unit and then quickly retreat the meatshield/defensive unit. Both unit will cross each other (moment X), the ennemy unit may be chasing and won't be braced nor charging. Even better, the unit will lose its formation in the case and might end up having isolated soldiers than becomes easy prey in the middle of your own charging unit (see the defense penalty for attack on flanks and rear of individual in the melee defense stat section). If the ennemy unit is on "hold", they won't chase but they won't charge either.

The longer it takes for your unit to cross each other, the more the chasing unit will be in a "loose" state. The risk is to have excess casualties if the ennemy is faster than your retreating troops.

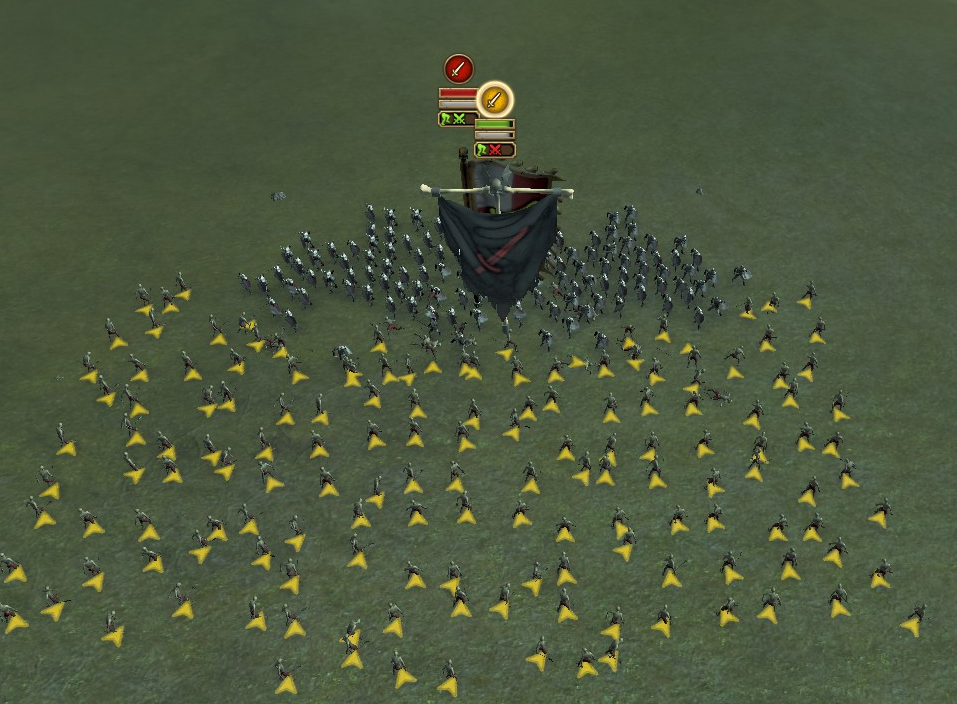
When ordering a retreat, think about what you know of the move formation : the meatshield will try to form the target formation as soon as possible. By making a wider formation for the retreat, individuals will spread and gives to your charging unit more chances not to be interrupted in their charge. However, if the ennemy unit is "grinding" the edges of the meatshield, this can cause a few added casualties to your meatshield. By playing with the shape of the formation for the retreating meatshield you can "shape" the ennemy unit in their short chase in order to maximize the impact of the offensive unit charge.

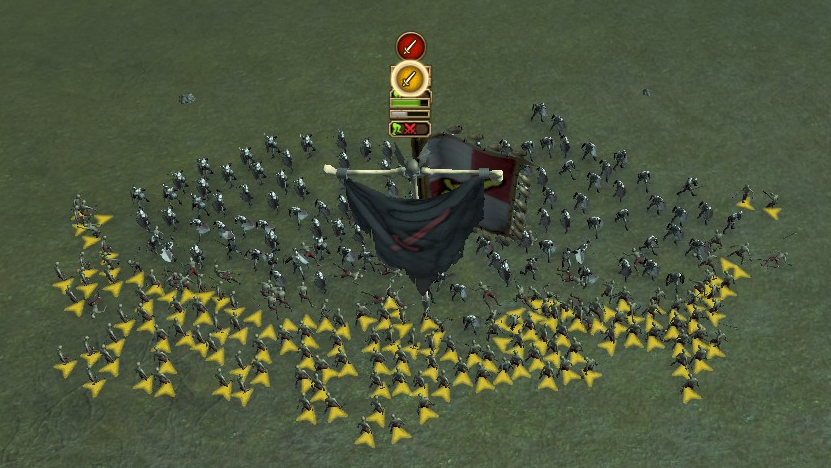
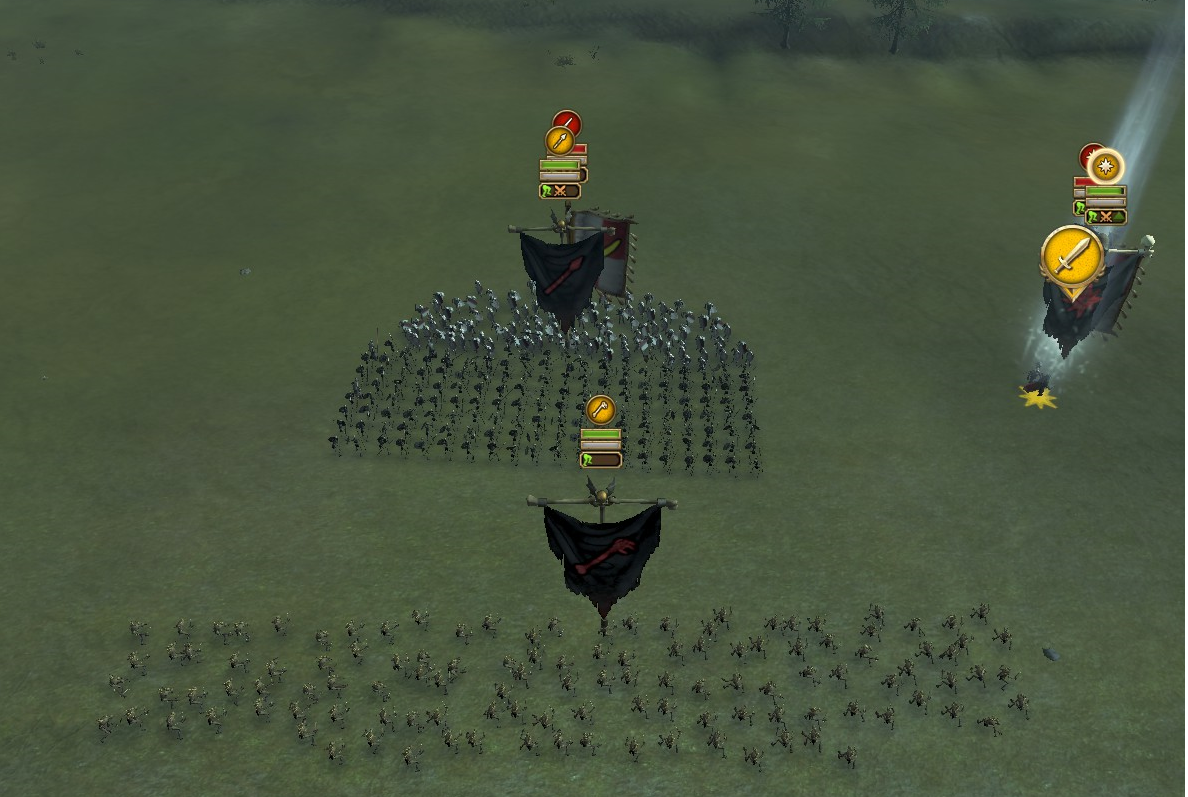
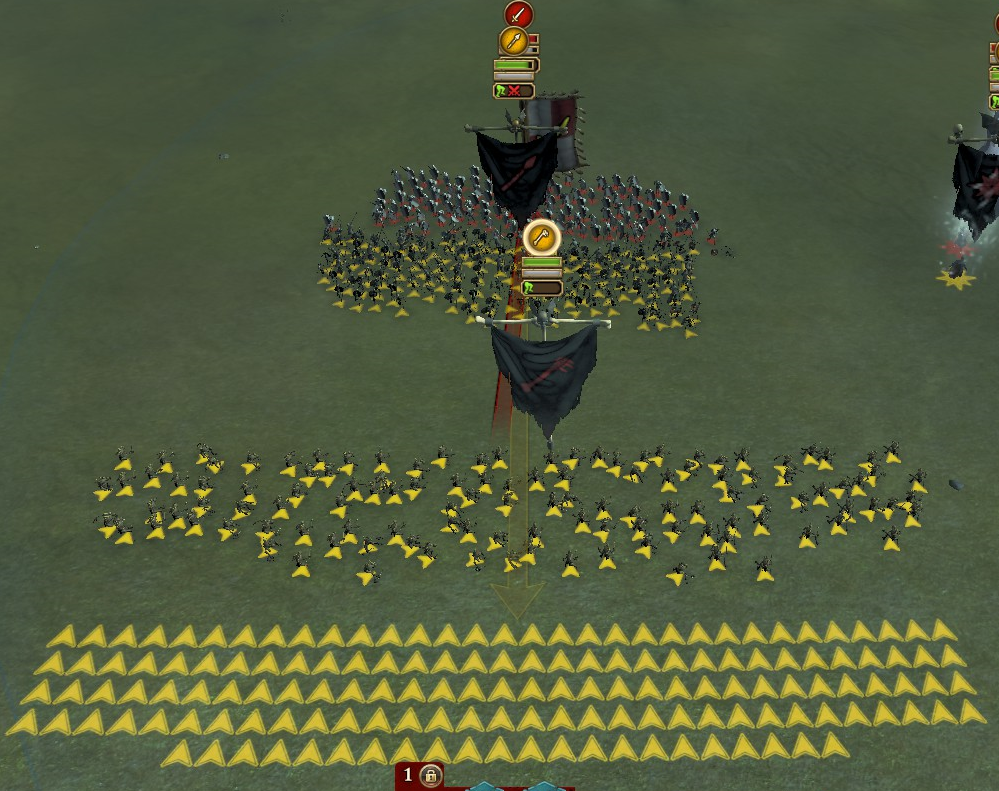
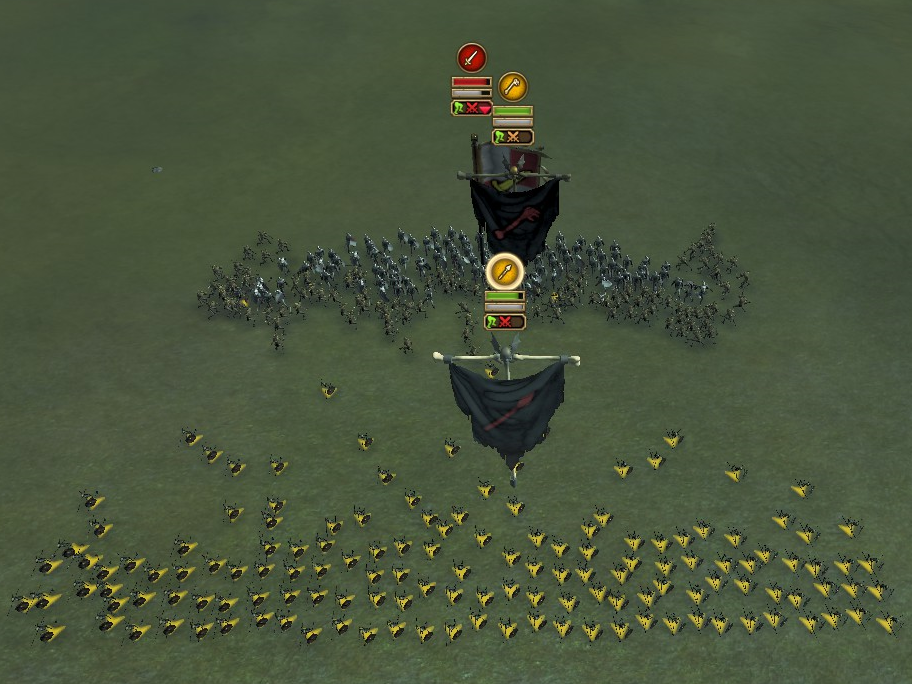
The next screenshots shows both orders, the ghouls ordered to attack and the spearmen ordered to move back (a wide retreat, because the ennemy unit doesn't grind the edges) :


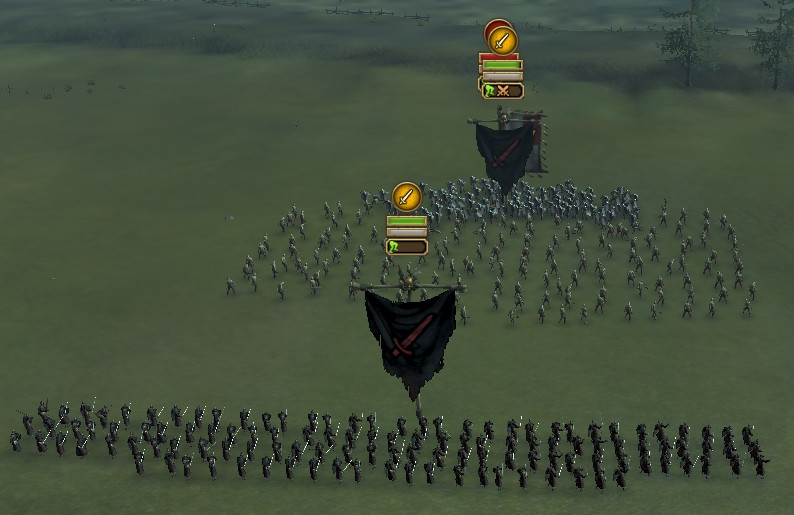
And then both units are switched :


Some tests to highlight the result of this method.

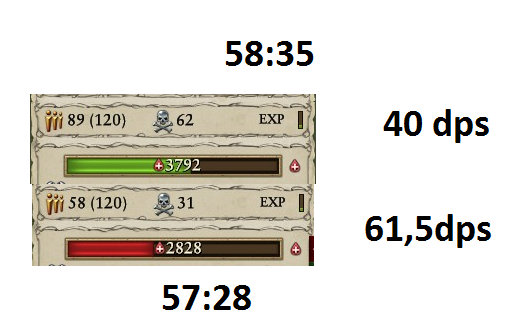
Using ghouls versus empireswordsmen on a flat map, both charging each other, the result are, in DPS : ~60 DPs for the ghouls and ~40DPs for the swordsmen.


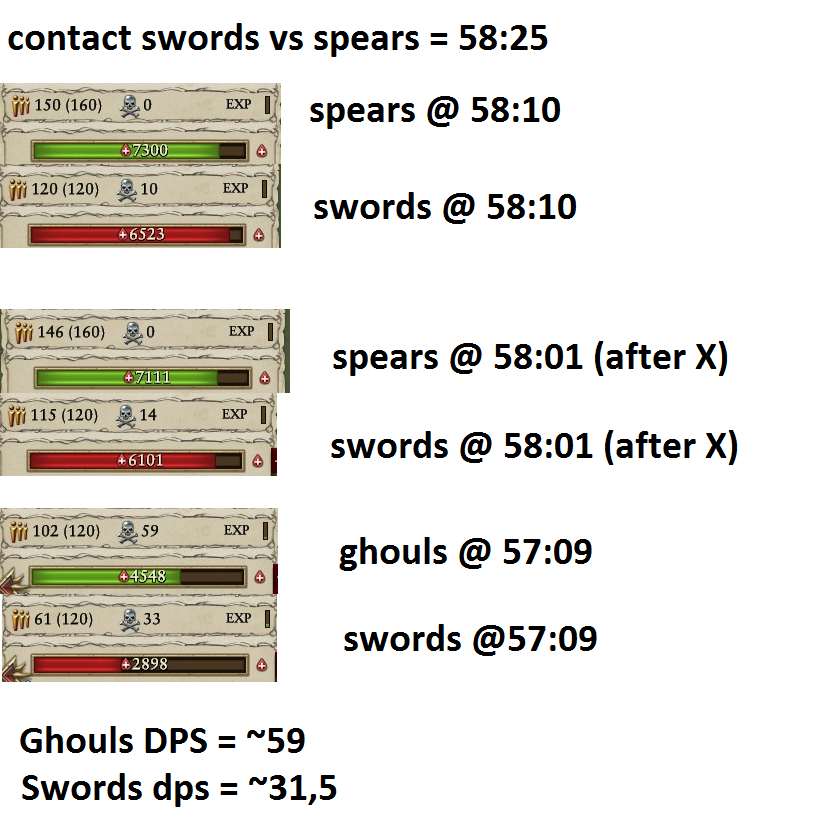
When I use skeleton spearmen as a meatshield during 15 seconds, and then charge in with ghouls, the net results are : ~59 DPS for the ghouls and ~30 dps for the swordsmen. Note that those DPS are not counting the damage recieved by the meatshields : 30 DPS is the damagte dealt by the swordsmen to the ghouls.


25% less. That's the charge input of the swordsmen towards their damage output against ghouls.

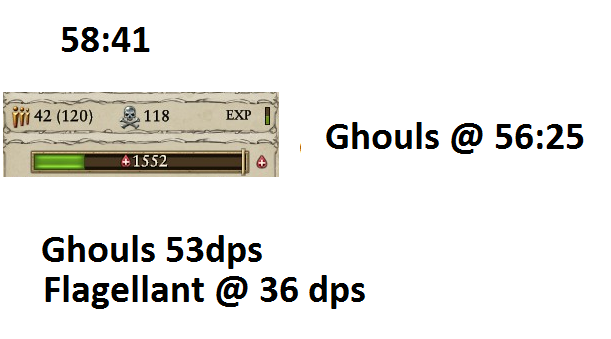
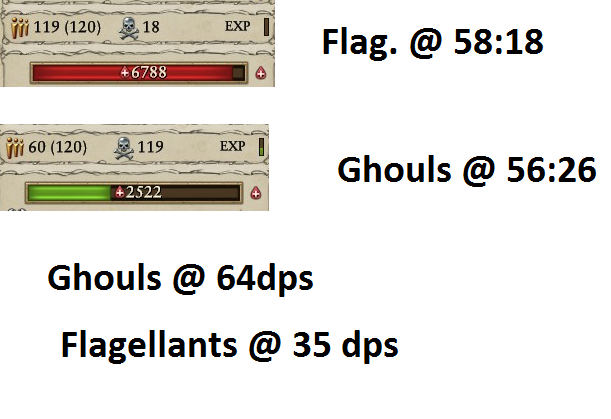
As an example with ghouls versus Flagellant, a head on charge gives those results :


And with the meatshield trick :


roughly 20% (in the first examplen the lower DPS of Ghouls comes from the flagellants one shoting the first row of ghouls due to their charge, hence the ghouls loses some of their charging bonus by being exterminated.
54 hp per ghoul, the damage dealt by flagellant is 36+26=62 damage at full charge
Meanwhile, flagellant have 60hp and the damage dealt by ghouls is 38+15=53 damages at full charge. Hence, if the ghoul hit first, it doesn't kill and receive a killing blow in return, and if the flagellant hit first, it does kill and receive no hit in return. This is why the DPs gap is showing by a decrease in the ghouls DPS rather than by the flagellants.

update : Another factor is the ability of flagellant to gain a huge boost in defense when they lose a fight. This reduce the DPS of the ghouls too.
20 Comments
coyo7e Dec 26, 2021 @ 3:32pm 
Engrish is hard
<1.SBS>StroggKingu Jul 3, 2018 @ 9:02am 
I wonder, how AP damage is applied on high and low armor is it % based like more AP the more armor target has?
Cause if it was always AP full damage than armor would be more or less useless.
[XIII FLaG-THiRD oF HoRRoR] Mar 13, 2018 @ 1:43pm 
@self-destruct Do you have any guidelines for warhammer 2?
Acc0unTant Feb 23, 2018 @ 5:07am 
thanks for that, this is really usefull.
do these principles apply to rome 2 as well or they just improved the model for this game?
HexNibbler  [author] Nov 30, 2017 @ 4:43am 
@lampros 200 armor apply to non AP damage. Every unit has at least 1 AP damage. Ward save is another topic. There are common things with TW:W2 but many values are different. Example is base chance to hit in TW:W2 is lower.
Lampros Nov 29, 2017 @ 7:04am 
By the way, I wish you had posted this on the TW2 guide page. Or can it be done simultaneously? The reason is that folks have moved onto the second game, so this may profit folks more on that guide space.
Lampros Nov 29, 2017 @ 7:02am 
On 200 armor reducing mundane damage by 100 percent: You sure if this is the case in practice, and that another modifier does not change the equation? For instance, 100 percent Ward save is in practice 90 percent in this game, because there is a max Ward save ceiling of 90 percent. It would be silly to have an "invincible" unit, and the tabletop worked the same way: That is, no damage is 100 percent resisted at all times.
[XIII FLaG-THiRD oF HoRRoR] Sep 5, 2017 @ 12:38pm 
well this is a great job thank you very much for your time, I understand that if I want to draw more conclusions I should go inside the pfm tables and investigate for myself :) thanks again and good night
HexNibbler  [author] Sep 5, 2017 @ 12:28pm 
Not any other work for now. This one is because I felt the game deserved some more documentation (however I understand the dev don't want to give too much infos to prevent itfrom becoming a "gamey" thing) and I had acquire some knowledge thanks to some DB digging. I'm glad it's useful.
[XIII FLaG-THiRD oF HoRRoR] Sep 5, 2017 @ 12:05pm 
already, I understand that it can not be adjusted to an exact value depends, I imagine of many other factors, interesting that point about the cancellation of the effect in distant range.

Do you currently have any more guides or do you work in some? I am interested enough you do a good job quite intuitive