Rising Storm/Red Orchestra 2 Multiplayer

Rising Storm/Red Orchestra 2 Multiplayer

73 คะแนน
No-nonsense tactics of team leaderership
โดย SmaSh it Up
This guide addresses the straightforward tactical issues encountered while performing the vital role of Team Leader in Territory mode. It seeks to enhance your team’s capabilities and maximise effectiveness. I am assuming the basics are already adequately grasped but by no means do I claim to be a know-it-all, and suggestions are encouraged and appreciated. For sake of simplicity Mortars, Artillery, Naval/Rocket Barrages - all types of off-map bombardment - are simply referred to as artillery.
   
รางวัล
ชื่นชอบ
ชื่นชอบแล้ว
เลิกชื่นชอบ
Your Presence: Positioning and Location
Though it is necessary for a Team Leader (TL) to remain near a radio for long stretches of play in order to continuously deploy reconnaissance, the TL’s effect on objectives and nearby team mates is often ignored. Firstly, the TL’s presence delivers a large bonus (representing three men) in accelerating or inhibiting the rate at which an objective is captured (destructible points aside). I have noticed at least one guide mentioning the TL should essentially be glued to a radio away from the main action, subsequently drawing the criticism that the TL can still fight like everyone else and should not idle while radio abilities are active or recharging. Certainly, “going Rambo/AWOL" and neglecting to frequently call reconnaissance flights will incur the wrath of your team.


At this juncture an overlooked game feature must be noted: as your experience grows you will eventually unlock the Hero, providing useful bonuses such as exceptional suppression resistance to team mates around you, and hopefully the morale boost of a TL leading by example. Being found on the current objective is sometimes not a deliberate choice. Your forces may have been pushed back to your radio position which was originally located behind the front. The game design rewards players who remain on the objective by awarding additional Team Points for kills 'on the objective' (both attacking and defending), and a sum of Team Points for occupying an objective the moment it is successfully captured or unsucessfully held. Crucially, the presence of leaders amplifies the effects of kill bonuses: Team Points are awarded for killing the enemy while in close proximity to the relevant Squad Leader or the Team Leader - that is, by "protecting" nearby officers.


Nom nom nom! The TL is below me in the hut. Note the Hero Bonus Indicator in the lower left of the screen.


More free points.

In the correct conditions and coupled to the above bonuses, not only actual combat effectiveness but individual and overall scores should improve if you are stationed on the objective, the team becoming more resilient and robust because of your presence.

Every unfolding situation demands a rapid and informed analysis, and an appropriate tactical response following a clear overall strategy. It is up to you to weigh the risk of a higher probability of a more immediate death and a failed reconnaissance (but providing territory and player bonuses by staying on the objective), with retreating to the relative safety of the next objective (where possible), so you can concentrate on using your essential radio-derived abilities without interruption. Questions which will inform your decisions might include: what was the last known position of the bulk of the enemy and when might their artillery be firing again? What is the state of our force and its distribution and how are the flanks holding up? How many reinforcements are remaining (you might want to reserve tickets and resist shouts of "force spawn!" if tickets are low but time and objectives remain)?
The Tactics of Smoke
For an attacking team the cover of smoke is a fundamental component for a successful advance. It is essential to deploy as many smoke grenades as possible towards, on, or even slightly beyond objectives. There are two principles that need to be remembered: the further towards the objective the smoke lands the more useful it is, and the more smoke the better (covering as wide an area as possible). The primary purpose of smoke is to impair the enemy’s vision and so allow your team to more comfortably close the distance to the objective.


Having thrown the two smoke grenades you start with, it is advisable to immediately replenish your stock by returning to an ammunition cache. N.B. 40+ metre throws are comfortably achieved when running forward and hitting the correct arc. Pulling the pin early means the cloud of smoke is effective about ten seconds after the first bounce of the grenade!


A sound option is to then move back towards the smoke you have previously thrown, and when engulfed by smoke throw two further smoke grenades towards the objective. It also possible to drop your smokes near the ammo, resupply, and then pick up the original smokes (so that four are possessed), bypassing having to return to the ammunition point entirely! Thanks to [Schnell_Feuer] for this tip.


The staggering of smoke is especially important because it progressively obscures the enemy’s field of view (despite revealing that your team’s push may be coming from a particular direction, and so attracts blind fire of all sorts). It affords your team ample opportunity to advance and remain alive by not being spotted. With luck and care (avoiding death), by the time your second set of smokes are thrown the initial smoke grenades will begin to dissipate. This has the advantage of giving your team a visible space to move into while still being covered by a new field of smoke further ahead. Optimally, all of this should be performed while reconnaissance is recharging and artillery is firing.

In certain situations deploying smoke is helpful when defending, too. For example, when covering a retreat of your remaining forces to the next objective; disorientating and stalling the enemy; channelling the opposition towards certain areas; and so on.
Efficient Use and Timing of Abilities
The understanding of timing in executing a TL’s duties is not easily taught, but there are basic tenets which assist. One, which somewhat contradicts the initial point above, is not to expose oneself to danger when the ability to request reconnaissance or artillery is available. The longer those abilities remain unused the longer they are squandered. Secondly, if you are going to move forward towards the danger zone (to deploy smoke, or assist in defence or capture of an objective) try to do so when a force respawn is available. In the event of your death, you can consider using force respawn to quickly return to the tasks at hand. This action can be strengthened by moving to forward areas when reconnaissance and/or artillery have nearly recharged (provide about a thirty second lead). Should you die, you will typically spawn quite close to a radio, and so are able to use the only-just-recharged radio abilities almost instantaneously. If you do not die you should find yourself capturing or defending the point and fully leveraging your inherent bonuses to the advantage of your team mates close by. A prolonged defence or capture while being on the objective (but away from the radio when abilities have recharged) is another problem to consider. Take care in requesting reconnaissance if you are in a vulnerable position; if you are lost then the enemy spotted by the flight overhead will not be relayed to the maps of your team mates.

Ideally, you want to follow this order of activity as TL at the start of the game:
  • If attacking deploy your two smoke grenades towards the objective(s)
  • Call reconnaissance and advise your team to examine the location of the enemy
  • Select or mark an appropriate artillery target and call in artillery
  • If attacking, once the recon flight is no longer active/effective move forward with more smoke (best practice is to throw it while the artillery is still falling so there is a field of smoke after the artillery has ceased)
  • If defending sit tight near the radio at an active objective and try not to die. Should you die it is prudent to then remain at the next objective(s) further back and resume being the "recon monkey!"
  • Throughout, remain alert to swathes of team mates dying at once so a large reinforcement wave can be force-spawned. Also, try to get reinforcements on the field while reconnaissance is still active so team mates have heads up upon spawning - intelligence wins battles
The snap-dropping of artillery without reconnaissance is an option at the beginning of games but is a high risk strategy. If you are confident the enemy has moved in a predictable manner (usually the confines of each map determine the viability of this strategy; narrow ones are more suitable), then consider the use of artillery prior to a recon flight. However, your ultimate aim remains the precise synchronisation in the availability of reconnaissance and artillery, where both abilities are at your disposal simultaneously so that artillery can always be accurately directed.


Good timing - Aerial Recon: 48 / Mortars: 49 / Force Respawn: 50. Note the mass of friendlies on the right flank.


About to Force Repawn - Aerial Recon: 37 / Mortars 34. The game was lost because the team camped off the point.


This is the last desperate stand where the majority of the team has abandoned the last point with five minutes remaining. Defeat, not only in this round - but the whole match (having chased the US off the field in the first game!) - was successfully snatched from the Jaws of Victory!
Neglected Essentials
  • If defending, calling an artillery strike on a position beyond an objective that is about to fall or has recently been lost will result in the automatic cancellation of the artillery, protecting the enemy’s new spawn locations. This results in a monumental waste of artillery if it has just started firing.
  • Once called in, artillery strikes will remain active until finished or cancelled – you are free to move away from the radio.
  • You are not required to be operating a radio to cancel an artillery strike, simply cancel artillery via the normal map.
  • Similarly, you do not need to be next to a radio to force respawn (default key: N).
  • As mentioned above, if you perish or move too far away from a radio while a reconnaissance flight is active your team will not be able to identify the enemy over which the spotter aircraft is flying (via the map).
  • Once called, the effect of reconnaissance is only active from the particular radio set where reconnaissance was called from. This means if you die you must return to the same radio set to regain reconnaissance of the enemy.
  • It is not necessary to stare at the radio once reconnaissance is active. There is a radius around the radio within which you can move and perform the other ‘real-world’ functions, like firing a weapon, during a reconnaissance operation. This is critical to remember when the enemy are encroaching on your position and you must stay alive, say, in order to keep reconnaissance active.

  • The route of a reconnaissance flight is not always useful, often it will inspect irrelevent areas at the extremity of the map and even veer off the map (blocking target identification). This affords vital moments where the TL can rush forward with smoke if it is needed urgently, then returning to the proximity of the radio as the flight returns over an active zone. Again, the risk of death and 'losing' the remaining reconnaissance flight must be judged accordingly.
  • Try to resupply classes which require a steady flow of ammunition such as Machine Gunners. They might not even need it but you will still receive another five Team Points for your efforts.
29 ความเห็น
SmaSh it Up  [ผู้สร้าง] 25 ก.ย. 2018 @ 7: 07am 
Thanks Lone Trooper!
It's been a while since I played RO2/RS but the principles remain the same.
BOT Josvia 24 ก.ย. 2018 @ 2: 29pm 
NOOBBBBB I CAN P[LAY BETTER
Katz 23 ก.ย. 2018 @ 10: 27pm 
you got all the essentials in there, nice job.
jimbostealer 15 มิ.ย. 2015 @ 8: 18pm 
Fantastic >:D!!!!!!!
Star sapphire 28 เม.ย. 2014 @ 11: 32am 
Btw about the fall back strategy. If you are a cunning asshole with no shooting skills like me (lol) you can spend more time to time the enemy artillery. Works especially well with kwajalein point C and D (in fact it is what happened in my games just a few minutes ago).

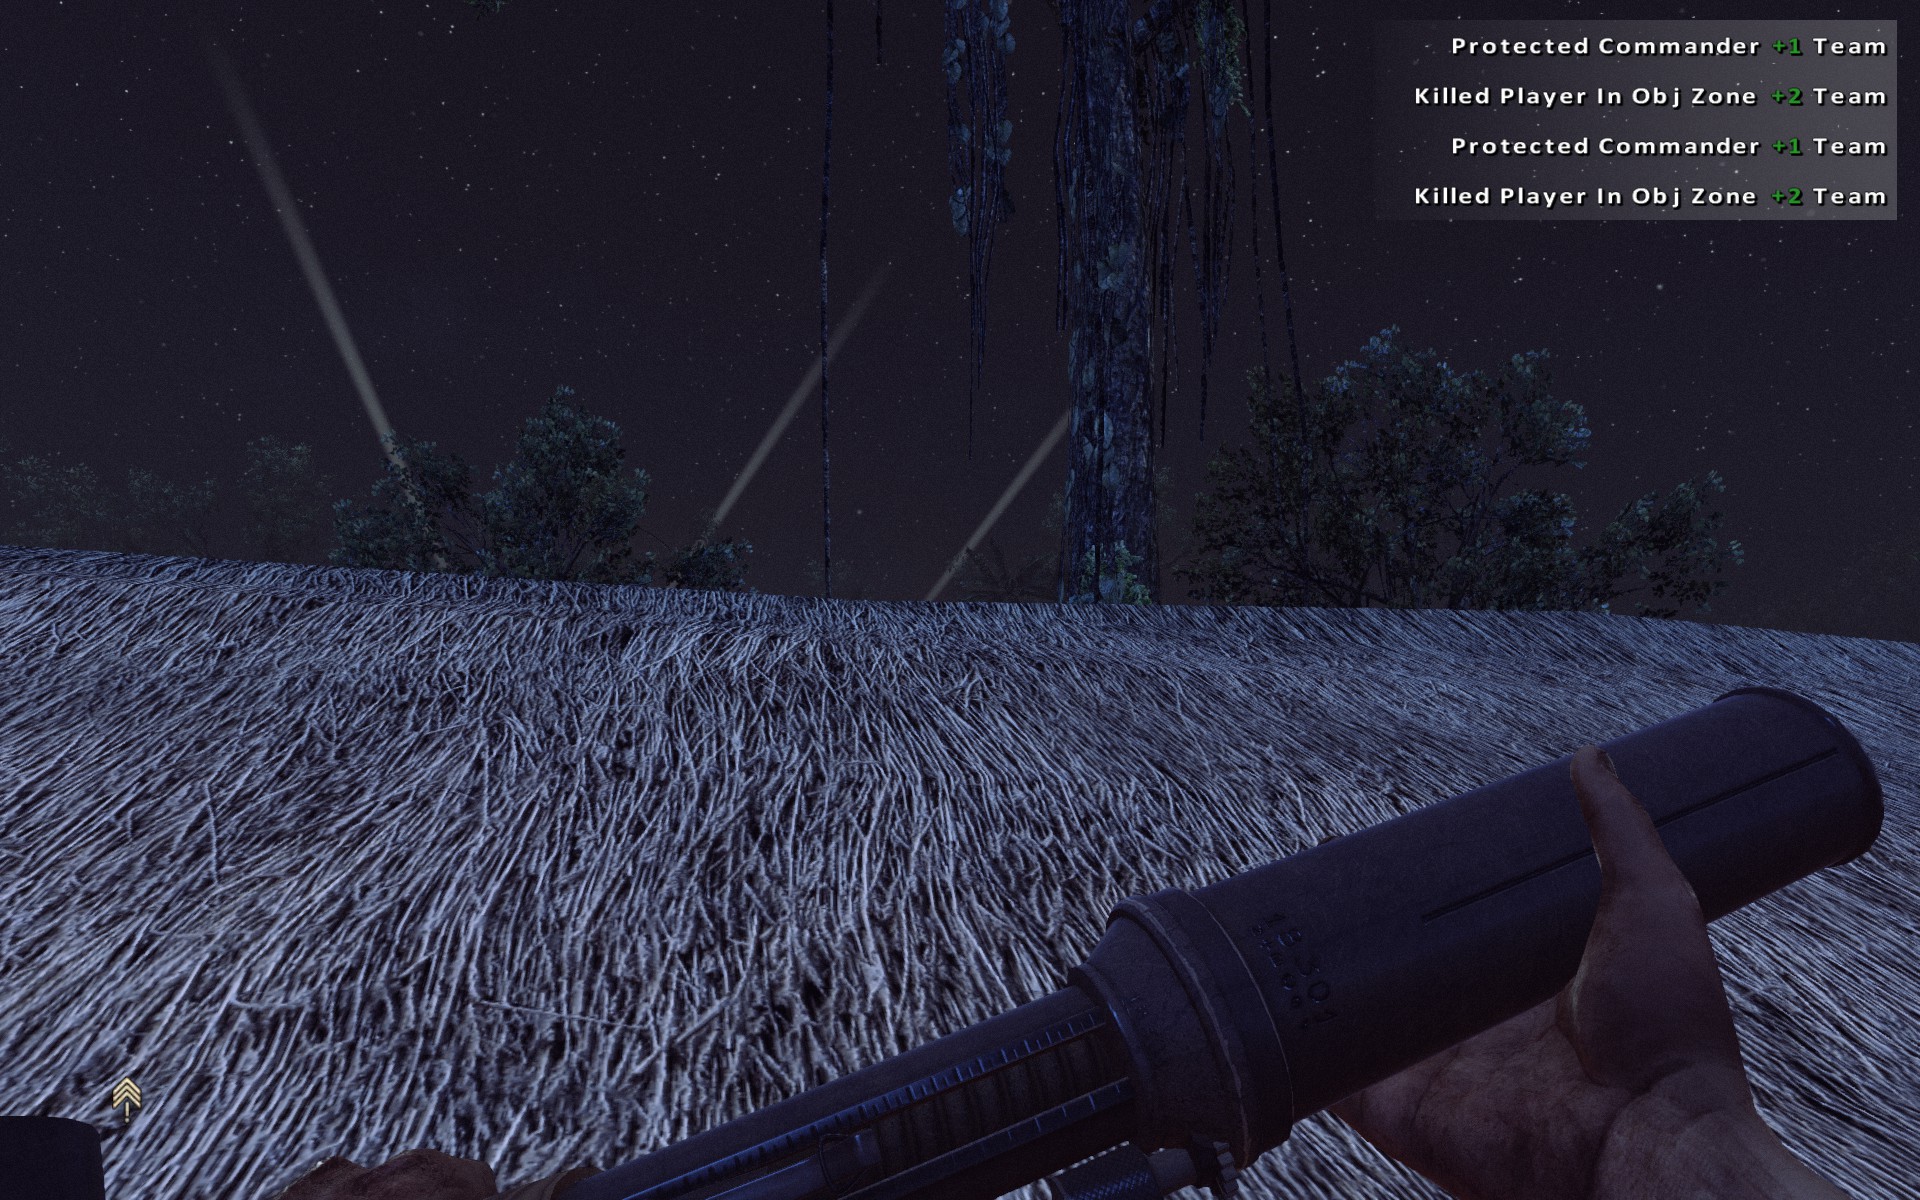
Enemy artillery sound heard > fall back(with 1 or 2 unlucky guys caught up) > our artillery firing = the finest dipshit sandwich you can create for the enemy
Works even better with the countdown meter.
The need to hang back is, you need to be quick in reaction plus you need to calculate the time. I actually have noticed how much faster experienced players can fall back if you notify them the enemy artillery say 30s in prior.

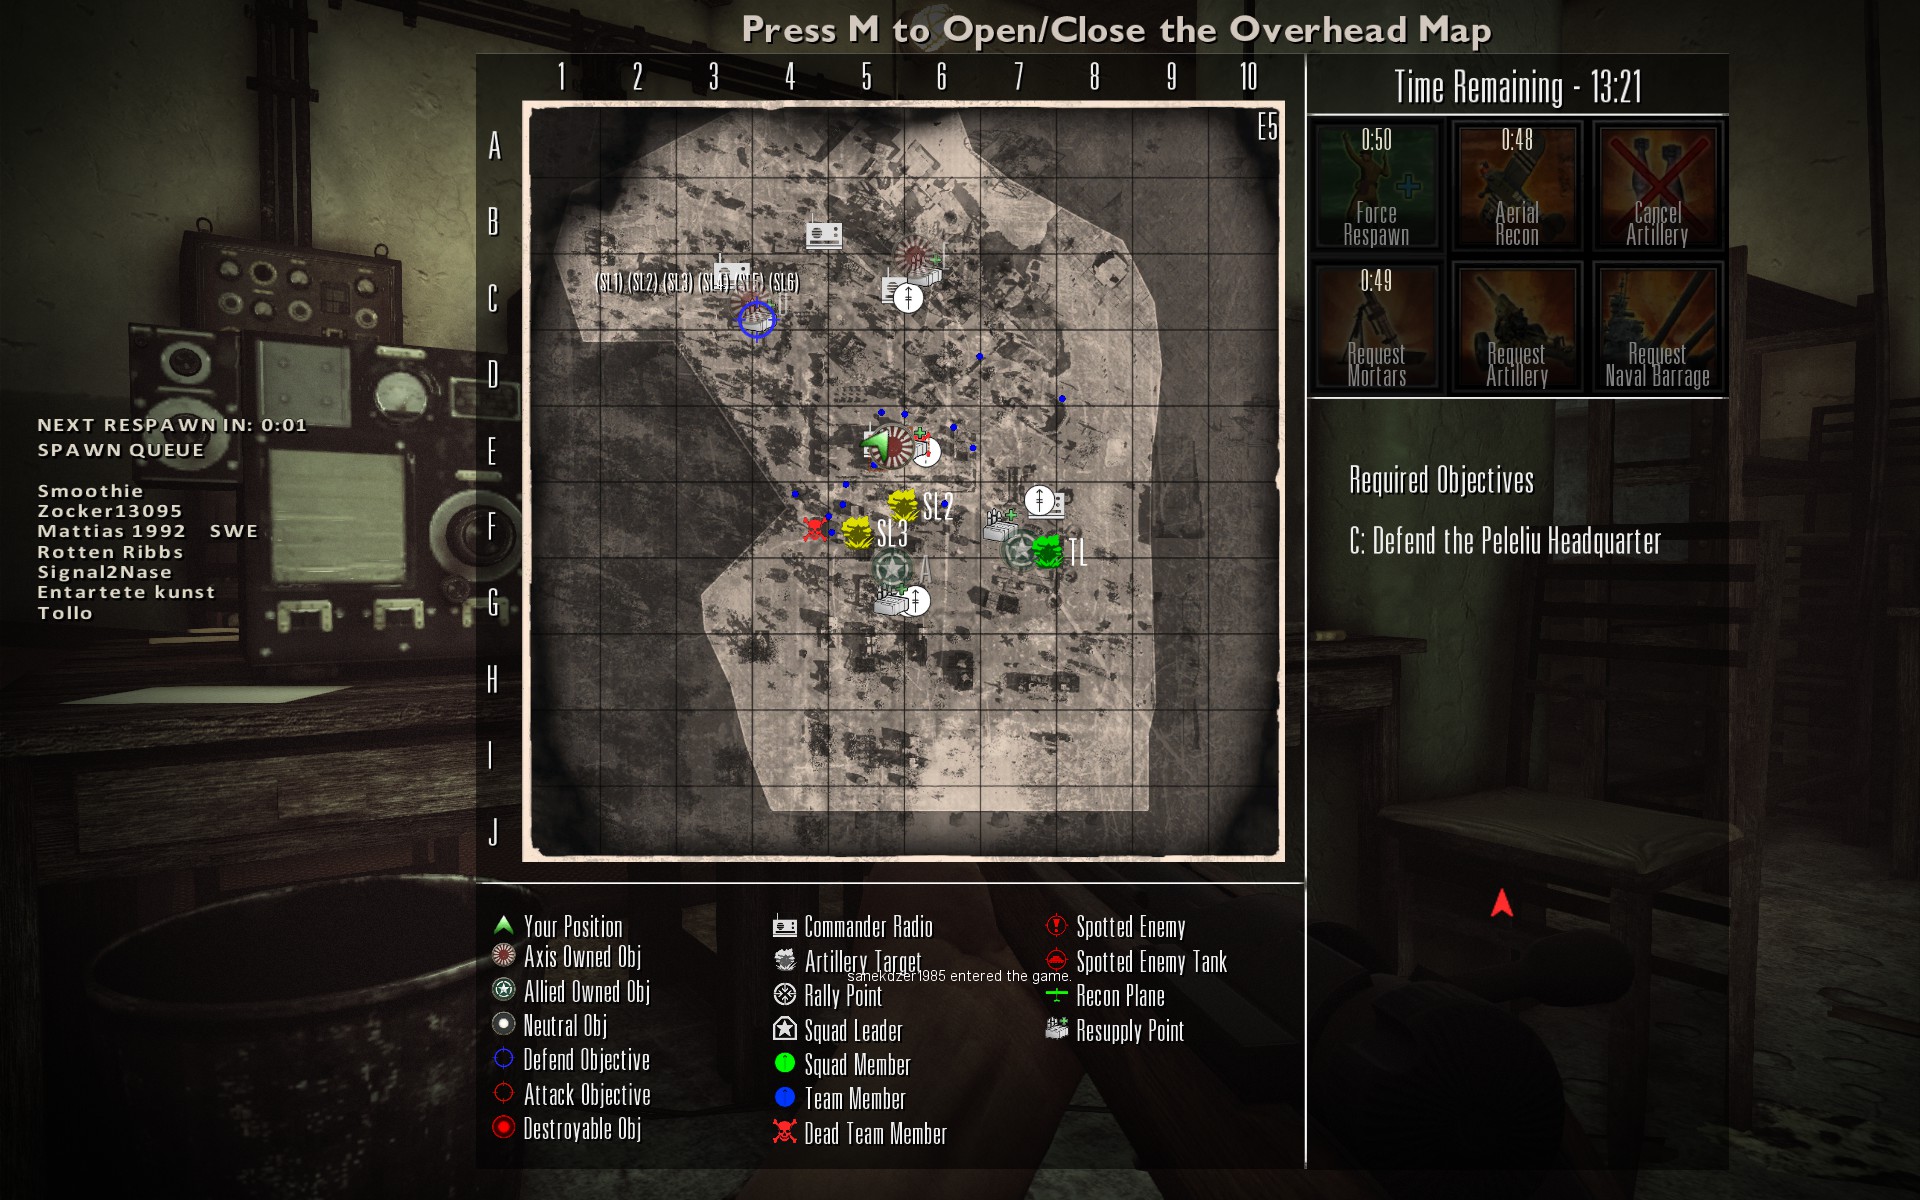
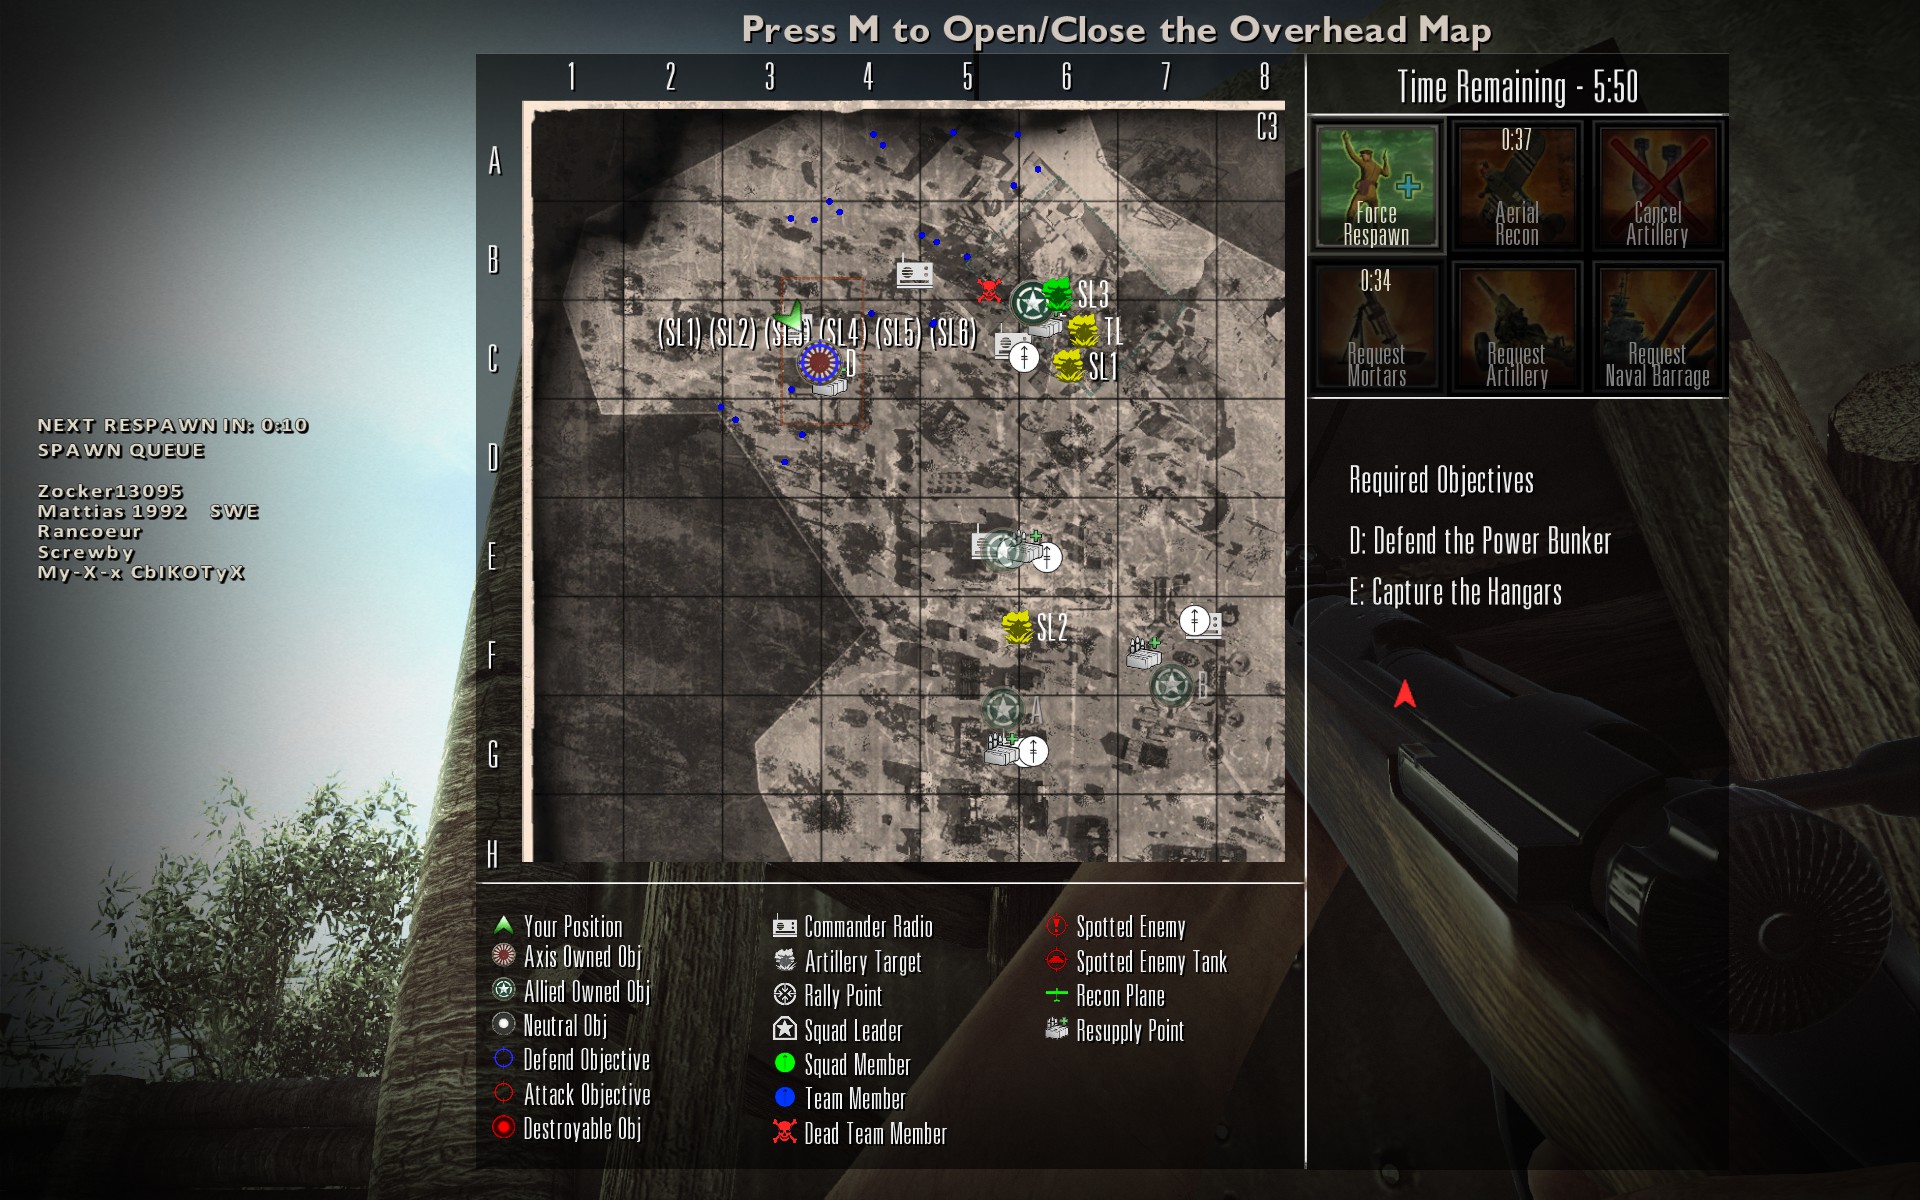
Btw we managed to held that infamous point E from 0 to 15 reinforcements. (lol)
Star sapphire 28 เม.ย. 2014 @ 11: 23am 
Well for the killing part of artillery the most efficient way to safe or soften caps is to kill. Plus you cant beat the scenario of an artillery killing 15+ of the oppposing team while using binos to see your man charge and bayonet the shocked rest that managed to get in. In fact it is the ultimate tool for K/D, exp, bla bla bla.

I do agree that the usage part is more of a map to map basics, which comes with experience. From small parts like objects for a quick mark far from 200m+ to spawn points and reinforcement routes, to more advanced gaming like analysing patterns of troop distribution to even knowing your most frequent servers best players' best role.

But heck I DONT mean noobs should snatch the slot for the freaking "experience". Revise the above post for core skills if any do read this.

Even so theres one more point from the previous discussion. And it fits pretty much here:
Radio = Mic + plan > force spawn > smoke > cap & moral >>> SMG/semi-auto
SmaSh it Up  [ผู้สร้าง] 28 เม.ย. 2014 @ 8: 39am 
Great points and thanks for the comments everybody!

@Sir Tobias
I concur! This is mentioned above (leading by example and the morale boost). Particularly useful and inspiring when leading a banzai charge as a Japanese TL!

@Unwanted Diplomatic Entity
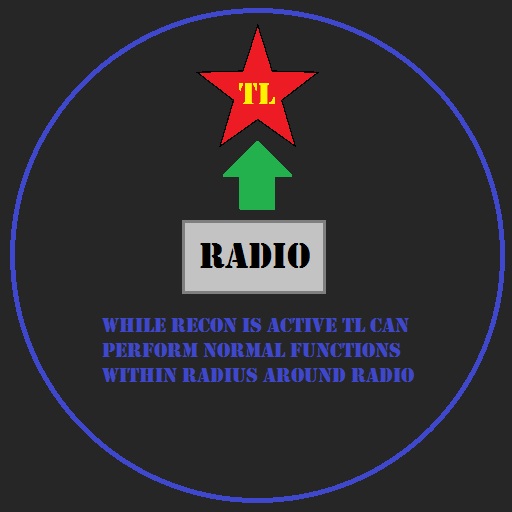
The order of activity that I proscribed was quite rough and only a general guide. There are definitely situations where it is better to attend to the radio first. A lot of the time it depends on the map - sometimes reconnaissance or artillery is not immediately available (or at all) and so going to the radio is a bit of a waste of time. You noted a really important element of using artillery which is to fend off attacks and soften up defences. Which leads to..
SmaSh it Up  [ผู้สร้าง] 28 เม.ย. 2014 @ 8: 39am 
@HeinzLo
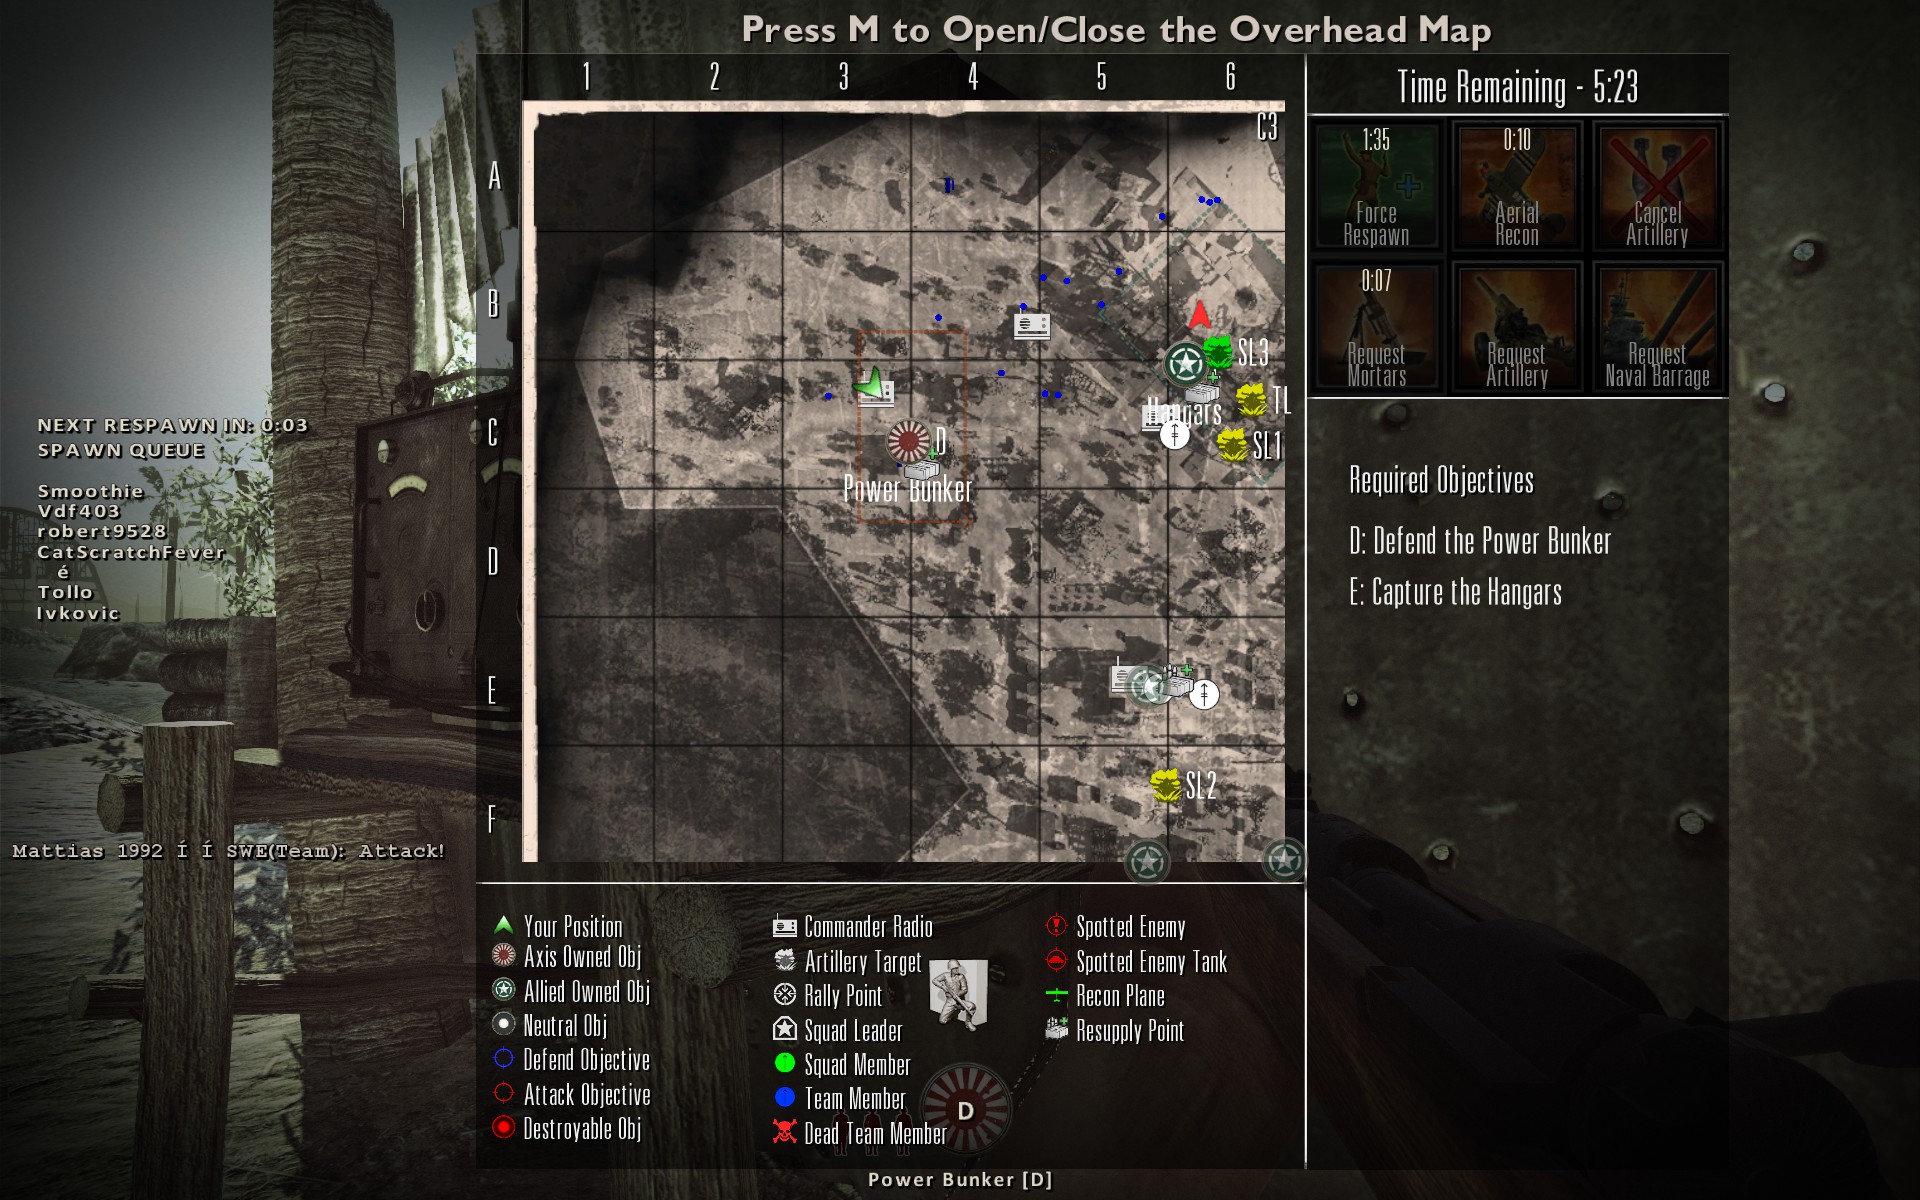
A section on artillery use has been requested but I think the factors vary and make a 'typical situation' hard to describe. It's probably more useful to write an artillery guide on a per map basis. You raise a really useful point about plans. Taking your Saipan example it is a very effective strategy to fall back to F as the Japanese if the ticket count is low and plenty of time remains. Using smoke on a retreat is noted in the guide.
SmaSh it Up  [ผู้สร้าง] 28 เม.ย. 2014 @ 8: 39am 
This "fall back" strategy, combined with well-timed use of artillery is devastating on a map like Kwajalein. On Alpha as the defending Japanese your team is able to remain in forward positions even if it falls, and smoke is very effective in confusing the enemy's advance to Bravo. Deploying smoke and dropping heavy artillery (e.g. on the ammo by the right side log bunker with the radio) seriously hampers the enemy's advance by forcing them to regroup and predictably use the flanks. It also halts the enemy TL from getting to the radio in the bunker, and gives your own forces ample opportunity to set up extremely strong defences. In this way the enemy attack stalls and lock down frequently ensues.
Star sapphire 27 เม.ย. 2014 @ 11: 58pm 
2. Counter arty: IMO underpracticed. Very often a well orchestrated attack would come in the form of arty then smoke and mass charge and if you play TL that often you can actually count manually the approximately the time of next enemy arty and give the attackers a nice suprise. The same principle applies if you are assulting a cap while the enemy attempts to flush you out with arty when you have the upper hand(esp americans on RS maps) you will at least create a stalemate. Not always good as an attacker though and judgement comes with experience. However if you time your recon to 15-25s before arty it will give you an ample of time to decide at ease.

And the whiney part: so many noob TLs with filthy scores, pathetic artillery and NO smokes after the price reduction. At least they should learn to read.