Borderlands 2

Borderlands 2

829 次評價
A Mechromancer Guide - Evil Enchantress build (Level 72 build)
由 yunni~* 與 2 位協作者共同發表
Hi there, I'm Korny, a random no one you have never heard of who mains Gaige. Having over 900 hours in Borderlands 2 and about 300 hours playing as her, and this is my build.
This is a self-made level 72 build.
Apparently this is my first guide I made with zero guidance, so pardon me if it's messy or too wordy >.<
   
獎勵
加入最愛
已加入最愛
移除最愛
What this build does
This build focus mainly on Shock elemental damage and damage over time from both Electrocute and Electrical Burn's ignite damage with the buff from Evil Enchantress skill. Resulting in damage over time doing over 300K damage per tick.

I mainly invest my skill points into Little Big Trouble and Ordered Chaos skill tree, and spend remaining 22 points in Best Friends Forever tree for some survival skills.

Many people rely too heavily on Bee shields. Constant amp damage is awesome but with the low shield capacity and long recharge delay, one will be left vulnerable without a shield or amp damage.
With this build, provided used properly, one does not even have to use the Bee shield.


Note: Tested and works well even in Ultimate Vault Hunter Mode. Might not work well with other people, either it's not their play-style or they are using it the wrong way.

Warning! - Doesn't work well against bosses like Seraph Guardians, as either they are immune to Elemental Effects or they are strong against them. Works fairly on Pete the Invincible.
Also might not work well in Overpower mode

If this build isn't your type, you can try other build created by other players from either Steam Hub, forum or YouTube or you can mix in a bit of your own build and see how it goes. It's all about trial and error.

“To invent, you need a good imagination and a pile of junk.”
― Thomas A. Edison
Skill points investing (Build 1)

This build focus heavily on Shock damage and Deathtrap's combat ability.

Level 5: Deathtrap (Action skill)

Level 6~10: 5 Myelin
Myelin: Bonus shield capacity and Shock resistance.

Level 11~16: 5 Shock Storm & 1 The Stare.
Shock Storm: Killing an enemy with a Critical Hit causes an Electric Storm, dealing Electrocute Damage to nearby enemies. Electrical Storms are also caused by Deathtrap whenever he kills an enemy.

The Stare: Allows Deathtrap to use his laser beam to attack enemies. Laser beam does Burn Damage.

Level 17~22: 4 Smaller, Lighter, Faster. 1 Anarchy & 1 Robot Rampage.
Smaller, Lighter, Faster: Reload faster with all weapons at the cost of slightly reduced magazine size.

Robot Rampage: Allow Deathtrap to perform a spinning attack to damage nearby enemies. A rampage lasts for 2 seconds, during which Deathtrap will strike 9 times. Each of these strikes inflicts 62% of a regular melee strike.

Level 23~32: 5 Blood Soaked Shield, 1 Discord, 3 Typecast Iconoclast & 1 Rational Anarchist.
Blood Soaked Shield: Restores 100% of your shield while losing 5% of your health whenever kill an enemy, lost health can be regenerated through the use of Discord and Cooking Up Trouble.

Discord: Whenever you manually reload your gun, draining 1 stack per second and regenerates 3% health per second.
Note: Discord can be canceled by manually reloading again.

Typecast Iconoclast: A chance of getting addition Anarchy stacks whenever you gain one.

Rational Anarchist: Allows you to gain 25 stacks instead of 1. This only works when you have 0 stack.
Note: Typecast Iconoclast skill can trigger too, resulting in 26 stacks.

Level 33~42: 5 Evil Enchantress & 5 Electrical Burn
Evil Enchantress: Killing an enemy increases the Damage that your Burn, Electrocute, and Corrode status effects deal to enemies for 6 seconds.
Note: This skill pairs well with Electrical Burn. If/When an enemy bursts into flames while Evil Enchantress is still in effect, the boosted Electrocute damage will result in higher Burn Damage. That damage will, in turn, be boosted by Evil Enchantress AGAIN, effectively getting twice the benefit.

Electrical Burn: When your Electrocute Status Effects deal damage to enemies, there is a chance they will burst into flames and take Burn Damage. Burn Damage is based on the Electrocute damage dealt.
Note: Electrocute Damage from Shock Storm will also trigger Electrical Burn.

Level 43~53: 5 Wires Don't Talk, 1 Make It Sparkle & 5 Close Enough
Wires Don't Talk: Increases all Shock and Electrocute Damage that you inflict.

Make it Sparkle: Gives Deathtrap elemental charges whenever you shoot him with an elemental gun. His melee attacks to deal additional damage of that element.
Note: Additionally, each individual hit of Robot Rampage will also trigger bonus damage, resulting in massive damage.

Close Enough: Your bullets that hit walls or other object have a chance to ricochet off towards a nearby enemy. Ricocheted bullets do reduced damage.

Level 54~59: 1 Buck Up & 5 The Better Half
Buck Up: Deathtrap restores the shields of one ally by 30%. (Very useful in Coop)

The Better Half: When your Magazine is half empty you gain a Fire Rate bonus.

Level 60~65: 5 Potent as a Pony, 1 Explosive Clap
Potent as a Pony: Increases maximum health for you and Deathtrap.

Explosive Clap: Deathtrap causes an explosion in front of him, dealing explosive damage to all nearby enemies.

Level 66~72: 5 Made of Sterner Stuff, 1 Shock and "AAAGGGGHHH!" & 1 Typecast Iconoclast
Made of Sterner Stuff: You and Deathtrap gain bonus damage reduction against all damage types. Deathtrap also gains bonus melee damage.

Shock and "AAAGGGGHHH!": Reloading your gun causes an Electrical Explosion, damaging nearby enemies.
Skill points investing (Optional Build 2)

This build allows you to regenerate your health slighty faster whenever you have a fully loaded magazine.
Note: Infinity is not recommended as Smaller, Light, Faster's reduced magazine size will bring its magazine size down to 0.

Level 5: Deathtrap (Action skill)

Level 6~10: 5 Myelin
Myelin: Bonus shield capacity and Shock resistance.

Level 11~16: 5 Shock Storm & 1 The Stare.
Shock Storm: Killing an enemy with a Critical Hit causes an Electric Storm, dealing Electrocute Damage to nearby enemies. Electrical Storms are also caused by Deathtrap whenever he kills an enemy.

The Stare: Allows Deathtrap to use his laser beam to attack enemies. Laser beam does Burn Damage.

Level 17~22: 4 Smaller, Lighter, Faster. 1 Anarchy & 1 Robot Rampage.
Smaller, Lighter, Faster: Reload faster with all weapons at the cost of slightly reduced magazine size.

Robot Rampage: Allow Deathtrap to perform a spinning attack to damage nearby enemies. A rampage lasts for 2 seconds, during which Deathtrap will strike 9 times. Each of these strikes inflicts 62% of a regular melee strike.

Level 23~32: 5 Blood Soaked Shield, 1 Discord, 3 Typecast Iconoclast & 1 Rational Anarchist.
Blood Soaked Shield: Restores 100% of your shield while losing 5% of your health whenever kill an enemy, lost health can be regenerated through the use of Discord and Cooking Up Trouble.

Discord: Whenever you manually reload your gun, draining 1 stack per second and regenerates 3% health per second.
Note: Discord can be canceled by manually reloading again.

Typecast Iconoclast: A chance of getting addition Anarchy stacks whenever you gain one.

Rational Anarchist: Allows you to gain 25 stacks instead of 1. This only works when you have 0 stack.
Note: Typecast Iconoclast skill can trigger too, resulting in 26 stacks.

Level 33~42: 5 Evil Enchantress & 5 Electrical Burn
Evil Enchantress: Killing an enemy increases the Damage that your Burn, Electrocute, and Corrode status effects deal to enemies for 6 seconds.
Note: This skill pairs well with Electrical Burn. If/When an enemy bursts into flames while Evil Enchantress is still in effect, the boosted Electrocute damage will result in higher Burn Damage. That damage will, in turn, be boosted by Evil Enchantress AGAIN, effectively getting twice the benefit.

Electrical Burn: When your Electrocute Status Effects deal damage to enemies, there is a chance they will burst into flames and take Burn Damage. Burn Damage is based on the Electrocute damage dealt.
Note: Electrocute Damage from Shock Storm will also trigger Electrical Burn.

Level 43~53: 5 Wires Don't Talk, 1 Make It Sparkle & 5 Close Enough
Wires Don't Talk: Increases all Shock and Electrocute Damage that you inflict.

Make it Sparkle: Gives Deathtrap elemental charges whenever you shoot him with an elemental gun. His melee attacks to deal additional damage of that element.
Note: Additionally, each individual hit of Robot Rampage will also trigger bonus damage, resulting in massive damage.

Close Enough: Your bullets that hit walls or other object have a chance to ricochet off towards a nearby enemy. Ricocheted bullets do reduced damage.

Level 54~59: 1 Buck Up & 5 The Better Half
Buck Up: Deathtrap restores the shields of one ally by 30%. (Very useful in Coop)

The Better Half: When your Magazine is half empty you gain a Fire Rate bonus.

Level 60~65: 5 Potent as a Pony, 1 Explosive Clap
Potent as a Pony: Increases maximum health for you and Deathtrap.

Explosive Clap: Deathtrap causes an explosion in front of him, dealing explosive damage to all nearby enemies.

Level 66~72: 5 Cooking Up Trouble, 1 Shock and "AAAGGGGHHH!" & 1 Typecast Iconoclast
Cooking Up Trouble: While your gun's magazine is full you regenerate 2% of maximum health per second.

Shock and "AAAGGGGHHH!": Reloading your gun causes an Electrical Explosion, damaging nearby enemies.
Skill points investing (Optional Build 3)

This build has some Anarchist taste in it, suitable for those who likes Anarchist playstyle.

Level 5: Deathtrap (Action skill)

Level 6~15: 5 Myelin & 5 Shock Storm
Myelin: Bonus shield capacity and Shock resistance.

Shock Storm: Killing an enemy with a Critical Hit causes an Electric Storm, dealing Electrocute Damage to nearby enemies. Electrical Storms are also caused by Deathtrap whenever he kills an enemy.

Level 16~20: 4 Smaller, Lighter, Faster & 1 Anarchy
Smaller, Lighter, Faster: Reload faster with all weapons at the cost of slightly reduced magazine size.

Level 21~27: 5 Blood Soaked Shields, 1 Robot Rampage & 1 Discord.
Blood Soaked Shield: Restores 100% of your shield while losing 5% of your health whenever kill an enemy, lost health can be regenerated through the use of Discord and Cooking Up Trouble.

Robot Rampage: Allow Deathtrap to perform a spinning attack to damage nearby enemies. A rampage lasts for 2 seconds, during which Deathtrap will strike 9 times. Each of these strikes inflicts 62% of a regular melee strike.

Discord: Whenever you manually reload your gun, draining 1 stack per second and regenerates 3% health per second.

Level 28~34: 3 Typecast Iconoclast, 1 Rational Anarchist & 3 Preshrunk Cyberpunk.
Typecast Iconoclast: A chance of getting addition Anarchy stacks whenever you gain one.

Rational Anarchist: Allows you to gain 25 stacks instead of 1. This only works when you have 0 stack.
Note: Typecast Iconoclast skill can trigger too, resulting in 26 stacks.

Preshrunk Cyberpunk: Increases the maximum number of Anarchy stacks you can have.

Level 35~44: 5 Evil Enchantress & 5 Electrical Burn
Evil Enchantress: Killing an enemy increases the Damage that your Burn, Electrocute, and Corrode status effects deal to enemies for 6 seconds.
Note: This skill pairs well with Electrical Burn. If/When an enemy bursts into flames while Evil Enchantress is still in effect, the boosted Electrocute damage will result in higher Burn Damage. That damage will, in turn, be boosted by Evil Enchantress AGAIN, effectively getting twice the benefit.

Electrical Burn: When your Electrocute Status Effects deal damage to enemies, there is a chance they will burst into flames and take Burn Damage. Burn Damage is based on the Electrocute damage dealt.
Note: Electrocute Damage from Shock Storm will also trigger Electrical Burn.

Level 45~55: 5 Wires Don't Talk, 1 Make It Sparkle & 5 Close Enough
Wires Don't Talk: Increases all Shock and Electrocute Damage that you inflict.

Make it Sparkle: Gives Deathtrap elemental charges whenever you shoot him with an elemental gun. His melee attacks to deal additional damage of that element.
Note: Additionally, each individual hit of Robot Rampage will also trigger bonus damage, resulting in massive damage.

Close Enough: Your bullets that hit walls or other object have a chance to ricochet off towards a nearby enemy. Ricocheted bullets do reduced damage.

Level 56~65: 5 The Better Half & 5 Unstoppable Force
The Better Half: When your Magazine is half empty you gain a Fire Rate bonus.

Unstoppable Force: Killing an enemy grants you bonus movement speed and regenerate your shield for a short while.

Level 66~72: 1 Buck Up, 2 Typecast Iconoclast & 4 Potent as a Pony
Buck Up: Deathtrap restores the shields of one ally by 30%. (Very useful in Coop and helps in close combats)

Potent as a Pony: Increases maximum health for you and Deathtrap.
Key items.
To maximize the effectiveness of this build, choosing the the right equipment is very important.
Below are the equipement I'm using right now.

Weapon 1: Hail (Shock)

What play thing can you offer me today?Always elemental. Fires projectiles in a high arc. After a certain distance bullets will split in two. Damage done with this gun heals the wielder.
  • A good Assualt rifle with High accuracy and High firerate.
  • Restores 3% of damage inflicted.
  • Obtained from the mission Bandit Slaughter located in Fink's Slaughterhouse.
Because it's a Moxxi weapon and can spawn as a Shock weapon, making it one of the best weapon for a Mechromancer. Any damage you done to enemies will be restored as health. Including damage from Nova/Spike shield, Grenades and Elemental effects. (Damage done by Deathtrap will not count)


Weapon 2: Slagga

blagagaAlways Slag element. Fires 3 slag projectiles with reduced damage per shot at a cost of one SMG ammo. High chance to slag.
  • Obtained randomly from any suitable loot source but has an increased chance to drop from Tector & Jimbo Hodunk located in The Dust.
  • Slag is your best friend. Slagged target takes x2 (x3 in UVHM) from non-slag element damage. A precise shot from any of your gun to an enemy's weak point will result in tremendous amount of damage.
  • If you don't have one, a Purple rarity Maliwan Slag SMG or a Slag Dart Pistol can be used to slag your enemies.


Weapon 3: Infection

Itchy. Tasty. Extremely high elemental effect damage/chance, but extremely low projectile damage. Projectiles travel in a slight arc and at a low velocity. Projectiles explode after travelling a certain distance. Always corrosive.
  • Obtained from trading with the Seraph Vendor in Hunter's Grotto.
  • Super effective against armor types.
The only thing you are lacking is a corrosive weapon, to deal with armor type enemies, you will need one, the Infection is a good choice. Even when it lacks in raw power, it makes up for in DoT. The Infection has the highest elemental damage-per-second in the game, combining with Evil Enchantress' bonus, it is a force to be reckoned with.


Weapon 4: Chulainn (Choice 1)
Riastrad!Fires shock and slag rounds. Applies slag to the wielder as long as the weapon is equipped which will last a couple of seconds after swapping weapons. Increased damage, rate of fire, magazine size and reload speed. Reduced accuracy and stability.
  • Obtained from the mission Clan War: Zafords vs. Hodunks when siding with the Zaford family at the showdown at Lynchwood Station.
  • I recommend you using it Fight for your life, especially in UVHM, taking x3 damage is something you will not want.
  • Slags your enemy and does Shock damage at the same time, one of the best weapon for a Shock build Mechromancer.

Weapon 4: Florentine (Choice 2)
Double troubleFires shock projectiles which deal bonus slag damage on impact. Consumes 2 ammo per shot.
  • Obtained from trading with the Seraph Vendor in Flamerock Refuge.
  • Slags your enemy and does Shock damage at the same time, one of the best weapon for a Shock build Mechromancer.
  • No self slag effect

For those who are trying to tell me to remove Chulainn, please read this!


Shield: Black Hole
You are the center of the universe.Pulls nearby enemies towards the wearer when its shield charge is depleted, then explodes in a huge nova. Increased damage and range, always shock element.
  • Obtained randomly from any suitable loot source but has an increased chance to drop from Foreman Jasper located in Opportunity.
  • One of the best shield for a Shock build Mechromancer since apon a depleted shield, it pulls near by enemies towards you before releasing a hugh amount of nova damage, usually able to kill most slagged non-badass enemy with just one blast.
  • If you don't have one, a Purple rarity Shock Nova shield isn't that bad. Just lack of the singularity effect and lower damage. Flame of the Firehawk Shield works great too with Moxxi weapons.


Grenade Mod: Chain Lightning
Don't pay it back, pay it forward.Always Shock. Regenerates grenade ammo over time. Shoots a bolt of lightning straight forward that explodes on impact and arcs to nearby targets. Character may shout "Lightning Bolt!" after use.
  • The Chain Lightning is a rare drop from Badass Sorcerers in Tiny Tina's Assault on Dragon Keep.
  • Ability to regenerate grenade ammo, making this grenade spammable.
  • If you don't have one, a Shock O-Negative from Torgue Seraph Vendor, Quasar which drop from Ultimate Badass Varkids or a Purple rarity Shock Singularity grenade is a nice choice.
The Chain Lightning is ideally suited for Gaige builds with heavy investment in the Little Big Trouble tree (specifically Wires Don't Talk, Electrical Burn and Myelin). Its arcing effect can also help a similar build to hit targets at range with a high Anarchy stack, as it can mitigate the accuracy penalty.

Class Mod: Evil Catalyst
Or
Class Mod: Legendary Catalyst
  • Obtained randomly from any suitable loot source.
  • Legendary Catalyst can be obtain from killing Chubby/Tubby enemies. Chubby Rakks do not drop them!
  • This class mod will further boost your elemental damage.
  • Multiple Catalyst class mods in coop game will stack its elemental bonus.


Relic: Bone of the Ancients
  • Obtained randomly from any suitable loot source but has an increased chance to drop from Legendary Loot Midgets.
  • Increases Shock damage and reduced the cooldown of your Deathtrap will further make Gaige a even deadlier threat.
Situational items
Kitten (Shock)

We're all mad here. I'm mad. You're mad.Fires three bullets per shot at the cost of one ammo. The shot spread takes the shape of a smiley face, with two eyes and a wide grin. The spread starts out tight, lengthens, and then closes in again.
  • Obtained from Mad Moxxi by finishing the Everybody Wants to be Wanted mission in Mr. Torgue's Campaign of Carnage.
  • Restores 2.5% of damage inflicted.
  • Works like a high-speed shotgun.
Gaige can make good use of the Kitten with her Close Enough skill. The Kitten's high damage, rate of fire, and projectile count per ammo used make it ideal for spraying ricocheted shots all over the battlefield.

B*tch (Shock)

yup. back.Critical hit damage bonus, achieves highest (to which it is near pinpoint) accuracy quicker than most other Hyperion submachine guns.
  • Drop from BNK-3R located in The Bunker.
  • Pin-point accuracy
Given its increased critical damage, high firerate and high accuracy. It is a great weapon for scoring easy critical hits even at long distance.

Sand Hawk (Shock)

In. Not unlike Errol.Consumes three rounds per shot, producing 8 slow-moving projectiles in a horizontal bird-shaped pattern which shifts as though flapping its wings.
  • Obtained from the mission Whoops located in Wurmwater from Captain Scarlett and Her Pirate's Booty.
  • Impressive spread similar to a shotgun.
  • Powerful when aiming down sight.
Consuming 3 rounds per shot and producing 8 projectiles and its powerful effect when aiming down sight. It is a great weapon against large enemies, especially the ones with large weapon spots like the Warrior.

Pimpernel (Shock)

Sink me!When the bullet impacts it splits into five lower-damage elemental energy balls that are cast out in a circular distribution parallel to ground from the point of impact for additional damage.
  • Obtained from the mission Don't Copy That Floppy located in Washburne Refinery from Captain Scarlett and Her Pirate's Booty.
Useful against enemies with defenses against direct attacks with bullets, such as Nomad Taskmasters or Shield Surveyors. While the initial projectile will still be stopped or even deflected towards the player, the energy balls will be created based on the point of deflection, bypassing the defense and damaging the enemy.
Larger enemies such as Badass Constructors, Roscoe, or any larger boss, a direct hit with the Pimpernel may result in massive damage, as the energy balls will spawn close enough that most, if not all, will strike the enemy for additional damage and critical hits.

Orc (Shock)

Have I achieved worth yet?Reduced damage and reload speed, increased accuracy and magazine size. Firing will randomly activate a short-lived boost that causes bullets to split extra projectiles downward as they travel and ricochet and split into 3 upon impact with surfaces. While this boost is activated, reload speed and fire rate increase dramatically.
  • Obtained from the mission Magic Slaughter: Round 5 in Murderlin's Temple.
The Orc is an excellent weapon on a Mechromancer, making use of the Anarchy tree because of its ricochet ability, especially as it can spawn as a shock weapon.

Crit

Slippery when wet.Does very high amounts of shock damage. Has a small chance to drop out of the player's hand when reloading. Does not take up inventory slots, due to chance of dropping.
  • Obtained from the mission Critical Fail given by Moxxi in Flamerock Refuge from Tiny Tina's Assault on Dragon Keep.
A good weapon for a Shock focus Mechromancer because of its high Shock damage.
Note: Avoid using it in place where you are near a cliff, pits or anywhere that will make this gun unretrievable when dropped.

Thunderball Fists

I can have such a thing?Shots fired produce electrical orbs which upon impact deal an AoE burst of electric damage before flaring upwards for a few seconds then detonating a second time with electric damage.
  • Drop from Captain Flynt located in Southern Shelf.
  • High shock damage from the orbs produced can tear through most shields
When combined with The Transformer shield, and fired directly down, the secondary explosions from the electrical orbs will not only restore depleted shields, but are also absorbed as rocket launcher ammo.

Flame of the Firehawk
From the ashes she will rise.Constant fire nova effect when the shield is depleted. This effect lasts indefinitely, as long as the shield remains at 0, and triggers roughly every second. Any shield recovery forces for a complete shield recharge before the effect can trigger again.
  • Obtained from the mission Cult Following: The Enkindling located in Frostburn Canyon.
Extremely high nova damage. Works very effectively with a Moxxi weapon. The constant burst of nova will constantly heal you as long as you are holding a Moxxi weapon.

Transformer

There's more than your eye can see. High chance to absorb enemy bullets. Immunity to electrocution damage-over-time effects, and Shock damage recharges the shield.
  • Drop from Pimon located in Wildlife Exploitation Preserve.
  • Effective when fighting Loaders and Surveyors because of their electrical bolt attacks.

Crossfire (Shock)

Find, fix, flank, finish!Increased damage and blast radius. Behaves like a standard Bouncing Betty Grenade, but releases grenades as well as bullets at an approximate rate of two per second.
  • Obtained from trading with the Seraph Vendor in the Badass Crater of Badassitude.
  • Grenade's bullet spray cannot harm allies.
Choosing Chulainn or Florentine
Here's a screenshot of the 2 SMG.


Comparing both SMG
Chulainn
Florentine
Lower Gun Damage
Higher Gun Damage
Higher Fire Rate
Slower Fire Rate
Not as accurate as the Florentine
Slightly more accurate
Slightly faster Reload Speed
Slightly slower Reload Speed
Twice the chance of causing Elemental Effect
Pretty low Elemental chance for a Maliwan SMG
Slags users when holding it
Does not slag the user when holding it
Obtainable through Clan Wars quest
Obtainable only in Tiny Tina's Assault on Dragon Keep DLC and cost 120 Seraph Crystals
Consume 1 ammo per shot, making it a better ammo saver than the Florentine
Consume 2 ammo per shot, use up ammo faster than the Chulainn

Depending on the player, some might prefer Chulainn but mostly people prefer Florentine since it does not Slag the user.
I personally prefer the Chulainn for a few reasons.
  • Higher Fire Rate means faster in causing Elemental Effect. Adding the high Elemental Chance, I have a higher Elemental DPS.
  • Faster Reload Speed makes it an excellent weapon to use in FFYL event. Not to forget Fire Rate helps a lot in that.
  • Do not use up ammo as fast as the Florentine.

But of course you can use the Florentine if you don't like the Self Slag effect of the Chulainn.
For those without Florentine, you can use the Chulainn as a replacement. But please use it only in FFYL or as a last resort.

Note: Both guns have the same Elemental Effect Damage.
Slag and Shock chance might not be apply on the target at the same time as both are different elements.

VERY IMPORTANT! DO NOT USE CHULAINN IN OVERPOWER RANKS! ENEMIES DO LARGE AMOUNT OF DAMAGE TO YOU AND WITH THE SLAG EFFECT, YOU TAKE EVEN MORE!

As for those people that just do not understand why I mentioned Chulainn in the guide.
Come on! It's not like everyone owns a Florentine right? And not everyone can kill a Raid Boss on their own right? And each fight only yields you less than 10 crystals, this gun is not cheap also. If you want to duplicate it for them, go ahead, you're just spoiling their game that's all!
5 points into Made of Sterner Stuff worth it or not?
According to the wiki, it gives 1% damage resistance per level and 3% Deathtrap melee damage per level. So 5 points into it will provide both you and Deathtrap a 5% damage resistance, yup, it's not worth it. But then again, it also increases Deathtrap's melee damage by 15% which not too bad, since Deathtrap have a pretty high base melee damage.

If one doesn't seem to be comfortable investing 5 points into this skill, they can try putting it into other skills.
E.g: 1 Upshot Robot, 3 Annoyed Android, 1 Typecast Iconoclast

What about adding Fancy Mathematics?
Nope, most of the time my health is above 50% since I'm using Kitten and Hail and I already have 5 points of Blood Soaked Shield which makes this skill not effective.
But if it's for bossing, maybe it's worth something.

What about Strength of Five Gorillas?
Each points increase Deathtrap's melee damage by 3%, a total of 15% at level 5. Almost similar to Made of Sterner Stuff and 90% of the fights you hardly will use your melee attacks.
Using this build
Mainly depend on your playstyle. For me, I just use Chulainn most of the time. Since I know how to chain my targets, I can clear a group of bandits with a few cripple to none.

Tactics
When facing a group of enemies, just throw a Singularity grenade in before shooting them, Deathtrap can be use to distract your enemies while you vapourise them.
If you get yourself crippled, worry not, because this is where Black Hole's power comes in. One nova should be enough to kill for a Second Wind Up or at least do enough damage to your enemies for you to finish them off. After a kill from your nova, Blood Soaked Shield effect comes in, restoring 100% of your shield, just enough for you to deliver another nova attack. Thus this cycle keeps going and going until you die, killed everyone, or run away from the fight.

Thunderball Fist + Transformer + Crossfire (Shock) combo
Given Transformer's ability to recharge shield when taking Shock element damages, performing a high risk dive on a group of enemies becomes more safer. Lobbing 1 or 2 Shock Crossfire into a group and unloading your Thunderball Fists. Both Grenades and Orbs will constantly recharge your shield.
Warning: Not recommended if most of the enemies have guns equipped.

Understanding Fight For Your Life
The bleed-out timer of Fight For Your Life is roughly 11 to 12 seconds. Entering Fight For Your Life again soon after receiving a Second Wind shortens the bleed-out timer. If this happens a few times in rapid succession, bleed out becomes nearly instantaneous.

Health regeneration
Don't forget to Manually reload your gun for Discord and Cooking Up Trouble (I actually call this Cooking Up Discord) for health regen.
Discord regens 3% health per second, Cooking regens 2% health per second, total 5% health regen per second.

Keep an eye on your mini-map!
Many of us usually forgets about this. Looking at your mini-map can help you track where your enemies are and can save you from running into a group of enemy when trying to find cover.

Enemies to avoid
Try not fight any enemy that are strong against Shock element, immune to Elemental Effect or cannot be Slag like:
  • Crystalisks in Ultimate Vault Hunter mode (I have no idea how to kill them without the use of Bee. Try killing them will result in wasting lots of ammo. Another way is... RUN!)
  • Ion Loaders (Use a corrosive weapon instead)
  • Shock Badass Skag/Rakk (Use a fire weapon instead)
  • Skeletons from DLC 4 (Use an explosive weapon instead)
  • Crystal Skeletons from DLC 4 (They will deflect bullets but cannot deflect projectiles fired from a Torgue weapon)

DO NOT RELY HEAVILY ON DEATHTRAP!
He may have x10 or health than you but he will surely get destroy in seconds in a heavy gun fight. Throwing a Singularity grenade before Deathtrap entering battle is a good way to keep Deathtrap from being wasted. Unless you're using him as a distraction to escape a fight.

Picking your targets
This is very important especially in UVHM, picking off the right target first can increase your chances of not dying. Two ways you can do this.
  • Finish off all lesser enemies and you can stay focus on fighting the tougher ones. (Like in boss fights)
  • Or, you can kill a lesser enemies just to get the Evil Enchantress buff and use it against the stronger ones.
FAQ
Q: Why not use the Bee shield?
A: Using Bee only turns me into a glass cannon. Getting caught in an ambush might be the end of you as one or two hit is enough to break through the shield. Bee is completely useless during FFYL events.
There are a few cases where you may need to use the Bee shield like, Crystalisks, Boss fights or quests like Defending the Hyperion Supply crate.

Q: Why invest 5 points into Blood Soaked Shield?
A: Maxing out that skill is usually recommended since after a nova blast, if it kills anyone, your shield will immediately be fully restored and ready for a second blast. As I said on the above, lost health can be regenerated through the use of Cooking Up Discord.

Q: Must we use Shock element for every weapon?
A: No, it's good to have at least one Corrosive weapon for Loaders and Constructors and one Fire weapon for flesh health type enemies that are strong against Shock and semi-strong against Corrosive like Badass Shock Skags and Badass Shock Rakks.
Evil Enchantress works perfectly with Corrosive and Fire elemental weapons too.

Q: Why not invest into Interspersed Outburst?
A: Usually, Chulainn is my main weapon, no really wise to invest into this skill since it can already slag enemies by itself, adding my habit of switch to Slagga and then switch back to a non-slag weapon.
In my opinion, Interspersed Outburst have more use if you don't have much stacks of Anarchy and using a Sniper rifle half of the time.

Q: Why not use Legendary Class Mod instead?
A: This build mainly focus on Shock Elemental Damage. Catalyst Class mod gives bonus skill levels that actually further increases the Shock damage I'm doing while Legendary Class mod doesn't.

Q: Why not invest into Preshrunk Cyberpunk and increase the max stacks for Anarchy to 400?
A: If you're playing in Ultimate Vault Hunter mode. Damage is important, but accuracy is also equally important. Close Enough helps but you will be sacrificing 50% damage for ricocheted bullets. With only 150 stacks, ricochet bullets do only 90% damage, that means, to achieve 100% damage, one will need over 150 stacks but you are still missing 50% of the time and wasting ammo.

Most of the time, you will be spending those stacks healing with Discord in battles and may lose stacks under FFYL events as it is a very common thing in UVHM.
Credits, and Resources
Credits
All screenshots are taken by me
Guide Thumbnail belongs to subaru01rins [subaru01rins.deviantart.com] of DeviantART

Resources
Borderlands Wiki[borderlands.wikia.com]
Update history
May 14:
Moved 5 points of Death from Above skill to Close Enough skill.
May 24:
Added opinion about the Bee shield in FAQ section.
June 28:
Added opinion regarding Preshrunk Cyberpunk and Anarchy stacks in FAQ section.
July 3:
Added opinion on Chulainn and Florentine SMG.
Updated on DLC 4 enemies in Using this build section.
July 6:
Added Credits, and Resources content.
July 12:
Added 2 more screenshots of Evil Enchantress skill build.
Build 2: More DPS
Build 3: Anarchist playstyle
July 14:
Fixed wrong skill investment in Skill Investing section.
September 17:
Update guide to Level 72
Changed all Level 61 items screenshots to Level 72 items.
Changed weapon of choice in Key items section.
Added Situational items section.
Added Thunderball Fists + Transformer + Crossfire combo in Using this build section.
September 18:
Swapped the Orc with Infection for balanced fight in Key items section.
Added the Orc and Flame of the Firehawk in Situational items section.
January 24:
Added an opinion on Made of Sterner Stuff skill.
*NEW* How to make proper comments
Since it's apparently so hard for many people to understand what this guide is about and people desperately try to prove me wrong or say something I supposedly haven't already, read this.

READ THE COMMENTS FIRST TO SEE IF THERE'S NOT ANOTHER IDIOT WHO SAID THE SAME THING

DO NOT INSULT ME WHEN YOU ARE THE ONE TRYING TO PROVE ME WRONG IN THE FIRST PLACE WHEN THERE IS NO RIGHT OR WRONG

You guys know who you are, stop wasting my time writing replies I wouldn't have to write if people with an IQ above 50 would comment. Backup your facts with the wiki if you're trying to prove me or anything said in this guide wrong. Of all the comments suggesting me to edit something in the guide, only around 3 have succeeded. Go figure.
161 則留言
Polaris 2022 年 8 月 1 日 上午 8:48 
Not sure if you still update your guide or not, but I see no mention of Chulainn affecting Make it Sparkle. I just tested it, and Chulainn always puts Death Trap into Shock, which means the Chulainn can be used to apply Slag to enemies, deal Shock damage AND won't interfere with Death Trap keeping his Shock damage.

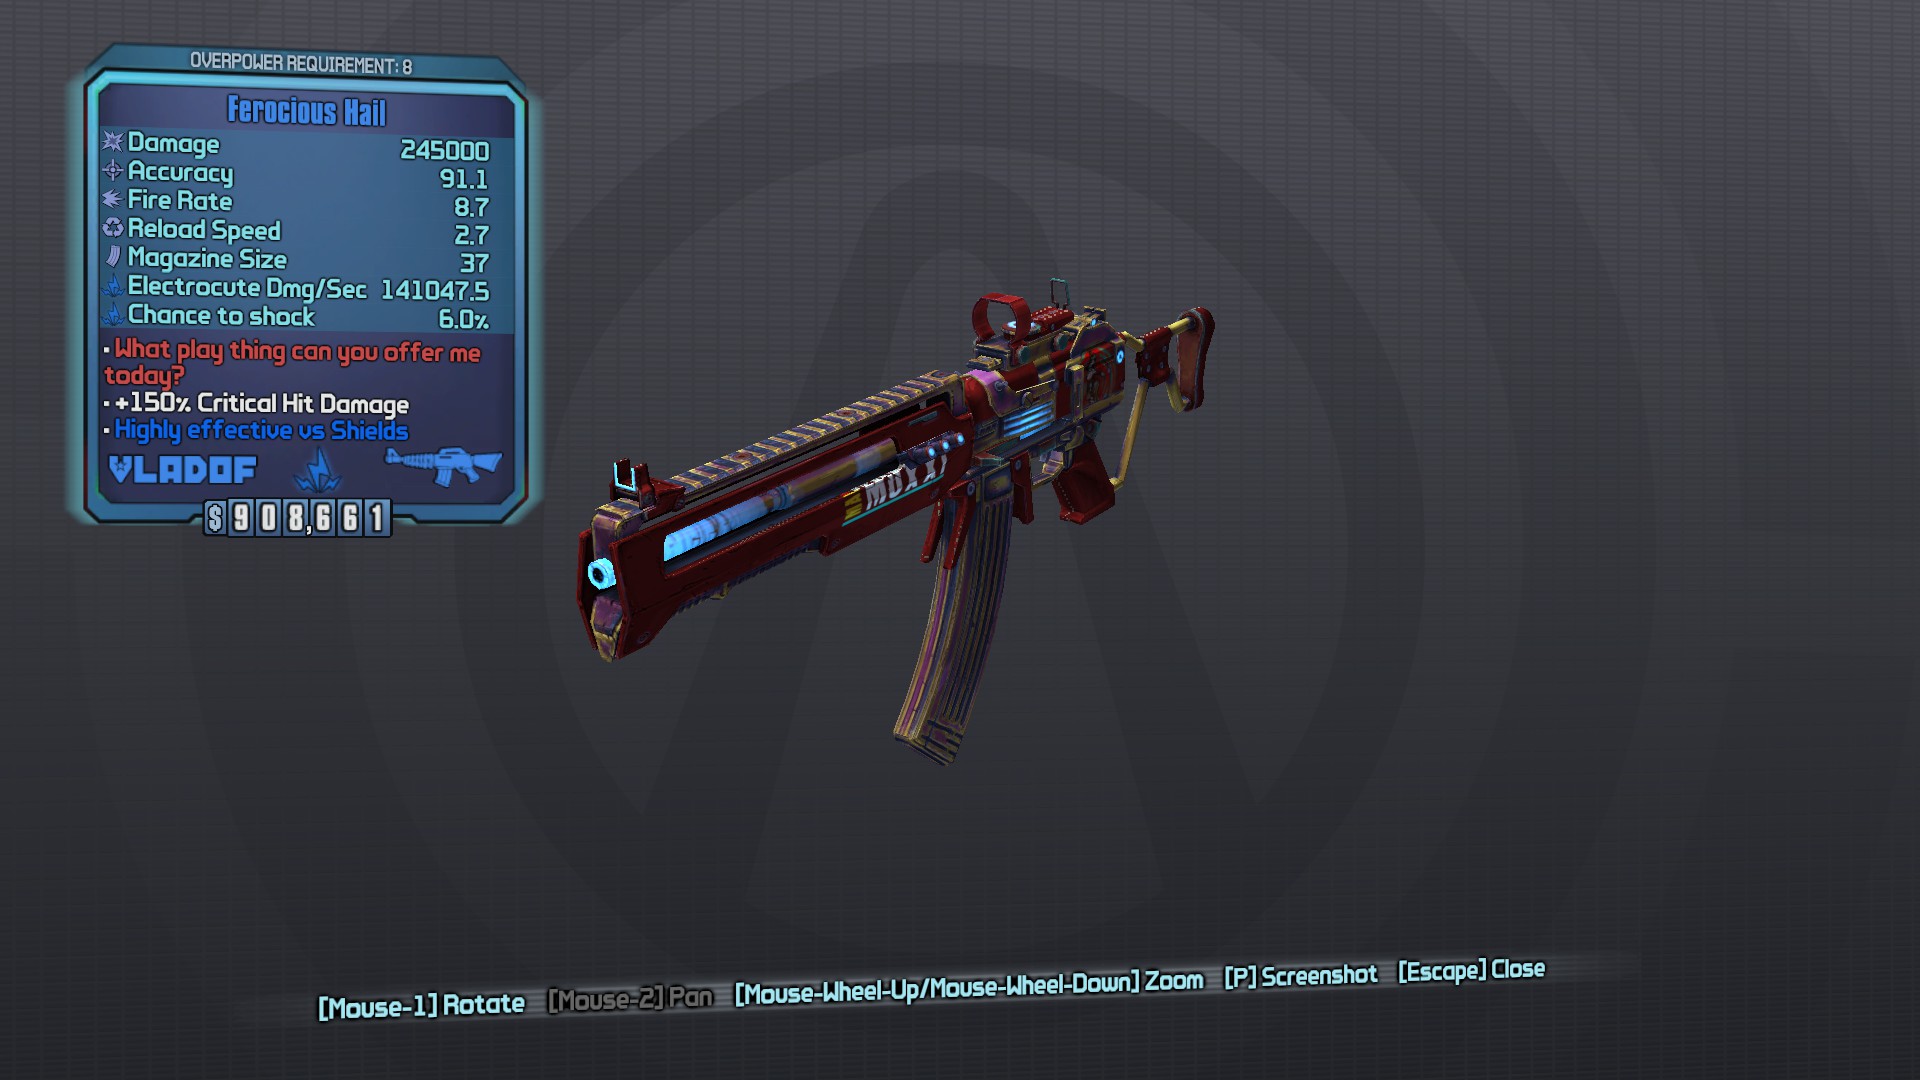
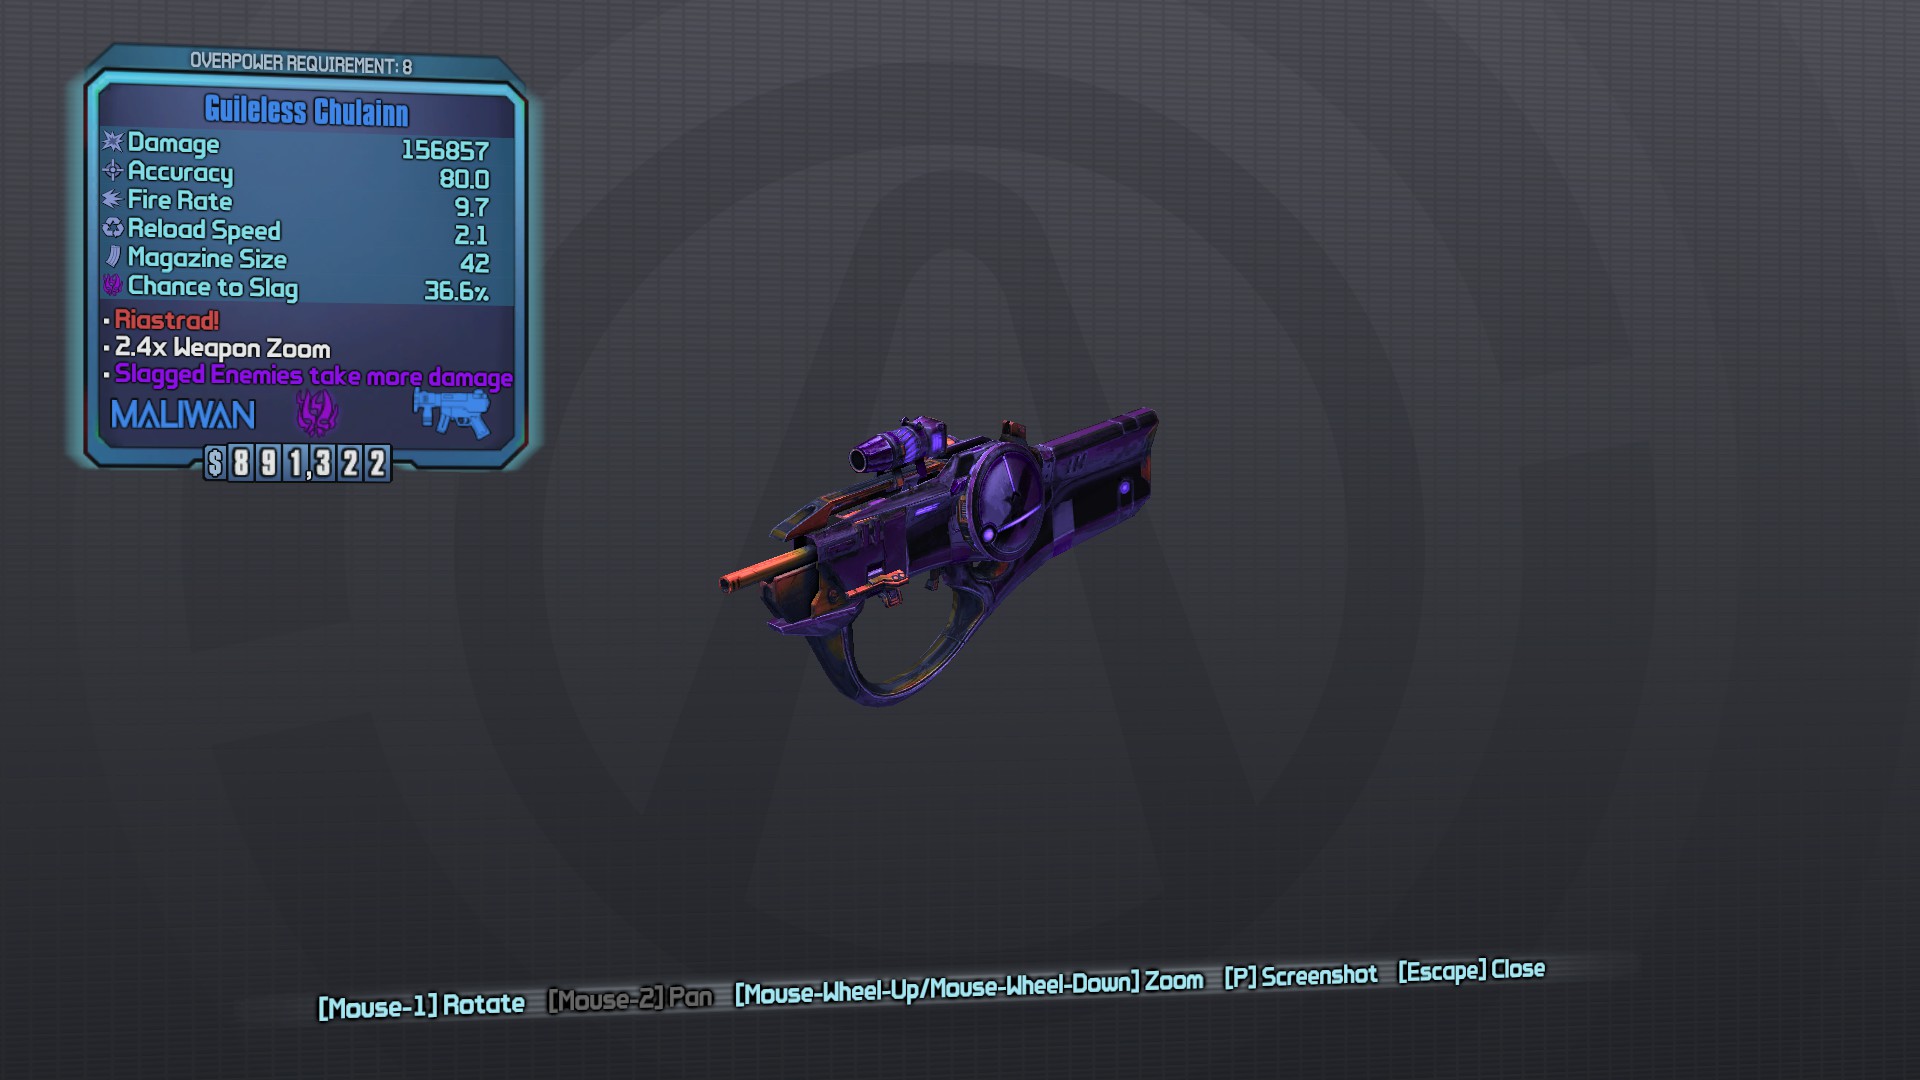
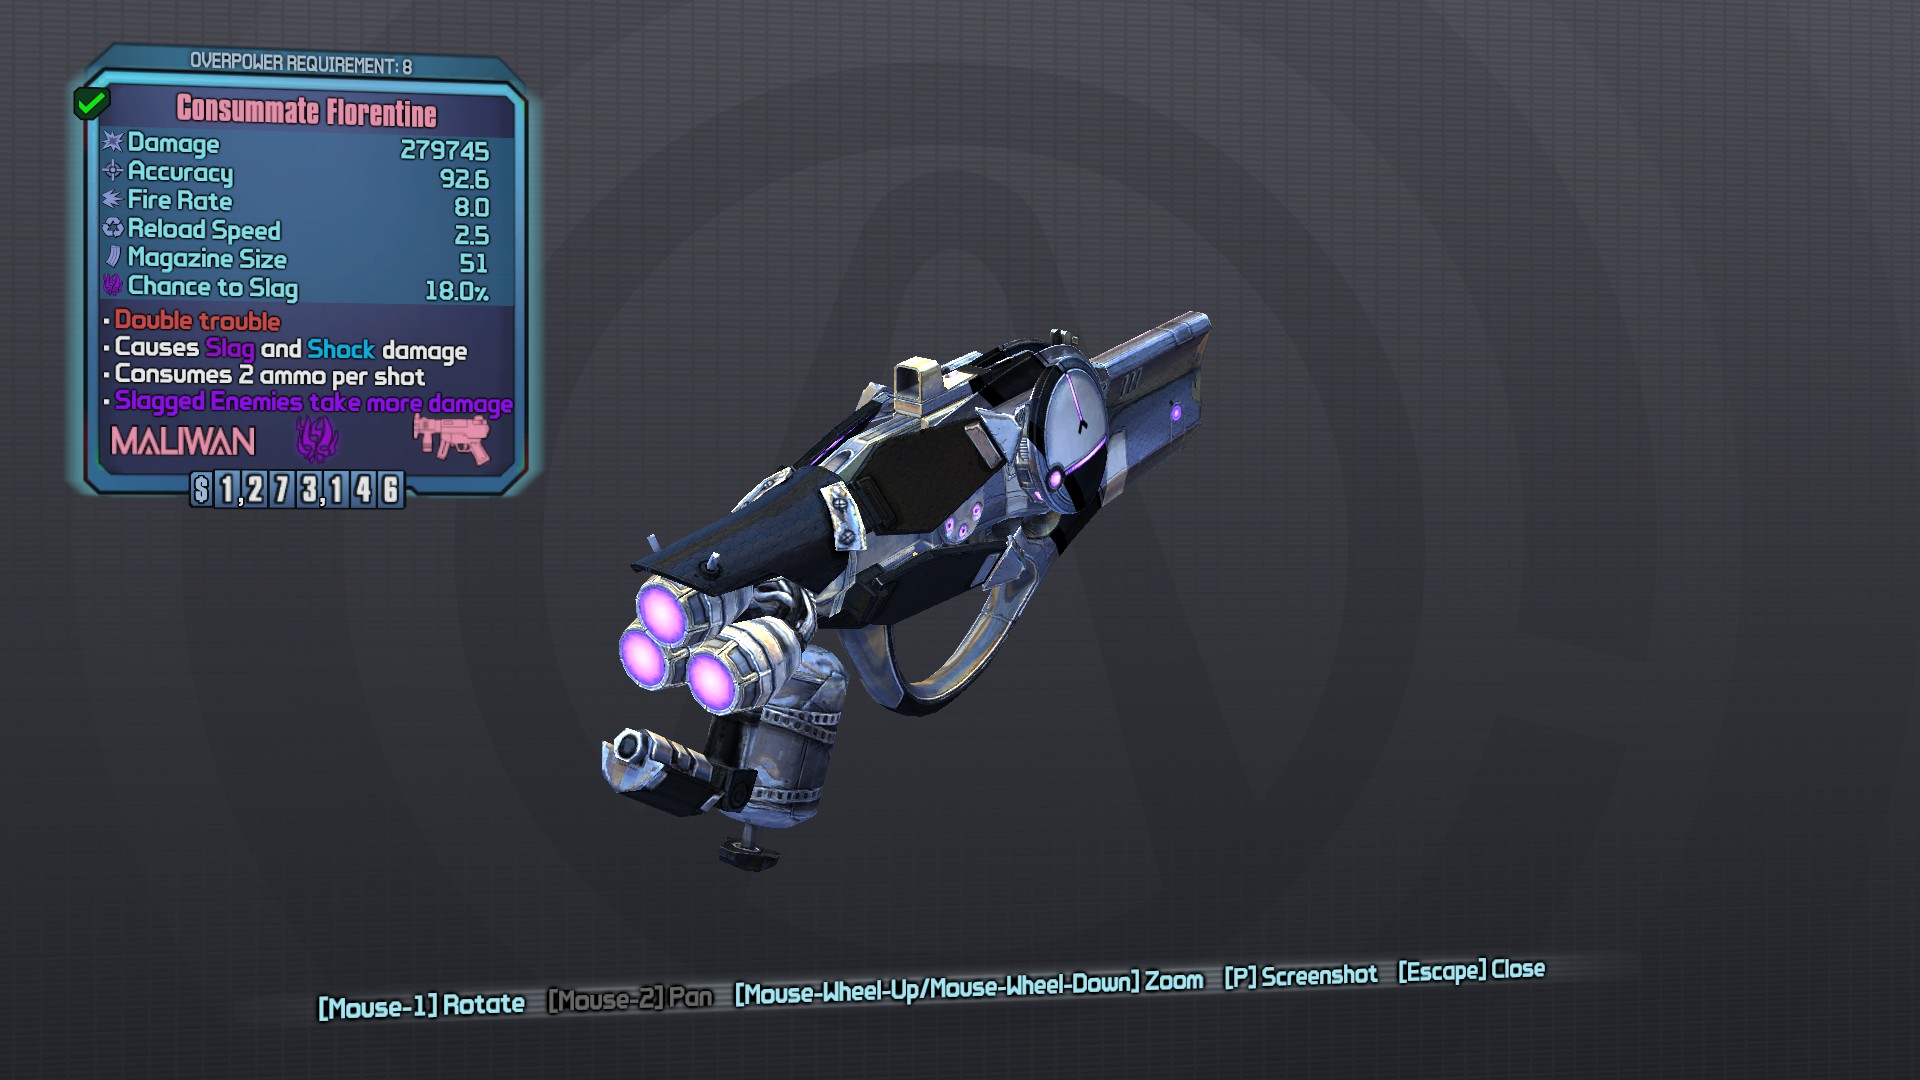
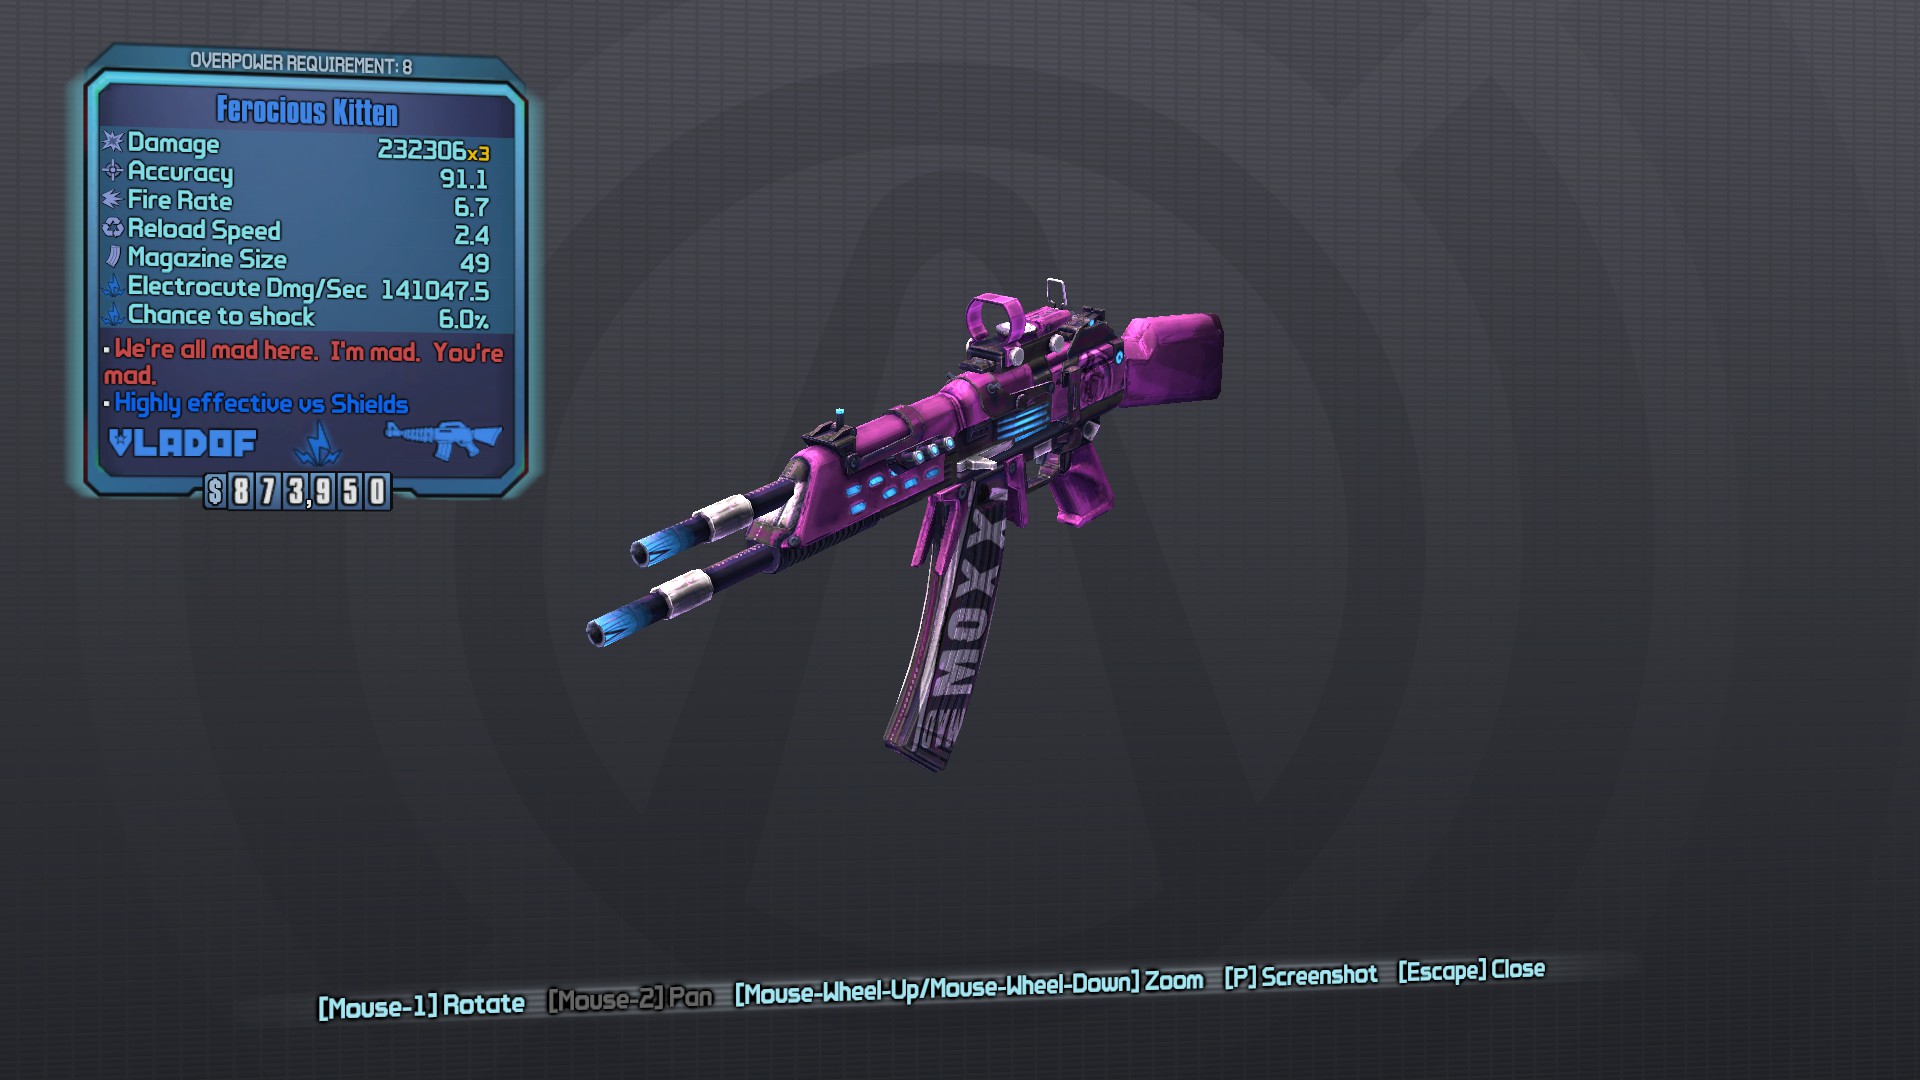
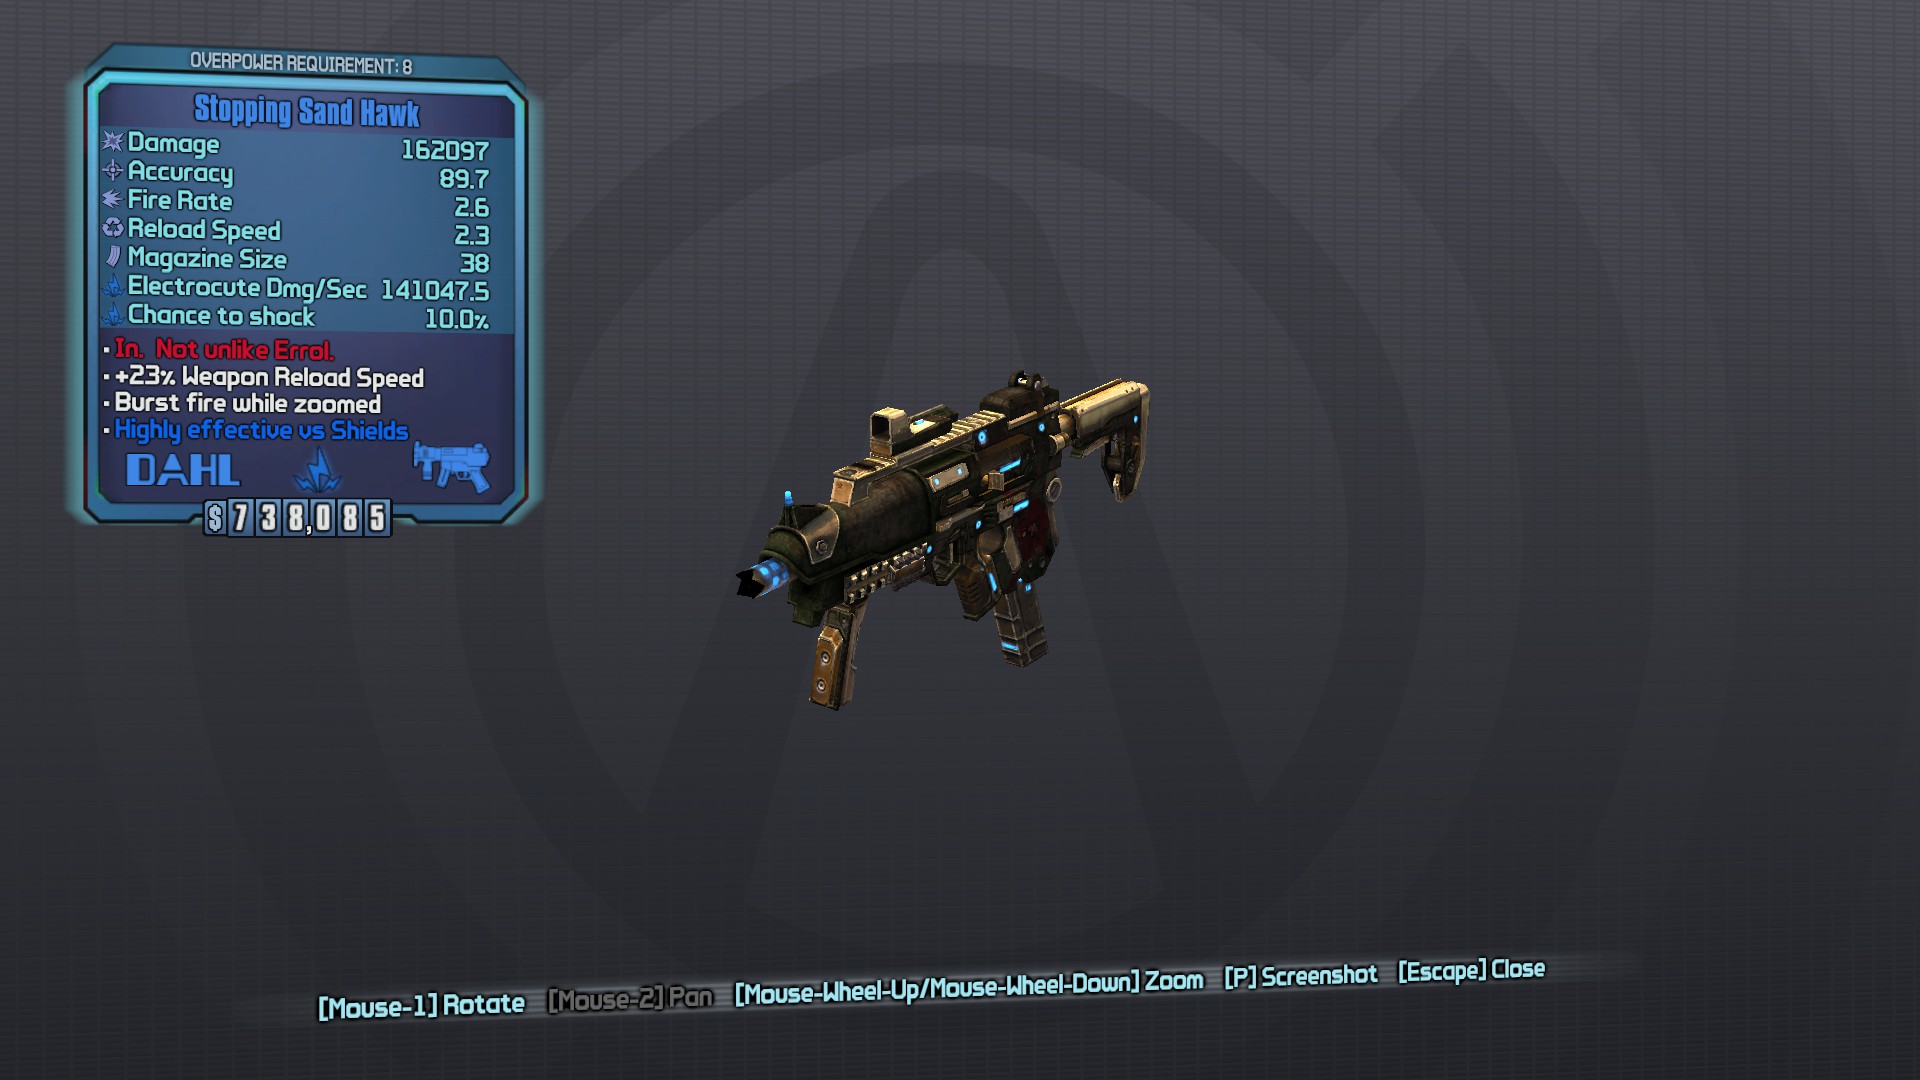
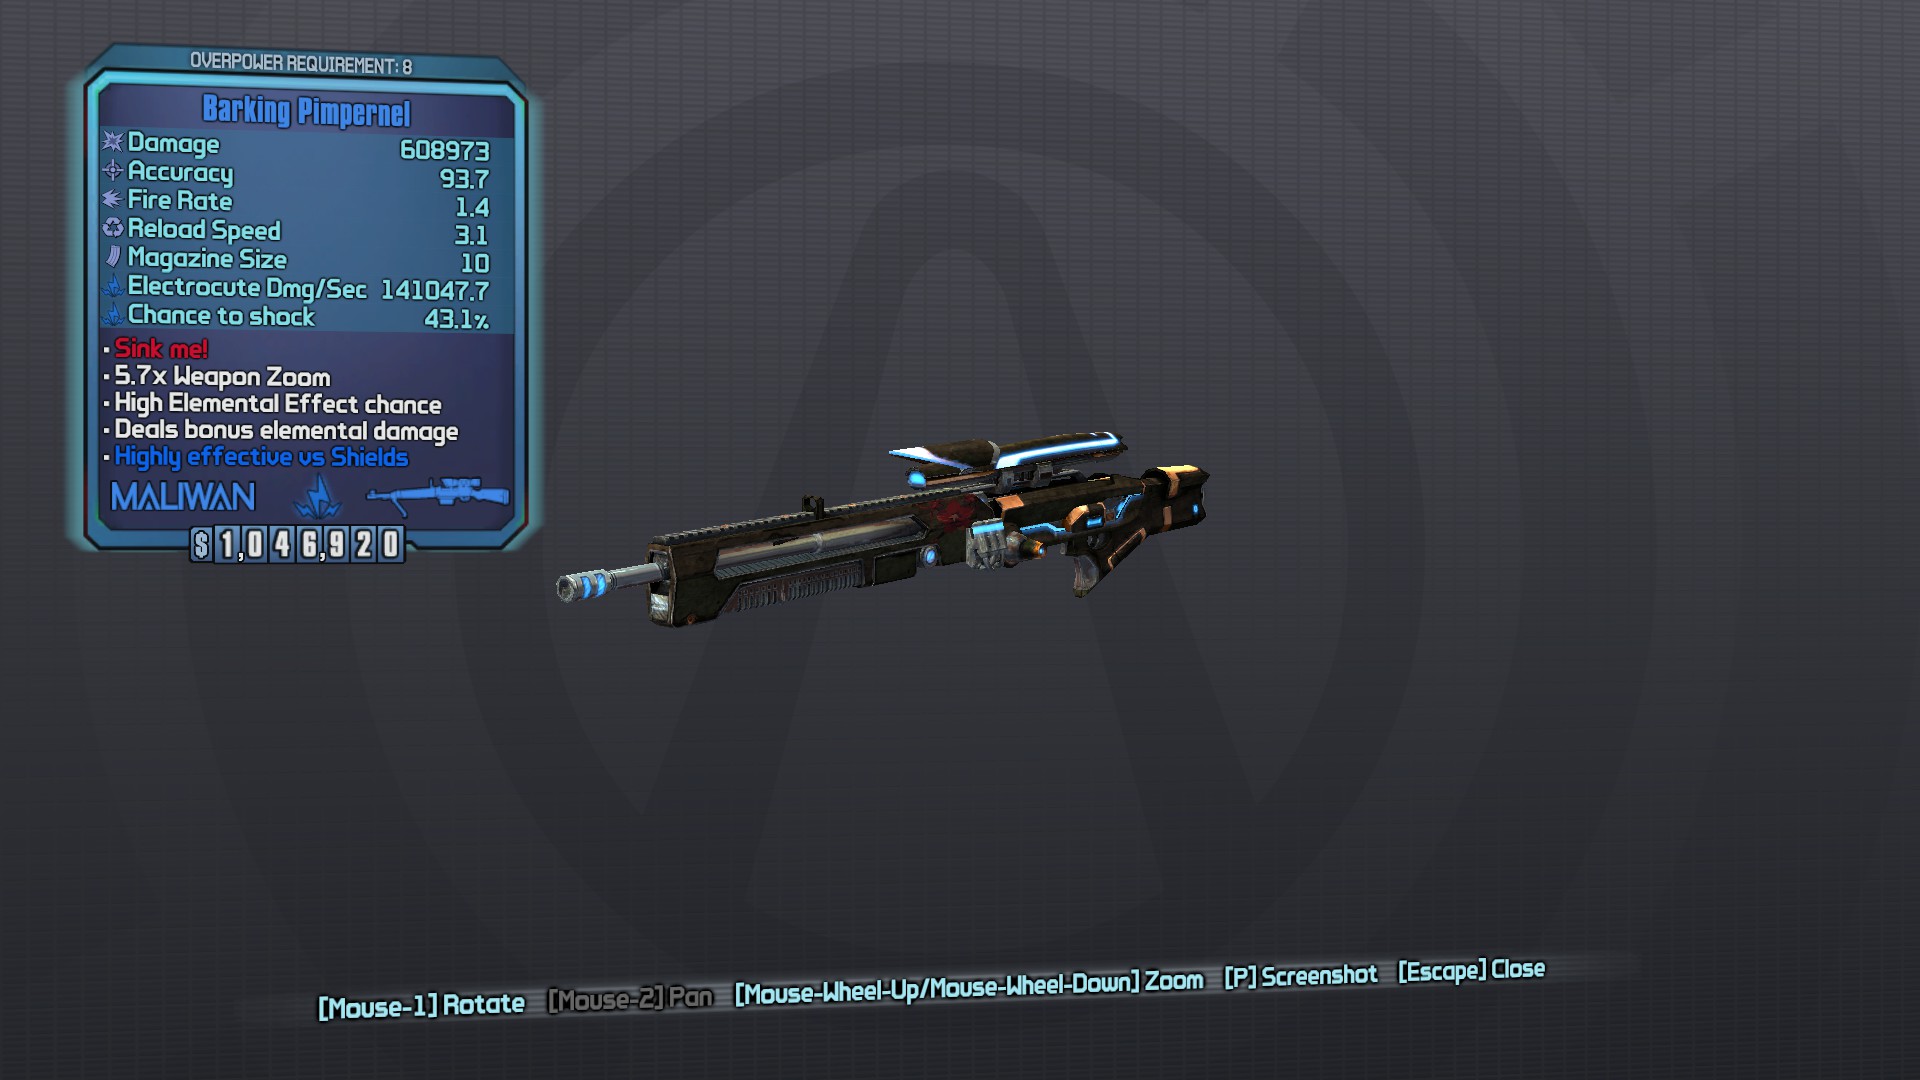
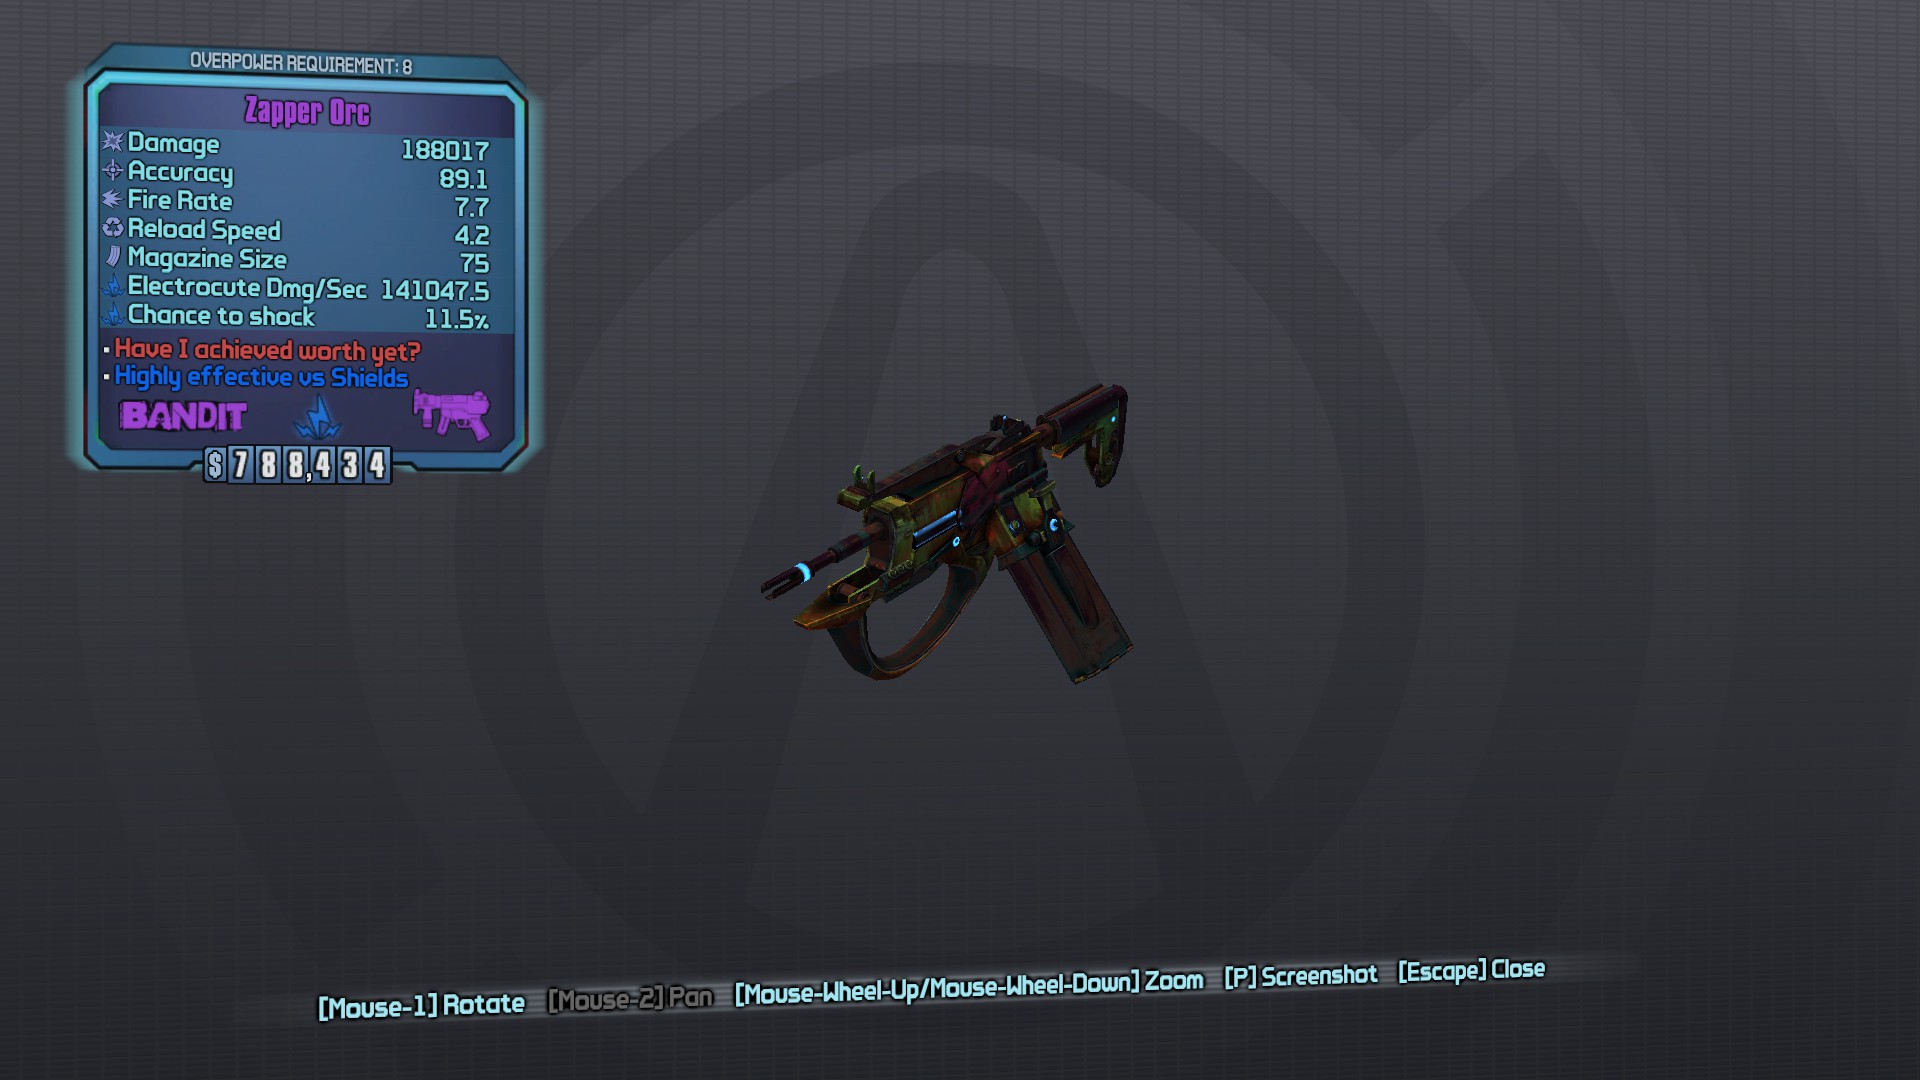
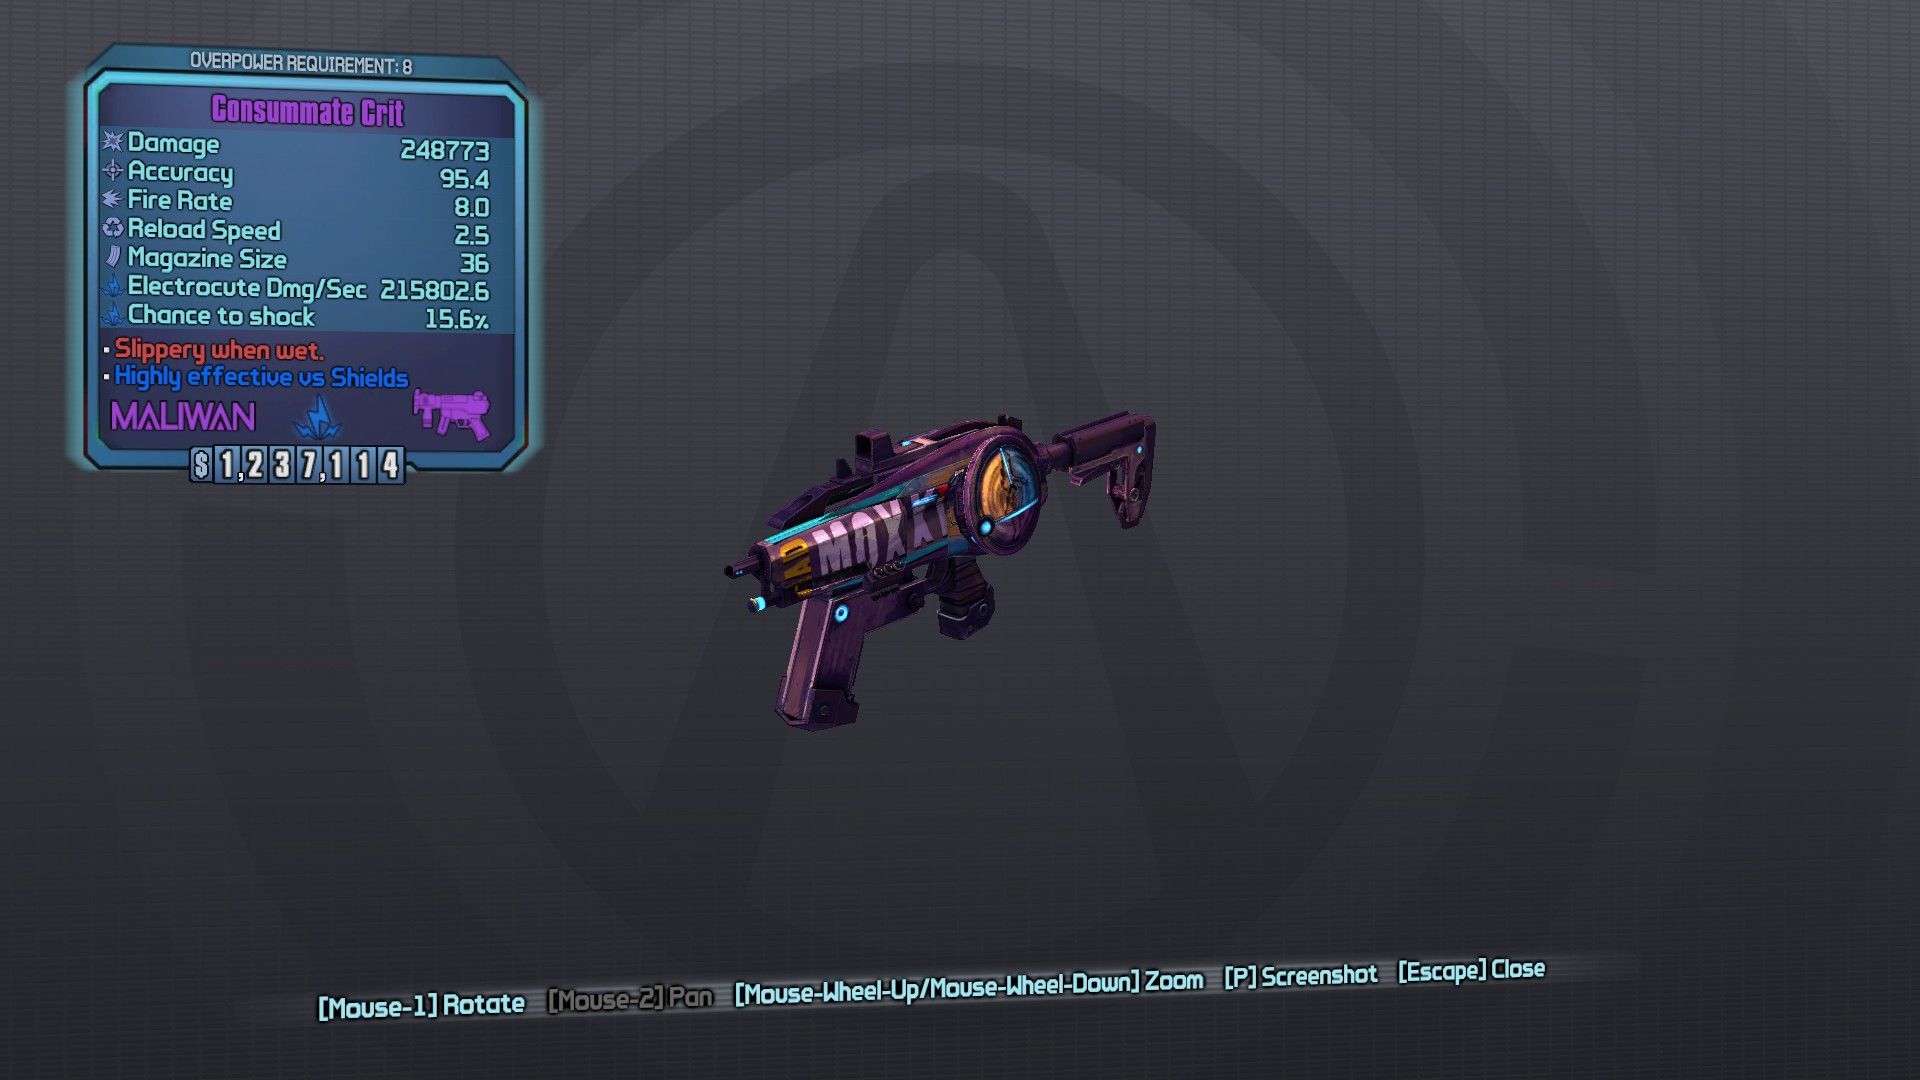
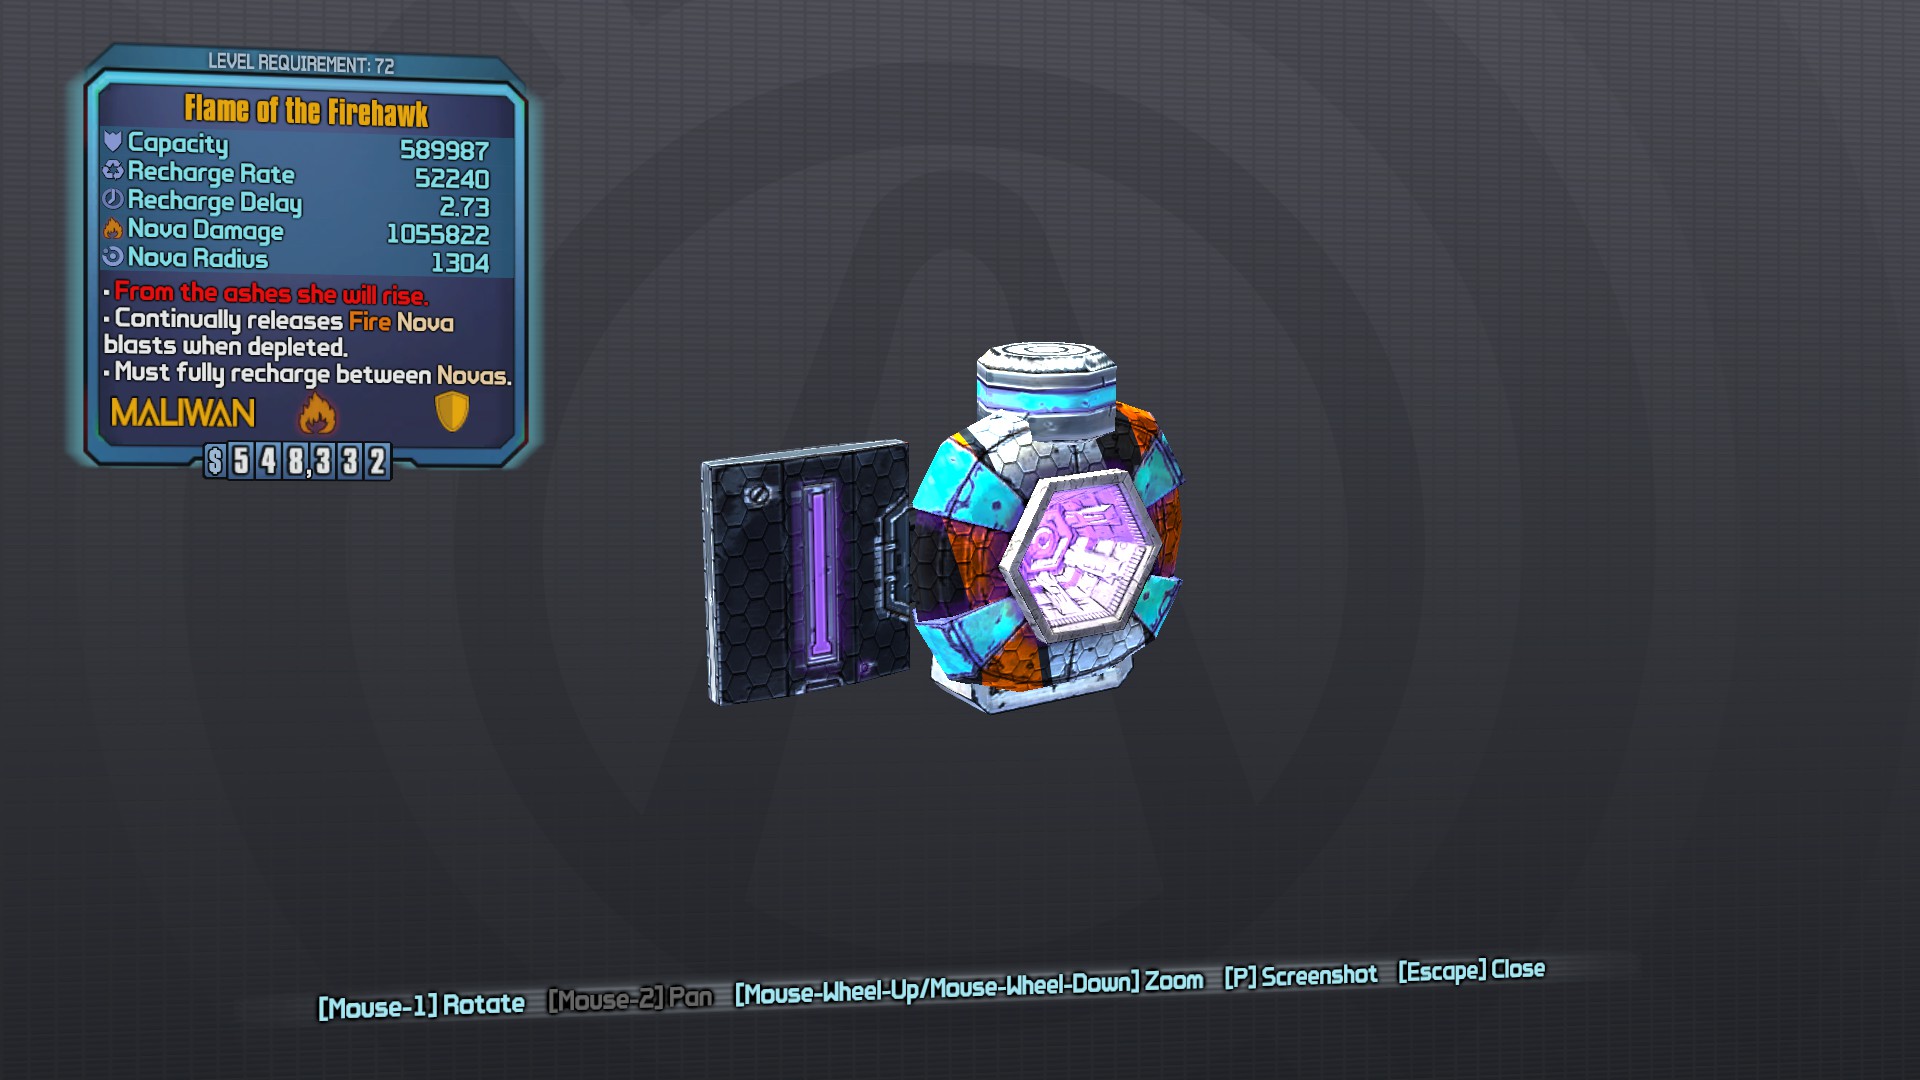
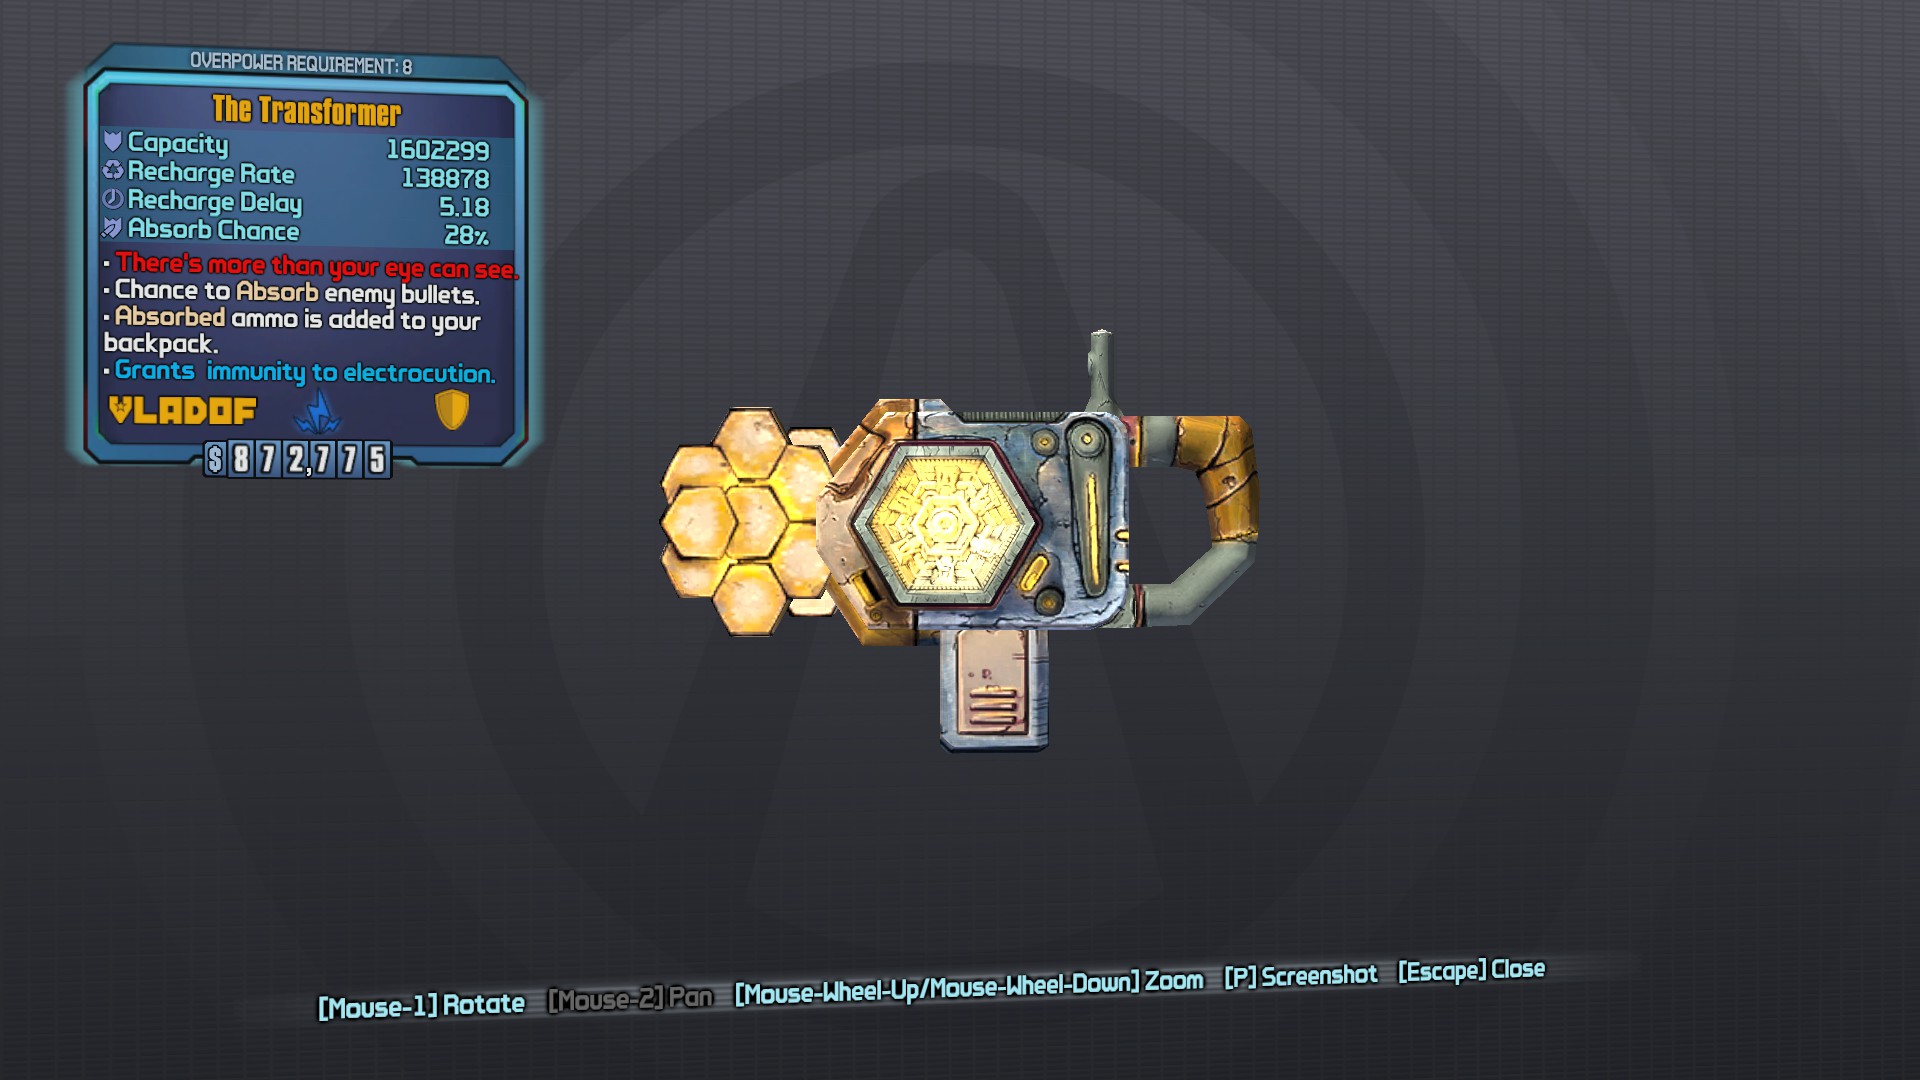
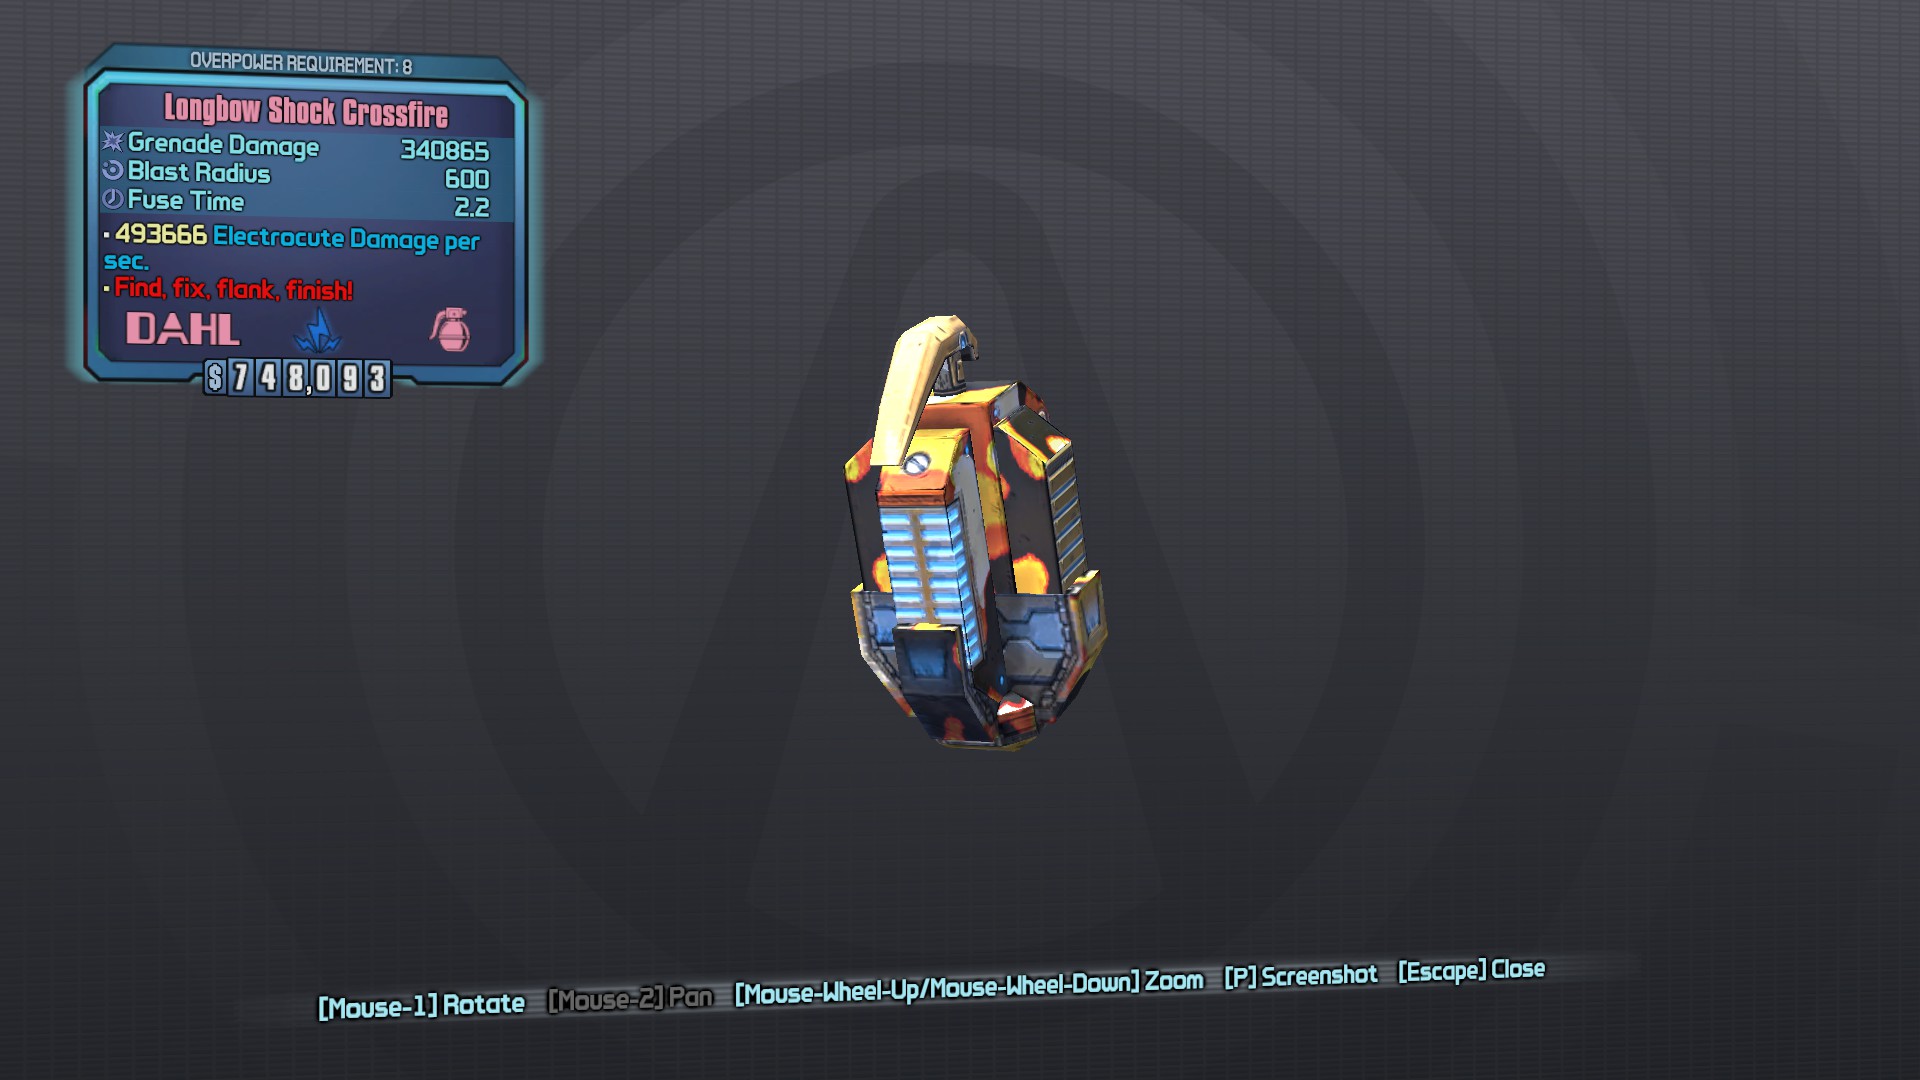
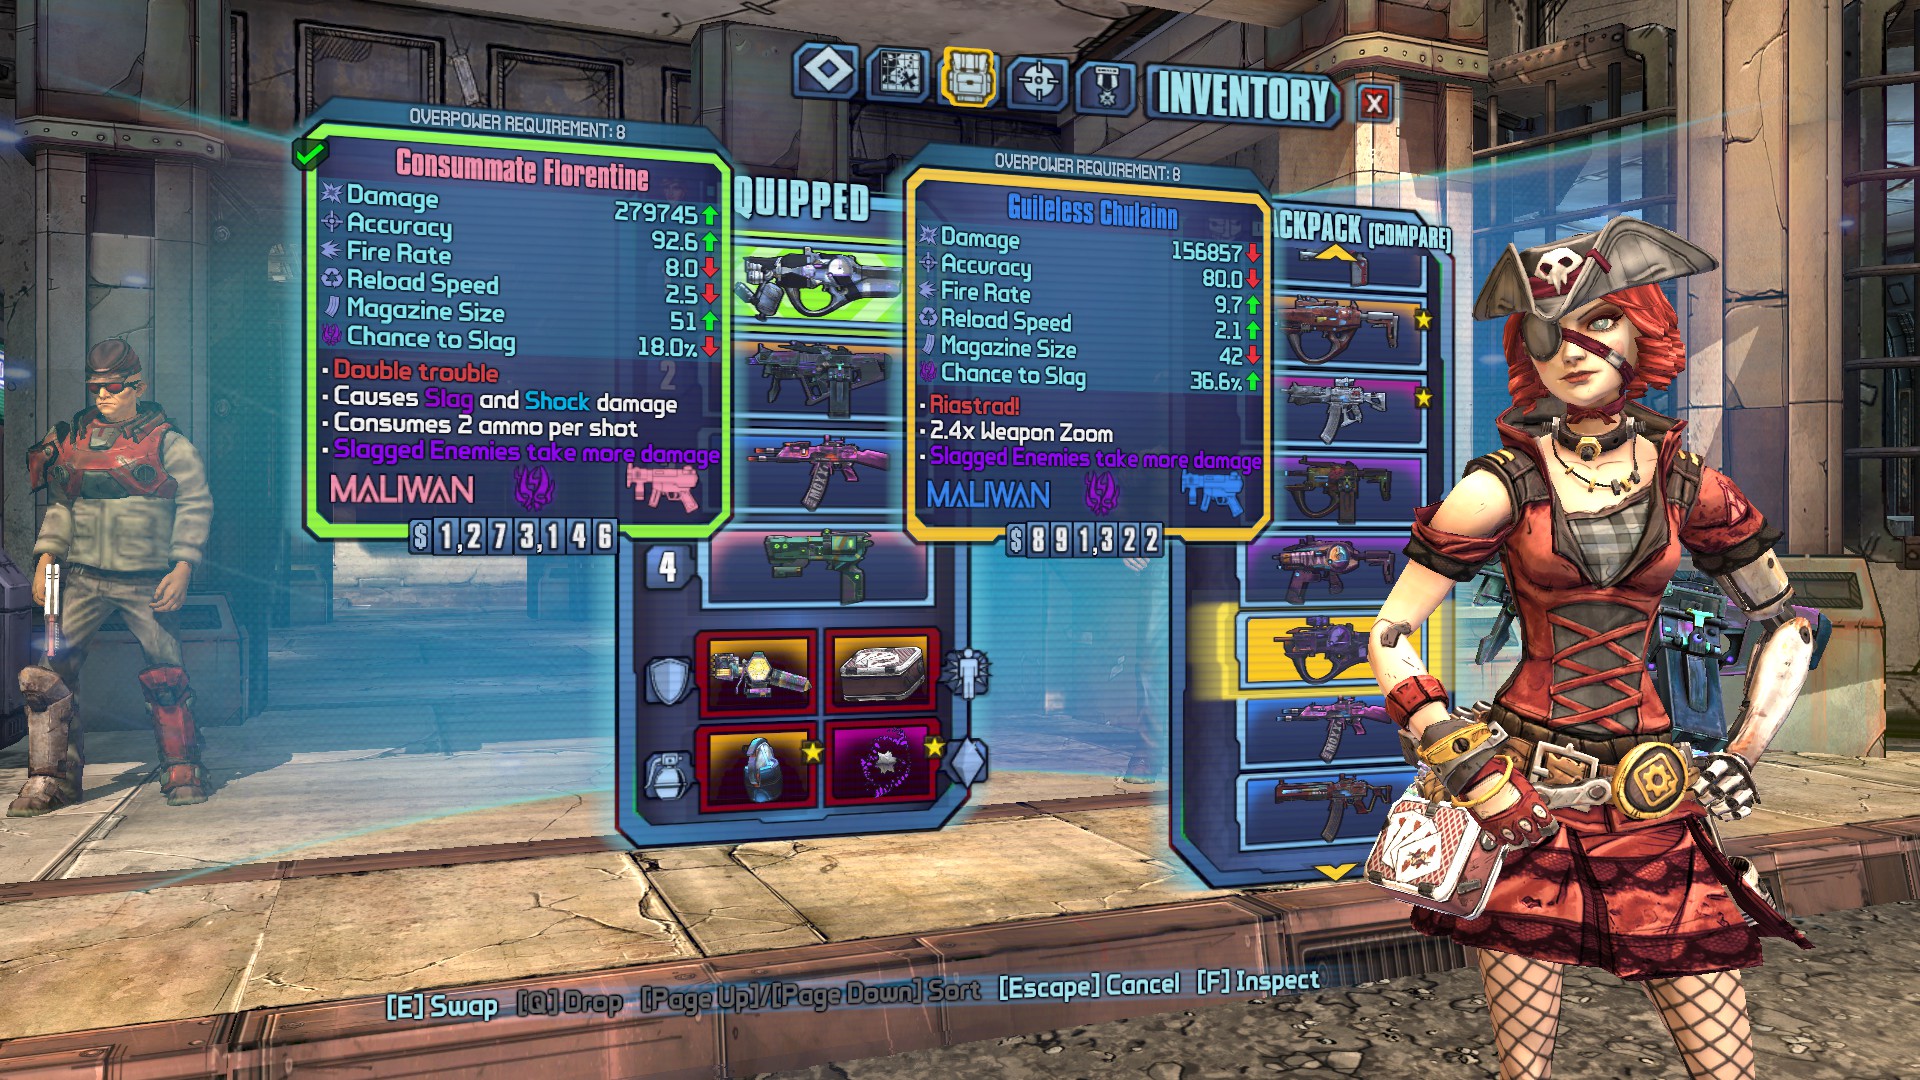
Sorry if this was one of those: "that was obvious enough to not state it" things, but I couldn't find the answer to my question online and decided to try it myself. Slag gun to turn DT purple, Shock to turn him blue, back to Slag, then Chulainn for blue... rinsed and repeated.
NIKED 2018 年 1 月 30 日 上午 6:38 
Really great guide! btw Can you add me? :borderlands2:
The CEO. Of Sex 2017 年 9 月 30 日 上午 2:54 
Nice guide! thanks for the reference for me building my own electrical gaige build it helped alot with giving me an idea of what to start with
deniz 2017 年 4 月 1 日 上午 7:58 
Thanks for the answer!
yunni~*  [作者] 2017 年 4 月 1 日 上午 7:46 
@Uzun Adam: The other 2 weapon's main purpose is not for slagging like Slagga, I use them for more on a DPS side since they both does Shock and Slag damage. But Slagga would be better Slagger on hard to slag targets... If you don't wish to use them, you can swap them to something like HellFire or any non Slag weapons.
deniz 2017 年 4 月 1 日 上午 7:38 
Here comes a noob question, why did you put 2 different slag weapons in the 'key items' section? Isnt it pointless since using just one of them will do the job anyways?
󠀡󠀡 2016 年 12 月 14 日 上午 9:46 
And a happy Xmas to ya'll!
󠀡󠀡 2016 年 12 月 14 日 上午 9:46 
I love your builds like always.
Blurrry 2016 年 10 月 24 日 上午 8:56 
Well written guide! so far it works great for me! Really enjoying the playstile! big ups dude
feurolant 2016 年 1 月 16 日 上午 8:18 
Hey dude. Really awesome guide, love it <3