D Series OFF ROAD Driving Simulation

D Series OFF ROAD Driving Simulation

Ikke nok vurderinger
D Series Off Road Track Creator Guide
Af devotid
This is a How-To Guide on creating customs Tracks and Maps for D Series with the in-game track creator.
   
Pris
Føj til foretrukne
Gjort til foretrukken
Fjern som foretrukken
Basic Editor Controls
General Keys and Movement.


The camera works very similar to a 3DS max style camera.


Mouse Commands:
Left Mouse Button: Interact with objects and terrain editor
Right Mouse Button: N/A
Middle Mouse Button: Move Camera Up, Down, Left, Right
Middle Mouse Button + ALT: Rotate Camera
Mouse Scroll Wheel: Zoom View IN/OUT
Left Shift: Zoom 10X Multiplier

Keyboard Commands:
F Key: Focus on selected object (TODO: Cam zooms all the way in, Need to change that)
C Key: Recenters the Cam to the middle of the entire "world" (If you get lost)
Control + D Key: Clones the selected object
W Key: Go to Move selected object mode
E Key: Go to Rotate selected object mode
R Key: Go to Scale selected object mode
Delete Key: Will Delete Selected object after confirmation
Creating New Track

Click the Create New Track button in the My Tracks menu to start a fresh Map from scratch. You can also click on the "edit" button on a specific track in the My Tracks menu to edit it.

You can only edit tracks in your My Tracks menu. All of your own created tracks are stored in C:\Users\YOURUSERNAME\AppData\LocalLow\devotid\DSERIES2\Tracks folder. This folder is HIDDEN and you must turn on hidden files on windows to find them if you want to. You can change the default path in the launch menu of the game. You should not need to... but some folks may have the game on another Hard Drive.


Track Size: You will need to tell the track creator what size your track is going to be. A good small stadium style track size is around 300 x 300 and 40 - 50 units tall for the height. Go ahead and play around with some very basic tracks and get a feel for what size you are going to need for your application. You cannot change this later. So make sure to do some testing.

Pick a Base Terrain Texture: To draw the new terrain the level creator must draw a single texture across the entire new surface. Make sure to choose a texture that you will use later in the build as you cannot delete them.

At this stage you should have a simple one color terrain on screen and ready to start doing some earth moving!


-----------------------------------------------------------------------------------------------
Editing Terrain/Ground
You should now have a flat terrain on screen and ready to start adding your elevation, cliffs and jumps. You also need to decide now if you are going to add any water to the scene. If you are adding water and you want it to be deep, you must build up the terrain so you have something to "dig down into".

THERE IS NO "Control+Z UNDO" feature yet, so you must be very careful with the terrain editing tools! You should save often and that way if you dont like your changes you can simply click the reload button in the top left menu.


When building the track ....Just like in real life you should build the racing surface and all the elevation (jumps) first. Dont lay the course dividers and then try to make jumps and bury everything. I have found it is easiest to paint a very rough layout of the race line you want with a contrasting texture. Use a texture that you plan to use later in the level as you cant delete paintable terrain textures and you want to use as few of them as possible. Every 4 textures is another "full pass" for the shader. So its best to use them in powers of 4 (Example either 4 or 8... if you need that many).

After all the major Mountains and Valleys are done then add in the detail of the cliffs or rivers etc. Then add all of the jumps and little bump details. ONLY start to lay the track dividers when you have tested jumps with a vehicle and make sure you are some what satisfied with the flow of the terrain. You can always go back later and touch the terrain up but try to at least have the majority of the elevation built and done before you start to add too many objects to the scene. It will save you time in the future. Some of the bigger objects like the cars and buildings will "snap/attach" to the terrain and must have a full level area underneath them to sit upright. So be aware of that if you want to have a pit are or places were big buildings, flat fences or sidewalks are going to be.


Terrains Tools explained:


Raise and Lower Terrain tool:
This tool will raise and lower the terrain when you click the left mouse button. You can change weather it raises it or lowers it in the terrain menu by clicking the "Raise" or "Lower" check boxes.


Set Terrain to Specific Height Tool:
This tool will set the terrain to a specified height in the world. You can change the height in the menu with the slider or you can click the "Read Terrain Paint Height" button (It will turn red) and then click anywhere in the world and it will "grab" the height. From there that brush will set the terrain to that height.


Smooth Terrain Tool:
This tool will smooth the terrain. You can change the intensity to make it more or less powerful. You can also limit the direction and rotate the smoothing. This is a VERY useful tool to make directional jumps and double triple sections.


Paint Terrain Tool:
This tool is how you "paint the terrain". It works just like any painting software out there. Play with the levels and brush settings to get a feel of how to smooth the edges and blend all the textures so you dont get as many "repeating" textures.

Click Add + New button to another texture to your pallet. There is about 18 to choose from and Im always adding new ones as I think of new uses. Try to use as few as possible. I usually need about 8 to really add a bunch of detail.

NOTE: The dust and traction level for all vehicles is determined by the paint (Terrain texture that is underneath them) If you paint a bunch of dirt it will have less traction and handling characteristics than if you paint Asphalt or Mud. It does all of this automatically.


Brushes:
DSeries Track Creator has a bunch of brushes to choose from. You can do quite a bit with them. Play around with the settings (size, amount, angle of smoothing and technique) and you will see how each affects the brush differently.
Adding Game Objects
Game Object placement:


This is were you will be adding all the game objects to your track/Map. Simply open the OBJECTS panel from the top of the menu and then click the objects you want to open. All you need to do to add them to your scene is just drag and drop them into the scene from the lower preview image area. You can open a small "extra tools" menu in the upper right hand corner to find out a little more useful info about each object and what it will do once put into the scene.

The editor will only let you drop in game objects "onto" the terrain that you have created. If you are off of the Terrain the object will turn all RED and not allow you to place it. It will also automatically warn you if you are placing too many of one item into the scene. (Ex. Only one of each starting spot is allowed in the scene) It will give a warning of "Max # Reached".

Manipulating Game Objects:


Delete Selected Game Object:
Deletes the currently selected game object after a confirmation page.


Clone Selected Game Object:
This button clones the currently selected game object. You can also use the Control + D key combo. This is useful when you are building something with multiple objects in a line or something like that. (Example: cloning a next piece of a line or fence at the same angle of the first piece.)


Focus on Selected Game Object:
This button will make the camera focus on the selected game object. You can also use the F Key on the keyboard for a short cut.

The C Key will recenter the camera to the center of the map if you get lost too. ;)


Move Selected Game Object: Shortkey "W"
This button turns on the Move Game Object Tool. This will allow you to move the selected game object around on axis that is not locked on the object. You will find that there are some axis on objects that are locked and not adjustable. (Ex: Buildings are locked to the ground and cannot be moved on the Y axis. They can not float in the air. So the axis isnt even available in the editor)


Rotate Selected Game Object: Shortkey "E"
This button turns on the Rotate Game Object Tool. It allows the rotating of any axis that is present. Some axis are locked and will not apear in the editor. (ex: Light poles are only installed perpendicular or 90 degrees to the ground.)


Scale Selected Game Object: Shortkey "R"
This button will turn on the Scale Game Object tool. It will allow you to adjust the scale of any game object along its axis. Some objects are restricted in their scaling along certain axis. If the axis show up in the editor you can adjust it. It will not be present if it is not adjustable.


Select Game Object:
This button will turn on the hand selector for grabbing and interacting with Game objects.


Set Color of Game Object:
This button will allow you to set the color of a game object that allows color adjustment.


Sleep On Awake for Selected Game Object:
This button makes the selected objects that have rigid bodies (Real Time Physics) go to sleep for one frame when the track first loads. It is useful if you are stacking physics items on top of each other or building complex buildings and obstacles that you want to fall down on contact with a vehicle or another rigidbody.
Saving and Loading Tracks


When you are done editing the level just click the "SAVE" button and the save menu will pop up.
Fill out the Track info if you plan on sharing your track with the community. Make sure to give it a unique name that explains what is going on there. (Example: Doug's MonsterTruck Track or Mayhem Outdoor Crawling Park).

If you want, you can also make a Forwards and Reverse Version of each track. All you have to do is re-arrange the race starting positions so they are pointing the correct direction when the race starts. You should not have to adjust the checkpoints or the start/finish collider if you are only changing the direction. Then re-save with _Reversed at the end so people will know.

---- HINT ----: you can keep saving your level in different Versions (Ex: track_V1, track_V2 etc...) so you can always jump back to a back up copy if you make too many unwanted changes. Then when you are satisfied with a final version you can upload that version with a new proper unique name for sharing to the community.


Saving a Preview Image:
After click the save button the game will ask you to position the camera and then take a screen capture or you can even keep the old screen image if you are updating an existing track.
Sharing/Uploading Track to the Steam Workshop
After you have saved a track for the first time it will be in your My Tracks folder. Once you have it all working good and polished up, If you want to share it with the D Series Community just click on the SHARE button on the Track in the My Tracks menu. A new menu will open and then just click one button to start the upload process. It should only take less than a minute. Its only uploading a text file and the preview images.

If this is your first time using the Steam Workshop you must "Agree to the Steam Workshop User Agreement". You can get to it by clicking the workshop button in the Community tracks menu ingame or just going to this link. http://steamcommunity.com/sharedfiles/workshoplegalagreement


After you have uploaded the item you can go to your workshop items in the steam web client and add more High Def larger Preview images.

All of the tracks will go in the "D Series Tracks" tag found under the browse tab in the D Series Workshop. You can see the workshop here. http://steamcommunity.com/app/363430/workshop/

Downloading Community Tracks
To download and add a track to D Series all you have to do is go to the D Series Steam Workshop and just click the Subscribe button on the track that you want. The next time you restart the game it will be in your Community Tracks Folder and you can then even use it for Multiplayer with friends. (For Multiplayer you must have the hosted track in your my community menu or else it will warn you that you must get it from the Steam Workshop)


You can also just click on the Steam Workshop Button IN GAME in the Community Tracks Menu.
Create a BASIC RACE TRACK
LAND RACING TRACK:
This section of the guide will show you the minimum objects needed to make a simple racing track.


Creating a Race Track:
You can create MANY different scenarios with the Track Creator.... but in this section we will cover the Racing Basics and the things that are required for the different modes to work properly.

Quick notes:
- RC Sim supports closed loop circuit or a point to point rally style racing.

This is a list of the MINIMUM Level Objects that are REQUIRED:


All 10 Race Start Positions -RED BALLS-:
- Initial Snap to Terrain
- Then rotate arrow toward the vehicles Starting Direction
--NOTES--
This is were the vehicle will be positioned before a race starts. This is basically the starting position for the race. The best practice is to set the height of the Red Ball about 1 meter above the starting grid surface.
Usually placed on the longest or straightest part of the track. They can be staggered or a "heads up" Side-by-side start. Whatever you want.

Make sure to NOT put any race checkpoints or the finish line checkpoint in the starting grid area. Either in front of or behind, but never in the middle of the starting "grid/pack". If you want a reverse version of your track it is best to save another copy and rearrange the starting positions so the vehicles are pointing the correct direction.


All 10 Vehicle Spawn "Pit Spot" Positions -BLUE BALLS-:

- Initial Snap To Terrain

This is were the vehicle will spawn at the start of the level. You will return here anytime the reset Vehicle button is called. Make sure to put this on a flat surface or your car will roll away (or do... if that is your sinister plan ;) ). Do not put them all in one spot in case the track is used for mutliplayer. You dont want everybody spawning in the same pit spot.
--NOTES--
After placing the object you can set the height to your liking, IE; so you can start on a higher placed box/table or non terrain surface. Once you set the object to the spot you want it will add 1 meter to the height to make sure it doesnt start inside of the ground or any object below it. This is the Starting spawn spot 1 per player, were the car is first created in the game after loading.


1 Start-Finish Line Object:
- Initial Snap To Terrain
--NOTES--
For the timing system, Place it ACROSS the race line and adjust the scale so it reaches fully across the raceline at ONE POINT on the track, Dont let the collider hang out into another race lane and get hit by other lanes of traffic as it will not work properly.
If you want a rally style Point-to-Point race just put in two finish lines (One at start and one at end). It will still check for 5 checkpoints but you will not have to finish at the starting point.


All 5 Checkpoint Colliders:
- Initial Snap To Terrain
--NOTES--
These will make sure no one is cutting the track and cheating, Place these around the track 90 degrees ACROSS the race line. each driver must "drive through" each of these before crossing the finish line. It doesnt matter in which order that you cross them (ie they work in both directions of racing a track, backwards or forwards) but they all must be hit once in order for the lap to "count" and be counted.


Create a basic CHECKPOINT RUBICON
RUBICON COURSE:

A Rubicon is point to point check point journey. Made up of checkpoints across a variety of natural and man made obstacles strung into a long course. These are meant to stress the vehicles capabilities and force the driver of the vehicle to push them to their max. Crazy bridge crossings, Water crossings, Mountains, Rocks, Wood piles..... you name it. The possibilities are endless.

There is no time limit but the clock is ticking to see if you are getting better each time.


Creating a RUBICON Track:
You can create MANY different scenarios with the Track Creator.... but in this section we will cover the RUBICON Basics and the things that are required for the different modes to work properly.

Quick notes:
- D Series supports closed loop circuit or a point to point racing.


All 10 Race Start Positions -RED BALLS-:
- Initial Snap to Terrain
- Then rotate arrow toward the vehicles Starting Direction
--NOTES--
This is were the vehicle will be re positioned before a Rubicon starts. This is basically the starting position for the run. The best practice is to set the height of the Red Ball about 1 meter above the race surface.
Make sure to use the track graphic arrows to show the users were the next "Checkpoint" is.


All 10 Vehicle Spawn "Pit Spot" Positions -BLUE BALLS-:

- Initial Snap To Terrain
--NOTES--
Then you can set the height to your liking, IE; so you can start on a higher placed box/table or non terrain surface. This is the Starting spawn spot 1 per player, were the car is first created in the game after loading.

This is also were your vehicle will go when you click the Reset Vehicle Button.


Minimum 1 Rubicon Collider Object:
- Initial Snap To Terrain
--NOTES--
These are the Rubicon checkpoint colliders. Place one between two of the Rubicon flags so the users have to drive between them. (Rubicon flags are covered in next section)

You can place up to 100 collider/checkpoints on the course. The game will automatically count them and tell you how many you have left to finish. You should be liberal with the on track graphic arrows to tell the user how to get to the next gate. For now the game has no way of knowing a certain order of the gates... So thats is all up the the layout of the course and the arrows. Make use of cones and other track objects to direct them into the proper gate as well. It all up to you to get as crazy as you want. When you are in Rubicon Mode (Not just practice Mode) and have completed all the checkpoints it will tell you your time. You can then restart the level if you would like to try again.

Make sure to check out the very simple Sample Rubicon map that came in your mytracks folder. It shows a simple basic idea of how to build them.


Rubicon Flags:
- Initial Snap To Terrain
--NOTES--
These are the small track/gate markers. THE YELLOW GATE WILL ALWAYS BE ON THE DRIVERS LEFT. That will let the user know what direction the gate is supposed to be approached. There should be one green on the right and the Yellow on the left. The Rubicon Collider (Covered above) should be scaled and positioned so that it only covers the area between these two small flags. That way the user will be force to go between them.


Track Direction arrow helps:
- Initial Snap to Terrain
--NOTES--
These are the arrows that you will use to show the user were the next gate is.


Winching Notes:
- Winch spots can be anywhere.
--NOTES--
Everyone knows the best crawling and rubicons involve some winching. Right? You can go into the Misc tab in the track editor Objects folder and place a "winch Spot" anywhere in the world that you want. But remember that the winch on the rockcrawlers is only so long. The user can click a button on their GUI to show in a blue glow where the winch spots are.

Make sure to place them where the driver can see them. There is also two trees that have winch spots already on them. You currently can not attach any winch spots to any moving objects.


Other Game Objects for ALL TRACKS
Other Level items that are optional:


- Track surface Graphics -GREEN BALLS- (Snaps To Terrain) Place them anywhere you want and Rep D Series and devotids supporting sponsors. (Big Thanks for that)


- Most trees in the game editor have a level of detail setting and will look different up close than they do far away.


- Most smaller objects have "collidable Physics" and can be interacted with. You can also choose for them to be "live" on the first frame of the game or to be "asleep on start" and wait to be interacted with before "doing anything. Making an item "asleep on start" is good for stacking items that may sometimes cause a strain on the loading of the level and cause them to fall over or go bonkers.) It basically tells the object to be "asleep" for at least the first frame after loading.

Moving objects in the editor can be tricky.... I have not finalized the placement tool for them and they will have live physics when ever you are moving them or adjusting them. This is still in beta as well and will be changing in the future.


- Camera Man "Bob"
Camera man "Bob" is a guy that will film the action nonstop. Place them around the map and make sure to point them toward the action with the rotate game object tool. If you turn on the extra TV Cams in the Camera Gui Menu it will show up on the LCD monitors and JumboTron automatically ( Must have a LCD monitor or a jumbotron in the scene somewhere).


- LCD monitor
- Jumbo Tron
This LCD Monitor will always show whatever is on the closet "Bob camera" to the action in the Game. You must have at least one Camera man in the scene or the scene will just have the default "LiveTime" logo on the screen. Make sure the Extra TV Cams Check Box is turned ON in the Camera GUI Menu in game aswell. It is off by default for now for optimizing.


The extra tools menu is in the upper right hand corner of the editor screen.

It is a place to find out a little more info on the object that you are about to place into a scene and also you can turn shadows on and off along with turning the "Day Light" off to test your night time lighting. (Shadows will be automatically turned on in the editor when you capture a screen shot.)
Summary
In summary, the track editor can be used to create simple sand lots to complete stadium race tracks. The "direction" of the game is really up to the track creator. You can make it as simple or as crazy as you want. I tried to create enough objects and tools so the user can create just about any scenario that he or she can imagine.

So have fun and done be afraid to experiment with it. Done forget to share your finished creations on the Steam Workshop. It only takes one click.

devotid
2 kommentarer
devotid  [ophavsmand] 25. feb. 2017 kl. 8:15 
You can hit the G key and there is 3 different "Grid" options for lining things up in the track editor.

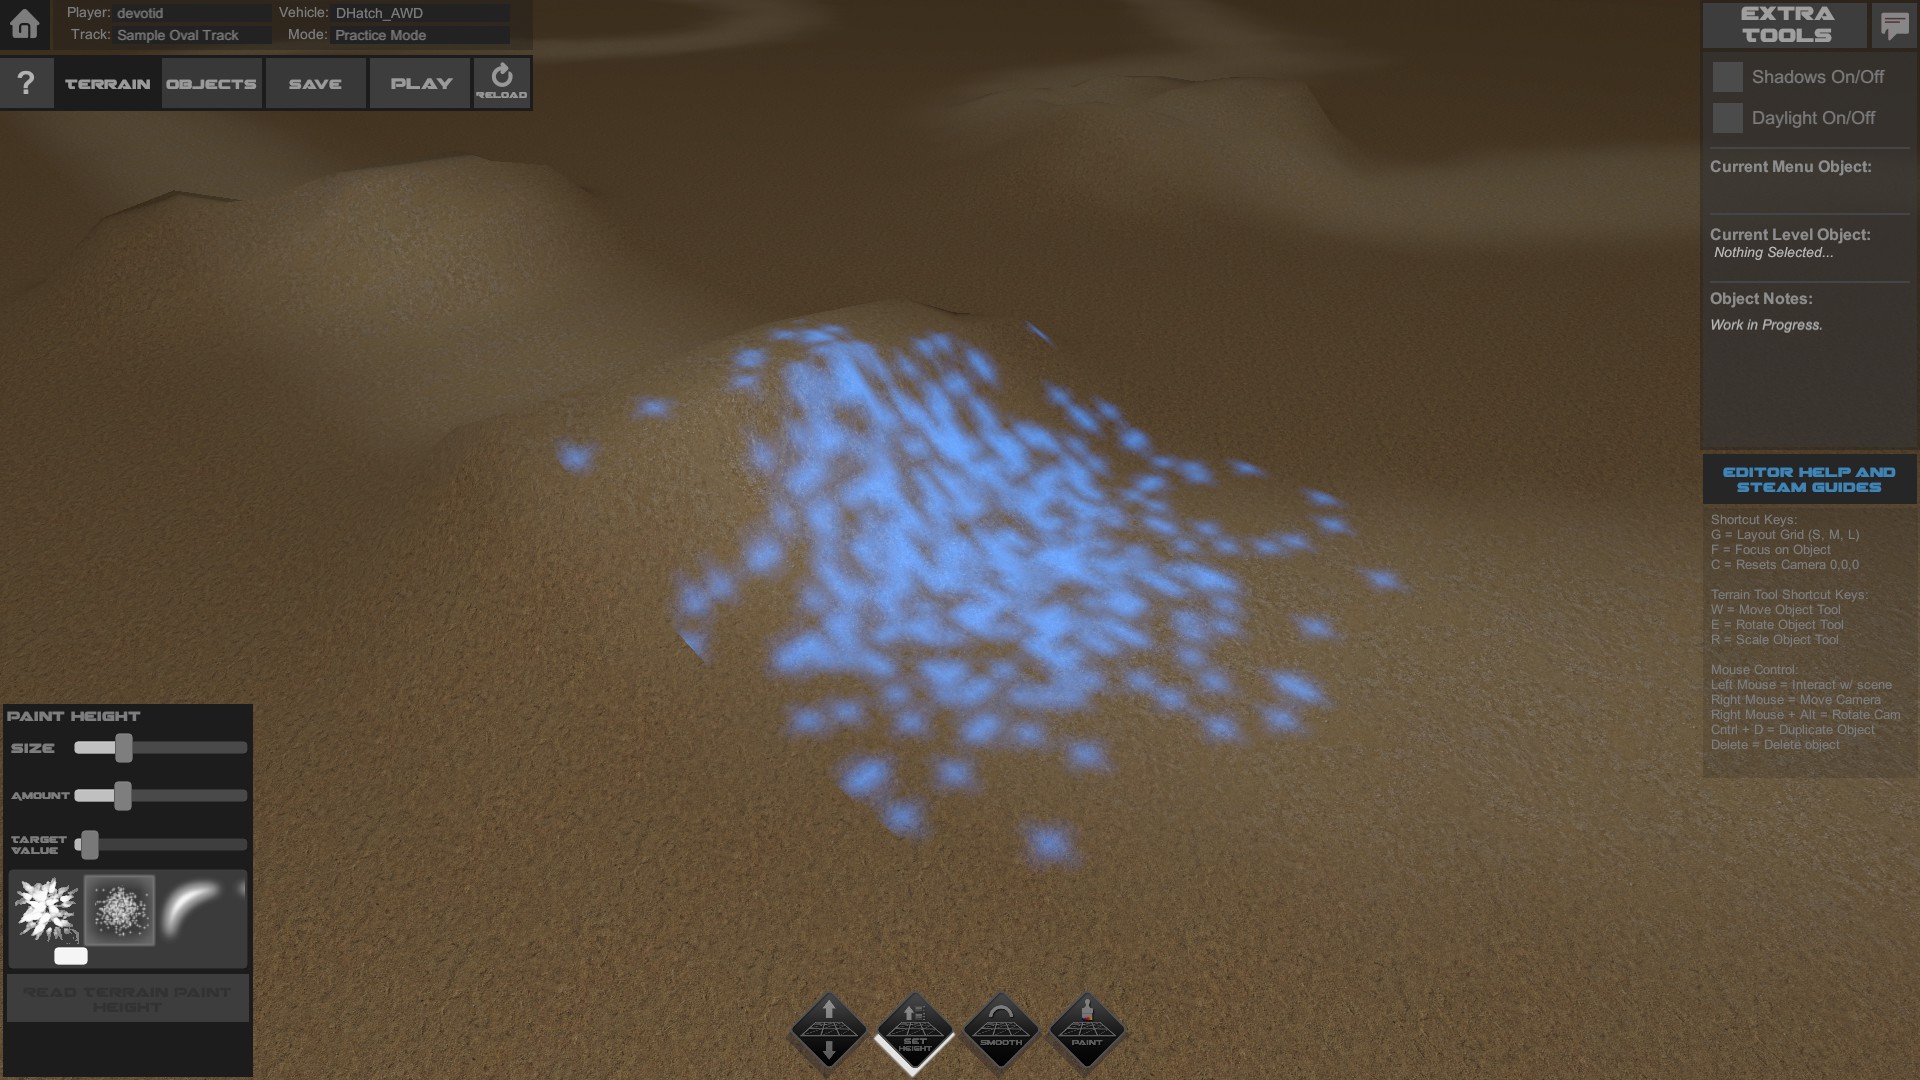
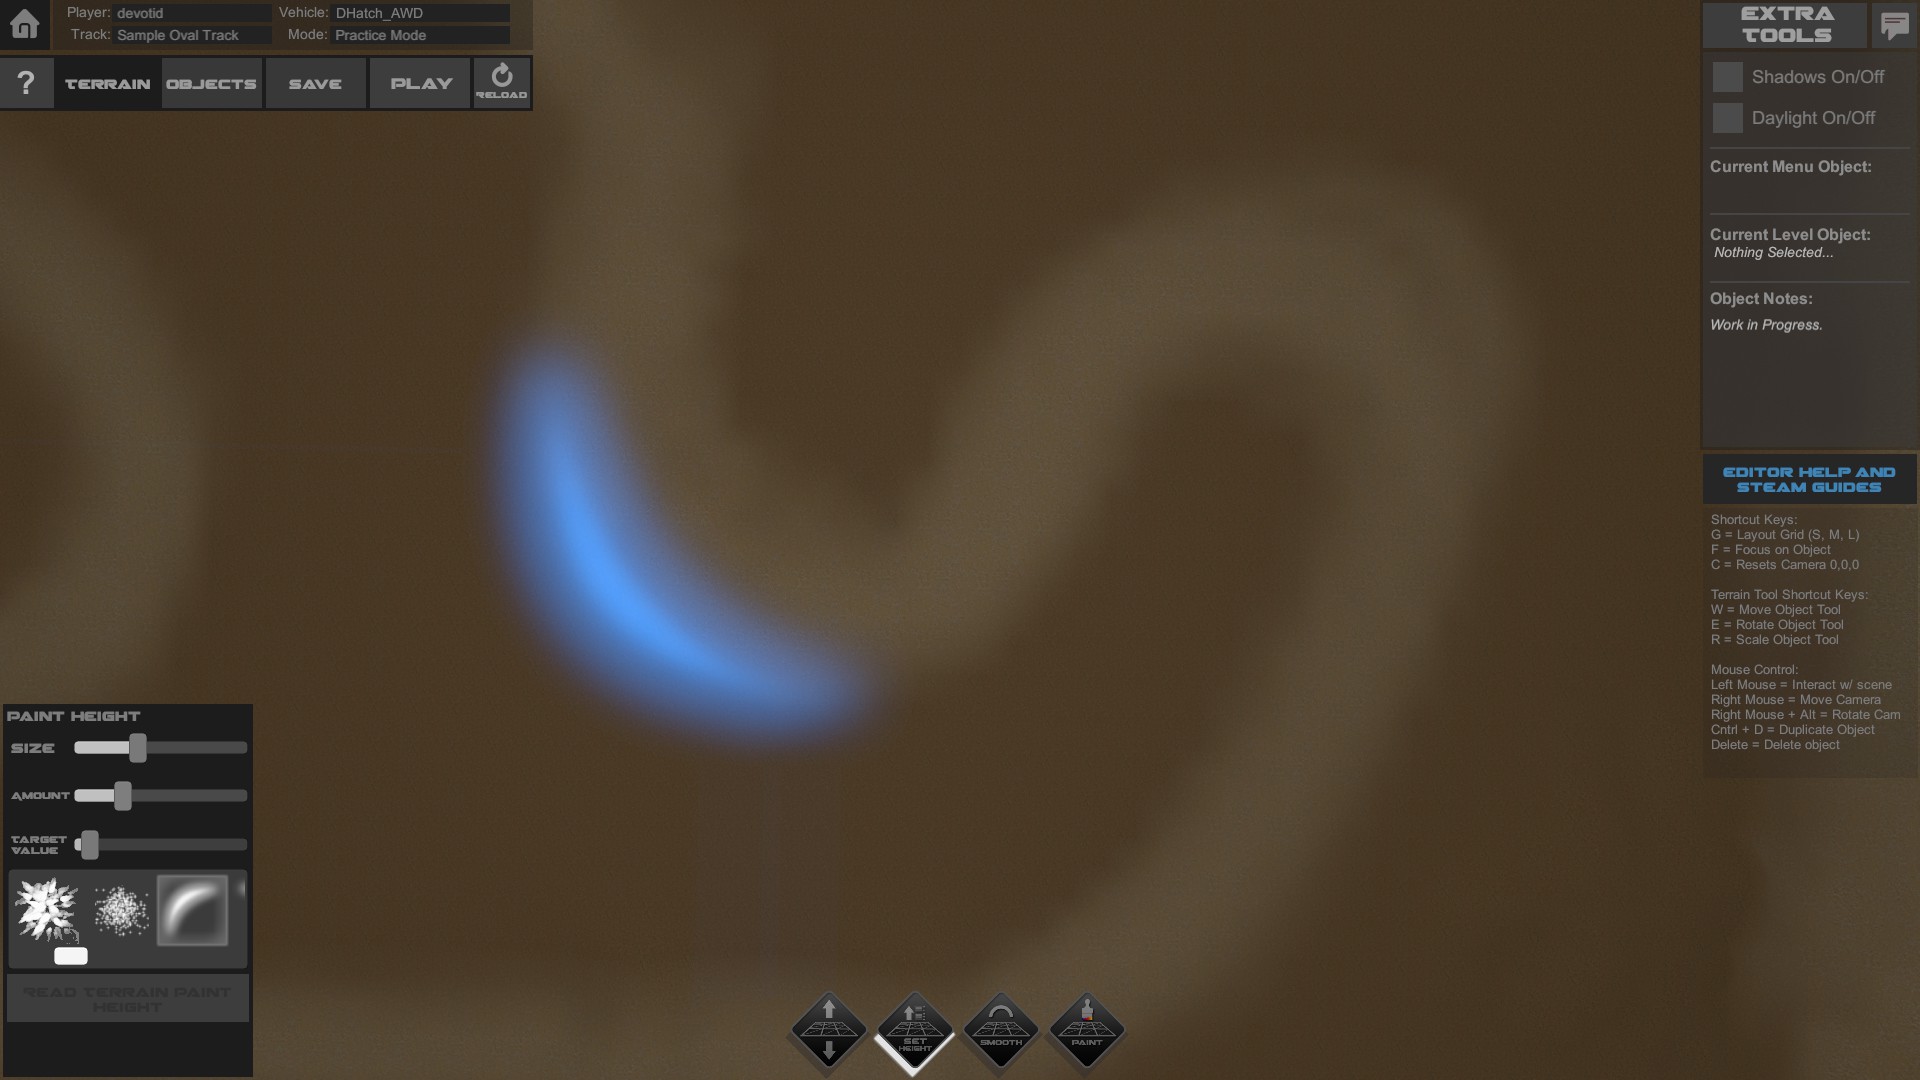
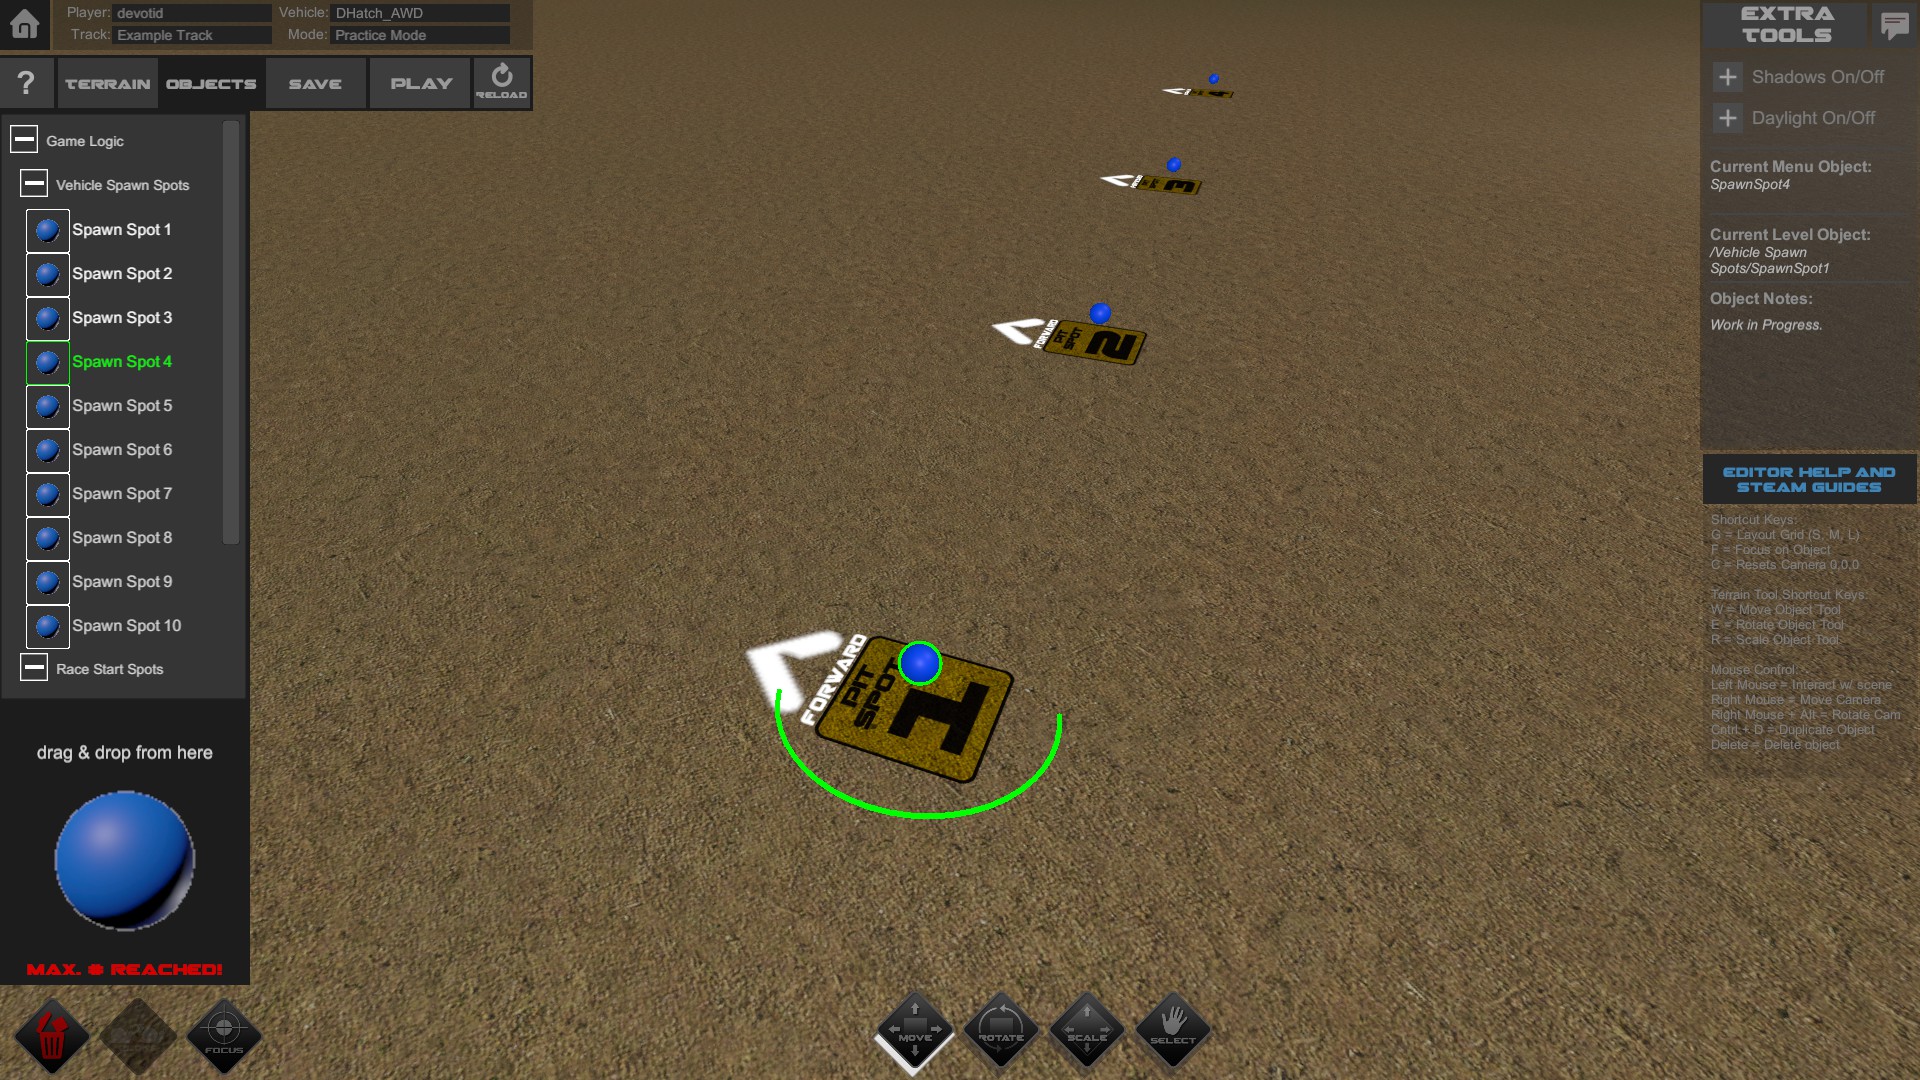
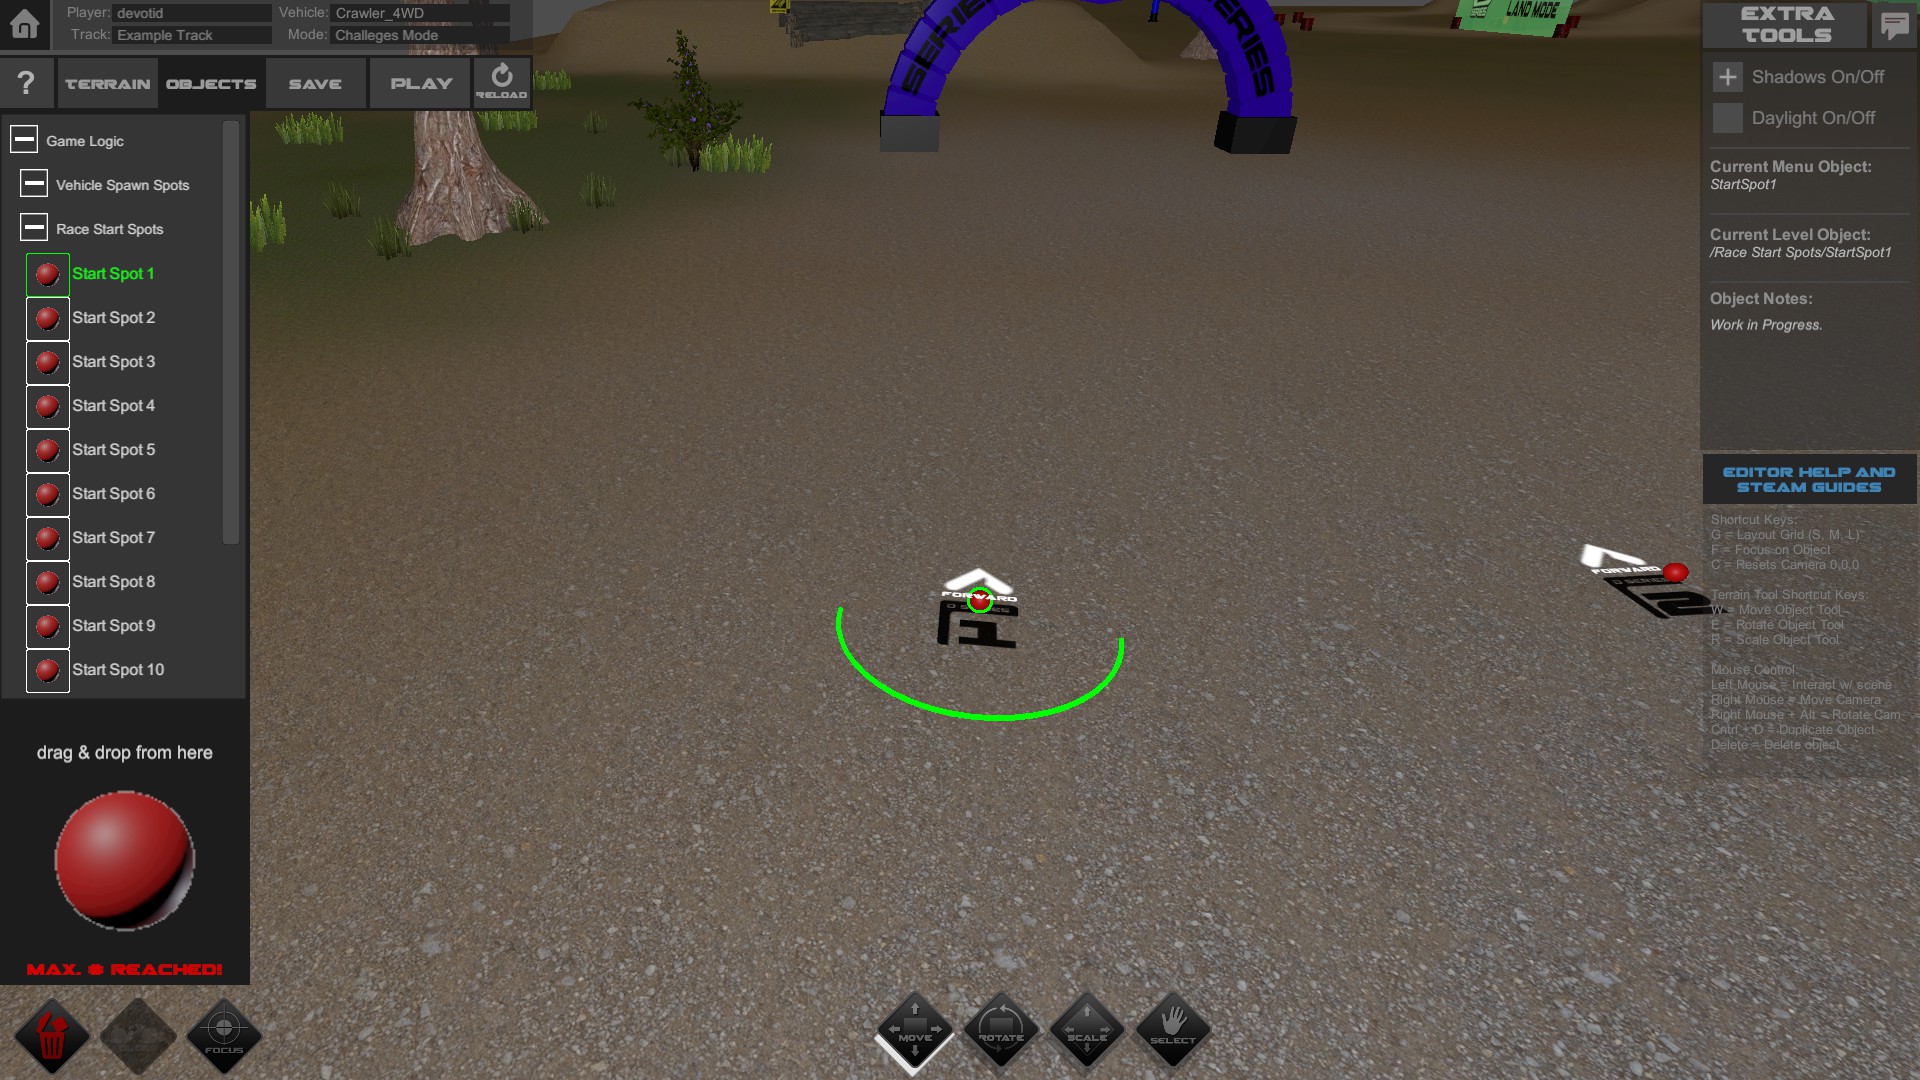
Also, you can set a specific height for the brush with the SET HEIGHT tool. right now you can only slide the slider by eye..... but I will make a text element that shows the numerical height as well. That way you can dial in jumps to the exact height you need them.

Thanks for the feedback and let me know if you need any other help.
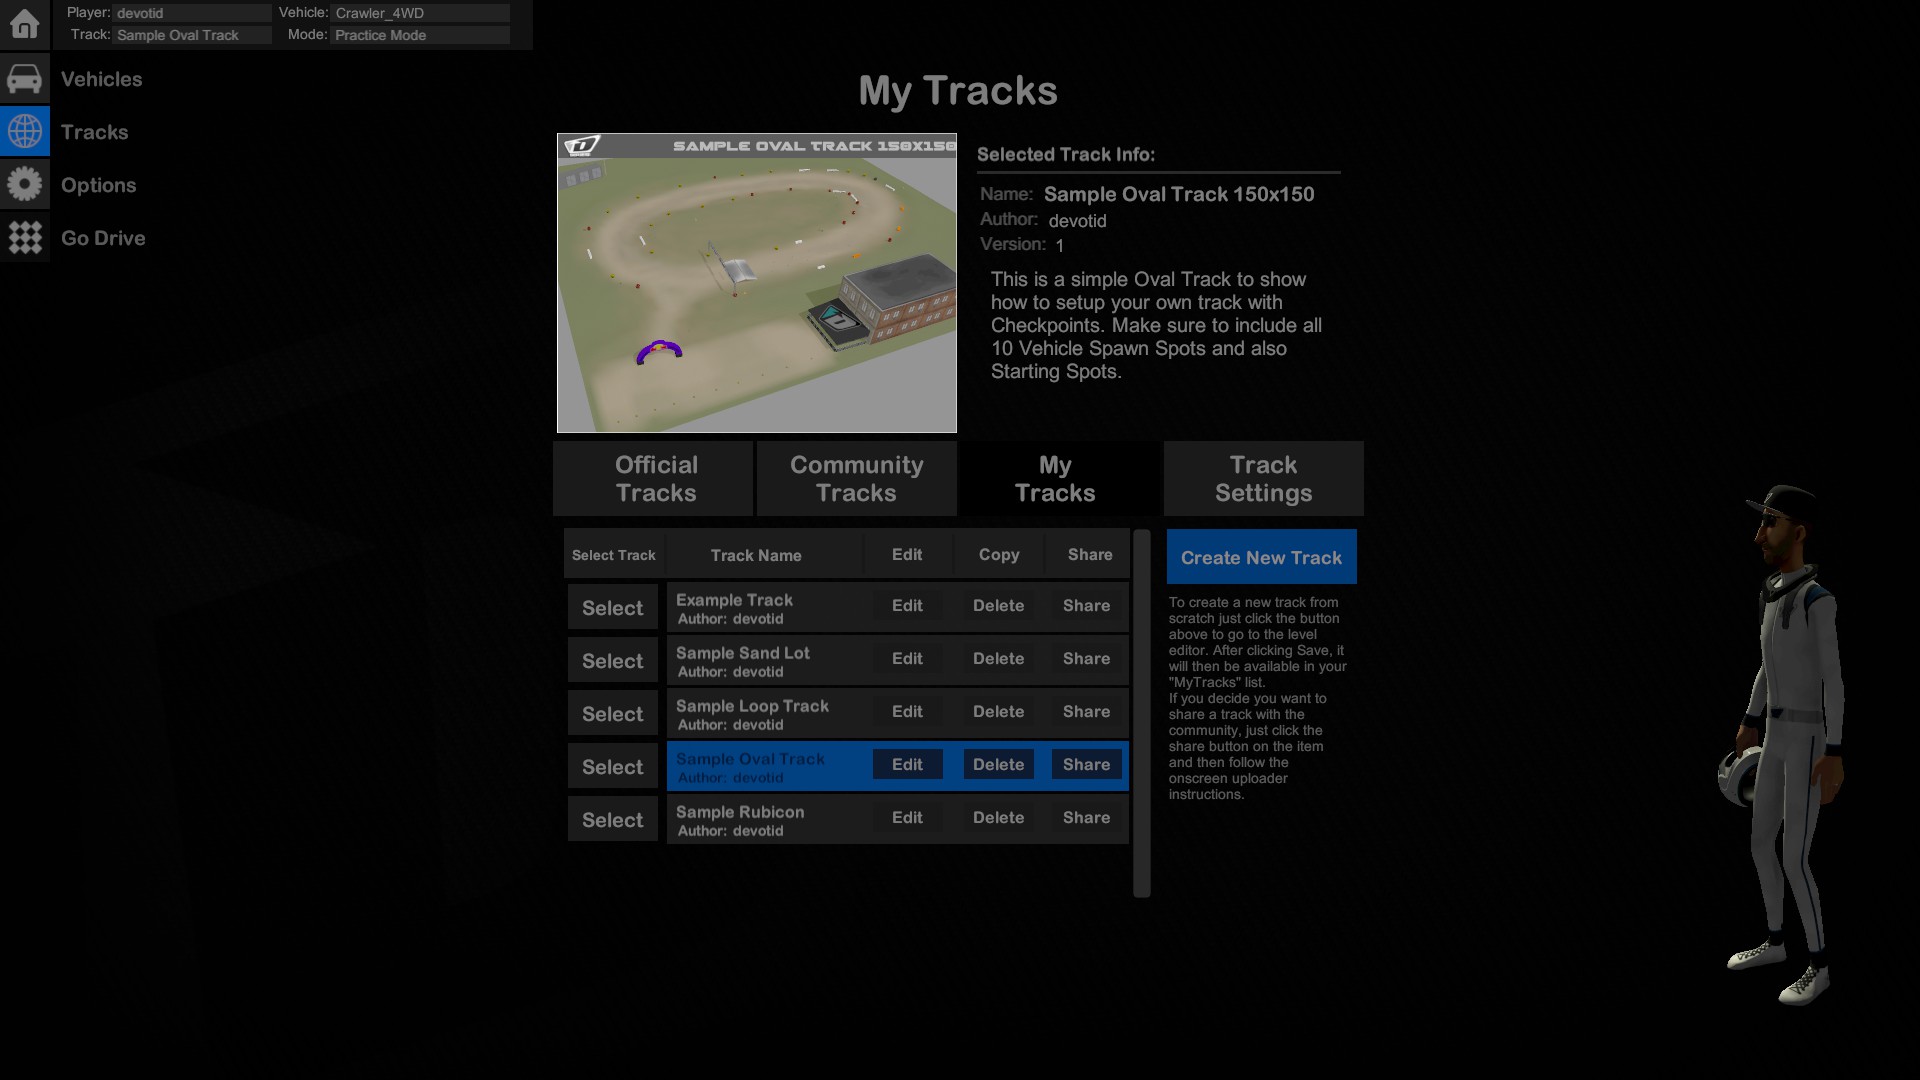
devotid :DLogo:
JlnPrssnr 24. feb. 2017 kl. 13:42 
Would be awesome if a future version would allow for custom grid overlay resolution. I'd love to set a 1x1 meter grid, instead of referencing everything with the ruler object.

And even more awesome would be a function to set the height (Preferrably also optionally in meter) of every point of the grid OR a way to set the height adjustment brush to "draw" a specific height :)