The Elder Scrolls V: Skyrim Special Edition

The Elder Scrolls V: Skyrim Special Edition

137 ratings
Skyrim Master File Cleaning Guide
By Avrie and 1 collaborators
A simplified Guide to the master files for Legendary or Special Edition
   
Award
Favorite
Favorited
Unfavorite
From the author ...
Hello everyone, This is just a quick heads-up that with the official release of xEdit 4.0.2 available for Skyrim-LE, Skyrim-SSE, Enderal-FS, and FO4 the information in this guide has become dated, and the procedures While still valid for older versions of xEdit will not work with the newest version.

Not only does the new version clean more and better, but the procedure has become more or less automated (with some caveats) I will be releasing an updated quide for use with all of the above games. In the mean time I would highly recommend viewing the tutorial video from Gamer Poets.

https://youtu.be/L6T4rKRAgwo

Why should I do this?
The simple answer is because the original game Master files (.ESM) include multiple references to identical items, but more importantly they also include references to deleted items that can and will interfere with some mods working correctly. What we accomplish by removing these "dirty edits" is a more stable game environment if you are installing mods. No it won't make it faster, or prettier ... but in it's own small way, it can make it better.

Bethesda didn't bother cleaning the original Skyrim files, then in their infinite wisdom didn't bother again, when they had the chance with the release of the special edition, but it is still needed. Just add this to the list of things that "could" have been fixed but wasn't.
When should I do this?
The sooner the better for a new installation, and also everytime Bethesda releases an update, or if you need to verify the integrity of your game cache. In short, any situation that downloads and replaces your master files with fresh copies. I chose to work with fresh masters for this guide.

What do I need?
There is only one tool required for cleaning your master files, and that is Xedit.

TES5edit for the Legendary edition
http://www.nexusmods.com/skyrim/mods/25859/?

SSEEdit for the Special edition
http://www.nexusmods.com/skyrimspecialedition/mods/164/?

Please make sure you download the current version.

Note, the newest WIP versions of Xedit (3.3.5 Beta at the time of this writing) clean a little more than when the guide was released. The procedures are exactly the same but the number of files cleaned/undeleted in the screen shots will not exactly match. This is not a problem.

(Actually they are the same program, you can simply rename it, I'm just trying to keep it simple)

Extract the download to your preferred tools folder, or simply to your game drive. Please make sure to keep all of the files together, but nothing needs to be "installed" just right click on TES5edit or SSEEdit.exe and select "send to" and desktop to make a shortcut.

Please be careful when you're navagating to the data folder as the two games are virtually identical. I find it useful to pause for a moment at the X:/Steam/Steamapps/Common folder when I'm selecting the game to edit.

.

Then just double click on the data folder after sellecting the correct game.
Start with Update.esm
Update.esm is the file that brings Skyrim up to the current build, and as such is a required file for all other DLCs. Therefore it needs to be cleaned first, and by itself.

Open SSEedit, right click in the Master/Plugin selection window, and choose "Select None" then put a check in the boxes for Skyrim.esm, and Update.esm, Click OK, then wait for the background loading proccess to complete.

*


Right click on Update.esm in the left pane, and select "Apply Filter for Cleaning". Then again wait for the opperation to complete.

*


Right click on Update.esm again and select Remove "Identical to Master" records. There will be an "Are you absolutely sure" window, hover over the yes button for a few seconds and it will become available, click Yes, then wait for the script to complete.

*


Right click on Update.esm one last time and select Undelete and Disable References

*


Congradulations, update.esm is done. In order to save the changes simply click the "X" on the top right corner of the window to close SSEedit and it will bring up the save window ... Click OK


note - it is not neccessary to back up the original plugin, but you can if you prefer.

A word about Navmesh errors
You will see several "Deleted Navmesh" errors come up while cleaning. The Xedit team learned very early that "fixing" navmesh errors will simply makes things worse, and might break your game. They will notify you that the deleted mesh exists, but it is informational only. This isn't a problem if you don't try to fix them. So you will see the warning for deleted Navmesh(s) as you clean, but will not see a method to "repair" them. This is by design. It is not an error, or an oversight.

Chalk it up to yet another shortcut made by Bethesda, and continue cleaning... you're fine.
Now lets do the rest in order
Now we simply repeat the process for each of the DLCs one at a time. It is NOT a good idea to open all of the masters at once, and might cause problems later. Seeing how quick and easy this is, please just do them in order and save yourself any aggravation.

Open SSEedit again, right click in the selection menu and choose "Select None" again, this time put a check in the Skyrim.esm, Update.esm, and the Dawnguard.esm boxes, then click OK, and wait for the background operations to complete again.

Right click on Dawnguard.esm on the left pane, and again "Apply Filter for Cleaning" and wait for the filter to complete loading, then remove "Identical to Master" records, and "Undelete and disable References" exactly as described above for Update.esm

When everything is done simply click the "X" to close and save the file.

Now lets do exactly the same thing for Hearthfires.esm, simply select Skyrim.esm, Update.esm, and Hearthfires.esm. When the background loading is done, filter, clean, and save just as before.

Finally do it all one last time for Dragonborn.esm. Select Skyrim.esm, Update.esm, and Dragonborn.esm. When the background loading is done, filter, clean, and save.

Your masters are now cleaned. Oops, not quite!

12.27.2016 SSEEdit updated to version 3.2, Testing shows that a minor issue, has surfaced again. When you finish cleaning Dragonborn, load SSEedit one last time and clean the Dawnguard master a second time. You will find 6 additional ITM records to remove.

In addition there are three remaining edits to the Dawnguard.ESM file (not made by the automatic cleaning filter.) Before you close and save after the second Dawnguard cleaning, please complete the section below.
And finally the last few edits
Recently Arthmoor has brought to the attention of the community additional information regarding manual cleaning of Dawnguard.esm, which everyone needs to do for their own setup same as automatic cleaning ( because nobody can legally upload official master files anywhere, everyone needs to do their own )
Copied from http://afkmods.iguanadons.net (link provided below)

There are three remaining edits that need to be done to Dawnguard that the automatic cleaning filter will miss, so we have to knock them off manually. Two of them are pretty straight forward. Both are what we call wild edits. (meaning they were never intended) We're simply going to remove both records entirely.

  1. Click on the +sign next to Dawnguard.esm
  2. Click on the +sign next to Cell
  3. Click on the +sign next to Block 2
  4. Click on the +sign next to Sub-Block 1
  5. Right click on record 0001FA4C (CWGuard Templates) and select remove.
  6. Accept warning to remove record
Click on the -sign next to Block 2 to collapse the tree again. (Makes editing a bit less confusing.)

*


Now lets grab the next, It's just as easy as the first.
  1. Click on the +sign next to Block 8
  2. Click on the +sign next to Sub-Block 1
  3. Right click on record 0006C3B6 (AAADeleteWhenDone) and select remove.
  4. Accept warning to remove record
Click on the -sign next to Block 8 to collapse the tree again.

*


Finally for the last edit. It's basically exactly the same, but we're going to only remove a single sub-record, not the entire record. Please don't remove the ragged Flagon. This sub-record blocks an official fix in the Update.esm
  1. Click on the +sign next to Block 5
  2. Click on the +sign next to Sub-Block 3
  3. left click on record 00016BCF (RiftenRaggedFlagon)
  4. In the right-hand window, scroll down until you see XEZN - Encounter Zone
  5. Under Dawnguard.esm find the sub-record RiftenRatewayZone [ECZN:0009FBB9]
  6. Right click on that sub-record only, and select Remove
  7. Accept warning to remove record

*


Now we're all done. Promise ... well until the next official update anyway. Click on the X to close the window and save. Remember to copy the cleaned masters to your cleaned-backup folder.

This is a link to afkmods cleaning guide. I highly recommend you look it over. Any additional manual edits will surface there first. ( Besides - their graphics are much better than mine :)

https://www.afkmods.com/index.php?/topic/4110-manual-cleaning-skyrim-and-skyrim-se-master-files/
Trouble Shooting
It appears Bethesda has corrected the time stamp issue as of the last official update to the SSE game. It is highly advised that you update to the current release of the game and the creation kit. The error below should no longer occur with Official game content, but ... just in case you run into an issue with a mod that has been flagged as a master, I'm leaving the trouble shooting section in the guide, at least for now.

Error - MasterX is required to load before masterY

With the release of SSEedit, The program parses the Plugins.txt file to create the initial ordering of the masters. This should no longer pose an issue if the time stamps are out of sequence, As Bethesda has taken steps to make sure the masters now load in the correct order, and nothing but official content can alter the initial ordering. It is still possible for a mod that has been flagged as a master to end up where it doesn't belong. The result ... errors of course.

This error occurs when one master file is dependant on another, and the dependant file loads first. The solution is very simple; edit the plugins.txt file located in your AppData\Local\Slkyrim Special Edition folder. Just re-order the list as required to read in the correct order.

Once the files are ordered correctly in the plugins.txt file they will parse correctly in SSEedit, and you will no longer have any issues cleaning you mods.

An alternate, and some would argue easier approach would also be to delete the plugins.txt file and re-run the launcher. That will recreate the plugins.txt correctly, but not correct the original problem with the order of the timestamps.

Time Stamps

As I mentioned above this error has been corrected for the current update to the SSE, and the Creation Kit. However it is still required for the original game, as the legendary edition has not received any new updates.

http://steamcommunity.com/sharedfiles/filedetails/?id=818155665
Final thoughts
It's going to happen ... Something will glitch and you'll need to go to your Skyrim Special Edition properties in Steam, and "verify the integrity of your game cache" in order to continue your playthrough. No big deal, expect it. But now you have all new versions of the master files installed and they are no longer clean. The simple solution ... Make a "cleaned-Backup" folder on your game drive and copy all of the masters into it. When you suddenly need to validate your masters, simply copy the contents of your backup folder back into the data folder, and you're finished! No new downloads, no re-cleaning, Now aren't you smart :)
Change Log
12.14.2016 initial creation of this guide
12.19.2016 Edited opening section for clarity (Thanks Sparky:)
12.27.2016 Added note to clean Dawnguard twice when using SSEedit 3.2
12.27.2016 Added Dawnguard manual edit section
12.30.2016 Replaced, removed photos that illustrated time stamp errors, updated text to match
9.1.2018 Added message about Navmesh errors as it's own section
5.11.2021 Updated link to afkmods
61 Comments
lada_ May 29, 2023 @ 11:07am 
Thank you, Avrie! :1heart::lunar2020playfuldog:
smr1957  [author] Jan 7, 2023 @ 3:16pm 
Actually, it is now recommended NOT to clean the Masters or any CC content, due to issues with how the newest versions (v 4.0 series) of xEdit work. Cleaning them can result in issues - one major one being potentially missing worldspace.
Espritviril`` Jan 7, 2023 @ 3:13pm 
Thank you for this! After all these years still saving some skyrim saves and playthroughs :blissful_creep:
Avrie  [author] Nov 12, 2021 @ 2:45am 
While I'll always caveat by saying it needs to be tested, it was only released yesterday, but seeing as SAE is only a function of a new compiler, creation crap, and slightly improved graphics I can't see there being any less need to fix UDR. There is some question of the benefit of removing ITMs.

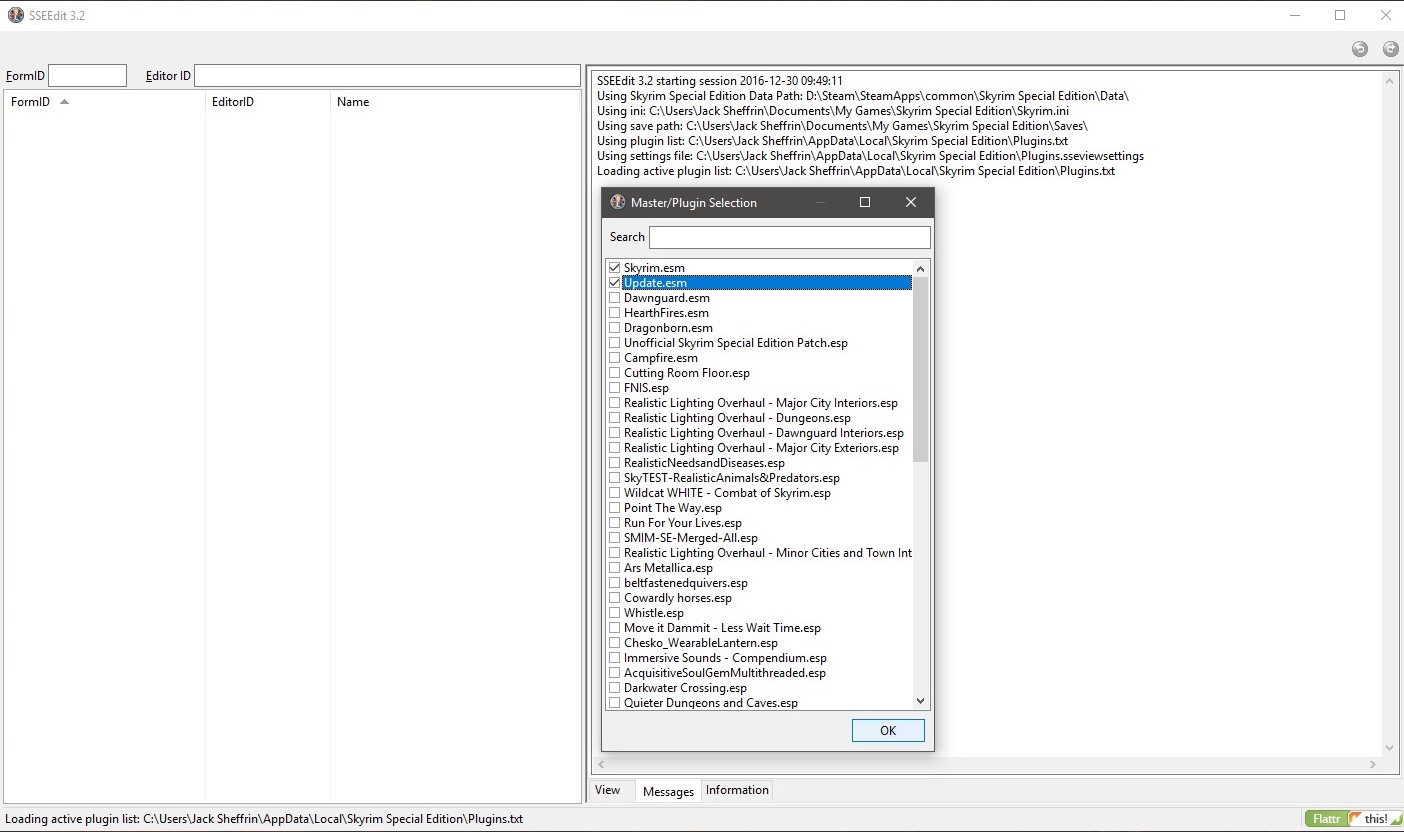
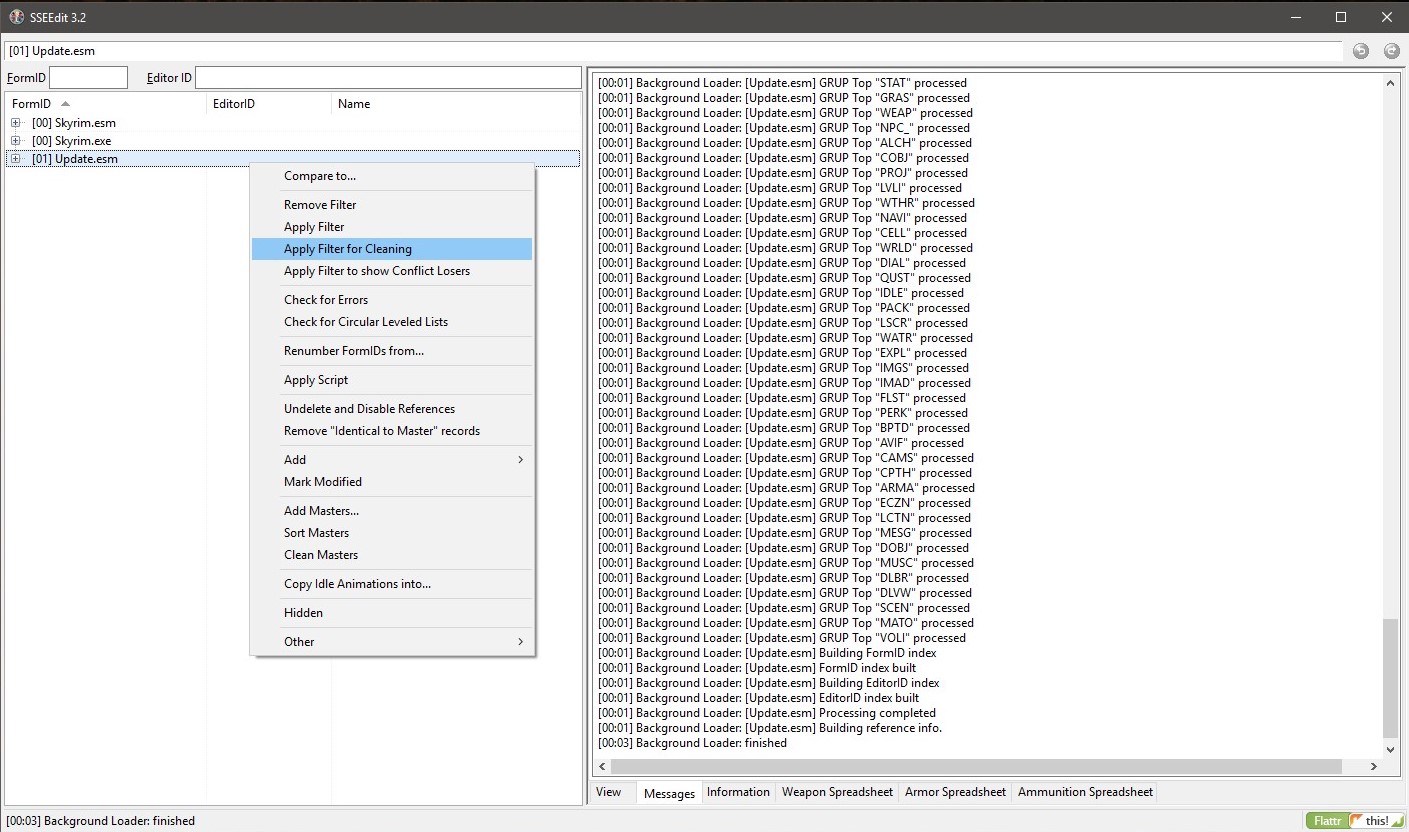
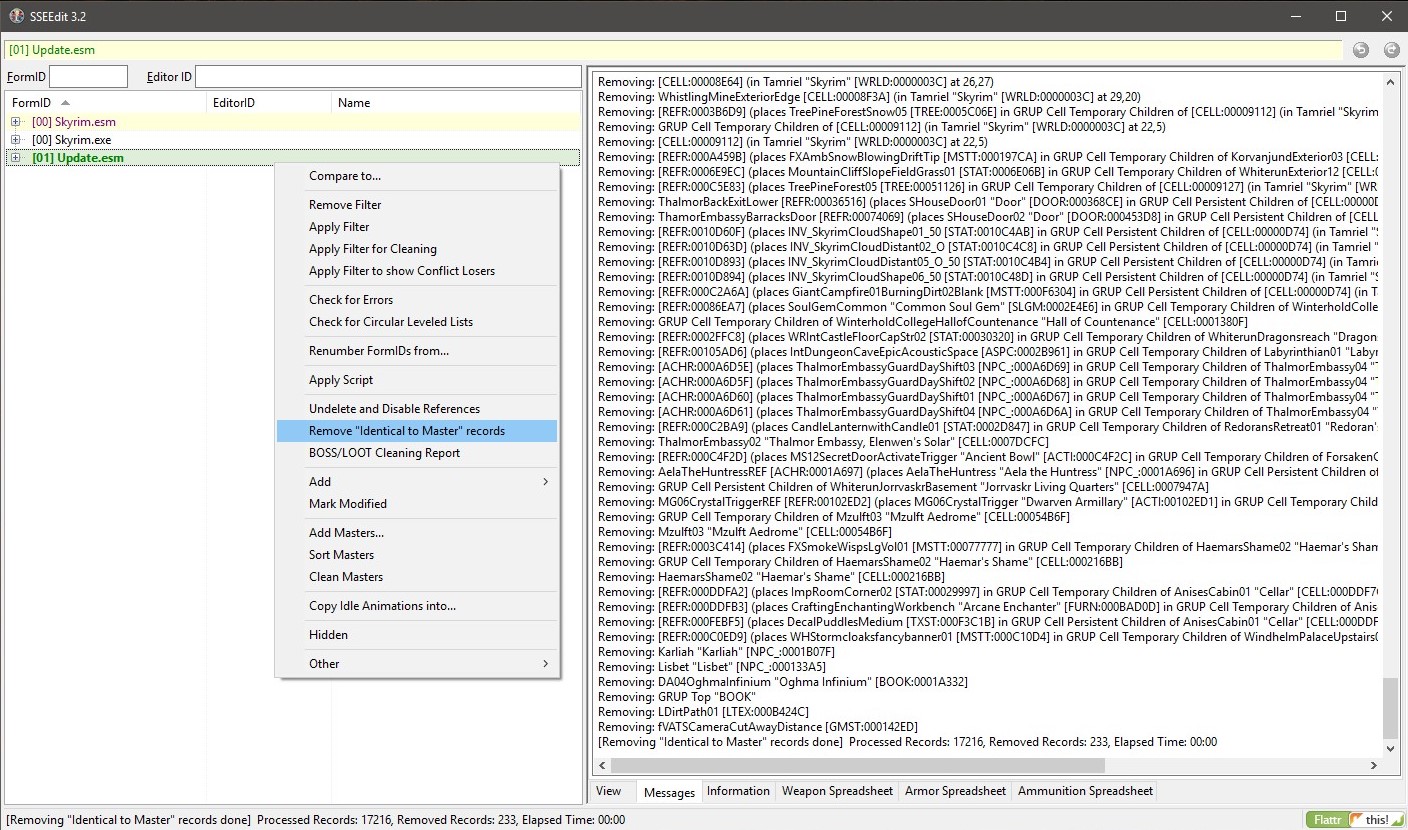
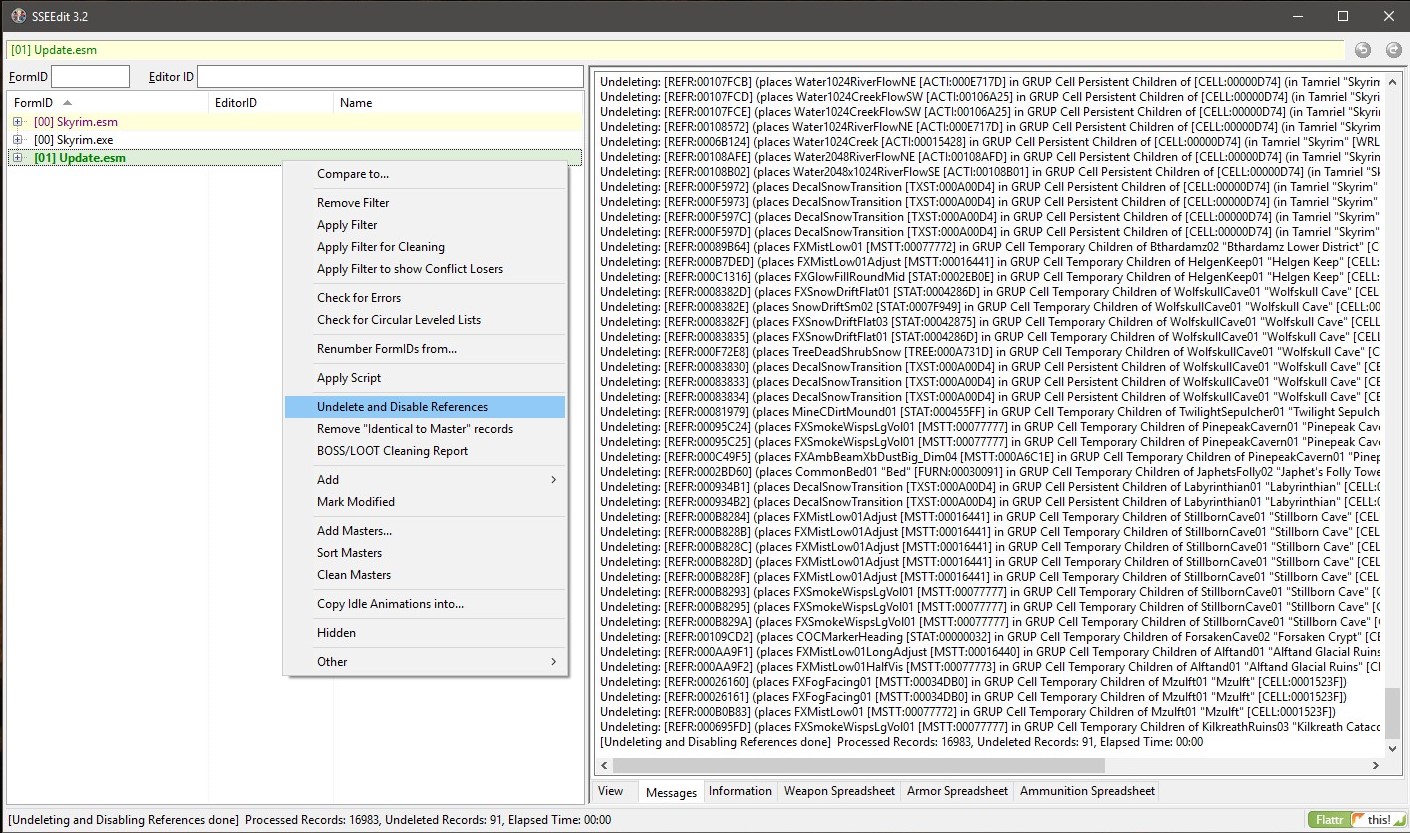
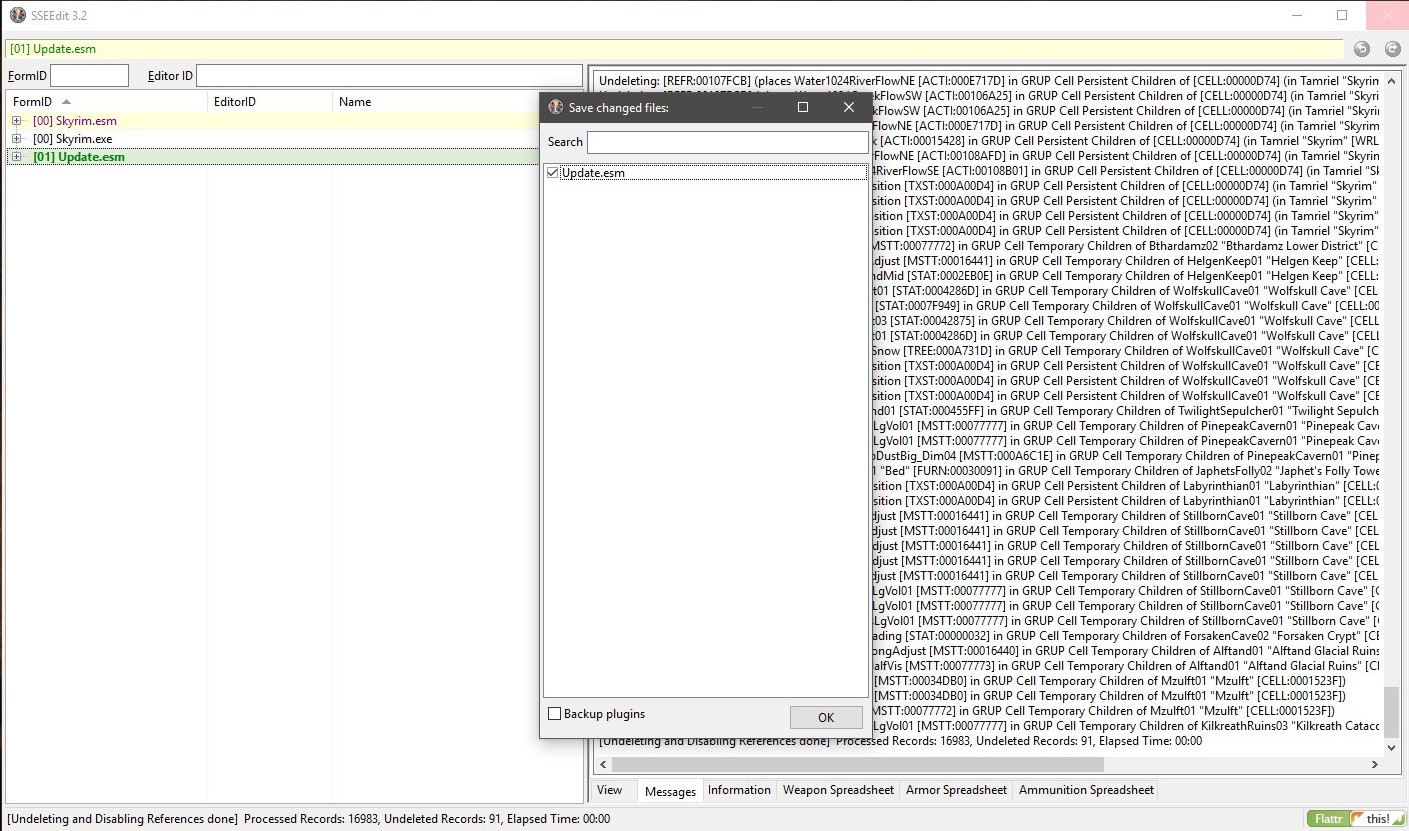
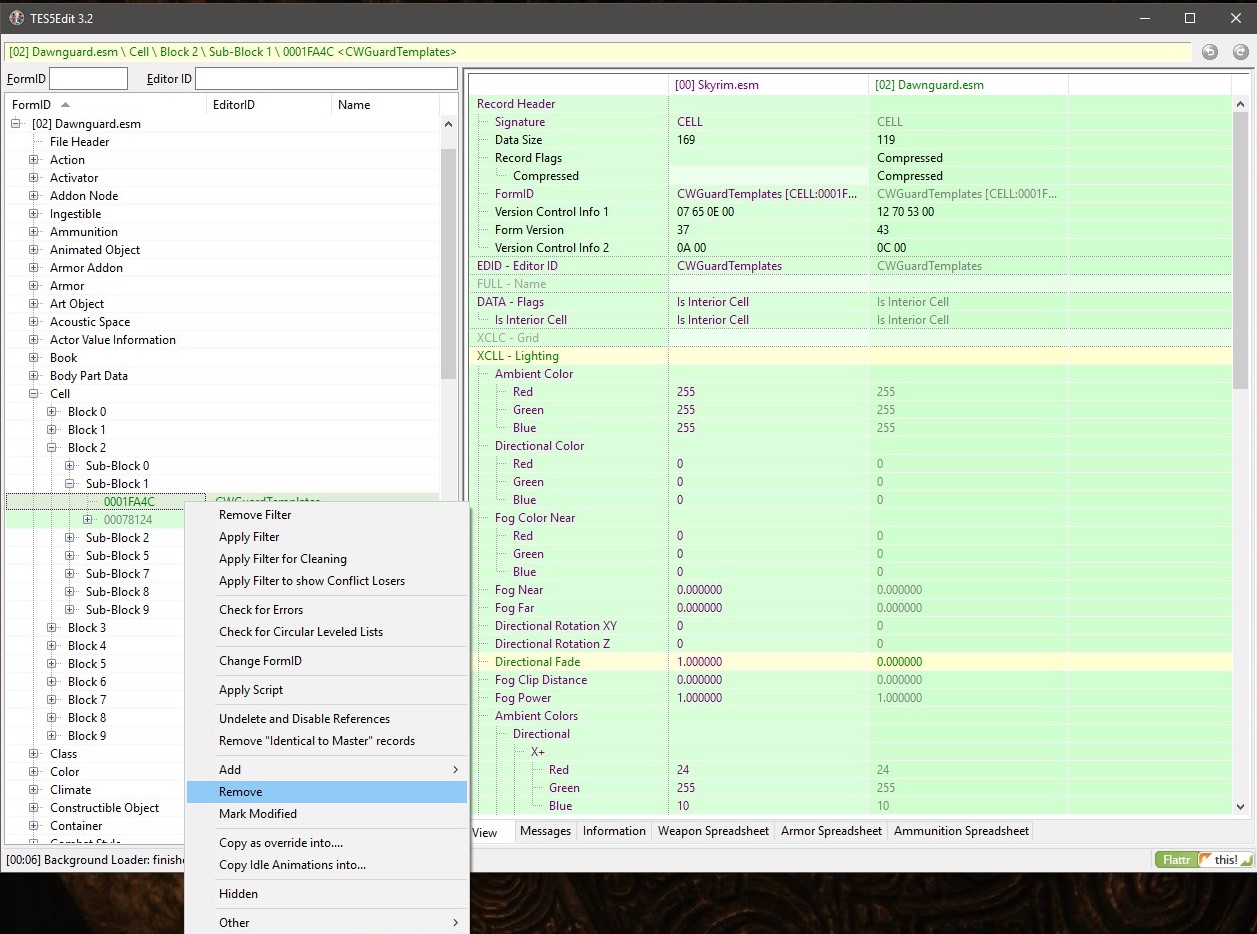
I'll add that the official release of xEdit 4.04 brings a better version of quick auto clean to the nexus "Finally" but I'm not taking this guide down as some would still prefer manual removal using the stable xEdit 3.2 version this was written for.
Dark Sceptor Nov 11, 2021 @ 9:47pm 
Since the Anniversary Edition is installed on top of Special Edition, will this still work?
thomaspartyboy Oct 30, 2021 @ 4:49am 
Thank you Avrie!
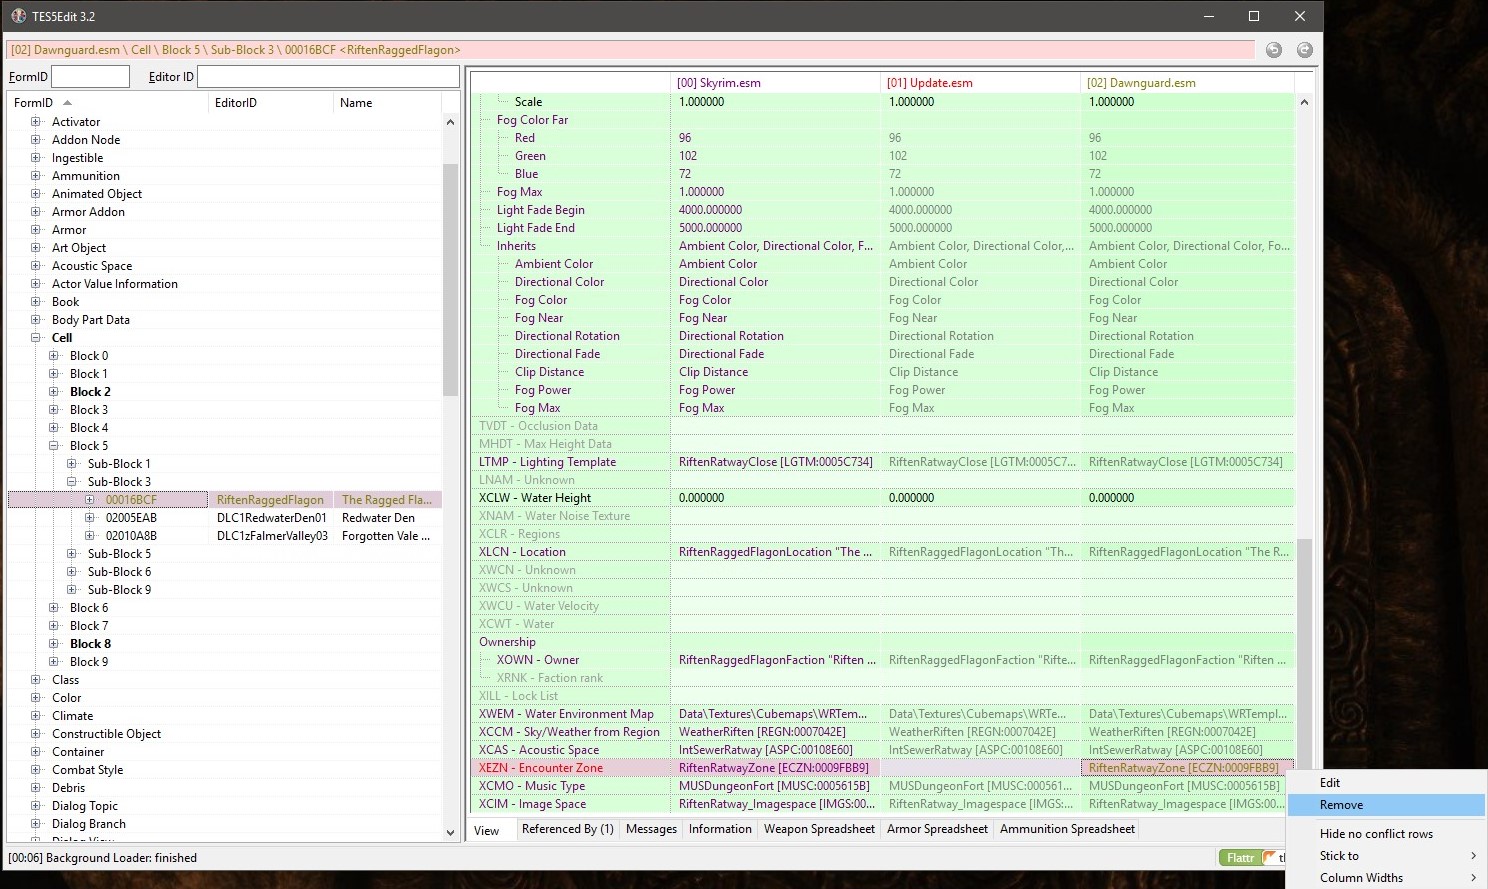
The hard way eh :) Easier than committing to starting new.
Avrie  [author] Oct 29, 2021 @ 7:28am 
All I can recommend is open your current load order in xEdit, highlight the Riften child world and check for errors. Cleaning is not going to show anything about mod conflicts, and sorry to say neither is the papyrus log.
thomaspartyboy Oct 29, 2021 @ 7:11am 
hey all, is there any advice above the attached manual to debug a specific instance of CTD. I have continual and regular CTD when entering the Bee and Barb. I checked papyrus log and nothing interesting to note (that I can see). Is there a better way to debug or cease these specific CTD? I know my load order is rough and conflicts likely great. Time doesn't allow for a big clean.
redwolf49 Nov 19, 2018 @ 8:21am 
Avrie - couple years after you compiled/wrote this guide it's so Helpful - Greatly Appreciated. Thank You for your effort - and the smiles (i,e, "Beating Win 10 into submission"!!) love it..:steamhappy:
smr1957  [author] Sep 2, 2018 @ 2:43am 
If you followed all the steps exactly, literally step by step do exactly as it says, in the order it says, there should be no messages. The deleted NavMeshes cannot be removed should be kgnored - there is nothing in the guide about them - just do exactly what the guide says to do, and don't worry about anything it doesn't say.

Youcan also refer to the other guide which is the same (these are all based on the same master guide), but is written in a slightly more step by step manner (Although it is in the Oldrim forum, both these guides are the same, as the records involved are the same):
http://steamcommunity.com/sharedfiles/filedetails/?id=700525972