The Dig

The Dig

118 ratings
The Dig, Complete Walkthrough
By Zoinker
A walkthrough for what many consider one of LucasArts' most frustrating adventure game.
2
6
   
Award
Favorite
Favorited
Unfavorite
Introduction
This is a complete walkthrough for the 1995 Lucasarts adventure The Dig.

I strongly recommend you play through the game and try to solve its puzzles by yourself as much as possible, and refer to this guide only as a last resort for when you're absolutely stuck.

The playthrough in this guide tries to minimize backtracking. Every time I mention an Item or an action that you might not have picked up or performed at that point, I will mention the relevant location you'll need to backtrack to.

I will try to skirt around the most significant plot spoilers. Still, reading through the guide before playing the game might spoil some of its moments.

Feel free to point out any typos and formatting errors in the comments. If something in this guide is unclear, feel free to point that out as well and I'll try to make it clearer.
Stopping the Asteroid
You start off outside the shuttle with the rest of your landing team; Brink and Robbins. Your starting inventory is sparse; your examine action, a flashlight, an arming key and your pen-ultimate. The latter can be used to contact any of your crewmembers, whether they're in the shuttle or out there with you.

The mission is simple: Stop the asteroid. If you're unsure on how to accomplish this you should talk to your crewmembers. After all, they've had the same training as you.

First off: You need more equipment. Talk to your payload specialist, Miles, about the "Pig" to have her deploy the flying toolchest, then push the "Pig" towards the asteroid.

Open the "Pig" and look inside. Take the two explosive units (alpha and beta), the shovel and the zero-g digger.

Your pilot, Borden, should know where to place the nukes.

Go to asteroid quadrant 2. The target surface is uneven, so you'll need to use something to even it out. Use the zero-g digger on the surface, then place explosive unit alpha on it and arm it with the arming key.

Go to asteroid quadrant 3. There's a boulder right where the second nuke's supposed to go. Use the shovel to remove it, then place explosive unit beta in its place and arm it with the arming key.

With the nukes in place, go back to the shuttle. Talk to Borden about the nukes to watch the fireworks.
Exploring the Asteroid
Once the Earth is safe, you'll find yourself inside a large crack in the asteroid with the "Pig". There are some strange rocky projections here, and something else that doesn't quite belong...

Use the zero-g digger on each of the three rocky projections to reveal a metal plate. There's also a fourth metal plate in plain sight as well. you can push each of them to reveal a tunnel. Push all four.

The largest plate on the bottom left leaves behind a tunnel large enough for you to fit in. Enter it to reach the center of the asteroid.

Go towards the pedestal on the far end of the room. Around it are all the metal plates you pushed. Pick all four up, then look at the square indentations.

The metal plates can be arranged into the square indentation to form a diamond shape. Do this to reveal the stunning secret of the asteroid!
Exploring the Canyon
After getting your bearings, leave your current area. You will see a birds-eye view of the canyon with four areas you can check out. The one to the south is the dais you just left. The others will be unexplored.

Go to the area to the west and enter the wreckage. Open the chest inside and pick up the device inside. Pull the hanging wire. Once it's on the ground, pick up the wire and the engraved rod, then return to the clearing.

While viewing the entire canyon, use the device. You will automatically move to the eastern area. Once there, use the device again to reveal an area on the ground. Use your shovel on it to reveal a bracelet which you should pick up. Return to the clearing.

Explore the northern area of the canyon. Use the shovel on the right-most grave, then pick up the tusk and jawbone. Return to the clearing and from there to the dais.

Once back where you started, there will be a small hole to the right revealed to you. Use the shovel on it to escape the canyon.
Exploring the Nexus
The area you are in now is sort of the hub area of the game, connecting to all the other significant areas on the island. It's a circular hall that loops in on itself. Here is a brief map.


The doors are not actually colored. The reason for the color coding will be clear soon enough.

Get the metal plate near the canyon entrance and the purple engraved rod near the red door. If you look at the purple engraved rod, you see four polyhedrons of varying colors. Looking at any of the door panels, you will see four buttons that, when clicked on, will shift into different shapes and colors. However, inputing the sequence on the rod will do nothing.

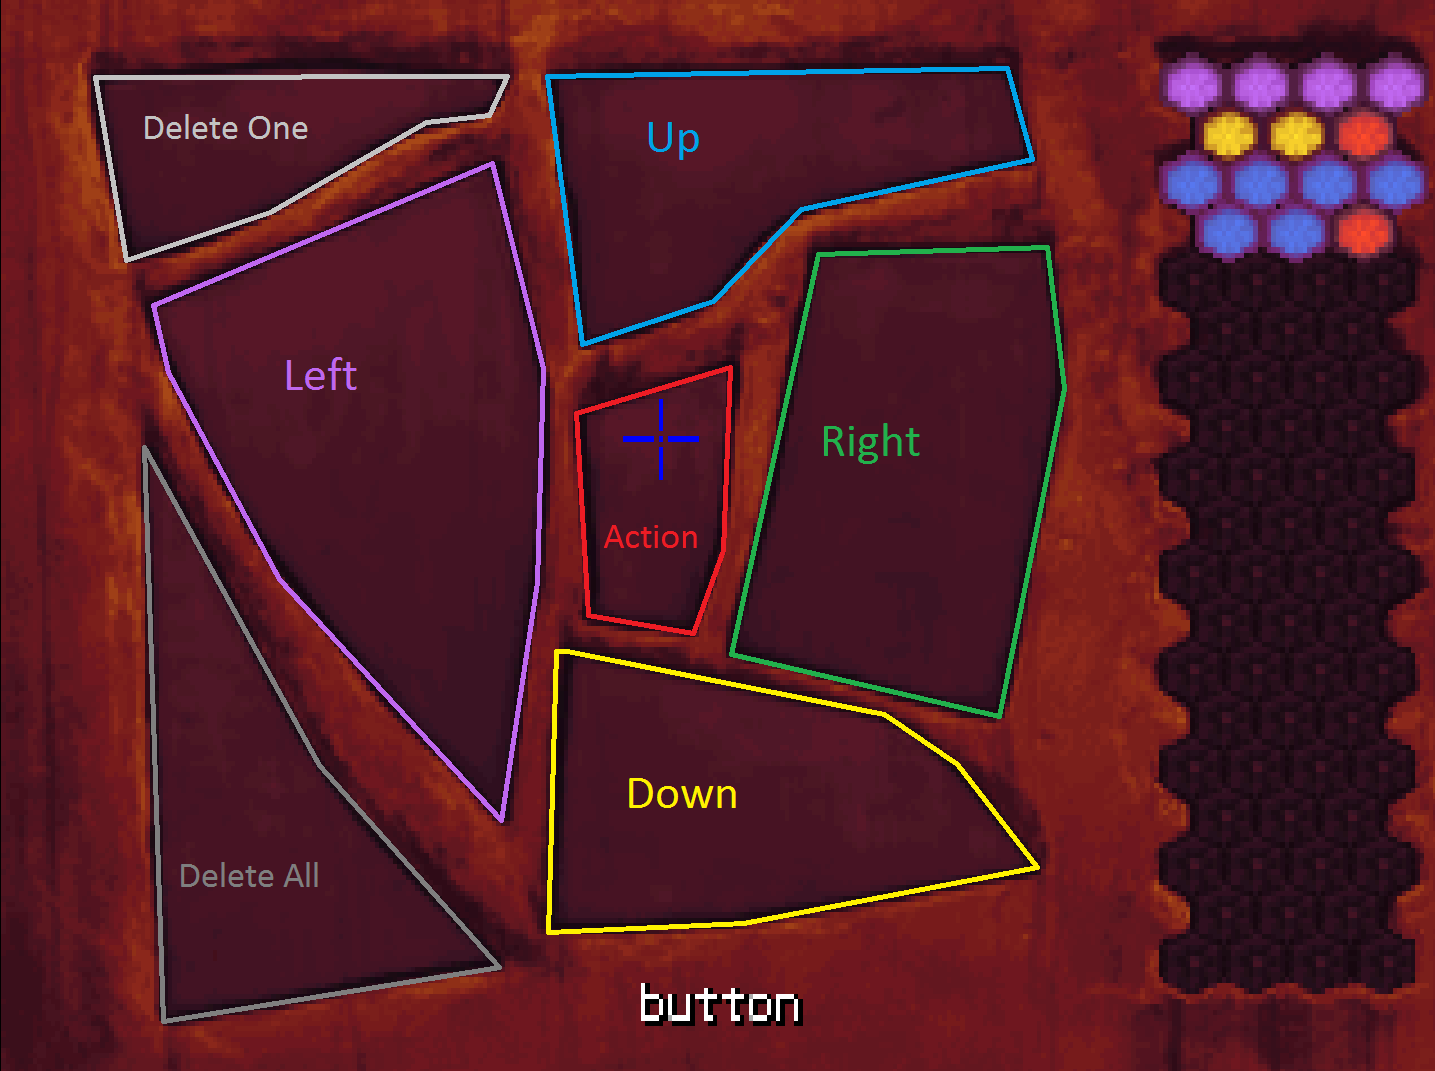
Go down the ramp. You will notice that one of the mirrors below has dislodged. To fix this, use the drone. You can summon it by hitting the triangular button to the left. To actually make it do something you need to enter inputs into the control panel in the middle: The four large buttons are directions while the small button in the middle makes the drone perform an action. To erase an unwanted input, use the top left button while the bottom left button erases all input.


To fix the mirror enter the following input and press the button:
Left x 4
Down x 2
Action
Up x 6
Action

If you only managed to make the drone pick up the mirror, it will take it up the chute it came out of. If you summon it again it will return with the mirror. In that case, use the following input to make it return the mirror to the proper place:
Left x 4
Up x 4
Action

Once the mirror is back where it belongs, the door panels will work. Remove the loose plate and pick up the blue crystal. If you picked it up before fixing the mirror, you need to put it back or the drone won't work.

If you haven't already, look at the panel by the purple door and input the pattern on the purple engraved rod. The door will now open.
Exploring the Museum Spire
Enter the purple door and push the button inside. A tram will be summoned. Enter it to be transported to a new area. There's a weakened door here that you can not open by yourself (and another that cannot be opened at all). Go outside to find yourself at the base of a spire. Go up and you'll find a strange device that seems pretty important. This is the first light bridge:
How to fix Light Bridges
There are five light bridges in the game, which can be activated in pretty much any sequence. These can be used to move quickly back and forth between the five spires so there's no reason not to activate any of them the moment you find them, but how difficult doing so is depends on when you come accross each of them.

The first one is the easiest: Use the strange device and hold down the switch to make a line form between one of the circles on the display and the shape in the middle. Once the line is complete the light bridge will be active.

The second and the third need to be adjusted a bit. First try to activate them like the first. This will not work. Adjust the mirror below and try again. If this doesn't work you'll need to adjust the mirror again. The mirror has three settings so you'll never have to adjust it more than twice.

The fourth needs to be fixed. Open the panel on the side of the strange device and take a look inside. There are eight chrystals inside: five white and three colored red, green and blue. One of the white chrystals has a beam of light emitting from it. adjust it so the beam hits one of the other white crystals, causing it to refract into three colored beams. Adjust that chrystal so that each of the beams hits another white chrystal (if you can't do that, you need to readjust the beam into another white crystal) and then adjust those so that each beam of light hits a chrystal of the same color. After that you should be able to activate the light bridge normally, unless you messed with the mirrors beforehand.

The last light bridge has a different puzzle that will be addressed later.
Museum Spire cont.
Once the light bridge is active, enter the door opposite it. Inside are four displays. Each of them shows a short animation that's supposed to give you an important clue. The one furthest to the right is optional, but the rest must be watched to progress.

Once you've checked the displays, pick up the glowing crystals, the red engraved rod and the tablet to the right of the entrance. The door to the left leads to Maggie, in case you want to catch up, but it's not essential.

Return to the nexus and go to Brink near the canyon entrance. Use one of the glowing crystals on him. Return to the museum spire and open the weakened door with Brink's help and go inside. Pick up the canister. You can also pick up more crystals if you think you need them (Though you should already have more than you need).

Go to the base of the spire and notice the fossil on the ground. That will be important in a moment. Go to the water to the left. Brink will leave you at that moment. You'll want to check out that cave in the water, but first you need to do something about that thing down there.

Look at the pile of loose bones by the shore. You need to rearrange them to form a complete skeleton of the creature it used to be. For reference you can look at the fossil by the base of the spire. You'll know you succeded if hovering the cursor over the bones will identify them as 'dead creature' rather than 'loose bones'.

Once you've rearranged the skeleton, place the canister into it and then use a glowing crystal on it. With that done enter the water and then enter the chamber inside the cave. In there you'll find another metal plate and the orange engraved rod.

With that the Museum Spire is more or less explored. Return to the Nexus.
Exploring the Planetarium Spire
You've got two new engraved rods, but if you try to use the red one on the red door, you'll find that the tram button inside doesn't work! That leaves one other door to try.

Open the orange door (using the orange engraved rod) and summon the tram inside. Continue on until you come across a chasm. To get accross, you'll have to jump to the other side when you hear a rumble. Once on the other side, you can optionally use the shovel on the boulder to create a more reliable bridge.

Continue on. There's a light bridge here that you should activate. Keep moving to the right, enter the crevice and get the blue rod inside. Go back outside and enter the plateau near the light bridge.

Behold the most frustrating puzzle in the game! To fix the door you need to find the critter that took the door part. So you'll need to construct a trap.

Pick up the dowel, the rib cage and the red rod . Place the dowel in the hole in the wheel-like construct, then reposition the pole and then pick it up again and place it on the dowel. Finally, place the rib cage on the hook and use the red rod to prop the trap up.

Now that you have the trap set up, you need to wrangle the critter into it. look into any of the holes beside the door. Keep looking into them until the creature appears. You want it to stop between the wheel and the trap. Once it's there, you want to manouver yourself behind the wheel without going too close to the critter, or it will run off in the wrong direction and you'll have to try all over again. Once there, move towards the critter to scare it into the trap and catch it.

Once the creature is trapped, you'll need a way to track it before releasing it. If you got the device and the bracelet from the canyon, use the bracelet on the critter and then release the trap. Make sure to pick up the red rod again before you move on, then use the shovel on the small cave the critter went through and enter. Use the device again to reveal a tracker spot on the ground and use the shovel on it to reveal the machine part. Pick it up and go back outside.

Put the machine part in the door panel, pick up the cover and place it on the panel as well. Push the button to open the door and go inside. In this room, pick up the twin scepters, green engraved rod and the metal plate. If you use one of the scepters on the faint light in the ceiling, you'll conjure up a display depicting the planet and its moons. You can use the gold scepter to control the large moon and the silver scepter to control the smaller sub-moon. What you're supposed to do here will become apparent later. For now, we got two more spires to explore.
Exploring the Tomb and Map spires
If you haven't already opened the red door, you'll notice that doing so only gets you so far, since the tram inside doesn't work. Time to fix that.

Go back to the nexus and enter the dark tunnel. Go to the left and push the button to enter the airlock, then push the inner button twice to close the outer door and open the inner door.

Inside, check out the glowing panel in the middle. put the blue rod you found at the planetarium spire in one of the small holes to reveal three rods, then click on the darker of the five crystals to the left to light up somewhat. Moving the three rods up and down will change the luminescence of the darkened crystal. Adjust the rods until the crystal is fully lit.

With the crystal lit, the tram beyond the red door will work. use it to move to another spire.

Continue on until you see a stone plate opposite a wilted tree. Use the shovel to remove the stone plate and reveal an opening. Inside you'll find a tomb. This place will be VERY important later on.

Go further to the right and activate the light bridge here. Also note the engraving behind it. That will also be important. Further to the right you'll find a cave opening and further along, Brink! He's not cooperative, so leave him be for now.

This spire is pretty bust, but theres another we can check out. Go back to the nexus and try to open the green door. Unfortunately, the panel doesn't seem to work. If you got the tusk and the wire from the canyon, you can use the former to open the panel, then jumpstart it by using the wire on the panel and then placing the other end in the sparks in the ground. With the panel fixed, open the door like all the others (with the green engraved rod) and move on to the next spire.

From the tram, go to the ledge and then enter the cavern in the top right. Enter the pit to the right and continue on until you come across a device. There's a panel on the device similar to the ones in the nexus. Input the sequence on the red engraved rod to reveal an image of the tomb. Turns out there's more to it than you thought!

Go through the other opening in this room to find this spire's light bridge. Activate it like all the others. From now on you can use the light bridges to move between the four spires explored.
Opening the Crypt
By now you should have figured that there's something terribly important about that tomb in the eponymous tomb spire. If you haven't already, you should check out the relevant display in the museum (Second one from the right).

From the display and looking around the tomb you should notice the motif of a moon within a moon. If you look at the engraving near the tomb spire light bridge you should notice a depiction of the smaller moon eclipsing the larger one, as seen through the hollow spire. A VERY small part of the engraving shows the positions the two moons should be in relative to the planet.


Go to the planetarium at the planetarium spire. Use on of the scepters on the faint light in the ceiling to activate the planet display and move the moons. Use the golden scepter to move the larger moon in about the two o' clock position relative to the planet and the smaller moon, using the silver scepter to about the seven o' clock relative to the larger moon. Having done that, push the button to escape.


Go back to the tomb. Outside you'll see the moons are in position, but nothing is happening inside. It's kind of dark inside so if you have the blue crystal from the nexus on you, put it in the hole in the wall. If you notice the shutter in the roof, you'll see that it's closed. If you step on the symbol of the two moons on the floor, the loose stone it's on will lower, causing the shutter to open. You'll need to prop the stone down, though, or the shutter will close as soon as you step off it, so use the red rod you found in the planetarium spire.

Go back outside and you'll notice a patch of dirt that's glowing. Wipe it away to allow the moonligh to flow iside the tomb. Inside, touch the statue and then enter the crypt proper (if you haven't already use the red engraved rod on the map device in the map spire or Boston won't connect the dots).

Go to the left and approach the door. To deal with the guard, use a glowing crystal on the broken bones beside it. Use the engraved rod (The first one you picked up in the canyon) on the slot to open the door and go through it. Approach the pyramid and use the engraved rod on the panel to reveal the alien corpse inside. Use a glowing crystal on the corpse.

There's really no use talking to this guy. You'll need someone to interpret for you. Unfortunately that someone happens to be in a bit of a bind...
Saving Maggie
You'll find Maggie in the map spire. From the tram enter the ledge, then the cavern to the upper right and from there the nest to the left.

Unfortunately you're not going to be much help alone. Go find Brink in the cave at the tomb spire. Brink is still uncooperative despite everything, so you'll need to coerce him somehow.

At the mouth of the cave, use the flashlight on the bat-creatures. Once Brink leaves, go inside and take his stash of crystals.

With Brink by your side, return to Maggie. Talk to Brink about the monster to distract it. This will allow you to move further into the nest. Go to the falls source and there push the rock to redirect the river. Go back to the nest and this time talk to Brink about the grate. Teamwork!

Teamwork only takes you so far though. Brink's gone, and so are all your crystals. Still, Maggie's safe, and you're tantalisingly close to figure out the secret of this place.

With Maggie's help you can now talk to the alien, though you'll need to restock on glowing crystals to do so. It has buttloads of exposition, but nothing completely essential at the moment.
The last Spire
You've explored four out of five spires. Pattern recognition would dictate that the last one can be entered via the last unopened door in the nexus, but instead of a panel, that one is flanked by a triangular alcove, similar to what you found inside the asteroid. It seems you should be able to arrange four metal plates in a triangular shape inside the alcove, but so far you've only found three. One on the floor of the nexus by the cave opening, another in the underwater cavern under the museum spire and a third inside the planetarium room in the planetarium spire.

Exploring the map spire, you would have found a beach with a strange glowing field close to the tram area. If you go there now and show the tablet you found in the museum spire to maggie she'll figure out its secret. Enter the newly revealed island where you'll find the last metal plate. If you have all four, return to the nexus.

You'll get a call from Brink and won't be able to use the alcove until you've helped him out. Judging from his description he should be in the crevice in the planetarium spire. You'll find him in a rather sticky situation. If you got it from the canyon, use the jawbone on him to help him out.

You'll automatically be back at the alcove. Place the four metal plates in their place to open the door and take the tram to the final spire. Go inside and look at the console on the bottom. There's a piece missing and it looks like you'll also need some glowing crystals.

Go all the way up and outside. You'll find the last light bridge here. There's a bird's nest there that you'll have to kick off, but otherwise it works immediately.

You're very close now, but there's a literal piece missing, and there's only one who can help you find it.
Opening the Eye
Go have a chat with the alien inventor. Talk to him repeatedly about the alen device in the cathedral spire. Eventually he'll mention the missing eye piece. Ask about that a couple of times and he'll relent and give you the creator's engraving. It's an engraved rod like all the other. Do as he told you and use it on the panel in the map spire.

The area revealed is in the map spire. Go past the nest where Maggie was held captive and from there enter the beach in the top left. Open the rock in the front to reveal the eye part and pick it up. Now return to the lab in the cathedral spire.

Use the eye part in the console and talk to Maggie about it. It soon becomes apparent that you're going to need more than one crystal to start it. Unfortunately, Brink's scoured the island for them. The only way you're going to get any at this point is to confront him.

Make sure to get the eye part back, then go to Brink's cave in the tomb spire and talk to him. Turns out the eye part might be useful to him as well so tell him about it. Use the eye part in his machine to gain two glowing crystals, then take back the eye part.

Time to finish this once and for all. Make sure all the light bridges are active, then go back to the lab and place the eye part and two glowing crystals in the console, then talk to Maggie about the alien device. Once it's been activated, step on the light bridge.

The inventor left you a final obstacle, but it's easily overcome. Simply turn off the light bridge! Then turn it back on and enter the eye. Inside, touch the portal and enjoy the finale!
Extra things to try
As with any adventure game that's not outright out to kill you or screw you over, you should definitely explore everything, talk to anyone about anything and show them everything and try everything in this game. Just following the guide blindly will cause you to lose out on a large part of the game.

Following are some things you may want to try out:

  • Place a nuke in the wrong place on the asteroid.
  • Return to the Canyon after activating a light bridge.
  • Aggravate the bat creatures in the tomb spire a few too many times.
  • After trying to activate the cathedral spire machine for the first time, leave the eye part inside and go talk to Brink about it. You'll now be able to talk to him through the Pen-ultimate for the first and only time (The other times he's either been right beside you, dead or not in the mood to talk).
  • For the secret bad ending break your promise to Maggie.
In case you get stuck
There are a couple of places I've noticed people getting stuck while playing this game. Like every LucasArts game since Loom, The Dig is 100% completable no matter how much you mess around with it. If there are parts you have difficulty getting through, even after reading this guide, let me know in the comments and I'll add the solution here.

"I never turned on any light bridges and now I'm stuck on the Planetarium spire."
After you've "ridden the wave" accross the gorge, you can use the shovel on the conveniently placed rock on the other side to make a natural bridge.

"I've already used the Blue Rod to fix the trams and now I can't finish the rat-trap/open the tomb."
This one's partially my fault. In an earlier version of this guide, I used the item names as they appear in-game. Appart from the engraved rods, there are two other rods, both of which are found in the planetarium spire. The blue rod is only used to fix the tram system. The other rod, confusingly only called 'rod', is found in the same room as the rest of the rat-trap. I've now changed the guide to refer to this item as the 'red rod' (not to be confused with the red engraved rod!).
Edit History
04/10 2018
Clarified rod mix-up and added 'In case you get stuck' section.
27/4 2016:
Added a couple of pictures to better clarify some of the puzzles. Let me know if you want me to add more.
23/8 2015:
Guide released.
42 Comments
Đeath’ş Aļļ | Horst Fuchs Dec 25, 2023 @ 9:19am 
Can anyone oxplain logic behind mirror puzzle? Still no idea how the fuck should i find exact amounts of various colors (ways). Still doesnt make any sense.
jpr9845 May 16, 2023 @ 10:23pm 
yes correct panel, wrong shape - the last two are very similar and with my poor eye sight. Anyway, figured it out. thanx again
Zoinker  [author] May 16, 2023 @ 9:08pm 
The door humming is a sign that the power is on, so the purple rod should work. Are you sure you put the pattern in the right panel? It's the next one on the left when you leave the room with the drone.
jpr9845 May 16, 2023 @ 7:54pm 
I still have something wrong the purple door when I enter the pattern on the rod. I get the door is humming slightly not open...??? idea of what I missed...
jpr9845 May 16, 2023 @ 7:23pm 
thank you - I did not realize I had to enter the instructions first. Great tips!
Zoinker  [author] May 16, 2023 @ 2:09pm 
@jpr9845 If you haven't removed the blue crystal (or you've put it back in) then the only other reason i can think of is that you're trying to activate the drone before putting in any instructions on the control panel.

Also, you can skip most cutscenes with esc and even zoom through dialog with the '.' button.
jpr9845 May 16, 2023 @ 11:54am 
I don't know what I did wrong, but when I push the triangle button to activate the drone "nothing happens". I can't progress any more until I figure this out. And I really don't want to start over and sit through all of that dialog - especially Brink - pretty happy when he died. Which proves to be the correct way to feel about that guy.
Back to my spot - what do I need to do to activate the drone? Blue crystal is still in the slot = power in the area....
PlayingAaron Feb 17, 2023 @ 4:13pm 
This is a great guide. It turned a frustratingly impossible game into merely difficult.
Tantrum Oct 8, 2022 @ 3:22pm 
cant't get the map spire activated
Zoinker  [author] Mar 28, 2022 @ 7:58pm 
Glad you figured it out, and I suspected this might be the issue. To be honest I should probably have made it clearer in my guide how the magnifying glass works. As it is, it's just a quick easily missable mention at the start of the first section.