Men of War: Assault Squad 2

Men of War: Assault Squad 2

523 ratings
Unicorn's Shiny Noob MOWAS2 Game Guide
By UnicornPoacher
Men of War: Assault Squad 2 is not for the faint of heart. It is no Comany of Heroes--you cant just bludgeon your way through with explosions and cannons blaring. Victory will require methodical planning, sound intelligence, diverse unit selection, careful deployment, and above all, patience. If you get the hang of it, theres no other realistic WWII simulator like it on the market.

This guide will focus mainly on the single player game (Skirmish mode), but there is likely something here for everyone. There's not a ton of comprehensive information out on this complex game, so the guide aims to be a one-stop shop to get newcomers' feets' wet with discussions on basic controls, game types, battle group composition, tactics, and overall battle strategies without having to watch dozens of videos. Being a noob guide, specific suggestions may not be applicable on higher difficulty levels--this was written for something like a "normal" difficulty playthrough. Hard+ difficulty is HARD. The enemy will throw everything they have at you, and fast (while you're fielding some infantry, they're fielding 20mm cannon. If you're fielding a medium tank, they're fielding a heavy tank [you'll never see a King Tiger on normal!]). If you can survive this on your own, then you don't belong reading this guide (non-superhumans must bring a friend).

Also note that this is not a traditional walkthrough--I will not delve into the basic principles of WWII warfare or how to beat each mission (each map is like a sadistic little puzzle, why spoil the fun?), rather it emphasizes strategies that may be applied in most situations. If you don't know about these things, then you best whip out a few programs on the History Channel before you causal gamers stop in here. If you are looking for the skinny, you've come to the right place--read on! Please give a "thumbs up" if you learned something, or at least got a few chuckles.

"We're going to hold on to him by the nose, and kick him in the ass. We are going to kick the hell out of him all the time, and we're going to go through him like crap through a goose!"

- General George S. Patton
6
2
4
2
   
Award
Favorite
Favorited
Unfavorite
Key Controls
You may want to make your first stop the game's set of tutorial missions to really get acclimated. If you want the crash course, though, here as some basics that aren't so intuitive but oh-so helpful to know. Master the following in order to keep up with the fast pace of the game as the enemy will be constantly hounding you sooner if not later:

  • Action Grouping - select the units you want and press shift + number.
  • Repair - it seems that most (if not all) vehicle crews carry a repair kit. Park your thing in a safe place, hit the repair icon on the UI, and out pops your repair guy. You could also grab a spare tank crew and send them out for a combal repair. Oh, and keep your vehicles fully crewed with drivers and gunners (anyone can do it although tank crews are more effective).
  • Resupply - Move your troops within the resupply radius of a supply truck. You can also do this manually if you like to micro (press I).
  • Revive - Click on a squad with a medic (or the medic), then right click on the downed soldier (only works if they have a bloody orb over their corpse). Keep your medics alive at all cost and out of harm's way wherever possible, they will be as good of a friend to you as the guy with the machinegun.
  • Run(!) - Your troops can walk or run into battle, depending on whether you single or double right-click. One click, your troops will take their sweet time to follow your orders and may get hung up shooting the enemy gung-ho while standing around with their parts in their hands. On the other hand, this will not expend their stamina. Two, and your troops will up the action, making a beeline for relative safety (or certain doom).
Basic Tips for Getting Started
  • Hit the pause button and take a pause. look around. Think about your next steps. It may save the game for you. Also, it is possible to slow the game down when things are getting really hairy, so play around with this. It's not cheating, I promise (come on, you can't even issue orders while paused!).
  • Save early and often, especially right before and after battle milestones. Any time find that you set yourself up with a nice defense, or you are ready to make your big push, save the game. It will probably go wrong.
  • In the words of Patton, "attack, attack, attack!" Don't dally once you get into combat. Prolonged firefights are not ideal as the enemy's available reinforcements are unlimited. Your units will run out of ammo quickly so plan your attack, pin the enemy, and promptly flank them to deliver the finishing blow.
  • Look ahead on the map. Make a habit of watching the minimap for armor blips coming your way and see what's there. You should know what's coming down the pike so you can redeploy (or deploy) as necessary by the time they arrive, but be warned, enemy reinforcements will often move erratically.
  • Most armor engagements are at range. Don't call in a shiny Tiger thinking you can just roll in and blitzkrieg--you are liable to get a tread blown off best-case, but more likely to get obliterated by a well-camoflaged heavy gun. In fact, blitzkrieg tactics are seldom (if ever) applicable the way the makers have lined up meticulously overlapping defenses for you to... explore, unless they have been properly neutered by infantry, mortars, artillery, and special attacks.
  • Direct Control. You can use first person mode on anything. This is fun. I find this useful particularly when my guys aren't doing what I want them to do (they're usually pretty good shots). Select a unit and press "E." For example: your AT gun is careless plunking away at enemies at range and some armor rolls up on your flank posied to ruin your day. Go into first person, point at a weak point on their armor (more on this later), and put a swift end to the shennanigannery. You can even mill around in this mode with the ASDW keys! If you want to get geared up for "Hard" difficulty, you should definitely be well-practiced with direct control as this is an indispensible skill.
  • You may need a repair box in your inventory to do a repair (derp).
  • It is better to have and not need, than to need and not have. Don't misinterpret this--I'm saying don't spend your points needlessly. A great tip that I attribute to AfricanRhino. Think if you can accomplish more with less. Brute force is rarely the answer here--consider all options at your disposal.
  • Always be on your guard. expect the unexpected. Even when assaulting, the enemy will perform routine counter attacks, especially when you capture a command point it seems. Be ready to hold on to what you take (unless you're going for a momentary unit tree boost to deploy some heavy vehicles).
  • Murphy's law is true. You may plan as I describe, but be flexible and mix it up if conditions call for it. With that said, refer to "save early and often."
Infantry Warfare
Basic Infantry Tactics

Don't let anyone fool you. Infantry are the cornerstone to any effective fighting force, whether it be screening armor, defending entrenched positions, or flushing out hairy AT positions.

Try to keep your infantry platoons around 4-6 in number (guerilla forces excepted) and use action groups to keep them straight (although you can merge and subdivide at any moment when called for). Scout the approach, send in a base-of-fire unit to get the party started, then swing around the side with your flankers to bring the hurt with some enfilade fire. Never try to cover significant open ground under fire as stamina will quickly deplete, and your poor guys will be left holding the bag. For a quick advance, use leapfrog tactics, where you execute the above maneuver, and follow up to the next position using your base of fire squad. This is risky. Don't get ahead of yourself, cowboy.

Infantry are fragile. Always move from cover to cover. Pick sturdy looking things like stone walls and boulders as you advance. Trenches are always the best choice. Wait for your machine gun crew to set up and suppress the enemy before your next steps. Be sure to spread your troops out when holding a position against nasties i.e. howitzers (small groups of 1 or 2), as one stray shell will spoil your whole little brigade.

Later down the road, upgrade to elite mechanized infantry for an extra punch (although stock infantry will still perform admirably). These guys are great for rolling in in a blaze of glory, unsually mounting several machine guns to chew through enemy infantry. Count on them to get some serious dangerous work done, including bolstering your AT squads--they always carry bazookas and so can replace AT rifles. Don't forget theyre still mushy infantry so they'll also go out in said blaze of glory if you put them into sticky situations (all dozen-or-so of them).

Platoon Composition

1. Base-of-fire squads. These guys will fight at range and keep your enemy's head down while you figure out how to squash them, and can adequately defend a location against soft targets. They will be a potent mid-to long-range force and will support your advance. They should be primarily comprised of a machinegunner to provide a base of fire, a bunch of rifemen, and a medic. Most importantly, add an AT squad. There is little worse than slogging up the road early-game to find an armored car or the like come rolling up, catching you with your pants down because you dont have armor yet. Also, they are good with base-of-fire groups because they are just behind the main line, so while your flankers are creating a distraction (getting obliterated), they're ready to pick off any cocky tanks as they go zipping by willy-nilly. On the other hand, if all you've got are a couple of anti-tank rifles... well, you better bring along a small gun.

2. Flanking squads. If the base-of-fire squads are the anvil, these guys are the hammer. Combine a few submachinegunners and assault rifle guys with a flamethrower for some good close-range punch.

3. Supply truck(s). You will need the ammo. trust me. Start by simply moving all your troops into the resupply radius before you initate the engagement (first truck's free!). Keep these guys in safe places as you move along.

4a. Mortar(s). as soon as you got some dineros left over. Mortars are interesting and universally indispensible, particularly in groups for softening up a command point or defending against massed infantry. Especially useful when you don't have line-of-sight on your target, and when the enemy has an elevation advantage.

4b. Sniper(s). Sneak snipers in (either solo or under cover of your infantry) to poke the enemy from range, spearheading or supporting the advance, hiding them under a bush or something. Very useful for picking off machinegunners. These guys can really excel when you have an elevation advantage (even when you don't). In fact, there was this one time when I used a sniper to singlehandedly clear out an entire rail yard garrison of about two dozen entrenched and well-armed germans (AT guns, assault rifles, etc.) on hard. Very cool (try it for yourself, the Iskra Soviet mission).

5. A Reserve Squad. Cobble together whatever else you got hanging around and keep them coming up behind (sounded wrong) to plug any gaps, like when you didn't add that AT squad like I told you and one of your flanking squads got blasted out of the water by a marauding armored car. Always be sure to use them to man HMGs as you claim control points.

Flanking Maneuvers

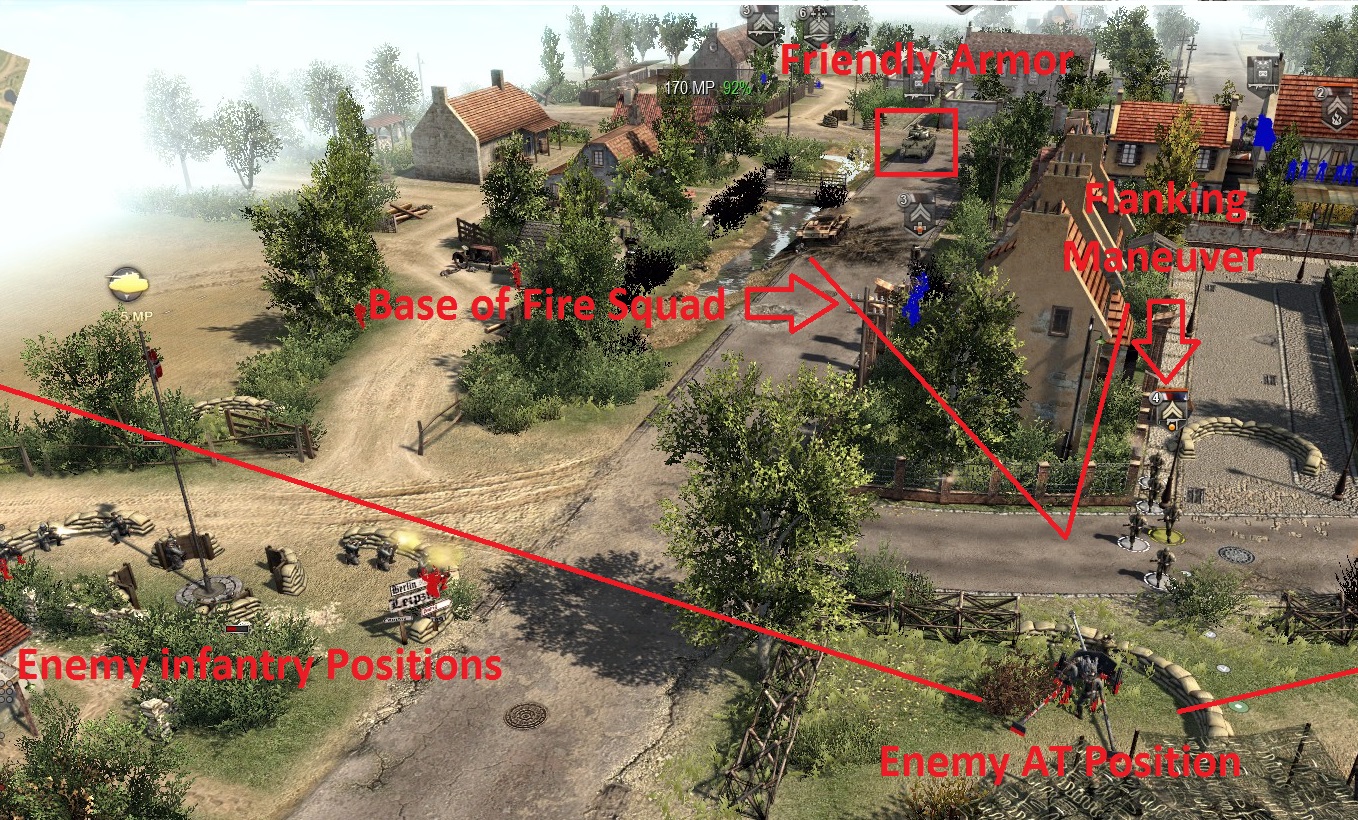
How does base-of-fire and flanking work in practice, when the enemy is well-entrenched with good defensive lines? Consider the following scenario:


The placement of the enemy AT gun makes for a very dangerous approach, especially for that Sherman hanging around at the top of the image. Although he might give those entrenched troopers a headache, if we were to conduct a frontal assault, he would be subject to close-range enfilade fire from the AT gun facing his left armor (mercy!). If the infantry were to just buzz in, they would be in a world of hurt from all parties involved, especially as there is no decent cover from the AT. This position appears to have no suitable approach.

Instead, the base-of-fire squad has carefully taken up a position between houses and a stone wall to get the attention of the enemy, but notice that the AT field of fire does not permit retaliation. This has caused a distraction sufficient to permit flankers to slip through the urban area on the right away from most of the trouble, getting the drop on the unsuspecting AT crew. A few frames later, the flanking squad has shredded the AT gunners with grenades and SMGs, and the tank is rolling up unchallenged down the main road to support their subsequent flanking of the soldiers in the sandbag positon.

"Battlefield Thievery"

On lower difficulties, this is not very useful at all. Tanks coming up against you are typically on par with what you have, or at least manageable to deal with. if you decide to give hard difficulties a go, you will need to beg, borrow, and steal to get ahead. When you are plunking around with T-34/57's and a Pather rolls into town, you bet your bottom dollar you want to grab that puppy for yourself when it goes down. Establish a perimeter, select a group of infantry and click the repair button, and take the thing for your own so you have a fighting chance.

Guerilla Warfare

Sneaking units around and placing infantry into brush cover is more effective than you might think, especially in multiplayer games where the fog of war mechanic is in effect. This type of cover actually can be decent as your guys will typically go prone (always use prone). Think of them as a force recon group. Wooded areas and light brush (I think you can even garrison trees?!) are great spots to put snipers and elite infantry like marksmen and AT squads, especially in harassment positions on the farthest flanks. Makeshift foxholes (i.e. impact craters) also work well for this. In small, well dispersed groups (one to two per position), these forces make impeccable flankers and can accomplish great feats. Dispersion is useful in keeping cohesion of this force type when encountering artillery fire (and always for that matter).

In multiplayer, use them to get eyes on the enemy and encircle them, taking up positons where they least expect. Consider your rules of engagement, holding fire or switching to return only when appropriate to maintain stealth. Where possible, quitely tuck them away along roads and reinforcement routes. AT weapons are a bit OP in this game, so if the enemy is armor-heavy and light on infantry, this is a surprisingly resourceful way of defeating a top-heavy opponent.
Armored Warfare
Basic Armor Tactics

Tanks are balanced based on real life, mostly, so your use of them (quantity) may need to vary with respect to quality (you've got your Germans, then, well... everyone else I suppose). First, look for weaknesses in the enemy lines before approaching. Target areas that are not under the overwatch of an AT gun and avoid them like the plague. Even losing a tank tread stinks--repairs take forever (allow for 5 minutes of work even on a tread). Advance your infantry first in these areas to clear the threat. ATs are deadly against infantry as well especially with HE rounds, so try to pin their guys from a safe place, pick the safest approach you can find, and sprint over there with you pew-pews (and hand grenades if you don't want to steal it) so your tanks can roll in and mop up.

Armor is precious. I prefer to babysit them one at a time rather than lumping them into action groups to maximize effectiveness and flanking fire. Tanks are powerful when used properly yet expensive when squandered needlessly. Armor should therefore be used offensively only in wide open spaces where they can attack with impunity (e.g. fields), otherwise employ defensive tactics and screen with infantry. Avoid close contact with the enemy unless safe (they will chuck AT grenades and the ilk). If you are going to plow the road, don't pick urban areas unless they have first been secured by your infantry. Also make sure your tanks are fully crewed so they are operating at maximum efficiency (scrolling over the tank shows the crew requirement and any additional transport capacity). Getting that second machinegun up and operational again can mean a big difference when the zerg swarms approacheth.

Ammunition Selection

Use the right ammo for the right situation. Vehicles have a few options. Select a vehicle and look to the bottom left of your UI. Use HE (high explosive) against infantry and APCR (armor-piercing composite rigid) against scaries at close range (good penetration). Do I need to explain what to do with regular rounds too (if you are already confused about all this jargon, just go with standard AP)?

Armor Selection

Armor compositon is greatly continent upon the disposition of the enemy (think rock-paper-scissors approach). Certain tanks are useful in certain situations:

Armored Cars. Use these in the early game to compliment flanking infantry as a fast-attack force to turn your foes into a bloody little pulp. How better to flank your foe than accomanied by a mobile 20mm cannon? More useful late-game as a cheap and speedy way to defend control points that may be subject to incursions by slithering enemy infantry.

Light Armor. Versatile especially in the early game in combating enemy armor, light vehicles, and supressing/overwhelming unsupported infantry (think HE rounds). Keep them far, far away from enemy AT and (heavier) enemy armor.

Medium Armor. These typically form the backbone of your force. Effective at performing all the roles of light armor (albeit a bit more slowly) and spooking heavier ones from the flanks, while soaking up more punishment. Also a very useful addition to your reserve force. When in doubt, grab a medium tank (or just save up).

Heavy Armor. Will annihilate most all enemy vehicles with powerful, long range, large-calibur shells like a knife slices through warm bread. Weaknesses include poor mobility and turn speed. These guys are by no means invincible, either--a Tiger tank tread can be damaged quite readily just as with smaller vehicles, leaving you with a big, immobilized (but still boomy) tin can. Support with infantry.

Tank Hunters. These guys are interesting but can be more difficult to deploy. Note that many hunters are often plagued by lack of a rotating turret, so you need to gain a good position before engaging large targets in particular. On the upside, their weapon is usually more comparable to that of a heavier vehicle.

Advanced Armor Tactics

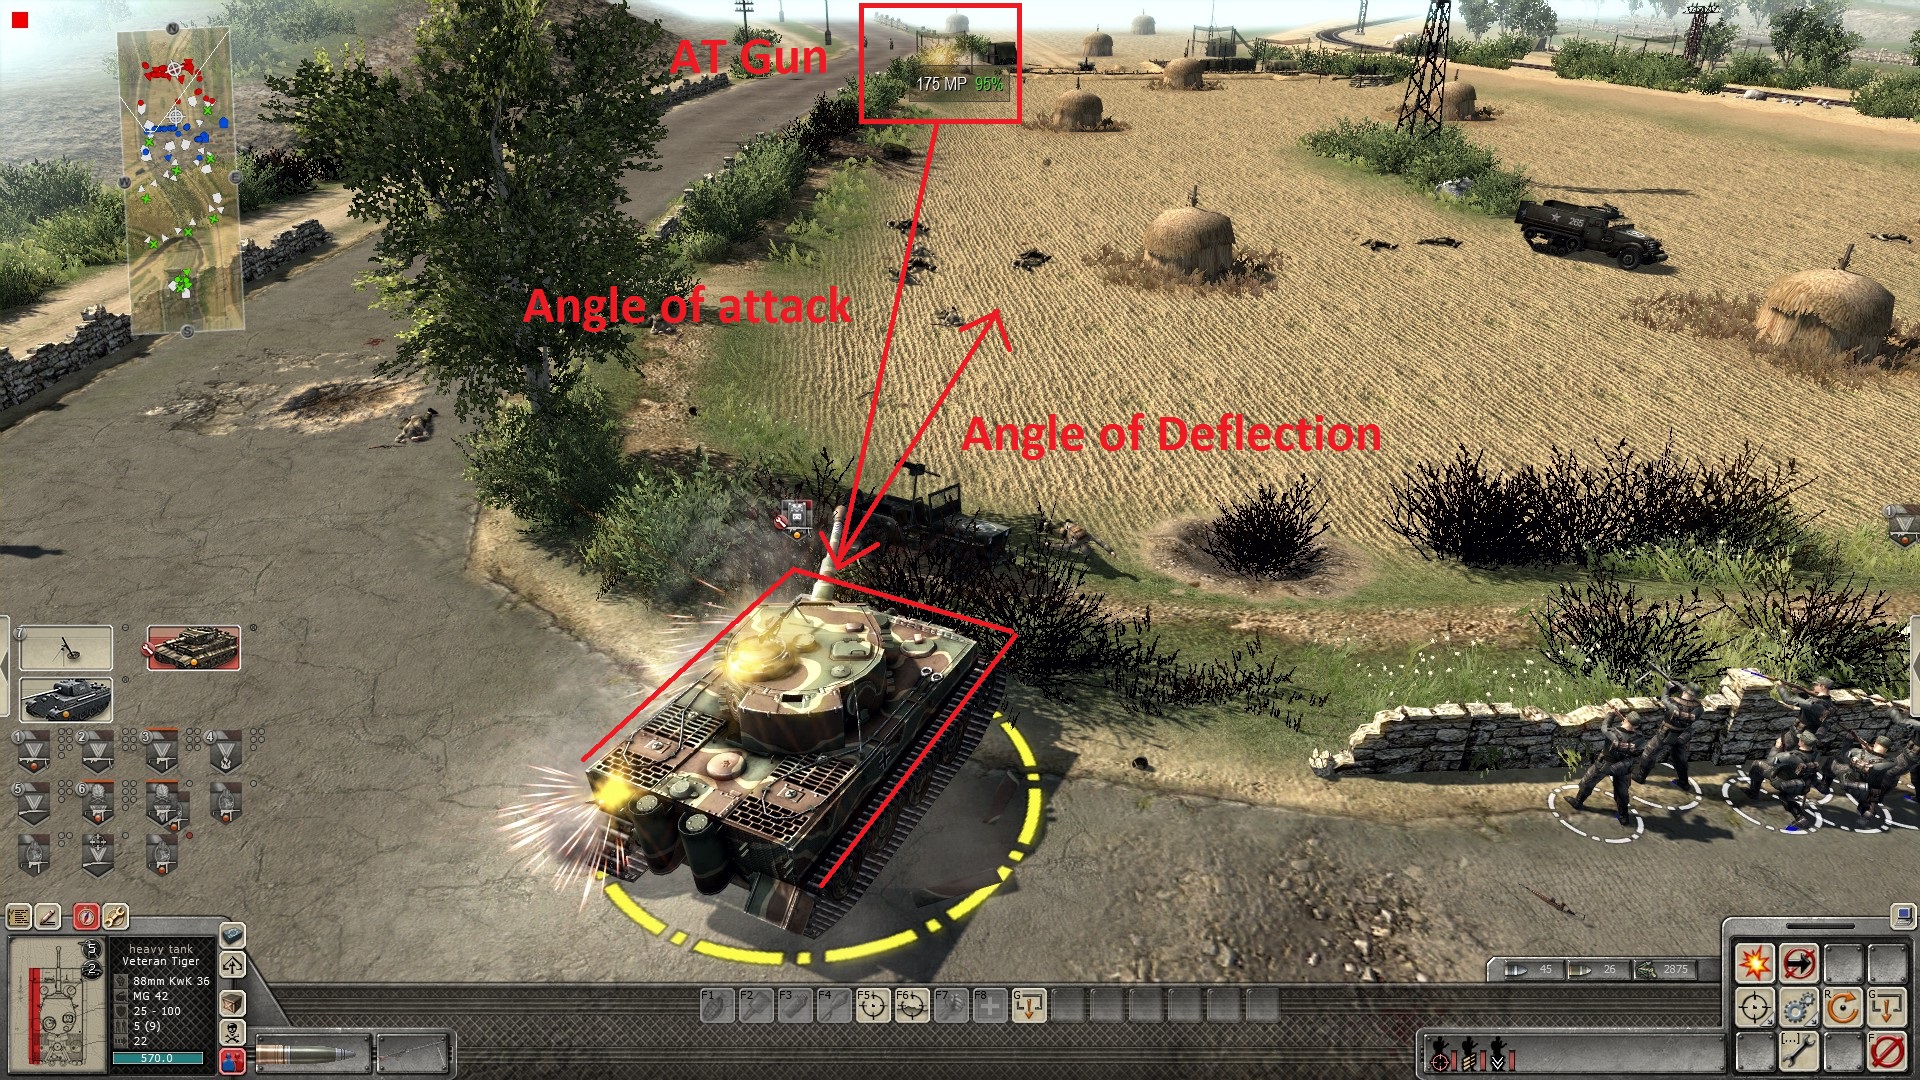
I tend to deploy armor defensively except when supporting or leading an advance. Always present the enemy with your front when possible. If in a defensive posture, point your vehicle at a (preferably) 45 degree angle towards the enemy to maximize deflection of shells even on tanks with relatively flat armor (e.g. a Tiger). Point the thing the right way and the enemy can plunk away at your armor all day (at least the big ones) with little effect.


Be mindful of the position of your vehicles in relation to the enemy. As a rule, armor is weakest in front and gets worse as you work your way to the rear. Sloping or angular armor (e.g. the German Panthers) is better than flat armor.

When attacking, screen your armored forces with infantry whenever possible. Tanks are always suceptible to flanking from AT infantry and armor alike.

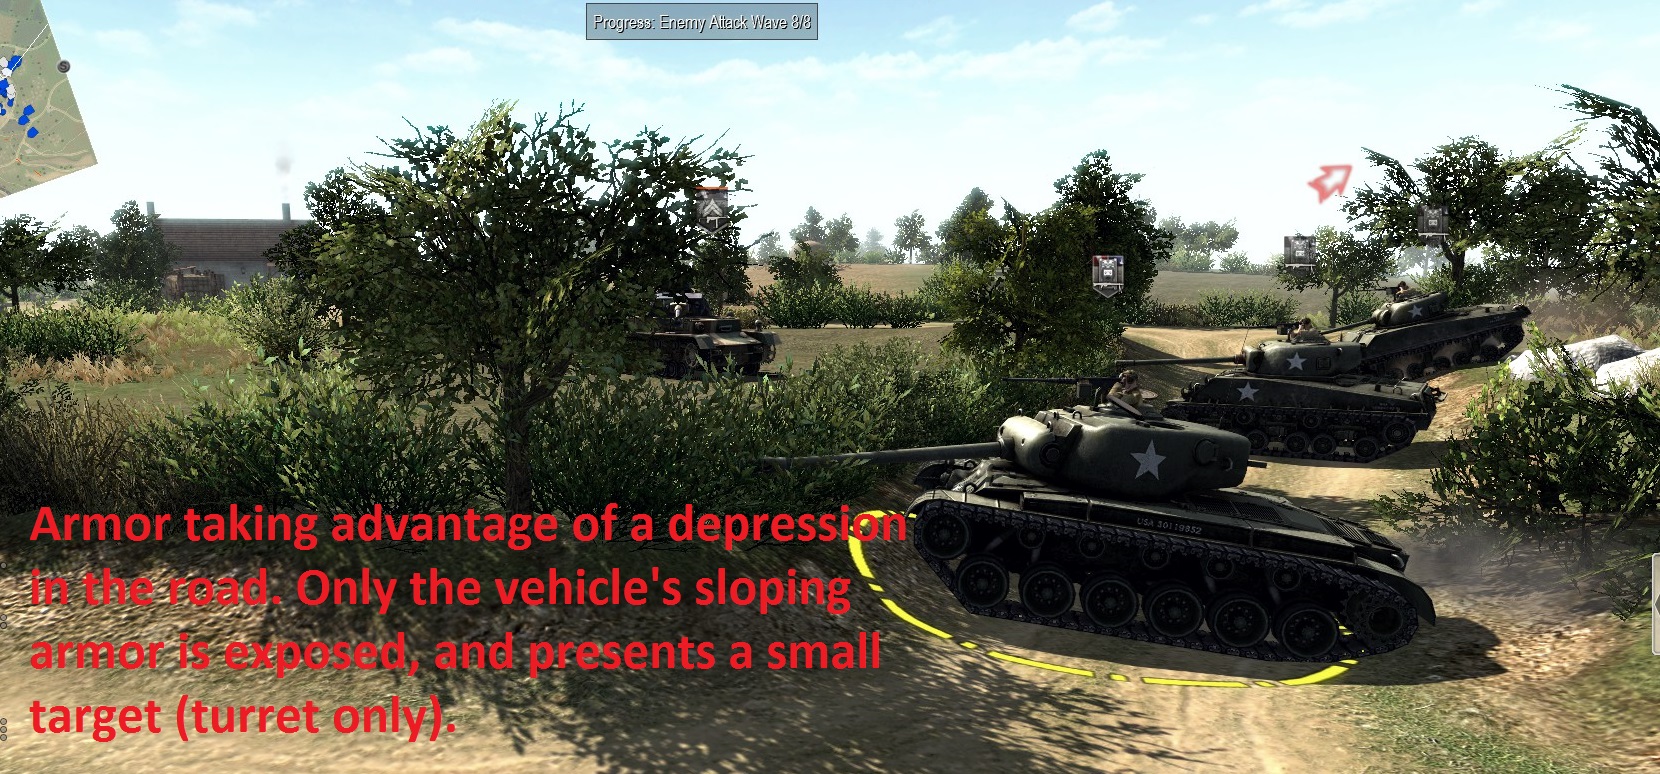
Elevation and position is important. Put your vehicle where they can't get you (but make sure you can get them). Always use buildings and natural terrain features to shield your vehicles when you are not actively attending to them (and even when you are!). If there is a gully in the road, park your tanks in there and watch the enemy squirm:


In multiplayer, stay mobile. Once the enemy spots you, they are liable to counter from range or flank your position, so permanent defensive positions are less viable. Hide your guys in buildings and stuff when you are not using them. If your enemy has howitzers or rocket artillery, run like hell when they spot you, and relocate to another spot on the battlefield.
Faction Special Abilities
Here is a list of the special abilities granted to each faction and a few words on how they may be used. They are often a cheap and effective way of dealing with the enemy without getting touchy with your precious units, albeit they are often somewhat fragile. Don't forget these--they can prove incredibly useful especially when the enemy has you pinned on all fronts. On the whole, use these to break the enemy's most impenetrable defenses.

Commonwealth

Artillery Strike - Not always the most accurate, but when on target, devastating to clustered enemy positions and static defenses like 88's and howitzers. When the advance gets bogged down, use this abusively to clear the way for your armored battlegroup.

Commandos - A cute ability which calls in a mechanized infantry platoon (trio of scout cars). Call these guys in when regulars are not getting the job done or just need a bit of extra punch, or if your flank squad is knocked out and needs a quick replacement. You get a potent (but fragile) anti-infantry vehicle and a large group of elite troops armed with submachineguns and light machineguns. I find a limited use for this ability... I tend to favor SAS (the special infantry choice) as they tote AT weapons, however if you feel enemy armor is not a risk for the particular approach, feel free to go for these.

USA

Paratroopers - Call in a single carbine-armed trooper anywhere on the battlefield. May seem impotent prima facie, however cooldown is fast and the troops are very effective at what they do. Spam them behind enemy lines of course to knock out targets of interest (AT guns) before your big push.

Airstrikes - Combine paratroopers with this for a decisive one-two punch (see infantry tactics). Call in paratroopers to a safe location and keep them quiet-like, call in an airstrike on the more potent targets, and mop up with the infantry. Useful for capping irascible command points. Not recommended if enemy armor is floating around. See the infantry tactics above for recommendations on use.

Germany

Veteran Tiger - Deploy a... veteran Tiger tank to the battlefield! Pretty straightforward one here. This guy will shred all enemy armor that you encounter quite seamlessly, and make defending control points a breeze, as he can pick of most tanks from outside their effective range. As always, don't forget this thing has weaknesses too (can be flanked, vulnerable to infantry, and disabled by heavier AT).

Goliath - Difficult to use but quite boomy. A remotely controlled explosive on wheels (tracks). Sounds wonderful? Try getting it close to your target. This is no small feat... better used in multiplayer (fog of war is great) when your opponent is distracted as the AI rarely falls for this trick.

Japan

200mm Rockets - These handy little babies can pummel enemy fortifications from afar. Great for knocking out enemy howitzers, or the occasional piece of armor. Conserve ammo for the big targets.

Banzai! - This might be my favorite ability. For a handful of MP, you get a sizeable fast-attack force delivered anywhere on the battlefield in a matter of moments. The force is comprised of several infantry platoons and a few light tanks. True to their nature, these guys will attack relentlessly and quite effectively (although will favor rapid advance over self-preservation). I find them useful for either pressing an enemy's weaker defenses, or as a distraction to their stronger ones while I slip in with special forces to deliver the killing blow to pesky howitzers. Alternatively, use them to screen your heavy armor as you press the frontal attack. This bargain can be called upon repeatedly every few minutes!

Soviet Union

203mm Howitzer - Another large-scary-thing smasher. Spot the enemy, then use this to plow the road of unwanted howizters and anti-tank weaponry. It has a cute nickname by the way, "Stalin's Sledgehammer." Well earned. This thing is a BFG. You might want to try strapping it to something to get it around because it's slow as heck (why it doesn't come with a tow, I have no idea).

For the Motherland! - An ability very similar to the Banzai charge, but slightly less potent as this lacks an armored element. You get a horde of conscripts that come flying in, battering themselves incessantly on... anything you like. It's a massive zerg meat shield! Nearly replaces the need to field your own infantry in the late game (you get a million more for only twice the price).
Game Modes: Assault
Assault

In this mission type, you typically begin with a handful of infantry and have to build up a force capable of blasting through increasingly hazardous positions. Spend your early MP to deploy a versatile platoon of infantry and mortars (see the Infantry Warfare section).

Draw an imaginary, roughly horizontal line across your minimap along the axis (no pun intended) of capture points. This is the front. Consider your position in relation to the enemy's disposition. Think about what you need to do to claim this line, find the weaknesses, and go from there.

Before you "attack, attack, attack," Recon, recon, recon. Know your enemy and all that jazz. Good intelligence is the cornerstone of any well-planned (although sometimes ill-fated) assault. Scout ahead and look for hidden AT guns (also look for the triangular unit on the minimap), they will ruin your day and I mean it. They are sneaky (hint: always check the bushes). Oh, and don't forget their baby AT infantry, they can be rather tough to spot (surprise!!).

Another word on mortars. Mortars are exceptionally useful in assault missions. The ability to field potent indirect-fire at good range in the early game cannot be understated. Deploy one, and watch him surgically toast enemy machinegun positions around the enemy control points as you poke in with your infantry squads. Deploy two or three, and enjoy some withering firepower capable of smashing through most all early and mid-game defenses. You can get them in quite close and safely which will allow them to clear the way much more effectively than tanks. Always use them to take out enemy AT guns so your boomier guys have a clear shot at supporting the advance.

Move up the line carefully along the width of the battlefield. Lookout for flanking maneuvers by the enemy. Establish good defenses as you advance. Static machinegun emplacements are great at mowing down the infantry that the AI will throw at you incessantly without wasting your ammo, so keep them fully manned and try to situate your infantry a bit to the rear of them. Place some AT or armor in a good defensive position especially along roads. Leave a few guards in areas where you don't expect action, just in case. Just a couple of these guys sneaking through your lines and capping your territories after you have pushed 3/4 up the combat zone will make you cry, especially if you are totally committed and ready to cap the last control point.

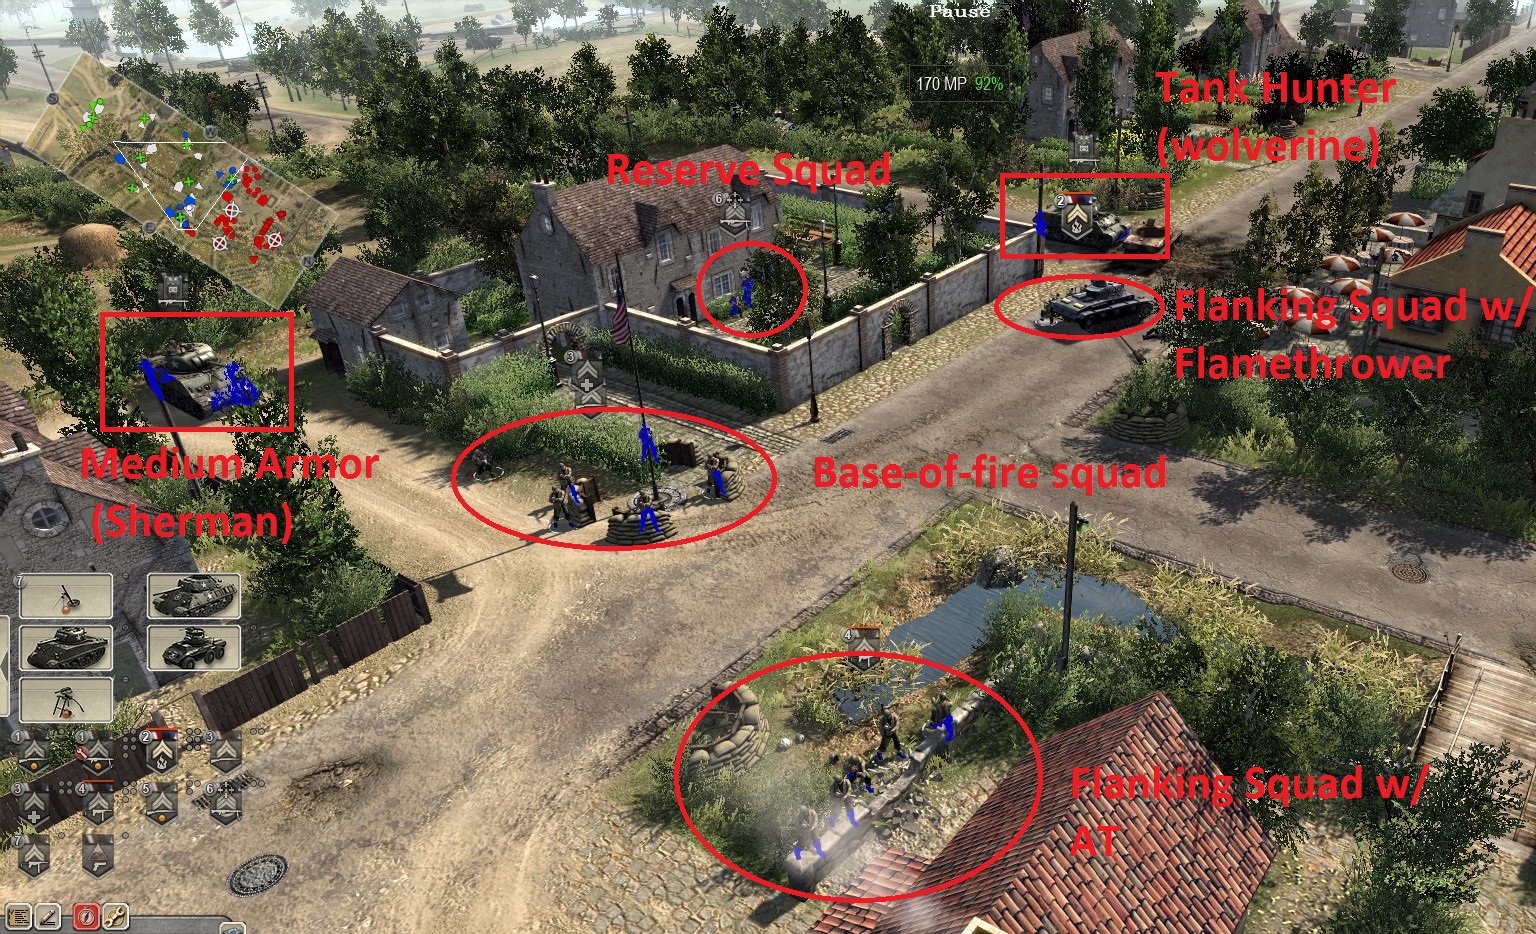
Moving on to the mid-game: here is an example of a mixed force well-suited to deal with a number of challenges:


A base-of-fire squad is situated in the middle with medium armor nearby, ready to defend the control point against light forces and support the advance. The squad includes a medic than can run out and help the flanking squads on the left and right flanks should they get into a pickle. The flankers are well-equipped with AT weapons and flamethrowers to deal with infantry and armor alike as they bob and weave between cover (although it may be more prudent to put your AT with your base of fire guys as previously mentioned). Lastly, note the reserve force (infantry and tank hunter) positioned a bit to the rear between this and an additional force a ways to the top-right (not shown but on the minimap) ready to plug any gaps if you get squashed on one of your approaches, or if a crazy tanker comes zipping through the line.

Breaking the Stalemate

You have made good progress, your guys have strong positions along the front, but you have hit a bit of a roadblock. The enemy defenses have become quite, shall we say, robust, with howizters and heavy AT's staring down all the good approaches to your final objective. What to do? Fight fire with fire, that's what.

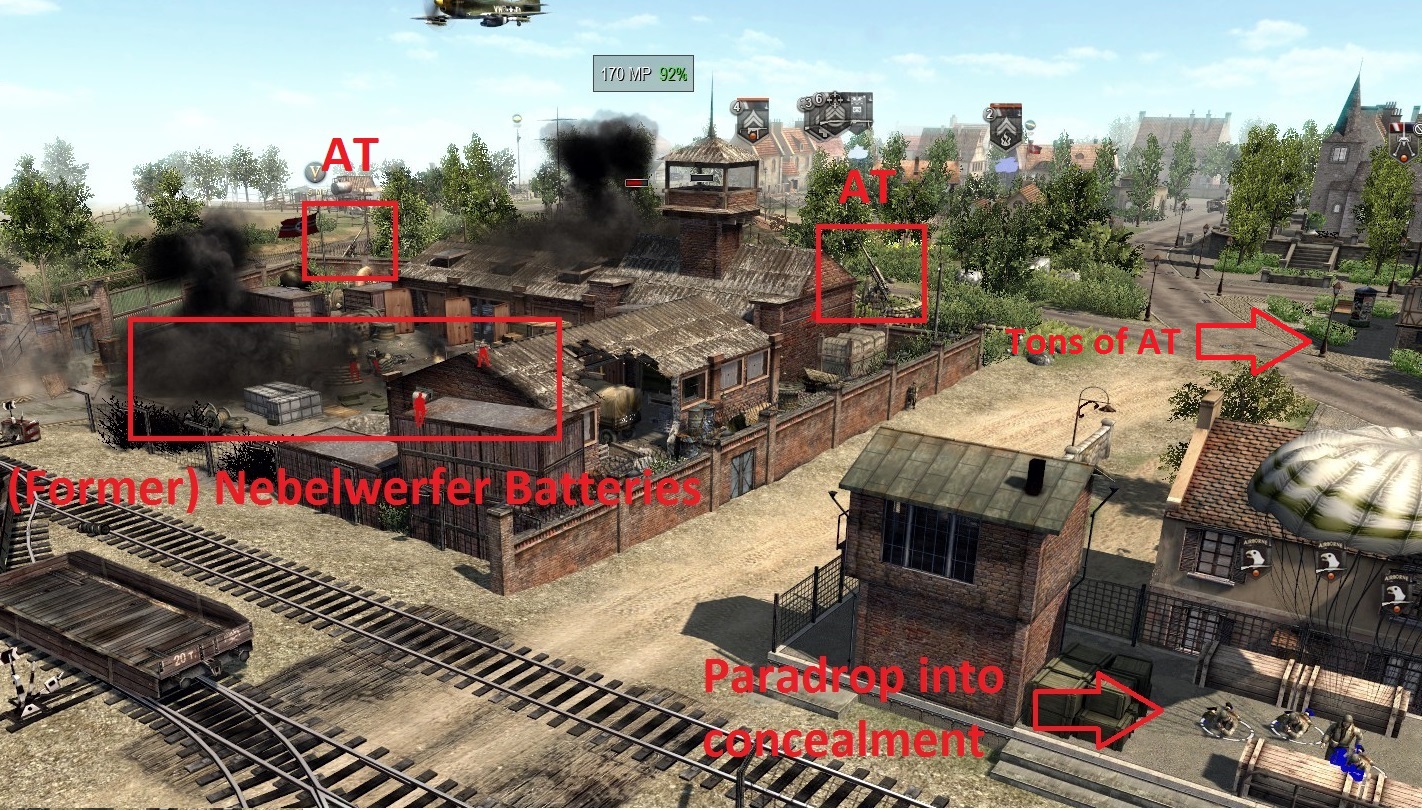
Consider the following American scenario. Our front line is quite a ways upfield, unable to advance due to 88mm artillery which will demolish our armor, pesky nebelwerfers which will cut swathes into any approaching infantry, and sneaky, camoflaged German infantry and machinegunners sprinkled like spoiled jimmies throughout the area (not shown) sufficient to slow and soften our guys while the big guns do the dirty deeds. Careful examination of the rest of this line reveals similar heavy overlapping defenses. A frontal assault would be sucidal, but we've spotted one key weakness to this otherwise inpenetrable defense--a poorly-defended train yard to the rear:


This, my friends, is a job for the paratroopers. These elite infantry can be dropped in with precision covertly and at a nominal cost, and although they lack AT, are elite forces capable of infiltrating this area and wiping the floor with enemy infantry. The paratroopers have dropped in quietly behind enemy lines (bottom-right) and are ready to run in and mop up following an air raid. This punitive strike offers a risk-free prelude to the attack that knocks the primary enemy position around the control point off guard just before the airborne makes a casual appearance to finish the job. This mission is won in a matter of moments and with minimal casualties. Don't ignore your faction's special abilities!

The Counterattack

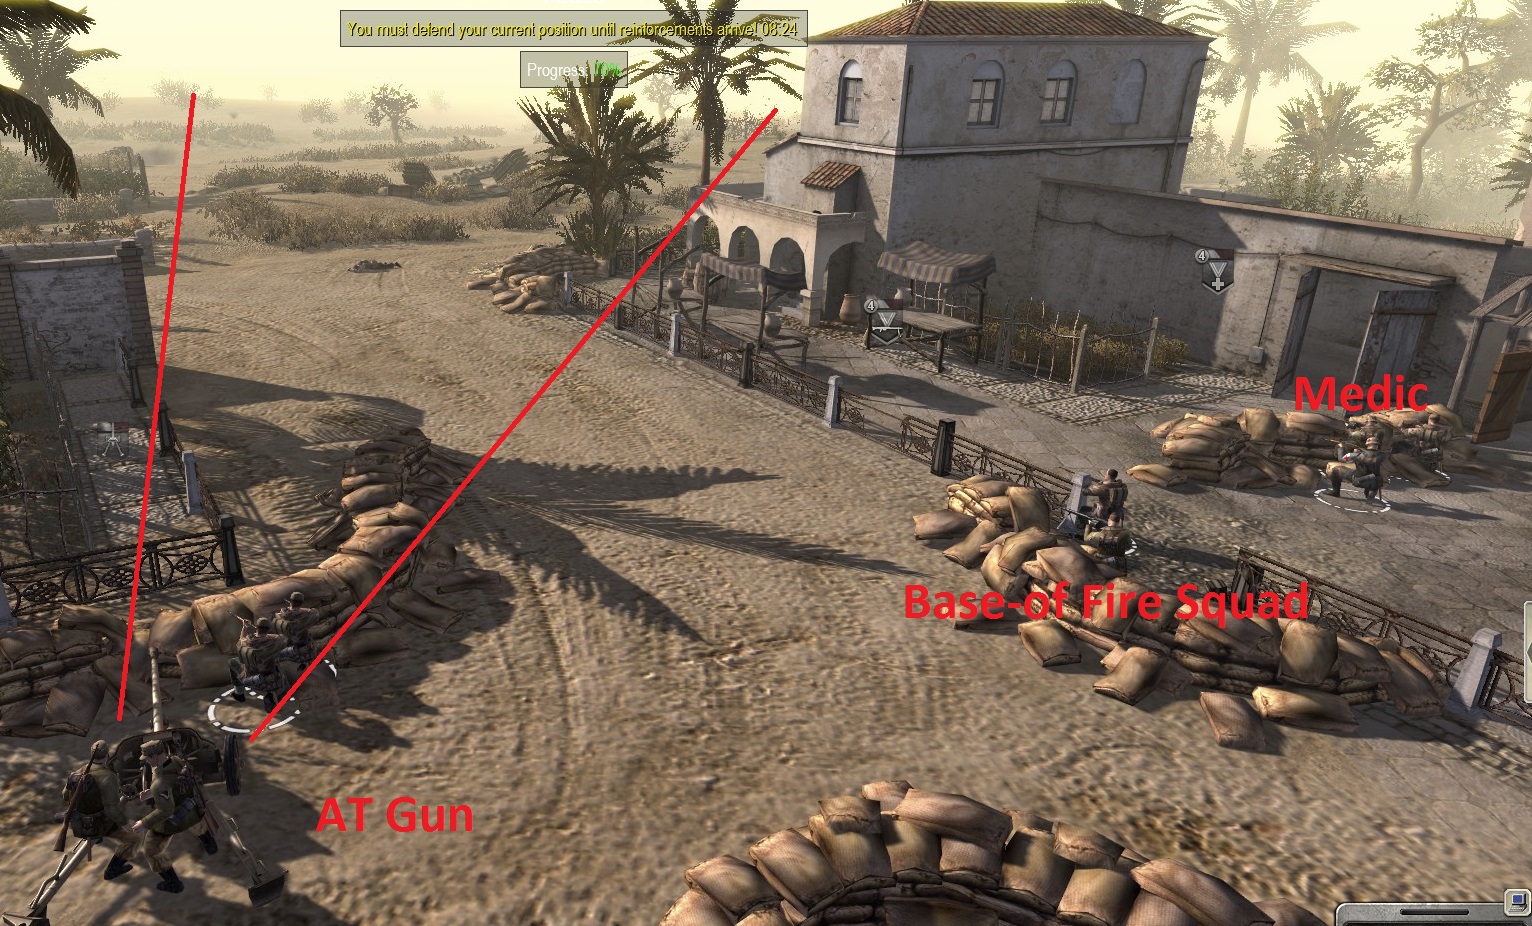
Occasionally you will be called upon to later defend secured territory. Establish overlapping defensive lines with infantry and armor carefully interspersed between buildings, along walls, and the like. Make use of chokepoints when possible to funnel the enemy into killzones:


Note the AT has a good field of view on the road, yet is well defended by natural barriers like the buildings on the left and right (don't forget that tanks can still roll straight through these and spoil everything). It is positioned on the corner as such to take best advantage of an enfilade firing position to suppress approaching infantry and stop any advancing armor in its... tracks (hardy-har!). It's quite satisfying to watch a marauding enemy tank that comes careening around the street corner only to find itself with an 88mm gun pointed squarely at its face (side armor)! A local base-of-fire squad is also situated nearby to address any stragglers, protecting the AT gun.
Game Modes: Defense
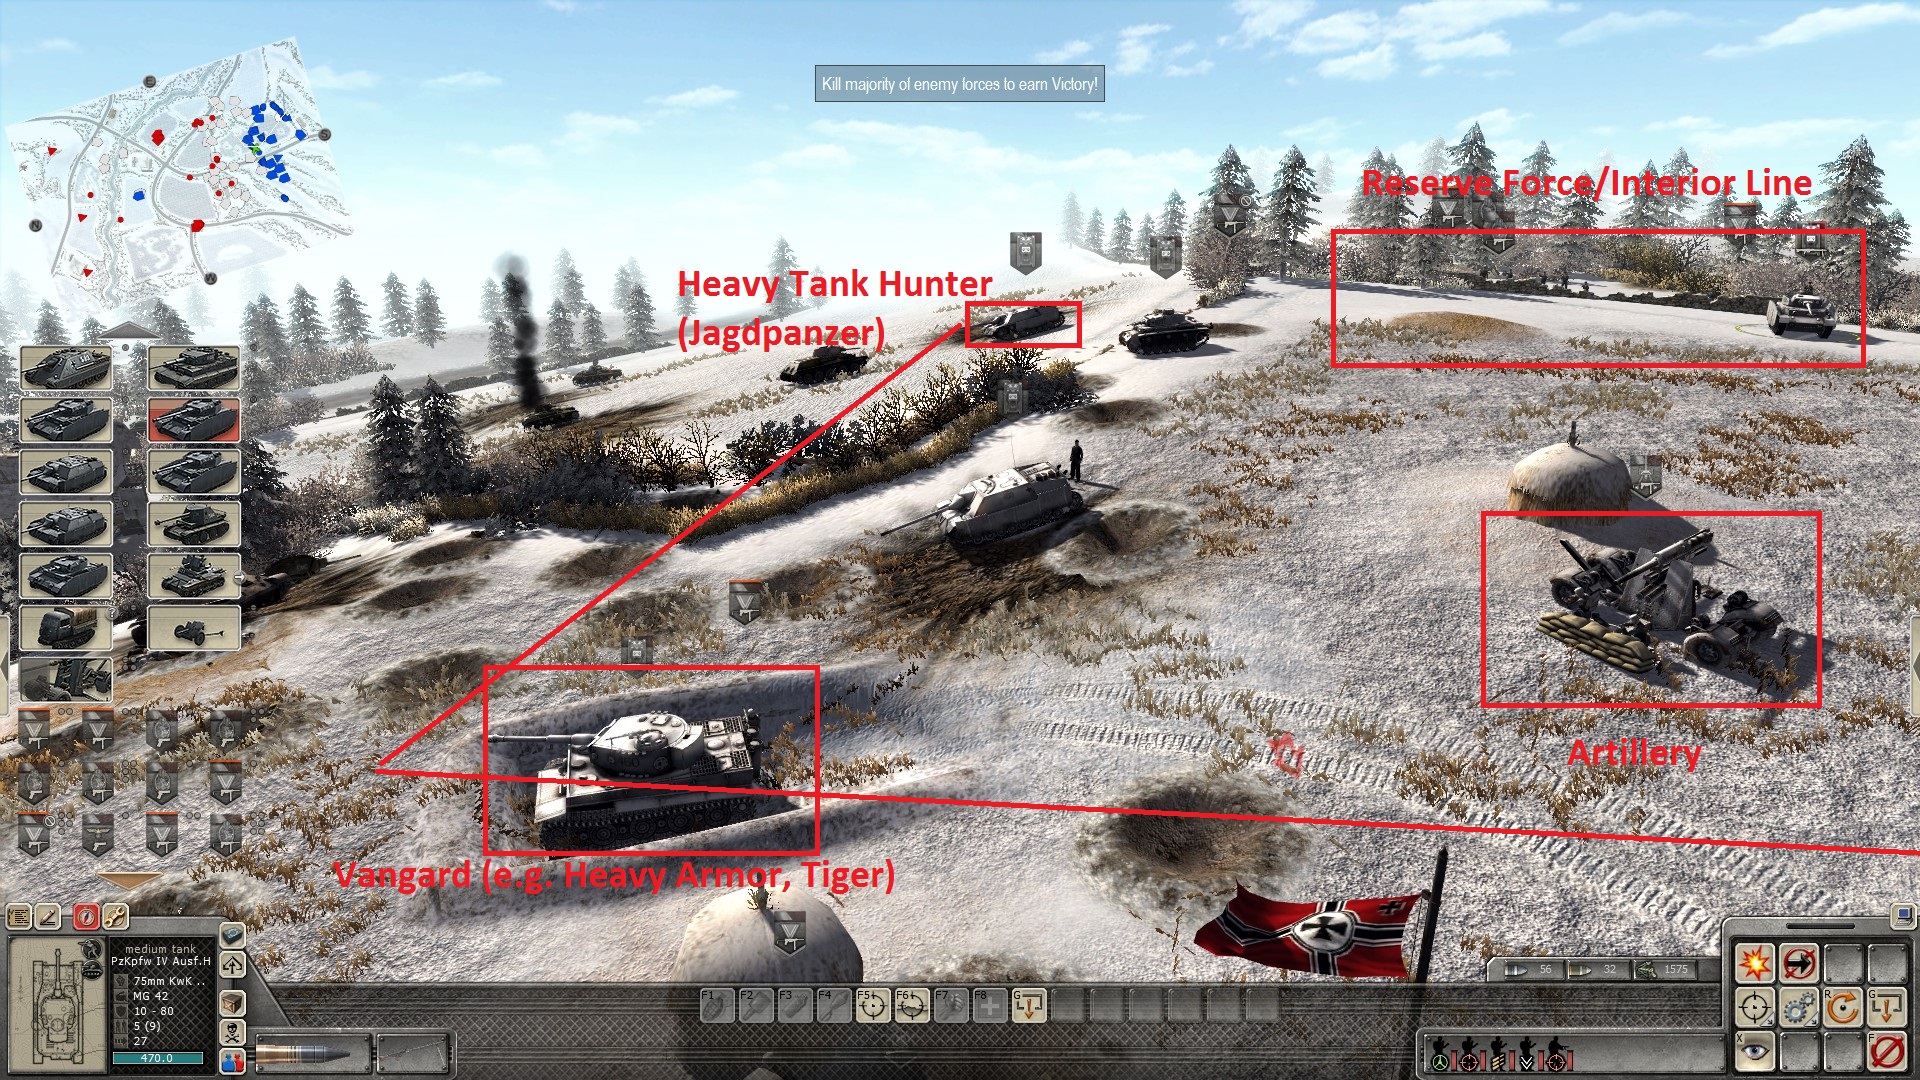
Defense is a completely different experience from assault. Your reinforcement options are typically armor-heavy and will include tank crews that will be your lifeblood in keeping your armor mobile and in good condition through 8 waves of attacks. Of course, your defense should take full advantage of the terrain and surroundings, however some of these situations provide little (if any) cover, so I will address a worst-case scenario where an armored German battle group is tasked with defending an exposed hill:


On one hand, field of fire is not usually a problem and many guns can engage targets at great range, but if they get close, your goose may be cooked. To address this, the group has taken up a vanguard formation on the crest of the hill. The center and flank is bolstered by the heaviest armor available equipped with APCR rounds to anchor the position, while presenting potent AT firepower to the sides of the enemy's advance when practicable. The line is filled out with medium tanks in staggered formation between the two points.

Also note that a reserve force of infantry and a tank is hunkered down beyond the line of battle behind a stone wall. The force is comprised of an AT gun (it's there I swear), an AT squad, a repair crew, and a panzer. This reserve force is just as useful as in the assault mode scenario. They will fullfill a variety of roles including:

1. plugging gaps in the line--the enemy can and will damage and destroy even your most well-deployed vehicles throughout the battle, and at these moments, the group is ready to fill in, and they ain't happy.

2. stemming an advance into a penetrated flank. Anybody that gets through between those heavies will have these guys to answer to (and they ain't happy).

3. repair disabled vehicles. Tracks will frequently come off, turrets will sometimes be disabled, and these guys will be ready to get them back in the action without jeapoardizing the vehicle crew.

4. forays into the thick of it to retrieve the usual token downed heavy vehicle or deal with any long-range threats (rockets, mobile artillery) that will wreak havok on your carefully devised line while they sit like big, helpless metal ducks. Meanwhile your main body remains undisrupted. Hint: have your crews jump on the side of the tank for a nice ride.

Consider your placement of AT guns carefully when faced with limited cover:


*sorry for this bug... I am not sure how to fix, the above doesn't belong here; if anyone can advise please do so!*

In this case, potent artillery is positioned in the center at a high point on the hill. The gun is placed to provide an optimal field of fire to support the entire formation, but is not at the absolute front of the line where the gun would be vulnerable to machine gun and cannon fire from the sides.

Watch out when it comes to wave 8. At this point, the enemy will typically call in their super-heavy armor and will conduct an attack on your flanks as vigorously as possible, so make sure everyone is positioned, repaired, resupplied, and ready to go for the final assault.

Believe it or not, hills can actually be used to defend from the opposite point of view. Occasionally you may find yourself with an opportunity to mount a reverse-slope defense. This is ideal when you are faced with overwhelming armored foes. Imagine that you are facing that final assault wave, and the enemy's attack on one of your flanks is going better than you expect because you said "hey, I don't need me no stinkin' reserves," and now the enemy is in a positon ready to roll around to the side and rear of your prevailing flank. Your remaining forces are limited, so you quickly take up the following position (you better make sure they're finished with what they are doing first):

[previewicon=2722859;sizeOriginal,inline;Reverse slop defense.jpg][/previewicon] The full strength of your remaining tanks and infantry are trained on the top of the hill where the enemy is expected to crest. They majority of their force cannot strike because you are below their field of fire, but as they come along, your own armor can start popping them off one-by-one, guns aimed at their soft unde

*sorry for this bug... I am not sure how to fix, the above doesn't belong here; if anyone can advise please do so!*

In this case, potent artillery is positioned in the center at a high point on the hill. The gun is placed to provide an optimal field of fire to support the entire formation, but is not at the absolute front of the line where the gun would be vulnerable to machine gun and cannon fire from the sides.

Watch out when it comes to wave 8. At this point, the enemy will typically call in their super-heavy armor and will conduct an attack on your flanks as vigorously as possible, so make sure everyone is positioned, repaired, resupplied, and ready to go for the final assault.

Believe it or not, hills can actually be used to defend from the opposite point of view. Occasionally you may find yourself with an opportunity to mount a reverse-slope defense. This is ideal when you are faced with overwhelming armored foes. Imagine that you are facing that final assault wave, and the enemy's attack on one of your flanks is going better than you expect because you said "hey, I don't need me no stinkin' reserves," and now the enemy is in a positon ready to roll around to the side and rear of your prevailing flank. Your remaining forces are limited, so you quickly take up the following position (you better make sure they're finished with what they are doing first):


The full strength of your remaining tanks and infantry are trained on the top of the hill where the enemy is expected to crest. They majority of their force cannot strike because you are below their field of fire, but as they come along, your own armor can start popping them off one-by-one, guns aimed at their soft underbellies, while your infantry keep them free of harassment.

Recovering the Lost Special Tank

This is a fun little minigame that turns up at the outset of the engagement. A foolish little tank column gets ambushed by a bunch of goons skulking by the side of the road, at a distance just unconfortably distant from your base. They are carrying a useful payload--a "special tank." This is very useful in completing the mission, so even before you get fancy deploying all your defenses, get a crew tooled up to go out and recover the thing. This will take quite a while, but a medium tank and a unit of AT is usually sufficient to get the job done (note that the infantry there will join you when you approach and are repair-capable).

Clear the enemy quickly and set up a defensive perimeter around the tank with your force. The medium tank will be indispensible in picking off enemy tanks showing up to finish the job--a light tank or other light vehicle is not enough to deal with them except on the easiest difficulties. Careful not to get this thing disabled, or all is likely lost. When done, roll backwards back towards your base so as not to lose a track or something to a troublesome Panzer II. Pull your guys out slowly as the special makes its escape to the relative safety of your base (leave the squishy infantry behind for a bit until you know the coast is clear).

Game Modes: Stronghold Defense
This game type is comprised of an initial 30-minute enemy assault, followed up by an epic counteroffensive against three nasty enemy positions.

Initial Defense

You will find that this type of defense is going to go quite differently than what you are used to. You start out with a fair amount of CP and a bit of time to lay out your defenses. You are given a main base supported by three satellite positions. If you lose said positions, it can be difficult and time consuming to recover, so I recommend holding these at all costs. The center position is typically very defensible, so it's a great place to park a reserve force and a supply truck to keep everybody well-fed.

To begin, I recommend splitting up the infantry into three sections and deploying them very loosely in the outlying trenches. Arrange your three tanks to support each of the satellite bases. The assault will come in a light-to-medium attack mob that will swarm your outer defenses like a hive of angry gun-toting wasps driven from their nest by a high-explosive shell. Unfortunately, none of these positions are particularly defensible with respect to terrain. You may get haughty and be inclined to deploy a buch of tanks and such. Don't. Even in squishy swarms, the enemy wasps will poke away at your AT guns and fancy armor with their gazillions of pesky stingers.

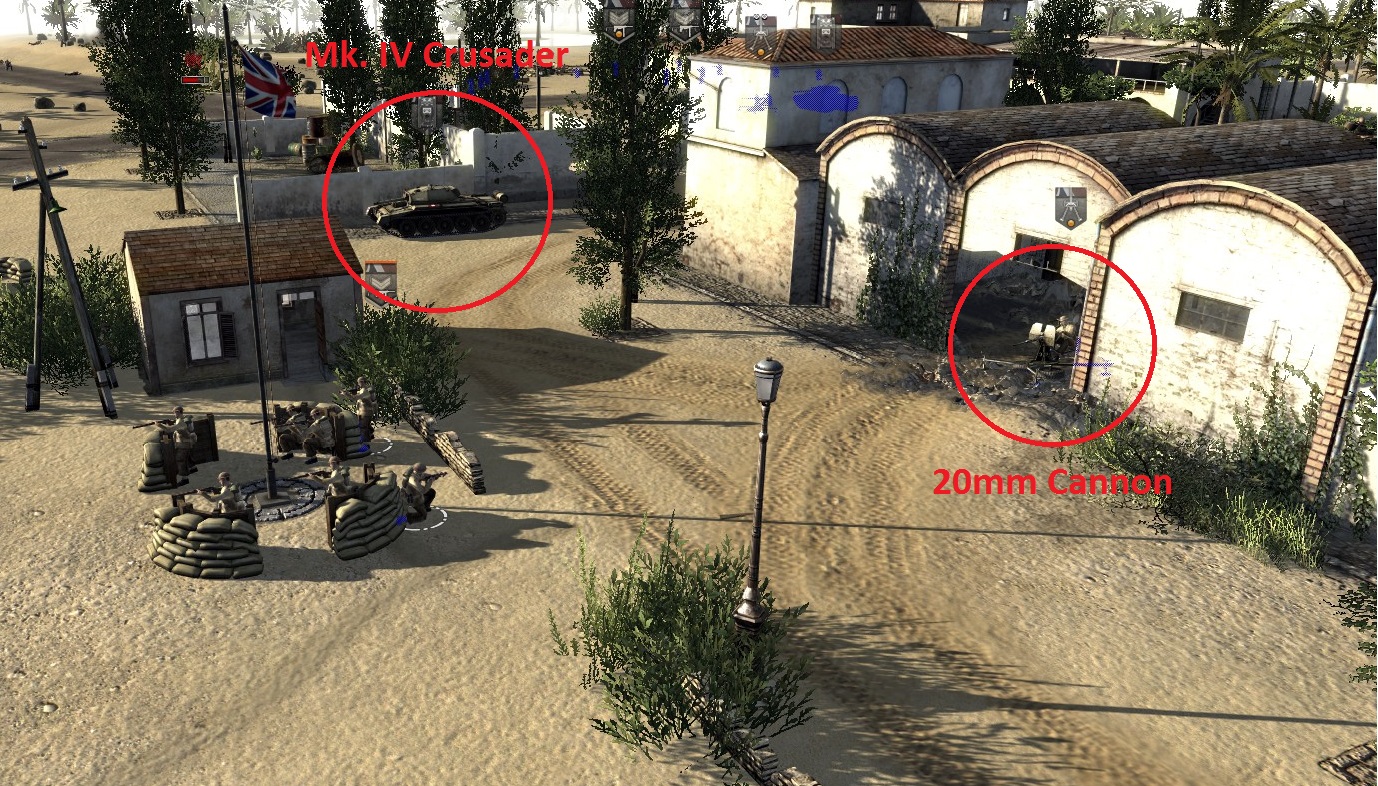
Your entrenched infantry won't save you. Neither will your shiny tanks, AT guns, or your other accountrement. No sir: I have two words for you: 20mm cannon. If you want to shred squishy infantry and vehicles in a few seconds flat and with minimal micromanagement, these are your guys. You will learn that the 20mm will be everyone's best friend in the early stages of the battle. To boot, they are super cheap. Deploy one at each of your sattelite bases in a nice spot like so:


This is an excellent spot for the 20mm: not too close to the action (your trenches [not shown] will serve as a buffer zone), but close enough to keep everyone comfy should the enemy close. The 20mm will also help to keep your big guns alive to plunk away at heavier targets as those are usually lost (and quickly) to a few kamikaze tanks that get a wee bit too close. Note that the tank is also positioned defensively, only exposed on the left side to protect it from incoming fire on (at least) one of the extreme flanks. This cheaply-defended position will hold out admirably against the nonsensical hordes of AI (but watch ammo consumption)!

What to do with all those extra points? Save them. The enemy will occasionally throw a surprise your way (e.g. a precision paradrop smack-dab in your center). You will also have use for them later when you are building up for your final counterattack. It may also come in handy if you still manage to lose your outer defenses and you need to fall back on the main base. Speaking of which, there are a couple nice little howi's there, so make sure you stick them on fire-at-will (ideally you won't need them at all).

Make sure you have a bit of infantry in the center for those weird random sneak attacks. You might also consider a howizer of your own to further support the outer defenses, or perhaps a tank to plug a gap if one of your babies gets nicked.

Counteroffensive

Things start to get real interesting. A massive relief force of tanks and infantry comes swarming through your base to throw the enemy back. But don't get too comfortable--the enemy will respond in kind, and they ain't happy they you splattered millions of their peons--so don't go rolling in Patton-esque.

Begin by arranging your (remaining) armor to support the front which will bear the brunt of a heavy assault wave, but let your buddies take most of the punishment (keep them within the perimiter of your base). I usually like to send a few guys out and mop up the left and right, but this is not terribly important.

Once things are under control, take a gander at the enemy positions. Looks hairy? It is. There is no suitable approach for a frontal assault without getting shredded by enemy armor, heavy ATs, mortars, etc. (don't tell your AI buddy that). Also note that in this game type you have no access to special faction abilities. So now what? let your guys do the dirtiest work. Support his advance like so:


if the 20mm's were the crux of the initial defense, a few howizers or rocket launchers will be the key to a successful counter attack. Use these guys to soften up those AT guns and you will find that your endless waves of supporting forces inch ever closer to the central objective. Taking this is key, as this will block the enemy's flow of reinforcements.

If you have finished this job or get bored with all the waiting, strike out at their own satellite positions with your howitzers. If you run out of ammo, another tactic you can try is sneaking a radio operator up (around 60m) and firing off a few flares at their AT so you can get in and take over.

Select a radio operator and a few screening infantry (that your can bear to part with), move them to the flank, and go prone. Fan out and approach the positon until the enemy gun is in range, switch your radio operator to direct control, and take out the flare gun (secondary weapon). Fire the thing off and watch the fireworks. Now you can roll in with a couple tanks and infantry and finish the job with a smart frontal attack like you have been waiting all this time for.
Game Modes: Sabotage
I'll be honest. I don't particularly care for the sabotage missions. I have only played one, and I pretty much poopooed my way through it. These are typically "attack the objective" or secure the control point" style missions. I am not in a good position to give advice on this I wouldn't say, so I will hold off for now, but I may come back to it. One though I will share is that stealth is your friend, particularly on the harder difficulties. Try to avoid alerting the enemy to your presence by switching rules of engagement to return-fire (or hold fire if you are feeling particularly sneaky) as you mill around the battlefield.
How to Cheat Properly
If you are beating your head against the keyboard after a couple losses on easy, or you just want to free yourself up from a whole lot of micromanagement to focus on the big picture, don't fret. Check out CheatMod by WhiteSnoop. This mod will allow you to equip infinite ammo and fuel. Hey, not everyone wants to be running around dispensing rifle ammo while the might of the 3rd Reich is barelling down on your last line of defense, 88mm guns blazing. I will say that the new resupply system makes this option slightly less of a must.
Closing Comments
I dont have any additional content planned for the guide at this time beyond what's been accounted for, but I am all ears for suggestions and requests. Please give a "thumbs up" if you learned something, or at least got a few chuckles. Thanks for reading and please feel free to discuss in the comments below!

- UnicornPoacher
76 Comments
UnicornPoacher  [author] Mar 9 @ 8:40am 
@Renight [83] welcome to the community! :)
Skywalker Mar 8 @ 7:16am 
Thanks UnicornPoacher, MOWAS are my first WW2 RTS, i will try Ostfront too.
UnicornPoacher  [author] Mar 8 @ 6:59am 
Not sure the problem Renight, that is the correct default keybinding to my knowledge. Did you select the desired group of units first? I suggest checking your controls settings, more importantly what are you doing still playing MOWAS? Go play Ostfront!! https://steamcommunity.com/sharedfiles/filedetails/?id=3086395126
Skywalker Mar 8 @ 5:42am 
How to form squads, i press shift + number but it dos anything.
tanktastic Dec 25, 2022 @ 1:23pm 
good guide but this is not the most realistic nor best ww2 simulator at all lol. If you want a game with similar 3d graphics and control with far more realism, I would recommend the WW2 Combat Mission Games.
Rommel Dec 3, 2022 @ 2:44pm 
You absolutely can just bludgeon your way through the majority of the time. Very easy to overwhelm AI and even easier to overwhelm a player.
A L E R O V Aug 6, 2022 @ 9:31pm 
I am playing this game form 2014 and still noob on It 😂 (steam Don't record the playtime) because I was playing the cracked version of the game ):
A L E R O V Aug 6, 2022 @ 9:28pm 
I am playing this game form 2014 and still noob on It 😂
aflemister31 Mar 8, 2022 @ 3:27pm 
3 days of playing this game and very in need of a guide like this. This is really helpful, thank you.
El Presidente Jul 6, 2021 @ 10:36am 
To long, this is how u really win.
Step 1: Subscribe to "cheat mod"
Step 2: Spam heavy tanks and/or nukes until either u win or ur pc bursts into flames