Agarest: Generations of War

Agarest: Generations of War

64 ratings
Walkthrough (Fourth Generation)
By Frenzy85
Basically information from the wiki that I stole so it would be more convenient to use with Steam.

Agarest wiki can be found here: http://agarest.wikia.com/wiki/Agarest_Wiki

Disclaimer: I didn't write most of the information below. I wrote a very small portion of it, and did some edits while I was playing through the game. The information below is from the Agarest wiki. Most of what I did was making it presentable in the Steam guides format. I meant to have this for personal use, because I find using the Steam browser a pain and Steam guides help with quick navigation. If enough people complain about it, I will remove it from public view and make it private. If you think I should do this, leave a comment. If more than a dozen people ask for it, it'll happen, I promise.

Also, this does take quite some time to make, and is not just plain copy and paste! If you don't believe me, give it a shot... *shrugs*
I'll even tell you some tips to speed up the process if you ask. It still takes a while.
There are a few edits here and there, that people have been unable to do in the wiki because the pages are locked.
   
Award
Favorite
Favorited
Unfavorite
Notes
  • The information below (everything, just slightly edited...) is from the Agarest Wiki[agarest.wikia.com]
  • I'm making this because I hate using Steam Browser to browse stuff. It's extremely inconvenient, in my humble opinion. Steam guides can be quite convenient for navigation...

  • If you want to go for a perfect run, and are not sure what choices to make, I marked the choices(#) that will get you a "perfect run". You'll get True End and all scenes, except heroine endings, since they're mutually exclusive. You pick your own heroine! Canon choices are those on the top left of the pictures on the bottom right of the screen during scenes.
  • You may notice that the paths that aren't part of the "perfect run" has missing info. This is probably because people who filled in the information in the wiki mostly went for the perfect run. You don't miss any scenes, iirc, so there's no reason not to. Some scenes happen in different locations, such as the choice where you help either Fyuria/Luana.
  • I lied when I said you get all scenes... It's impossible to get all scenes in one playthrough, unless you re-load at some points. There are times when you have to choose between the heroines, and the scenes for each is mutually exclusive.
  • With that said, I suggest you go one run through on Easy/Normal, picking whatever you want and not going for True End. Then go to NG+ for the True End on Hard.

  • Note that encounters in blue/orange locations are approximate and are not 100% certain.
Tips and stuff
  • The Forbidden Tome of this generation is obtained in Bibrest Mountain. If you do not take path 2B, you will not be able to access it until the end of this generation.

  • New actives: Crusher -> ATK +330.
    Available near the beginning of this generation, after your first random encounter against a Gigantes, who drops Power Stone.

    Also, you'll probably be gaining enough EP to enhance Halper Scythes. Do so. It's a much better investment going forward.

  • For Mages, converting INT +30 is still one of the best methods, but a new option has opened up. If you have a lot of EP to spare, use INT +30, if you have a lot of TP, make Shadow Blasters.
    • Shadow Blaster -> MAG +300
      Not registerable in shop, but all materials can be bought. It costs a total of 350TP, ~432EP and some gold to buy the materials. Then another 2k EP to enhance it. Very much worth it if you have spare TP. It actually costs less EP than INT +30, and it gives more MAG total.
      Handgun -> Grip
      Assault Cannon (150TP) -> Assault Barrel
      Magic Stone Piece (200TP)

    • Moon Crusher -> MAG +330
      Not easily grindable, you'll have to farm ingredients from mobs.

  • Ragnarok and Judgment. If you don't use these Combination Attacks, then start using them. You won't regret it.
    Ragnarok is the most efficient skill for Breaking enemies. Judgment has a pretty good chance of doing a OHKO regardless of enemy HP (it also goes through Magic Barrier!). Both deal good damage in an AoE. It makes getting S and A ranks so much easier.
New Party Members
Name
Character Type
Duran
Variable
Hildegard
Fighter
Silvi
BattleMage (Fighter)
Ryuryu
Mage
Reverie
BattleMage (Mage)
Qua
Fighter
Fer
Thief?*

*Fer has an E rating for both STR and INT, making him significantly weaker than every other party member in terms of offense. He does, however, have good AGI/LUK and Willpowers that are well suited for capturing and stealing.

First 4 characters listed are the Main Character + 3 Heroines.
All characters except previous MC + Heroines will be available unless otherwise stated.

  • Borgnine leaves your party for 1 fight nearing the end of this generation
  • Ellis leaves your party for a few fights nearing the end of this generation
  • Vashtor leaves your party nearing the end of this generation. It's possible to get him back in the next generation.
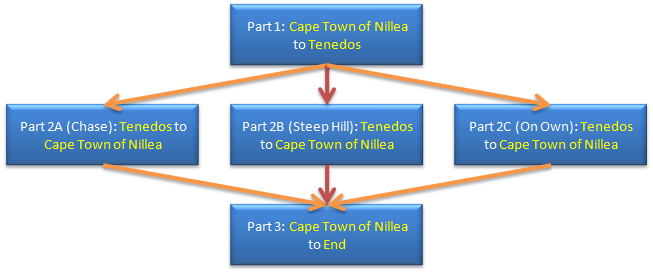
Flowchart
Part 1
Town: Cape Town of Nillea
  • Event: Duran joins
World Map
  • Scheleier Sea Route, East: Cerberus x2
  • Scheleier Sea Route, West: Cerberus x2
  • Lyon Field: Cerberus x1-2, Orc Mage x2
  • Galledetex Forest, South: Cerberus x1-2, Orc Mage x2
Pirrene
  • Event: Story related
Tran Hills
  • Fight: Bull Orc x2, Goblin Mage x3, Hobgoblin x3
  • Event: Qua joins
  • Event: CG 111 unlocked
  • Item: Deadly Gamble obtained
World Map
  • Jeal Lulun Way: Cerberus x1-2, Orc Mage x2
Town: Tenedos
  • Event Choice: Choose what to do
    • Chase the harpuia: Gauge moves towards DARK Move to Fourth Generation, Part 2A
    • Take the steep path(#): Gauge moves towards LIGHT Move to Fourth Generation, Part 2B
    • Find it on our own: Gauge moves strongly towards DARKMove to Fourth Generation, Part 2C
Part 2A
World Map
  • Kewunlis Brush: Bone Warrior x2, Gigantes x1
Chelpeco's Gorge
  • Event: Story related
World Map
  • Sorlistrum Pass: Bone Warrior x2, Orc Mage x3
  • Lerouxnar Passage: Bone Warrior x2, Magic Lord x2
Boreal Path
  • Event Choice: Comment from Ganz
    • Let it go: Gauge moves towards LIGHT
    • Argue: Gauge moves towards DARK
    • Provoke: Gauge moves strongly towards DARK
World Map
  • Genozard Trail: Bone Warrior x2, Basilisk x2
  • Bibrest Trail, North: Bone Warrior x2, Basilisk x2
Cannus's Tear
  • Event: Silvi joins
World Map
  • Voeli Zeil Plank Road: Bone Warrior x2, Gigantes x1, Magic Lord x2
Phoenix Wing Fortress
  • Event: Story related
Town: Cape Town of Nillea
  • Event: Hildegard joins

Move to Fourth Generation, Part 3
Part 2B
World Map
  • Galledetex Forest, North: Cerberus x1-2, Orc Mage x2
  • Bibrest Trail, South: Cerberus x1-2, Orc Mage x2
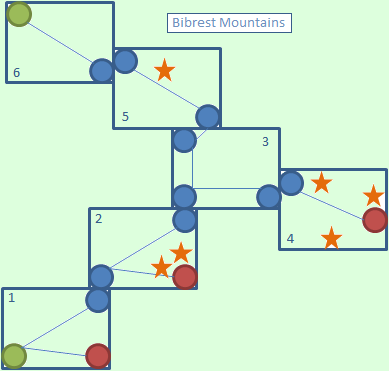
Quest: Bibrest Mountains
  • Enemies: Basilisk, Bone Warrior, Dragon, Garuda, Gigantes, Magic Lord
  • Treasure: LUK Up, Bloody Sword, AGI Up, Forbidden Tome III, Sonic Gun, Earth Dragon, Status Up
Cannus's Tear
  • Event: Silvi joins
World Map
  • Voeli Zeil Plank Road: Bone Warrior x2, Gigantes x1, Magic Lord x2
Phoenix Wing Fortress
  • Event: Story related
Town: Cape Town of Nillea
  • Event: Hildegard joins

Move to Fourth Generation, Part 3
Dungeon 1: Bibrest Mountains


If you do not take path 2B, then this dungeon will only be available at the end of the generation.

  • 1: Nice change of scenery from the caves. Make your way up the mountain steps. Not far up the steps split. Stay to the left and continue up. Eventually you'll come to the next area at the top right of the screen.

  • 2: Same layout as the first screen. When the steps split this time, take the right path (down the steps) to find two treasures containing LUK UP and BLOODY SWORD . Go back and continue up the steps to the next screen.

  • 3: Go forward to find a large open area. Head to the bottom right of the screen to reach the next area. Just a quick mention. if you were looking for the woman, you will receive a cutscene and will end up outside the dungeon.

  • 4: You will see a bridge in-front of you. Don't cross it just yet, instead head to your right to find a treasure containing AGI UP . Now head back to the bridge and cross it. Another bridge will be immediately to your right. Cross this bridge to find a dead end with a chest containing FORBIDDEN TOME III. Head back across the previous bridge and head towards the bottom right of your screen to find one more chest containing Gun SONIC GUN . Retrace your steps back to the third screen by heading to the top left of the screen.

  • 3: Go back to the large central area and go to the top left to find the next area.

  • 5: This area is straightforward. Make your way through the path. You will spot a treasure on your right hand side which contains EARTH DRAGON . The next area will be at the top left of the screen.

  • 6: Another straightforward area. Make your way through it and again you will end up spotting a treasure containing STATUS UP on the right hand side of a small open area. That's the treasures for this dungeon. If you continue to the top left of the screen you will find an exit to this dungeon.
Part 2C
World Map
  • Sorlistrum Pass: Bone Warrior x2, Orc Mage x3
  • Lerouxnar Passage: Bone Warrior x2, Magic Lord x2
Boreal Path
  • Event Choice: Comment from Ganz
    • Let it go: Gauge moves towards LIGHT
    • Argue: Gauge moves towards DARK
    • Provoke: Gauge moves strongly towards DARK
World Map
  • Genozard Trail: Bone Warrior x2, Basilisk x2
  • Bibrest Trail, North: Bone Warrior x2, Basilisk x2
Cannus's Tear
  • Event: Silvi joins
World Map
  • Voeli Zeil Plank Road: Bone Warrior x2, Gigantes x1, Magic Lord x2
Phoenix Wing Fortress
  • Event: Story related
Town: Cape Town of Nillea
  • Event: Hildegard joins

Move to Fourth Generation, Part 3
Part 3i
World Map
  • Bool Burn Course 1: Lost Pirate x4-5
  • Bool Burn Course 2: Lost Pirate x4-5
Cittilia Channel
  • Event: Duran and Hilda ride the waves
  • Event: Gauge moves towards DARK, Hildegard UP
World Map
  • Bool Burn Course 3: Lost Pirate x4-5
  • Bool Burn Course 4: Lost Pirate x4-5
Oriana Waters
  • Requirement: Before turn 30, Dark
  • Event: Plum gets tipsy
  • Event: CG 96 unlocked
World Map
  • Bool Burn Course 5: Death Killer Bee x3, Sea Bat x3
  • Geminia Cape: Death Killer Bee x2, Sea bat x3
Jalfa Fortress
  • Event: Story related
World Map
  • Route split. Note that some events disappear if Crystal Lake or Halulu Atea are visited before City of Rabat Salle.
  • To City of Rabat Salle (Labato Salle City):
    • West Linotor Sea: Death Killer Bee x2, Demon x1, Sea Bat x2
    • West Linotor Sea Gate: Death Killer Bee x2, Demon x1, Sea Bat x2
    • Simnil Bay, North: Death Killer Bee x2, Demon x1, Sea Bat x2
    • Simnil Bay, West: Death Killer Bee x2, Demon x1, Sea Bat x2

  • To Crystal Lake:
    • Tarllaphon Sea, West: Death Killer Bee x2, Demon x1, Sea Bat x2
    • Tarllaphon Sea, Central: Death Killer Bee x2, Demon x1, Sea Bat x2
    • Tarllaphon Sea, East: Death Killer Bee x2, Demon x1, Sea Bat x2

  • To Halulu Atea:
    • Jalfa Cape: Cockatrice x1, Demon x2, Sea Bat x2
    • Gunilu Bay: Cockatrice x1, Death Killer Bee x2, Sea Bat x2
    • Pirate's Point
    • Kushtina Island: Demon x2-3, Devil Cancer x2, Water Pudding x2
    • Samceil Channel: Demon x2-3, Devil Cancer x2, Water Pudding x2
    • Thiem Wildland: Demon x2-3, Devil Cancer x2, Water Pudding x2

    You can go to any of the three first, it seems. If you're going for a perfect run, then go to Rabat Salle -> Crystal Lake -> Halulu Atea, as listed below.
Town: City of Rabat Salle (Labato Salle City)
  • Requirement: Before the event at Crystal Lake, before the event at Halulu
  • Event: Story related
World Map
  • You can take one of two routes to Nymph's Bath.
  • From City of Rabat Salle (Labato Salle City):
    • Simnil Bay, South: Demon x2, Devil Cancer x2, Water Pudding x2
    • Simnil Bay, East: Demon x2, Devil Cancer x2, Water Pudding x2
  • Via Pirate's Point:
    • Lerolli Waters: Cockatrice x1-2, Devil Cancer x2, Mandrake Root x1
    • Wonlutota Sea: Cockatrice x1-2, Mandrake Root x1, Water Pudding x2
Nymph's Bath
  • Requirement: Before the event at Halulu Atea
  • Event: Story related
  • Item: Divine Branch, Unicorn Horn, Moon Fragment, 50 PP obtained

  • Re-enter for next event.
  • Requirement: Before turn 40, Dark, before getting Fer, before the event at Halulu Atea
  • Event: Ellis and Qua at the beach
  • Event: CG 97 unlocked

Crystal Lake
  • Event: Fer joins
  • Item: Esoteric Book XVII and Hazardous Kingdom obtained
Town: City of Rabat Salle (Labato Salle City)
  • Event: Story related
Crystal Lake
  • Event: Reverie joins
  • Event Choice: Choose the next destination
    • Visit Halulu Atea(#): Gauge moves towards DARK, Hildegard UP, Silvi UP
    • Visit Nymph's Bath: Gauge moves towards LIGHT, Hildegard UP, Silvi DOWN
    • Just take the Shard: Gauge moves towards DARK, Hildegard DOWN, Silvi DOWN
  • Item: Esoteric Book XIV
  • Field: Wild Coliseum obtained
Copenia Coast
  • Requirement: Reverie, Before turn 45, Not Light, before the event at Halulu Atea
  • Event: Reverie experiences a storm on land
  • Event: CG 98 unlocked
World Map
  • Shelltodal Sea, North: Demon x2, Water Pudding x2
  • Flambalt Trench: Demon x3, Water Pudding x2
  • Shelltodal Sea, South: Demon x3, Devil Cancer x2
  • Yulider Coast: Devil Cancer x2, Water Pudding x2
  • These nodes can be bypassed by backtracking to Jalfa Fortress and proceeding via Pirate's Point
Town: Halulu Atea
  • Event: Story related
World Map
  • Mitdiroll Forest Land: Cerberus x1-2, Gigantes x2, Garuda x2
Legenda Castle
  • Event: Story related
World Map
  • Rip Cape: Mandrake Root x2, Water Pudding x2
  • Labert Channel: Mandrake Root x1, Water Pudding x2
  • Dydon Cape: Devil Cancer x2, Water Pudding x2
Eriswil (Ellisvil)
  • Fight: Lox, Bull Orc x2, Goblin Mage x4
    • Stolen: Lox (Magic Stone Piece, Dragon Ring) Bull Orc (Element of Thunder, Darkness Element) Goblin Mage (Element of Wind, Darkness Element)
    • EX Stolen: Lox (Homura, Katoyanga) Bull Orc (Recovery Herb, Charged Blast) Goblin Mage (Recovery Herb, Gravity)
    • Overkilling: Lox (Max HP Up+) Bull Orc (Mithril Ore) Goblin Mage (Mithril Ore)
  • Event: Ryuryu joins
  • Item: Esoteric Book XV obtained
Town: Halulu Area
  • Requirement: Have Ryuryu
  • Event Choice: Duran and Silvi get their fortunes told
    • Fisherman fortune-teller: Gauge moves towards DARK, Hildegard UP, Silvi UP, Ryuryu DOWN
    • Old fortune-teller:(#) Gauge moves towards DARK, Hildegard DOWN, Silvi UP, Ryuryu DOWN
    • Elven fortune-teller: Gauge moves towards LIGHT, Hildegard UP, Silvi DOWN, Ryuryu UP
Pirate's Point
  • Event Choice: Ryuryu tells someone's fortune
    • Tell my fortune: Gauge moves towards DARK, Hildegard DOWN, Silvi UP, Ryuryu Up
    • Tell me what will happen: Gauge moves strongly towards LIGHT, Hildegard UP, Silvi UP, Ryuryu UP
    • Tell your own fortune(#): Gauge moves towards LIGHT, Hildegard UP, Silvi DOWN, Ryuryu UP
Town: City of Rabat Salle (Labtato Salle City)
  • Requirement: Ryuryu
  • Event Choice: Duran whines and complains
    • Look to Hildegard: Gauge moves towards DARK, Hildegard UP, Silvi DOWN, Ryuryu UP
    • Look to Silvi: Gauge moves towards DARK, Hildegard DOWN, Silvi UP, Ryuryu DOWN
    • Look to Ryuryu(#): Gauge moves strongly towards LIGHT, Hildegard DOWN, Silvi DOWN, Ryuryu UP
Nymph's Bath
  • Event: Story related
World Map
  • Pienso Sac Channel: Cockatrice x1, Mandrake Root x1, Water Pudding x2
Part 3ii
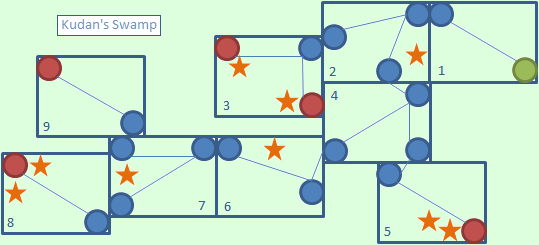
Quest: Kudan's Swamp
  • Enemies: Eye of Devil, Gargoyle, Mandrake Root, Water Pudding, Sea Bat, Devil Cancer
  • Treasure: Sword Breaker, Adv. Weapons III, Orichalcum, Marine Rouge
  • Treasure: Secret Arts XII, Blizzard, STR Up+, Secret Arts XIII, Oboro
  • Fight: Giant Squid
    • Stolen: Giant Squid (Generation Crystal, Squid Tentacle)
    • Ex Stolen: Giant Squid (Beast Sense, VIT Up+)
    • Overkilling: Giant Squid (Three Stars)
Nymph's Bath
  • Event: Story related
Jalfa Fortress
  • Event Choice: Hilda is afraid to go in the cave alone
    • Make her go alone: Gauge moves towards DARK, Hildegard DOWN, Silvi DOWN, Ryuryu UP
    • Go with her(#): Gauge moves towards LIGHT, Hildegard UP, Ryuryu DOWN
    • Walk away: Gauge moves strongly towards DARK, Hildegard DOWN, Silvi DOWN, Ryuryu UP
  • Item: Esoteric Book XVI obtained
World Map
  • Diano Coast: Cockatrice x2, Gargoyle x2, Mandrake Root x2
Villers le Lac (Ville Luluck)
  • Fight: Bull Orc x2, Hobgoblin x2, Orc Mage x2
  • Fight: Bull Orc x3, Garvel x1, Orc Mage x3
  • Fight: Bull Orc x2, Garvel x2, 2x Hobgoblin, Orc Mage x2

  • Re-enter for next event.
  • Event: Duran gets possessed by Winfield
  • Event: Gauge moves towards DARK, Hildegard UP, Silvi UP, Ryuryu UP

Town: City of Rabat Salle (Labato Salle City)
  • Requirement: Ryuryu affection level 4 or higher
  • Event: Duran eavesdrops on Ryuryu
  • Event: Gauge moves towards DARK, Ryuryu UP

Nymph's Bath
  • Event: Ryuryu drops her books
  • Event: CG 88 and CG 89 unlocked

    *this has bothered me for quite some time now... I can't figure out why they would place this event in Nymph's Bath. :-\
World Map
  • Rein Channel, South: Cockatrice x2, Eye of Devil x2, Gargoyle x2
  • Rein Channel, North: Cockatrice x2, Eye of Devil x2, Mandrake Root x2
Konolfingen (Coluno Fingen)
  • Fight: Bull Orc x2, Hobgoblin x3, Orc Mage x2
  • Fight: Goblin King x1, Hobgoblin x3, Orc Mage x3
  • Fight: Garvel x2, Goblin King x2, Orc Mage x2
Nymph's Bath
  • Event: CG 112 unlocked
Konolfingen (Coluno Fingen)
    Note: Make sure Silvi is properly equipped before you start this event because you won't be given the chance to equip her once the battle starts.
  • Requirement: Silvi and Ryuryu affection level 3 or higher
  • Event: Duran gets sick
  • Fight: 1x Garvel
    • Killing: Garvel (Midnight Sun, Aura Ring)
    • Overkilling: Garvel (Force Frame)
  • Event: Gauge moves strongly towards LIGHT, Silvi UP, Ryuryu UP
  • Item: Marfile Seed, Holy Beast Sword, Oboro, Esoteric Book XXI, 50PP obtained
Crystal Lake
  • Requirement: Before turn 75, All Heroines affection level 4 or higher
  • Event Choice: Hot springs
    • Follow him(#): Gauge moves towards DARK, Hildegard DOWN, Silvi DOWN, Ryuryu DOWN
      • Event: CG 71 unlocked
      • Item: Secret Album 4 obtained
    • Doubt him: Gauge moves towards LIGHT, Hildegard UP, Silvi UP, Ryuryu UP
Pirate's Point
  • Requirement: Ryuryu affection level 3 or higher
  • Event Choice: Alone together after a tsunami
    • Hilda!: Gauge moves towards LIGHT, Hildegard UP, Silvi DOWN, Ryuryu DOWN
    • Silvi!(#): Gauge moves towards LIGHT, Hildegard DOWN, Silvi UP, Ryuryu DOWN
    • Ryuryu!: Gauge moves towards LIGHT, Hildegard DOWN, Silvi DOWN, Ryuryu UP
  • Item: Estoeric Book XVIII obtained
Pirate's Point
  • Requirement: Before turn 75, Silvi affection level 5
  • Event: Silvi gets wet
  • Event: CG 87 unlocked
Jalfa Fortress
  • Event: Hildegard leaves the group
Town: City of Rabat Salle (Labato Salle City)
  • Event Choice: Choose who saves Hilda
    • Push through the front line(#): Guage moves towards LIGHT, Hildegard UP, Silvi DOWN, Ryuryu UP
    • Let the pirates save Hilda: Gauge moves towards DARK, Hildegard DOWN, Silvi UP, Ryuryu UP
    • Let Kilik save Hilda: Gauge moves strongly towards LIGHT, Hildegard UP, Silvi UP, Ryuryu DOWN
World Map
  • Position Duran in Gunilu Bay(SE of Jalfa), and hold Up+Left

  • Vict Channel, SE: Cockatrice x2, Eye of Devil x2
  • Vict Channel, NW: Cockatrice x1, Eye of Devil x2, Mandrake Root x1
Darfur Cave
  • Fight: Pirate (Fighter) x5
  • Fight: Pirate (Fighter) x3, Pirate (Mage) x3
  • Fight: Pirate (Fighter) x4, Pirate (Mage) x4
  • Fight: Vlady, Pirate (Fighter) x3, Pirate (Mage) x3
    • Stolen: Vlady (Lapis Noster, Meteoric Iron)
    • Ex Stolen: Vlady (White Frame, LUK Up+)
    • Overkilling: Vlady (Railgun)
  • Event: CG 115 unlocked
  • Event: Hildegard rejoins
World Map
  • Venicson Tunnel: Giant Squid x1, Mandrake Root x2
  • Giana's Sea: Giant Squid x1, Mandrake Root x2
Town: Merchant City Tegea
  • Event: Vashtor, Ellis, and Borgnine leave the group
  • Fight: Garvel x2, Goblin King x2, Orc Mage x4
  • Event: Borgnine rejoins
World Map
  • Danakil Great Fen, Far South: Flame Knight x2, Ice Knight x2
  • Eldybil Swamp: Flame Knight x2, Ice Knight x2
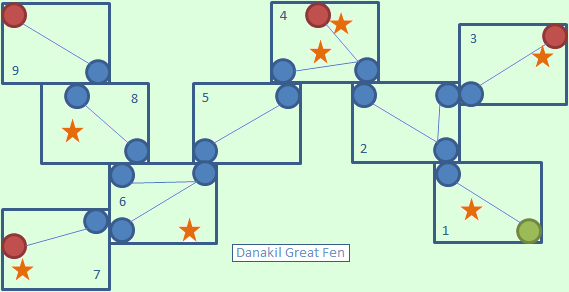
Quest: Danakil Great Fen
  • Enemies: Flame Knight, Gorgon, Ice Knight, Iron Golem, Mist Dragon, Black Dragon, Goblin King
  • Treasure: O-Bracelet, Advanced Weapons V, Bardiche, Dark Ray, LUK Up+, Secret Arts XV, Accessories 2-I
  • Fight: Mist Dragon
    • Stolen: Mist Dragon (Generation Crystal, Slumberland Flower)
    • Ex Stolen: Mist Dragon (Dragon Claw, Aura Ring)
    • Overkilling: Mist Dragon (STR Up+)
World Map
  • Sion Boardwalk: Goblin King x2, Ice Knight x2
  • Danakil Great Fen, Far North: Flame Knight x2, Gorgon x2, Ice Knight x2
Aeropagus
  • Fight: Bull Orc x2, Goblin King x2, Orc Mage x3
  • Fight: Garvel x2, Goblin King x2, Orc Mage x2
  • Fight: Keith, Garvel x2, Orc Lord x2
    • Stolen: Keith (Divine Branch, Unicorn Horn)
    • Ex Stolen: Keith (Divine Lance, Clairvoyance)
    • Overkilling: Keith (Angel Wing)
World Map
  • Elebashtina Forest Rd: Goblin King x2, Gorgon x2, Iron Golem x1, Black Dragon x1
Dungeon 2: Kudan's Swamp


  • 1: Make your way through the passage. There's no chests and it's pretty straightforward.

  • 2: These areas should look familiar by now; it's the typical cave zones. Head to the bottom left of the screen. Don't go down the steps, stay on the upper level and head into the next area.

  • 3: Head forward and drop down the steps. Head to the left to spot a treasure immediately containing SWORD BREAKER . Now make your way to the bottom right of the area to find another chest with ADVANCED WEAPONS III. Head back to the second screen.

  • 2: Make your way down those steps and do the bottom right of your screen. You'll see a treasure which contains ORICHALUM . Continue on this path to the next area.

  • 4: Head forward into the open room and head to the bottom right to the fifth screen.

  • 5: Straightforward path. Head through it to reach a dead end with two chests containing MARINE ROUGE and SECRET ARTS XII. Head back to the fourth screen.

  • 4: Head forward into the open room and head to the bottom left to the sixth screen.

  • 6: You'll see a chest on your screen to the top left. Inside you'll find BLIZZARD. Continue on to the next screen.

  • 7: Head into the open room and to the left of the crater is a chest with STR UP+ . It may be hard to spot since it can be hidden by the wall. After you open it, head to the bottom left.

  • 8: Straightforward passage that ends in a dead end with two chests which contain SECRET ARTS XIII and OBORO . Head back to the seventh screen.

  • 7: Make your way to the top left this time. Be warned, a boss fight is ahead.
Dungeon 3: Danakil's Great Fen


  • 1: Typical forest areas like earlier Generations. Head through the area to the top left. Continue on past the bridge, nothing on the small island. A treasure containing an O-BRACELET will be on your left as you make your way through the area.

  • 2: Cross the bridge and make your way forward until you see a bridge on the right. Cross this to the third screen.

  • 3: Straightforward path with a treasure at the end. It contains ADVANCED WEAPONS V. Retrace your steps to the second screen.

  • 2: Cross the bridge and head to the top left to then next area.

  • 4: Similar to the first screen. Half way through you'll spot a treasure to the left next to a tree. Inside you'll find a BARDICHE . Continue on around the lake to the very top of the screen. You'll spot another treasure with DARK RAY inside. Head back down where you were; to the bottom left of the screen you'll see the next area.

  • 5: Straightforward path with no treasures. Continue to the sixth screen.

  • 6: Go forward and cross the bridge, when the path splits into a few directions, go to the bottom right of the screen. You'll cross a bridge and find a treasure containing LUK UP+. Go back over the bridge and head into the area to the left of you.

  • 7: Straightforward path with a treasure at the end. It contains SECRET ARTS XV. Retrace your steps to the sixth screen.

  • 6: Go up to the top left of this area to enter the eighth screen.

  • 8: You should know this area by now. Make your way to the top left, ignore the bridge. On the way you'll find a treasure chest containing ACCESSORIES 2-I next to a tree. Head up for the next area. Be warned, you will encounter a boss in the next area.
Part 3iii
Bygone Footstep
  • Event Choice: Nine questions [check next section]

  • Perfect run choices: 2, 2, 1, 2, 2, 1, 2, 1, 1
World Map
  • Wiseman's Cape: Black Dragon x1, Gorgon x2, Iron Golem x1, Goblin King x2
Archer's Point
  • Event: Ellis rejoins
  • Fight: Gurg
    • Stolen: Gurg (Generation Crystal, Orichalcum)
    • Ex Stolen: Gurg (Meteorite Sword, Three Stars)
    • Overkilling: Gurg (Ring of Inability)
Town: Tenedos City
  • Event: Hilda wears a swimsuit
  • Event: CG 86 unlocked
Town: Merchant City Tegea
  • Event: Qua eats a banana
  • Event: CG 99 unlocked
Enhambre
  • End of Fourth Generation
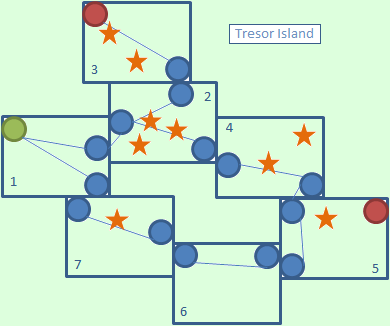
Dungeon 4: Tresor Island


  • 1: This is somewhat of an odd dungeon. You start off on areas that you might have seen from the Trum Coast DLC dungeon. Follow the sand path to the bottom right and eventually you will come to some grass cliffs that you can jump up. Make your way up the steps and continue to the top right of the screen to reach the second screen.

  • 2: Now you're in a desert... anyways you'll immediately see a treasure containing BARDICHE to your right. Directly south of that is another treasure with a RESIST FRAME inside. A third chest can be seen to your right; inside you'll find THREE STARS. Exit this area via the top right zone.

  • 3: The path in this area is pretty straightforward. Not too far in you'll find a chest with GLADIUS. Continue on to reach a dead end with another chest containing a SWORD OF KINGS. Head back to the second screen.

  • 2: This time take the bottom right zone to the next screen.

  • 4: You seem to be on a mountainside now. Follow the path and you will come up to a treasure containing RUSH BEAT. You'll see another a short distance away on a step. Inside you will find a MAGIC HAND. Follow the path to the next screen

  • 5: Follow the cliff to the top right for a SHADOW STING then drop down onto the sand and follow the sand in the bottom left of the screen.

  • 6: Follow the sand path all the way to the left of the screen until you reach the next area. Ignore the grass steps when you pass them.

  • 7: Again, follow the sand path while staying against the cliffs. Eventually you'll come across a treasure with SQUARE CROSS inside. Continue on to the left of the screen and you'll soon reach the first screen.

  • 1: You actually made your way back to the first screen. There are no more treasures to be found so make your way to the top left of the area to exit the dungeon.
Event: Nine Questions
  • Hildegard Question 1
    Answer
    Alignment
    Hildegard
    Silvi
    Ryuryu
    I will do my best
    Dark
    -
    -
    +
    I am already myself
    Light
    +
    +
    -

  • Silvi Question 1
    Answer
    Alignment
    Hildegard
    Silvi
    Ryuryu
    Will you bear this burden with me?
    Light
    +
    +
    -
    I cannot ask you to do that
    Dark
    -
    -
    +

  • Ryuryu Question 1
    Answer
    Alignment
    Hildegard
    Silvi
    Ryuryu
    Not in the least
    Light
    +
    -
    +
    If you say so
    Dark
    -
    +
    -

  • Hildegard Question 2
    Answer
    Alignment
    Hildegard
    Silvi
    Ryuryu
    Your point?
    Light
    +
    -
    +
    Leave me alone
    Dark
    -
    +
    -

  • Silvi Question 2
    Answer
    Alignment
    Hildegard
    Silvi
    Ryuryu
    Freedom does not exist
    Dark
    -
    -
    +
    I hate heights
    Light
    +
    +
    -

  • Ryuryu Question 2
    Answer
    Alignment
    Hildegard
    Silvi
    Ryuryu
    How are we alike?
    Light
    +
    -
    +
    Perhaps you are right
    Dark
    -
    +
    -

  • Hildegard Question 3
    Answer
    Alignment
    Hildegard
    Silvi
    Ryuryu
    I have never thought about it
    Dark
    -
    +
    +
    I do not hate you
    Light
    +
    -
    -

  • Silvi Question 3
    Answer
    Alignment
    Hildegard
    Silvi
    Ryuryu
    I want you to be with me
    Dark
    -
    +
    -
    I need you to help me
    Light
    +
    -
    +

  • Ryuryu Question 3
    Answer
    Alignment
    Hildegard
    Silvi
    Ryuryu
    Yes
    Light
    +
    -
    +
    No
    Dark
    +
    +
    -


    NOTE: The + and - are not equal. Some of them affect the heroines more than others. I have had a heroine get 1+ and 1- and it resulted in loss in affection.
Choosing a Heroine
At the end of the first generation, you'll (most likely) get a choice of heroines to bear Duran's child. You can pick among the heroines if their affection level is 4 or above.

Affection level can be checked by their faces on the bottom right of the screen during scenes. Level 4 is when they have a big smile. Level 5 is when they blush.

If all your heroines are at affection level 3 or below, you will automatically pick the heroine on the upper left of the circle. [ie. Fyuria, Valeria, Lavinia, Hildegard]

It's important to have your preferred heroine at max affection. Why? Your main character will have better stats, that's why! When your chosen heroine is at max affection, your next main character will be stronger compared to if your heroine's affection is at level 4.
*they will also have different weapons

So, how exactly does the mother affect your main characters?
  • Stats
    Generally, the main attribute of your MC is dependent on his lineage and their mothers affect this the most. There's no hard formula for this, by 5th gen, there are a lot of combinations!
  • Weapon
    Same as stats, it depends on their cumulative lineage, and is mostly affected by their mother. There's no hard formula for this, by 5th gen, there are a lot of combinations!
  • Appearance
    Your main characters will look slightly different depending on who their mother is
  • Willpowers
    They learn different Willpowers based on their mothers
  • Extended Area
    Also depends solely on their mothers.
  • Skill slots
    The first 4 skill slots are based on the mothers. You get 2 more skill slots if you use the item "Proof of Valor" at level 50. One of them is based on their mothers, the other is based on their grandmothers. Only exception is 2nd gen, for obvious reasons. One of his extra skill slots is always Fire.


If you want to check out what descendants you will end up with, you can check out this awesome guide[www.gamefaqs.com] by ACasser!

There's also an online tool to help you with this, based on the guide above. Click here![www.soifon.net]
Credits, Links, all that good stuff
Credit to all wiki contributors, since I nicked the information off of them, with a small bit of editing.
The only ones I know of are Erellisae, Byuusan, Wathman(all the images) and Smurgledwerf(True End path). There are most definitely others, though!

Compile Heart & Red Entertainment, for creating the game

Idea Factory, Aksys Games and Ghostlight for publishing the game

Ghostlight again, for porting the game to PC

and you, for reading up to the credits!


Links
5 Comments
gigastar Sep 25, 2018 @ 6:38am 
If youre looking to power up your mages then once you have access to Danakil's Great Fen you can farm Ice Knights there for Soul Suckers. Theyre a rare drop, so use EX steals to acquire them faster.

Once upgraded and converted they give a +400 magic active equip, theyre a bit pricey at ~6kEP each but requires no TP or alchemy.
MeatballSenpai Jul 29, 2014 @ 1:00pm 
Alright, thanks for the tip.
Frenzy85  [author] Jul 28, 2014 @ 11:06pm 
@TheDarkArcanaLord
They're both combination attacks. Only enemies can have those as single attacks.
Use these attacks in sequence and the attack will change (you can link and have multiple people take part)

Ragnarok = Stardust + Atomic Hole + Impulse + Gravity + Ray + Dark Ray
Judgment = Ascension + Ray + Impulse + Stardust + Atomic Hole

Once you've used it once, you'll be able to see it somewhere in the combination attack list. It's somewhere in the menu, probably under database/list/etc. or something of the like.
MeatballSenpai Jul 28, 2014 @ 1:23pm 
I searched the wiki and i couldnt find where or how to get the Ragnarok or Judment skills. Any ideas where to get these two?
NickLionheart Jul 23, 2014 @ 2:03pm 
very good guide :happymeat: